Week 04 | Multi-Domain Img2Img Translation : StarGAN v2 - Diverse Image Synthesis for Multiple Domains
--
본 게시물에서 활용한 코드는 StarGAN v2의 저자인 NaverClova의 공식 깃허브 코드'CLOVAAI-STARGANv2'를 참고했습니다!
--
Prerequisite
Image-to-Image Translation은 결국 이미지를 합성하는 작업입니다.
여기서 합성이라는 것은 원래 이미지의 본질적인 특징을 남긴채 특정 Domain(성별,나이,머리색)만을 바꾸는 것을 의미합니다.
따라서 이미지 합성을 잘하려면(=Image-to-Image Translation을 잘 수행하려면) 아래의 2가지 조건을 만족시켜야 합니다.
- 합성된 이미지가 다양해야 한다.
- Domain마다 다양한 Style을 만들 수 있어야 한다. (ex. 여자 Domain 안에서 흑발, 금발과 같이 다양한 style을 생성해야 한다.)
본격적인 StarGAN v2에 앞서, 방금 언급된 Domain과 Style이라는 개념에 대해서 짚고 넘어가도록 하겠습니다.
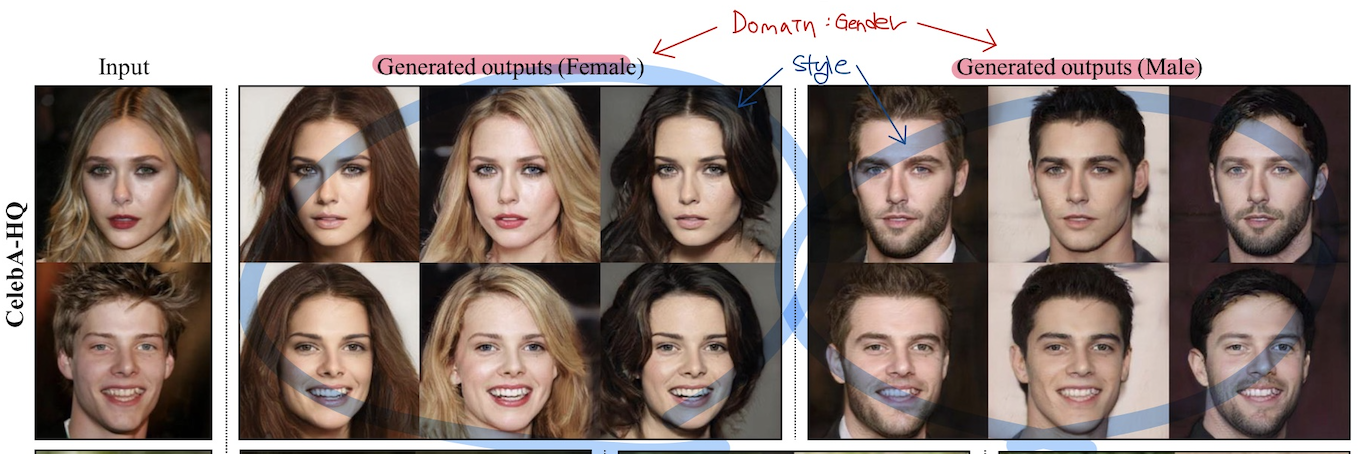
Domain : 여러 이미지를 시각적으로 분류할 수 있는 기준 (ex. 성별, 나이)
Style : 한 이미지가 가진 고유의 특성 (ex. 금발에 쿨톤인 여자)
논문의 그림을 참고해서 살펴보면, 빨간색 부분이 Domain 간의 구분이고 파란색 부분이 Style 간의 구분이라고 이해하시면 될 거 같습니다.
Introduction
서두에 언급한 것처럼 Image-to-Image Translation을 잘 수행하려면, 하나의 도메인 안에서 다양한 스타일을 합성해낼 수 있어야 합니다.
기존 Image-to-Image Translation은 Gaussian distribution와 같은 분포에서 latent code를 sampling해 스타일을 입히는 형태로 이미지를 생성했습니다.
하지만 기존 모델들의 경우 2개의 domain 간의 변화만을 수행했기 때문에 k개의 domain 간의 변화를 수행하려면 k(k-1)개의 generator를 학습해야 했는데, StarGAN이 이를 해결한 구조를 제안했습니다.
하지만 StarGAN도 Domain에 대한 정보를 deterministic하게 주었습니다.
(ex. ['Black Hair', 'Blond', 'Brown', 'Male', 'Young']이라는 Domain에 대한 정보를 [1, 0, 0, 0, 1]이라고 주면 '검은 머리를 가진 젊은 여자'라는 deterministic한 정보만을 전달한다.)
이러한 정보는 데이터의 multi-modal pdf를 정확히 반영하지 않죠.
StarGAN v2는 이러한 one-hot vector 형태의 domain 정보를 distributed representation의 형태로 주기 위해 기존 StarGAN에 Mapping Network와 Style Encoder라는 구조를 추가합니다.
Proposed Framework
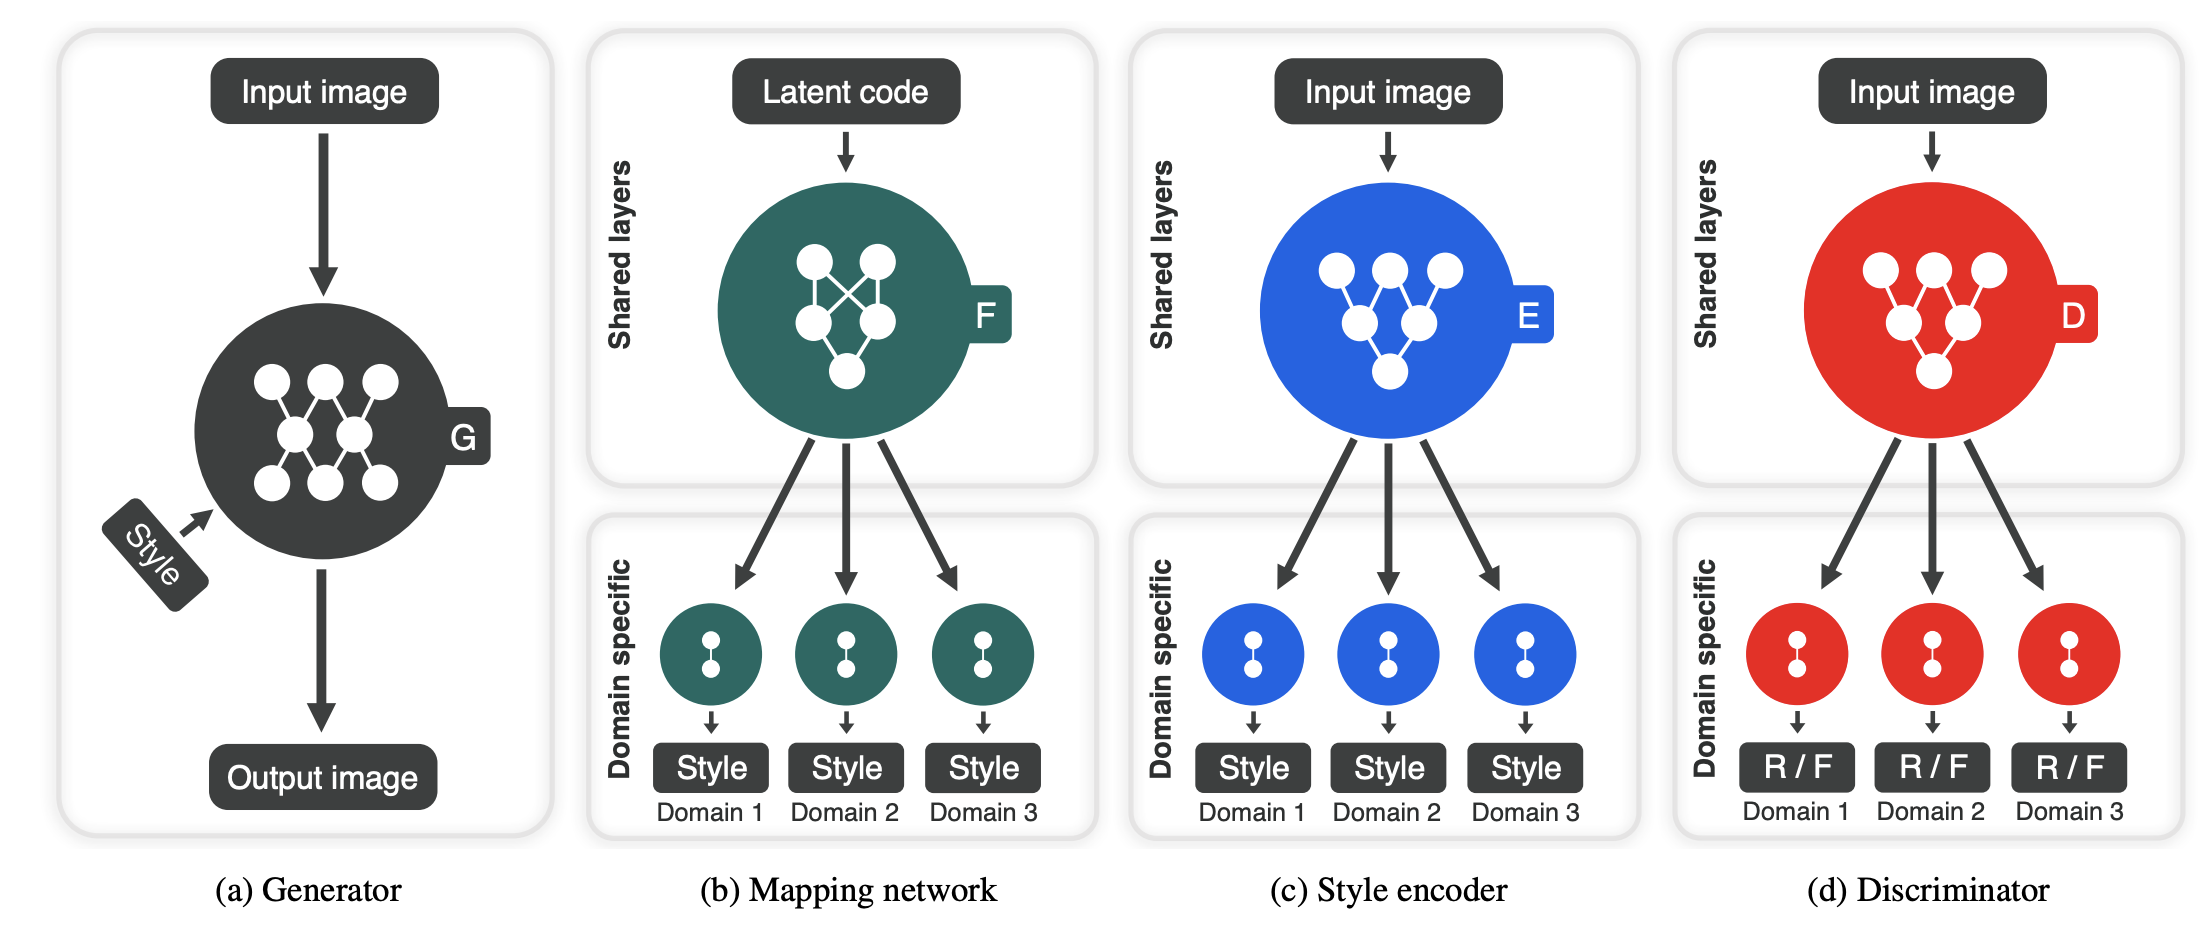
위의 그림은 StarGAN v2의 전반적인 Framework를 보여줍니다.
StarGAN v2의 목표는 이미지 집합 X에서 가져온 이미지 x와 도메인 집합 Y에서 가져온 임의의 도메인 y가 있을 때, 하나의 generator G로 이미지 x가 domain y안에서 다양한 스타일을 갖도록 생성하는 것을 목표로 합니다.
Generator

Generator는 이후에 설명할 Mapping Network와 Style Encoder에 얻어진 style code(64차원짜리 style vector)를 AdaIN을 활용해 원래 이미지 x를 encoding해 합성된 이미지를 만듭니다. G(x,s)
- ADAIN
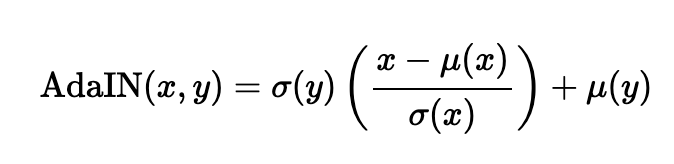
ADAIN은 원래 이미지 x를 평균과 분산으로 normalization 해준 후, style 벡터 y의 평균과 분산으로 rescaling 해주어서 y의 style은 추가해주는 layer입니다.
class AdaIN(nn.Module):
    def __init__(self, style_dim, num_features):
        super().__init__()
        self.norm = nn.InstanceNorm2d(num_features, affine=False)
        self.fc = nn.Linear(style_dim, num_features*2)

    def forward(self, x, s):
        h = self.fc(s)
        h = h.view(h.size(0), h.size(1), 1, 1)
        gamma, beta = torch.chunk(h, chunks=2, dim=1)
        return (1 + gamma) * self.norm(x) + beta
- AdaIN이 추가된 Residual Block
class AdainResBlk(nn.Module):
    def __init__(self, dim_in, dim_out, style_dim=64, w_hpf=0,
                 actv=nn.LeakyReLU(0.2), upsample=False):
        super().__init__()
        self.w_hpf = w_hpf
        self.actv = actv
        self.upsample = upsample
        self.learned_sc = dim_in != dim_out
        self._build_weights(dim_in, dim_out, style_dim)

    def _build_weights(self, dim_in, dim_out, style_dim=64):
        self.conv1 = nn.Conv2d(dim_in, dim_out, 3, 1, 1)
        self.conv2 = nn.Conv2d(dim_out, dim_out, 3, 1, 1)
        self.norm1 = AdaIN(style_dim, dim_in)
        self.norm2 = AdaIN(style_dim, dim_out)
        if self.learned_sc:
            self.conv1x1 = nn.Conv2d(dim_in, dim_out, 1, 1, 0, bias=False)

    def _shortcut(self, x):
        if self.upsample:
            x = F.interpolate(x, scale_factor=2, mode='nearest')
        if self.learned_sc:
            x = self.conv1x1(x)
        return x

    def _residual(self, x, s):
        x = self.norm1(x, s)
        x = self.actv(x)
        if self.upsample:
            x = F.interpolate(x, scale_factor=2, mode='nearest')
        x = self.conv1(x)
        x = self.norm2(x, s)
        x = self.actv(x)
        x = self.conv2(x)
        return x

    def forward(self, x, s):
        out = self._residual(x, s)
        if self.w_hpf == 0:
            out = (out + self._shortcut(x)) / math.sqrt(2)
return out- RGB Image를 flatten해 ADAIN으로 style을 주어 다시 RGB Image로 변환하는 Generator
class Generator(nn.Module):
    def __init__(self, img_size=256, style_dim=64, max_conv_dim=512, w_hpf=1):
        super().__init__()
        dim_in = 2**14 // img_size
        self.img_size = img_size
        self.from_rgb = nn.Conv2d(3, dim_in, 3, 1, 1)
        self.encode = nn.ModuleList()
        self.decode = nn.ModuleList()
        self.to_rgb = nn.Sequential(
            nn.InstanceNorm2d(dim_in, affine=True),
            nn.LeakyReLU(0.2),
            nn.Conv2d(dim_in, 3, 1, 1, 0))

        # down/up-sampling blocks
        repeat_num = int(np.log2(img_size)) - 4
        if w_hpf > 0:
            repeat_num += 1
        for _ in range(repeat_num):
            dim_out = min(dim_in*2, max_conv_dim)
            self.encode.append(
                ResBlk(dim_in, dim_out, normalize=True, downsample=True))
            self.decode.insert(
                0, AdainResBlk(dim_out, dim_in, style_dim,
                               w_hpf=w_hpf, upsample=True))  # stack-like
            dim_in = dim_out

        # bottleneck blocks
        for _ in range(2):
            self.encode.append(
                ResBlk(dim_out, dim_out, normalize=True))
            self.decode.insert(
                0, AdainResBlk(dim_out, dim_out, style_dim, w_hpf=w_hpf))

        if w_hpf > 0:
            device = torch.device(
                'cuda' if torch.cuda.is_available() else 'cpu')
            self.hpf = HighPass(w_hpf, device)

    def forward(self, x, s, masks=None):
        x = self.from_rgb(x)
        cache = {}
        for block in self.encode:
            if (masks is not None) and (x.size(2) in [32, 64, 128]):
                cache[x.size(2)] = x
            x = block(x)
        for block in self.decode:
            x = block(x, s)
            if (masks is not None) and (x.size(2) in [32, 64, 128]):
                mask = masks[0] if x.size(2) in [32] else masks[1]
                mask = F.interpolate(mask, size=x.size(2), mode='bilinear')
                x = x + self.hpf(mask * cache[x.size(2)])
        return self.to_rgb(x)
Mapping Network
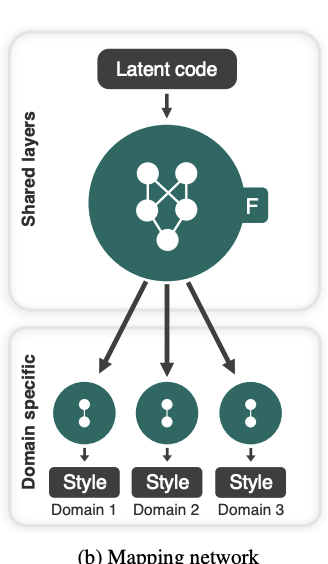
Mapping Network은 standard Gaussian Distribution에서 sampling한 latent code (=16dim vector)를 각 K개의 domain에 대한 style code (=64dim vector)로 변환하는 역할을 합니다.
직관적으로 우선 설명을 드리면 샘플링된 하나의 64dim latent code는 '피부가 하얀 여자이면서 여자 domain 내의 style), 그 여자의 머리 색깔은 어두운 갈색 빛이 있어야 하는데 (머리카락 domain 내의 style), 어깨는 하견형이어야 한다 (어깨 domain 내의 style)'라는 특징을 갖도록 mapping하는 작업이라고 보시면 됩니다.
모델 안에서 forwarding되는 측면에서 설명하면,
-
sampling한 64차원 latent vector를 512차원으로 확장하고, 3 layer MLP를 태웁니다.
-
그리고 각각 K개의 domain마다 512차원의 3 layer MLP와 512dim->64dim으로 변환하는 MLP Layer를 추가해줍니다.
각 domain마다의 style을 distributed representation으로 만들어주는 네트워크를 학습한다고 이해하시면 될 거 같습니다.
class MappingNetwork(nn.Module):
    def __init__(self, latent_dim=16, style_dim=64, num_domains=2):
        super().__init__()
        layers = []
        layers += [nn.Linear(latent_dim, 512)]
        layers += [nn.ReLU()]
        for _ in range(3):
            layers += [nn.Linear(512, 512)]
            layers += [nn.ReLU()]
        self.shared = nn.Sequential(*layers)

        self.unshared = nn.ModuleList()
        for _ in range(num_domains):
            self.unshared += [nn.Sequential(nn.Linear(512, 512),
                                            nn.ReLU(),
                                            nn.Linear(512, 512),
                                            nn.ReLU(),
                                            nn.Linear(512, 512),
                                            nn.ReLU(),
                                            nn.Linear(512, style_dim))]

    def forward(self, z, y):
        h = self.shared(z)
        out = []
        for layer in self.unshared:
            out += [layer(h)]
        out = torch.stack(out, dim=1)  # (batch, num_domains, style_dim)
        idx = torch.LongTensor(range(y.size(0))).to(y.device)
        s = out[idx, y]  # (batch, style_dim)
        return s
Style Encoder
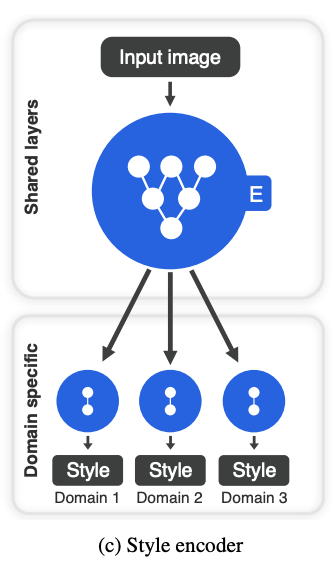
Style Encoder는 이미지 x를 받아서 각 domain별로 style code를 추출해주는 역할을 합니다.
구체적으로 설명하면,
-
image를 입력받아 6개의 pre-activation residual block(아래의 ResBlk : convolutional layer와 instance normalization layer + shorcut을 통과하는 block)을 통과합니다.
-
1을 통과한 벡터를 이후 K개의 domain마다 Linear Layer를 통과시켜 64차원짜리 style code로 mapping 시켜줍니다.
class ResBlk(nn.Module):
    def __init__(self, dim_in, dim_out, actv=nn.LeakyReLU(0.2),
                 normalize=False, downsample=False):
        super().__init__()
        self.actv = actv
        self.normalize = normalize
        self.downsample = downsample
        self.learned_sc = dim_in != dim_out
        self._build_weights(dim_in, dim_out)

    def _build_weights(self, dim_in, dim_out):
        self.conv1 = nn.Conv2d(dim_in, dim_in, 3, 1, 1)
        self.conv2 = nn.Conv2d(dim_in, dim_out, 3, 1, 1)
        if self.normalize:
            self.norm1 = nn.InstanceNorm2d(dim_in, affine=True)
            self.norm2 = nn.InstanceNorm2d(dim_in, affine=True)
        if self.learned_sc:
            self.conv1x1 = nn.Conv2d(dim_in, dim_out, 1, 1, 0, bias=False)

    def _shortcut(self, x):
        if self.learned_sc:
            x = self.conv1x1(x)
        if self.downsample:
            x = F.avg_pool2d(x, 2)
        return x

    def _residual(self, x):
        if self.normalize:
            x = self.norm1(x)
        x = self.actv(x)
        x = self.conv1(x)
        if self.downsample:
            x = F.avg_pool2d(x, 2)
        if self.normalize:
            x = self.norm2(x)
        x = self.actv(x)
        x = self.conv2(x)
        return x

    def forward(self, x):
        x = self._shortcut(x) + self._residual(x)
        return x / math.sqrt(2)  # unit variance
class StyleEncoder(nn.Module):
def __init__(self, img_size=256, style_dim=64, num_domains=2, max_conv_dim=512):
super().__init__()
dim_in = 2**14 // img_size
blocks = []
blocks += [nn.Conv2d(3, dim_in, 3, 1, 1)]
repeat_num = int(np.log2(img_size)) - 2
for _ in range(repeat_num):
dim_out = min(dim_in*2, max_conv_dim)
blocks += [ResBlk(dim_in, dim_out, downsample=True)]
dim_in = dim_out
blocks += [nn.LeakyReLU(0.2)]
blocks += [nn.Conv2d(dim_out, dim_out, 4, 1, 0)]
blocks += [nn.LeakyReLU(0.2)]
self.shared = nn.Sequential(*blocks)
self.unshared = nn.ModuleList()
for _ in range(num_domains):
self.unshared += [nn.Linear(dim_out, style_dim)]
def forward(self, x, y):
h = self.shared(x)
h = h.view(h.size(0), -1)
out = []
for layer in self.unshared:
out += [layer(h)]
out = torch.stack(out, dim=1) # (batch, num_domains, style_dim)
idx = torch.LongTensor(range(y.size(0))).to(y.device)
s = out[idx, y] # (batch, style_dim)
return sDiscriminator
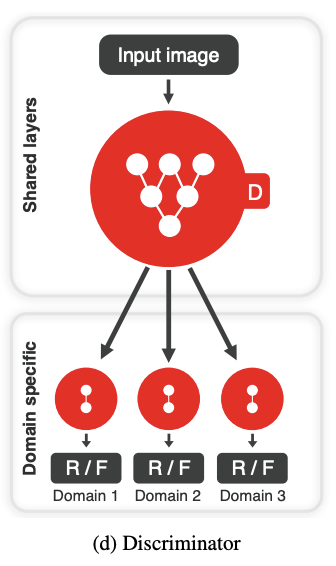
StarGAN v2의 Discriminator는 Generator가 의도했던 Fake Image의 Domain으로 제대로 변형했는지 안했는지를 판별하는 역할을 하게 됩니다.
Fake Image가 금발 여자를 흑발 여자로 변환을 했는데, Discriminator는 머리색이라는 domain에서 이 Fake Image가 가짜 흑발이라고 판단하다록 학습하는 것이라고 이해하면 좋을 듯 합니다.
class Discriminator(nn.Module):
    def __init__(self, img_size=256, num_domains=2, max_conv_dim=512):
        super().__init__()
        dim_in = 2**14 // img_size
        blocks = []
        blocks += [nn.Conv2d(3, dim_in, 3, 1, 1)]

        repeat_num = int(np.log2(img_size)) - 2
        for _ in range(repeat_num):
            dim_out = min(dim_in*2, max_conv_dim)
            blocks += [ResBlk(dim_in, dim_out, downsample=True)]
            dim_in = dim_out

        blocks += [nn.LeakyReLU(0.2)]
        blocks += [nn.Conv2d(dim_out, dim_out, 4, 1, 0)]
        blocks += [nn.LeakyReLU(0.2)]
        blocks += [nn.Conv2d(dim_out, num_domains, 1, 1, 0)]
        self.main = nn.Sequential(*blocks)

    def forward(self, x, y):
        out = self.main(x)
        out = out.view(out.size(0), -1)  # (batch, num_domains)
        idx = torch.LongTensor(range(y.size(0))).to(y.device)
        out = out[idx, y]  # (batch)
        return out
Training Objectives
StarGAN v2는 위에서 제시한 4가지 모듈들을 전부 학습하도록 목적함수가 설계되었는데요, 하나씩 살펴보겠습니다.
Adversarial objective
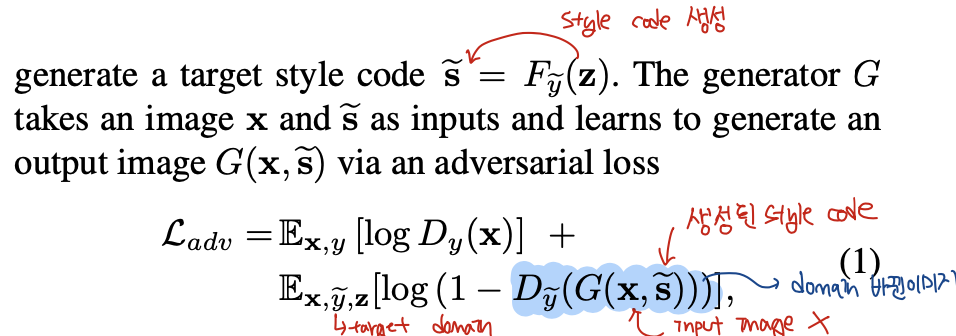
Vanilla GAN처럼 Generator가 합성한 이미지가 우리가 타켓팅한 도메인으로 잘 mapping되도록 하기 위해 설꼐된 목적함수입니다.
우리의 target domian을 y~라고 할 때, latent code z로 만들어낸 style code s~는 원래 이미지 x와 함께 generator로 들어가 합성된 이미지를 생성하게 됩니다. (수식의 파란색 부분으로 색칠된 부분)
Discriminator는 각각 target domain 관점에서 Generator가 생성한 이미지는 합성된 것이라는 정보를 학습하고, 원래 이미지 x와 기존 domain인 y는 진짜라고 학습하게 됩니다.
Style Reconstruction
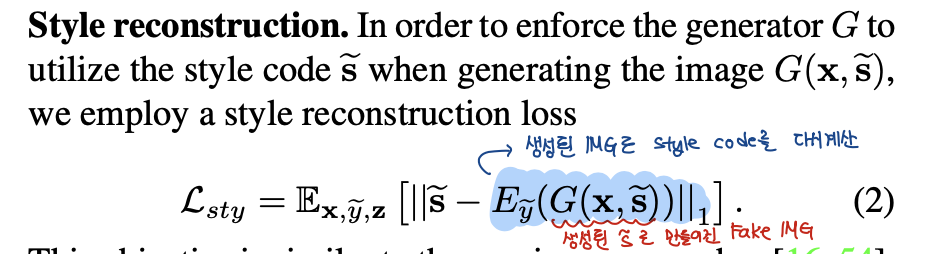
Mapping Network로 얻은 style code s~와 원래 이미지 X를 넣어서 합성한 이미지를 Style Encoder에 forwarding하게 되면 합성된 이미지의 style code를 얻게 됩니다.
이 합성된 이미지의 style code가 우리가 원래 만드려고 주입했던 style code s~와 가까울수록 generator가 각각 domain에서 목표로 했던 합성을 잘 했다고 판단할 수 있기 때문에 style reconstruction loss도 추가해주었습니다.
Style Diversification
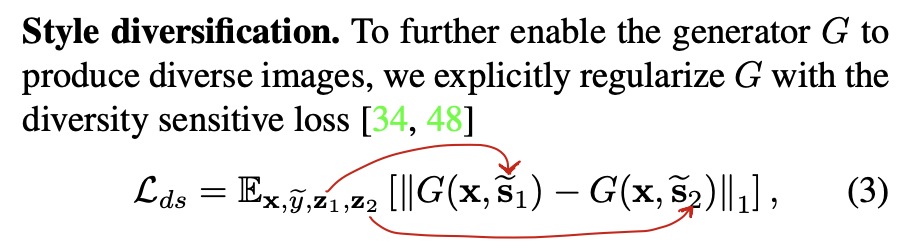
이 부분은 Generator가 각각 domain에서 다양한 style을 학습할 수 있도록 하기 위해 추가된 부분입니다.
보시면 서로 다른 latent code z1, z2에서 얻어진 style code s1~, s2~를 가지고 합성된 이미지는 image space상에서 거리가 멀어지도록 하기 위해 위의 수식이 고안되었습니다.
(저는 일종의 mode collapse를 해결하기 위해 추가된 부분이라고 이해했습니다.)
하지만 위의 목적함수는 최적점이 존재하지 않습니다.
(서로 다른 스타일로 합성된 이미지가 얼마나 멀리 떨어져 있는가에 대한 label 정보가 없기 때문에)
따라서 저자들은 해당 loss term을 초기에만 일정 부분 흘려주고 이후에는 decaying을 통해 줄여주었다고 합니다.
Preserving Source Characteristics
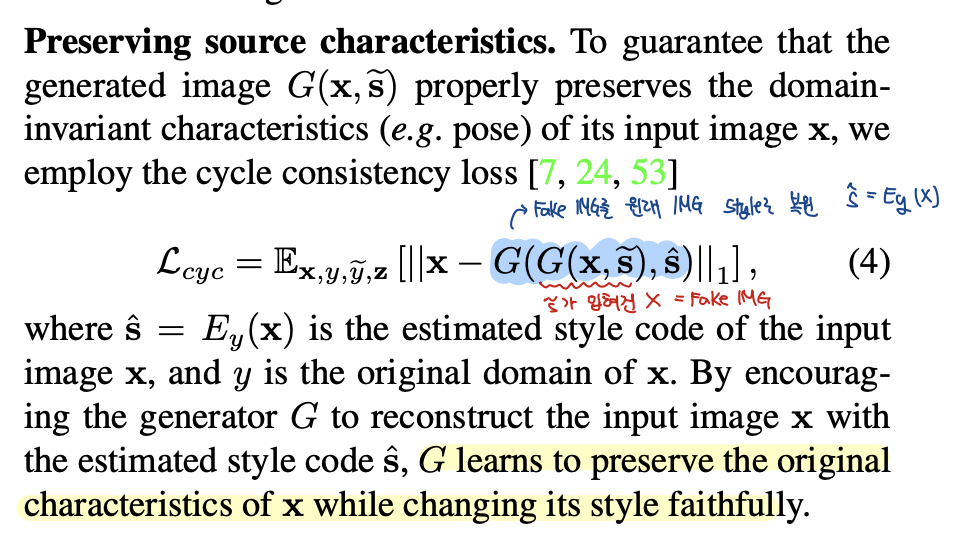
마지막 loss term은 cycle consistency loss와 관련이 있습니다.
target domain의 style s~로 합성한 이미지를 원래 이미지의 style s^로 다시 합성하면 원래 이미지 x와 거리가 가까워지도록 term을 설계했습니다.
StarGAN v2 자체가 원래 이미지의 고유한 특성(포즈나 골격)들은 그대로 유지하고 domain 내에서의 style만 바꾸는 것이 목적하기 때문에 위의 term이 추가되었다고 보시면 될 거 같습니다.
Full Objectives
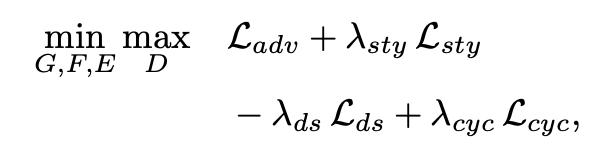
위에서 언급된 loss term들과 weighting term을 통해 구축된 최종 목적함수는 위와 같습니다.
언급했던것처럼 Style Diversification term 같은 경우에는 멀수록 다양한 style을 생성할 수 있기 때문에 minus 기호가 붙은 것을 확인할 수 있습니다.
Results
결과에 앞서서 네이버 클로바가 StarGAN v2를 발표하면서 'AFHQ, high-quality animal faces with large interand intra-domain differences'라는 데이터셋을 발표한 것도 논문이 accept되는데 큰 기여를 했다고 생각합니다!
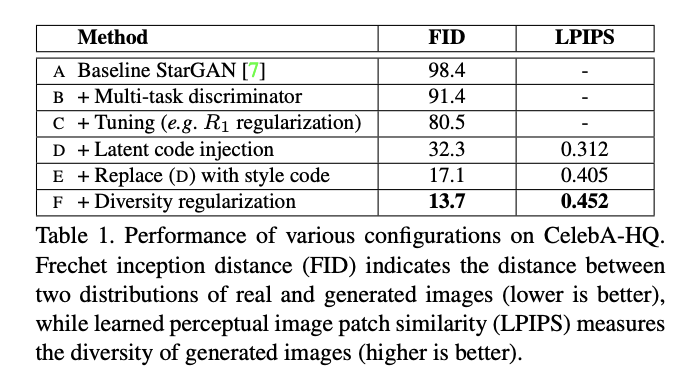
표에서 보시는 것처럼, 원래 StarGAN에 이번 논문에서 제시한 구조를 추가할수록 real image와 generated image distribution 간의 차이를 측정하는 metric인 FID는 작아지고, LPIPS는 높아지는 것을 확인할 수 있습니다.
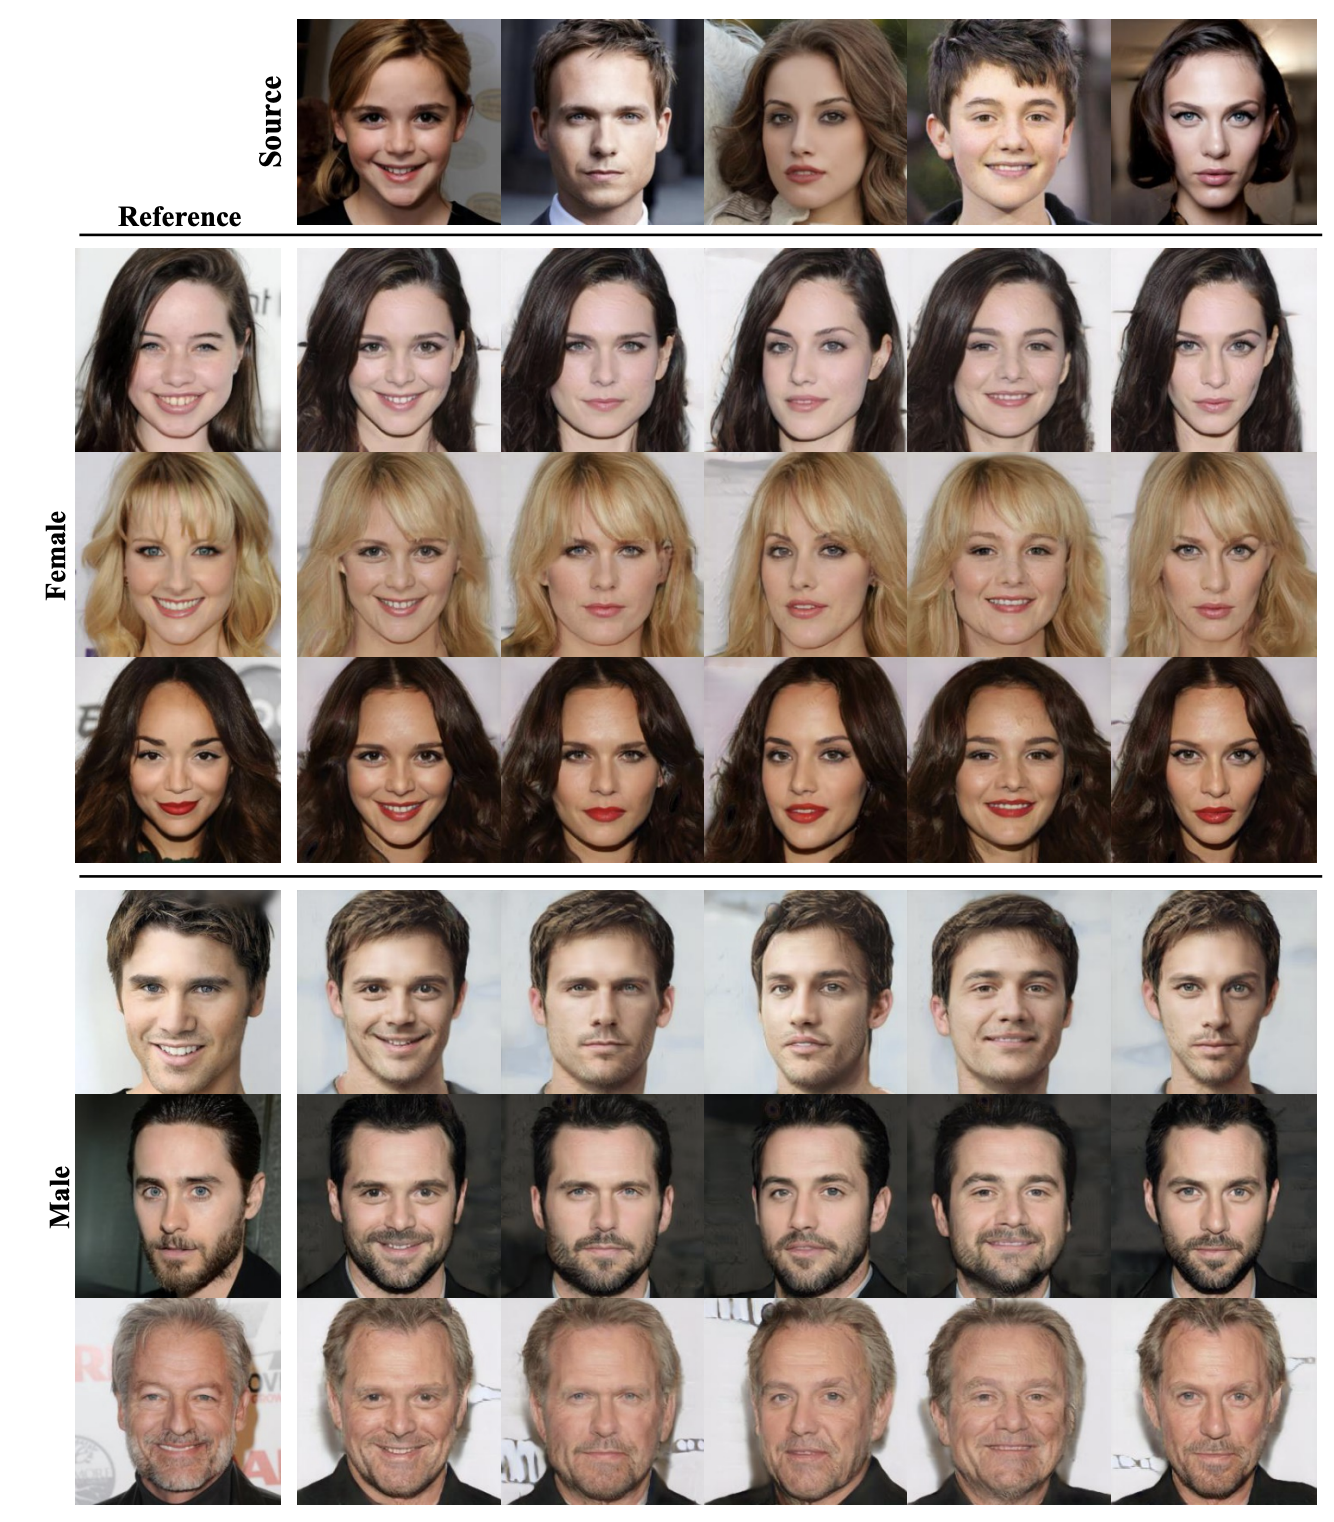
StarGAN v2의 가장 큰 contribution은 보시는 것처럼 source 이미지가 주어지고, reference에서 style을 추출해서 합성했을 때, source의 identity는 잘 유지되면서 원하는 domain style로의 합성이 잘 되는 것이라고 볼 수 있습니다.
이는 아래의 그림에서 기존 baseline들에 비해서도 성능이 좋은 것을 통해 확인할 수 있습니다.

Discussion
저자들은 StarGAN v2가 다양한 domain에서 이미지를 성공적으로 합성하는 이유를 다음과 같이 주장합니다.
-
domain별로 sytle code가 독립적으로 mapping되기 대문에 generator가 domain-specific한 정보를 잘 활용할 수 있다.
-
StarGAN과 같이 multiple domain shift를 하나의 네트워크가 학습하기 때문에, 보다 많은 training data를 가지고 domain-invariant feature를 학습할 수 있다는 장점이 있다. 또한, 바로 gaussian distribution에서 가져온 latent code가 아니라 일종의 학습된 transformation (=style code)를 가지고 이미지를 생성해 안정된 합성이 가능하다.
Reference
해당 글을 작성하기 위해 참고한 자료는 아래와 같습니다
StarGAN2 Original Paper
Naver Clova StarGAN2 Implementation
나동빈님 STARGAN 영상 강의
Star GAN2 영상 설명
