
3.2 Coding Style
3.2 Coding Style - Link
Syntax
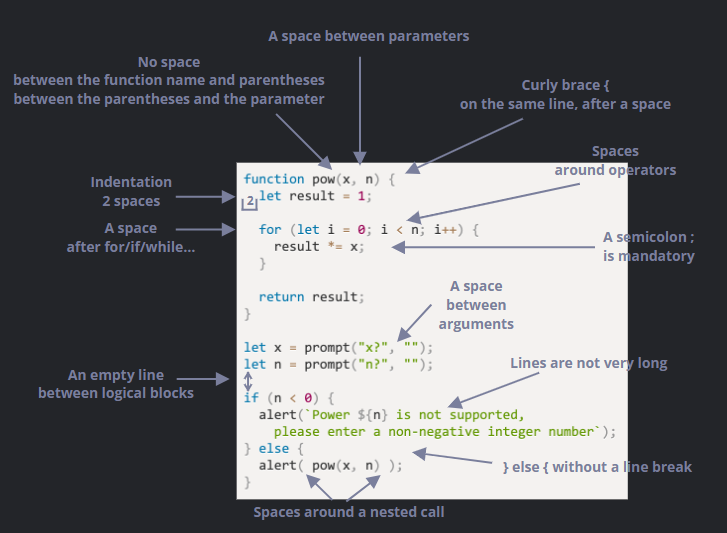
- No space between the function name and parentheses between the parentheses and the parameter
- A space between parameters
- Curly brace
{on the same line, after a space - Indentation 2 spaces
- A space after for/if/while…
- Spaces around operators
- A semicolon; is mandatory
- A space between arguments
- An empty line between logical blocks
- Lines are not very long
- else
{without a line break - Spaces around a nested call
Curly Braces
- “Egyptian” style: opening brace on the same line as the corresponding keyword
if (conditon) {
	// body
}
Why the term "Egyptian"?
The term "Egyptian" comes from the way the braces look visually, which some people feel resemble the shape of the ancient Egyptian pyramids.
The opening brace is at the end of the line (representing the base of a pyramid), and the closing brace is at the same indentation level (which visually resembles the peak of a pyramid).
Line Length
No one likes to read a long horizontal line of code. It’s best practice to split them.
// backtick quotes ` allow to split the string into multiple lines
let str = `
  ECMA International's TC39 is a group of JavaScript developers,
  implementers, academics, and more, collaborating with the community
  to maintain and evolve the definition of JavaScript.
`;
And, for if statements
if (
  id === 123 &&
  moonPhase === 'Waning Gibbous' &&
  zodiacSign === 'Libra'
) {
  letTheSorceryBegin();
}
Indents
Horizontal indents: 2 or 4 spaces
show(parameters,
     aligned, // 5 spaces padding at the left
     one,
     after,
     another
  ) {
  // ...
}
Vertical indents
- Even a single function can often be divided into logical blocks. In the example below, the initialization of variables, the main loop and returning the result are split vertically
function pow(x, n) {
  let result = 1;
  //              <--
  for (let i = 0; i < n; i++) {
    result *= x;
  }
  //              <--
  return result;
}
Semicolons
- A semicolon should be present after each statement, even if it could possibly be skipped
Nesting Levels
Try to avoid nesting code too many levels deep.
For example, in the loop, it’s sometimes a good idea to use the continue directive to avoid extra nesting.
For  (let i = 0; i < 10; i++) {
	if (!cond) continue;
	...// no extra nesting level
}
A similar thing can be done with if/else and return.
// Option 1
function pow (x, n) {
	if (n < 0) {
		alert("Negative 'n' not supported");
	} else {
		let result = 1;

		for (let i = 0; i < n; i++) {
			result *= x;
		}

		return result
	}
}
// Option 2
function pow (x, n) {
if (n < 0) {
alert("Negative 'n' not supported");
return;
}
let result = 1;
for (let i = 0; i < n; i++) {
result *= x;
}
return result;
}- The second one is more redable because the “special case” of
n < 0is handled early on. Once the check is done we can move on to the “main” code flow without the need for addtional nesting.
Function Placement
There are 3 ways to organize the functions.
- Declare the functions above the code that uses them
// function declaratons
function createElement() {
	...
}
function setHandler(elem) {
	...
}
function walkAround() {
	...
}

// the code which uses them
let elem = createElement();
setHandler(elem);
walkAround();- Code first, then functions
// the code which uses the functions
let elem = createElement();
setHandler(elem);
walkAround();

// --- helper functions ---
function createElement() {
	...
}
function setHandler(elem) {
	...
}
function walkAround() {
	...
}- Mixed: a function is declared where it’s first used
- Most of time, the second variant is perferred.
Style Guide
Popular JavaScript Style Guide
Automated Linters
Linters are tools that can automatically check the style of your code and make improving suggestions.
- JSLint – one of the first linters.
- JSHint – more settings than JSLint.
- ESLint – probably the newest one.
All of them can do the job. The author user ESLint.
Most linters are integrated with many poppular editors: just enable the plugin in the editor and configure the style.
For instance, for ESLint you should do the following:
-
Install Node.js
-
Install ESLint on project ( it’s manual start or can use quick start )
npm install eslint --save-dev- what is npm?
- nowadays it’s built in node js with npx, npm
- Node Pakaage Manager; npm
-–save-devis used to install dependencies for development purposes
- what is npm?
-
Create ESLint setting file
npx eslint --init// eslint.config.mjs import globals from "globals"; import pluginJs from "@eslint/js"; /** @type {import('eslint').Linter.Config[]} */ export default [ { languageOptions: { globals: globals.browser, }, // set your rule rules: { indent: ["error", 2], "no-console": "warn", }, }, pluginJs.configs.recommended, ]; -
Install/enable the plugin for your editor that integrates with ESLint. The majority of edifors have one.
