edu day 33
브라우저 관련 객체 (Browser Object Model:BOM)
-
Window 객체 : 브라우저 창이 열릴 때 마다 하나씩 만들어지는 객체로서, 브라우저 창 안에 존재하는 모든 요소의 최상위 객체이다.
-
Navigator 객체 : 브라우저와 관련된 정보를 포함하는 객체
-
Screen 객체 : 화면(screen)정보와 관련된 객체
-
History 객체 : 사용자가 방문한 URL정보를 포함하는 객체
-
Location 객체 : 현재 방문한 URL 정보를 포함하는 객체
Window 객체
다시 한번 설명하지만, 브라우저 창에 존재하는 모든 모든 요소의 최상위 객체이다.
(전역객체, 글로벌 객체, 루트객체)
😋property
| 프로퍼티 | 설명 |
|---|---|
| doucument | window에서 보여지는 현재 문서를 의미한다. |
| name | window의 이름을 리턴한다. |
| history | window의 history객체를 의미한다. |
| location | window의 location객체를 의미한다. |
| navigator | window의 navigator객체를 의미한다. |
| screen | window의 screen객체를 의미한다. |
| opener | 새롭게 생성된 window에서 이전 window의 참조값을 리턴한다. |
| parent | 현재 window의 부모 window 객체를 리턴한다. |
| self | 현재 window의 참조값을 리턴한다. |
| top | 가장 최상위 window의 참조값을 리턴한다. |
🤨메서드
| 메서드 | 설명 |
|---|---|
| alert() | 경고창을 보여줄 때 사용한다 |
| open() | 새로운 window창을 보여줄 때 사용한다. |
| close() | 현재 window창을 닫는다. |
| moveTo() | 명시된 위치로 현재 window를 움직인다. |
| print() | 현재 window의 내용을 출력한다. |
| seInterval() | 명시된 시간후 반복적으로 특정 작업 수행 |
| setTimeout() | 명시된 시간후 한번 특정 작업 수행 |
| confirm() | 다이얼로그 창을 보여줄때 사용한다. |
| focus() | 현재 window에 포커스를 지정할 때 사용한다. |
| blur() | 현재 window의 포커스를 제거할 때 사용한다. |
- opener / close 예제
<!DOCTYPE html>
<html>
<head>
<meta charset="UTF-8">
<title>child.html</title>
<script type="text/javascript">

	function xxx(){
		close();
	}
	function xxx2(){
		opener.close();	//나를 연 창 닫기
	}

</script>
</head>
<body>
이 페이지는 자식페이지입니다.<br>
<button onclick = "xxx()">창닫기</button>
<button onclick = "xxx2()">부모창닫기</button>
</body>
</html>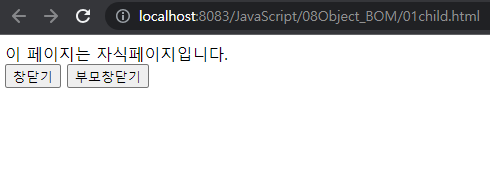
--> 창닫기(close())를 누르면 창이 닫긴다.
--> 부모창닫기는 이 창을 호출한 창이 닫긴다.
----> 현재코드는 다른 창에서 호출한 창이 아니기 때문에 부모창닫기(opener.close())가 동작하지 않는다.
- 부모창 코드 생성
<!DOCTYPE html>
<html>
<head>
<meta charset="UTF-8">
<title>parent.html</title>
<script type="text/javascript">

	var child;	// 자식창 참조 - 전역변수
	function yyy(){
		// 팝업을 가운데 위치시키기 위해 아래와 같이 값 구하기
		var width=200;
 		var height=300;
        var left = Math.ceil(( window.screen.width - width )/2);
        var top = Math.ceil(( window.screen.height - height )/2);
		child = open("01child.html", "childName", "width="+width+", height="+height+", left="+left+", top="+top);
	}

	function yyy2(){
		child.close();
	}

	function yyy3(){
		close();	//창 닫기
	}

</script>
</head>
<body>
여기는 부모창입니다.<br>
<button onclick ="yyy()">창생성</button>
<!-- 이벤트 처리: 특정 이벤트 발생 => 동작할 함수호출 -->
<!-- inline방식 이벤트 처리  on발생이벤트이름:처리할함수이름 -->
<button onclick ="yyy2()">자식창 닫기</button>
<button onclick ="yyy3()">창닫기</button>
</body>
</html>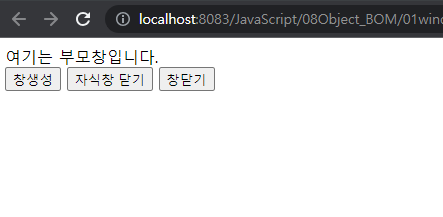
--> yyy()함수에서 설정한 크기로 창이 생성되는데, 자식 창으로 경로를 지정해서 자식창을 설정 크기로 불러오면서 생성한다.
--> child.close()를 통해 자식창만 닫게할 수 있고, 그냥close()를 통해 현재 부모창을 닫을 수 있다.
--> 또한 부모창에서 자식창을 호출했기 때문에 opener.close()를 동작할 수 있다.
- 다른 페이지로 접근하는 여러 방법
a<!DOCTYPE html>
<html>
<head>
<meta charset="UTF-8">
<title>Insert title here</title>
<script type="text/javascript">

	function xxx(){
		location.reload();	//현재화면 리로딩
	}

	function yyy(){
		location.href = "target.html";//페이지 이동
	}

</script>
</head>
<body>

폼의 바깥 <br>
<button onclick="xxx()">reload</button><br>
<a href="javascript:yyy()">target.html</a><br>
<button onclick="yyy()">버튼target.html</button><br>
<button onclick="location.href='target.html'">location.href='target.html'</button><br>

</body>
</html>
--> xxx()함수에 있는 reload()를 통해 현재 화면을 리로딩(새로고침)할 수 있다.
--> 태그의 href 옵션으로 경로를 바로 지정하여 target.html 창으로 옮겨갈 수 있다.
--> yyy()함수에 target.html경로를 설정하고 그 함수를 onclick에 넣어 경로를 지정한다.
--> onclick에 바로 yyy()함수에서 경로를 지정한 함수 내용을 바로 넣어버린다.
- ❗form에서 데이터를 넘기는 유일한 방법❗
a<!DOCTYPE html>

<html>
<head>
<meta charset="UTF-8">
<title>Insert title here</title>
<script type="text/javascript">

	function target2(){
		document.getElementById("myForm").action = "target2.html";
	}

	function target3(){
		event.preventDefault();	//submit 이벤트 정지 후 페이지이동. 단 데이터 전달안됨
		location.href = "target2.html";
	}

</script>
</head>

<form id = "myForm">
<!-- form에서는 submit이벤트가 발생되고, 데이터를 넘기는 유일한 방법은 action사용임 -->
	<input type = "text" name = "userid"><br>
	<button onclick="target2()">target2.html</button>
	<!-- 아래부분전달안됨 -->
	<button onclick="location.href='target2.html'">location.href='target2.html'</button><br>
	<button onclick="target3()">target3()</button><br>
	<button>전송</button>

</form>

</body>
</html>
--> ❗위의 form밖에서는 경로를 지정하면 데이터가 넘겨졌는데, 안에서는 불가능하다.
--> ❗form에서는 submit이벤트가 발생되고, 데이터를 넘기는 유일한 방법은 action을 사용하는 방법밖에 없다.
--> submit이벤트를 정지하여 데이터는 전달이 안되지만 페이지는 넘길 수 있게 할 수 있다.
📌Dom (Document Object Model)
웹 페이지의 HTML문서 구조를 객체로 표현하기 위한 계층구조로서 문서를 나타내는 최상위 객체는 document 객체이다.
웹 페이지가 로드될 때, 웹 브라우저는 페이지의 DOM을 생성하고 트리 구조로 관리한다.
각각을 노드(node)라고 하며 엘리먼트 노드, 텍스트 노드, 속성 노드가 있다.
DOM은 플랫폼/언어 중립적으로 구조화된 문서를 표현하는 W3C의 공식 표준안이다.
HTML과 XML문서에 대한 응용 API로서 문서를 구조적(계층적인 트리구조)로 정리하여 문서의 내용과 시각적인 형태를 변경할 수 있도록 지원한다.
- HTM문서의 DOM 표현 방법
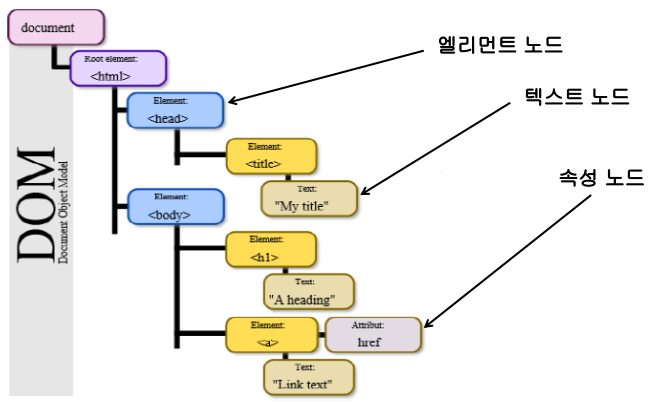
- 부모와 자식 노드의 관계
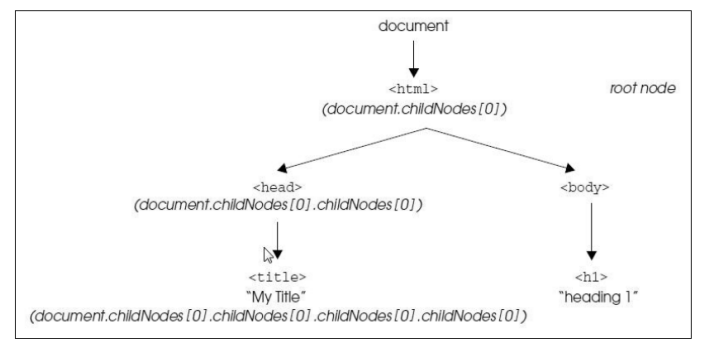
DOM 개요
- Dom을 이용한 핵심 작업
- js를 이용한 페이지의 모든 태그 변경 가능
- js를 이용한 페이지의 모든 속성 변경 가능
- js를 이용한 페이지의 모든 CSS 스타일 변경 가능
- js를 이용한 페이지의 모든 이벤트 처리 가능
- ❗DOM 핵심 API❗
- 순회
: childNodes , firstChild, lastChild , nextSibling , previousSibling
- 선택
: getElementById() , getElementsByTagName() , getElementsByClassName()
querySelector(), querySelectorAll()
- 생성 및 추가/삭제
: createElement(), createTextNode(), appendChild(), removeChild()
createAttribute() , setAttribute(), getAttribute()
- 내용 저장 및 조회: innerHTML, innerText, .value
- 순회
DOM 객체 접근 방법
직접 접근 방법
- id 값으로 접근
- document.getElementByld( id값 ) : Node
- 태그명으로 접근
- document.getElementsByTagName( tag명 ) : NodeList
- class 속성으로 접근
- document.getElementsByClassName( class명 ) : NodeList
- CSS selector 사용(#, . 등등 css 기호 사용)
- document.querySelectorAll(css selector); //일치하는 모든요소
- document.querySelector(css selector)//일치하는 하나의 요소
노드 워킹 접근 방법
- 상대적인 위치로 접근하는 방법이다.
- 첫번째 자식, 형제, 마지막 자식 등
DOM의 로딩
DOM 작업시 어려움 중 하나는 DOM이 완전히 로딩 되기전에 자바스크립트 코드가 실행될 수 있다는 것이다.
헤더에 포함된 스크립트와 불러온 자바 스크립트는 HTML DOM이 실제로 생성되기 전에 실행된다.
--> 따라서 헤더나 외부파일에서 실행된 모든 스크립트는 DOM에 접근할 수 없다.
DOM HTML 작성 예제
document.body
: body로 접근하여 body부분의 모든 부분을 접근할 수 있다.
<!DOCTYPE html>
<html>
<head>
<meta charset="UTF-8">
<title>Insert title here</title>
<script type="text/javascript">

	 function login(){
		//body로 직접 접근 가능
		var body = document.body;
		console.log(body)
	 }

</script>
</head>
<body>
아이디<input type = "text" id = "xxx" name = "userid" class="kkk" value="tester">a<br>
비밀번호<input type = "password" id = "yyy" name = "passwd" class="kkk" value= "1234">a<br>
<button onClick = "login()">로그인 </button>
<div id = "zzz"> innertext사용부분 </div>
</body>
</html>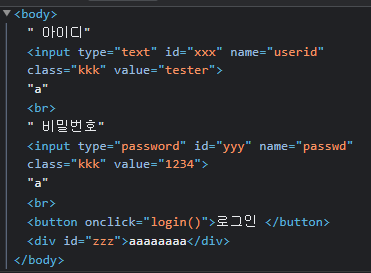
document.getElementById
: id가 'xxx'인 태그에 접근하여 object타입의 태그 내용 전체를 반환한다.
해당 내용이 든 변수에.value,.innerText등을 통해 값과 내용에 접근할 수 있다.
var id2 = document.getElementById("xxx");	//# 사용안함! id=xxx
console.log(id2);	//<input type = "text" id = "xxx" name="userid" class="kkk" value = "tester"
console.log(id2.value); //tester

var zzz = document.getElementById("zzz");
console.log(zzz.innerText);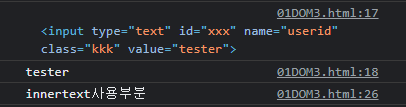
document.getElementsByName / document.getElementByClassName / document.getElementsByTagName 등도 똑같은 메커니즘으로 사용할 수 있다.
document.querySelector/document.querySelectorAll
단일 선택 시 사용.#기호 / 여러개 선택 시 사용..기호
querySelector의 파라미터는 #기호를 무조건 붙여줘야한다.
innerText 또한 접근하여 수정할 수 있다.
var zz = document.querySelector("#zzz");
console.log(zz.innerText)
document.querySelector("#zzz").innerText='aaaaaaaa';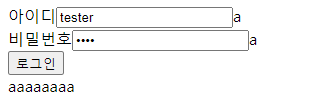
마찬가지로 querySelectorAll의 파라미터는 .기호를 무조건 붙여줘야하며 여러 개의 값일 때 Array의 형태로 받아 배열로 접근할 수 있다.
var tags = document.querySelectorAll(".kkk"); //여러개 선택 css 기호 사용
console.log(tags);
console.log(tags[0]);