K8S 인증/인가
소개
인증 : 시스템에 접근하는 사용자가 시스템에 등록된 접근 가능한 사용자 여부 판단
인가 : 접근 가능한 사용자가 어떤 자원에 접근이 가능한지 여부를 판단
인증이 먼저 선행이 되고 난 후 인증된 사용자의 자원 접근 여부를 판단
Kubenetes돌 멀티테넌시 환경을 지원하여 여러 사용자가 하나의 Cluster에서 여러 Namespace 단위로 구분하여 사용이 가능하며, 이 때 각 사용자는 각자 접근 가능한 Namespace를 지정하여 해당 Namespace의 자원에 접근이 가능
이때 사용자는 Service Account 자원을 통해서 Namespace내의 자원에 접근하며, Service Account는 허용 가능한 Role을 RoleBinding을 통해서 연결, 최종적으로 사용자는 Service Account와 Binding된 Role 만큼 자원에 접근이 가능
실습 환경은 2개의 SA(Service Account)와 2개의 NS(Name Space)를 만들어서 다양한 환경에서 지정된 role에 해당하는 자원에 접근 가능하는지를 확인
네임스페이스와 서비스 어카운트 생성 후 확인
네임스페이스(Namespace, NS) 생성
$> kubectl create namespace dev-team

$> kubectl create ns infra-team
네임스페이스 확인
$> kubectl get ns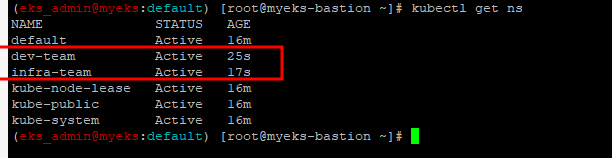
네임스페이스에 각각 서비스 어카운트 생성
$> kubectl create sa dev-k8s -n dev-team

$> kubectl create sa infra-k8s -n infra-team
서비스 어카운트 정보 확인
$> kubectl get sa -n dev-team

$> kubectl get sa dev-k8s -n dev-team -o yaml | yh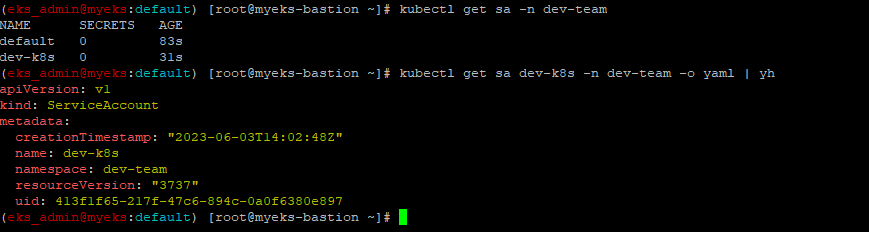
$> kubectl get sa -n infra-team

$> kubectl get sa infra-k8s -n infra-team -o yaml | yh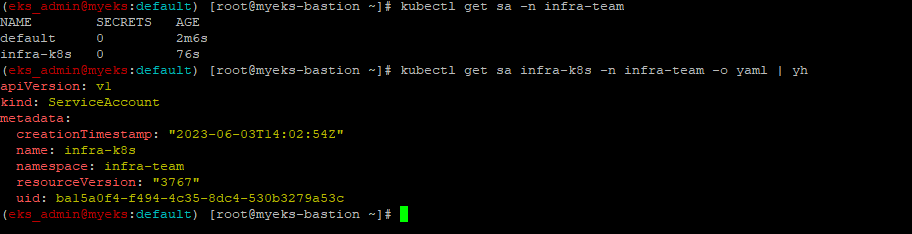
실습용 파드 생성
각 Namespace에서 Kubectl Pod 생성 : Pod 내에 Kubectl이 실행이 가능
파드 기동 시 서비스 어카운트 한 개가 할당되며, 서비스 어카운트 기반 인증/인가를 함, 미지정 시 기본 서비스 어카운트가 할당
$> cat <<EOF | kubectl create -f -
apiVersion: v1
kind: Pod
metadata:
  name: dev-kubectl
  namespace: dev-team
spec:
  serviceAccountName: dev-k8s
  containers:
  - name: kubectl-pod
    image: bitnami/kubectl:1.24.10
    command: ["tail"]
    args: ["-f", "/dev/null"]
  terminationGracePeriodSeconds: 0
EOF

$> cat <<EOF | kubectl create -f -
apiVersion: v1
kind: Pod
metadata:
  name: infra-kubectl
  namespace: infra-team
spec:
  serviceAccountName: infra-k8s
  containers:
  - name: kubectl-pod
    image: bitnami/kubectl:1.24.10
    command: ["tail"]
    args: ["-f", "/dev/null"]
  terminationGracePeriodSeconds: 0
EOF
Pod 생성 확인
$> kubectl get pod -A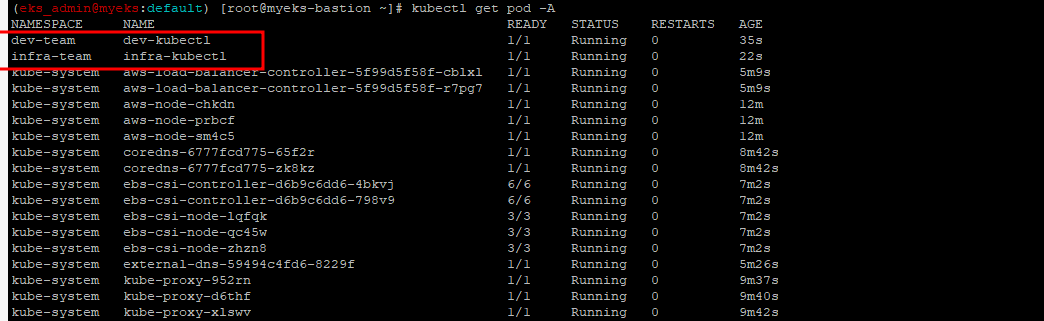
$> kubectl get pod -o dev-kubectl -n dev-team -o yaml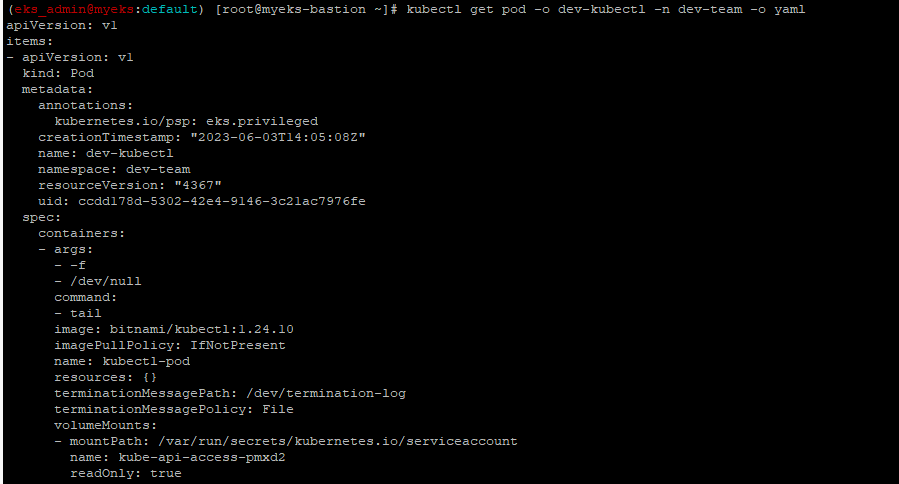
$> kubectl get pod -o infra-kubectl -n infra-team -o yaml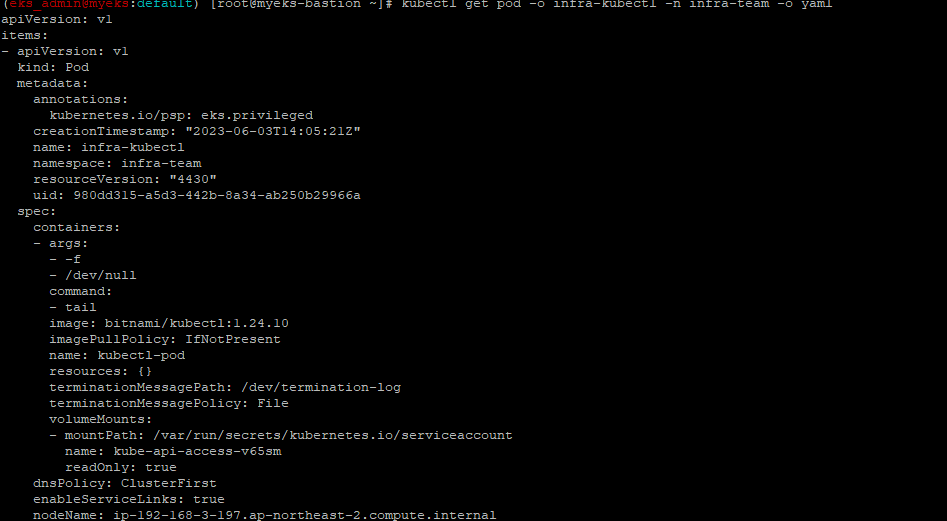
파드에 기본 적용되는 서비스 어카운트(토큰) 정보 확인
$> kubectl exec -it dev-kubectl -n dev-team -- ls /run/secrets/kubernetes.io/serviceaccount

$> kubectl exec -it dev-kubectl -n dev-team -- cat /run/secrets/kubernetes.io/serviceaccount/token

$> kubectl exec -it dev-kubectl -n dev-team -- cat /run/secrets/kubernetes.io/serviceaccount/namespace

$> kubectl exec -it dev-kubectl -n dev-team -- cat /run/secrets/kubernetes.io/serviceaccount/ca.crt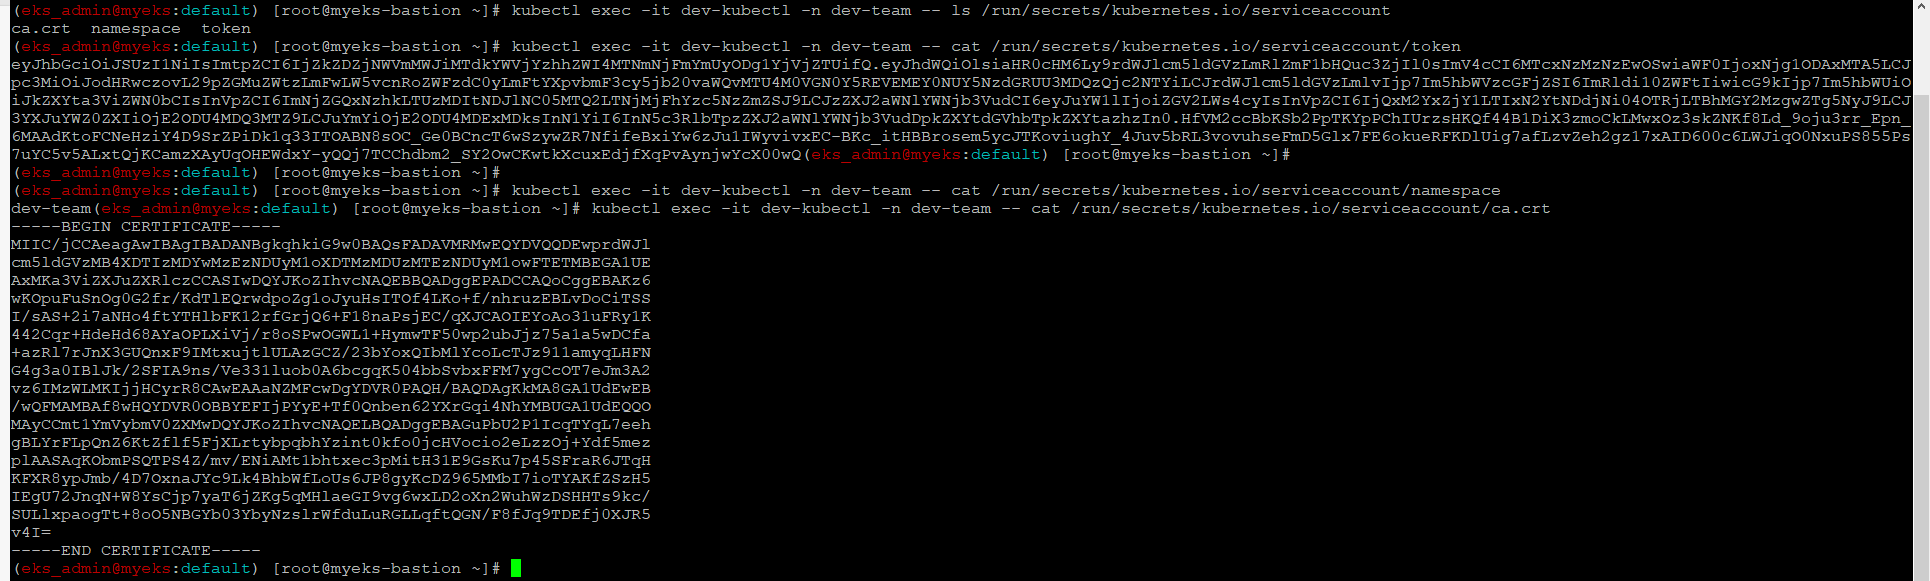
각각 파드로 Shell 접속하여 정보 확인 : 단축 명령어(alias) 사용
$> alias k1='kubectl exec -it dev-kubectl -n dev-team -- kubectl'

$> alias k2='kubectl exec -it infra-kubectl -n infra-team -- kubectl'
권한 시험
$> k1 get pods 
$> k1 run nginx --image nginx:1.20-alpine

$> k1 get pods -n kube-system
$> k2 get pods

$> k2 run nginx --image nginx:1.20-alpine

$> k2 get pods -n kube-system
각 Pod에 Service Account가 할당이 되어 있으나 Service Account에 아무런 권한이 없어 모두 실패
각각 네임스페이스에 롤(Role)를 생성 후 서비스 어카운트 바인딩
Role은 특정 Namespace별로 한정된 권한 정의
각 네임스페이스내의 모든 권한에 대한 롤 생성
$> cat <<EOF | kubectl create -f -
apiVersion: rbac.authorization.k8s.io/v1
kind: Role
metadata:
  name: role-dev-team
  namespace: dev-team
rules:
- apiGroups: ["*"]
  resources: ["*"]
  verbs: ["*"]
EOF

$> cat <<EOF | kubectl create -f -
apiVersion: rbac.authorization.k8s.io/v1
kind: Role
metadata:
  name: role-infra-team
  namespace: infra-team
rules:
- apiGroups: ["*"]
  resources: ["*"]
  verbs: ["*"]
EOF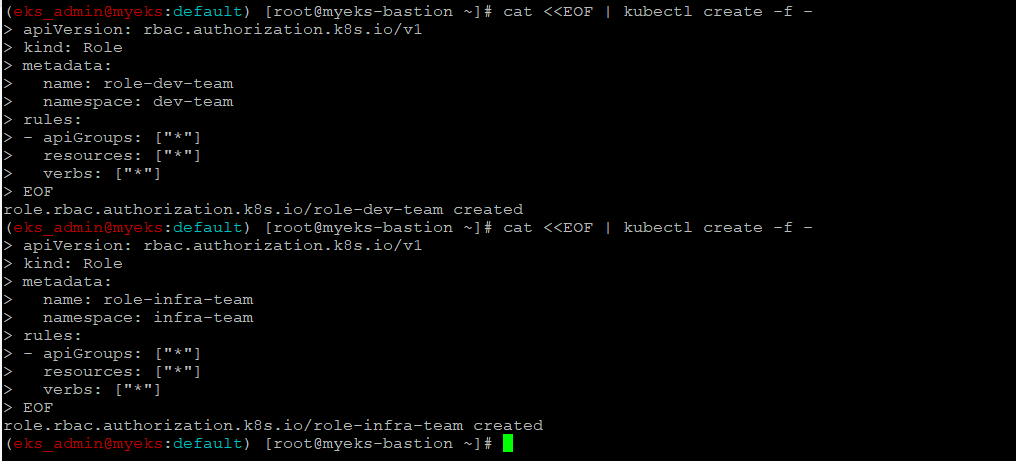
Role 확인
$> kubectl get roles -n dev-team

$> kubectl get roles -n infra-team

$> kubectl get roles -n dev-team -o yaml

$> kubectl describe roles role-dev-team -n dev-team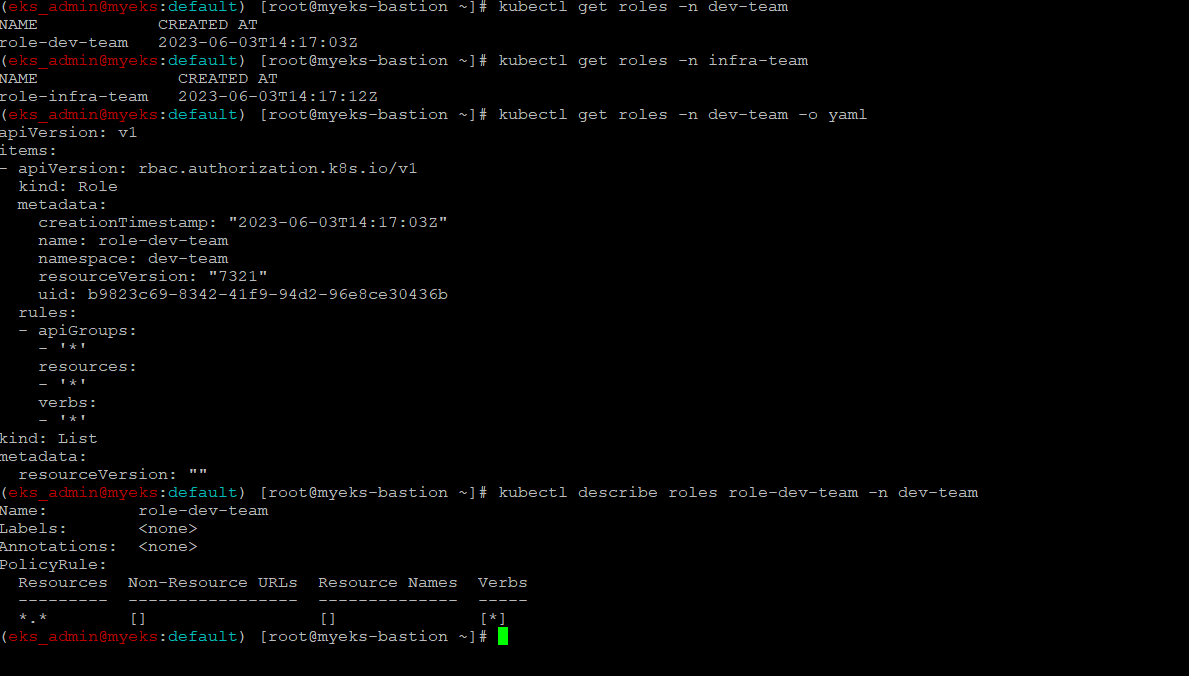
RoleBinding 생성 : SA <-> Role 연결
$> cat <<EOF | kubectl create -f -
apiVersion: rbac.authorization.k8s.io/v1
kind: RoleBinding
metadata:
  name: roleB-dev-team
  namespace: dev-team
roleRef:
  apiGroup: rbac.authorization.k8s.io
  kind: Role
  name: role-dev-team
subjects:
- kind: ServiceAccount
  name: dev-k8s
  namespace: dev-team
EOF

$> cat <<EOF | kubectl create -f -
apiVersion: rbac.authorization.k8s.io/v1
kind: RoleBinding
metadata:
  name: roleB-infra-team
  namespace: infra-team
roleRef:
  apiGroup: rbac.authorization.k8s.io
  kind: Role
  name: role-infra-team
subjects:
- kind: ServiceAccount
  name: infra-k8s
  namespace: infra-team
EOF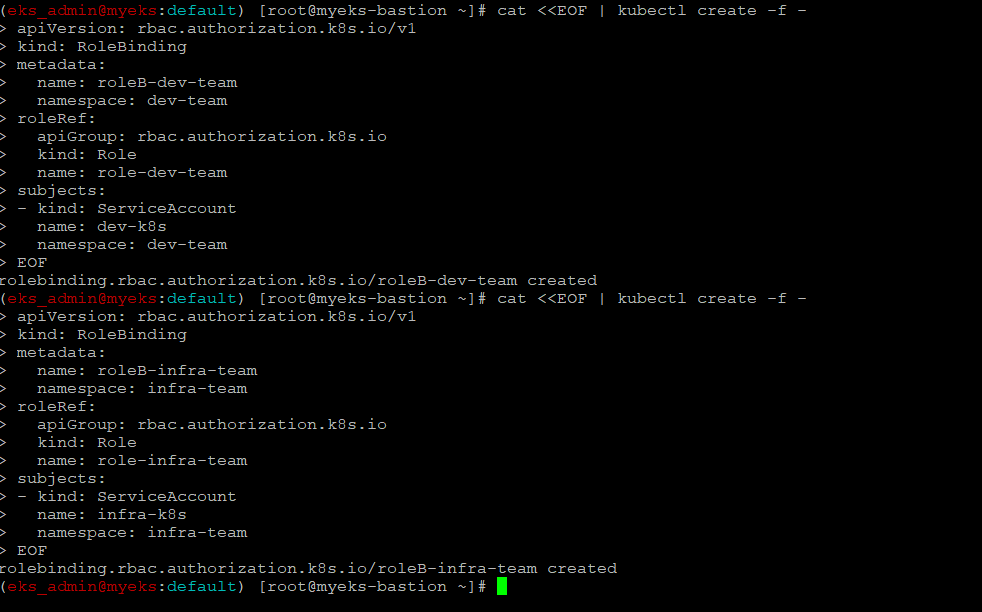
RoleBinding 확인
$> kubectl get rolebindings -n dev-team

$> kubectl get rolebindings -n infra-team

$> kubectl get rolebindings -n dev-team -o yaml

$> kubectl describe rolebindings roleB-dev-team -n dev-team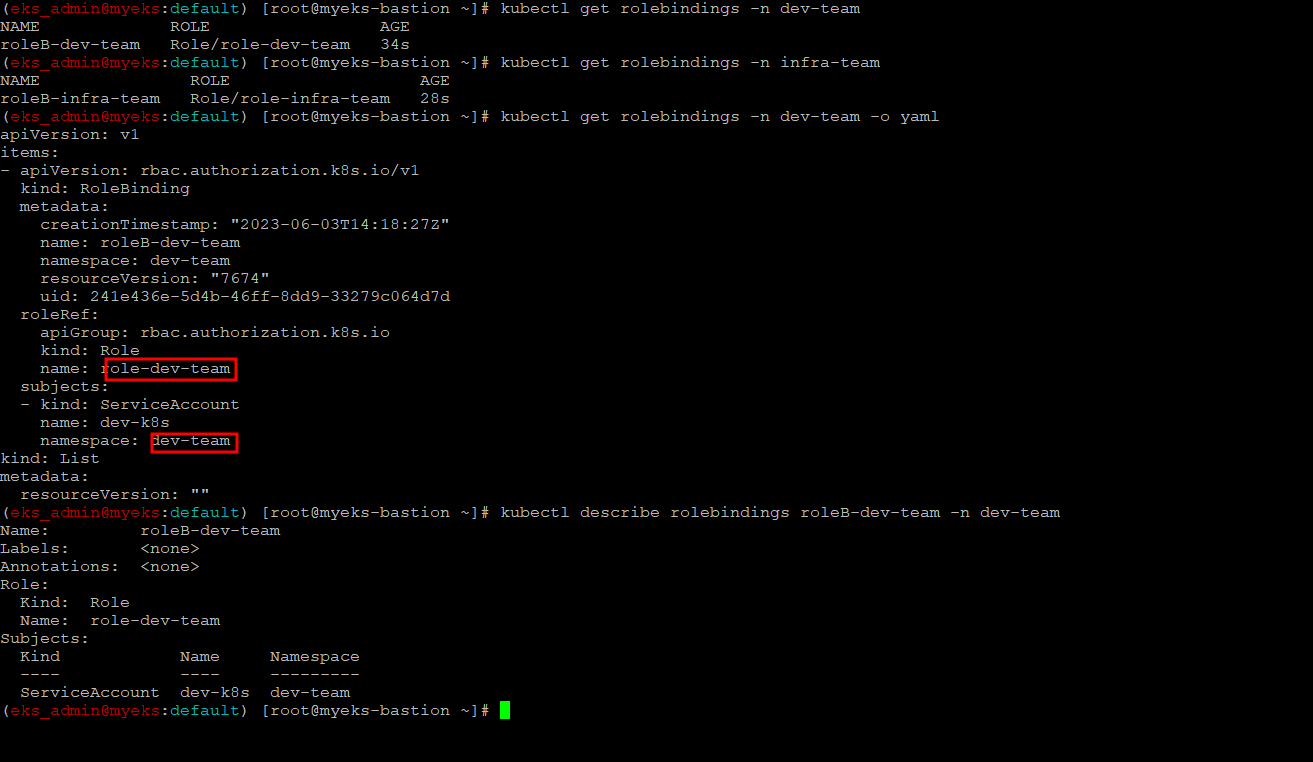
SA를 지정하여 생성한 Pod에서 다시 권한 시험
각 파드로 Shell 접속하여 정보 확인 : 단축 명령어(alias) 사용
$> alias k1='kubectl exec -it dev-kubectl -n dev-team -- kubectl'

$> alias k2='kubectl exec -it infra-kubectl -n infra-team -- kubectl'
권한 시험
Pod에 대한 모든 권한은 부여 받았으나 타 Namespace나 Nodes에 대한 권한이 없어 실패
?> Role 정의시 apigroup,resource, Verb 모두 all(*) 명시가 되어 있었는데, 왜 Pod만 사용 가능하다?
$> k1 get pods

$> k1 run nginx --image nginx:1.20-alpine

$> k1 get pods

$> k1 delete pods nginx

$> k1 get pods -n kube-system

$> k1 get nodes
$> k2 get pods

$> k2 run nginx --image nginx:1.20-alpine

$> k2 get pods

$> k2 delete pods nginx

$> k2 get pods -n kube-system

$> k2 get nodes
namespace 삭제
$> kubectl delete ns dev-team infra-teamEKS 자원 접근에 대한 인증/인가
소개
간략히 EKS내의 자원 접근 및 관리에 대한 인증은 AWS IAM을 통해서 수행하며, 인가는 Kubenetes의 RBAC를 통해서 수행
다음 Chapter에서 설명할 IRSA와는 상반된 개념이다. IRSA는 Pod에서 AWS에 대한 자원 접근 권한에 대한 부분이므로 AWS 자원에 대한 권한 정의의 바탕은 AWS의 정책/권한이므로, 당연히 Pod의 AWS 자원에 대한 인가는 IAM에서 정의하며, 인증은 EKS에서 발급한 OIDC로 한다.
위 인증/인가에 기본개념은 어떤 자원에 접근 하냐에 따라서 상이하며, 접근하고자 하는 자원이 EKS이면 인가는 RBAC, AWS 자원이면 AWS IAM
보다 자세한 사항은 AWS의 Doc 참조 : https://docs.aws.amazon.com/ko_kr/eks/latest/userguide/cluster-auth.html
기본적인 인증/인가 절차는 아래와 같다
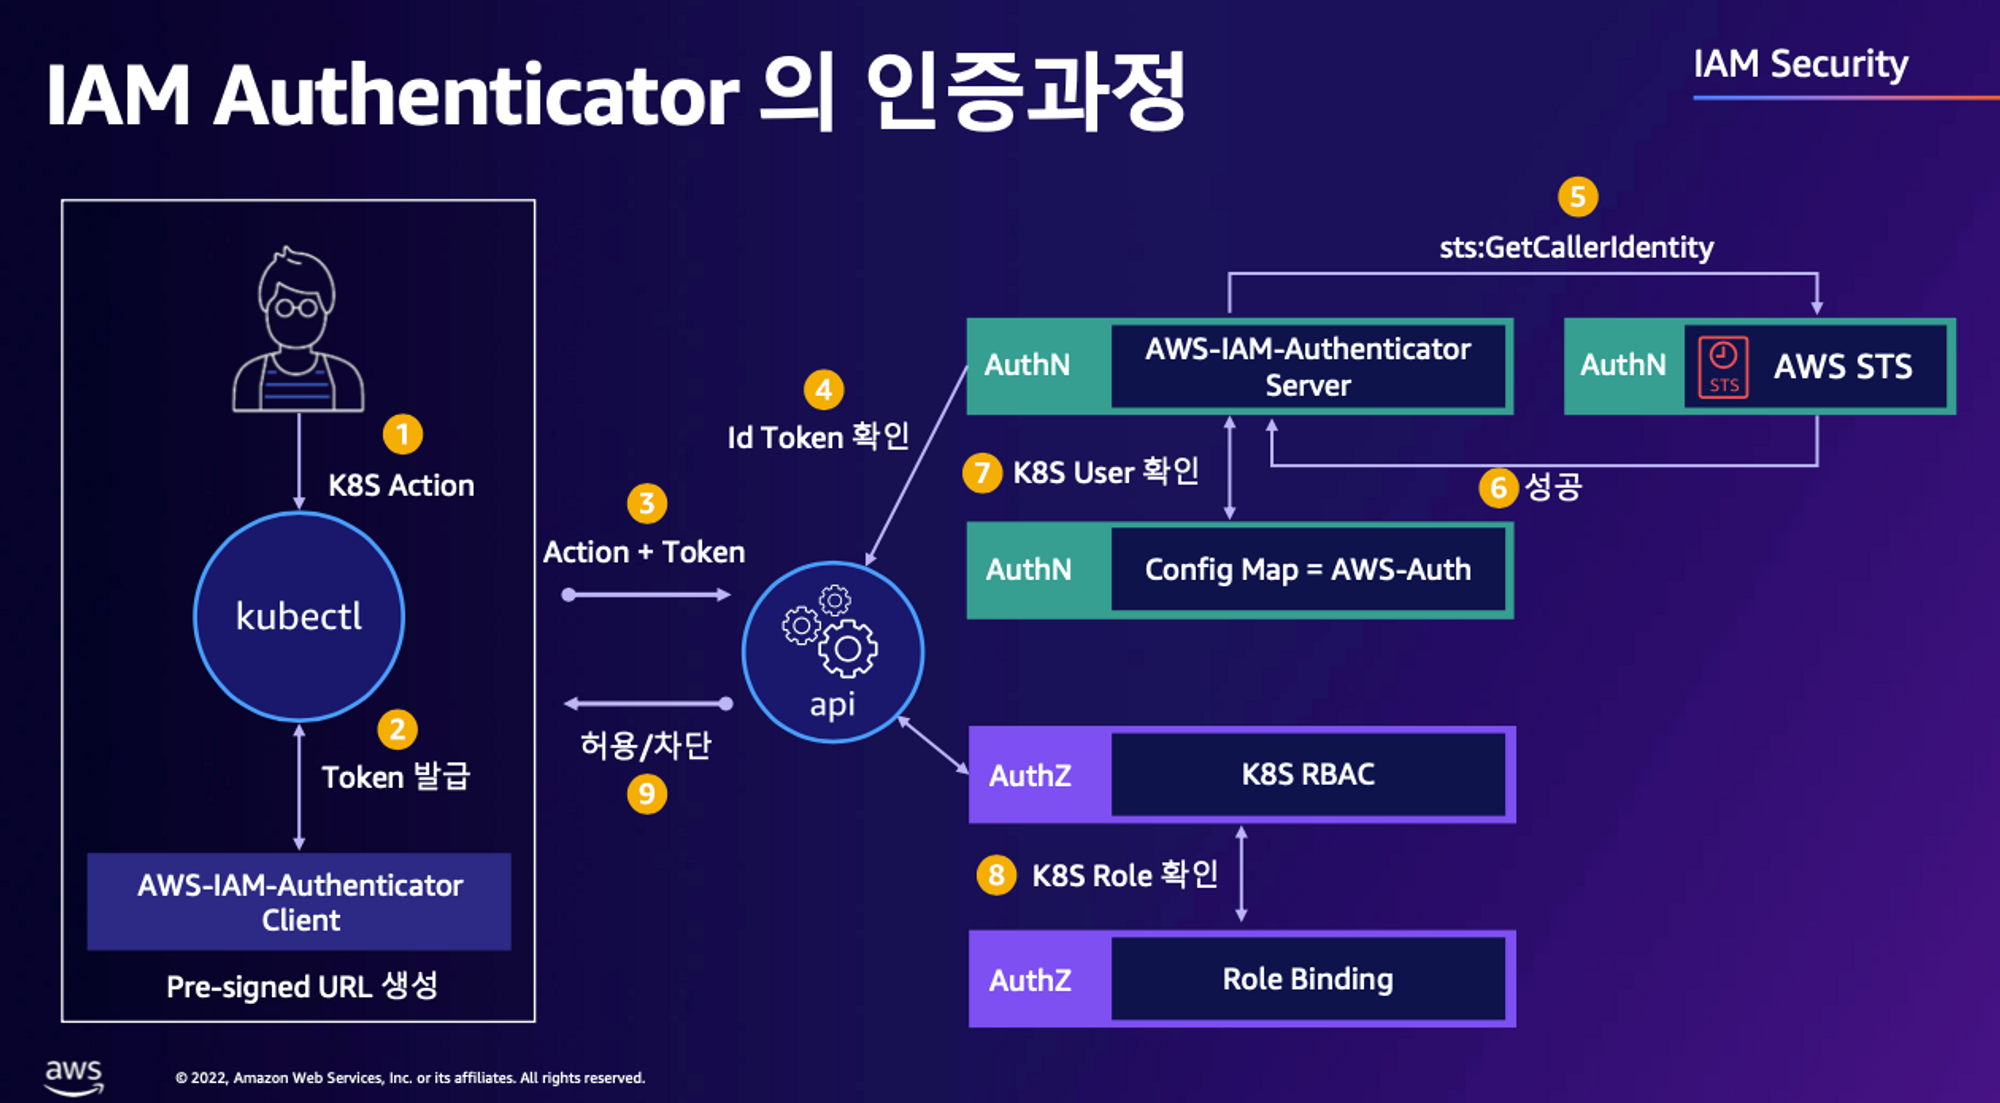
- kubectl 명령어 사용 시 내부적으로 인증 token을 생성
- EKS Cluster에게서 Token 값을 받는다
? Token의 ID값은 ~/.kube/config 의 User에 해당 되는 것인가? aws configure 명령어에 사용된 ID아닌가? aws sts get-caller-identity 명령어로 다시 한번 확인 필요
현재 eks_admin name으로 등록
kubectl 명령어 사용시 Context에 따라 aws sts get-caller-identity 호출 결과가 상이 할것으로 예상
-
Token Response 로 Token 과 Pre-signed URL로 API Server 접속
-
API Server는 Web Hook으로 인증 요청을 AWS-IAM-Authenticator로 요청
-
AWS-IAM-Authenticator는 AWS IAM에 인증 요청
-
인증 결과에 성공이면 K8S RBAC에 인가 요청
AWS IAM 인증 완료후의 Response Format에 대한 자세한 설명은 아래 URL 참조
https://docs.aws.amazon.com/ko_kr/STS/latest/APIReference/API_GetCallerIdentity.html
인증 Token 생성
aws eks get-token 명령으로 EKS Service Endpoints(EKS API Server)에 token 요청하여 응답 값으로 API Server의 Pre-Signed URL 수신
sts(Security Token Service) caller id의 ARN 확인
Token을 요청할 ID 확인
$> aws sts get-caller-identity --query Arn
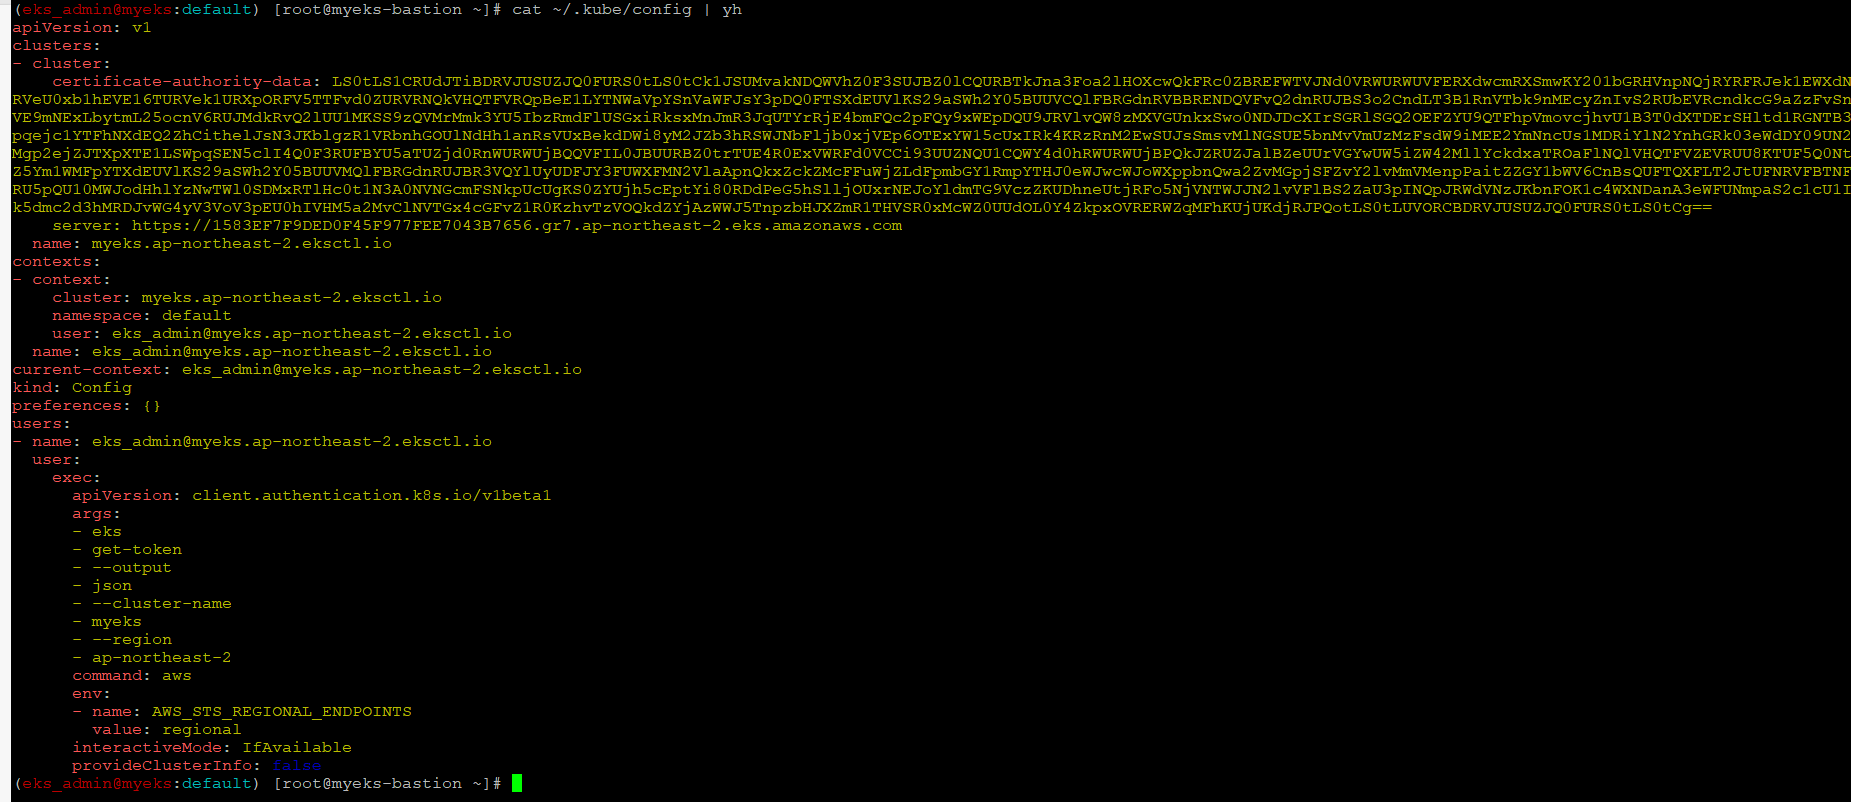
kubeconfig 정보 확인
kubeconfig의 user 정보를 Token ID로 이용
보다 자세한 사항은 Kubenetes 공식 문서 : https://kubernetes.io/ko/docs/concepts/configuration/organize-cluster-access-kubeconfig/ 와 다른 Blog URL 참조 https://nayoungs.tistory.com/entry/Kubernetes-Kubeconfig
$> cat ~/.kube/config | yh
임시 보안 자격 증명(토큰)을 요청
Kubenetes의 API Server에 Cluster 인증을 위해 인증 토큰 요청을 한다.
보다 자세한 사항은 AWS 공식 문서 URL 참조 : https://docs.aws.amazon.com/ko_kr/eks/latest/userguide/cluster-auth.html
$> aws eks get-token --cluster-name $CLUSTER_NAME | jq

$> aws eks get-token --cluster-name $CLUSTER_NAME | jq -r '.status.token'


EKS API Server가 Token Review를 Webhook token authenticator에 요청
아래 명령어는 Token Review와 관련된 API Resource 확인 및 Token Review와 관련된 상세한 설명을 보여준다
tokenreviews api 리소스 확인
$> kubectl api-resources | grep authentication
tokenreviews에 대한 설명
$> kubectl explain tokenreviews
Webhook api 리소스 확인
$> kubectl api-resources | grep Webhook
validatingwebhookconfigurations 리소스 확인
$> kubectl get validatingwebhookconfigurations
$> kubectl get validatingwebhookconfigurations eks-aws-auth-configmap-validation-webhook -o yaml | kubectl neat | yh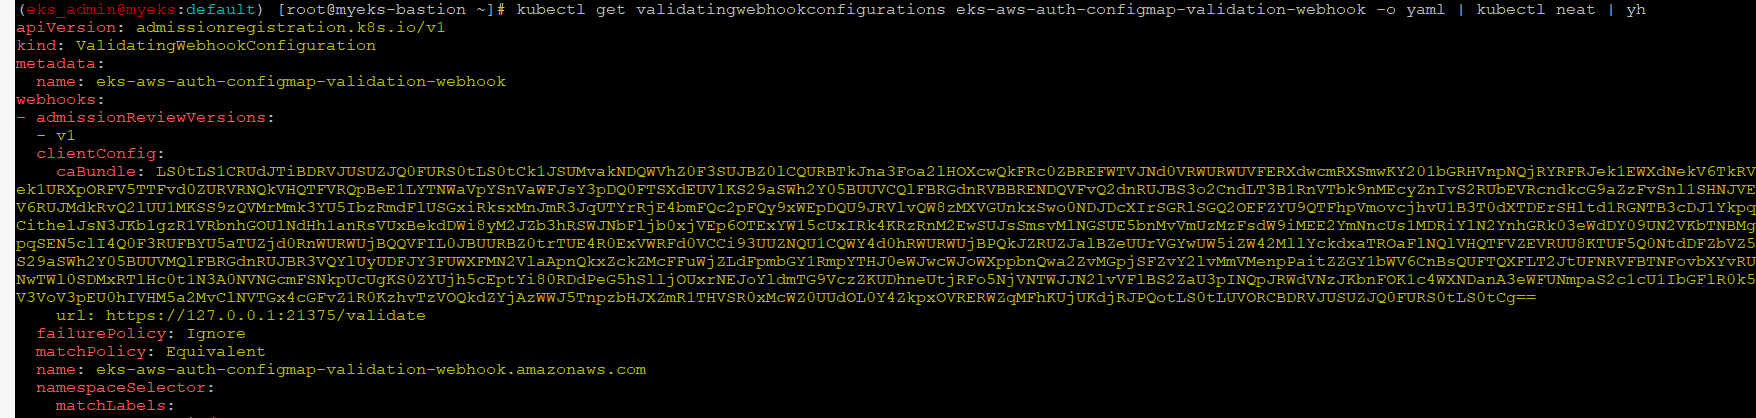
IAM 인증 완료 후 인가를 위해 aws-auth Config Map 참조
aws-auth configmap에는 IAM User/Role ARN+ Cluser User ID + RoleBinding으로 구성이 되어 있어, 인증 완료 후의 User/Role ARN 값을 바탕으로 어떤 Cluser User로 어떤 Role로 Cluser 자원에 접근 가능한지가 확인이 가능하다.
aws-auth 컨피그맵 구성 확인
$> kubectl get cm -n kube-system aws-auth -o yaml | kubectl neat | yh
rback-tool, rolesum 설치
$> kubectl krew install rbac-tool rolesum
aws-auth ConfigMap에 명시된 Group과 ClusterRole/Role을 확인
EKS 설치한 IAM User 정보
$> kubectl rbac-tool whoami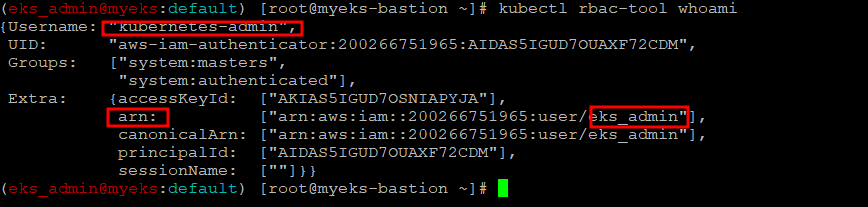
system:masters , system:authenticated 그룹의 정보 확인
kubenetes에서는 subject(User, Group, ServiceAccount)의 표현법은 문자열로 된다면 아무런 문제가 없고, system: prefix로 시작하는 kubenetes 에서 system use로 예약된 Prefix
보다 자세한 Subject 참조하는 방법에 대해서는 URL 참조 : https://kubernetes.io/docs/reference/access-authn-authz/rbac/#referring-to-subjects
아래 system:masters, system:authenticated 에 대한 자세한 설명은 URL 참조 : https://kubernetes.io/docs/reference/access-authn-authz/rbac/#discovery-roles
$> kubectl rbac-tool lookup system:masters

$> kubectl rbac-tool lookup system:authenticated

$> kubectl rolesum -k Group system:masters

$> kubectl rolesum -k Group system:authenticated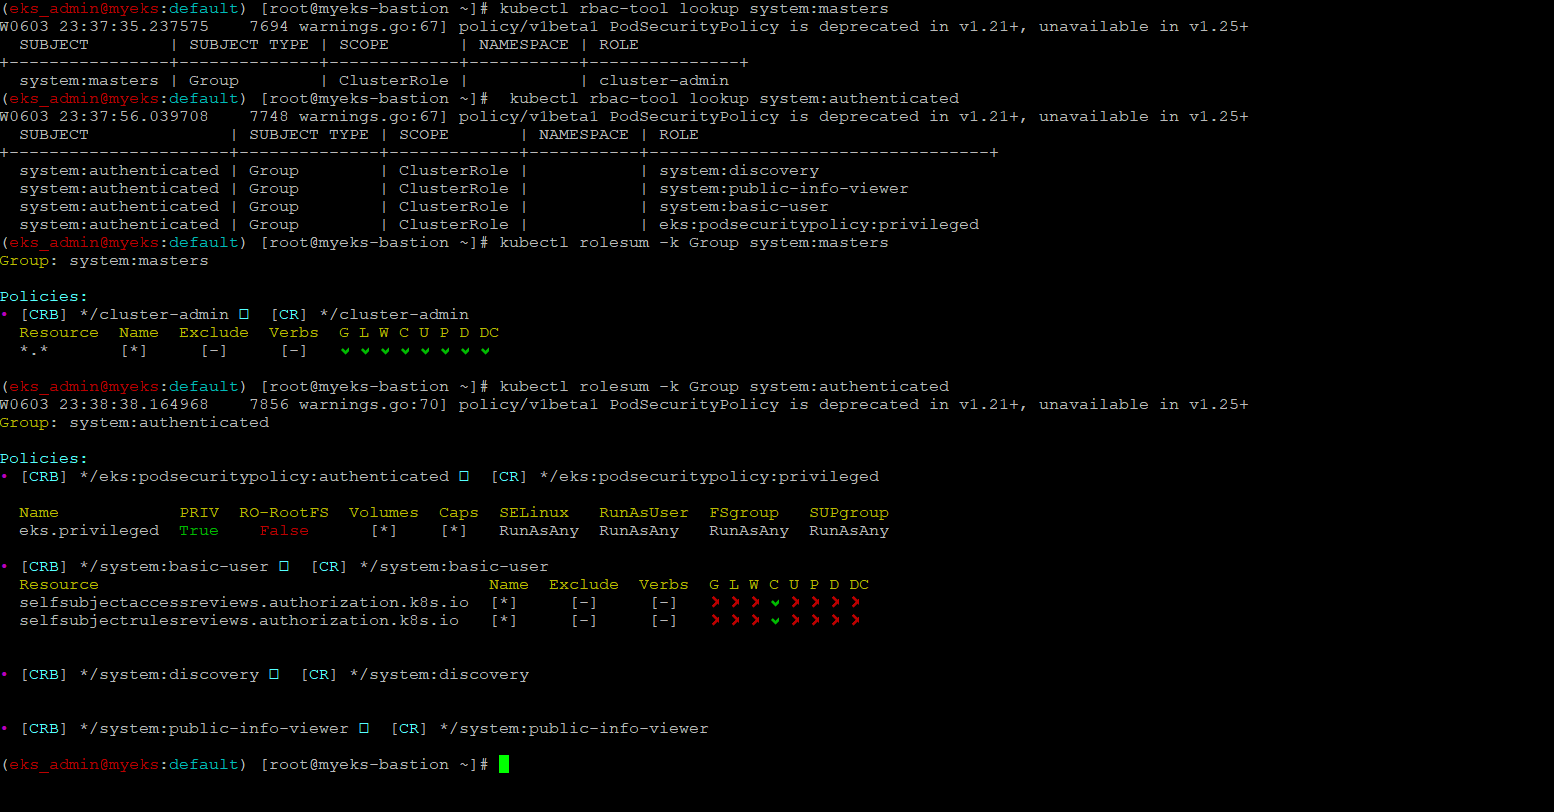
system:masters 그룹이 사용 가능한 클러스터 롤 확인 : cluster-admin
Bindings를 통해서 Role과 Subjects와의 관계를 확인
$> kubectl describe clusterrolebindings.rbac.authorization.k8s.io cluster-admin
cluster-admin 의 PolicyRule 확인 : 모든 리소스 사용 가능!
$> kubectl describe clusterrole cluster-admin
system:authenticated 그룹이 사용 가능한 클러스터 롤 확인
$> kubectl describe ClusterRole system:discovery

$> kubectl describe ClusterRole system:public-info-viewer

$> kubectl describe ClusterRole system:basic-user

$> kubectl describe ClusterRole eks:podsecuritypolicy:privileged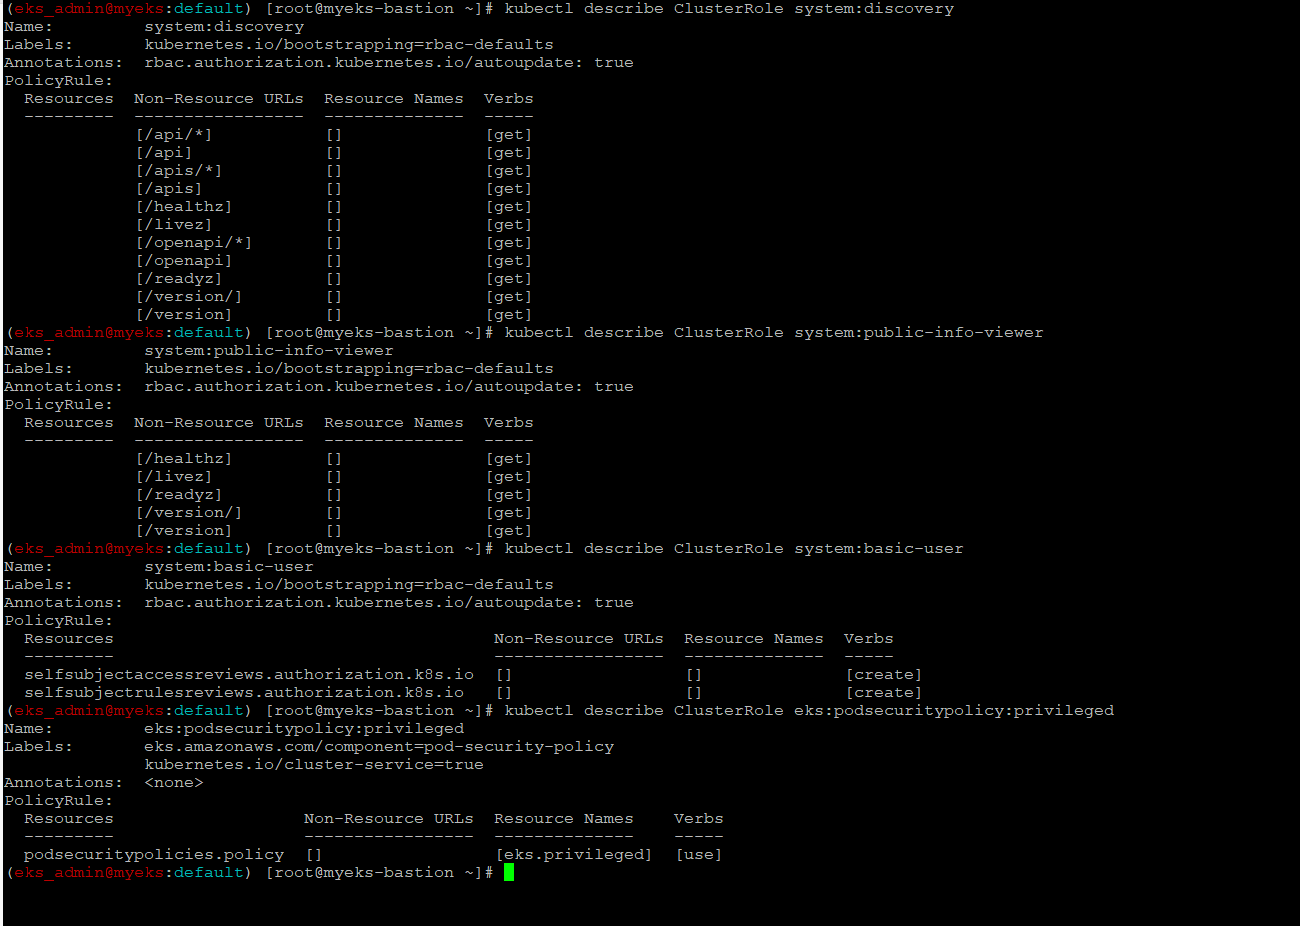
aws-auth ConfigMap 이해를 돕기 위한 실습
Kubenetes에서 인증/인가가 구분되어서 실행되는 상황을 설명 하기 위한 실습
[myeks-bastion] testuser 사용자 생성
testuser 사용자 생성
$> aws iam create-user --user-name testuser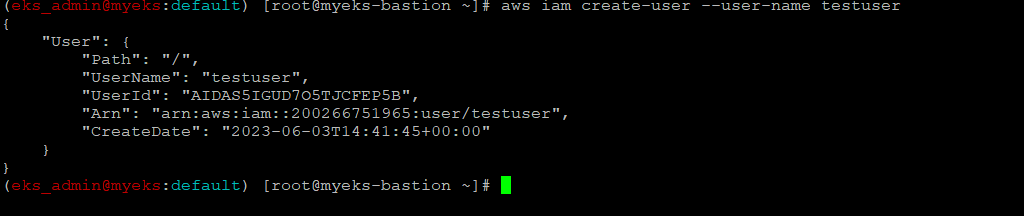
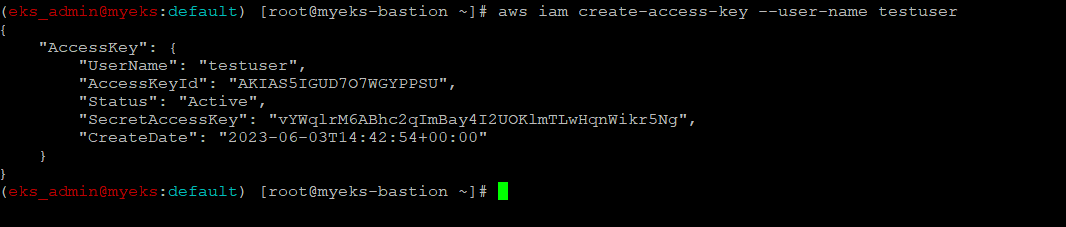
testuser에게 프로그래밍 방식 액세스 권한 부여
$> aws iam create-access-key --user-name testuser
testuser 에게 AdministratorAccess 정책을 할당
$> aws iam attach-user-policy --policy-arn arn:aws:iam::aws:policy/AdministratorAccess --user-name testuser현재 EKS Cluster를 운영하는 ID 반환
$> aws sts get-caller-identity --query Arn
get-caller-inentity API에 대한 설명은 아래 URL 참조 :
https://docs.aws.amazon.com/ko_kr/STS/latest/APIReference/API_GetCallerIdentity.html
[myeks-bastion-2] testuser 자격증명 설정 및 확인
현재 EKS Cluster를 운영하는 ID 반환
$> aws sts get-caller-identity --query Arn
testuser 자격 증명 설정
$> aws configure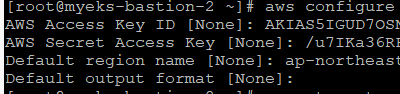
현재 EKS Cluster를 운영하는 ID 반환
$> aws sts get-caller-identity --query Arn
kubectl 시도_권한이 없음
$> kubectl get node -v6

$>ls ~/.kube
[myeks-bastion] testuser에 system:masters 그룹 부여로 EKS 관리자 수준 권한 설정(추가)
eksctl 사용 >> iamidentitymapping 실행 시 aws-auth 컨피그맵 작성
$> eksctl create iamidentitymapping --cluster $CLUSTER_NAME --username testuser --group system:masters --arn arn:aws:iam::$ACCOUNT_ID:user/testuser
Aws-Auth ConfigMap 설정 확인
$> kubectl get cm -n kube-system aws-auth -o yaml | kubectl neat | yh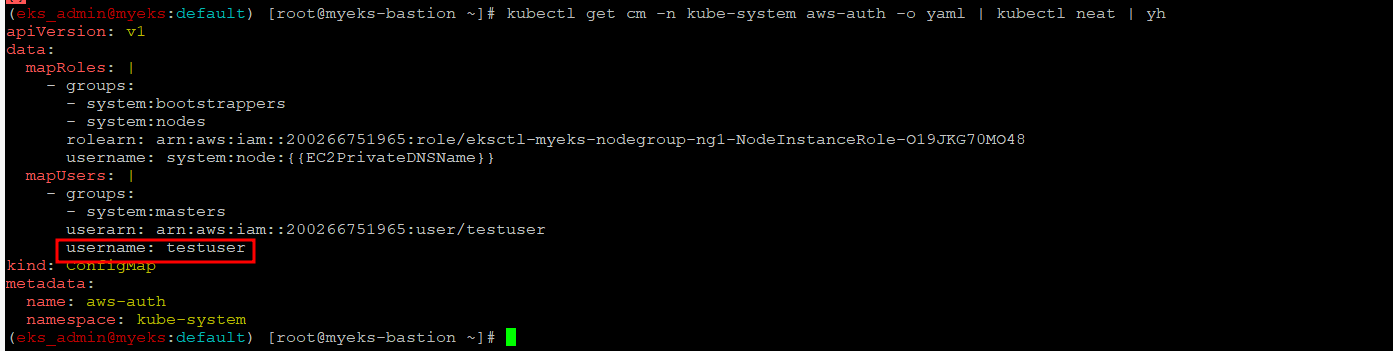
[myeks-bastion-2] testuser kubeconfig 생성 및 kubectl 사용 확인
testuser kubeconfig 생성
$> aws eks update-kubeconfig --name $CLUSTER_NAME --user-alias testuser
첫번째 bastion host의 config와 비교
$> cat ~/.kube/config | yhbastion host 1
bastion host 2

kubectl 사용 확인
$> kubectl ns default

$> kubectl get node -v6
rbac-tool 후 확인 >> 기존 계정과 비교
$> kubectl krew install rbac-tool && kubectl rbac-tool whoami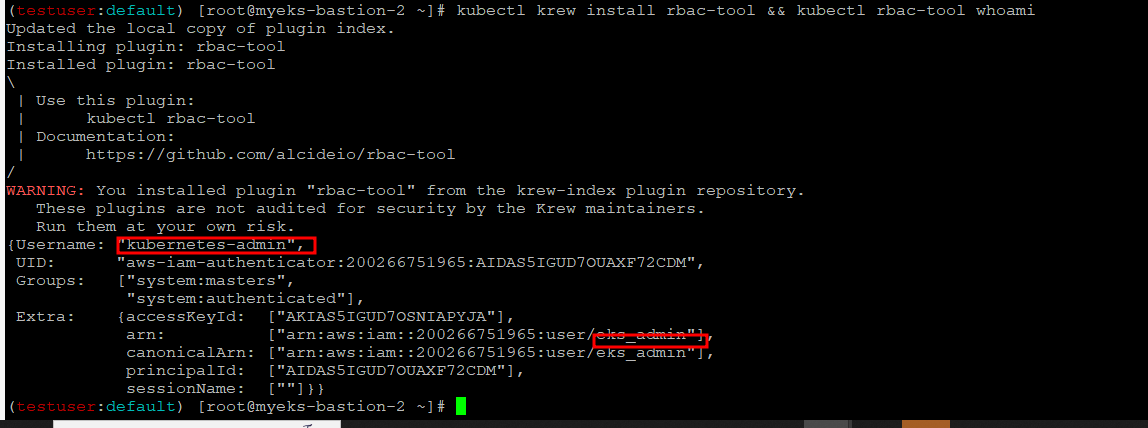
[myeks-bastion] testuser 의 Group 변경(system:masters → system:authenticated)으로 RBAC 동작 확인
edit로 mapUsers 내용 직접 수정
$> kubectl edit cm -n kube-system aws-auth수정 결과 확인
$> eksctl get iamidentitymapping --cluster $CLUSTER_NAME
[myeks-bastion-2] testuser kubectl 사용 확인
$> kubectl get node -v6

$> kubectl api-resources -v5
[myeks-bastion]에서 testuser IAM 맵핑 삭제
testuser IAM 맵핑 삭제
$> eksctl delete iamidentitymapping --cluster $CLUSTER_NAME --arn arn:aws:iam::$ACCOUNT_ID:user/testuser
Get IAM identity mapping(s)
$> eksctl get iamidentitymapping --cluster $CLUSTER_NAME

$> kubectl get cm -n kube-system aws-auth -o yaml | yh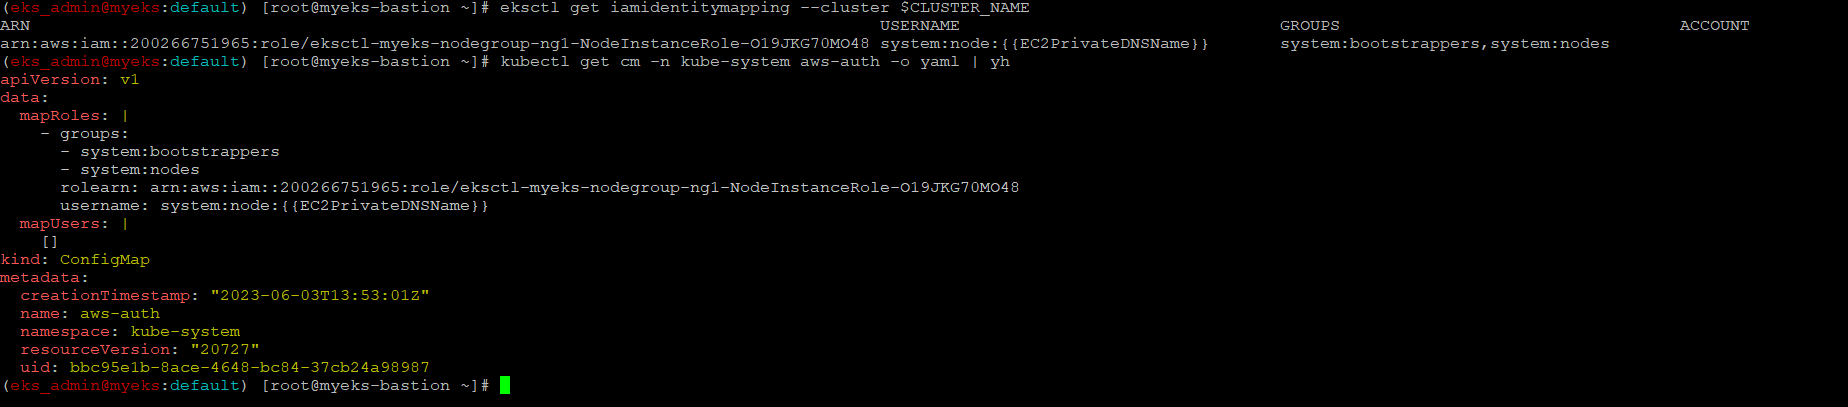
[myeks-bastion-2] testuser kubectl 사용 확인
$> kubectl get node -v6

$> kubectl api-resources -v5
IRSA(Iam Roles for Service Account)
소개
Pod에서 AWS 자원 접근을 위해 IRSA를 통해서 자원 접근 권한을 취득, EC2 Instance Profile을 통해서도 Pod가 AWS 자원 접근을 할 수 있으나 최소한의 권한 할당 원칙으로 본다면 Node 단위의 EC2 Instance Profile 방식은 보안상에 위협이 될 수 있다.
IRSA는 Pod에 할당된 SA(Service Account)의 권한을 AWS IAM Roles와 Mapping을 통하여 구현하며, 구현 과정에서 EKS IdP(ID Provider)와 AWS IAM이 연동하여 인증과 인가를 실행한다.
인증은 앞서 EKS 인증/인가 부분에서도 간략한 서술 했듯이 EKS IdP에서 하며, 인가는 AWS IAM에서 처리를 한다.
Node 단위의 권한 할달 방식인 EC2 Instance Profile
Node 단위의 IAM 설정 예시인 eksctl 사용시
아래 --external-dns-access --full-ecr-access --asg-access option은 AWS 자원인 DNS, ECR, ASG(Auto Scaling Group)에 대한 접근 권한 할당 요청
ksctl create cluster --name $CLUSTER_NAME ... --external-dns-access --full-ecr-access --asg-accessCluster 생성에 사용 되었던 yaml File에서 IAM 권한 요청 설정 값
$> cat myeks.yaml | yh인증/인가 동작 방식
선행 지식
Service Account Token Volume Projection
API Server에 토큰 인증 요청 시 Service Acount Token 정보를 Projected Volume에 할당하여 사용, 이 때 Token의 대상과 사용 기한을 설정 할 수 있다.
apiVersion: v1
kind: Pod
metadata:
  name: nginx
spec:
  containers:
  - image: nginx
    name: nginx
    volumeMounts:
    - mountPath: /var/run/secrets/tokens
      name: vault-token
  serviceAccountName: build-robot
  volumes:
  - name: vault-token
    projected:
      sources:
####       - serviceAccountToken:
          path: vault-token
          expirationSeconds: 7200
          audience: vault
Projected Volume에 대한 보다 자세한 사항은 아래 URL 참조 :https://kubernetes.io/ko/docs/concepts/storage/projected-volumes/
그리고 Projected Volume은 몇가지 Volume source를 하나의 디렉토리에 통합을 할 수 있다
시크릿(secret), downwardAPI, 컨피그맵(configMap), 서비스어카운트토큰(serviceAccountToken) 들이다.
Secret를 Projected Volume으로 사용한 예시
Secret 파일을 생성
$> echo -n "admin" > ./username.txt

$> echo -n "1f2d1e2e67df" > ./password.txt
secret object를 생성
$> kubectl create secret generic user --from-file=./username.txt

$> kubectl create secret generic pass --from-file=./password.txt

Secret를 Project Volume으로 사용하는 Pod 생성
$> kubectl apply -f https://k8s.io/examples/pods/storage/projected.yaml
Pod 생성 확인
$> kubectl get pod test-projected-volume -o yaml | kubectl neat | yh
Secret file 파일 확인
$> kubectl exec -it test-projected-volume -- ls /projected-volume/
Secret User Name 확인
$> kubectl exec -it test-projected-volume -- cat /projected-volume/username.txt ;echoSecret Password Value 확인
$> kubectl exec -it test-projected-volume -- cat /projected-volume/password.txt ;echoPod 와 secret Object 삭제
$> kubectl delete pod test-projected-volume && kubectl delete secret user pass
실습 1-Role과 연동하는 Service Account mount없이 Pod 생성
Pod내의 Running Process가 아무런 Role이 없는 경우 Access Denied 에러 발생을 하는 예를 보여줌
Pod 생성
$> cat <<EOF | kubectl apply -f -
apiVersion: v1
kind: Pod
metadata:
  name: eks-iam-test1
spec:
  containers:
    - name: my-aws-cli
      image: amazon/aws-cli:latest
      args: ['s3', 'ls']
  restartPolicy: Never
  automountServiceAccountToken: false
EOF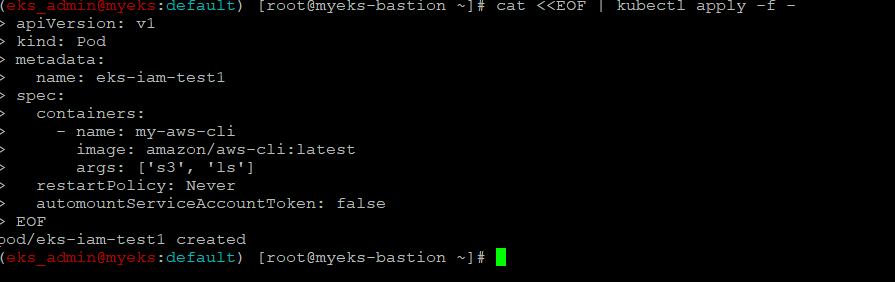
Pod 생성 확인
$> kubectl get pod

$> kubectl describe pod
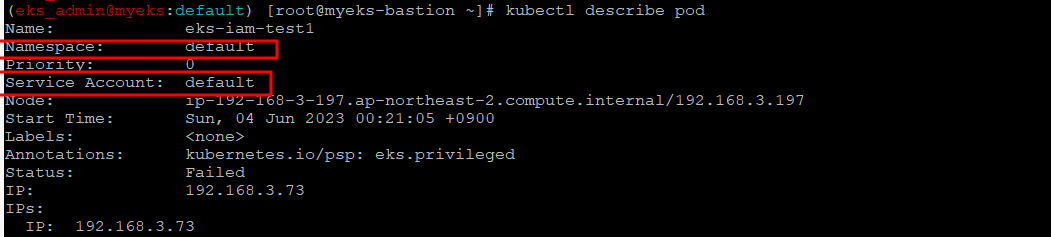
Pod의 에러 로그 원인 확인
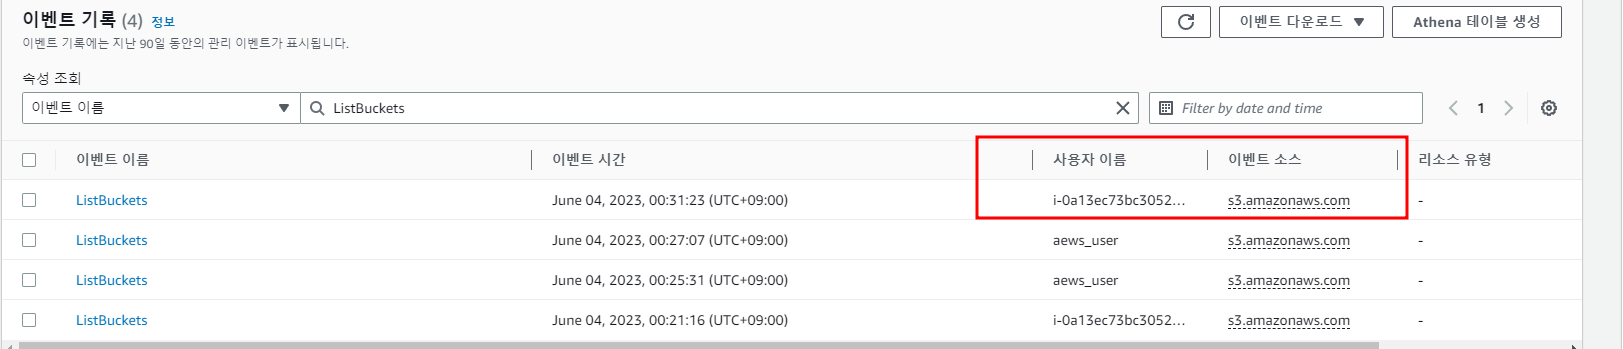
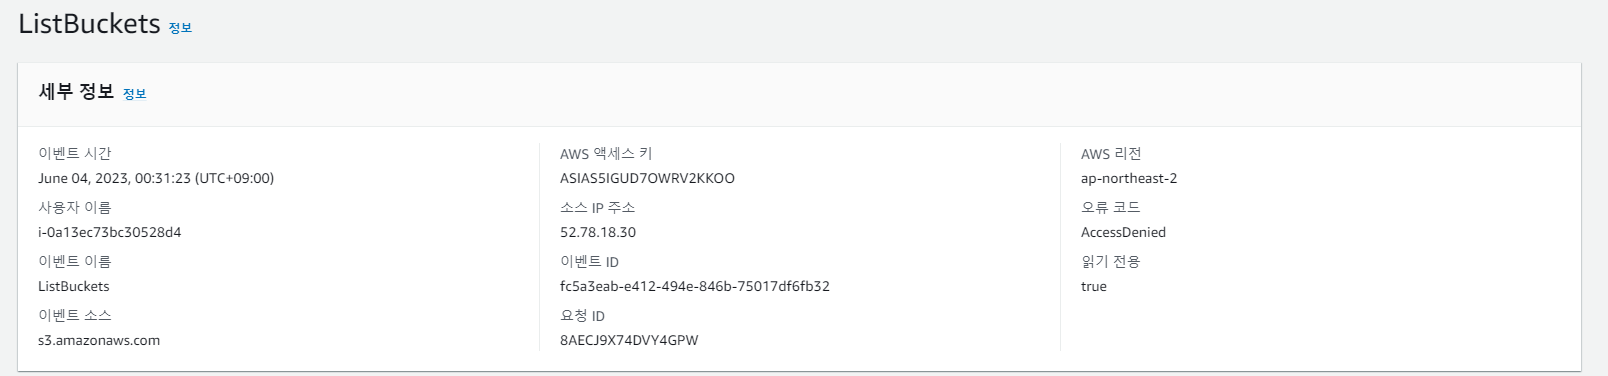
$> kubectl logs eks-iam-test1
보다 상세한 에러를 AWS Console ColudTrail에서 확인
Pod 삭제
$> kubectl delete pod eks-iam-test1실습 2 - Pod에 권한 할당 하지 않은 default Service Account 할당
Pod에 Service Account를 할당 하지 않으면 자동으로 default name으로 Service Account 할당
Pod 생성
$> cat <<EOF | kubectl apply -f -
apiVersion: v1
kind: Pod
metadata:
  name: eks-iam-test2
spec:
  containers:
    - name: my-aws-cli
      image: amazon/aws-cli:latest
      command: ['sleep', '36000']
  restartPolicy: Never
EOF
Pod 생성 확인
$> kubectl get pod
$> kubectl describe pod
AWS S3 명령 사용 시도
$> kubectl exec -it eks-iam-test2 -- aws s3 ls
Pod 삭제
$> kubectl delete pod eks-iam-test2실습 3- Pod가 AWS 자원에 접근 가능하게 환경 구성 및 실행
Service Account, Role 생성 및 Binding Service Account와 Role
$> eksctl create iamserviceaccount \
  --name my-sa \
  --namespace default \
  --cluster $CLUSTER_NAME \
  --approve \
  --attach-policy-arn $(aws iam list-policies --query 'Policies[?PolicyName==`AmazonS3ReadOnlyAccess`].Arn' --output text)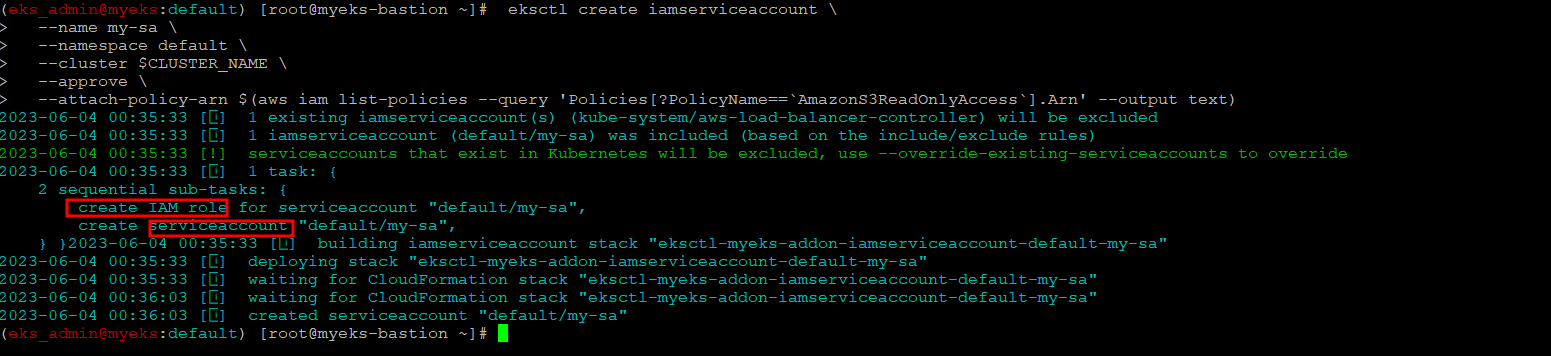
iamserviceaccount 생성 확인
$> eksctl get iamserviceaccount --cluster $CLUSTER_NAME
$> kubectl get sa
$> kubectl describe sa my-sa
Pod 생성 with new SA(my-sa)
serviceAccountName field에서 S3에 AmazonS3ReadOnlyAccess 권한으로 접근 가능한 Service Account my-sa를 명시하여 eks-iam-test3 Pod는 권한을 Assume받아 AWS S3에 접근 가능
$> cat <<EOF | kubectl apply -f -
apiVersion: v1
kind: Pod
metadata:
  name: eks-iam-test3
spec:
  serviceAccountName: my-sa
  containers:
    - name: my-aws-cli
      image: amazon/aws-cli:latest
      command: ['sleep', '36000']
  restartPolicy: Never
EOF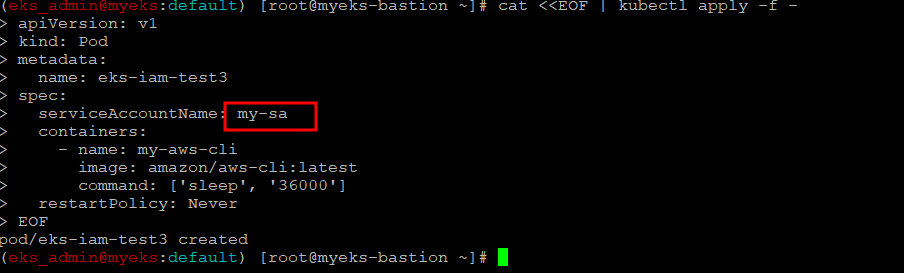
EKS Admisson Controler가 행하는 결과로 Pod 생성에 명시 하지 않았던 내용이 추가
$> kubectl get pod eks-iam-test3
$> kubectl describe pod eks-iam-test3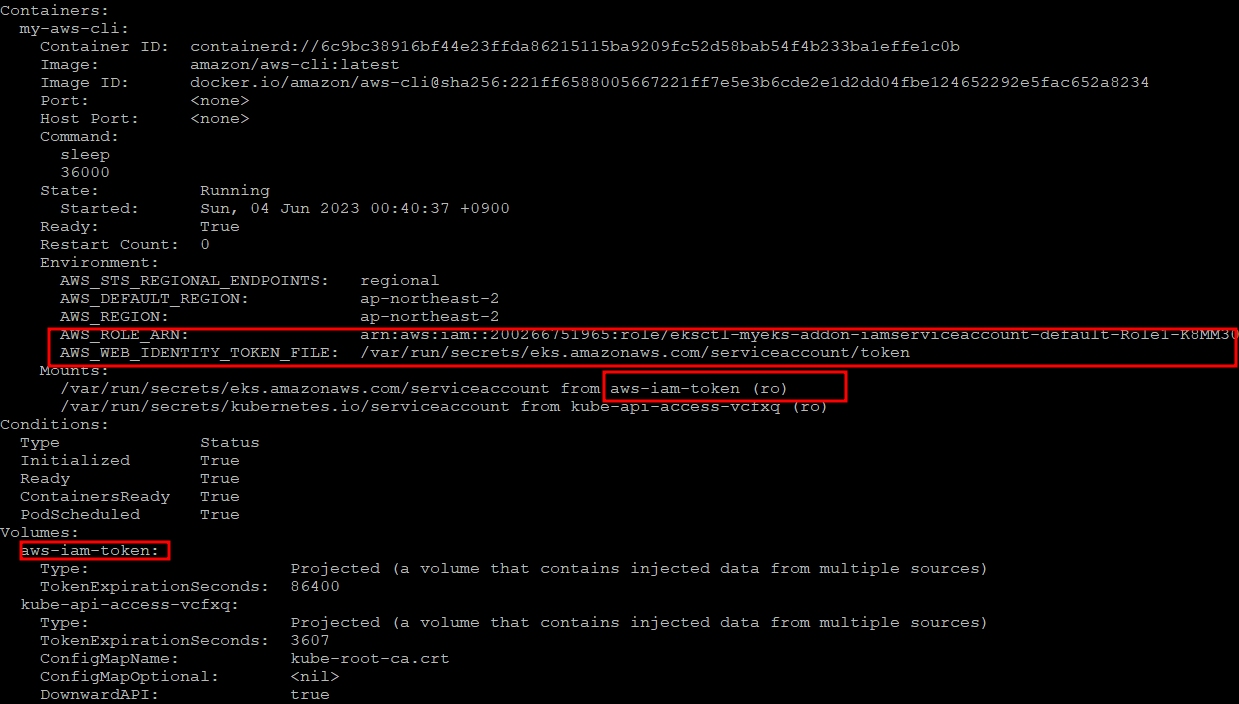
Pod에서 aws cli 사용 확인
$> eksctl get iamserviceaccount --cluster $CLUSTER_NAME
$> kubectl exec -it eks-iam-test3 -- aws sts get-caller-identity --query Arn
현재 Pod 내에서 실행 여부 명령어 확인
s3에 read 권한만 있어 S3 ls 명령어만 성공적으로 실행
$> kubectl exec -it eks-iam-test3 -- aws s3 ls

$> kubectl exec -it eks-iam-test3 -- aws ec2 describe-instances --region ap-northeast-2

$> kubectl exec -it eks-iam-test3 -- aws ec2 describe-vpcs --region ap-northeast-2
mutating Webhook
Kubenetes 의 접근 제어는 총 3단계로 수행이 되며, 지금까지 인증, 권한 허가 외에 Admission Control도 있다
Admission Control은 인증/권한 확인 후에 요청 내용에 대해서 변경(Mutate)하거나 검증을 하는 역할을 한다.
Mutate도 Web hook을 통해서 다양한 변경이 가능하도록 지원을 한다.
hook resource 자원 확인
$> kubectl api-resources |grep hook
$>kubectl explain mutatingwebhookconfigurations
$> kubectl get MutatingWebhookConfiguration
pod-identity-webhook 확인
$> kubectl describe MutatingWebhookConfiguration pod-identity-webhook
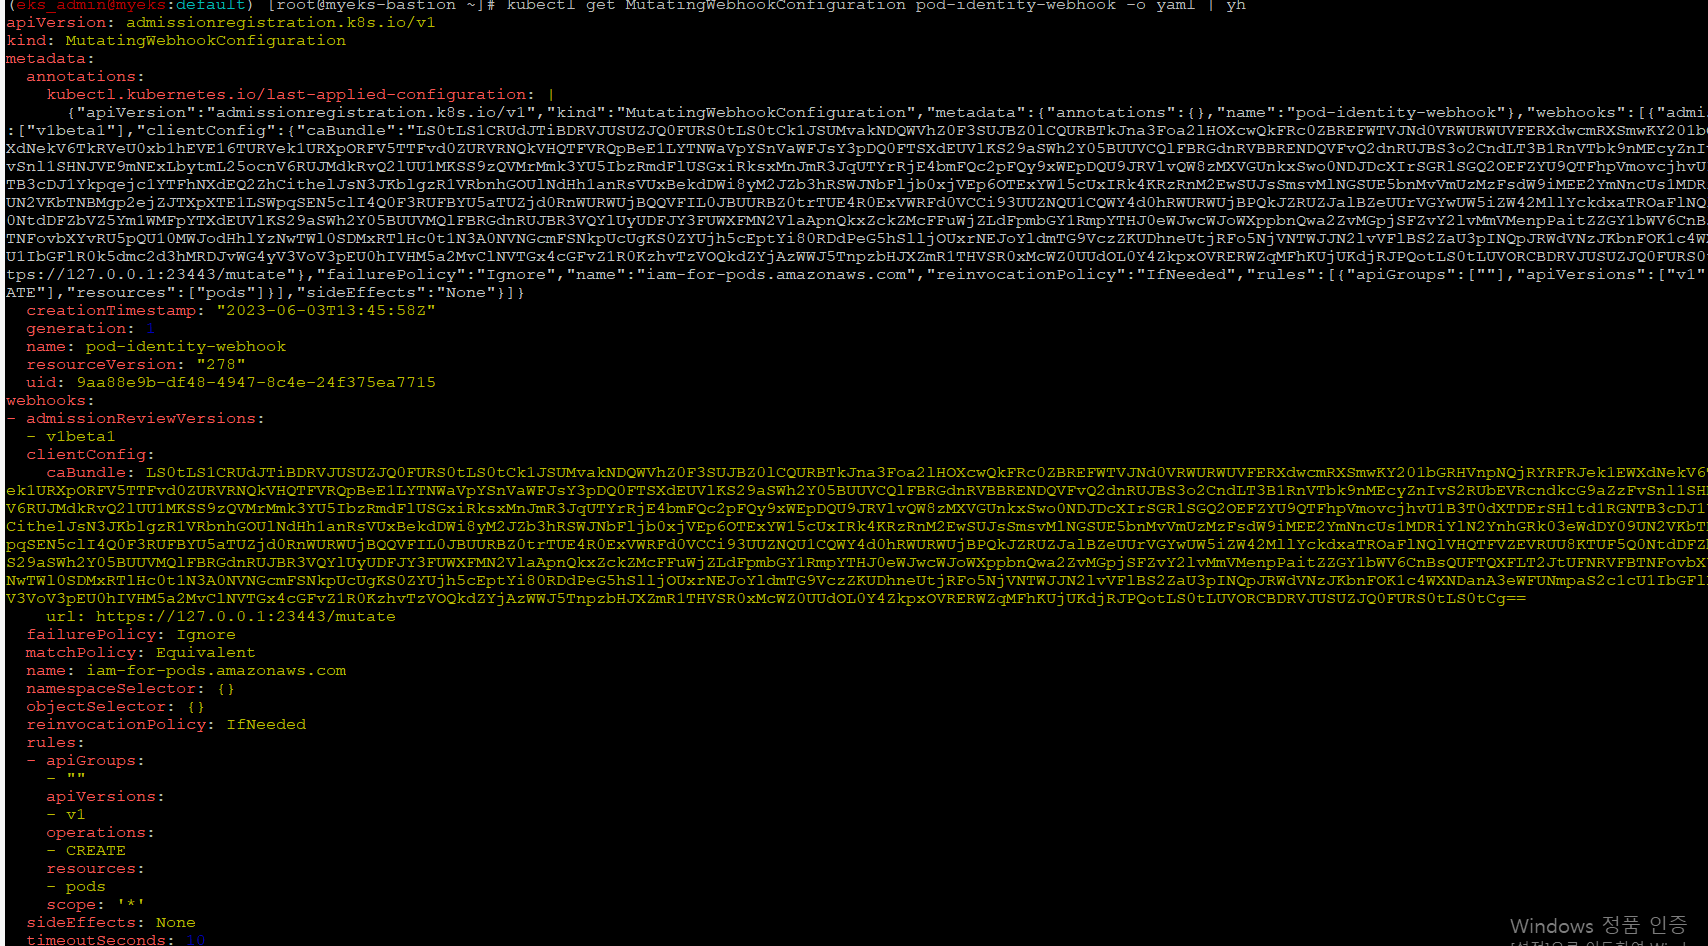
$> kubectl get MutatingWebhookConfiguration pod-identity-webhook -o yaml | yh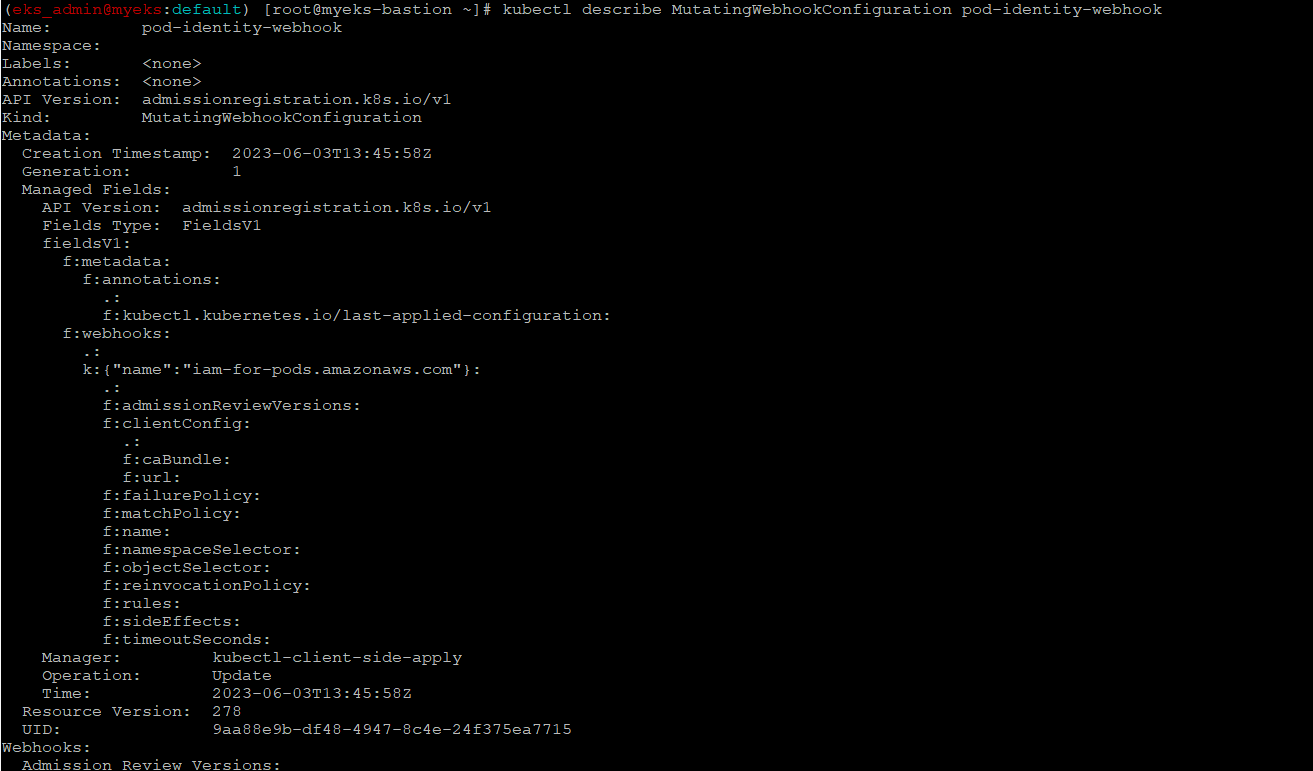
Pod 삭제
$> kubectl delete pod eks-iam-test3