1 HPA(Horizontal Pod AutoScaler)
1.1 소개
Pod를 자원 관리 정책에 따라 Scale In/Out을 한다.
즉 Application 요청을 순조롭게 처리를 하기 위해 Pod 내의 자원(Cpu, memory) 상태를 감시하면서 추가적인 자원이 필요할 경우 Pod를 Scale Out을 한다.
Pod의 자원 상태를 감시 하기 위해 cAdvisor가 생성한 자원 상태 정보를 kubelet을 통해서 Metric Server가 수집하며, 이 정보를 바탕으로 HPA가 최종적으로 정책에 따라 Scale In/Out을 한다.
1.2 실습을 위한 apache server 배포
1.2.1 apache server 배포
apache server 서비스와 배포를 정의를 한 yaml file Download
$> curl -s -O https://raw.githubusercontent.com/kubernetes/website/main/content/en/examples/application/php-apache.yaml
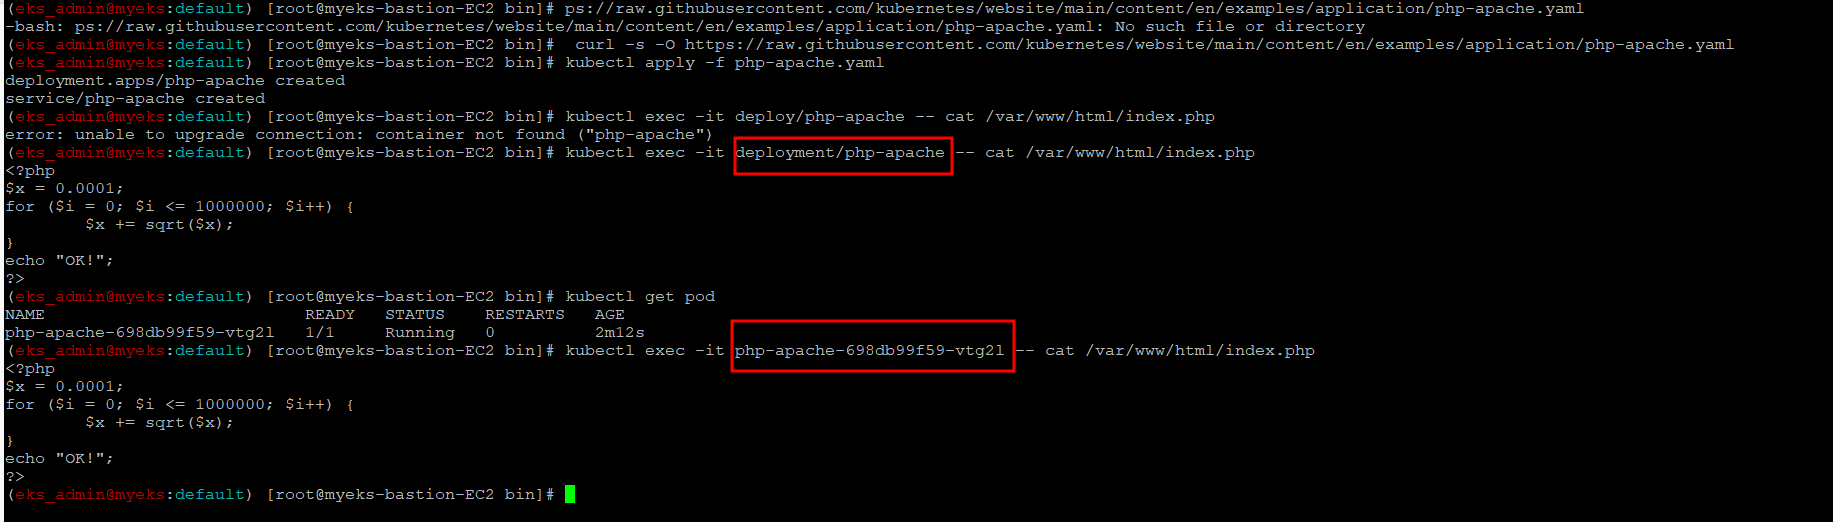
$> kubectl apply -f php-apache.yaml1.2.2 배포 확인
$> kubectl exec -it deployment/php-apache -- cat /var/www/html/index.php? > kubectl exec -it 명령어는 pod에 대해서 실행하는 명령어인데 deployment/php-apache pod가 있다는 말인가? 실습시 확인 필요
=> Pod Name으로 명시한 결과와 동일한 것으로 보아 deployment 형태로 지정을 해도 가능은 한듯 정확한 근거(?)가 필요
1.2.3 Pod 자원 상태 확인
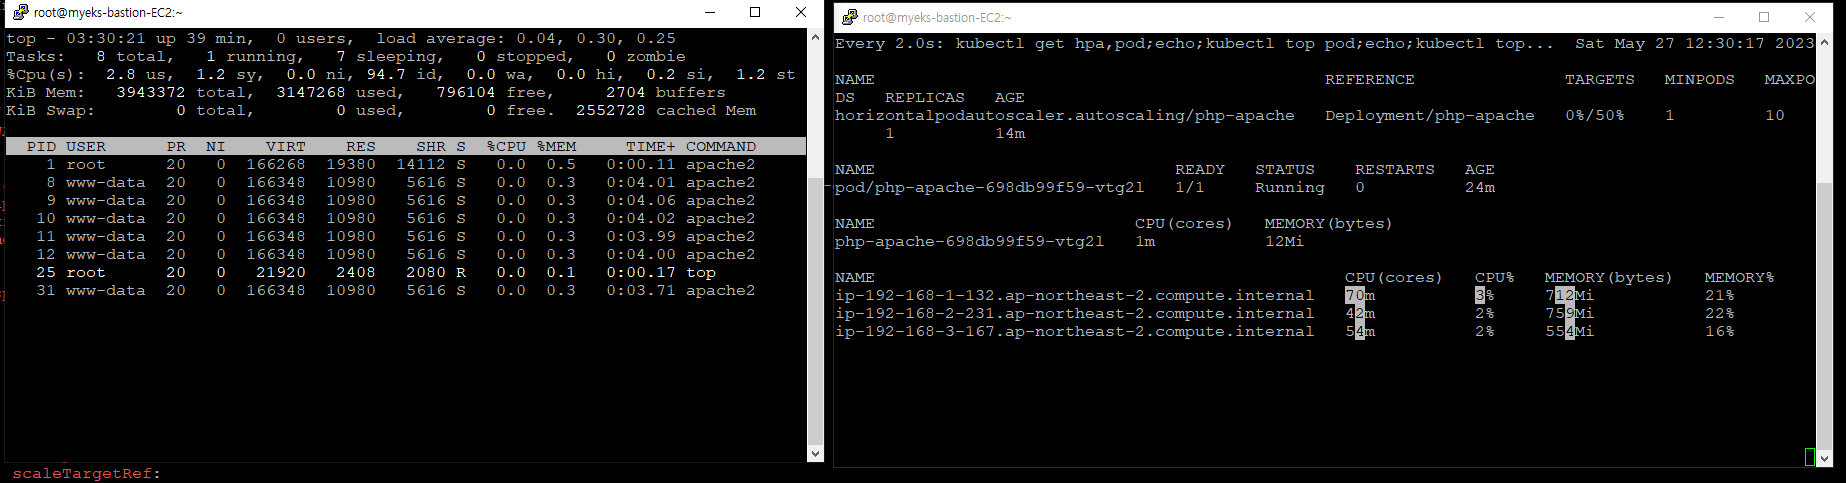
$> watch -d 'kubectl get hpa,pod;echo;kubectl top pod;echo;kubectl top node'

$> kubectl exec -it deployment/php-apache -- top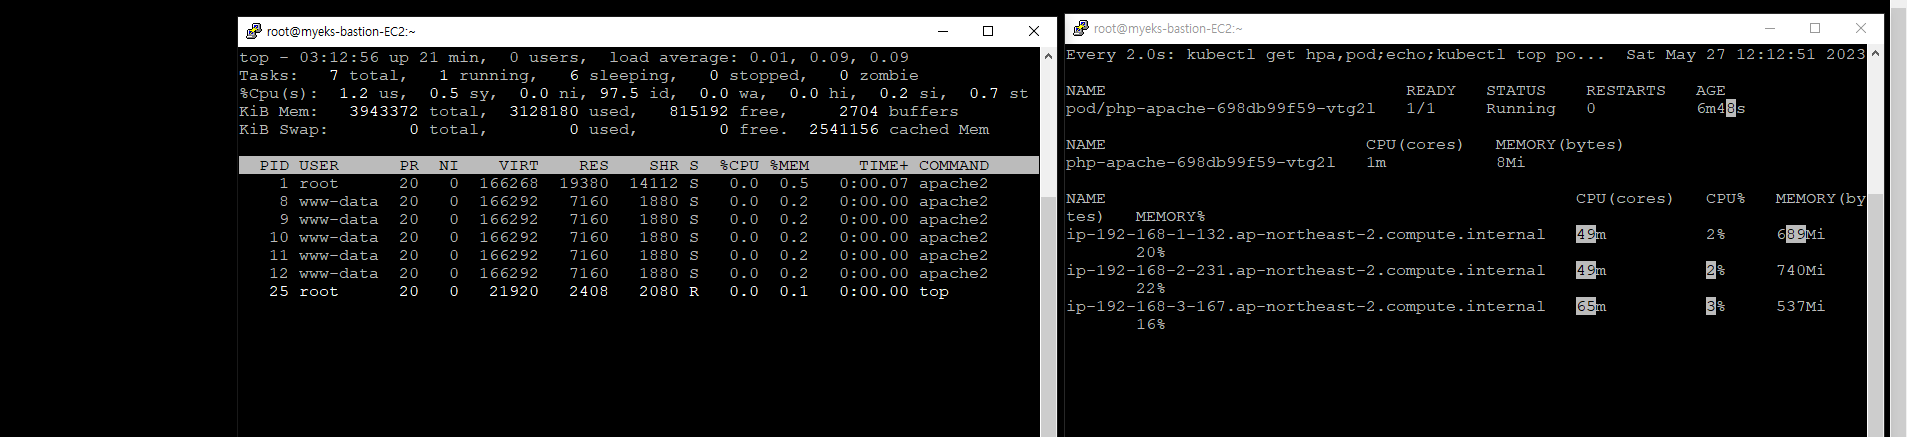
1.2.4 Pod 접속
$> PODIP=$(kubectl get pod -l run=php-apache -o jsonpath={.items[0].status.podIP})

$> curl -s $PODIP; echo
1.2.5 HPA 생성
yaml 파일로도 HPA 생성이 가능하나 아래 예시는 kubectl 명령어를 통해서 HPA를 생성
$> kubectl autoscale deployment php-apache --cpu-percent=50 --min=1 --max=10

$> kubectl describe hpa
1.2.6 HPA 설정 확인
$> kubectl krew install neat

$> kubectl get hpa php-apache -o yaml | kubectl neat | yh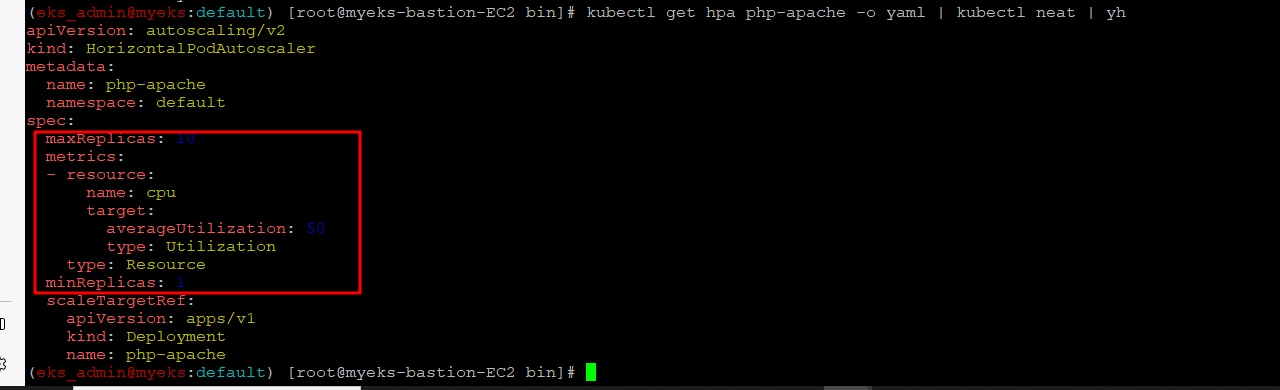
1.2.7 apache server의 부하 발생 방안 1
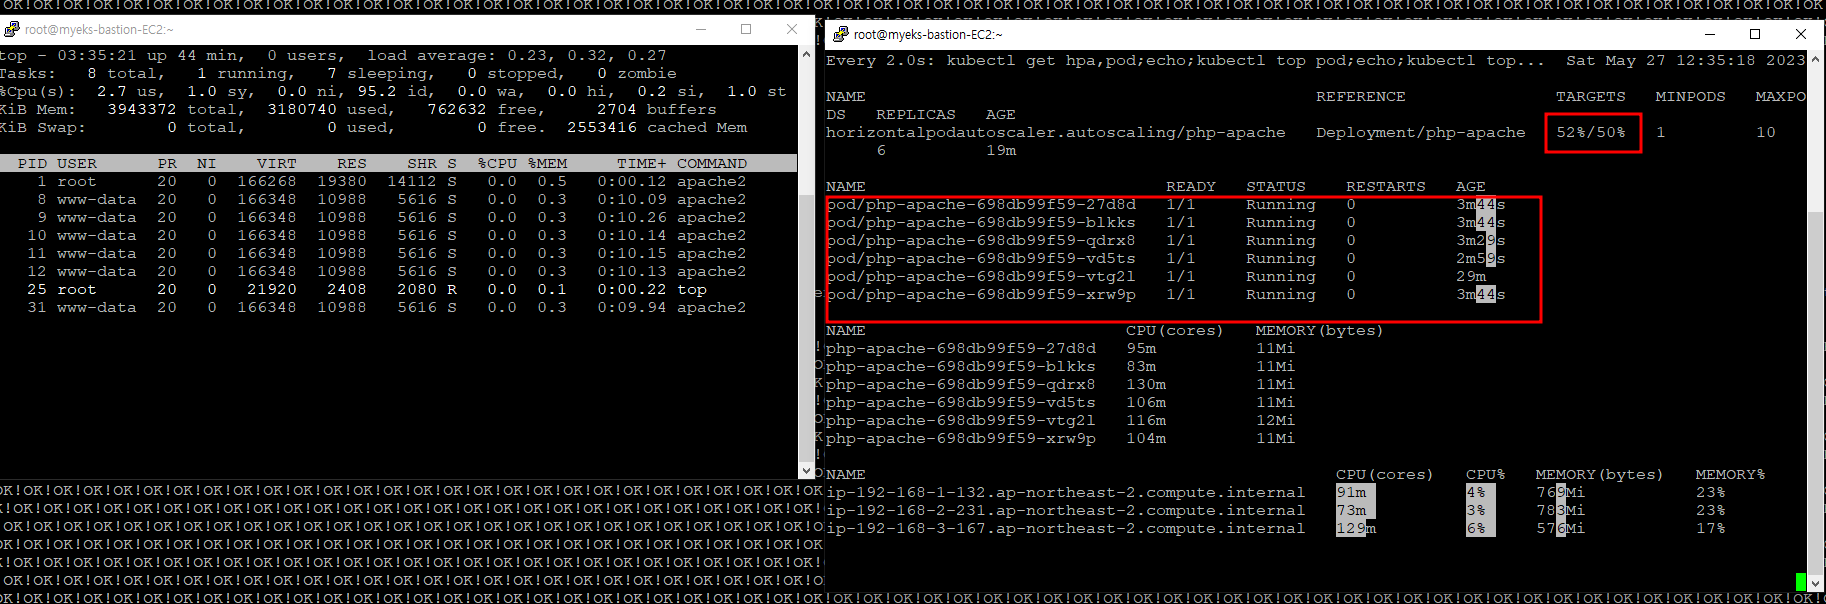
$> while true;do curl -s $PODIP; sleep 0.5; doneNginx Pod가 1개에서 2개로 증가
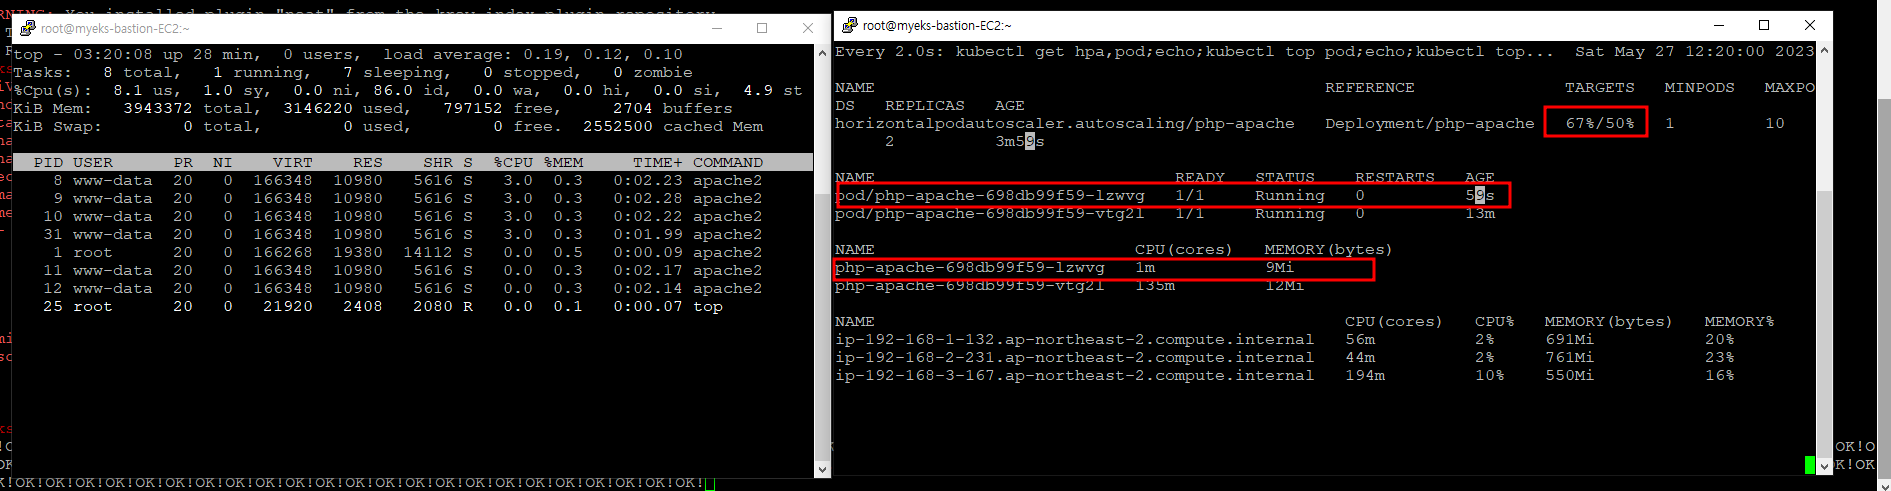
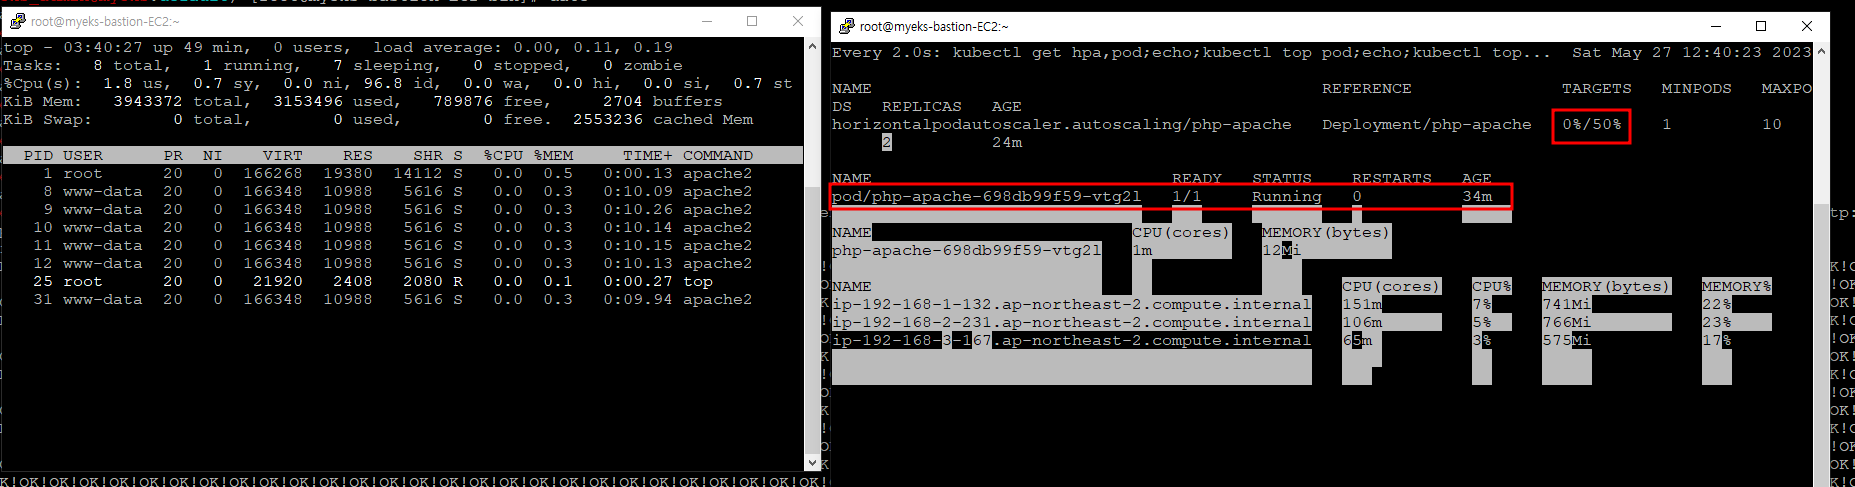
5분후에 아래와 같이 상태 변경
Pod 수가 2개에서 1개로 변경
1.2.8 apache server의 부하 발생 방안 2
앞서 생성한 서비스명 도메인으로 접속
load-generator name으로 새로운 Pod를 생성하여 부하 발생 방안 1과 동일하게 무한 loop로 서비스명 php-apache에 접속 시도
$> kubectl run -i --tty load-generator --rm --image=busybox:1.28 --restart=Never -- /bin/sh -c "while sleep 0.01; do wget -q -O- http://php-apache; done"? > Pod가 증가하는 것을 확인, 이 때 Node도 함께 증가하는지 확인 필요
=> Node 수에는 변화가 없음, Pod만 1개에서 6개로 증가
?> 최대 10개까지 가능은 한데 6개까지 Pod가 증가, Node의 최대 가능 자원 때문인지?
5분후 Pod 갯수는 1개로 감소
1.2.9 Object 삭제
$> kubectl delete deploy,svc,hpa,pod --all2 KEDA_Kubernetes based Event Driven Autoscaler
2.1 소개
HPA는 자원 기반 스케일 여부를 결정을 하는 반면에 KEDA는 특정 이벤트를 기반으로 스케일 여부를 결정한다.
이벤트의 종류는 다양하여, 각 Event 마다 Scaler가 존재하여 자세한 Scaler는 KEDA online Document를 참고 : https://keda.sh/docs/2.10/scalers/
2.2 Helm으로 KEDA 설치
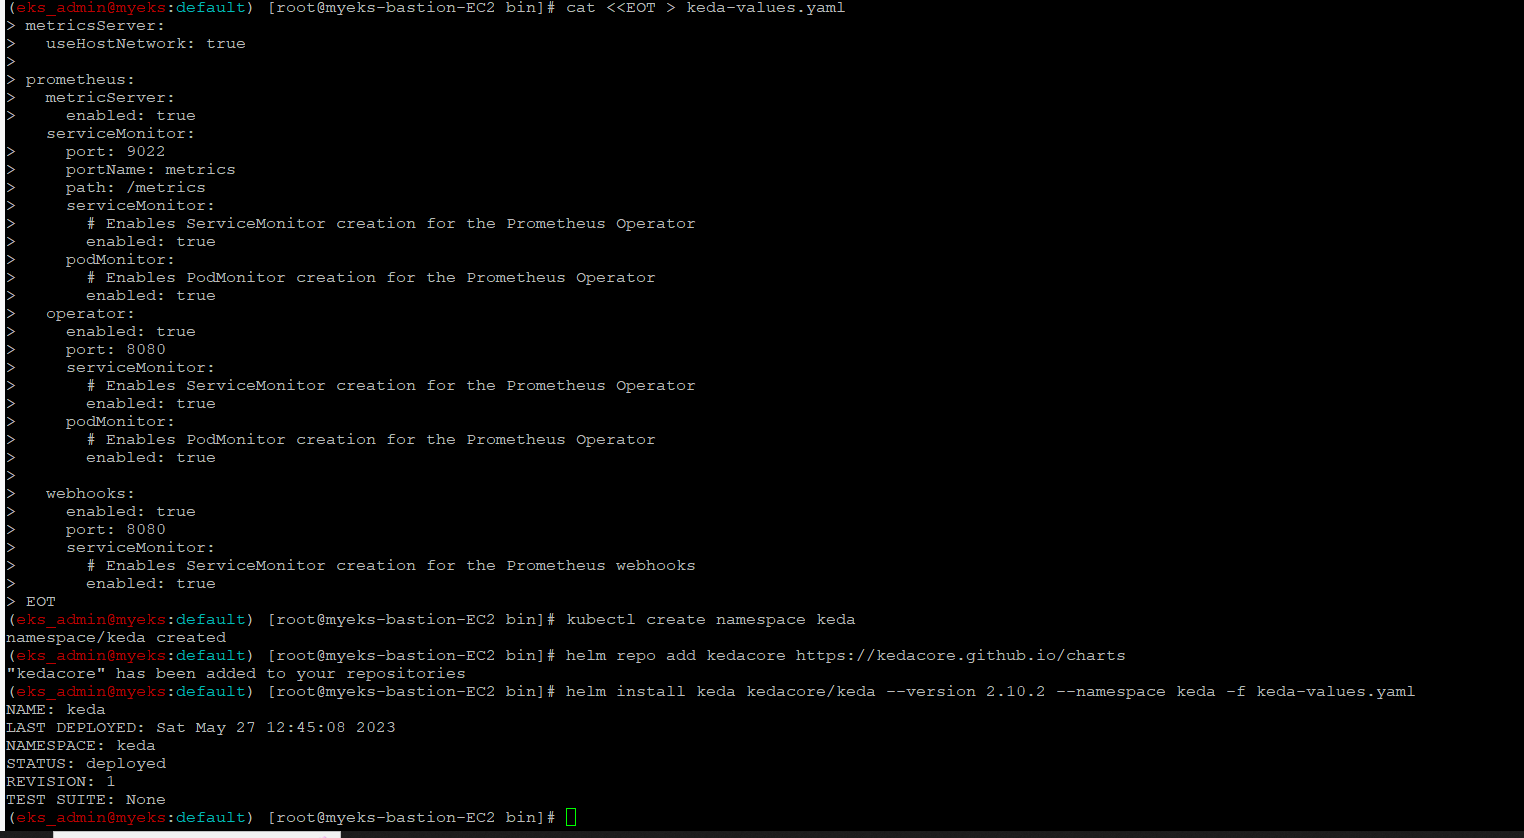
$> cat <<EOT > keda-values.yaml
metricsServer:
  useHostNetwork: true

prometheus:
  metricServer:
    enabled: true
    port: 9022
    portName: metrics
    path: /metrics
    serviceMonitor:
      # Enables ServiceMonitor creation for the Prometheus Operator
      enabled: true
    podMonitor:
      # Enables PodMonitor creation for the Prometheus Operator
      enabled: true
  operator:
    enabled: true
    port: 8080
    serviceMonitor:
      # Enables ServiceMonitor creation for the Prometheus Operator
      enabled: true
    podMonitor:
      # Enables PodMonitor creation for the Prometheus Operator
      enabled: true

  webhooks:
    enabled: true
    port: 8080
    serviceMonitor:
      # Enables ServiceMonitor creation for the Prometheus webhooks
      enabled: true
EOT

$> kubectl create namespace keda

$> helm repo add kedacore https://kedacore.github.io/charts

$> helm install keda kedacore/keda --version 2.10.2 --namespace keda -f keda-values.yaml
2.3 설치 확인
$> kubectl get-all -n keda

$> kubectl get all -n keda

$> kubectl get crd | grep keda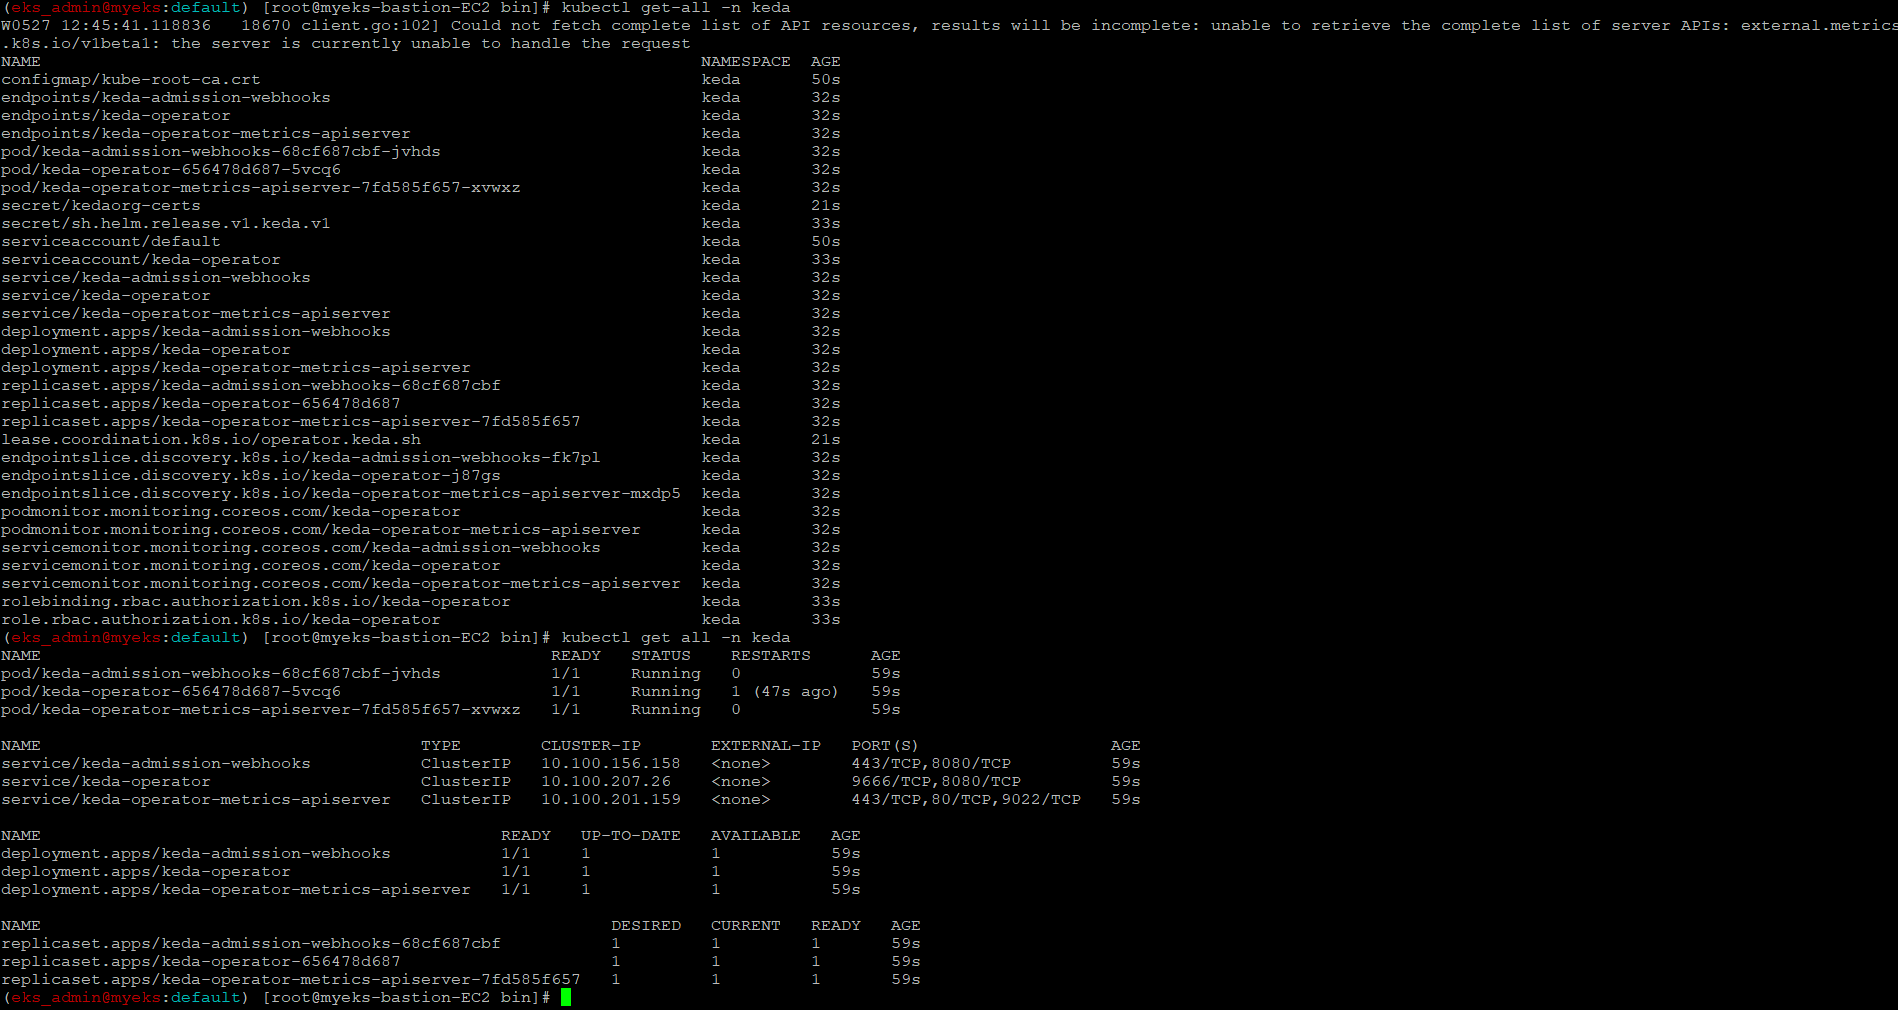

2.4 Keda Namespace에 php-apache Deployment
$> kubectl apply -f php-apache.yaml -n keda

$> kubectl get pod -n keda
2.5 Cron Type의 ScaledObject 정책 생성
apache server를 15분마다 5분 동안 실행한 후 종료하는 상황을 관찰
$> cat <<EOT > keda-cron.yaml
apiVersion: keda.sh/v1alpha1
kind: ScaledObject
metadata:
  name: php-apache-cron-scaled
spec:
  minReplicaCount: 0
  maxReplicaCount: 2
  pollingInterval: 30
  cooldownPeriod: 300
  scaleTargetRef:
    apiVersion: apps/v1
    kind: Deployment
    name: php-apache
  triggers:
  - type: cron
    metadata:
      timezone: Asia/Seoul
      start: 00,15,30,45 * * * *
      end: 05,20,35,50 * * * *
      desiredReplicas: "1"
EOT

$> kubectl apply -f keda-cron.yaml -n keda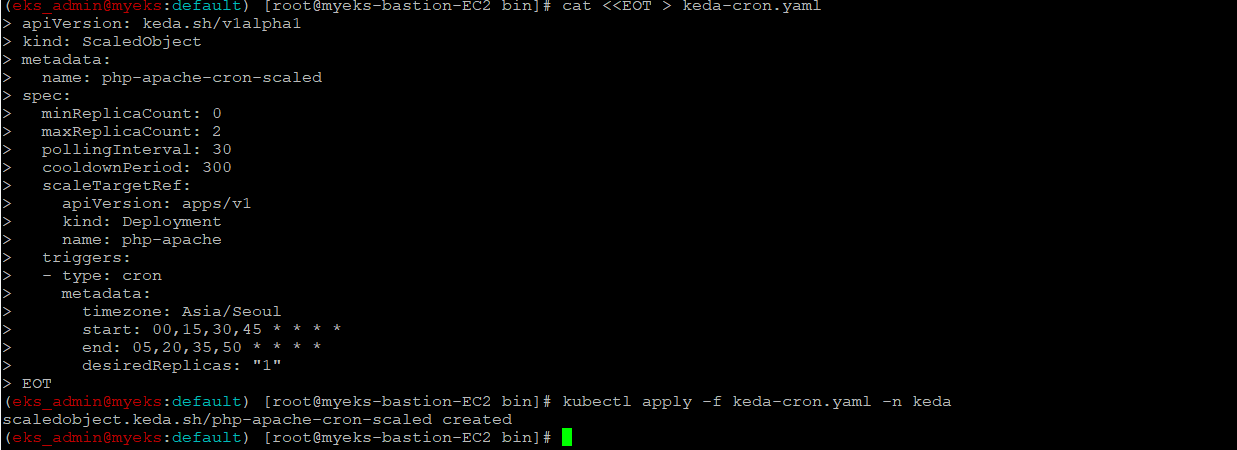
2.6 Cron Event 설정 상태를 확인
$> kubectl get ScaledObject,hpa,pod -n keda
$> kubectl get hpa -o jsonpath={.items[0].spec} -n keda | jq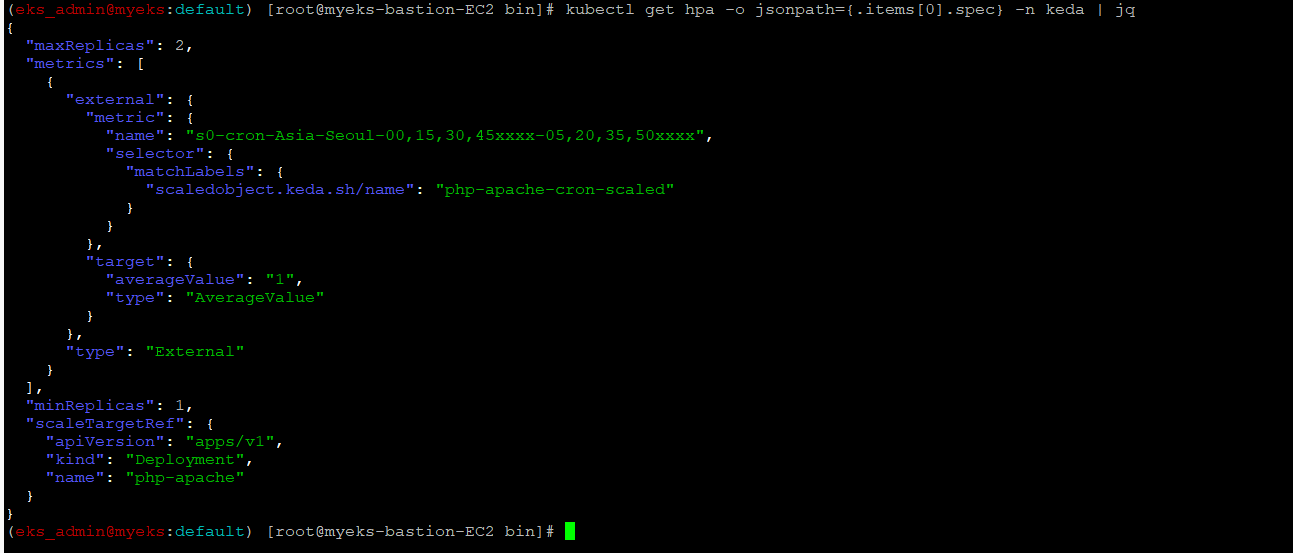
2.7 cron event를 확인
?> AWS Console의 EKS에서 Pod의 갯수 변화를 확인 할 수 있지 않을까?

55분에 Cron Pod이 종료, 근데 50분에 종료해야 하지 않나?
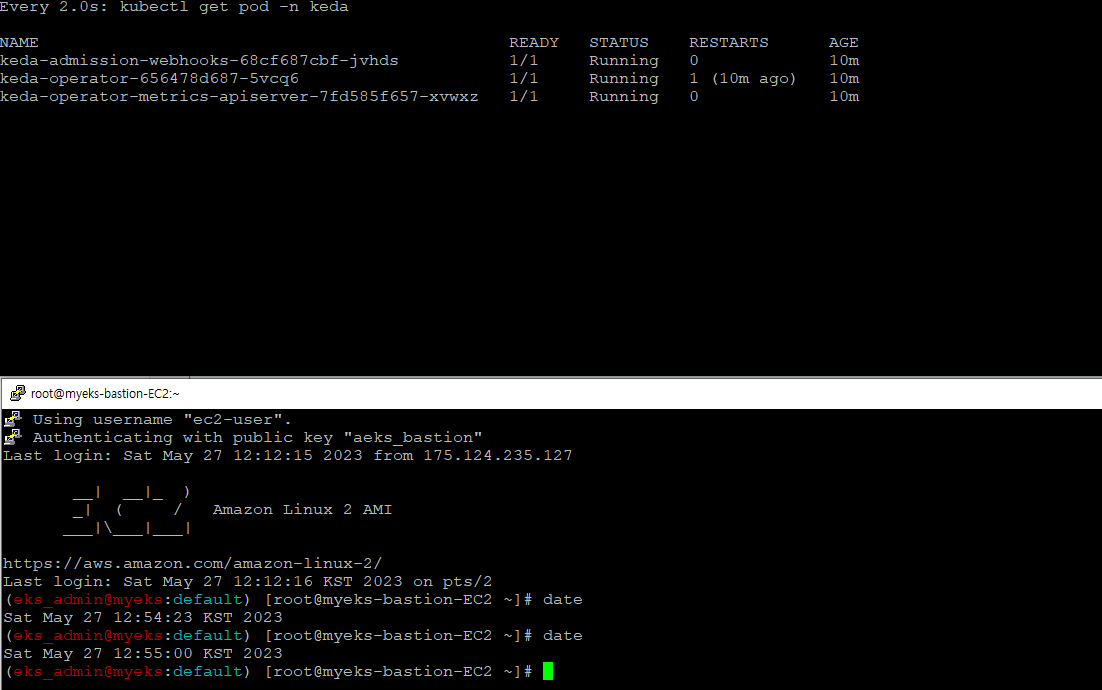
00분 실행은 비교적 유사한 시간에 기동

2.8 그라파나 Dashboard에 모니터링 추가
$> watch -d 'kubectl get ScaledObject,hpa,pod -n keda'5분이 지나도 그대로 실행 중

?> 8분을 초과하고 9분 20분쯤에 종료, 지연이 발생을 하는 이유가 무엇일까?

$> kubectl get ScaledObject -w?> 명령어 실행에 대한 반응이 없음, 별도 확인이 필요

2.9 KEDA 및 deployment 삭제
$> kubectl delete -f keda-cron.yaml -n keda && kubectl delete deploy php-apache -n keda && helm uninstall keda -n keda

$> kubectl delete namespace keda
3 VPA(Vertical Pod AutoScaler)
3.1 소개
HPA는 Pod수를 늘려 Application의 처리 요구량을 지원을 하는 반면, VPA는 Pod의 가용 자원 사용량을 늘리는 방식으로 지원, 즉 Pod의 Resource request를 상향 조정
VPA 역시 HPA와 동일하게 Pod의 CPU, Memory 사용량을 Metric Server를 통해서 확인
3.2 VPA Code Download from GitHub
$> git clone https://github.com/kubernetes/autoscaler.git

$> cd ~/autoscaler/vertical-pod-autoscaler/

$> tree hack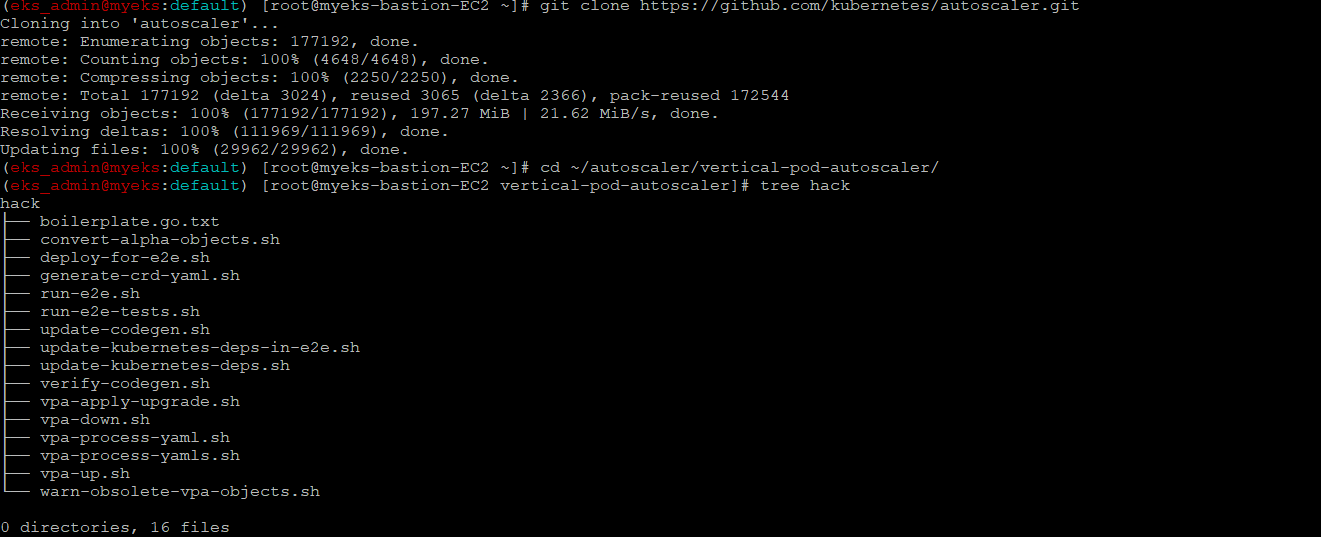
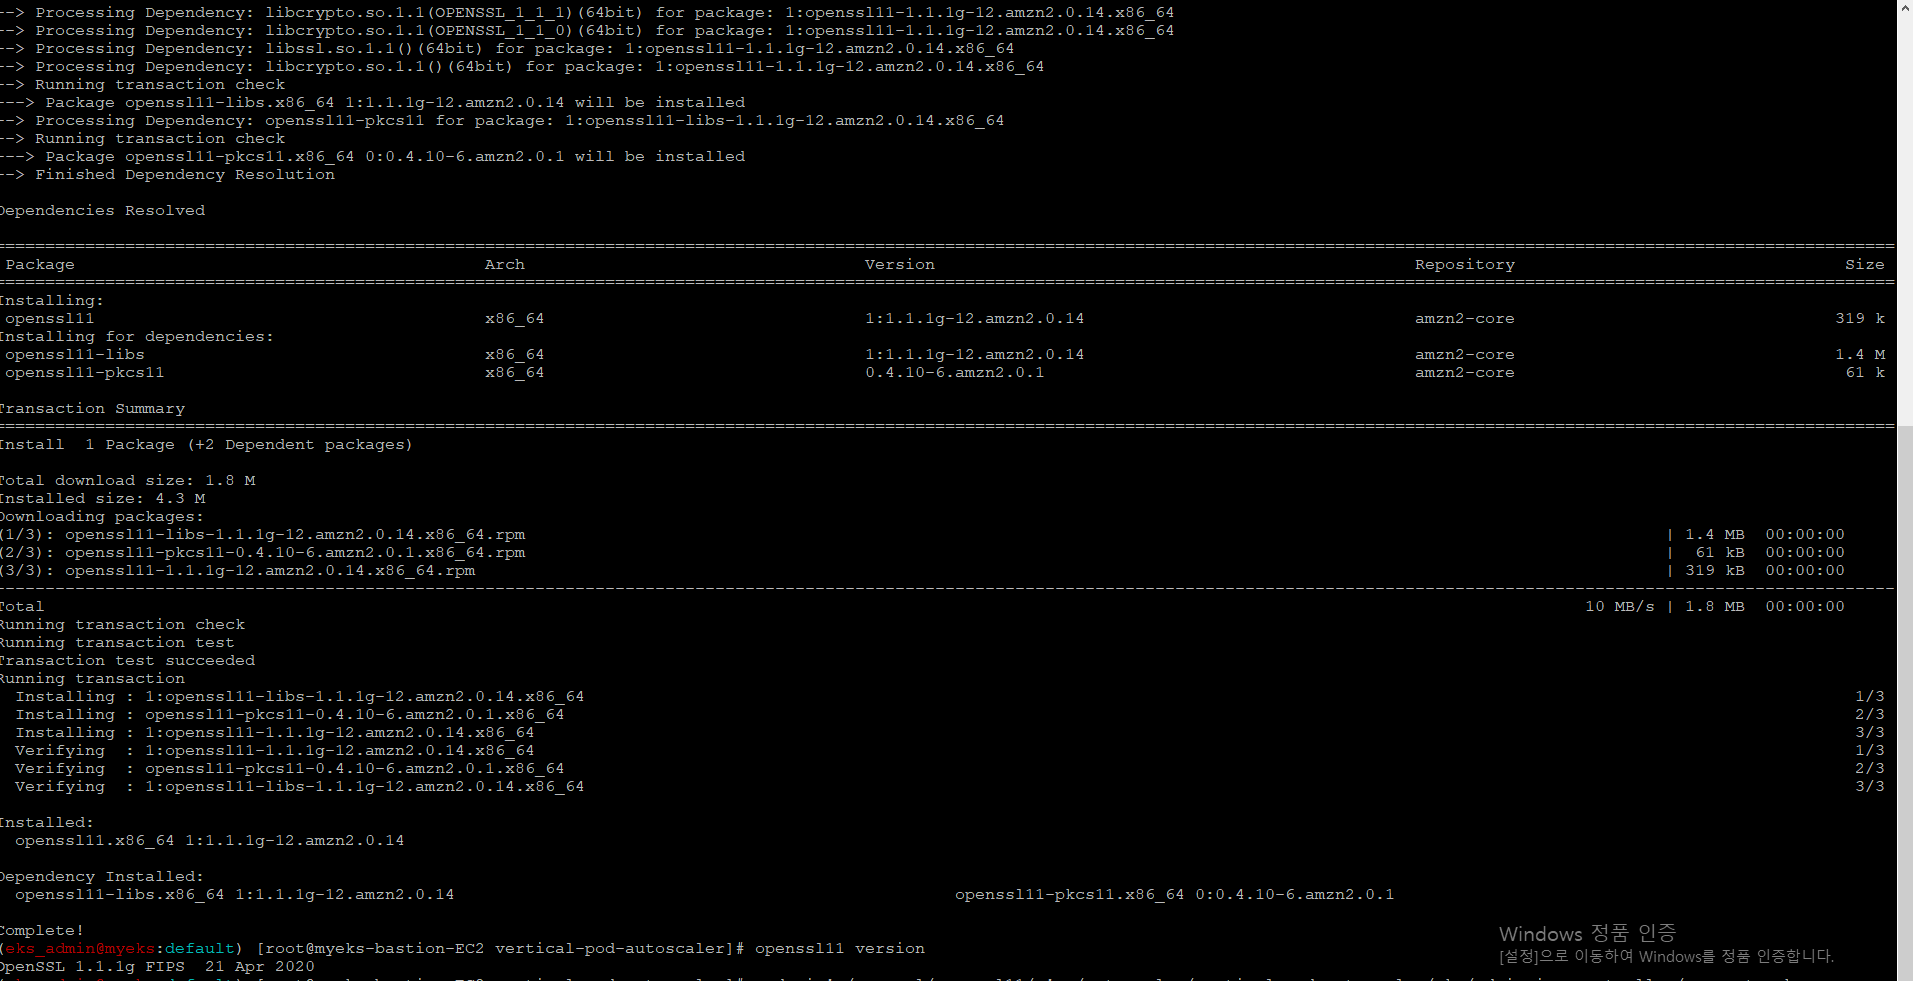
3.3 openssl version install & Update
admission Webhook http 통신을 https 통신으로 변경하기 위해 SSL를 설치를 하는 것인가?
admission 관련 부분은 아래 URL 2개를 참조
VPA : https://haereeroo.tistory.com/25
쿠버네티스 Admission Control : https://coffeewhale.com/kubernetes/admission-control/2021/04/28/opa1/
$> yum install openssl11 -y

$> openssl11 version

$> sed -i 's/openssl/openssl11/g' ~/autoscaler/vertical-pod-autoscaler/pkg/admission-controller/gencerts.sh
3.4 VPA 배포
$> watch -d kubectl get pod -n kube-system

$> ./hack/vpa-up.sh
$> kubectl get crd | grep autoscaling
3.5 Pod Monitoring_다른 Terminal에서 실행
$> watch -d kubectl top pod -kube-system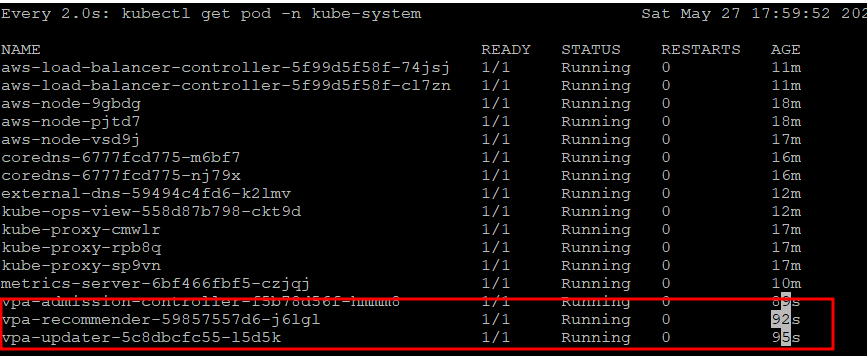
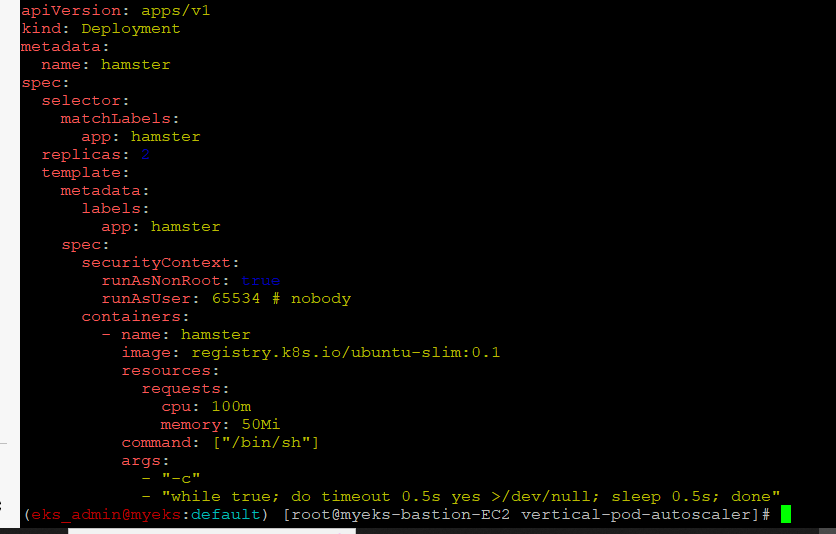
3.6 부하 발생용 예재 배포
$> cd ~/autoscaler/vertical-pod-autoscaler/

$> kubectl apply -f examples/hamster.yaml && kubectl get vpa -w
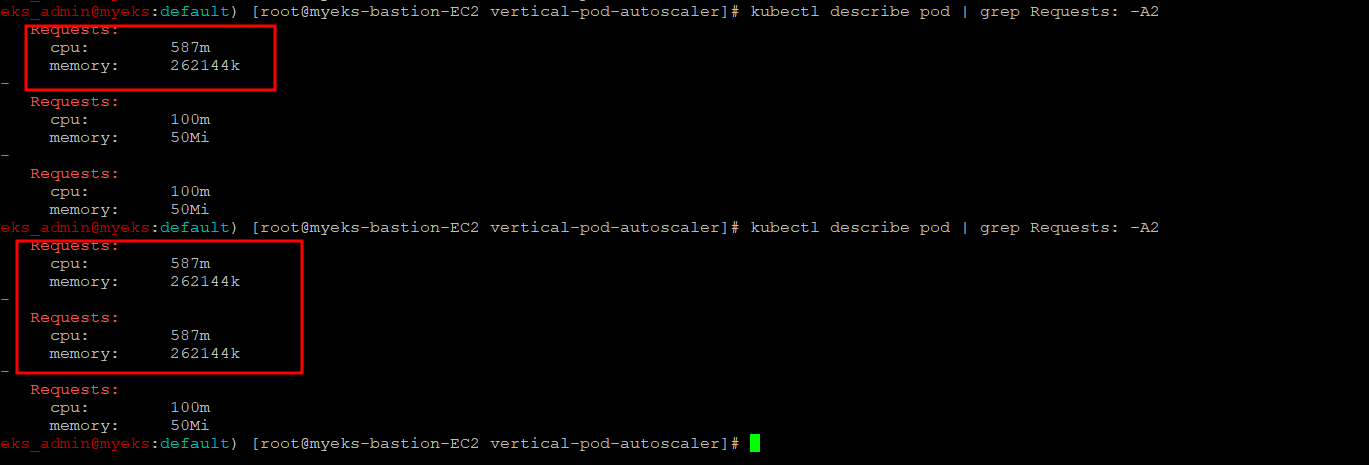
3.7 Pod Resource 설정 확인_2~3분후에 Pod Request 값이 변경
$> kubectl describe pod | grep Requests: -A2배포시 CPU, Memory request는 CPU 100m, Memory 50mi
Pod의 request 값이 상향
3.8 Pod 의 상태 변경 확인
$> kubectl get events --sort-by=".metadata.creationTimestamp" | grep VPA
3.9 부하 발생용 공식 예제 및 VPA 삭제
$> kubectl delete -f examples/hamster.yaml && cd ~/autoscaler/vertical-pod-autoscaler/ && ./hack/vpa-down.sh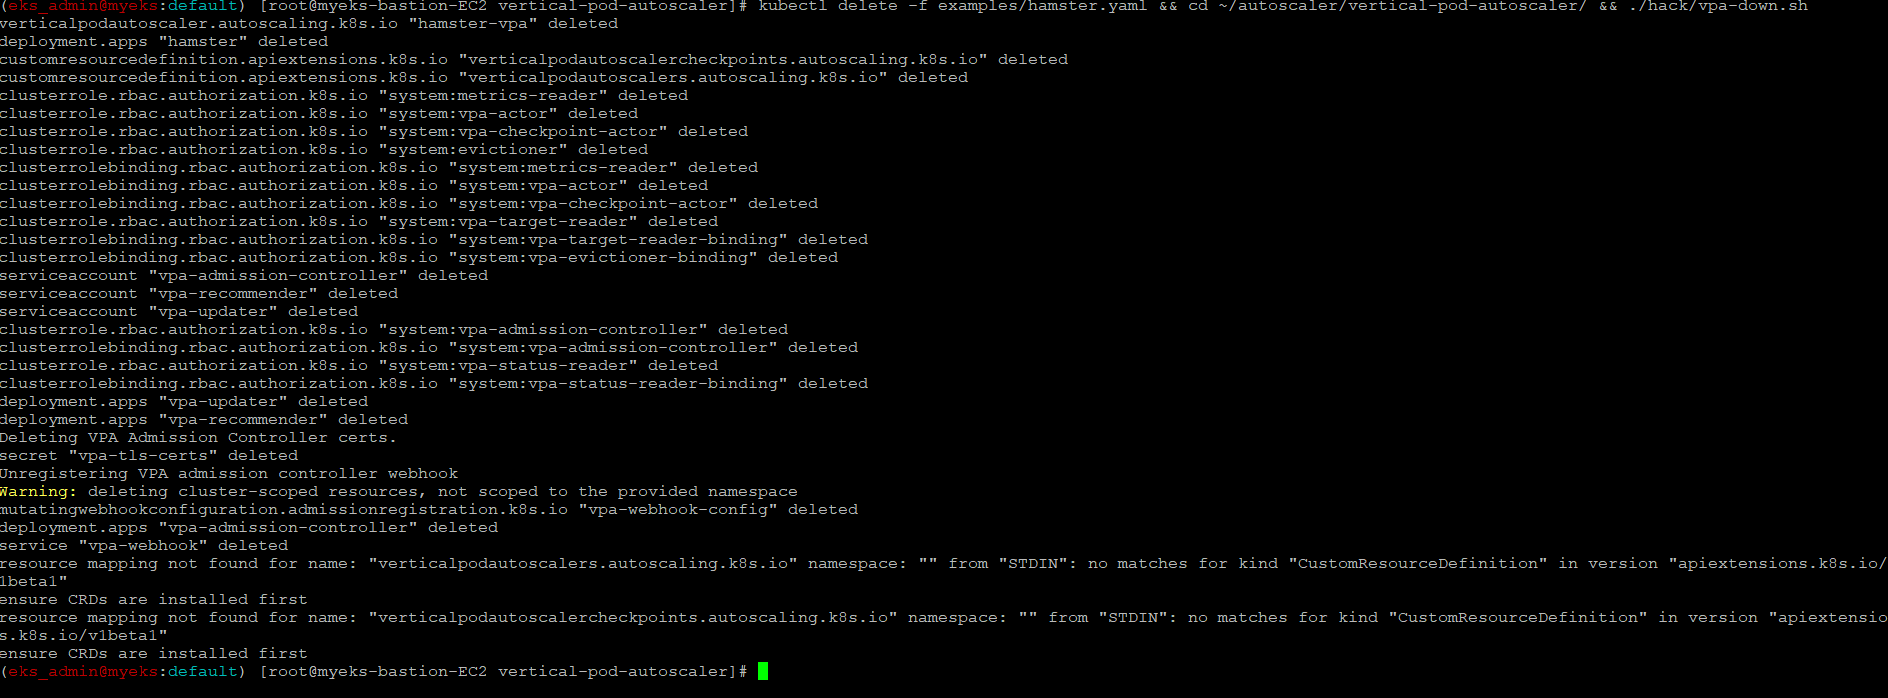
4 CA_cluster AutoScaler
4.1 소개
앞의 Sacler는 Pod 단위의 Scale In/Out이며, CA는 Node 단위의 Scale In/Out 기능이다.
CA는 Pending 상태의 Pod가 발생하면 , Work Node를 Scale Out을 하며, 이 때의 Work node는 AWS의 ASG를 사용한다.
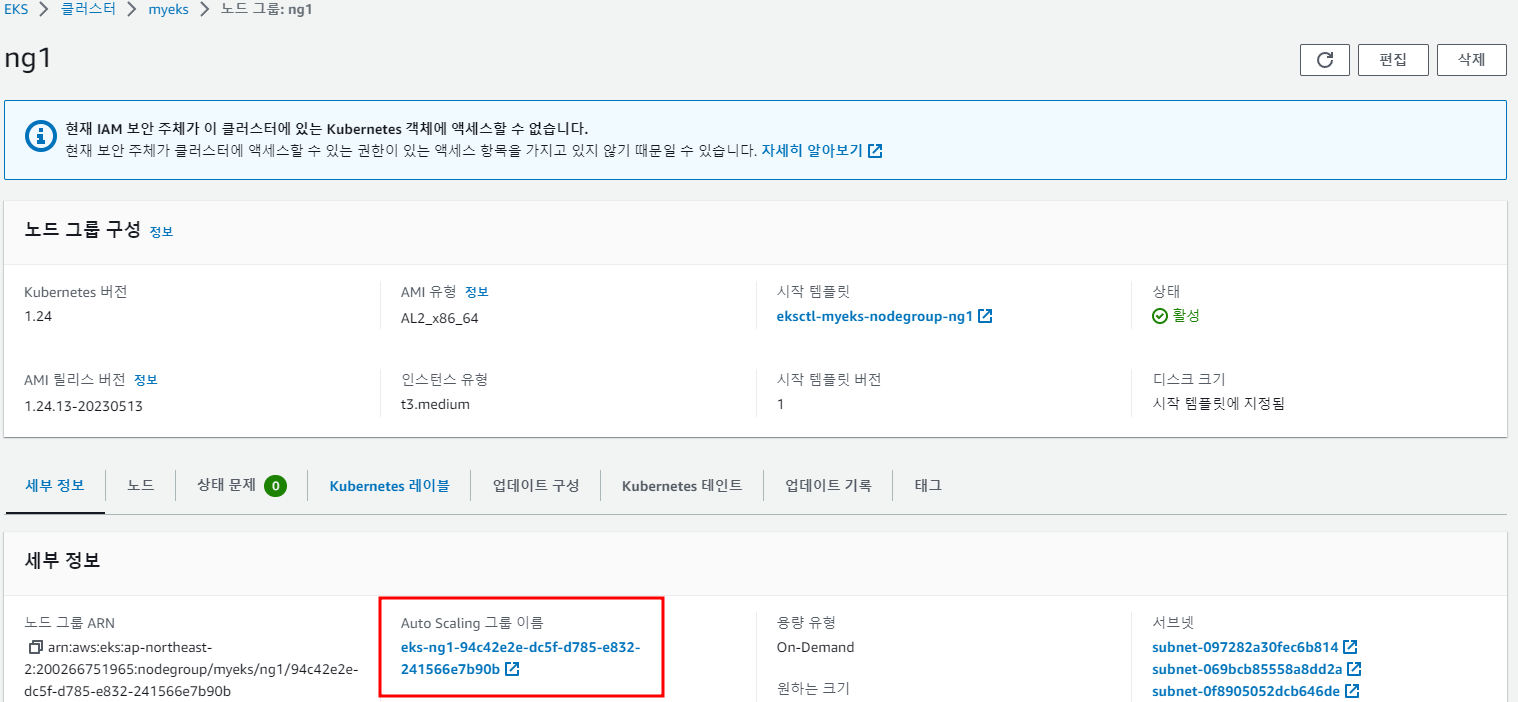
4.2 설정 전 확인_AutoScaling Tag
Auto Scaling 그룹 태그가 있는 노드 그룹 Cluster Autoscaler에서는 Auto Scaling 그룹에 다음과 같은 태그가 있어야 자동 검색

$> aws ec2 describe-instances --filters Name=tag:Name,Values=$CLUSTER_NAME-ng1-Node --query "Reservations[*].Instances[*].Tags[*]" --output yaml | yh
4.3 Cluster와 연동하는 ASG(Auto Scaling Group) 확인
$> aws autoscaling describe-auto-scaling-groups \
    --query "AutoScalingGroups[? Tags[? (Key=='eks:cluster-name') && Value=='myeks']].[AutoScalingGroupName, MinSize, MaxSize,DesiredCapacity]" \
    --output table
AWS Console의 EKS 서비스에서도 확인이 가능
4.4 Node 수를 3 -> 6개로 변경
$> export ASG_NAME=$(aws autoscaling describe-auto-scaling-groups --query "AutoScalingGroups[? Tags[? (Key=='eks:cluster-name') && Value=='myeks']].AutoScalingGroupName" --output text)

$> aws autoscaling update-auto-scaling-group --auto-scaling-group-name ${ASG_NAME} --min-size 3 --desired-capacity 3 --max-size 6
4.5 Node 수 변경 확인
$> aws autoscaling describe-auto-scaling-groups --query "AutoScalingGroups[? Tags[? (Key=='eks:cluster-name') && Value=='myeks']].[AutoScalingGroupName, MinSize, MaxSize,DesiredCapacity]" --output table
AWS Console의 EC2 -> AutoScaling Group에서도 확인 가능

4.6 CA 배포
$> curl -s -O https://raw.githubusercontent.com/kubernetes/autoscaler/master/cluster-autoscaler/cloudprovider/aws/examples/cluster-autoscaler-autodiscover.yaml

$> sed -i "s/<YOUR CLUSTER NAME>/$CLUSTER_NAME/g" cluster-autoscaler-autodiscover.yaml

$> kubectl apply -f cluster-autoscaler-autodiscover.yaml
4.7 CA 배포 확인
$> kubectl get pod -n kube-system | grep cluster-autoscaler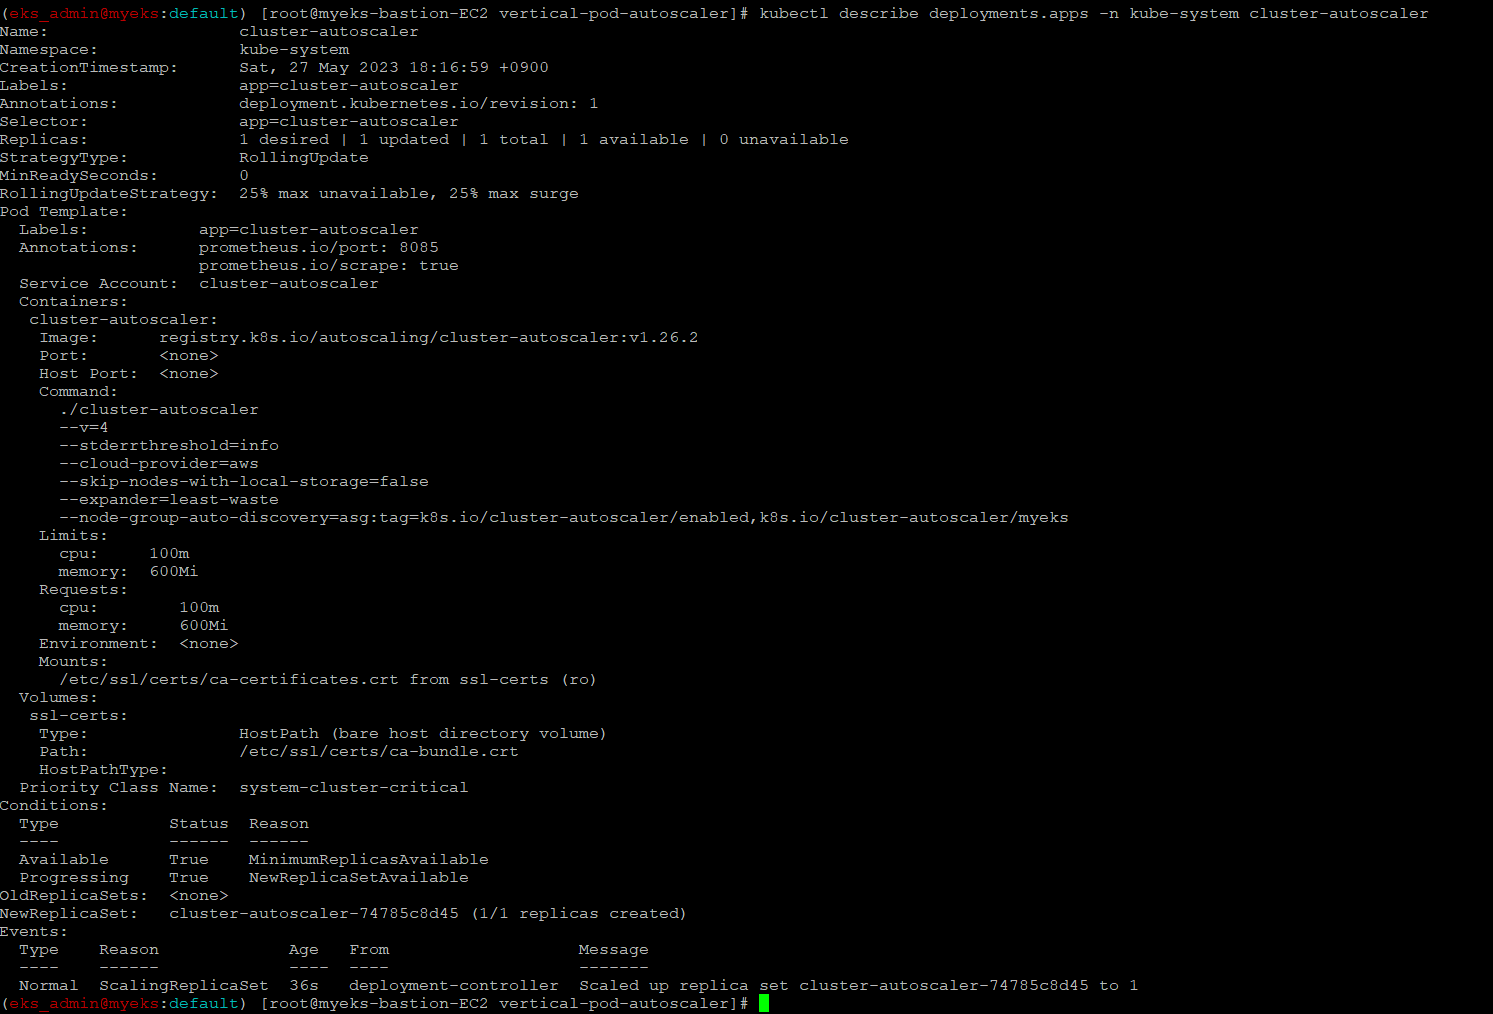
$> kubectl describe deployments.apps -n kube-system cluster-autoscaler
4.8 Scaling with CA
4.8.1 Nodes 모니터링
Node Scaling 전의 Node 상태
$> kubectl get nodes -w
$> while true; do kubectl get node; echo "------------------------------" ; date ; sleep 1; done

$> while true; do aws ec2 describe-instances --query "Reservations[*].Instances[*].{PrivateIPAdd:PrivateIpAddress,InstanceName:Tags[?Key=='Name']|[0].Value,Status:State.Name}" --filters Name=instance-state-name,Values=running --output text ; echo "------------------------------"; date; sleep 1; done
4.8.2 Sample Nginx App 배포
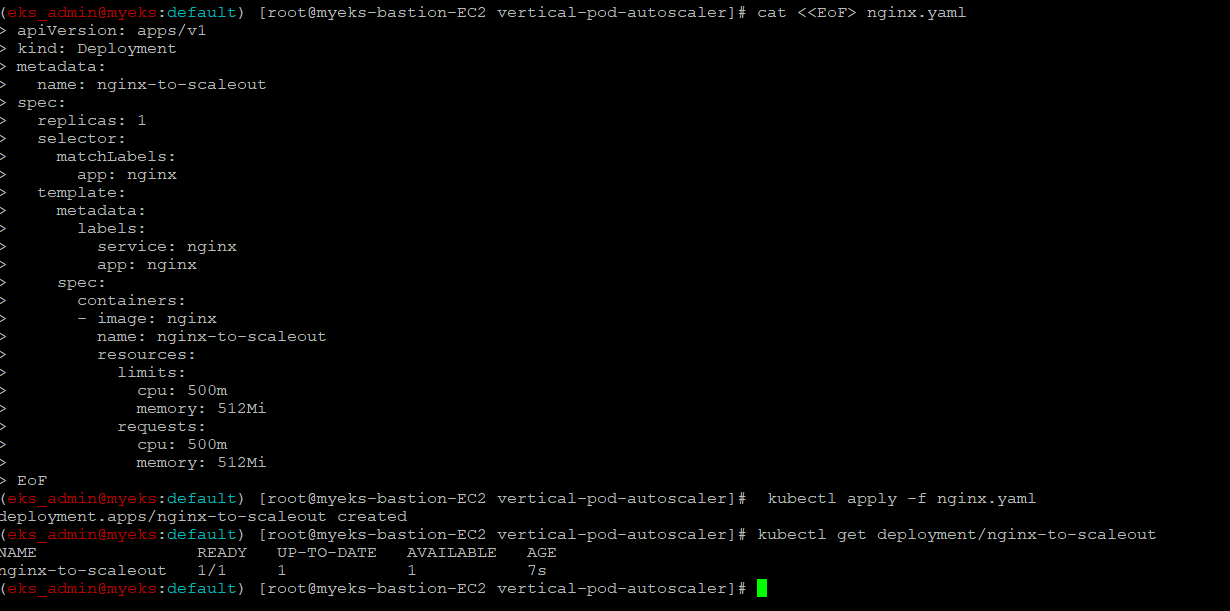
$> cat <<EoF> nginx.yaml
apiVersion: apps/v1
kind: Deployment
metadata:
  name: nginx-to-scaleout
spec:
  replicas: 1
  selector:
    matchLabels:
      app: nginx
  template:
    metadata:
      labels:
        service: nginx
        app: nginx
    spec:
      containers:
      - image: nginx
        name: nginx-to-scaleout
        resources:
          limits:
            cpu: 500m
            memory: 512Mi
          requests:
            cpu: 500m
            memory: 512Mi
EoF

$> kubectl apply -f nginx.yaml

$> kubectl get deployment/nginx-to-scaleout
4.8.3 인위적으로 Nginx Pod 수를 1-> 15개로 변경
$> kubectl scale --replicas=15 deployment/nginx-to-scaleout && date4.8.4 Pod 증가 확인
$> kubectl get pods -l app=nginx -o wide --watchScale out 명령 실행 후 의 결과 화면

최종적으로 모든 Pod가 running 상태

4.8.5 Node Scale Out 확인
$> kubectl get nodes
aws autoscaling describe-auto-scaling-groups \
    --query "AutoScalingGroups[? Tags[? (Key=='eks:cluster-name') && Value=='myeks']].[AutoScalingGroupName, MinSize, MaxSize,DesiredCapacity]" \
    --output table
4.8.6 Node Viewer 로 확인
$> ./eks-node-viewer
4.8.7 Nginx 배포 삭제
$> kubectl delete -f nginx.yaml && date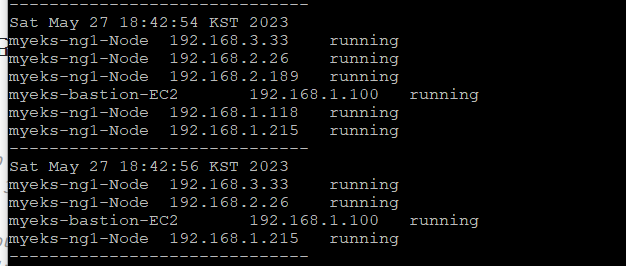
4.8.8 Node 갯수 감소 확인
기본 설정으로 10분후 Node 감소
$> watch -d kubectl get node약 10분 후 노드수가 감소

4.9 CA 삭제
$> kubectl delete -f cluster-autoscaler-autodiscover.yaml
5 CPA_Cluster Propotional AutoScaler
5.1 소개
Node 수 증가에 비례하여 Pod 수 증가가 필요한 경우에 이용
대표적으로 coreDNS이며, Pod가 증가, 즉 Application의 처리량이 증가하면서 내부적으로 Domain Name Service의 처리량도 증가함에 따라 기본 2개에서 Node 증가 시 함께 증가하여 Application의 증가하는 처리량을 수용
5.2 CPA 배포 with HELM
$> helm repo add cluster-proportional-autoscaler https://kubernetes-sigs.github.io/cluster-proportional-autoscaler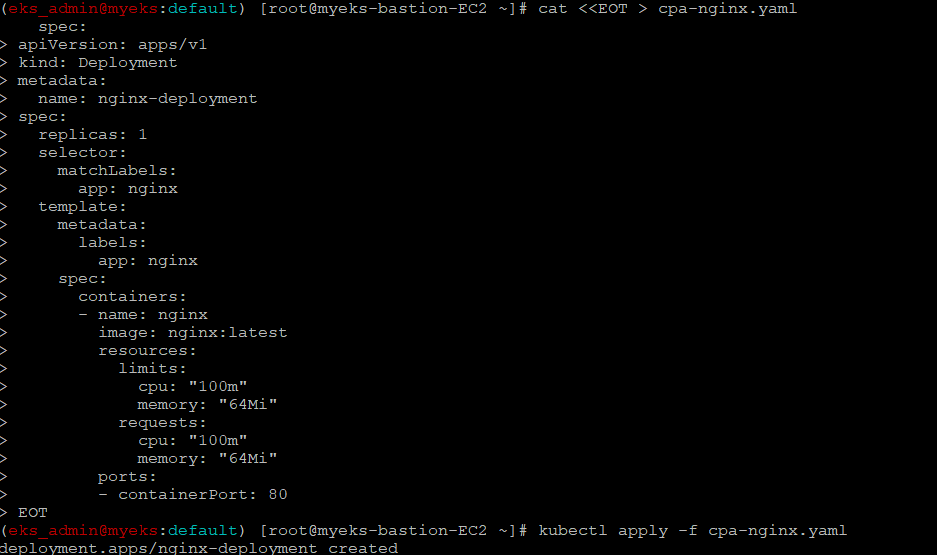
CPA 규칙이 없으면 CPA 배포가 불가한 관계로 먼저 HELM으로 배포 하기 전에 CPA 규칙 부터 설정
CPA 규칙은 Node 수 대비 어떤 Pod를 증가 시키는 것에 대한 정의이며, 그래서 먼저 시험용 Pod를 먼저 배포후 CPA 설정이 가능
5.2.1 시험용 Nginx 배포
$> cat <<EOT > cpa-nginx.yaml
apiVersion: apps/v1
kind: Deployment
metadata:
  name: nginx-deployment
spec:
  replicas: 1
  selector:
    matchLabels:
      app: nginx
  template:
    metadata:
      labels:
        app: nginx
    spec:
      containers:
      - name: nginx
        image: nginx:latest
        resources:
          limits:
            cpu: "100m"
            memory: "64Mi"
          requests:
            cpu: "100m"
            memory: "64Mi"
        ports:
        - containerPort: 80
EOT

$> kubectl apply -f cpa-nginx.yaml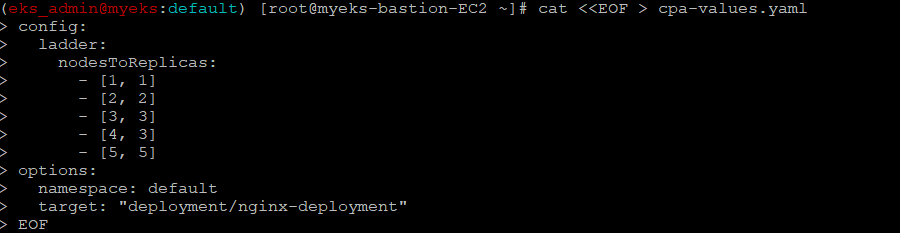
5.2.2 CPA 규칙 설정
$> cat <<EOF > cpa-values.yaml
config:
  ladder:
    nodesToReplicas:
      - [1, 1]
      - [2, 2]
      - [3, 3]
      - [4, 3]
      - [5, 5]
options:
  namespace: default
  target: "deployment/nginx-deployment"
EOF
5.2.3 HELM Install
$> helm upgrade --install cluster-proportional-autoscaler -f cpa-values.yaml cluster-proportional-autoscaler/cluster-proportional-autoscaler

$>kubectl get pod
5.3 Node 수를 5개로 증가후 Pod수 변화 확인
$> export ASG_NAME=$(aws autoscaling describe-auto-scaling-groups --query "AutoScalingGroups[? Tags[? (Key=='eks:cluster-name') && Value=='myeks']].AutoScalingGroupName" --output text)

$> aws autoscaling update-auto-scaling-group --auto-scaling-group-name ${ASG_NAME} --min-size 5 --desired-capacity 5 --max-size 5

$> aws autoscaling describe-auto-scaling-groups --query "AutoScalingGroups[? Tags[? (Key=='eks:cluster-name') && Value=='myeks']].[AutoScalingGroupName, MinSize, MaxSize,DesiredCapacity]" --output table
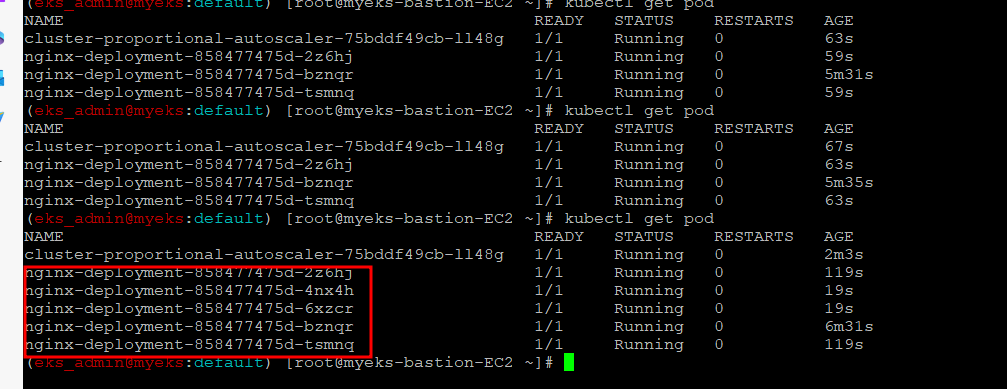
Node 수 5개에 Pod 수도 5개로 변경

5.4 Node 수를 4개로 축소한 경우 Pod수 변화 확인
$> aws autoscaling update-auto-scaling-group --auto-scaling-group-name ${ASG_NAME} --min-size 4 --desired-capacity 4 --max-size 4

$> aws autoscaling describe-auto-scaling-groups --query "AutoScalingGroups[? Tags[? (Key=='eks:cluster-name') && Value=='myeks']].[AutoScalingGroupName, MinSize, MaxSize,DesiredCapacity]" --output table
$> kubectl get podCPA 설정대로 Node수를 4개로 변경하면 Pod수가 3개로 변경

5.5 CPA 및 시험용 Nginx Pod 삭제
$> helm uninstall cluster-proportional-autoscaler && kubectl delete -f cpa-nginx.yaml
6 Karpenter 실습 환경 준비를 위해서 현재 EKS 실습 환경 전부 삭제
6.1 Helm Chart 삭제
$> helm uninstall -n kube-system kube-ops-view

$> helm uninstall -n monitoring kube-prometheus-stack
6.2 나머지 삭제
$> eksctl delete cluster --name $CLUSTER_NAME && aws cloudformation delete-stack --stack-name $CLUSTER_NAME7 Karpenter : K8S Native AutoScaler & Fargate
7.1 소개
Node를 Provisioning 하는 Auto Scaler의미로는 동일하나, CA는 이미 EC2 Spec이 결정된 ASG의 Node를 바탕으로 Node의 Scale In/Out을 하는 반면, Karpenter는 Pod의 자원 수요를 계산하여 여기에 맞는 Node를 Provisioning
7.2 EKS 배포 준비
7.2.1 IP 주소 확인_이건 왜 하는 걸까?
172.30.0.0/16 VPC 대역에서 172.30.1.0/24 대역을 사용 중
$> ip -br -c addr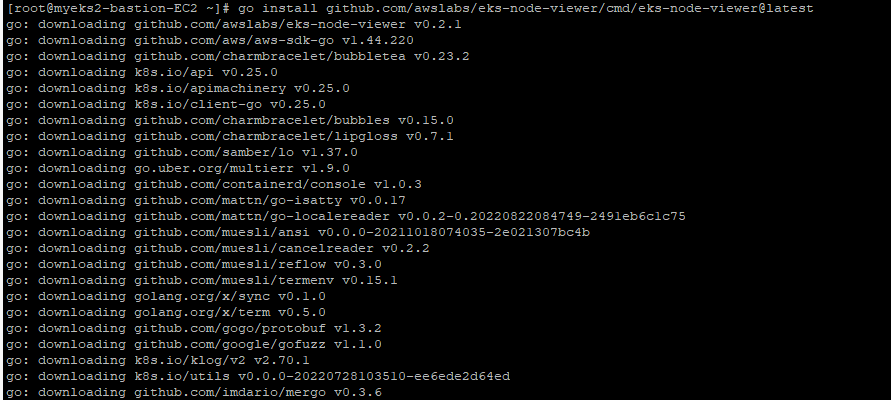
7.2.2 EKS Node Viewer 설치
$> go install github.com/awslabs/eks-node-viewer/cmd/eks-node-viewer@latest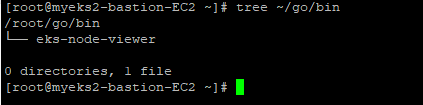
7.2.3 EKS Node Viewer 설치 확인
$> tree ~/go/bin

$> cd ~/go/bin

$> ./eks-node-viewer -h
7.3 EKS 배포
배포와 관련된 자세한 설명은 URL 참조 : https://karpenter.sh/v0.27.5/getting-started/getting-started-with-karpenter/
7.3.1 환경 변수 정보 설정 확인
이전 AutoScaler 실습에 사용한 환경 설정의 유무 확인
$> export | egrep 'ACCOUNT|AWS_|CLUSTER' | egrep -v 'SECRET|KEY'
7.3.2 환경 변수 설정
$> export KARPENTER_VERSION=v0.27.5

$> export TEMPOUT=$(mktemp)

$> echo $KARPENTER_VERSION $CLUSTER_NAME $AWS_DEFAULT_REGION $AWS_ACCOUNT_ID $TEMPOUT
7.3.3 CloudFormation 스택으로 IAM Policy, Role, EC2 Instance Profile 생성
$> curl -fsSL https://karpenter.sh/"${KARPENTER_VERSION}"/getting-started/getting-started-with-karpenter/cloudformation.yaml  > $TEMPOUT \
&& aws cloudformation deploy \
  --stack-name "Karpenter-${CLUSTER_NAME}" \
  --template-file "${TEMPOUT}" \
  --capabilities CAPABILITY_NAMED_IAM \
  --parameter-overrides "ClusterName=${CLUSTER_NAME}"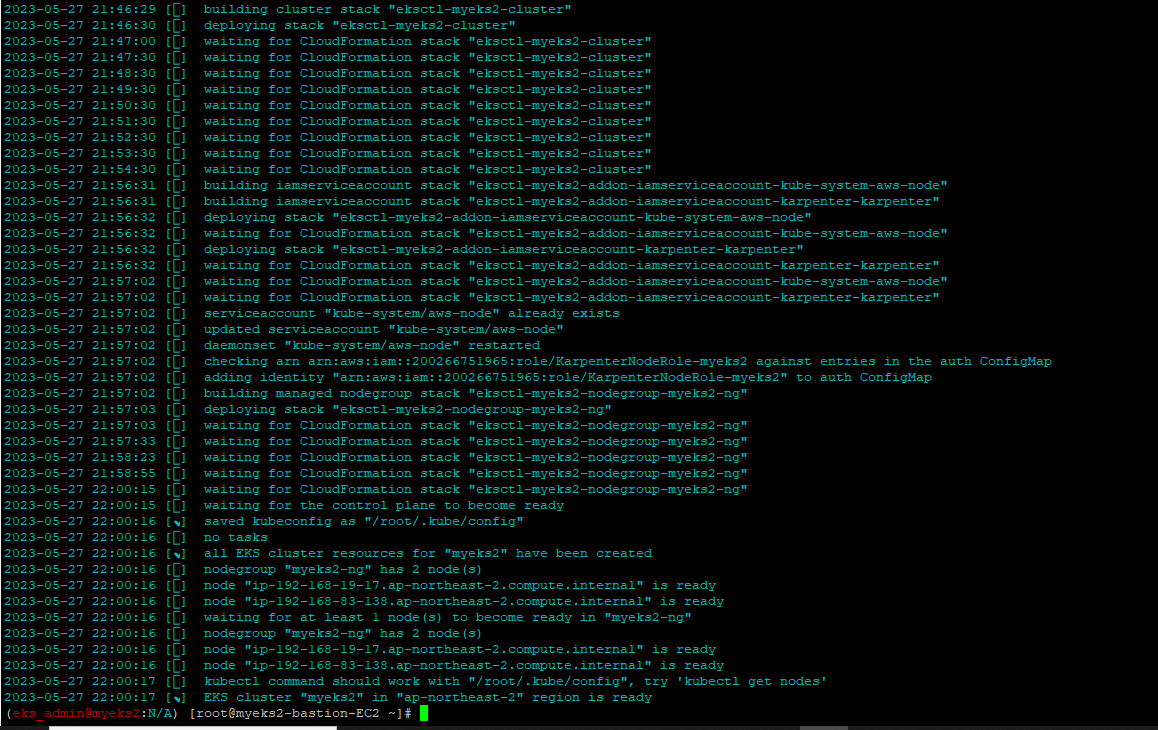
7.3.4 EKS 배포
$> eksctl create cluster -f - <<EOF
---
apiVersion: eksctl.io/v1alpha5
kind: ClusterConfig
metadata:
  name: ${CLUSTER_NAME}
  region: ${AWS_DEFAULT_REGION}
  version: "1.24"
  tags:
    karpenter.sh/discovery: ${CLUSTER_NAME}

iam:
  withOIDC: true
  serviceAccounts:
  - metadata:
      name: karpenter
      namespace: karpenter
    roleName: ${CLUSTER_NAME}-karpenter
    attachPolicyARNs:
    - arn:aws:iam::${AWS_ACCOUNT_ID}:policy/KarpenterControllerPolicy-${CLUSTER_NAME}
    roleOnly: true

iamIdentityMappings:
- arn: "arn:aws:iam::${AWS_ACCOUNT_ID}:role/KarpenterNodeRole-${CLUSTER_NAME}"
  username: system:node:{{EC2PrivateDNSName}}
  groups:
  - system:bootstrappers
  - system:nodes

managedNodeGroups:
- instanceType: m5.large
  amiFamily: AmazonLinux2
  name: ${CLUSTER_NAME}-ng
  desiredCapacity: 2
  minSize: 1
  maxSize: 10
  iam:
    withAddonPolicies:
      externalDNS: true

## Optionally run on fargate
# fargateProfiles:
# - name: karpenter
#  selectors:
#  - namespace: karpenter
EOF
7.3.5 EKS 배포 확인
$> eksctl get cluster

$> eksctl get nodegroup --cluster $CLUSTER_NAME

$> eksctl get iamidentitymapping --cluster $CLUSTER_NAME

$> eksctl get iamserviceaccount --cluster $CLUSTER_NAME

$> eksctl get addon --cluster $CLUSTER_NAME
$> cd ~/go/bin && ./eks-node-viewer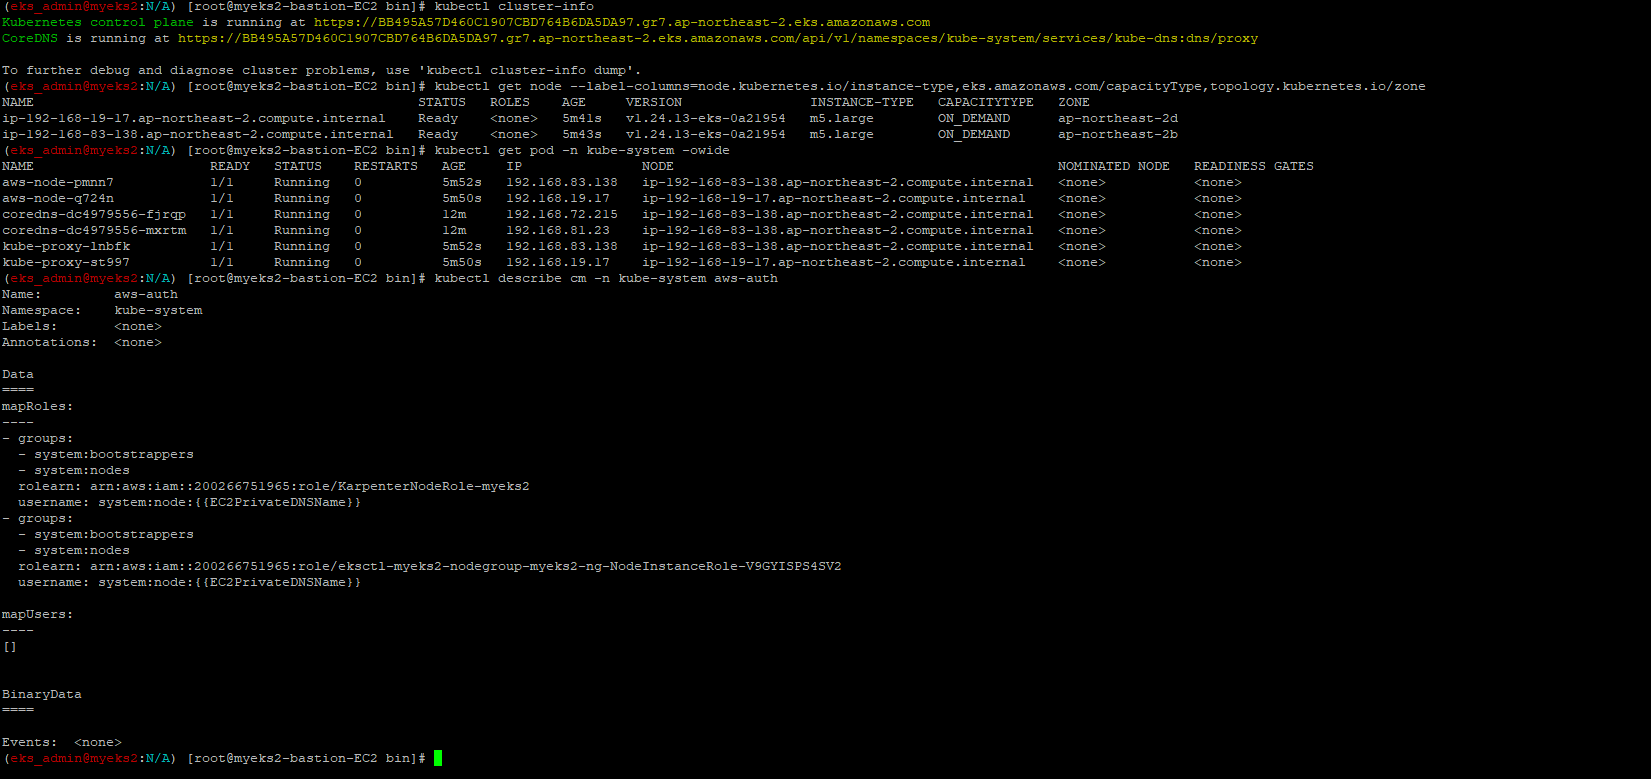
7.3.6 K8S 확인
$> kubectl cluster-info

$> kubectl get node --label-columns=node.kubernetes.io/instance-type,eks.amazonaws.com/capacityType,topology.kubernetes.io/zone

$> kubectl get pod -n kube-system -owide

$> kubectl describe cm -n kube-system aws-auth
7.4 Karpenter 설치
7.4.1 설치를 위한 환경 변수 설정
$> export CLUSTER_ENDPOINT="$(aws eks describe-cluster --name ${CLUSTER_NAME} --query "cluster.endpoint" --output text)"

$> export KARPENTER_IAM_ROLE_ARN="arn:aws:iam::${AWS_ACCOUNT_ID}:role/${CLUSTER_NAME}-karpenter"

$> echo $CLUSTER_ENDPOINT $KARPENTER_IAM_ROLE_ARN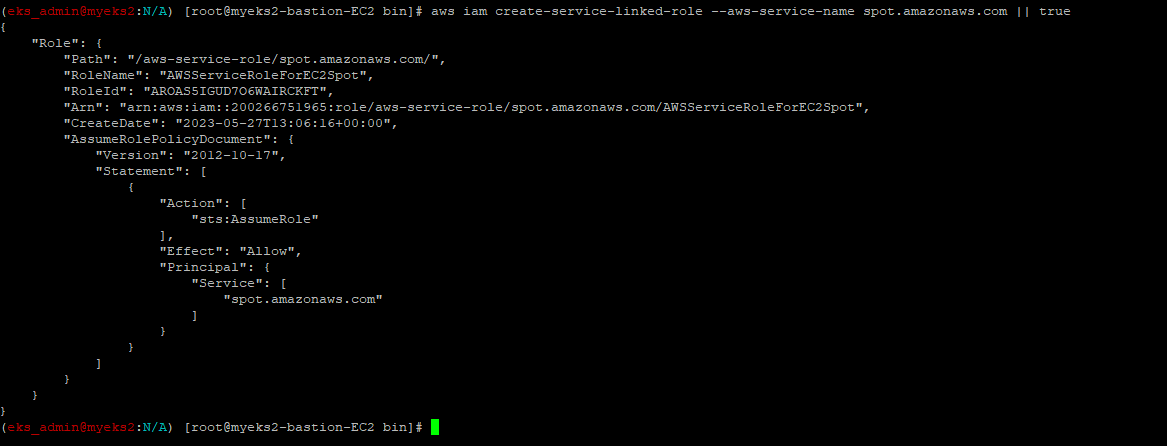
7.4.2 EC2 Spot Fleet 사용을 위한 service-linked-role 생성 확인
$> aws iam create-service-linked-role --aws-service-name spot.amazonaws.com || true
7.4.3 docker logout : Logout of docker to perform an unauthenticated pull against the public ECR
$> docker logout public.ecr.aws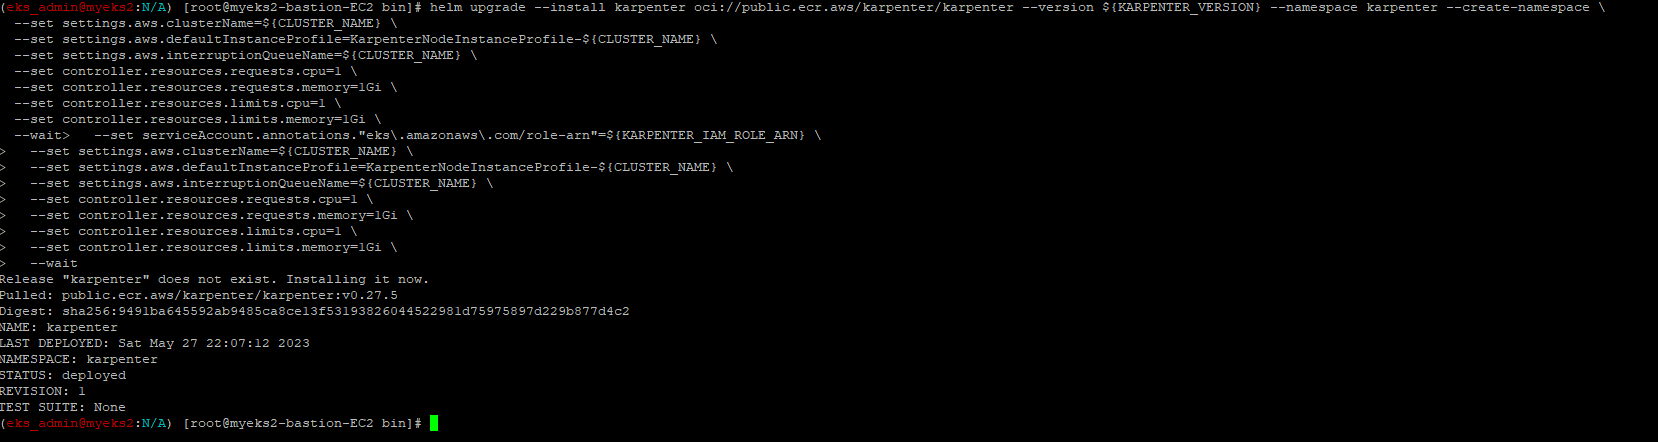
현재 인증된 Token 사용 후 해당 Token이 완료된 경우에 Public ECR에 미인가 접근을 위해 docker logout을 실행
보다 자세한 사항은 아래 URL 참조
https://docs.aws.amazon.com/ko_kr/AmazonECR/latest/public/public-troubleshooting.html
7.4.4 Karpenter 설치
$> helm upgrade --install karpenter oci://public.ecr.aws/karpenter/karpenter --version ${KARPENTER_VERSION} --namespace karpenter --create-namespace \
  --set serviceAccount.annotations."eks\.amazonaws\.com/role-arn"=${KARPENTER_IAM_ROLE_ARN} \
  --set settings.aws.clusterName=${CLUSTER_NAME} \
  --set settings.aws.defaultInstanceProfile=KarpenterNodeInstanceProfile-${CLUSTER_NAME} \
  --set settings.aws.interruptionQueueName=${CLUSTER_NAME} \
  --set controller.resources.requests.cpu=1 \
  --set controller.resources.requests.memory=1Gi \
  --set controller.resources.limits.cpu=1 \
  --set controller.resources.limits.memory=1Gi \
  --wait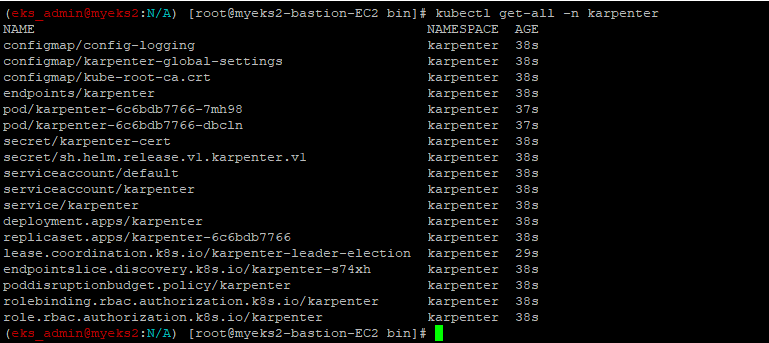
7.4.5 Karpenter 설치 확인
$> kubectl get-all -n karpenter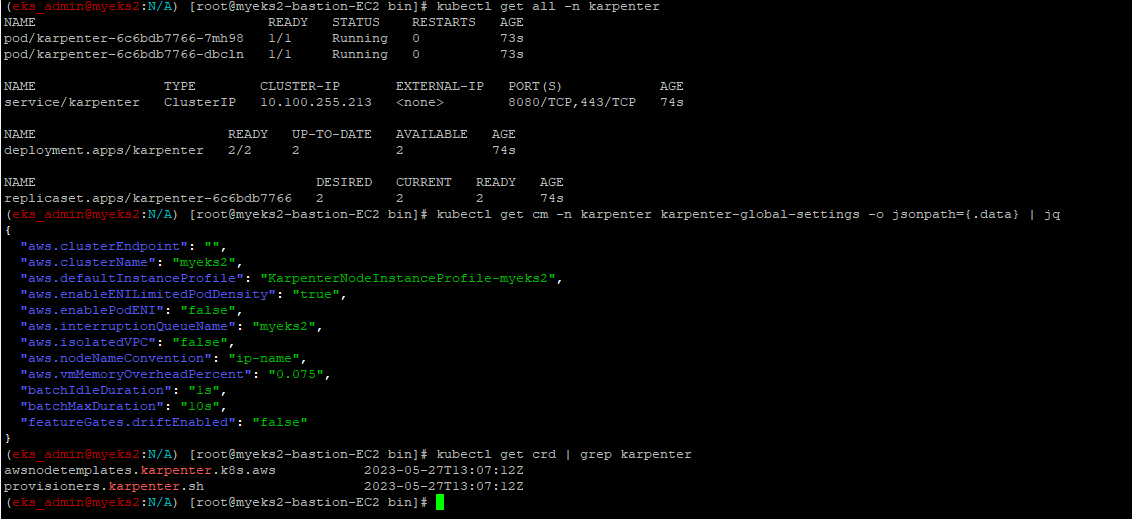
$> kubectl get all -n karpenter

$> kubectl get cm -n karpenter karpenter-global-settings -o jsonpath={.data} | jq

$> kubectl get crd | grep karpenter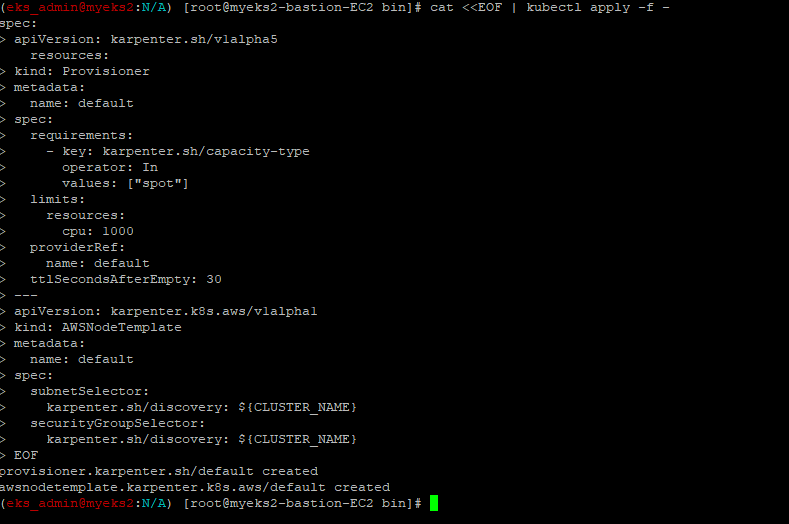
7.5 Provisioner 생성
node 설정을 하는 CRD이며, Instance type, cpu architecture 등을 설정
$> cat <<EOF | kubectl apply -f -
apiVersion: karpenter.sh/v1alpha5
kind: Provisioner
metadata:
  name: default
spec:
  requirements:
    - key: karpenter.sh/capacity-type
      operator: In
      values: ["spot"]
  limits:
    resources:
      cpu: 1000
  providerRef:
    name: default
  ttlSecondsAfterEmpty: 30
---
apiVersion: karpenter.k8s.aws/v1alpha1
kind: AWSNodeTemplate
metadata:
  name: default
spec:
  subnetSelector:
    karpenter.sh/discovery: ${CLUSTER_NAME}
  securityGroupSelector:
    karpenter.sh/discovery: ${CLUSTER_NAME}
EOF
7.6 Provisioner 생성 확인
$> kubectl get awsnodetemplates,provisioners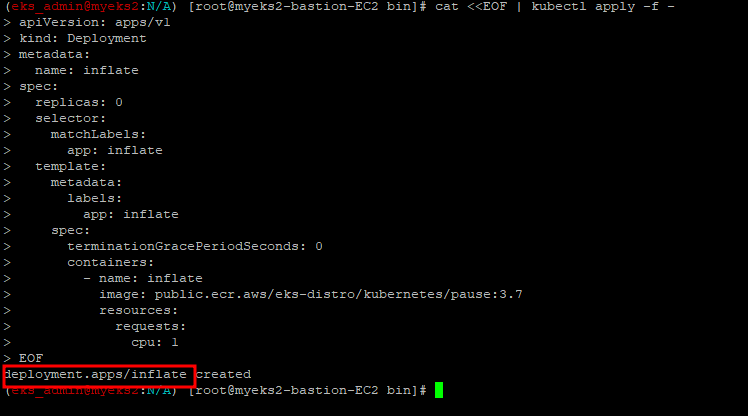
7.7 실습용 Pause Pod 배포
Pause Container(Pod)에 대해서는 URL 참조 : https://m.blog.naver.com/PostView.naver?isHttpsRedirect=true&blogId=alice_k106&logNo=221495126401
7.7.1 pause 파드 1개에 CPU 1개 최소 보장 할당
$> cat <<EOF | kubectl apply -f -
apiVersion: apps/v1
kind: Deployment
metadata:
  name: inflate
spec:
  replicas: 0
  selector:
    matchLabels:
      app: inflate
  template:
    metadata:
      labels:
        app: inflate
    spec:
      terminationGracePeriodSeconds: 0
      containers:
        - name: inflate
          image: public.ecr.aws/eks-distro/kubernetes/pause:3.7
          resources:
            requests:
              cpu: 1
EOF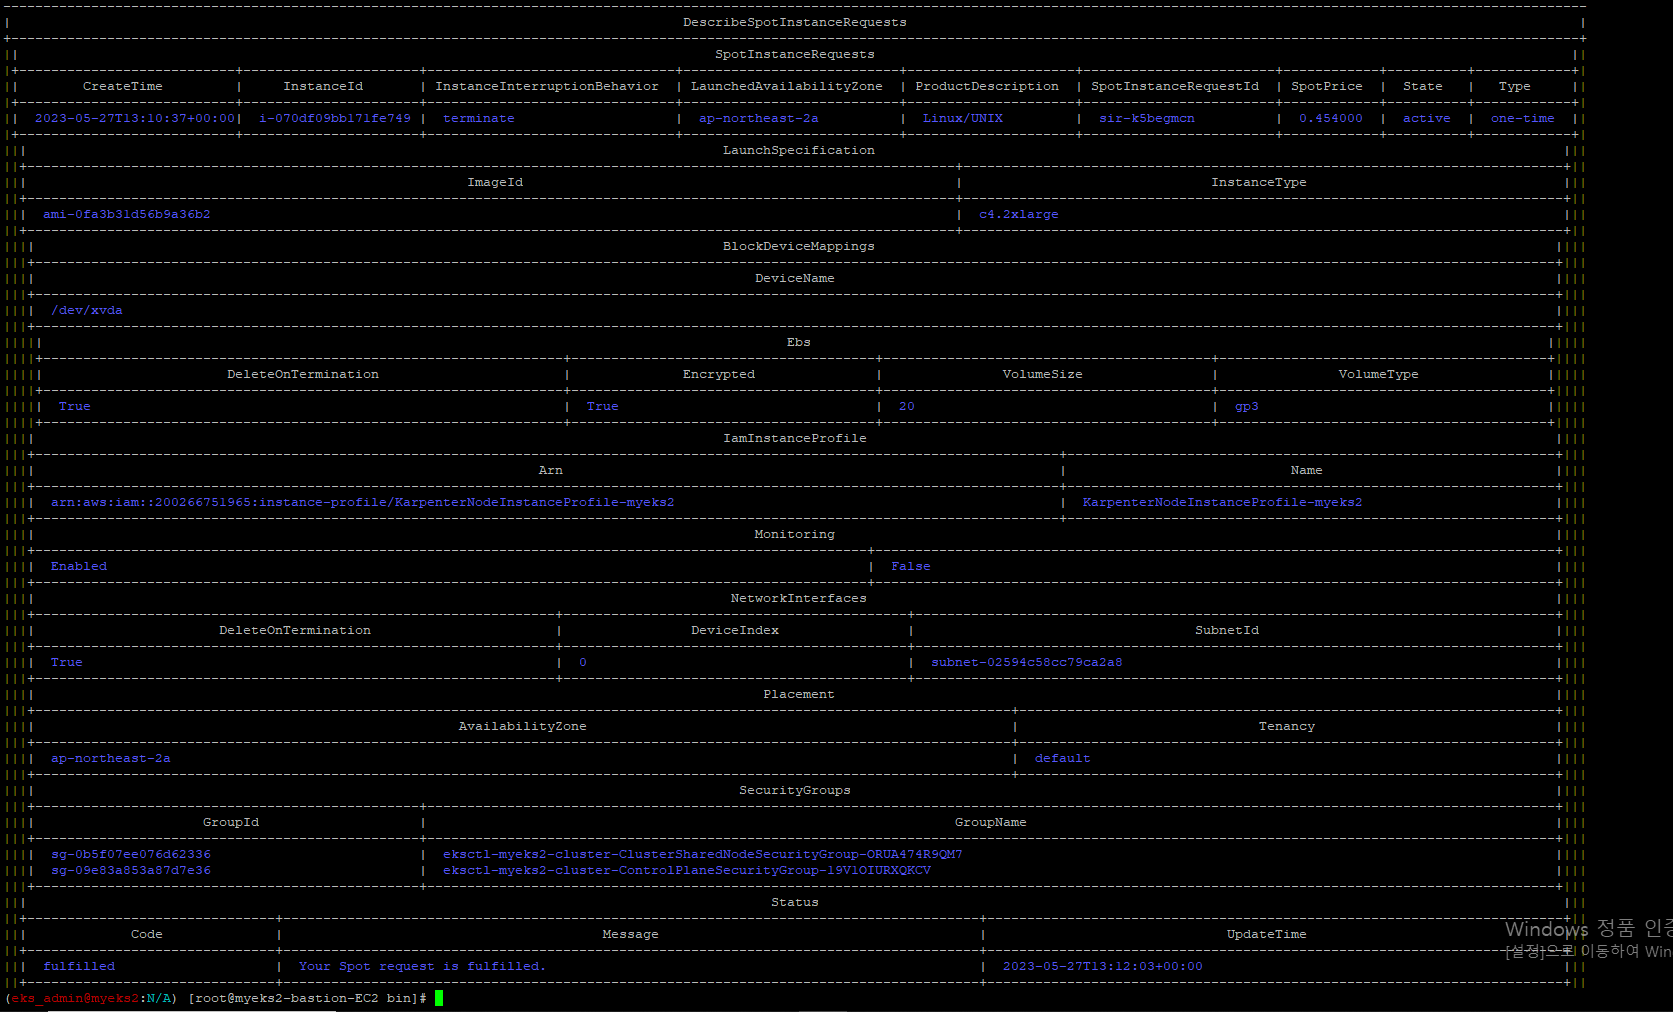
7.7.2 Pod 수를 5개로 상향 조정
$> kubectl scale deployment inflate --replicas 5

$> kubectl logs -f -n karpenter -l app.kubernetes.io/name=karpenter -c controller
7.7.3 Spot Instance 생성 확인_AWS Console에서 확인
$> aws ec2 describe-spot-instance-requests --filters "Name=state,Values=active" --output table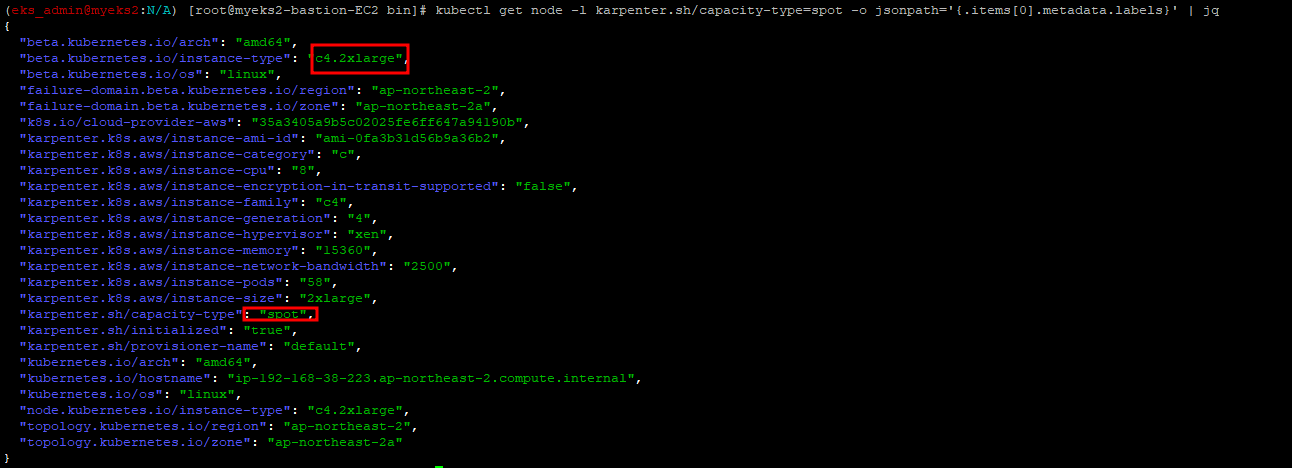
$> kubectl get node -l karpenter.sh/capacity-type=spot -o jsonpath='{.items[0].metadata.labels}' | jq
$> kubectl get node --label-columns=eks.amazonaws.com/capacityType,karpenter.sh/capacity-type,node.kubernetes.io/instance-type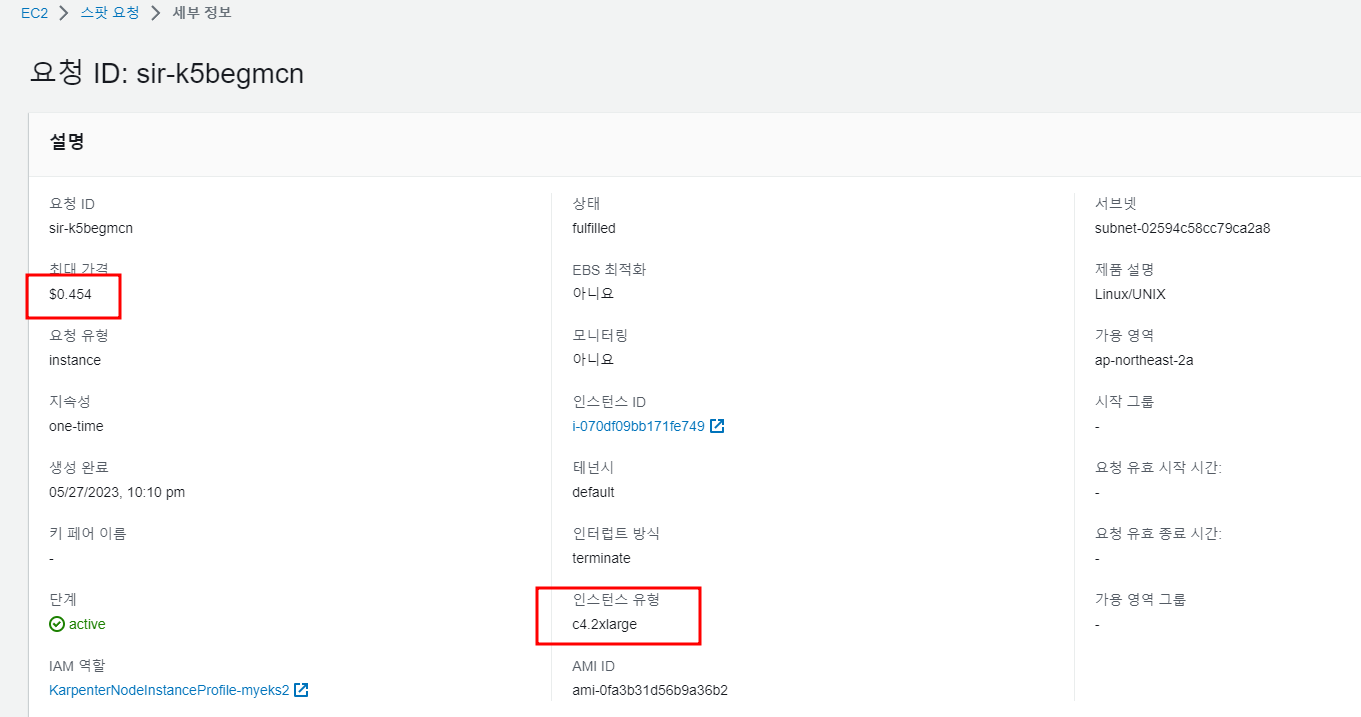
AWS Console에서 확인한 Spot Instance 정보

7.7.4 Pod 종료_AWS Console에서도 Spot Instance 감소 확인
ttlSecondsUntilExpired 30초 기준
$> kubectl delete deployment inflate
$> kubectl logs -f -n karpenter -l app.kubernetes.io/name=karpenter -c controller
Spot Instance 는 삭제

AWS Console에서도 close 상태로 전환
7.8 Consolidation_비용 측면
비 효율적인 instance들을 더 작은 규모의 Instance로 Compact하게 만들는 방법이 2가지 있는데, 그 중 Consolidation은 방법중 한가지이며, 좀 더 비용이 저렴한 instance로 Pod을 옮기는 기술이다. 주로 MicroService 와 ttlSecondsUntilExpired와 호환이 잘되지 않는 서비스에 적합
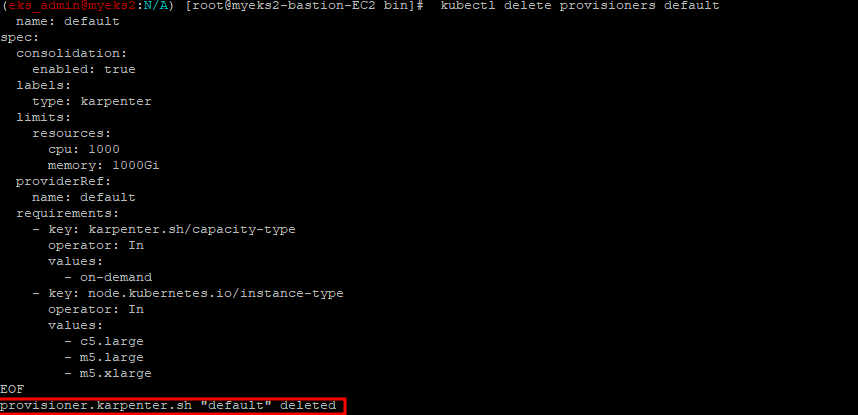
7.8.1 이전 provisioner 삭제
$> kubectl delete provisioners default
cat <<EOF | kubectl apply -f -
apiVersion: karpenter.sh/v1alpha5
kind: Provisioner
metadata:
  name: default
spec:
  consolidation:
    enabled: true
  labels:
    type: karpenter
  limits:
    resources:
      cpu: 1000
      memory: 1000Gi
  providerRef:
    name: default
  requirements:
    - key: karpenter.sh/capacity-type
      operator: In
      values:
        - on-demand
    - key: node.kubernetes.io/instance-type
      operator: In
      values:
        - c5.large
        - m5.large
        - m5.xlarge
EOF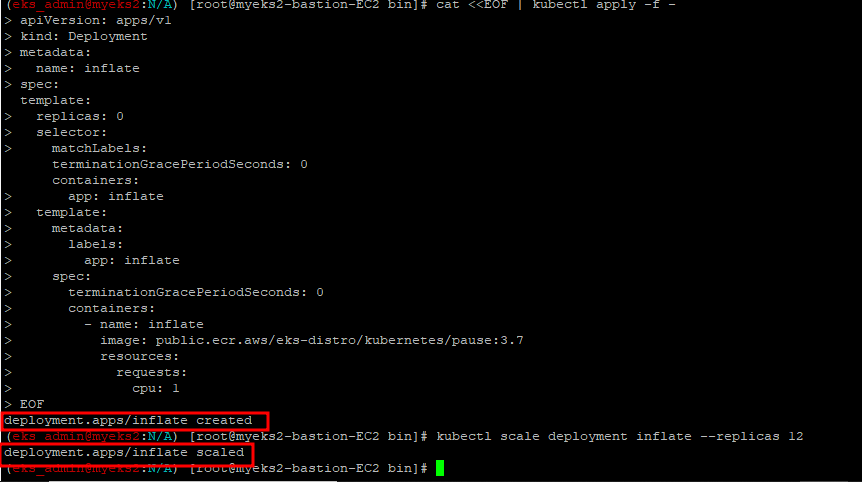
7.8.2 Colsolidation을 지원하는 Provisioner 생성
$> cat <<EOF | kubectl apply -f -
apiVersion: apps/v1
kind: Deployment
metadata:
  name: inflate
spec:
  replicas: 0
  selector:
    matchLabels:
      app: inflate
  template:
    metadata:
      labels:
        app: inflate
    spec:
      terminationGracePeriodSeconds: 0
      containers:
        - name: inflate
          image: public.ecr.aws/eks-distro/kubernetes/pause:3.7
          resources:
            requests:
              cpu: 1
EOF

$> kubectl scale deployment inflate --replicas 12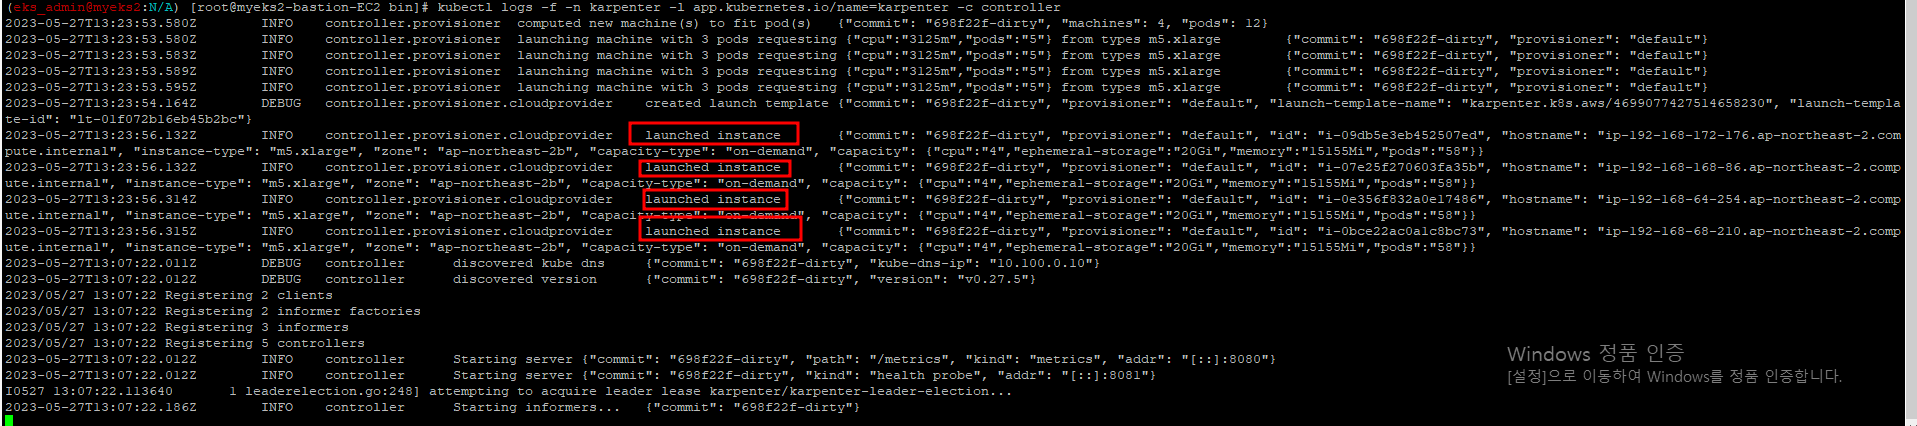
$> kubectl logs -f -n karpenter -l app.kubernetes.io/name=karpenter -c controller
7.8.3 instance 확인
$> kubectl get node -l type=karpenter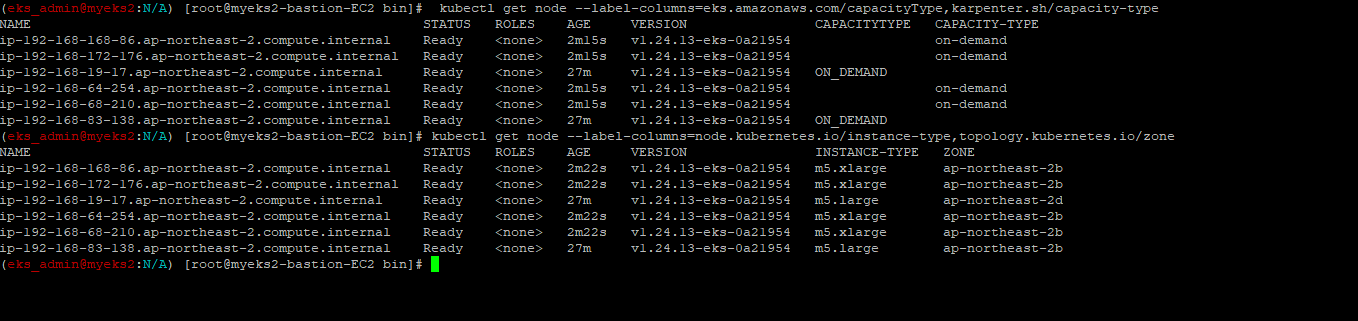
$> kubectl get node --label-columns=eks.amazonaws.com/capacityType,karpenter.sh/capacity-type

$> kubectl get node --label-columns=node.kubernetes.io/instance-type,topology.kubernetes.io/zone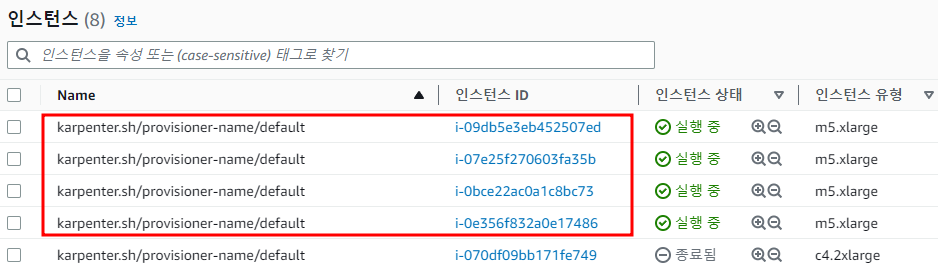
aws console에서도 확인이 가능

7.8.4 Scale Down to 5
$> kubectl scale deployment inflate --replicas 5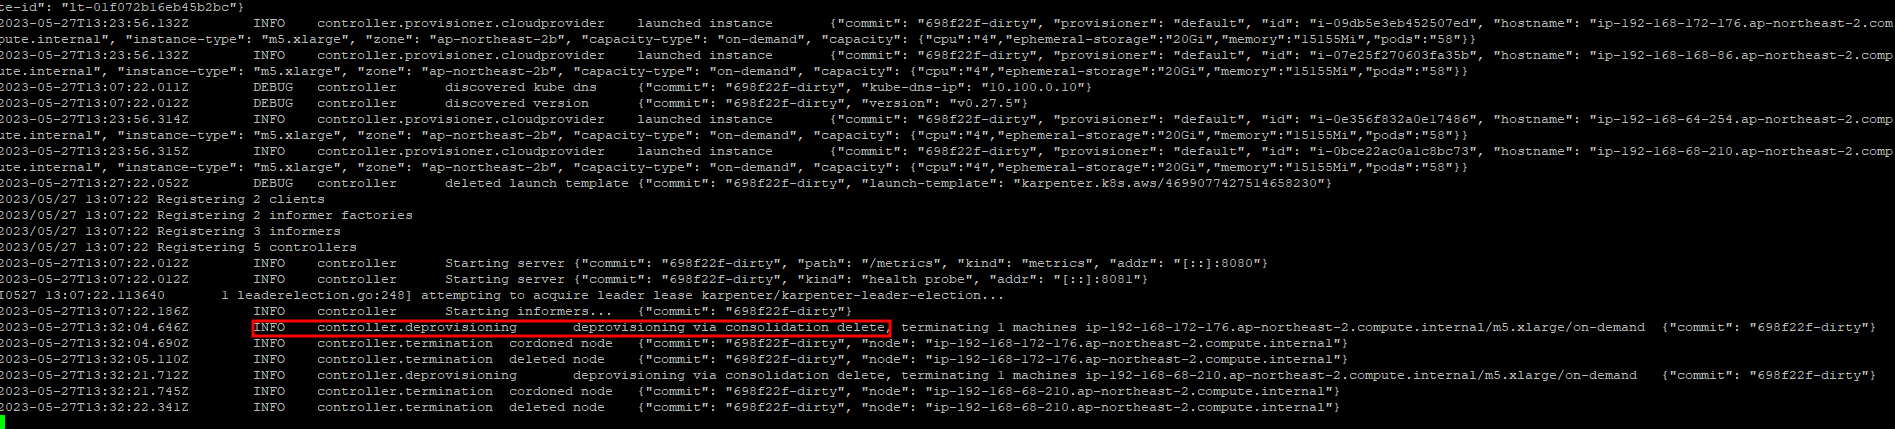
7.8.5 로그를 통해서 Node를 compact하게 하는 실행을 확인 가능
$> kubectl logs -f -n karpenter -l app.kubernetes.io/name=karpenter -c controller
7.8.6 인스턴스 확인_비용이 낮은 Instance Type으로의 변경
$> kubectl get node -l type=karpenter
$> kubectl get node --label-columns=eks.amazonaws.com/capacityType,karpenter.sh/capacity-type

$> kubectl get node --label-columns=node.kubernetes.io/instance-type,topology.kubernetes.io/zone
AWS Console에서도 확인이 가능

7.9 배포 삭제
$> kubectl delete deployment inflate