자세한 사항은 아래를 참조해주세요!
PyTorch 딥러닝 챗봇, 1.서론 [Pytorch vs. Tensorflow], wikidocs
2022년 PyTorch 와 TensorFlow 비교 | GeekNews
[PyTorch] . Tensorflow(텐서플로) PyTorch(파이토치) 차이점 비교
PyTorch vs TensorFlow in 2022, freejack
PyTorch vs TensorFlow in 2022, Ryan O'Connor
간단 비교
| Tensorflow | Pytorch | |
|---|---|---|
| 기반 | Theano | Torch |
| 개발사 | ||
| 그래프 | 정적 | 동적 |
| 실행 순서 | 모델의 전체 계산 그래프 정의 후 모델 실행 | 동작 중에 그래프 정의/조작 |
| Deployment | 배포 지향 app에 최적 | 부진했지만, 차이를 줄이는 중 |
| GPU 할당 | 자동 | cuda.is_available() |
고려 사항
- 모델 가용성 ( 공개된 모델을 이용 가능한가? ) => 최근 Pytorch 우세. 예외사항 존재
- 배포 인프라 ( 배포가 용이한가? ) => 여전히 Tensorflow 우세. ONNX 사용하여 Pytorch 모델을 TensorFlow 배포 workflow 내에서 사용 가능하다.
- 생태계 ( 환경/하드웨어 적합성 ) => Tensorflow 우세.
1. 모델 가용성 : PyTorch
모델 가용성
공개적 SOTA 모델 활용 가능한가?
사전 훈련된 모델에 접근할 수 있는가?
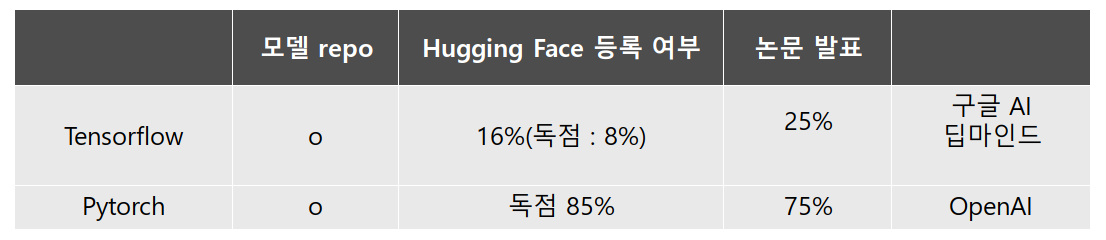
- Tensorflow, Pytorch 모두 자체 공식 모델 repository 보유
- Hugging Face 등록 여부
- Tensorflow : 16%(독점 : 8%).
상위 30개 모델로 비교했을 때 1/3을 사용할 수 없고 Tensorflow 독점은 없다. - Pytorch : 독점 85%
- Tensorflow : 16%(독점 : 8%).
- 논문 발표 추세
- Tensorflow : 25%
줄어든 이유 :
1. Tensorflow 1의 어려움
2. 1과 2의 호환성 - Pytorch : 75%
- Tensorflow : 25%
- Pytorch가 우세인 중에도 예외사항은 있다.
- Tensorflow : 구글 AI(Flax와 JAX를 사용), 딥마인드(2020. JAX, Haiku를 사용하여 연구 가속화)
- Pytorch : OpenAI(Pytorch 표준화. 강화학습의 base repo는 Tensorflow)
- JAX : Google의 또다른 프로젝트로 JAX를 활용하는 모델/논문의 수가 증가하고 있다.
2. 배포 : TensorFlow
배포
종단간 딥러닝 프로세스 고려
모바일, 클라우드 등에 적용 가능한가?
- Tensorflow : Serving, TensorFlow Lite를 사용하여 클라우드, 서버, 모바일 및 IoT 장치에 손쉽게 배포할 수 있다.
- Pytorch : 배포 관점에서 매우 부진했지만(모델 위에 REST API를 빌드해야 했다.), 작년에 TorchServe와 Pytorch Live가 도입되었다.
TensorFlow Serving : TensorFlow 모델을 가정이나 클라우드에 있는 서버에 배포할 때 사용한다. Vertext AI를 통해 Google Cloud와 통합되며 Kubernetes 및 Docker와 통합된다.
TensorFlow Lite : 모바일, IoT/Embedded device에 TensorFlow 모델을 배포할 대 사용된다. TFLite는 장치에 대한 모델을 압축 및 최적화하여 대기 시간, 연결, 개인 정보 보호, 크기 및 전력 소비와 같은 on-device AI에 대한 제약조건을 해결한다.
TorchServe : AWS와 Facebook(Meta)간의 협업으로 제작한 오픈 소스 배포 프레임워크로, 2020년에 출시되었다. endpoint specification, model 보관, metric 관찰과 같은 기본 기능이 있지만 아직 TensorFlow 대안보다 부족하다. REST 및 gRPC API는 모두 TorchServe에서 지원된다.
PyTorch Live : Android, iOS 및 Linux에 최적화된 기계 학습 모델을 배포하기 위해 2019년에 Pytorch Mobile을 출시하였고, Pytorch Live는 모바일 기반으로 구축하기 위해 최근 출시하였다. Javascript와 React Native를 사용하여 연결된 UI가 있는 크로스 플랫폼 iOS 및 Android AI 기반 앱을 만든다. on-device 추론은 Pytorch Mobile에 의해 수행된다.
배포는 TensorFlow 인프라를 사용하고, PyTorch에서만 사용할 수 있는 모델에 엑세스하려는 사용자는 ONNX를 사용하여 PyTorch에서 TensorFlow로 모델을 연결하는 것이 좋다.
3. EcoSystem, 생태계 : TensorFlow
- Tensorflow, Pytorch 모두 모델링 관점에서 이용 가능하고, 배포 관점에서 기술적 차이가 있지만, 생태계보다 중요하지는 않을 것이다.
- Pytorch
- Hub : 연구 지향적 공식 플랫폼. Audio, Vision, NLP용 모델 등이 있다.
- XLA : Google Cloud TPU에서 모델을 교육할 때 딥러닝 컴파일러와 연결하는 패키지
- TorchVision/TorchText/TorchAudio : 공식 컴퓨터 비전/자연어/오디오 라이브러리.
- Allen NLP : NLP 연구 라이브러리
- SpeechBrain : 오픈소스 음성 툴킷, ASR, 스피커 인식, 검증 등. Plug&Play 도구를 원한다면 AssemblyAI 자체 Speech-to-Text API 참조
- ESPnet : Kaldi 데이터 처리 스타일로 종단간 음성 처리를 위한 툴킷
- TorchElastic : AWS와 Facebook간의 협업으로 제작되었고, 학습에 영향을 주지 않기 위한 분산 교육 도구. event, network 문제로 인한 치명적인 오류를 방지한다.
- Pytorch Lightning : TensorFlow의 Keras와 같이 모델 엔지니어링 및 교육 프로세스를 단순화하는 데 유용하다.
- TensorFlow
- TensorFlow Hub : 사전 훈련된 기계 학습 모델의 repository
- Model Garden : SOTA 모델의 소스 코드를 사용할 수 있도록 하는 저장소
- TFX : 모델 배포를 위한 종단 간 플랫폼. 데이터 로드, 검증, 분석, 변환할 수 있다.
- Vertex AI : Google Cloud의 통합 기계 학습 플랫폼. 자동화, 모니터링 및 제어, 하이퍼파라미터 및 소스 코드 추적 가능
- MediaPipe : 개체 감지 등에 사용할 수 있는 기계 학습 파이프라인 구축 프레임워크
- TensorFlow.js : Node.js를 사용하여 브라우저와 서버 측에서 모델을 학습하고 배포할 수 있는 기계 학습을 위한 JavaScript 라이브러리
무엇을 사용해야 하는가? Pytorch or TensorFlow
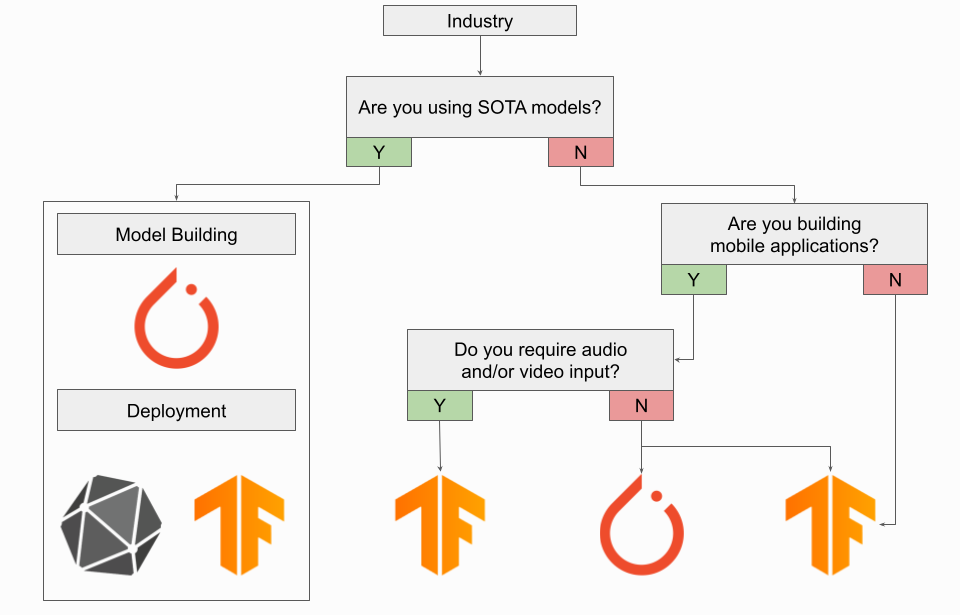
산업현장,임베디드 시스템, IoT 장치일 경우 TensorFlow를 사용하는 것이 낫다.(배포와 end to end 플랫폼 중요성) 다만, SOTA 모델에 엑세스 해야하는 경우와 같이 Pytorch 모델을 사용해야할 경우 ONNX를 사용하여 변환된 Pytorch 모델을 TensorFlow 배포 워크플로우로 배포할 수 있다.
모바일 응용 프로그램일 경우 오디오, 비디오가 필요하지 않다면 PyTorch Live를 사용할 수 있지만 그래도 TensorFlow가 나을 것이다.
연구원이라면? PyTorch를 강력하게 추천. 다만 강화학습은 TensorFlow를 추천한다. TensorFlow에는 Agent라는 Lib가 있기 때문이다. TPU train이라면 JAX, 아니라면 PyTorch가 낫다.
모델 활용 방법(코드)
공식 홈페이지 튜토리얼 코드와 깃 코드로 비교해보았다.
- Tensorflow : 선정의된 모듈이나 method를 이용하여 선언
- Pytorch : 주로 클래스를 이용하여 선언
물론 Tensorflow를 class화해서 작성하거나 Pytorch를 모듈을 통해 작성해도 된다..
Load data(Dataset), preprocessing
- TensorFlow
# load data(class가 directory별로 나눠진 경우)
train_ds = tf.keras.preprocessing.image_dataset_from_directory(
  data_dir,
  validation_split=0.2,
  subset="training",
  seed=123,
  image_size=(img_height, img_width),
  batch_size=batch_size)

# preprocessing
normalization_layer = tf.keras.layers.experimental.preprocessing.Rescaling(1./255)
normalized_ds = train_ds.map(lambda x, y: (normalization_layer(x), y))
or tf.data 사용
# load Data's path
list_ds = tf.data.Dataset.list_files(str(data_dir/'*/*'), shuffle=False)
# 과적합 방지를 위해 shuffle
list_ds = list_ds.shuffle(image_count, reshuffle_each_iteration=False)

# dataset 나누기
val_size = int(image_count * 0.2)
train_ds = list_ds.skip(val_size)
val_ds = list_ds.take(val_size)

# file_path로 (img, label) dataset 만들기
def get_label(file_path):
  parts = tf.strings.split(file_path, os.path.sep)
  one_hot = parts[-2] == class_names
  return tf.argmax(one_hot)
def decode_img(img):
  img = tf.io.decode_jpeg(img, channels=3)
  return tf.image.resize(img, [img_height, img_width])
def process_path(file_path):
  label = get_label(file_path)
  img = tf.io.read_file(file_path)
  img = decode_img(img)
  return img, label

# dataset
train_ds = train_ds.map(process_path, num_parallel_calls=AUTOTUNE)
val_ds = val_ds.map(process_path, num_parallel_calls=AUTOTUNE)- PyTorch : 본인 git에서 가져옴
class CustomDataset(Dataset):
    def __init__(self, dataset, appended_data=None, appended_data2=None):
        self.sentence1, self.labels = self.make_dataset(dataset, appended_data, appended_data2)

    def make_dataset(self, dataset, appended_data=None, appended_data2=None):
        sentence1, rlabels = [], []
        for data in dataset :
          rlabels.append(data['labels']['real-label'])
          sentence1.append(self.cleaning(data['sentence1']))
        return rlabels, sentence1
    def __len__(self):
        return len(self.labels)

    def __getitem__(self, idx):
        return self.sentence1[idx], self.sentence2[idx], self.labels[idx]

def custom_collate_fn(batch):
    input1_list, input2_list, target_list = [], [], []
    for _input1, _input2, _target in batch:
        input1_list.append(_input1)
        target_list.append(_target)
	... 기타 전처리 수행
    tensorized_label = torch.tensor(target_list)
    return tensorized_input, tensorized_label

train_dataloader = DataLoader(train_dataset, batch_size =batch_size, sampler = RandomSampler(dataset), collate_fn=custom_collate_fn)
valid_dataloader = DataLoader(train_dataset, batch_size =batch_size, sampler = RandomSampler(dataset), collate_fn=custom_collate_fn)
model 구성
- TensorFlow : 변수 형태
# model
num_classes = 5

model = tf.keras.Sequential([
  tf.keras.layers.experimental.preprocessing.Rescaling(1./255),
  tf.keras.layers.Conv2D(32, 3, activation='relu'),
  tf.keras.layers.MaxPooling2D(),
  tf.keras.layers.Conv2D(32, 3, activation='relu'),
  tf.keras.layers.MaxPooling2D(),
  tf.keras.layers.Conv2D(32, 3, activation='relu'),
  tf.keras.layers.MaxPooling2D(),
  tf.keras.layers.Flatten(),
  tf.keras.layers.Dense(128, activation='relu'),
  tf.keras.layers.Dense(num_classes)
])
- PyTorch : 클래스 형태
class Net(nn.Module):
    def __init__(self):
        super(Net, self).__init__()
        self.conv1 = nn.Conv2d(3, 6, 5)
        self.pool = nn.MaxPool2d(2, 2)
        self.conv2 = nn.Conv2d(6, 16, 5)
        self.fc1 = nn.Linear(16 * 5 * 5, 120)
        self.fc2 = nn.Linear(120, 84)
        self.fc3 = nn.Linear(84, 10)

    def forward(self, x):
        x = self.pool(F.relu(self.conv1(x)))
        x = self.pool(F.relu(self.conv2(x)))
        x = x.view(-1, 16 * 5 * 5)
        x = F.relu(self.fc1(x))
        x = F.relu(self.fc2(x))
        x = self.fc3(x)
        return x

model = Net()
훈련
- TensorFlow
# 컴파일
model.compile(
  optimizer='adam',
  loss=tf.losses.SparseCategoricalCrossentropy(from_logits=True),
  metrics=['accuracy'])
# 훈련
model.fit(
  train_ds,
  validation_data=val_ds,
  epochs=3
)- PyTorch : 본인 git에서 가져왔다
 model = CustomSTS(hidden_size=768, model_name=model_name)
 optimizer = AdamW(model.parameters(), lr=2e-5, eps=1e-8, weight_decay=wd)
 total_steps = len(train_dataloader) * epochs
 scheduler = get_linear_schedule_with_warmup(optimizer, num_warmup_steps=0, num_training_steps=total_steps)

def train(model, optimizer, scheduler, train_dataloader, valid_dataloader=None, epochs=1, model_name=''):
  loss_fct = nn.MSELoss()
  for epoch in range(epochs) :
    total_loss, total_f1, batch_f1, batch_loss, batch_count = 0,0,0,0,0
    model.train()
    model.to(device)
    for step, batch in enumerate(train_dataloader):
      batch_count+=1
      batch = tuple(item.to(device) for item in batch)
      batch_input, batch_label = batch
      model.zero_grad()
      # forward
      probs = model(**batch_input)
      loss = loss_fct(probs, batch_label)
      # backward -> 파라미터의 미분(gradient)를 자동으로 계산
      loss.backward()
      clip_grad_norm_(model.parameters(), 1.0)
      optimizer.step()
      scheduler.step()
      model.zero_grad()
    if valid_dataloader is not None:
        validate(model, valid_dataloader)	# train 메소드와 비슷하지만 model.eval() 모드로 실행한 것
  return None		# 결과값 리턴할 수 있다.

train(...)