Svelte - Todo List 만들어보기
프로젝트 세팅
우선 프로젝트 세팅을 해줍니다.
npx degit sveltejs/template todo
cd todo
yarn install
그리고 svelte에서 scss를 사용하기 위하여 세팅을 해줍니다.
yarn add -D svelte-preprocess node-sassrollup.config.js에서 다음과 같이 수정을 해줍니다.
...
plugins: [
		svelte({
			preprocess: sveltePreprocess(),
			compilerOptions: {
				// enable run-time checks when not in production
				dev: !production
			}
		}),
...
store
svelte에서는 상태관리 라이브러리를 따로 지원하지않고, 내부에 포함되어 있습니다.
store를 이용하여 일정관리를 해보도록 하겠습니다.
src/todo.js
import { writable } from "svelte/store";

const createTodo = () => {
    const { subscribe, set, update } = writable([]);

    return {
        subscribe,
        insert: (item) => update(n => [...n, item]),
        delete: (idx) => update(n => n.filter((todo, index) => index !== idx)),
        reset: () => set([])
    }
}

export const todos = createTodo()
우선 일정은 리스트로 관리를 하도록 하겠습니다.
내부에서 일정을 추가하는 insert, 일정의 index를 찾아 삭제하는 delete, 일정을 초기화하는 reset을 선언해줍니다.
Component
컴포넌트는 3가지를 구현해보도록 하겠습니다.
- 일정을 입력받는 TodoInsert
- 일정을 보여주는 TodoItem
- 일정 리스트를 보여주는 TodoList
TodoInsert
TodoInsert를 작성하기전에 svelte-material-icons를 설치해줍니다.
yarn add svelte-material-icons우선 script 부분을 작성해보도록 하겠습니다.
<script>
    import CalendarPlus from 'svelte-material-icons/CalendarPlus.svelte'
    import { todos } from '../store/todo'

    let todo = ''
    function onChange(e) {
        todo = e.target.value
    }

    function onSubmit() {
        todos.insert(todo)
        todo = ''
    }

</script>
우선 todo변수에 사용자의 입력을 저장하고 있다가 사용자가 제출을하면 todos배열을 업데이트 해주고 todo변수를 초기화해줍니다.
component/TodoInsert.svelte
<script>
    import CalendarPlus from 'svelte-material-icons/CalendarPlus.svelte'
    import { todos } from '../store/todo'

    let todo = ''
    function onChange(e) {
        todo = e.target.value
    }

    function onSubmit() {
        todos.insert(todo)
        todo = ''
    }

</script>

<form class="TodoInsert" on:submit|preventDefault={onSubmit}>
    <input placeholder="TODO" on:input={onChange} bind:value={todo}/>
    <button>
        <CalendarPlus/>
    </button>
</form>

<style lang="scss">
    .TodoInsert {
      display: flex;
      background: #495057;

      input {
        background: none;
        outline: none;
        border: none;
        padding: 0.5rem;
        font-size: 1.125rem;
        line-height: 1.5;
        color: white;

        &::placeholder {
          color: #dee2e6;
        }

        flex: 1;
      }

      button {
        background: none;
        outline: none;
        border: none;
        background: #868e96;
        color: white;
        padding-left: 1rem;
        padding-right: 1rem;
        font-size: 1.5rem;
        display: flex;
        align-items: center;
        cursor: pointer;
        transition: 0.1s background ease-in;

        &:hover {
          background: #adb5bd;
        }
      }
    }
</style>
TodoItem
일정을 보여주는 TodoItem에서는 일정을 보여주고 일정을 삭제할 수 있어야하기 때문에 todo와 index를 가지고 있어야 합니다. 그리고 사용자가 일정 삭제를 한다면 todos배열에서 해당 Index의 아이템을 삭제해줘야합니다.
component/TodoItem.svelte
<script>
    import {todos} from "../store/todo";

    export let text
    export let index

    function onRemove() {
        todos.delete(index)
    }
</script>

<div class="TodoItem-virtualized">
    <div class="TodoItem">
        <div class="CheckBox">
            <div class="Text">{text}</div>
        </div>
        <div class="remove" on:click={onRemove}>
            -
        </div>
    </div>
</div>

<style lang="scss">
    .TodoItem {
      padding: 1rem;
      display: flex;
      justify-content: space-between;
      align-items: center;
      &:nth-child(even) {
        background: #f8f9fa;
      }
      .checkbox {
        cursor: pointer;
        flex: 1;
        display: flex;
        align-items: center;
        svg {
          font-size: 1.5rem;
        }
        .text {
          margin-left: 0.5rem;
        }
        &.checked {
          svg {
            color: #22b8cf;
          }
          .text {
            color: #adb5bd;
            text-decoration: line-through;
          }
        }
      }
      .remove {
        display: flex;
        align-items: center;
        font-size: 1.5rem;
        color: #ff6b6b;
        cursor: pointer;
        &:hover {
          color: #ff8787;
        }
      }

      & + & {
        border-top: 1px solid #dee2e6;
      }
    }

    .TodoItem-virtualized {
      & + & {
        border-top: 1px solid #dee2e6;
      }
      &:nth-child(even) {
        background: #f8f9fa;
      }
    }
</style>
TodoList
TodoList에서는 todos의 배열을 바탕으로 TodoItem을 생성해줘야합니다.
each block을 이용해서 TodoItem을 생성해줍니다.
component/TodoList.svelte
<script>
    import {todos} from "../store/todo";
    import TodoItem from "./TodoItem.svelte";
</script>

<div class="TodoList">
    {#each $todos as todo, index}
        <TodoItem text={todo} index={index}/>
    {/each}
</div>

<style lang="scss">
  .TodoList {
    min-height: 320px;
    max-height: 513px;
    overflow-y: auto;
  }
</style>
App.svelte
이제 만든 컴포넌트들을 이용해서 페이지를 구성해야겠죠?
App.svelte에서 페이지 구성을 해주도록 합시다.
App.svelte
<script>
	import TodoInsert from './component/TodoInsert.svelte'
    import TodoList from "./component/TodoList.svelte";
</script>

<main>
    <div class="TodoTemplate">
        <div class="app-title">TODO List</div>
        <div class="content">
            <TodoInsert/>
            <TodoList/>
        </div>
    </div>
</main>

<style>
    .TodoTemplate {
        width: 512px;
        margin-left: auto;
        margin-right: auto;
        margin-top: 6rem;
        border-radius: 4px;
        overflow: hidden;
    }

    .app-title {
        background: #22b8cf;
        color: white;
        height: 4rem;
        font-size: 1.5rem;
        display: flex;
        align-items: center;
        justify-content: center;
    }

    .content {
        background: white;
    }
</style>
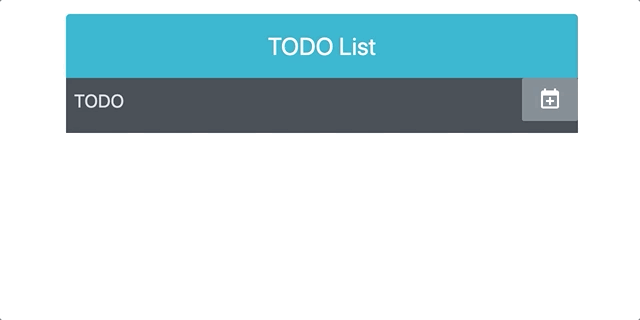
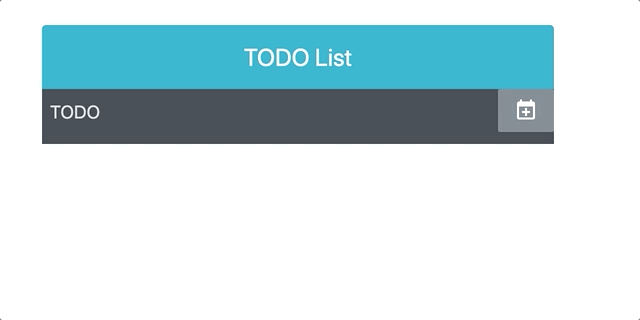
이렇게 하면 Todo app이 완성되었습니다.
한번 yarn run dev를 해서 페이지를 확인해보도록 할까요??