Custom Slider Widget 만들기(1)
carousel_slider | Flutter Package
이번 글에서는 Slider 위젯을 만들어 보려고 한다.
결과물이 궁금하신 분은 글 아랫 부분에 구현된 영상을 올려놨습니다.
기존 Flutter 기본 위젯으로 슬라이더가 가능한 스와이프 위젯을 만들 수 있다. PageView 위젯을 사용하여 만들 수도 있고 유명한 라이브러리인 carousel_slider 라이브러리를 사용해서도 이러한 UI는 쉽고 빠르게 만들어 볼 수 있다.
carousel_slider 라이브러리도 생성 기반은 PageView를 기반으로 하고 있고, PageView를 사용하다 보니 한 가지 문제점이 발생했다.
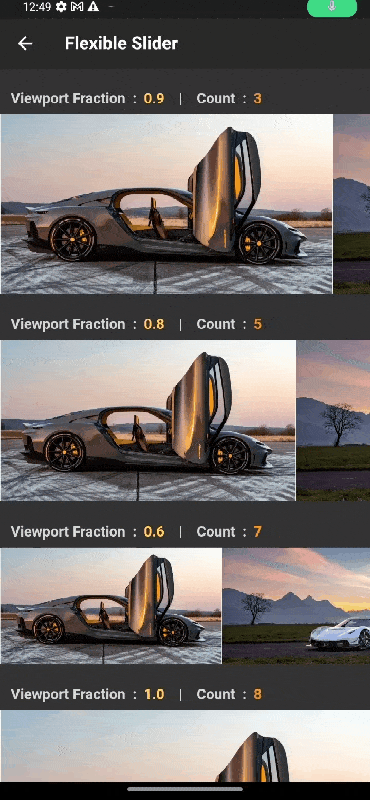
바로 viewportFraction 변수를 통해서 생성한 PageView 사이즈의 어느 정도로 위젯을 노출 시킬지를 결정할 수 있다. 최대 1.0 까지 설정하여 두 개의 이미지가 있다고 가정 했을 때 viewportFraction을 0.6으로 값을 주게 되면 첫 번째 이미지가 60%를 차지하고 두번 째 이미지가 40%를 차지할 수 있도록 해준다.
만약에 viewportFraction을 0.7로 주고, 스와이프를 해서 마지막 이미지에서 viewportFraction을 1.0으로 주게 되면 어떻게 될까 ? 한 번 시도해 보시면 우선 0.7에 맞는 포지션으로 이동했다가 다시 1.0으로 이미지가 이동하는 것을 확인할 수 있을 것이다.
이렇게 해서 Slider 뷰를 개발하게 되었다. viewportFraction 값에 상관 없이 가장 마지막 이미지에서는 Full 사이즈로 화면에 보이게 자연스러운 위젯을 만들어 보고 싶었다.
이미지의 개수와는 상관없이 처리할 수 있도록 만들어 보았다.
Flutter
먼저 기본적인 UI 구조의 코드이다.
단순한 구조이다. 수평(horizontal)으로 이동하는 ListView안에 아이템 UI를 배치할 것이고, ListView의 스크롤은 사용하지 않도록 비활성화 시켜주었다.
ListView의 스크롤은 GestureDetector에서 감지되는 영역 만큼 ScrollController를 사용해서 이동시켜 줄 것이다.
Column(
      children: [
        GestureDetector(
          onHorizontalDragUpdate: (details) {},
          onHorizontalDragEnd: (detail) {},
          child: SizedBox(
            width: widget.width ?? MediaQuery.of(context).size.width,
            height: _height,
            child: ListView.builder(
                controller: controller,
                scrollDirection: Axis.horizontal,
                physics: const NeverScrollableScrollPhysics(),
                itemCount: widget.itemCount,
                itemBuilder: (context, index) {
                  return Container(
                    height: _height,
                    width: index == widget.itemCount - 1
                        ? MediaQuery.of(context).size.width
                        : _width,
                    color: const Color.fromRGBO(115, 115, 115, 1),
                    child: widget.items[index],
                  );
                }),
          ),
        )
      ],
    );
UI 위젯에서 받아오는 파라미터로 설정해 주었다. 익숙하게 사용하기 위해 최대한 PageView 위젯의 파라미터와 비슷하게 구성하였다.
이미지를 가지고 있는 아이템과 이미지 갯수인 itemCount만 필수 파라미터로 받아오고 나머지 값은 null일 경우 고정 값을 미리 지정하였다.
  final int itemCount;
  final double? height;
  final double? width;
  final double viewportFraction;
  final List<Widget> items;
  final Function(int)? onPageChanged;
  const FlexibleCustomSlider({
    super.key,
    required this.itemCount,
    this.height,
    this.width,
    this.viewportFraction = 1.0,
    required this.items,
    this.onPageChanged,
  });
위젯안에서 사용해야 할 변수들을 선언해 주었다.
  ScrollController controller = ScrollController();
  late double _height;
  late double _width;

  double _currentPosition = 0.0;
  int _currentIndex = 0;
위젯의 초기 값을 세팅해 주는 부분의 코드이다.
    double viewportFraction =
        widget.viewportFraction > 1.0 || widget.viewportFraction < 0.0
            ? 1.0
            : widget.viewportFraction;
    _height = widget.height ?? MediaQuery.of(context).size.width;
    _width =
        widget.width ?? MediaQuery.of(context).size.width * viewportFraction;
이제 여기서 부터가 중요하다. onHorizontalDragUpdate는 수평 방향으로 제스쳐가 감지 될 때에 GestureDetector로 부터 DragUpdateDetails 객체를 리턴 받을 수 있다.
DragUpdateDetails 객체 안에 dx라고 x축 포지션의 이동 픽셀을 받을 수 있어서 현재 ScrollController의 포지션에서 이동 축 만큼을 제거해주면 제스쳐의 감지 픽셀과 동일하게 ListView를 이동시킬 수 있다.
currentPosition 변수를 사용하는 이유는 제스쳐를 놓았을 때에 수평 축의 마이너스인지 플러스 방향인지를 알기 위해서 사용되는 변수이다. 단순히 제스쳐의 수평 드래그에서 ScrollController의 픽셀 값을 대입하면 된다.
   onHorizontalDragUpdate: (details) {
            double _dx = controller.position.pixels;
            controller.jumpTo(_dx - details.delta.dx);
            _currentPosition = _dx;
          },
가장 복잡하고 까다로운 부분인 제스쳐가 끝날 때(?) 놓았을 때(?)에 수신되는 함수이다. onHorizontalDragEnd에서는 DragEndDetails 객체를 리턴 받아올 수 있는데, 여기서는
DragEndDetails 객체의 값으로 핸들링을 하지는 않았고, 디바이스의 사이즈와 viewportFraction의 비율, ScrollController의 현재 픽셀 값등을 사용하여 계산하였다.
currentPosition의 값을 사용하여 비교하는 조건식으로 currentPosition 값과 ScrollController 픽셀 값이 크고 작음으로 좌/우측 이동 방향을 결정하여 개발 하였다.
이 부분의 코드는 직접 사용해보면서 값을 수정해서 더 부드러운 위젯을 만들기를 추천한다. 저는 실제 프로덕션 앱에서는 더 복잡한 로직으로 구성이 되어있는데, 복합적인 상태 관리가 많아 블로그 글을 작성하기 위해 개인 프로젝트에 다시 개발을 한것이다.
아래 소스코드 전체를 공유했으니 해당 소스코드만 복사하셔서 바로 사용하실 수 있게 개발하였다.
 onHorizontalDragEnd: (detail) {
            double _dy = controller.position.pixels;
            if (_dy > _currentPosition) {
              double _currentMaxWidth = _width * (_currentIndex + 1);
              double _halfWidth = _width * _currentIndex;
              double _diffMaxWidth = (_currentMaxWidth - _halfWidth) / 3;
              double _point = _halfWidth + _diffMaxWidth;
              _currentIndex = _dy > _point ? _currentIndex + 1 : _currentIndex;
              _currentIndex = _currentIndex == widget.itemCount
                  ? _currentIndex - 1
                  : _currentIndex;
            } else {
              double _currentMaxWidth = _width * _currentIndex;
              double _halfWidth = _width / 3;
              double _point = _currentMaxWidth - _halfWidth;
              _currentIndex = _dy > _point ? _currentIndex : _currentIndex - 1;
              _currentIndex = _currentIndex < 0 ? 0 : _currentIndex;
            }
            controller.animateTo(_width * _currentIndex,
                duration: const Duration(milliseconds: 150),
                curve: Curves.easeIn);
            if (widget.onPageChanged != null) {
              widget.onPageChanged!(_currentIndex);
            }
          },
Result
Git
https://github.com/boglbbogl/flutter_velog_sample/tree/main/lib/ui/slider/flexible
Code
import 'package:flutter/material.dart';
class FlexibleCustomSlider extends StatefulWidget {
final int itemCount;
final double? height;
final double? width;
final double viewportFraction;
final List<Widget> items;
final Function(int)? onPageChanged;
const FlexibleCustomSlider({
super.key,
required this.itemCount,
this.height,
this.width,
this.viewportFraction = 1.0,
required this.items,
this.onPageChanged,
});
State<FlexibleCustomSlider> createState() => _FlexibleCustomSliderState();
}
class _FlexibleCustomSliderState extends State<FlexibleCustomSlider> {
ScrollController controller = ScrollController();
late double _height;
late double _width;
double _currentPosition = 0.0;
int _currentIndex = 0;
Widget build(BuildContext context) {
double viewportFraction =
widget.viewportFraction > 1.0 || widget.viewportFraction < 0.0
? 1.0
: widget.viewportFraction;
_height = widget.height ?? MediaQuery.of(context).size.width;
_width =
widget.width ?? MediaQuery.of(context).size.width * viewportFraction;
return Column(
children: [
GestureDetector(
onHorizontalDragUpdate: (details) {
double _dy = controller.position.pixels;
controller.jumpTo(_dy - details.delta.dx);
_currentPosition = _dy;
},
onHorizontalDragEnd: (detail) {
double _dy = controller.position.pixels;
if (_dy > _currentPosition) {
double _currentMaxWidth = _width * (_currentIndex + 1);
double _halfWidth = _width * _currentIndex;
double _diffMaxWidth = (_currentMaxWidth - _halfWidth) / 3;
double _point = _halfWidth + _diffMaxWidth;
_currentIndex = _dy > _point ? _currentIndex + 1 : _currentIndex;
_currentIndex = _currentIndex == widget.itemCount
? _currentIndex - 1
: _currentIndex;
} else {
double _currentMaxWidth = _width * _currentIndex;
double _halfWidth = _width / 3;
double _point = _currentMaxWidth - _halfWidth;
_currentIndex = _dy > _point ? _currentIndex : _currentIndex - 1;
_currentIndex = _currentIndex < 0 ? 0 : _currentIndex;
}
controller.animateTo(_width * _currentIndex,
duration: const Duration(milliseconds: 150),
curve: Curves.easeIn);
if (widget.onPageChanged != null) {
widget.onPageChanged!(_currentIndex);
}
},
child: SizedBox(
width: widget.width ?? MediaQuery.of(context).size.width,
height: _height,
child: ListView.builder(
controller: controller,
scrollDirection: Axis.horizontal,
physics: const NeverScrollableScrollPhysics(),
itemCount: widget.itemCount,
itemBuilder: (context, index) {
return Container(
height: _height,
width: index == widget.itemCount - 1
? MediaQuery.of(context).size.width
: _width,
color: const Color.fromRGBO(115, 115, 115, 1),
child: widget.items[index],
);
}),
),
)
],
);
}
}마무리
이번 글에서는 간단한 슬라이더 뷰를 만들어 보았다. 소스 코드 복사해서 직접 실행해 보시면 로직을 빠르게 이해하실 수 있고, 필요하시다면 더 개선해서 사용하시길 추천합니다.
계속해서 슬라이더/스와이프와 관련된 위젯을 개발하여 공유하는 글을 작성하도록 하겠습니다.

감사합니다 :) 잘 읽었습니다