기존 뷰 분석
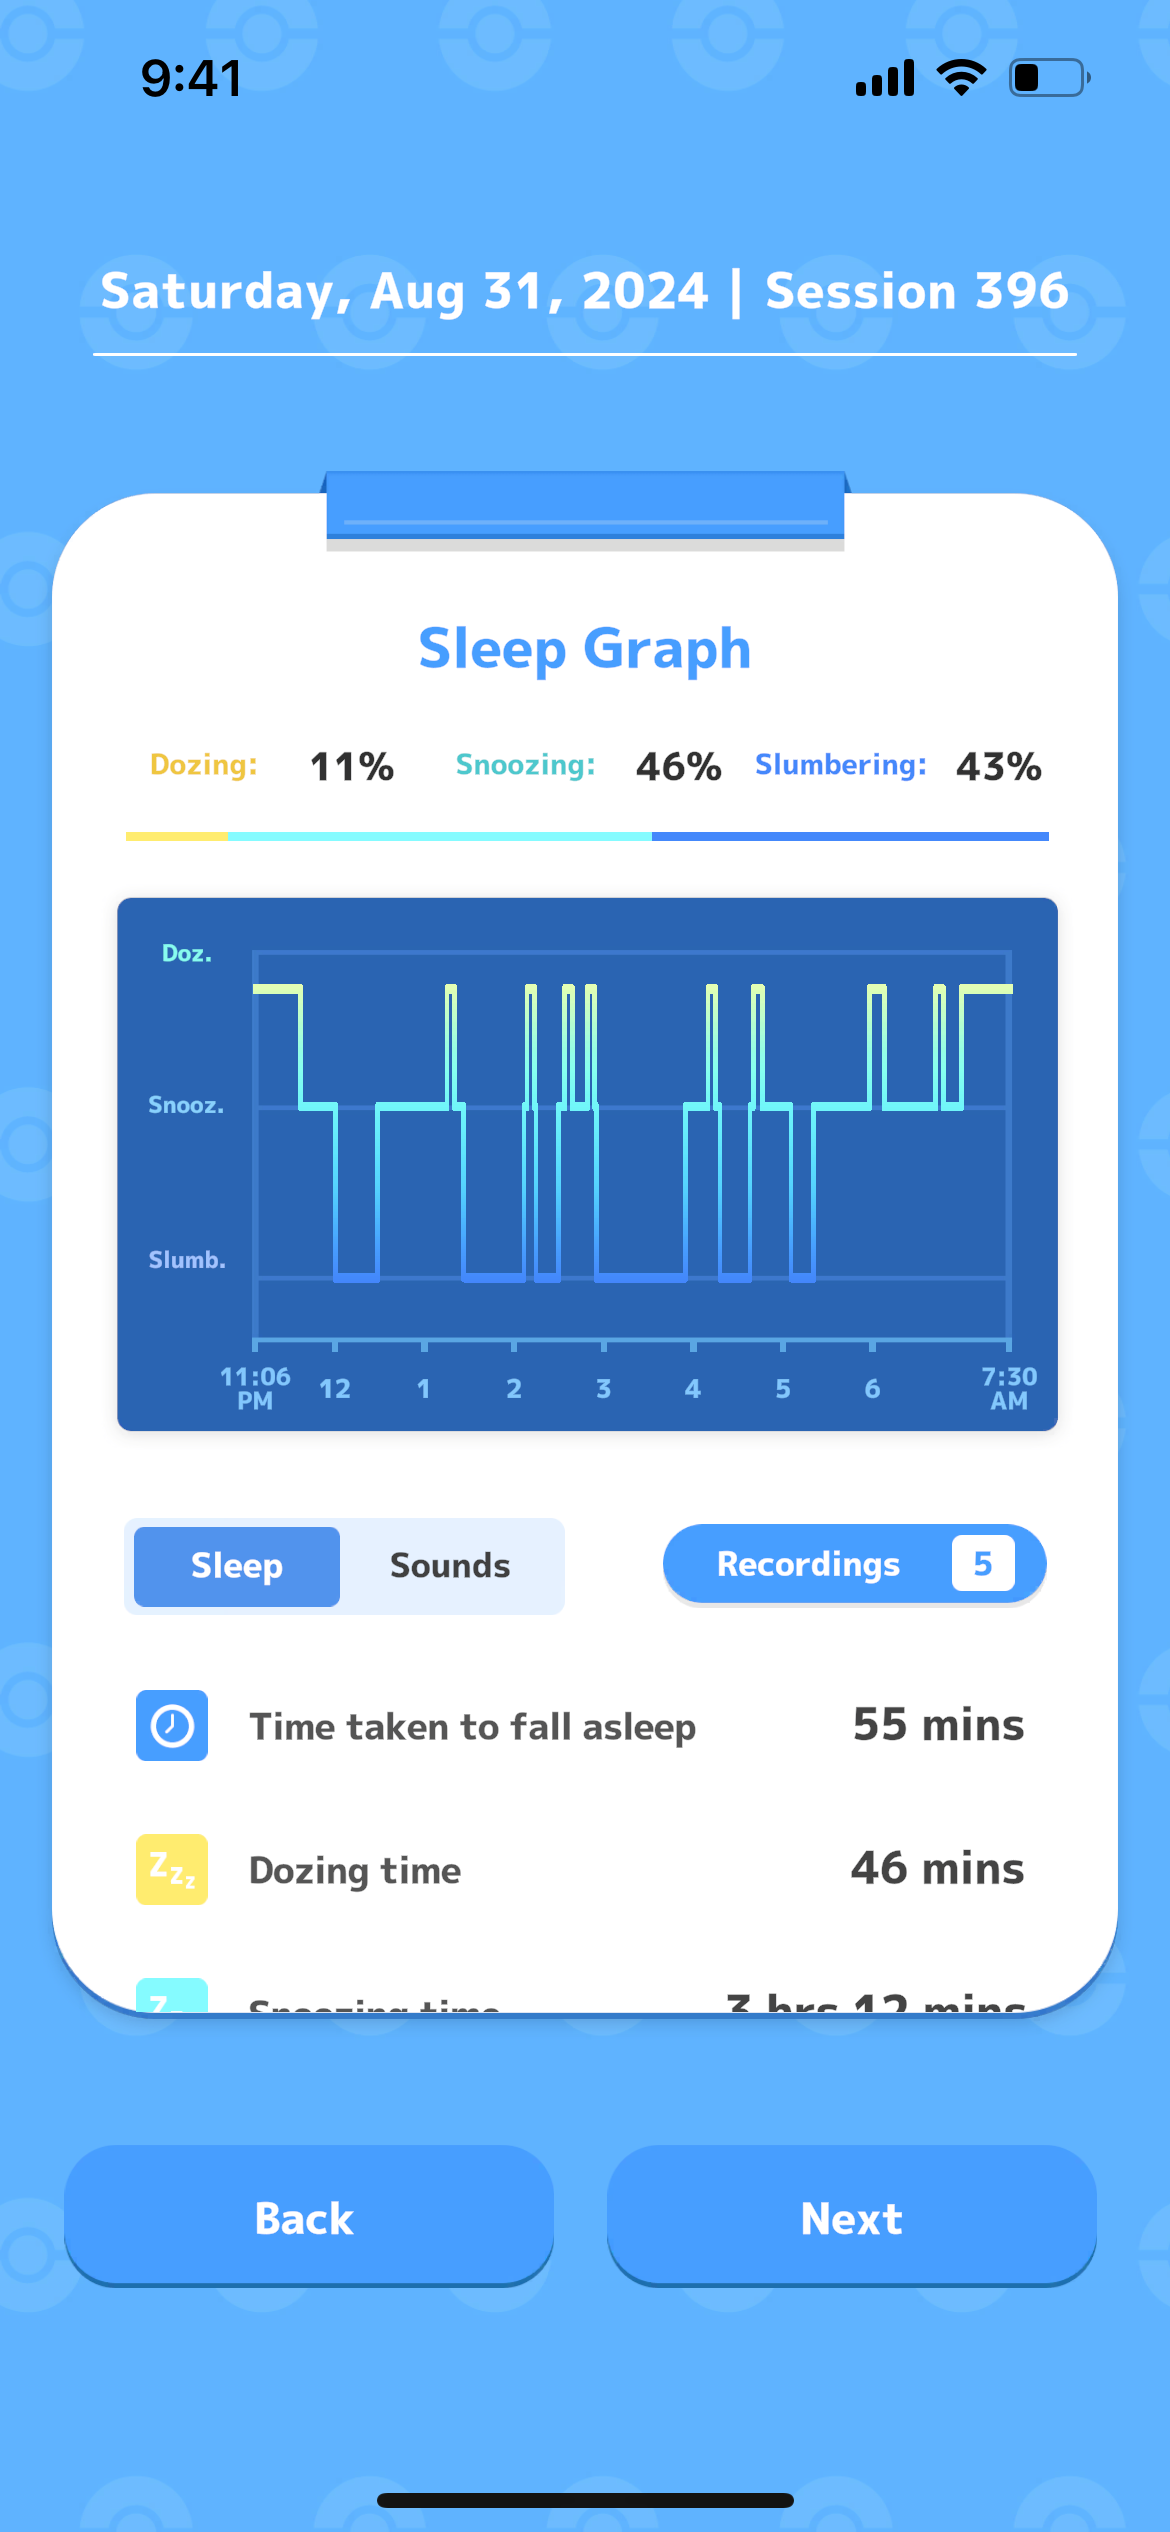
포켓몬 슬립에서 나오는 수면 그래프를 그려볼 것이다.
각 그래프 요소를 직접 배치해서 커스텀뷰를 만들 것이며
이렇게 그래프를 보여주는 애니메이션까지 만들어 볼 것이다.
커스텀 레이아웃 만들기
https://www.youtube.com/watch?v=xcfEQO0k_gU&t=310s
android compose-samples 중에 비슷하게 JetLagged라고 수면 측정 앱이 있다.
여기서 수면 그래프를 그린 방식에 대해 동영상이 있어서 이 방식을 거의 참고해서 만들었다.
@Composable
fun SleepGraph(
    sleepData: SleepData,
    yLabelsInfo: List<YLabel>,
    yLabel: @Composable (yLabel: YLabel) -> Unit,
    timeLabel: @Composable (index: Int) -> Unit,
    modifier: Modifier = Modifier,
) {

    val sleepTimeXLabel = @Composable {
        repeat(sleepData.hourDuration) {
            timeLabel(it)
        }
    }

    val yLabels = @Composable {
        repeat(yLabelsInfo.size) { index ->
            yLabel(yLabelsInfo[index])
        }
    }

    val rowCount = yLabelsInfo.maxOf { it.position }

    val density = LocalDensity.current

    val yAxisWidth = with(density) {
        3.dp.roundToPx()
    }

    val xAxisHeight = with(density) {
        3.dp.roundToPx()
    }

    val xTickerHeight = with(density) {
        5.dp.roundToPx()
    }

    val graphArea = @Composable {
        GraphArea(
            modifier = Modifier.fillMaxSize(),
            sleepData = sleepData,
            yLabelsInfo = yLabelsInfo,
            xLabelCount = sleepData.hourDuration,
            rowCount = rowCount,
            yAxisWidth = yAxisWidth,
            xAxisHeight = xAxisHeight,
            xAxisTickerHeight = xTickerHeight,
            yLabelPositions = yLabelsInfo.map { it.position }
        )
    }
}
Layout을 그리기 위해 필요한 컴포저블들을 세팅하는 과정이다.
sleepTimeXLabel
- x 좌표 레이블 수이며 sleepData의 hourDuration 만큼 생성한다. hourDuration은 잠든 시간부터 깬 시간까지 포함된 시간의 수 ex. 4시 반에 자서 8시 25분에 깨면 4,5,6,7,8 로 5개가 된다.
yLabelsInfo
- yLabel에 대한 정보이다.
data class YLabel(
val description: String,
val position: Int,
val key: Any? = null,
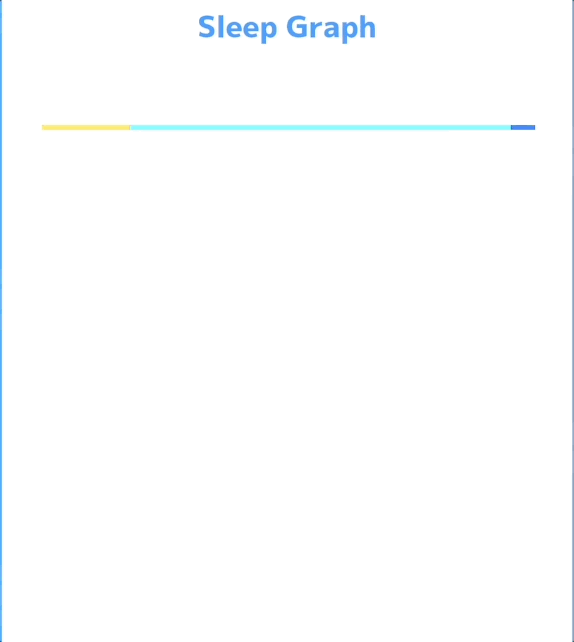
)position은 y 좌표값이다. 위 그래프를 보면 일정한 간격이 아니기에 직접 설정해주도록 하였다.
GraphArea
- 그래프를 그리는 공간이다.
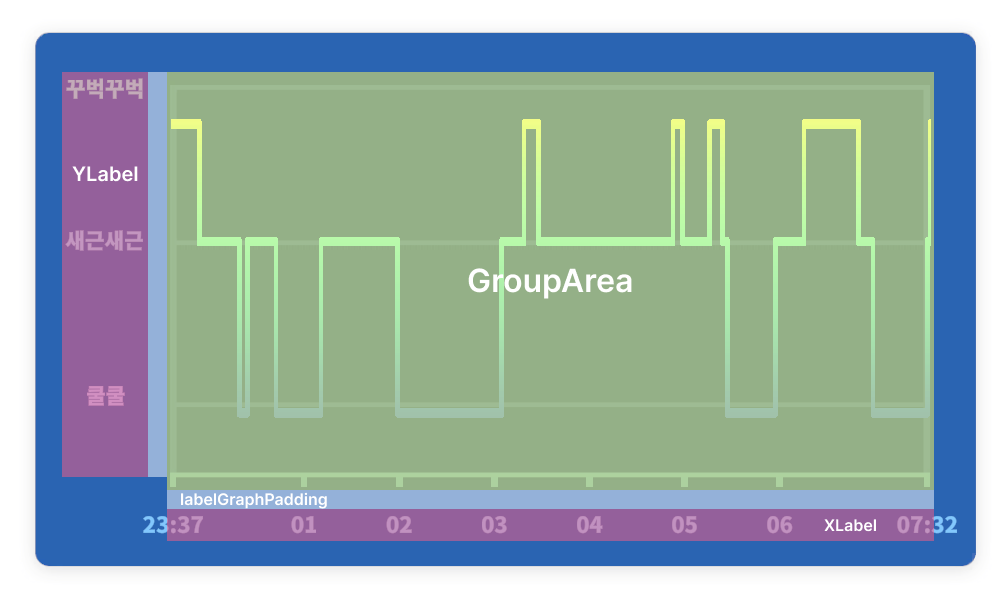
각 영역은 이렇게 분리되어 있다.
레이아웃 측정하기
- 우선 레이아웃에 배치할 요소들의 배치될 크기를 측정한 후 이를 배치해야 한다.
Layout(
    contents = listOf(sleepTimeXLabel, yLabels, graphArea),
    modifier = modifier
        .background(Color(0xFF0D63B0))
        .padding(start = 16.dp, top = 16.dp, end = 24.dp, bottom = 16.dp)
) { (sleepTimeXLabelMeasurables, yLabelsMeasurables, graphAreaMeasureable), constraints ->

    val adjustedConstraints = constraints.copy(
        minWidth = 0,
        minHeight = 0
    )

    var yLabelMaxWidth = 0

    val labelGraphPadding = 12.dp.roundToPx()

    val sleepTimeXLabelPlaceables = sleepTimeXLabelMeasurables.map { measurable ->
        val placeable = measurable.measure(adjustedConstraints)
        placeable
    }

    val yLabelsPlaceables = yLabelsMeasurables.map { measurable ->
        val placeable = measurable.measure(adjustedConstraints)
        yLabelMaxWidth = maxOf(yLabelMaxWidth, placeable.width)
        placeable
    }

    val groupAreaWidth = constraints.maxWidth - yLabelMaxWidth - labelGraphPadding
    val groupAreaHeight = constraints.maxHeight - sleepTimeXLabelPlaceables.first().height - labelGraphPadding

    val groupAreaPlaceables = graphAreaMeasureable.first().measure(
        constraints.copy(
            minWidth = groupAreaWidth,
            maxWidth = groupAreaWidth,
            minHeight = groupAreaHeight,
            maxHeight = groupAreaHeight
        )
    )
}
constraints를 통해서 측정해서 배치할 수 있는 placeable을 만든다.
이 때, 그냥 constraints를 사용하면 부모에 설정되어 있는 제약사항이 포함되어서 측정이 된다.
만약, wrapContentSize를 하고 싶다면 adjustedConstraints처럼 min을 0으로 만들어야 한다.
레이아웃 배치하기
val yLabelHalfHeight = yLabelsPlaceables.first().height / 2

val xPositionJump = groupAreaWidth / (sleepData.hourDuration - 1)

// placement
layout(constraints.maxWidth, constraints.maxHeight) {
    var xPosition = yLabelMaxWidth + labelGraphPadding
    val yPosition = constraints.maxHeight - sleepTimeXLabelPlaceables.first().height

    sleepTimeXLabelPlaceables.forEach { placeable ->
        placeable.place(
            x = xPosition + yAxisWidth / 2 - placeable.width / 2,
            y = yPosition
        )
        xPosition += xPositionJump
    }

    val yLabelHeight = groupAreaHeight - xTickerHeight - xAxisHeight
    val yLabelInterval = yLabelHeight.toFloat() / rowCount

    val yLabelBottom = yPosition - labelGraphPadding - xTickerHeight - xAxisHeight
    yLabelsPlaceables.forEachIndexed { index, placeable ->
        val yPos = yLabelsInfo[index].position * yLabelInterval
        placeable.place(
            x = yLabelMaxWidth - placeable.width,
            y = yLabelBottom - yPos.toInt()
        )
    }

    groupAreaPlaceables.place(
        x = yLabelMaxWidth + labelGraphPadding,
        y = yLabelHalfHeight
    )
}
이제 placeable을 가지고 원하는 위치에 배치해준다.
GroupArea
@Composable
fun GraphArea(
    modifier: Modifier = Modifier,
    sleepData: SleepData,
    yLabelsInfo: List<YLabel>,
    xLabelCount: Int,
    rowCount: Int,
    yAxisWidth: Int,
    xAxisHeight: Int,
    xAxisTickerHeight: Int = 0,
    yAxisTickerWidth: Int = 0,
    yLabelPositions: List<Int>,
) {
    val xAxisColor = Color(0xFF6DA3DE)
    val yAxisColor = Color(0xFF6DA3DE).copy(alpha = 0.6f)

    Box(
        modifier = modifier
            .drawBehind {
                val canvasWidth = size.width
                val canvasHeight = size.height

                // Draw X Axis
                drawRect(
                    color = xAxisColor,
                    topLeft = Offset(0f, canvasHeight - xAxisHeight - xAxisTickerHeight),
                    size = Size(canvasWidth - yAxisTickerWidth, xAxisHeight.toFloat())
                )

                // Draw Y Axis
                drawRect(
                    color = yAxisColor,
                    topLeft = Offset(yAxisTickerWidth.toFloat(), 0f),
                    size = Size(
                        yAxisWidth.toFloat(),
                        canvasHeight - xAxisHeight - xAxisTickerHeight
                    )
                )
                drawRect(
                    color = yAxisColor,
                    topLeft = Offset(canvasWidth - yAxisWidth, 0f),
                    size = Size(
                        yAxisWidth.toFloat(),
                        canvasHeight - xAxisHeight - xAxisTickerHeight
                    )
                )

                // Draw Y Axis Guideline
                val yLabelHeight = canvasHeight - xAxisTickerHeight - xAxisHeight
                val yLabelInterval = yLabelHeight / rowCount

                yLabelPositions.forEach { position ->
                    val yPos = (rowCount - position) * yLabelInterval
                    // Align guideline with the label
                    drawRect(
                        color = yAxisColor,
                        topLeft = Offset(yAxisWidth.toFloat(), yPos),
                        size = Size(canvasWidth - yAxisWidth * 2, xAxisHeight.toFloat())
                    )

                    // Draw y-axis tick
                    drawRect(
                        color = yAxisColor,
                        topLeft = Offset(0f, yPos - xAxisHeight / 2),
                        size = Size(yAxisTickerWidth.toFloat(), yAxisWidth.toFloat())
                    )
                }

                // Draw X Ticks
                val xLabelInterval =
                    (canvasWidth - yAxisTickerWidth - yAxisWidth) / (xLabelCount - 1)
                for (i in 0 until xLabelCount) {
                    val xPos = i * xLabelInterval
                    drawRect(
                        color = xAxisColor,
                        topLeft = Offset(xPos, canvasHeight - xAxisTickerHeight),
                        size = Size(yAxisWidth.toFloat(), xAxisTickerHeight.toFloat())
                    )
                }
            }

    ) {

        SleepRoundedPath(
            sleepData,
            yLabelsInfo = yLabelsInfo,
            xAxisHeight = xAxisHeight,
            xAxisTickerHeight = xAxisTickerHeight,
            yAxisTickerWidth = yAxisTickerWidth
        )
    }
}
GroupArea는 drawBehind Modifier를 이용하여서 축과 보조선을 그렸다.
여기까지 하면
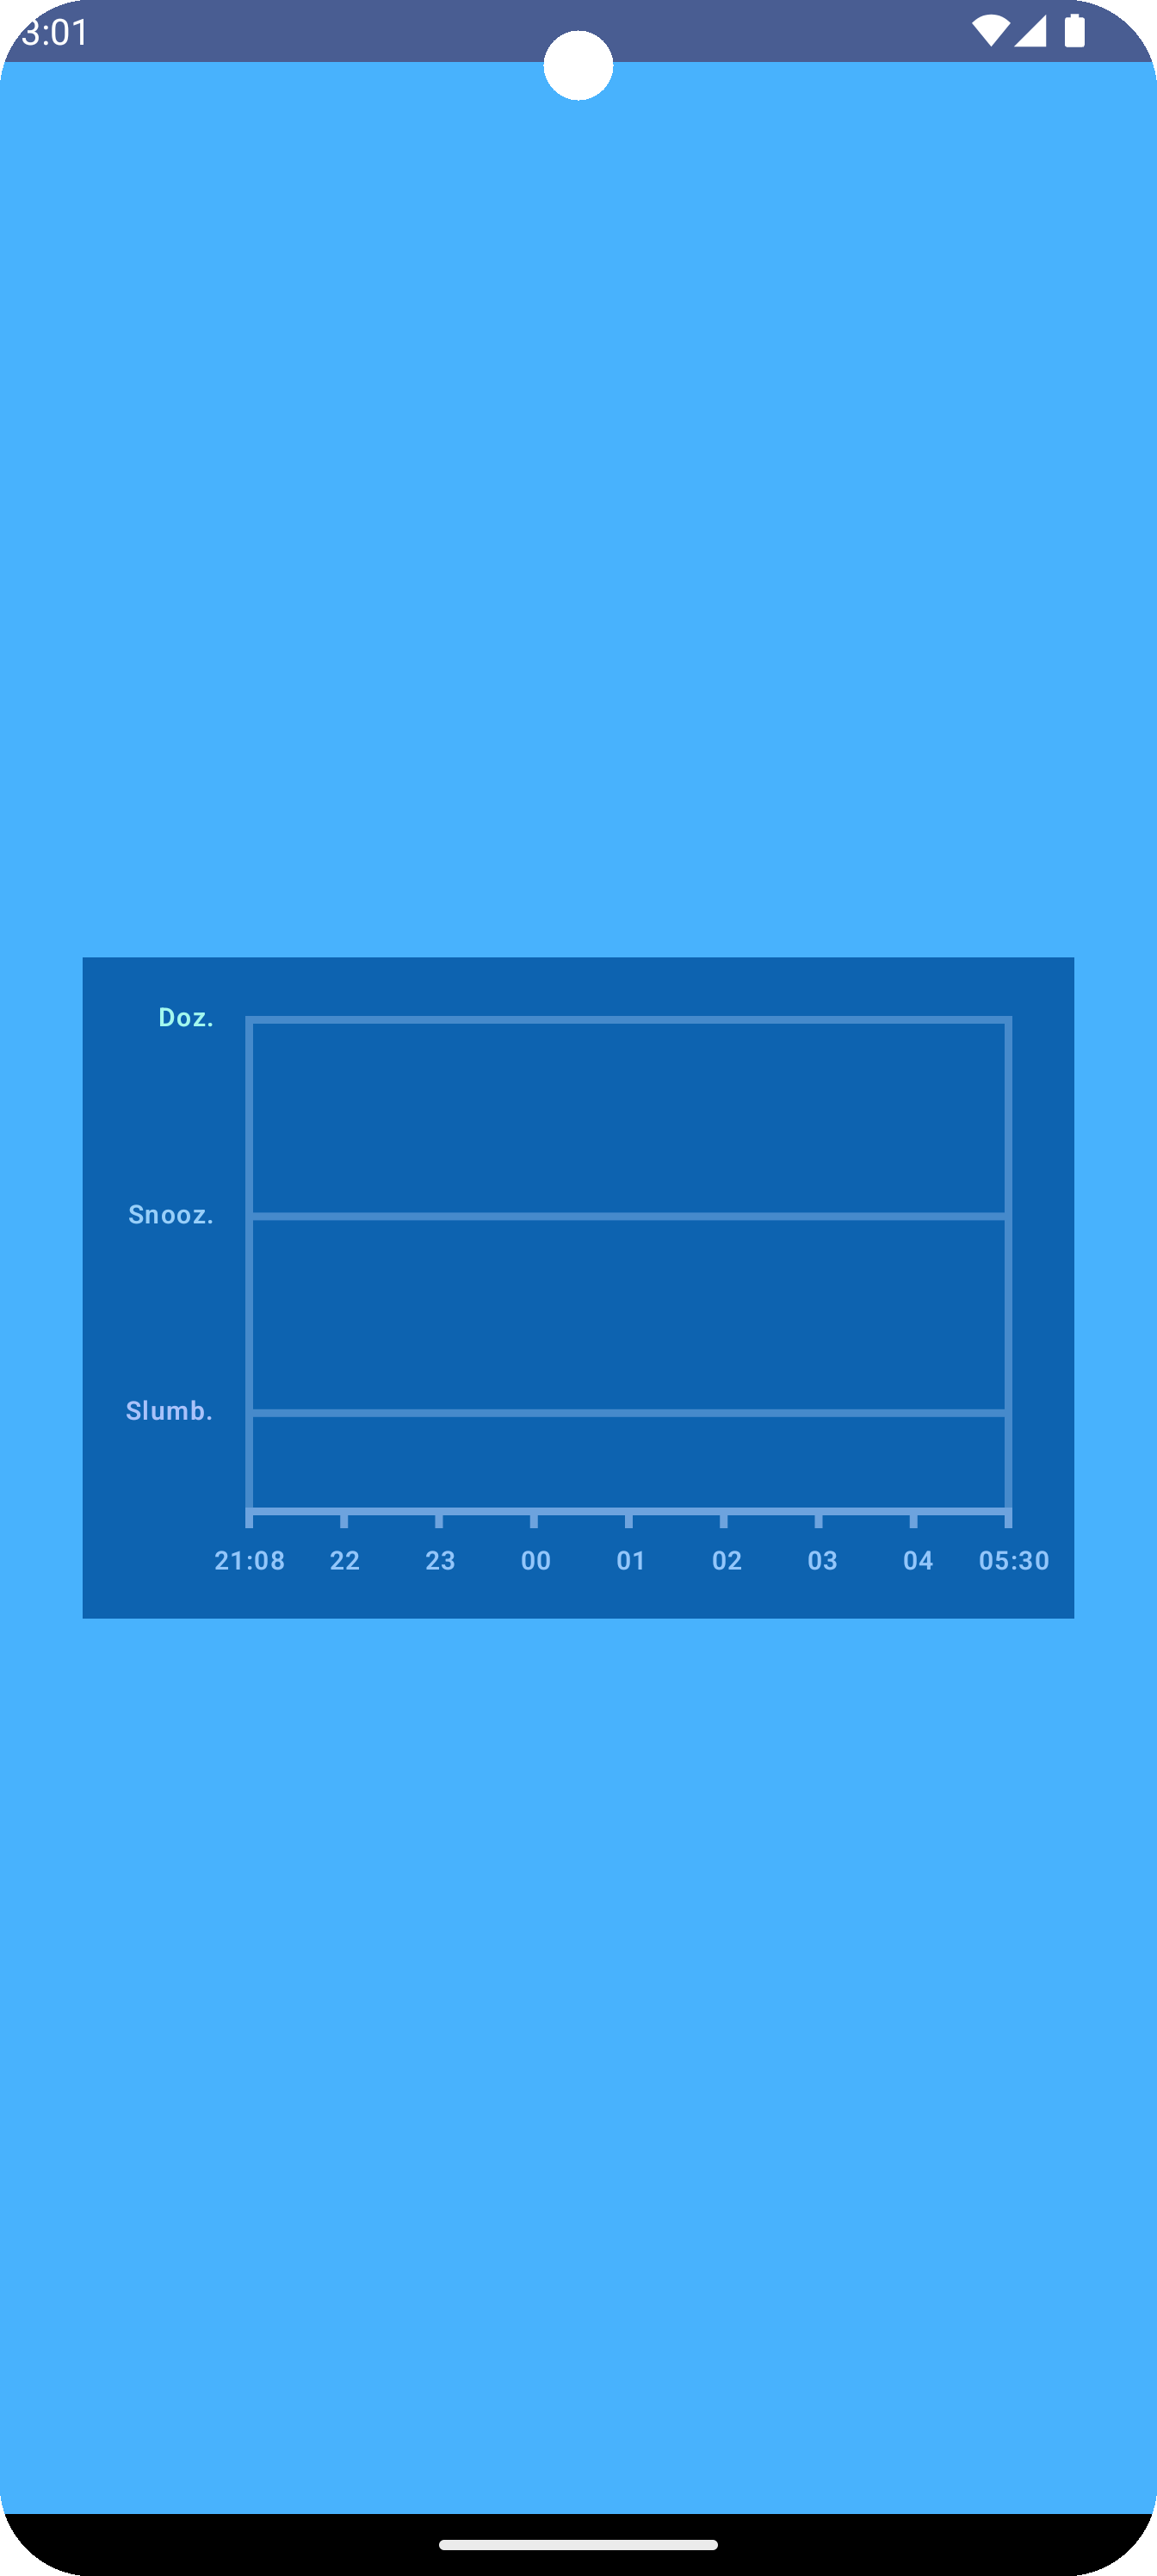 이렇게 그려진다!
그래프
@Composable
private fun SleepRoundedPath(
    sleepData: SleepData,
    yLabelsInfo: List<YLabel>,
    xAxisHeight: Int,
    xAxisTickerHeight: Int,
    yAxisTickerWidth: Int = 0,
) {
    val textMeasurer = rememberTextMeasurer()

    var animationProgress by remember {
        mutableFloatStateOf(0f)
    }

    LaunchedEffect(Unit) {
        animationProgress = 1f
    }

    val animatedProgress by animateFloatAsState(
        targetValue = animationProgress,
        label = "progress",
        animationSpec = tween(
            durationMillis = 3000,
            easing = FastOutSlowInEasing
        )
    )

    Spacer(
        modifier = Modifier
            .fillMaxSize()
            .drawWithCache {
                val cornerRadiusStartPx = 2.dp.toPx()

                val lineThicknessPx = 3.dp.toPx()
                val roundedRectPath = Path()
                roundedRectPath.addRoundRect(
                    RoundRect(
                        rect = Rect(
                            Offset(x = 0f, y = 0f),
                            Size(
                                this.size.width,
                                this.size.height
                            )
                        ),
                    )
                )
                val roundedCornerStroke = Stroke(
                    lineThicknessPx,
                    cap = StrokeCap.Round,
                    join = StrokeJoin.Round,
                )

                val height = size.height - xAxisHeight - xAxisTickerHeight
                val width = size.width - yAxisTickerWidth - yAxisTickerWidth
                val yInterval =
                    height / yLabelsInfo.maxOf { it.position }
                val xInterval =
                    width / sleepData.minuteDuration

                val sleepGraphPath = generateSleepPath(
                    size = Size(width, height),
                    sleepData = sleepData,
                    yLabelsInfo = yLabelsInfo,
                    yInterval = yInterval,
                    xInterval = xInterval,
                    xAxisHeight = xAxisHeight
                )
                val gradientBrush =
                    Brush.verticalGradient(
                        colorStops = arrayOf(
                            0f to Color(0xFFDDFFD8),
                            0.3f to Color(0xFF52F5F7),
                            0.6f to Color(0xFF217BE2)
                        ),
                        startY = yInterval * 5,
                        endY = height
                    )
                val textResult = textMeasurer.measure(AnnotatedString("Hi"))

                onDrawBehind {
                    drawSleepPath(
                        roundedRectPath,
                        sleepGraphPath,
                        gradientBrush,
                        roundedCornerStroke,
                        animatedProgress,
                        textResult,
                        cornerRadiusStartPx
                    )
                }
            }
    )
}
그래프는 SleepRoundedPath로 따로 분리를 하여서 그렸다.
brush랑 stroke를 캐싱하기 위하여 drawWithCache를 사용하였다.
그래프 그리기
private fun generateSleepPath(
    sleepData: SleepData,
    yLabelsInfo: List<YLabel>,
    yInterval: Float,
    xInterval: Float,
    xAxisHeight: Int,
    size: Size,
): Path {
    val path = Path()

    var previousPeriod: SleepPeriod? = null

    sleepData.periods.forEach { period ->
        var type = yLabelsInfo.find { it.key == period.type }?.position ?: 0

        if (period.type == SleepType.DOZE) type -= 5

        val yPos = size.height - type * yInterval + xAxisHeight / 2

        val startXPos =
            period.startTime.minuteDiff(sleepData.startTime).toFloat() * xInterval

        if (previousPeriod != null) {
            path.lineTo(
                x = startXPos,
                y = yPos
            )
        } else {
            path.moveTo(
                x = startXPos,
                y = yPos
            )
        }

        val endXPos = period.endTime.minuteDiff(sleepData.startTime).toFloat() * xInterval

        path.lineTo(
            x = endXPos,
            y = yPos
        )

        previousPeriod = period
    }

    return path
}
여기까지 하면
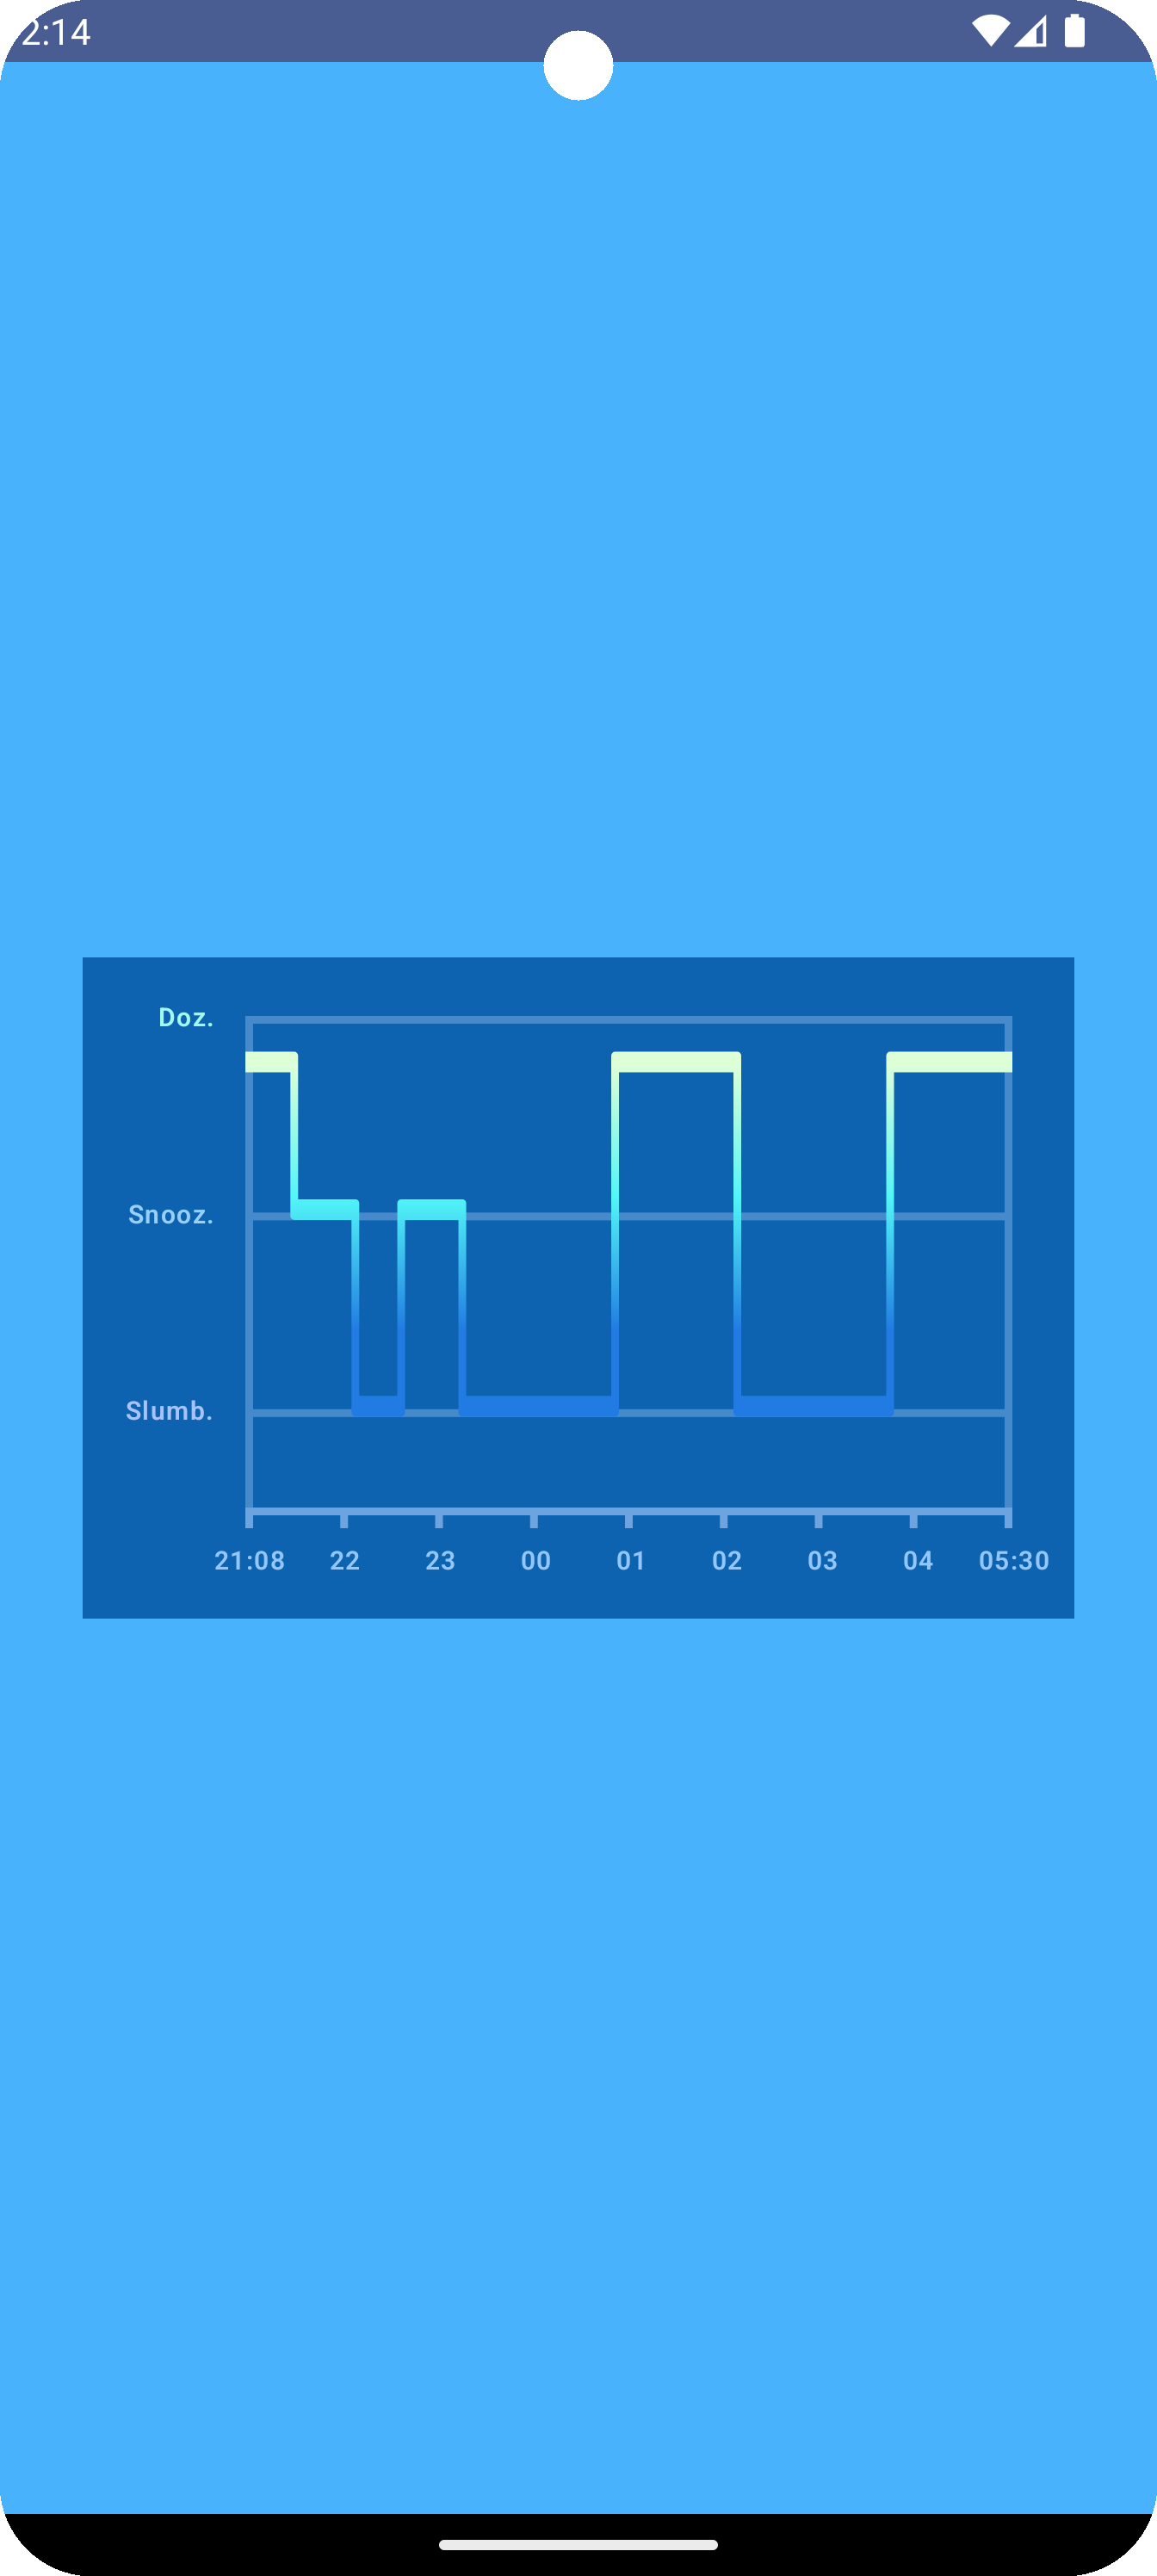 이렇게 그려진다!
애니메이션 적용
var animationProgress by remember {
    mutableFloatStateOf(0f)
}

LaunchedEffect(Unit) {
    animationProgress = 1f
}

val animatedProgress by animateFloatAsState(
    targetValue = animationProgress,
    label = "progress",
    animationSpec = tween(
        durationMillis = 3000,
        easing = FastOutSlowInEasing
    )
)

private fun DrawScope.drawSleepPath(
    roundedRectPath: Path,
    sleepGraphPath: Path,
    gradientBrush: Brush,
    roundedCornerStroke: Stroke,
    animationProgress: Float,
    textResult: TextLayoutResult,
    cornerRadiusStartPx: Float,
) {
    val pathMeasure = PathMeasure()
    pathMeasure.setPath(sleepGraphPath, false)

    val segmentPath = Path()
    var currentLength = 0f
    val pathLength = pathMeasure.length

    val segmentLength = pathLength * animationProgress

    while (currentLength < segmentLength) {
        val nextSegmentLength =
            (segmentLength - currentLength).coerceAtMost(pathLength - currentLength)

        pathMeasure.getSegment(
            currentLength,
            currentLength + nextSegmentLength,
            segmentPath,
            true
        )

        currentLength += nextSegmentLength
    }

    clipPath(roundedRectPath) {
        drawPath(
            path = segmentPath,
            style = roundedCornerStroke,
            brush = gradientBrush
        )
    }

}
animationProgress만큼 path를 잘라서 그려주는 방식으로 애니메이션을 적용하였다.
최종 결과

깃헙 링크