재질 클래스
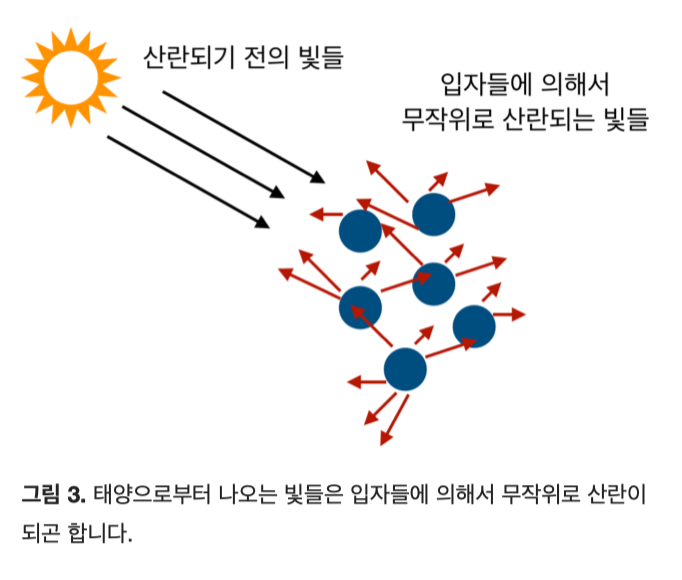
세상의 다양한 재질은 빛의 산란(Scattering)과 감쇠(Attenuate)로 재질이 표현됨
챕터 5에서 살펴본 matte재질도 빛의 산란과 감쇄로 구현됨
 빛의 산란 빛의 산란 | 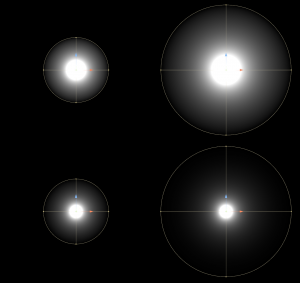 빛의 감쇠 빛의 감쇠 |
|---|
class Material
{
public:
    virtual ~Material() = default;

    //재질 별 빛 산란 메서드
    virtual bool scatter(
        const Ray& r_in, //Ray(빛) 입사광
        const HitRecord& rec, //충돌지점 정보 (법선, point)
        Color& attenuation, //빛 감쇠(색 변화)
        Ray& scattered //빛이 산란된 후의 광선
    ) const
    {
        return false;
    }
};
이런 메서드를 만들어주자
근데 문제가 있음
지금 선언된 HitRecord 클래스는 Hittable.h에 들어있음
잘생각해보자
Material은 충돌지점에서의 빛 계산을 위해HitRecord를 참조하고 있어야함HitRecord는 충돌지점의 처리를 위해Material을 참조하고 있어야함
즉,
Materual -> HitRecord
HitRecord -> Material
이라는 순환참조관계가 만들어짐
이걸 해결하는건 쉬움
그냥 전방선언하면됨
class Material;

class HitRecord
{
public:
    Point3 p;
    Vector3 normal;
    shared_ptr<Material> mat;
    double t;
    bool front_face;

    void set_face_normal(const Ray& r, const Vector3& outward_normal)
    {
        // 1. 광선(Ray)과 밖을 향하는 법선(outward_normal)의 내적이 음수(< 0.0)인지 확인합니다.
        // 내적이 음수면: 광선이 밖에서 안으로 들어오는 중 (앞면, front_face = true)
        // 내적이 양수면: 광선이 안에서 밖으로 나가는 중 (뒷면, front_face = false)
        front_face = dot(r.direction(), outward_normal) < 0.0;

        // 2. 항상 법선이 광선과 마주 보게(내적이 음수가 되게) 방향을 통일해 줍니다.
        // 앞면을 때렸다면 밖을 향하는 법선을 그대로 사용하고,
        // 뒷면(물체 내부)을 때렸다면 법선을 뒤집어서(-outward_normal) 사용합니다.
        normal = front_face ? outward_normal : -outward_normal;
    }
};
그냥 이렇게 바꾸면 끝~
그리고 Sphere.h에서 구체가 정의될때 Material도 정의되게 한 후, HitRecord의 Material을 해당 MAterial로 초기화해주면 됨
//...

class Sphere : public Hittable
{
private:
    //...
    shared_ptr<Material> mat; //추가
public:
    Sphere();
    Sphere(const Point3& center, double r) : center(center), radius(r) {}; //수정

    bool hit(const Ray& r, MinMaxInterval ray_t, HitRecord& hitRec) const override
    {
        //...

        hitRec.t = root;
        hitRec.p = r.at(hitRec.t);
        Vector3 outward_normal = (hitRec.p - center) / radius;
        hitRec.set_face_normal(r, outward_normal);
        hitRec.mat = mat; //추가

        return true;
    }
};

#endif
람베르트 빛 반사 수정
class Lambertian : public Material
{
public:
    Lambertian(const Color& albedo) : albedo(albedo) {}

    bool scatter(
        const Ray& r_in,
        const HitRecord& rec,
        Color& attenuation,
        Ray& scattered) const override
    {
        auto scatter_direction = rec.normal + random_unit_vector();
        scattered = Ray(rec.p, scatter_direction);
        attenuation = albedo;
        return true;
    }

private:
    Color albedo;
};
이런 Material을 상속받는 Lambertian머티리얼 클래스를 만들어주자
참고로 벡터의 Normal을 구해야할때, 0으로 나누는 division by zero를 유발할 수 있으므로,
random_unit_vector를 사용하는 곳에서 벡터가 0이 되는 경우를 찾아 미리 값을 수정해주어야함
이는 Vector3::near_zero()라는 메서드를 만들어 해결~
//Vector3.h...
bool near_zero() const
{
    double s = 1e-8; //임의의 작은 값
    return (fabs(e[0]) < s) && (fabs(e[1]) < s) && (fabs(e[2]) < s);
}
그리고 위의 Labertian클래스의 Scattering메서드를 수정!
//Lambertian.h ...
 bool scatter(
    const Ray& r_in,
    const HitRecord& rec,
    Color& attenuation,
    Ray& scattered) const override
{

    auto scatter_direction = rec.normal + random_unit_vector();

    if (scatter_direction.near_zero())
    {
        scatter_direction = rec.normal;
    }

    scattered = Ray(rec.p, scatter_direction);
    attenuation = albedo;
    return true;
}
반사
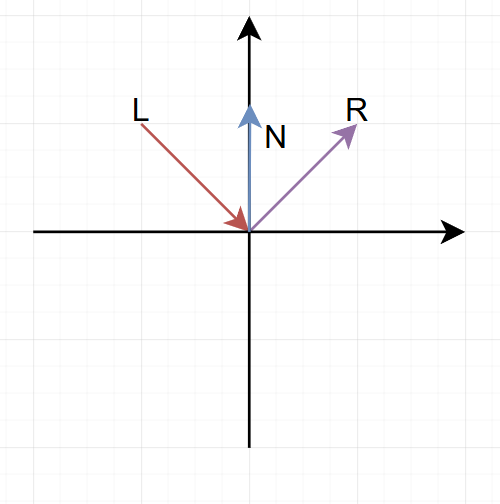
모든 벡터는 normalized된 벡터임.
여기서 R을 구해야하는 문제
먼저 를 구해야됨
- L과 N사이의 각 = -> 내적
- 90 - (L과 N사이의 각) = -> 외적
1. 내적을 이용하는 법

이거임
1-1. 벡터의 합
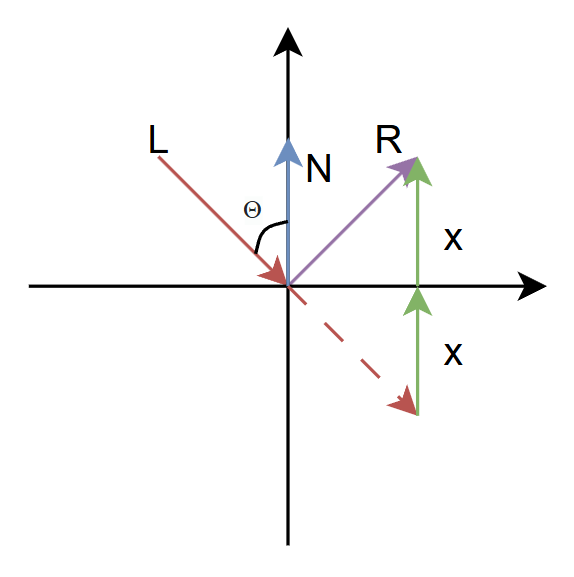
벡터의 합을 이용해서 L에서 접점으로 향하는 벡터에 + 2x를 하면 R이 된다.
따라서 우리는 x를 구하면 됨
1-2. 삼각함수
L과 N의 각이 세타이므로, N과 R의 각도 세타임(반사때문에)
그리고 x를 y축으로 이동(투영)시키면 위의 그림 형태가 됨.
여기서 우리는 를 구할 수 있음
= 와 인접한 변{} / 빗변{}
근데 은 normalized상태임
즉, = 이 됨
= 빗변에 대한 밑변의 비율 = 정규화된 상태에서는 밑변의 길이가 됨
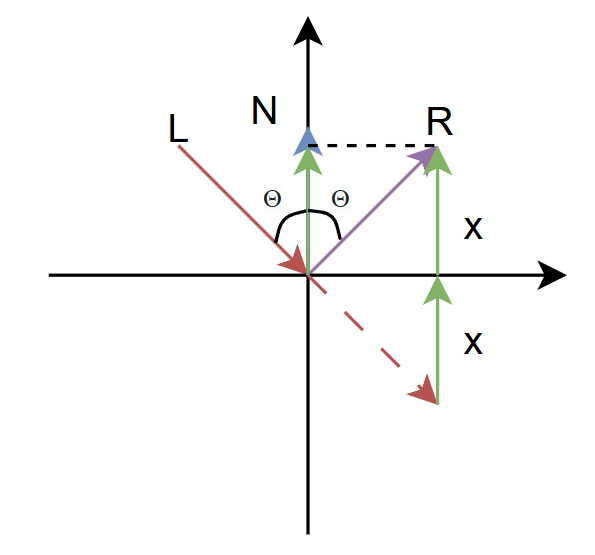
를 끼고 있는 두 벡터는 L, N이고, 두 벡터는 이미 정규화된 상태임
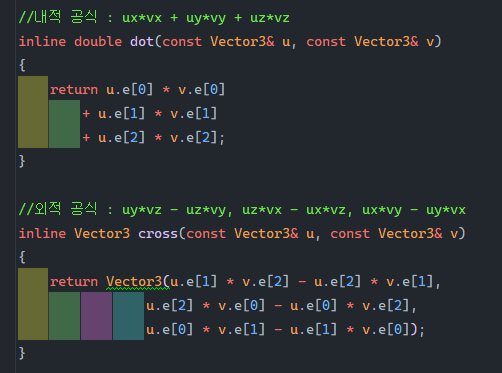
두 벡터 와 의 는
두 벡터의 크기와 사이각의 코사인 값을 곱한
즉, 정규화된 두 벡터 * = 두 벡터의 내적임
위의 공식을 사용하면
이라는 거임
여기서 이므로,
임
즉, 가 됨
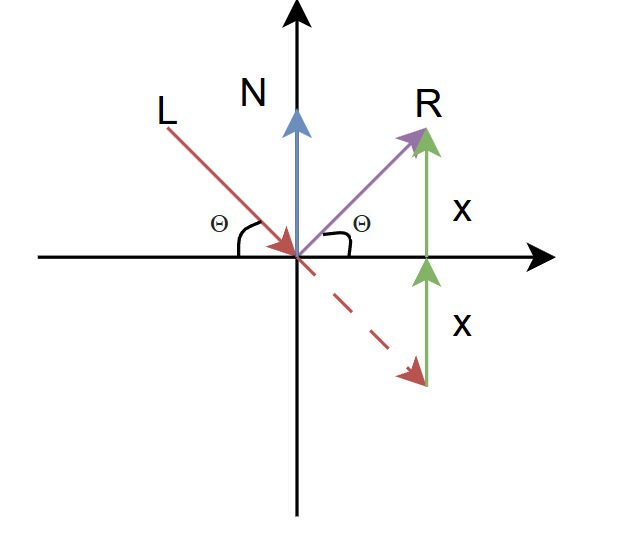
1-3. 구하기
이 사진을 다시 살펴보자
임
하지만 여기서 중요한 점이 있음
- x를 구하는건 좋은데, x가 스칼라 값이라는 거임
스칼라 값은 그냥 이동거리임
꼭 법선벡터 방향이 아니고, x축일수도 있고, -x축일수도 있음
따라서, 정규화된 법선인 N과 곱하여 +y축으로 향하는 방향을 만들어줘야함
그러고 2를 곱해야 R이라는 방향벡터가 나오지 ㅇㅇ
이걸 코드로 쓰면
L + 2 * (dot(L,N) * N) 이 됨
- 과 의 시작 정점이 다름
위의 사진에서 L의 연장선을 보면, N과의 각도가 둔각이 됨
따라서 시작점을 맞추어 N과의 각을 예각으로 만들어줘야함
시작점을 맞추는 방법은 L을 뒤집으면 됨
이걸 코드로 쓰면
L + 2 * (dot(-L,N) * N) 이 됨
2. 외적 이용하는 법
각 를 L과 N사이의 각이 아닌 여각으로 두면 됨
이러면 x는 세타의 대변이고, R은 빗변이므로
이 됨
이걸 이용해서 위처럼 구하면 됨
왜 내적을 사용? 외적은 왜 안씀?
외적을 사용하는 반사공식도 있긴하다는데 잘 모르겠음...
내적이 외적보다 계산이 간단함
이정도의 차이가 있음
최적화가 중요한 그래픽스에서는
내적이 더 연산횟수가 적으니 이걸 더 많이 쓰지 응응
metal재질
inline Vector3 reflect(const Vector3& v, const Vector3& n)
{
    return v + 2 * (dot(-v, n) * n);
}
먼저 이런 반사메서드를 vector3.h에 만들어줌
class Metal : public Material
{
public:
    Metal(const Color& albedo) : albedo(albedo) {}

    bool scatter(
        const Ray& r_in,
        const HitRecord& rec,
        Color& attenuation,
        Ray& scattered) const override
    {

        Vector3 reflectedVector = reflect(r_in.direction(), rec.normal);
        scattered = Ray(rec.p, reflectedVector);
        attenuation = albedo;

        return true;
    }

private:
    Color albedo;
};
이렇게 metal을 만들어줌
lambertian과의 차이점은
- Lambertian -> random vector을 이용
- Metal -> reflect를 이용
이제 만들어진 Material을 사용해야하니,
Camera.h의 ray_color메서드를 수정!
Color ray_color(const Ray& r, int depth, const Hittable& world) const
{
    //...
    if (world.hit(r, MinMaxInterval(0.001, infinity), rec))
    {
        Ray scattered;
        Color attenuation;

        if (rec.mat->scatter(r, rec, attenuation, scattered))
            return attenuation * ray_color(scattered, depth-1, world);
        return Color(0,0,0);
    }
    //...
}
그리고 추가한 Sphere에도 생성자에 추가
Sphere(const Point3& center, double r, shared_ptr<Material> mat) : center(center), radius(r), mat(mat) {};main을 손봐주자
int main()
{
HittableList world;
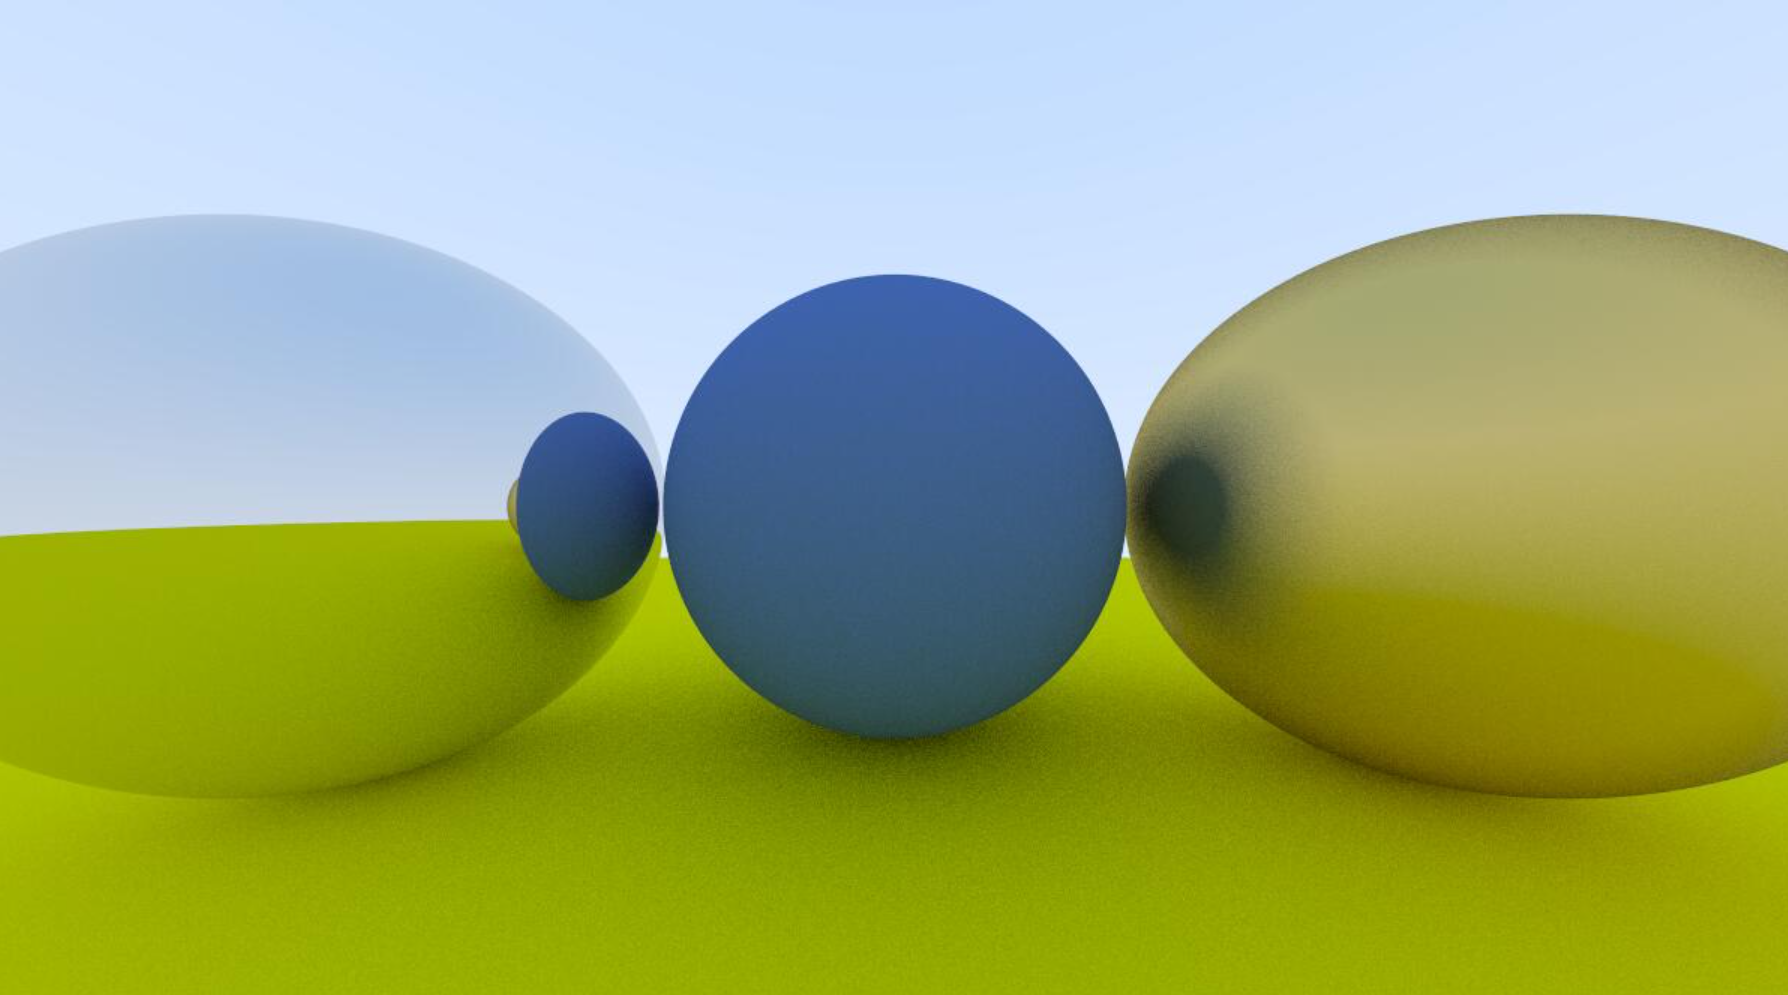
auto material_ground = make_shared<Lambertian>(Color(0.8, 0.8, 0.0));
auto material_center = make_shared<Lambertian>(Color(0.1, 0.2, 0.5));
auto material_left = make_shared<Metal>(Color(0.8, 0.8, 0.8));
auto material_right = make_shared<Metal>(Color(0.8, 0.6, 0.2));
world.add(make_shared<Sphere>(Point3( 0.0, -100.5, -1.0), 100.0, material_ground));
world.add(make_shared<Sphere>(Point3( 0.0, 0.0, -1.2), 0.5, material_center));
world.add(make_shared<Sphere>(Point3(-1.0, 0.0, -1.0), 0.5, material_left));
world.add(make_shared<Sphere>(Point3( 1.0, 0.0, -1.0), 0.5, material_right));
Camera cam;
cam.aspect_ratio = 16.0 / 9.0;
cam.image_width = 400;
cam.samples_per_pixel = 100;
cam.max_depth = 50;
cam.render(world);
}이렇게 sphere를 만드는데,
머티리얼을 사용해서 초기화 해주면....
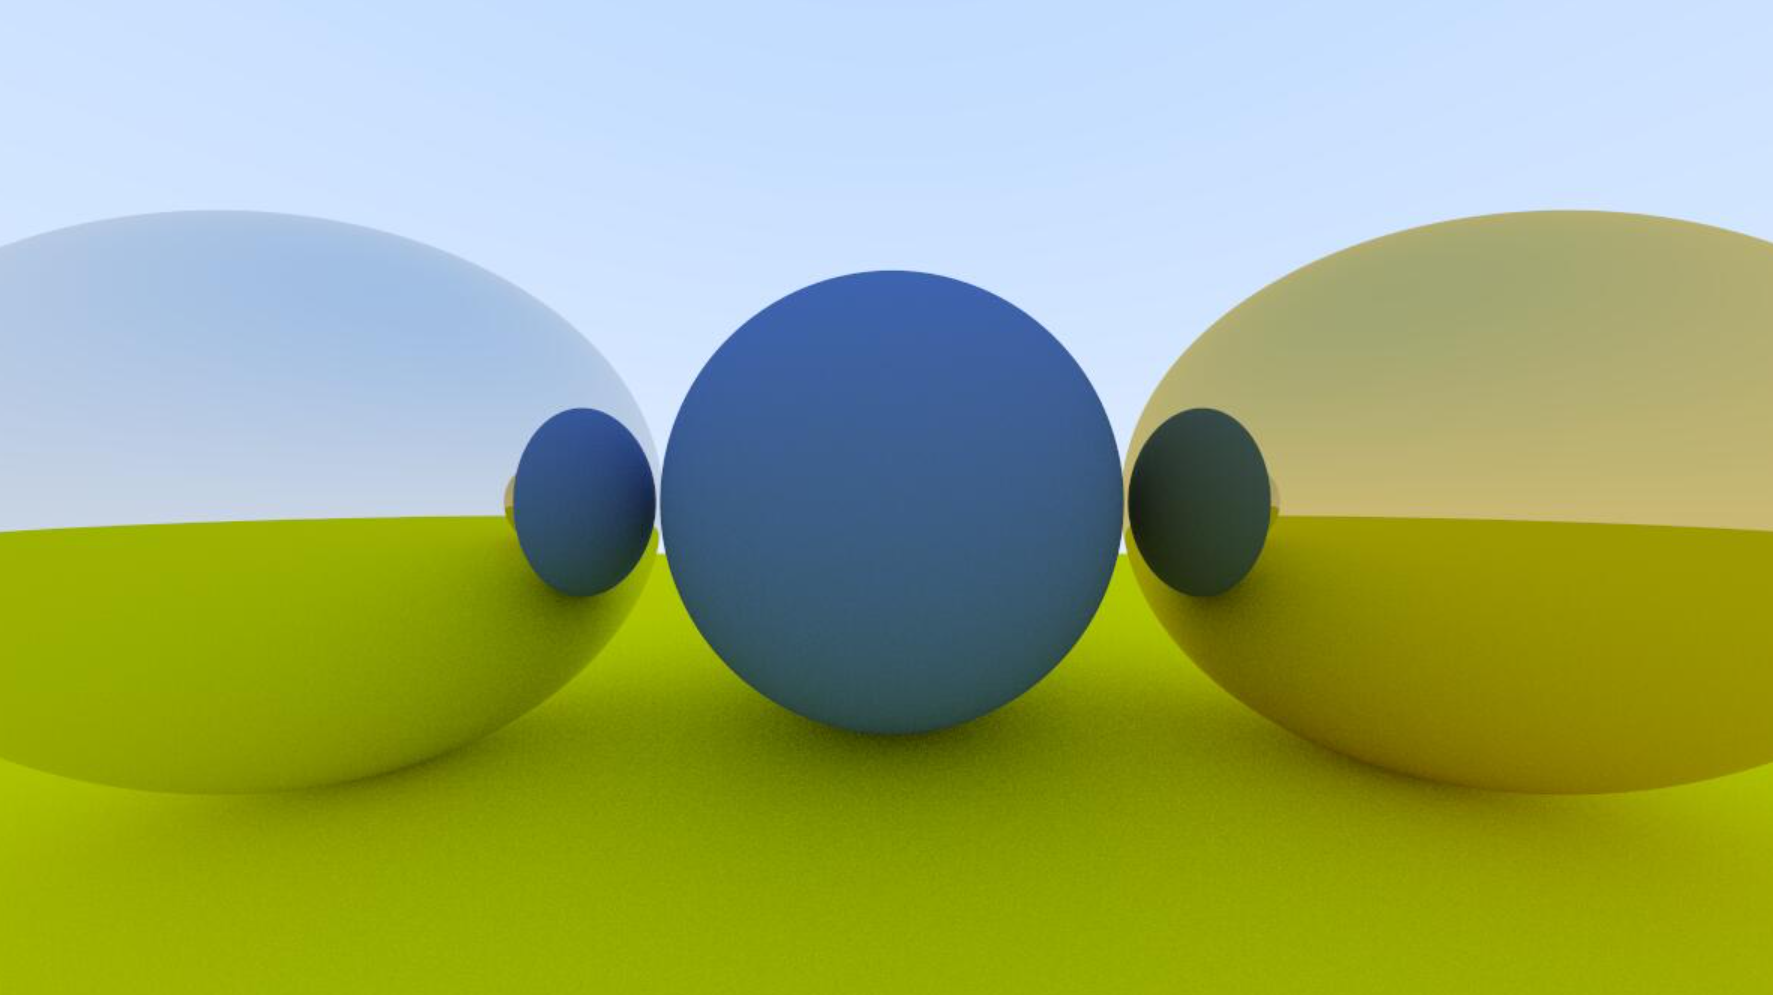
이런 두개의 메탈이 만들어짐!!
Fuzzy Reflection
Fuzzy는 흐린, 불명확한, 보풀의
이런 느낌의 형용사임

대충 이런 느낌의 빛반사를 만들거임
아이디어는 간단함
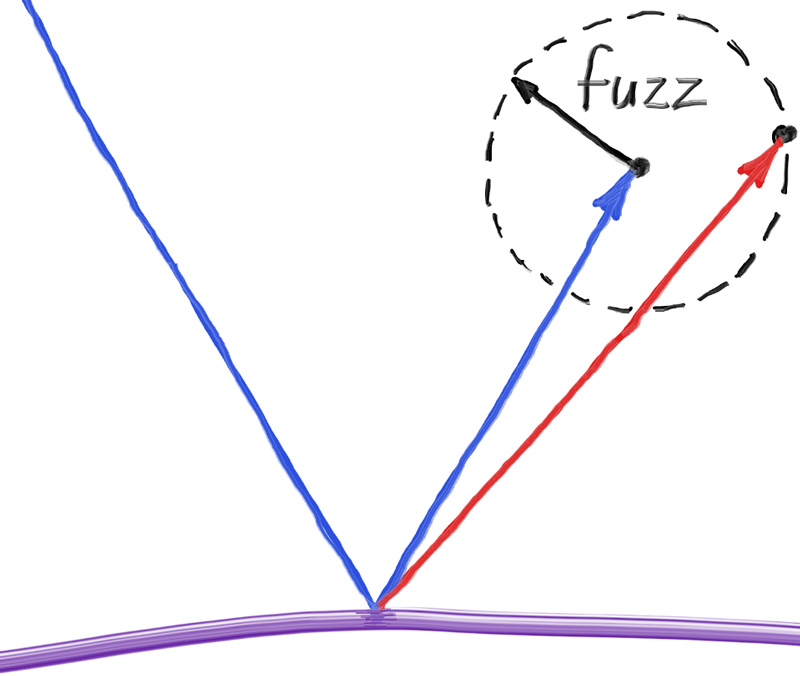
위의 Lambertian반사처럼 반사된 벡터에서
랜덤한 normalized된 벡터를 더한 방향으로의 Ray를 사용하면 됨
먼저 Material.h의 metal의 코드를 살짝 수정
fuzz값이 입력되면, fuzzy를 주고, 아니면 그냥 메탈릭
public:
    Metal(const Color& albedo, double fuzz) : albedo(albedo), fuzz(fuzz < 1 ? fuzz : 1) {}

bool scatter(
    const Ray& r_in,
    const HitRecord& rec,
    Color& attenuation,
    Ray& scattered) const override
{

    Vector3 reflectedVector = reflect(r_in.direction(), rec.normal);

	//fuzz에 따라 랜덤 하게 반사
    reflectedVector = unit_vector(reflectedVector) + random_unit_vector() * fuzz;

    scattered = Ray(rec.p, reflectedVector);
    attenuation = albedo;

    return dot(scattered.direction(), rec.normal) > 0;
}

private:
    double fuzz;
그리고 main의 코드의 material에도 fuzzy를 넣어주자
auto material_left   = make_shared<Metal>(Color(0.8, 0.8, 0.8), 0);
auto material_right  = make_shared<Metal>(Color(0.8, 0.6, 0.2), 0.5);
그럼... 아래처럼 사진이 나옴!