앞선 글에서는
BT(Behavior Tree)가 왜 필요한지,
그리고 FSM이나 if문 기반 코드가 어디서 문제가 생기는지 등을 이야기했다.
상태를 관리하려고 할수록 코드는 복잡해지고,
상황이 늘어날수록 수정 비용은 기하급수적으로 증가한다.
그래서 BT는
"AI를 어떻게 구현할 것인가?"의 문제가 아니라,
"AI가 상황에 따라 어떤 행동을 선택하도록 만들 것인가?"의 문제라는 결론에 도달했다.
그럼 자연스럽게 다음 질문이 나올 수 있다.
그래서 Unity에서 BT를 어떻게 쓰는데?
이번 글에서는
판단 구조를 Unity 프로젝트 안에서 실제 코드로 어떻게 옮기는지,
그리고 그 결과가 어떻게 움직이는 AI로 이어지는지를 정리해보려 한다.
[1. 목표]
이번 학습의 목표는 명확하다.
BT가 '행동 선택 구조'라는 것이 실제로 어떤 의미를 가지는지 체감하는 것
그래서 행동 자체는 최대한 단순하게 잡았다.
- 평소에는 맵을 순찰한다. (Patrol)
- 플레이어가 시야에 들어오면 따라간다. (Chase)
- 공격 거리 안으로 들어오면 공격한다. (Attack)
우리가 만들 BT 구조는 다음과 같다.
Selector
 ├─ Sequence (Attack)
 │   ├─ InAttackRange?
 │   └─ Attack
 ├─ Sequence (Chase)
 │   ├─ CanSeePlayer?
 │   └─ Chase
 └─ Patrol
이 구조 하나만 봐도
AI가 상태가 아니라 행동 우선순위로 설계되어 있다는 점이 드러난다.
[2. 프로젝트 환경]
- Unity 2022.3.17f1
- 3D (Built-in Render Pipeline)
- NavMesh 기반 이동
| 프로젝트 전체 화면 (GameView) |
|---|
 |
이번 학습의 목적은 BT 구조를 이해하는 것이기 때문에
그래픽이나 연출 부분은 전부 배제했다.
이제 본격적으로, Behavior Tree의 구조를 하나씩 살펴보자.
[3. BT의 가장 작은 단위: Node와 상태]
BT는 모든 노드가 동일한 실행 인터페이스를 가진다는 점에서 시작한다.
<Node와 실행 상태 정의>
namespace BT
{
    public enum NodeStatus
    {
        Success,
        Failure,
        Running
    }

    public abstract class Node
    {
        public string Name { get; private set; }

        protected Node(string name)
        {
            Name = name;
        }

        public abstract NodeStatus Tick();
    }
}
여기서 헷갈리기 쉬운 포인트가 하나 있다.
<Tick은 "한 번만 실행되는 함수"가 아니다>
Tick()은 매 프레임 호출된다.- BT는 매 프레임 "지금 어떤 행동이 적절한가"를 다시 판단한다.
<Running의 의미>
- 행동이 아직 끝나지 않았음을 의미한다.
- 이동, 추적처럼 여러 프레임에 걸친 행동을 표현하기 위해 필요하다.
이 구조 하나로
BT의 기본 실행 모델은 이미 완성된다.
[4. 흐름을 제어하는 Composite 노드]
Selector는 여러 행동 중에서 지금 실행할 행동을 고르는 역할을 한다.
using System.Collections.Generic;

namespace BT
{
    public class Selector : Node
    {
       private readonly List<Node> _children;
        public Selector(string name, List<Node> children) : base(name)
        {
            _children = children;
        }
        public override NodeStatus Tick()
        {
            for(int i = 0; i < _children.Count; i++)
            {
                NodeStatus status = _children[i].Tick();

                if(status == NodeStatus.Success)
                {
                    return NodeStatus.Success;
                }

                if(status == NodeStatus.Running)
                {
                    return NodeStatus.Running;
                }
            }

            return NodeStatus.Failure;
        }
    }
}
여기서 우선순위가 어디서 생기는지가 중요하다.
<Selector의 핵심 규칙>
- 자식 노드를 위에서부터 순서대로 평가한다.
Success또는Running이 나오면 즉시 탐색을 멈춘다.- 아래에 있는 노드는 아예 실행되지 않는다.
즉,
BT에서는 노드를 어떤 순서로 배치하느냐 자체가 행동의 우선순위를 정의한다.
이게 Attack -> Chase -> Patrol 순서로 우선되는 이유이다.
BT에서는 "조건의 강도"가 아니라 "배치된 순서"가 판단 기준이 된다고 할 수 있다.
[5. 조건과 행동을 묶는 Sequence]
Sequence는 여러 조건과 행동을 하나의 절차로 묶는 노드이다.
using System.Collections.Generic;

namespace BT
{
    public class Sequence : Node
    {
        private readonly List<Node> _children;
        public Sequence(string name, List<Node> children) : base(name)
        {
            _children = children;
        }
        public override NodeStatus Tick()
        {
            for(int i = 0; i < _children.Count; i++)
            {
                NodeStatus status = _children[i].Tick();

                if(status == NodeStatus.Failure)
                {
                    return NodeStatus.Failure;
                }

                if(status == NodeStatus.Running)
                {
                    return NodeStatus.Running;
                }
            }

            return NodeStatus.Success;
        }
    }
}
<왜 Attack과 Chase는 Sequence인가?>
- "조건이 만족되면 행동한다"는 구조이기 때문이다.
- 조건을 하나라도 실패하면 해당 행동은 실행되지 않는다.
즉,
Sequence는 "행동을 실행하기 위한 전제 조건"을 표현한다.
[6. Condition / Action 노드]
Condition 노드
using System;

namespace BT
{
    public class ConditionNode : Node
    {
        private readonly Func<bool> _predicate;
        public ConditionNode(string name, Func<bool> predicate) : base(name)
        {
            _predicate = predicate;
        }
        public override NodeStatus Tick()
        {
            bool result = _predicate();

            if (result)
            {
                return NodeStatus.Success;
            }

            return NodeStatus.Failure;
        }
    }
}
Condition은 행동을 실행할지 말지를 판단하는 필터이다.
- 성공 -> 다음 노드로
- 실패 -> 상위 노드에서 다른 행동 탐색
Action 노드
using System;

namespace BT
{
    public class ActionNode : Node
    {
        private readonly Func<NodeStatus> _action;
        public ActionNode(string name, Func<NodeStatus> action) : base(name)
        {
            _action = action;
        }
        public override NodeStatus Tick()
        {
            return _action();
        }
    }
}
Action은 실제 행동을 수행하고, 그 상태를 그대로 반환한다.
Action은 상태를 기억하지 않는다.
상태 유지는Running을 통해 상위 구조에서 처리된다.
[7. Enemy AI에 BT 적용]
이제 Enemy AI에 BT를 실제로 연결해보자.
public class EnemyAI : MonoBehaviour
{
    private Node _root;

    void Start()
    {
        _root = BuildTree();
    }

    void Update()
    {
        _root.Tick();
    }
}
여기서 가장 큰 변화는 이것이다.
AI의 판단 로직이 Update에서 완전히 사라졌다.
Update는 더 이상 "무엇을 할지"를 결정하지 않는다. 그 역할은 BT 구조가 맡는다.
트리 구성 코드
private Node BuildTree()
{
    Node attack = new Sequence(new List<Node>
    {
        new ConditionNode(IsInAttackRange),
        new ActionNode(Attack)
    });

    Node chase = new Sequence(new List<Node>
    {
        new ConditionNode(CanSeePlayer),
        new ActionNode(Chase)
    });

    Node patrol = new ActionNode(Patrol);

    return new Selector(new List<Node>
    {
        attack,
        chase,
        patrol
    });
}
이 코드만 봐도 바로 알 수 있다.
- Attack이 가장 먼저 평가된다.
- 안되면 Chase
- 둘 다 아니면 Patrol
라는 것을
우선순위가 변수나 Enum이 아니라 트리 구조 자체로 표현된다.
[8. BT는 반드시 눈으로 확인해야 한다]
BT는 구조가 명확한 대신, 디버깅 없이는 실행 흐름을 놓치기 쉽다.
그래서 현재 실행 중인 행동을 화면에 표시했다.
private void OnGUI()
{
GUIStyle style = new GUIStyle(GUI.skin.label);
style.fontSize = 72;
GUI.Label(
new Rect(10, 10, 600, 100),
"BT Node: " + _currentNodeName,
style
);
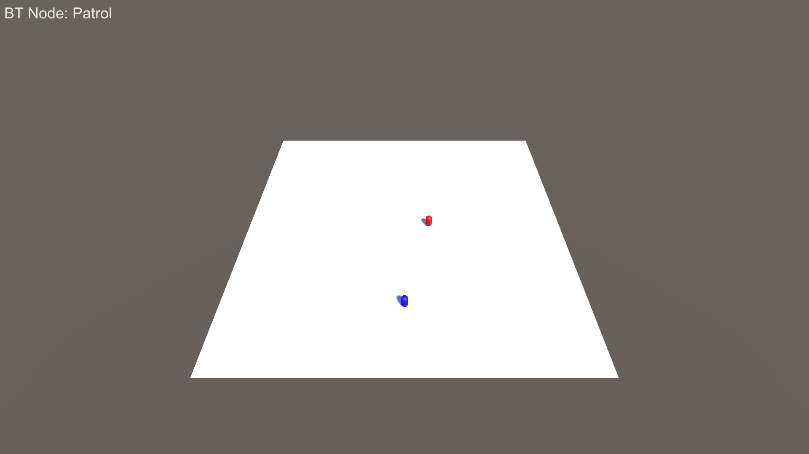
}이렇게 하면 Patrol -> Chase -> Attack 전환을 바로 확인할 수 있다.
| Patrol | Chase | Attack |
|---|---|---|
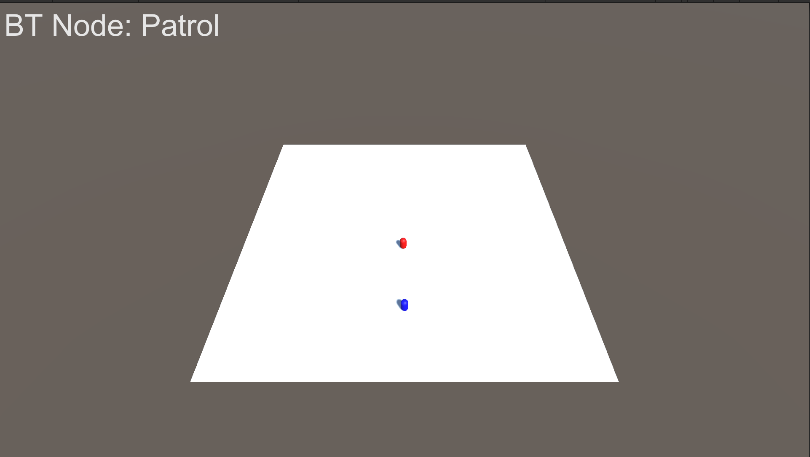 | 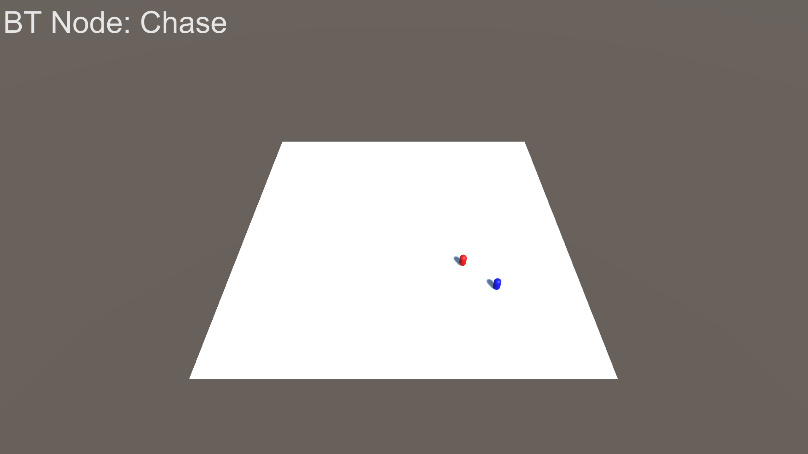 | 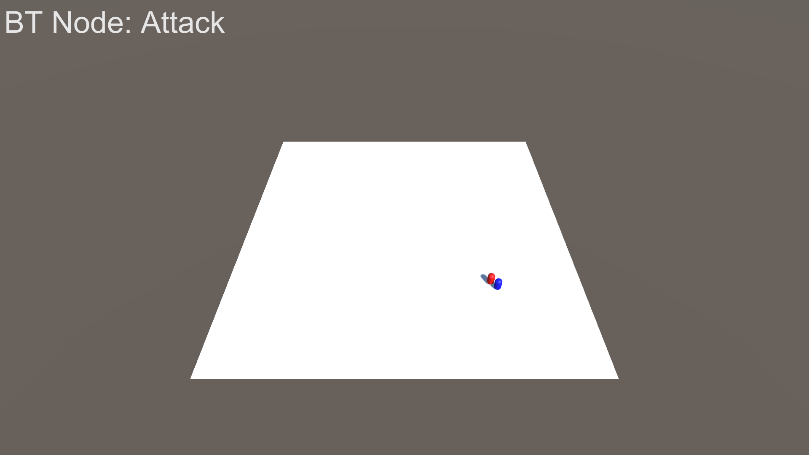 |
하지만 이것만으로는 "왜 지금 이 행동이 선택됐는지"까지는 알기 어렵다.
BT는 조건 판단이 핵심이기 때문에,
그 판단 기준 역시 눈에 보이면 알기 쉽다.
    private void OnDrawGizmosSelected()
    {
        Gizmos.DrawWireSphere(transform.position, sightRange);
        Gizmos.DrawWireSphere(transform.position, attackRange);
    }
이 코드는 SceneView에서 Enemy 오브젝트를 선택했을 때,
- 시야 범위(sightRange)
- 공격 범위(attackRange)
를 원 형태로 시각화해준다.
즉,
- 바깥 원: 추격 판단 기준
- 안쪽 원: 공격 판단 기준
이 된다.
| 범위 Gizmo |
|---|
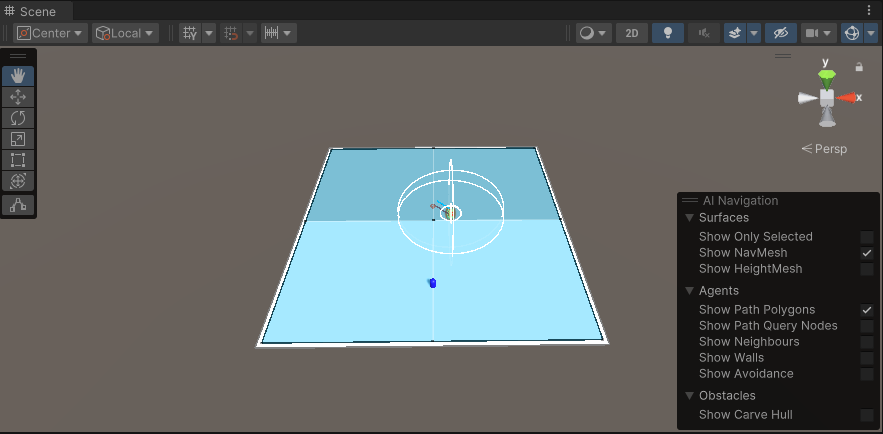 |
[9. 테스트]
이제부터는 실제로 따라하면 되는 학습 순서이다.
먼저 준비해야할 .cs 파일은 다음과 같다.
Assets/
 └─ Scripts/
     ├─ BT/
     │   ├─ Node.cs
     │   ├─ Selector.cs
     │   ├─ Sequence.cs
     │   ├─ ConditionNode.cs
     │   └─ ActionNode.cs
     │
     └─ Gameplay/
         ├─ EnemyAI.cs
         └─ PlayerMove.cs
[9-1. 오브젝트 배치 & 컴포넌트 붙이기]
이번 학습에는 아래 오브젝트들이 필요하다.
Ground
- Plane
- Scale: (5, 1, 5)
- Component: NavMeshSurface (Bake 완료)
Player
- Capsule
- Material: Blue
- Tag: Player
- Component: PlayerMove
Enemy
- Capsule
- Material: Red
- Component: NavMeshAgent, EnemyAI
PatrolPoints
- Empty GameObject 아래에 4개의 포인트 생성
- PatrolPoints
- Patrol_01 (4, 0, 0)
- Patrol_02 (0, 0, 4)
- Patrol_03 (-4, 0, 0)
- Patrol_04 (0, 0, -4)
PatrolPoint들은 EnemyAI에 연결할 것
| Enemy Inspector |
|---|
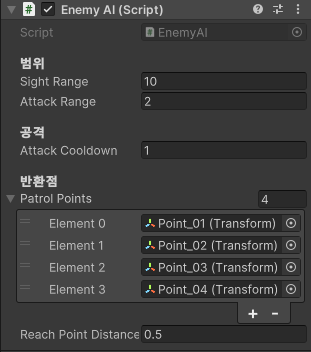 |
[9-2. AI Navigation 설치]
Unity 2022.3에서는 NavMeshSurface를 사용하려면 패키지를 설치해야 된다.
- Window -> Package Manager
- Unity Registry
- AI Navigation 검색
- Install
| AI Navigation 패키지 설치 화면 |
|---|
 |
| * Remove 위치에 Install이 있을 것이다. |
[9-3. NavMesh 베이크]
Ground(Plane)선택Add Component-> NavMeshSurface- Inspector에서 Bake
베이크가 완료되고 SceneView를 확인하면, 파란색으로 NavMesh 영역이 표시될 것이다.
| Bake된 모습 |
|---|
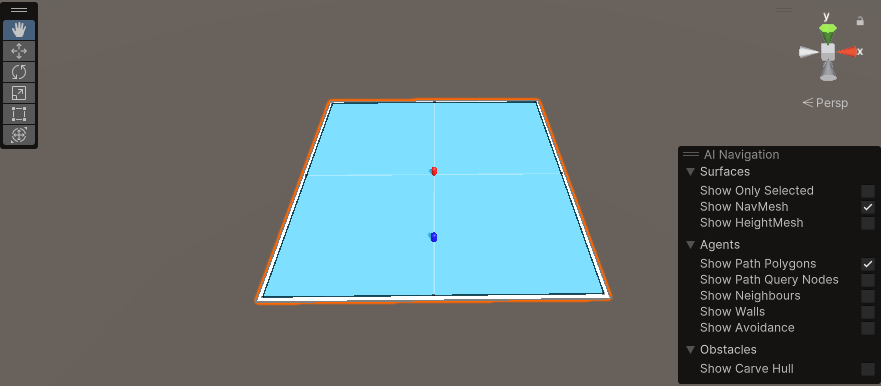 |
[9-4. PlayerMove]
AI가 "추격"으로 전환되는 걸 확인하려면 당연히 플레이어가 움직일 수 있어야 한다.
그래서 가장 단순하게 Transform 이동으로 플레이어의 움직임을 구현할 것이다.
using UnityEngine;

public class PlayerMove : MonoBehaviour
{
    [SerializeField] private float moveSpeed = 6f;

    private void Update()
    {
        float h = Input.GetAxisRaw("Horizontal");
        float v = Input.GetAxisRaw("Vertical");

        Vector3 dir = new Vector3(h, 0f, v).normalized;
        transform.position += dir * moveSpeed * Time.deltaTime;
    }
}
Player 오브젝트에 붙이면,
키보드 WASD로 이동하면서 BT 상태 전환을 테스트할 수 있다.
[9-5. EnemyAI 코드 (NavMesh + BT)]
이제 실제로 Enemy가 Patrol/Chase/Attack을 하도록 구현한다.
아래 코드는 BT노드를 이용해서 최종 트리를 구성하고,
이동은 NavMeshAgent로 처리한다.
using UnityEngine.AI;
using BT;
using System.Collections.Generic;
using UnityEngine;

public class EnemyAI : MonoBehaviour
{
    [Header("범위")]
    [SerializeField] private float sightRange = 10f;
    [SerializeField] private float attackRange = 2f;

    [Header("공격")]
    [SerializeField] private float attackCooldown = 1.0f;

    [Header("반환점")]
    [SerializeField] private Transform[] patrolPoints;
    [SerializeField] private float reachPointDistance = 0.5f;

    private Transform _player;
    private NavMeshAgent _agent;

    private Node _root;

    private int _patrolIndex;
    private float _nextAttackTime;

    private string _currentNodeName;

    private void Awake()
    {
        _agent = GetComponent<NavMeshAgent>();

        GameObject playerObj = GameObject.FindGameObjectWithTag("Player");

        if (playerObj != null)
        {
            _player = playerObj.transform;
        }

        _root = BuildTree();
    }

    private void Update()
    {
        if(_player == null)
        {
            _currentNodeName = "No Player";
            return;
        }

        _root.Tick();
    }

    private Node BuildTree()
    {
        Node attack = new Sequence("AttackSequence", new List<Node>()
        {
            new ConditionNode("InAttackRange?", IsInAttackRange),
            new ActionNode("Attack", TickAttack)
        });

        Node chase = new Sequence("ChaseSequence", new List<Node>()
        {
            new ConditionNode("CanSeePlayer?", CanSeePlayer),
            new ActionNode("Chase", TickChase)
        });

        Node patrol = new ActionNode("Patrol", TickPatrol);

        Node root = new Selector("RootSelector", new List<Node>()
        {
            attack,
            chase,
            patrol
        });

        return root;
    }

    private bool CanSeePlayer()
    {
        float dist = Vector3.Distance(transform.position, _player.position);
        if(dist <= sightRange)
        {
            return true;
        }

        return false;
    }

    private bool IsInAttackRange()
    {
        float dist = Vector3.Distance(transform.position, _player.position);
        if(dist <= attackRange)
        {
            return true;
        }

        return false;
    }

    private NodeStatus TickChase()
    {
        _currentNodeName = "Chase";

        _agent.isStopped = false;
        _agent.SetDestination(_player.position);

        return NodeStatus.Running;
    }

    private NodeStatus TickAttack()
    {
        _currentNodeName = "Attack";

        _agent.isStopped = true;

        if (Time.time >= _nextAttackTime)
        {
            _nextAttackTime = Time.time + attackCooldown;
            Debug.Log("[EnemyAI] Attack!");
        }

        return NodeStatus.Running;
    }

    private NodeStatus TickPatrol()
    {
        _currentNodeName = "Patrol";

        if (patrolPoints == null || patrolPoints.Length == 0)
        {
            _agent.isStopped = true;
            return NodeStatus.Failure;
        }

        _agent.isStopped = false;

        Transform target = patrolPoints[_patrolIndex];

        if (!_agent.pathPending)
        {
            _agent.SetDestination(target.position);
        }

        if (!_agent.pathPending && _agent.remainingDistance <= _agent.stoppingDistance + 0.1f)
        {
            _patrolIndex++;
            if (_patrolIndex >= patrolPoints.Length)
            {
                _patrolIndex = 0;
            }
        }

        return NodeStatus.Running;
    }

    private void OnGUI()
    {
        GUIStyle style = new GUIStyle(GUI.skin.label);
        style.fontSize = 72;

        GUI.Label(
            new Rect(10, 10, 600, 100),
            "BT Node: " + _currentNodeName,
            style
        );
    }

    private void OnDrawGizmosSelected()
    {
        Gizmos.DrawWireSphere(transform.position, sightRange);
        Gizmos.DrawWireSphere(transform.position, attackRange);
    }
}
[9-6. 플레이 테스트]
이제 플레이 버튼을 누르고, WASD를 눌러 이동하면서 BT의 변화를 확인해보자.
[10. 정리]
이번 글에서 만든 AI는 정말 단순하다.
하지만 기억해야하는 것은 "행동"이 아니라 "구조"이다.
- Selector는 배치 순서로 우선순위를 만든다
- Sequence는 조건 + 행동을 하나의 절차로 묶는다
- NavMeshAgent는 이동을 맡고, BT는 판단에 집중한다
이런 구조를 갖게되면
확장되더라도 구조가 무너지지 않는다.