TableView 리팩토링 하다가 레거시를 다르게 바꿀 수 있을까하면서 알아보았다.
이걸 배우면 이런게 가능하다. 자동으로 이렇게 애니메이션을 처리해준다! iOS 13에서부터 적용가능하다.
Current State-of-the-Art
// MARK: UICollectionViewDataSource

func numberOfSections(in collectionView: UICollectionView) -> Int {
    return models.count
}

func collectionView(_ collectionView: UICollectionView, numberOfItemsInSection section: Int) -> Int {
    return models[section].count
}

func collectionView(_ collectionView: UICollectionView, cellForItemAt indexPath: IndexPath) -> UICollectionViewCell {
    let cell = collectionView.dequeueReusableCell(withReuseIdentifier: reuseIdentifier, for:indexPath)
    // configure cell
    return cell
}
이게 예전에 하던 방식이다. section 개수 정해주고, section안의 개수를 정해주고, delegate로 함수가 호출이 되었을 때, 어떻게 cell을 만들어줄 것인지 정의해주면 되는 방식이다.
UICollectionViewDataSource
@MainActor protocol UICollectionViewDataSource이렇게 사용할 수 있었던 토대는 UICollectionViewDataSource를 사용하고 있기 때문이다. 이녀석은 protocol이고, viewController에서 self.dataSource = self를 통해 위와 같이 delegate로 처리가 가능한 이유는 viewController가 UICollectionViewDataSource를 채택하고 있기 때문이다.
Apps Are Often Complicated
하지만 실제로 1차원 배열에서는 편리하지만, 복잡한 경우 이러한 접근 방식은 상당히 머리아프다.
- Web service
- Core Data
- 뒤의 ViewController로 부터 업데이트 되는 경우
정말 단순하지만, 가끔 우리는 이런 에러를 마주하게 되는데..

StackOverflow에서 찾아보고 결국, 우리는 reloadData를 선택한다. WWDC에서도 전혀 무방한 행동이라고 하긴하지만, 이렇게 할경우 애니메이션되지 않은 효과가 나타난다.
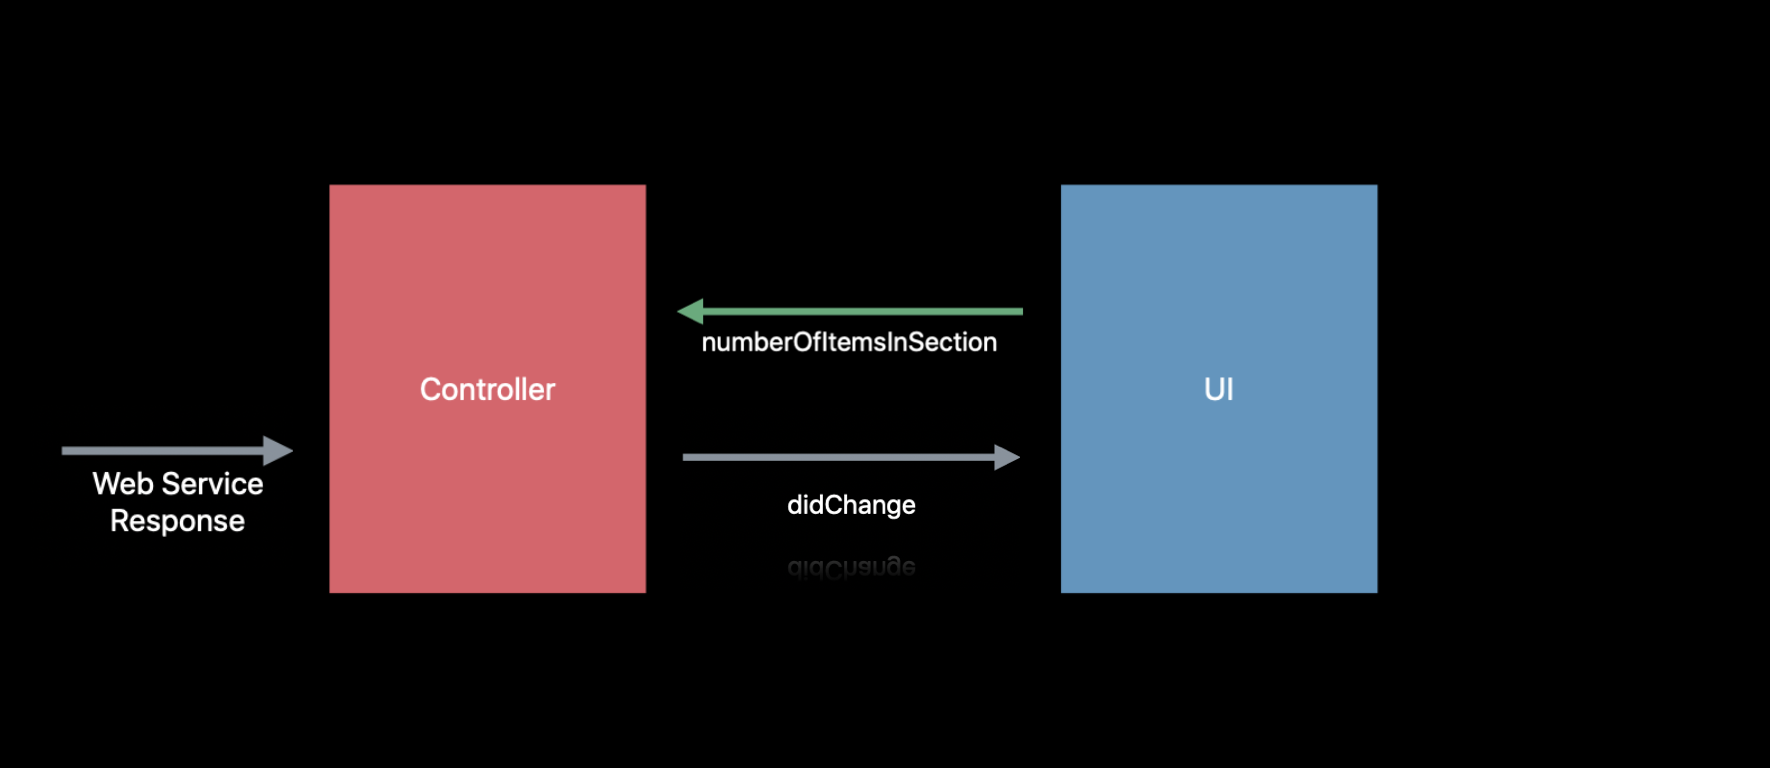
What is the problem
이러한 상황에서 문제는 어디에 "진짜"가 있느냐이다. 즉, DataSource 역할을 하는 DataController가 시간이 지남에 따라 변화하는 자신의 version, Truth를 가지고 있다는 것이다. (own version of the truth) 그리고 UI 역시 화면에 보여주고 있는 truth를 가지고 있다. 이 두개가 서로 맞지 않을 경우 위의 에러가 뿜!하고 나온다.
결국, 이 문제는 중앙집중형으로 통제되고 있는 truth가 없다는 것이 원인이다.
New Approach
그래서 Apple은 완전히 새로운 접근방식을 도입한다. 그것이 Diffable DataSource이다!
Diffable Data Source
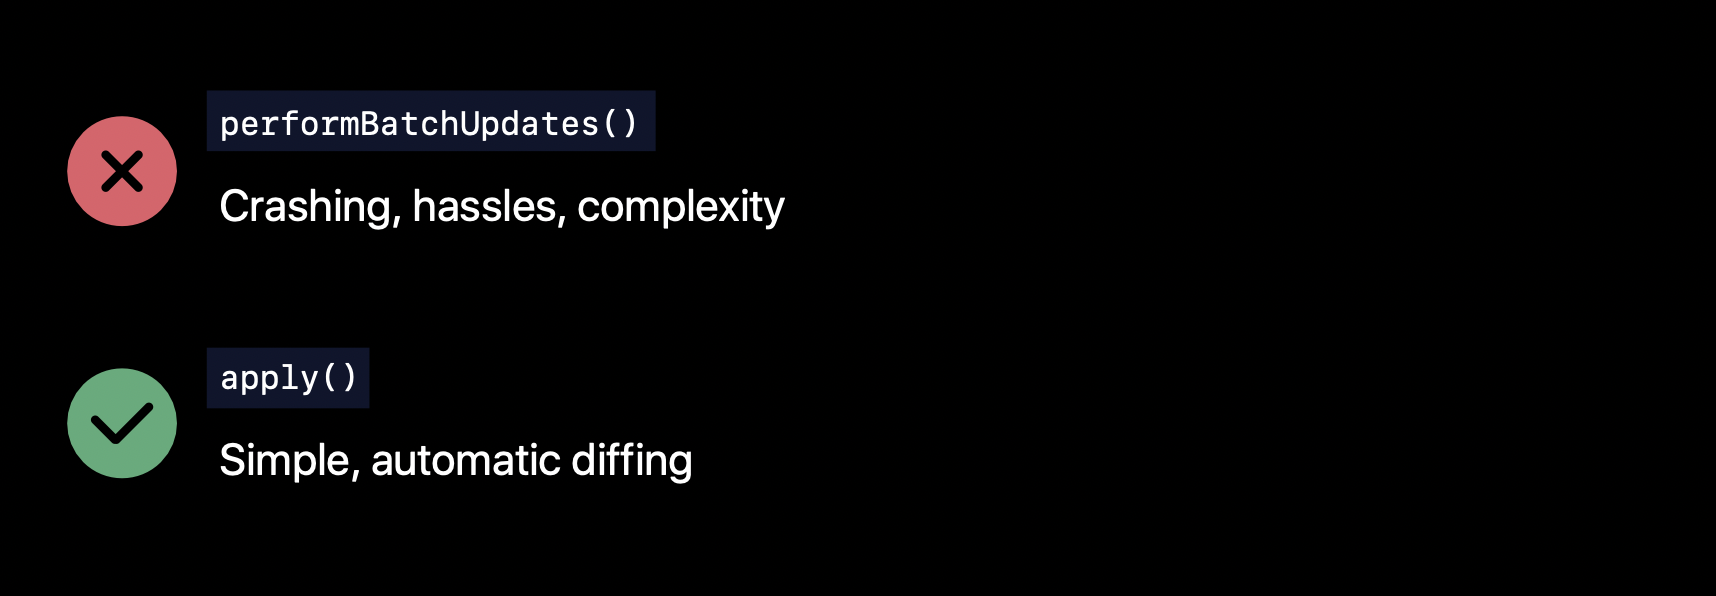
performBatchUpdates()가 없어진다. (연산을 통해 animation 주는 method) 귀찮고, 복잡하고 crash 준다. 이런 게 필요없고 이제 apply 한방이면 자동으로 변화를 감지해서 적용한다.
Snapshots
이걸 가능하게 하기 위해서 새로운 structure를 추가했는데, 그녀석은 snapshot이다. 현재 UI State의 truth를 가진 녀석이다.
- Truth of UI State
- Unique identifiers for sections and items
- No more IndexPaths
이제부터 IndexPath가 아니고 identifier로 이를 구분한다.
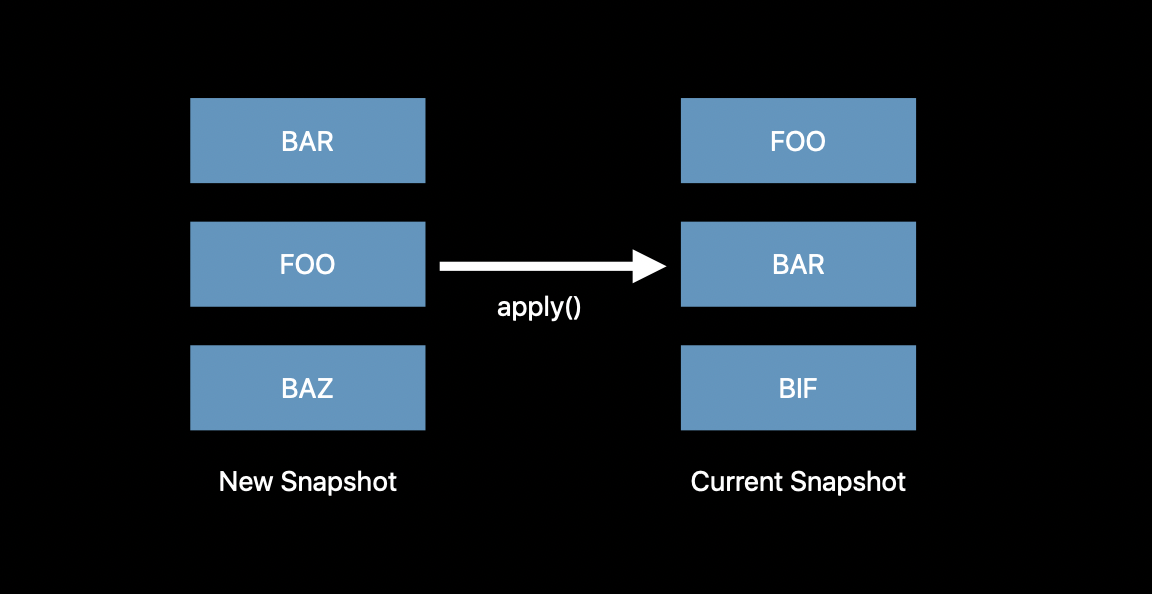
SnapShot이 적용되는 직관적인 그림은 위와 같다. 새로운 Snapshot으로 기존것을 대채하는 것! 이 때, Animation은 system이 자동으로 적용한다.
DiffableDataSource
- UICollectionViewDiffableDataSource
- UITableViewDiffableDataSource
- NSCollectionViewDiffableDataSource (MacOS)
- NSDiffableDataSourceSnapshot (Common)
여기서 주목할 점은, 이녀석들은 더이상 Protocol이 아니라는 점이다. class이며, 사용할 시 명시적으로 선언하고 apply 해주어야 한다.
Demo!
앞으로 설명할 코드는 Implementing Modern Collection Views에 있다.
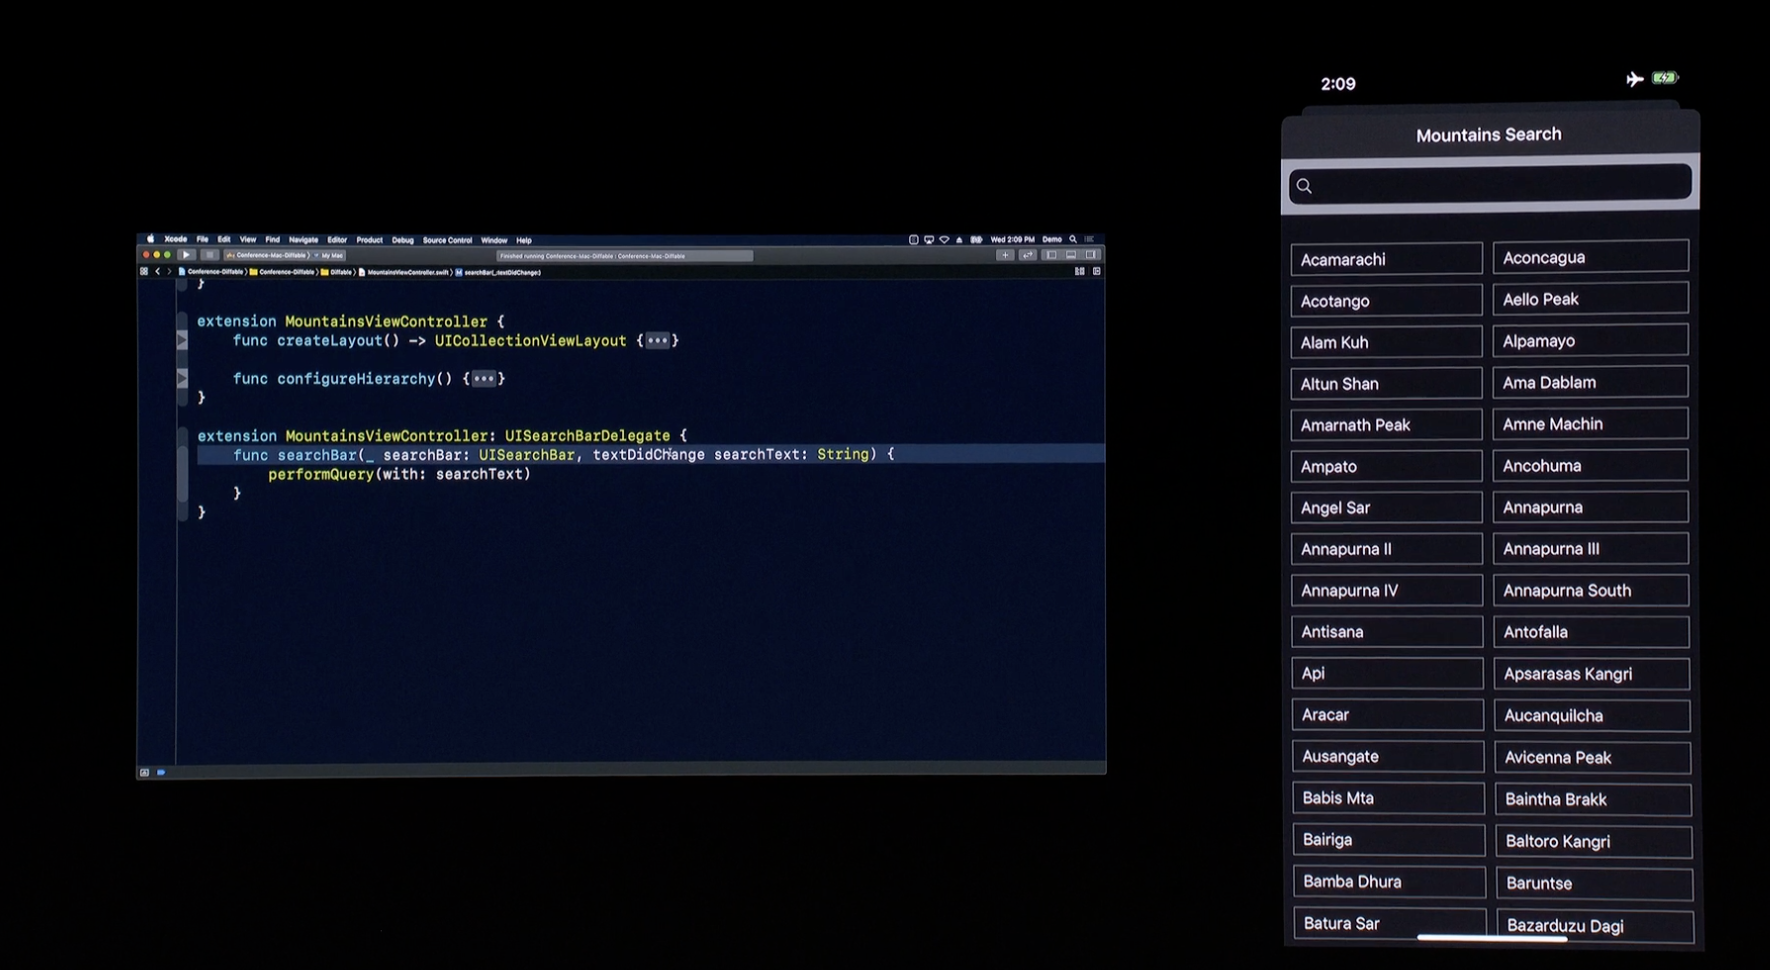
검색창에 입력하면, 이에 맞는 산을 필터링해주고 보여주는 동작을 하는 앱이다. 흐름은 다음과 같다.
- Search bar에 text가 변경되었을 시 callback 함수가 불린다.
- callback 함수내에서는 해당 입력으로 결과를 받아오는 query함수를 호출한다.
- 호출하는 query 함수내에서는 model layer에서 값을 받아오고, 새로운 snapshot을 찍는다.(인스턴스 생성)
- 찍은 snapshot을 현재 diffableDataSource에 apply한다.
Instructions
- Connect a diffable data source to your collection view.
- Implement a cell provider to configure your collection view's cells.
- Generate the current state of the data.
- Display the data in the UI.
Connect a diffable data source to your collection view.
class MountainsViewController: UIViewController {

    var dataSource: UICollectionViewDiffableDataSource<Section, MountainsController.Mountain>!
}
먼저, CollectionView에 dataSource를 만들어준다.
@MainActor class UICollectionViewDiffableDataSource<SectionIdentifierType, ItemIdentifierType> : NSObject where SectionIdentifierType : Hashable, ItemIdentifierType : Hashable이 때, 두개의 Type을 받는데 모두 Hashable이어야 한다.
SectionIdentifier Type
class MountainsViewController: UIViewController {
    enum Section: CaseIterable {
        case main
    }
    var dataSource: UICollectionViewDiffableDataSource<Section, MountainsController.Mountain>!
}
Apple 에서는 Section을 기본적으로 Enum으로 사용하고 있었다. Enum의 경우에는 연관값이 없거나, 연관값이 모두 Hashable할 경우 자동으로 synthesize된다.
For an enum, all its associated values must conform to Hashable. (An enum without associated values has Hashable conformance even without the declaration.)
ItemIdentifier Type
ItemIdentifier 역시 고유해야 한다. 이러한 경우 Apple에서는 UUID를 사용하여 이를 구현했다.
class MountainsViewController: UIViewController {
    enum Section: CaseIterable {
        case main
    }
    var dataSource: UICollectionViewDiffableDataSource<Section, MountainsController.Mountain>!
}

class MountainsController {

    struct Mountain: Hashable {
        let name: String
        let height: Int
        let identifier = UUID()
        func hash(into hasher: inout Hasher) {
            hasher.combine(identifier)
        }
        static func == (lhs: Mountain, rhs: Mountain) -> Bool {
            return lhs.identifier == rhs.identifier
        }
    }
}
Mountain을 보면, Hashable을 채택하고 있으며, 각 instance가 독립적이기 위해 UUID를 통해 Equality를 처리해주고 있다.
Connect CollceionView, Provider
이제 dataSource를 실제 인스턴스로 만들어서 넣어주면 된다. 인자로 collectionView와 cellProvider를 받는다.
@MainActor init(collectionView: UICollectionView, cellProvider: @escaping UICollectionViewDiffableDataSource<SectionIdentifierType, ItemIdentifierType>.CellProvider)collectionView의 경우 해당 VC에서 선언한 collcetionView를 넣어주면 되고, cell provider의 경우 3개의 인자(sectionIdentifier, indexPath, itemIdentifier)를 갖는 closure이다.
dataSource = UICollectionViewDiffableDataSource<Section, MountainsController.Mountain>(collectionView: mountainsCollectionView) {
            (collectionView: UICollectionView, indexPath: IndexPath, identifier: MountainsController.Mountain) -> UICollectionViewCell? in
            // Return the cell.
        }
여기서 closure 인자는 이전에 DiffableDataSource를 선언했을 때 sectionIdentifier와 itemIdentifier가 들어오게 된다.
Implement a cell provider to configure your collection view's cells.
dataSource = UICollectionViewDiffableDataSource<Section, MountainsController.Mountain>(collectionView: mountainsCollectionView) {
            (collectionView: UICollectionView, indexPath: IndexPath, identifier: MountainsController.Mountain) -> UICollectionViewCell? in
            // Return the cell.
            guard let cell = collectionView.dequeueConfiguredReusableCell(using: cellRegistration, for: indexPath, item: identifier) else { return }
            cell.configure(mountain: identifier)
            return cell
        }
Apple 코드에서는 dequeueConfiguredReusableCell를 통해 재활용된 cell을 제공하는 것으로 마쳤다. 생성해서 제공할 수도 있을 것이다.
Generate the current state of the data.
이제 우리가 실제 만들 앱에서 interaction과 연결해줄 차례이다. 우리는 사용자 text 입력에 따라 적용할 것이다.
// 01: Event 발생, 02: query 함수 호출
extension MountainsViewController: UISearchBarDelegate {
    func searchBar(_ searchBar: UISearchBar, textDidChange searchText: String) {
        performQuery(with: searchText)
    }
}

// 03: 모델로부터 변경된 값을 가져옴
extension MountainsViewController {
    func performQuery(with filter: String?) {
        let mountains = mountainsController.filteredMountains(with: filter).sorted { $0.name < $1.name } // model에서 결과를 가져옴

        var snapshot = NSDiffableDataSourceSnapshot<Section, MountainsController.Mountain>() // snapshot 생성
        snapshot.appendSections([.main])
        snapshot.appendItems(mountains)
        dataSource.apply(snapshot, animatingDifferences: true) // 04: apply
    }
}
snapshot을 찍을 당시에는 비어있기 때문에, 여기에 어떻게 보여질 지 설정해야 한다. section의 경우 단일이기 때문에 [.main]만 넣어주고, item의 경우 원래는 identifier가 들어가야 하지만, Swift의 경우 보다 elegant하게 작동하기 위해 own native type을 넣어도 동작한다.
Display the data in the UI.
 |  |
animation을 true로 주면, 위와같이 예쁜 애니메이션이 즉각 적용된다. false인 경우 오른쪽과 같이 나온다.
추가
storyboard나 xib를 사용하여 만들어진 녀석의 경우에는 register가 필수다.
self.collectionView.register(DJCollectionViewCell.self, forCellWithReuseIdentifier: "cell")그리고 나서 dequeue를 다음과 같은 방식으로 해줬었다.
dataSource = UICollectionViewDiffableDataSource<Section, MountainsController.Mountain>(collectionView: mountainsCollectionView) {
            (collectionView: UICollectionView, indexPath: IndexPath, identifier: MountainsController.Mountain) -> UICollectionViewCell? in
            // Return the cell.
            guard let cell = collectionView.dequeueReusableCell(withReuseIdentifier: "cell", for: indexPath) as? MountainCollectionViewCell else { preconditionFailure() }
            cell.configure(mountain: identifier)
            return cell
        }
그런데, 이작업 없이 diffabledataSource를 만들 때, dequeueConfiguredReusableCell을 사용하면 register와 동시에 configuration까지 처리할 수 있다. 이 방식이 Apple에서 사용한 방식이다.
dataSource = UICollectionViewDiffableDataSource<Section, MountainsController.Mountain>(collectionView: mountainsCollectionView) {
            (collectionView: UICollectionView, indexPath: IndexPath, identifier: MountainsController.Mountain) -> UICollectionViewCell? in
            // Return the cell.
            guard let cell = collectionView.dequeueConfiguredReusableCell(using: cellRegistration, for: indexPath, item: identifier) else { return }
            cell.configure(mountain: identifier)
            return cell
        }
Considerations
Current Snapshot
// Empty snapshot
let snapshot = NSDiffableDataSourceSnapshot<Section, UUID>()

// Current data source snapshot copy
let snapshot = dataSource.snapshot()
현재 snapshot을 가져올 수 있고, 만들 수 있다. 아래 함수를 호출하면 copy해서 갖다준다. 그래서 이전 snapshot에 영향을 미치지 않는다.
Snapshot State
// Snapshot State
var numberOfItems: Int { get }
var numberOfSections: Int { get }
var sectionIdentifiers: [SectionIdentifierType] { get }
var itemIdentifiers: [ItemIdentifierType] { get }
snapshot의 다양한 상태를 확인할 수 있다.
Configuring Snapshots
// Configuring Snapshots
func insertItems(_ identifiers: [ItemIdentifierType],
                 beforeItem beforeIdentifier: ItemIdentifierType)
func moveItem(_ identifier: ItemIdentifierType,
                 afterItem toIdentifier: ItemIdentifierType)
func appendItems(_ identifiers: [ItemIdentifierType],
                 toSection sectionIdentifier: SectionIdentifierType? = nil)
func appendSections(_ identifiers: [SectionIdentifierType])
snapshot을 구축하는데 있어서도 다양한 method를 제공한다.
Custom Identifiers
// Custom Identifiers
struct MyModel: Hashable {
    let identifier = UUID()

    func hash(into hasher: inout Hasher) {
        hasher.combine(identifier)
    }

    static func == (lhs: MyModel, rhs: MyModel) -> Bool {
        return lhs.identifier == rhs.identifier
    }
}
Identifier는 unique하고, hashable을 채택해야 한다.
Get Identifier busing indexPath
// What About IndexPath-based APIs?
func collectionView(_ collectionView: UICollectionView, didSelectItemAt indexPath: IndexPath) {
    if let identifier = dataSource.itemIdentifier(for: indexPath) {
    // Do something
    }
}
indexPath로부터 identifier를 가져오는 API도 제공한다. 해당 API의 시간복잡도는 Constant라고 한다.
Performance
굉장히 빠르다고 자랑했다. O(n)이라고 한다. 그리고 apply() 호출은 background queue에서 Safe하다고 한다!! 알아서 해준다!!
Summary
- Model을 관리하는 controller와 실제 UI에서 보이는 Truth의 차이로 DataSource를 관리하는 것이 어렵다.
- 이러한 점에서 Apple은 Diffable Datasource를 만들었다.
- Protocol 방식이 아닌 Class 방식을 사용하여 Snapshot을 찍고 이를 apply 함으로써 변화를 통한 애니메이션을 자동으로 처리해준다.
- Diffable DataSource 생성, Cell Provider 정의, Snapshot 생성, Diffable DataSource에 적용의 4단계로 처리가 가능하다.
- SectionIdentifier와 ItemIdentifier는 Hashable이어야 하며, 이 때 UUID를 활용할 수 있다.
- 속도가 굉장히 빠르다! 그리고 background queue에서
apply()를 호출해도 Safe하다. - iOS 13에서부터 적용가능하다.
막상 보다보니 Hashable같은 프로토콜에 대해 정확히 모르는 것 같다. 다음 포스팅에서는 이녀석을 다뤄보도록 하겠다. 끝!
Reference
