Ingress
클러스터 내부의 HTTP/HTTPS 서비스를 외부로 노출

- 클러스터 외부에서 HTTP/HTTPS 통신 요청을 받아서 처리해주는 Layer 7 동작
- 실제 동작은 인그레스 컨트롤러 파드가 처리
- 기능
- L7 트래픽 부하 분산 - URIs, 경로, 호스트 기반 라우팅 지원
- 카나리 배포 지원
nginx.ingress.kubernetes.io/canary: "true"
nginx.ingress.kubernetes.io/canary-weight: "X" - SSL/TLS 종료 지원
Ingress-Nginx Controller 생성
cat <<EOT> ingress-nginx-values.yaml
controller:
  service:
    type: NodePort
    nodePorts:
      http: 30080
      https: 30443
  nodeSelector:
    kubernetes.io/hostname: "k3s-s"
  metrics:
    enabled: true
  serviceMonitor:
      enabled: true
EOT

helm repo add ingress-nginx https://kubernetes.github.io/ingress-nginx
helm repo update

kubectl create ns ingress
helm install ingress-nginx ingress-nginx/ingress-nginx -f ingress-nginx-values.yaml --namespace ingress --version 4.11.2

# 확인
kubectl get all -n ingress
kc describe svc -n ingress ingress-nginx-controller

# externalTrafficPolicy 설정
kubectl patch svc -n ingress ingress-nginx-controller -p '{"spec":{"externalTrafficPolicy": "Local"}}'

# 기본 nginx conf 파일 확인
kc describe cm -n ingress ingress-nginx-controller
kubectl exec deploy/ingress-nginx-controller -n ingress -it -- cat /etc/nginx/nginx.conf

# 관련된 정보 확인 : 포드(Nginx 서버), 서비스, 디플로이먼트, 리플리카셋, 컨피그맵, 롤, 클러스터롤, 서비스 어카운트 등
kubectl get all,sa,cm,secret,roles -n ingress
kc describe clusterroles ingress-nginx
kubectl get pod,svc,ep -n ingress -o wide -l app.kubernetes.io/component=controller

# 버전 정보 확인
POD_NAMESPACE=ingress
POD_NAME=$(kubectl get pods -n $POD_NAMESPACE -l app.kubernetes.io/name=ingress-nginx --field-selector=status.phase=Running -o name)
kubectl exec $POD_NAME -n $POD_NAMESPACE -- /nginx-ingress-controller --version(⎈|default:N/A) root@k3s-s:~# k get svc,ep -n ingress
NAME TYPE CLUSTER-IP EXTERNAL-IP PORT(S) AGE
service/ingress-nginx-controller NodePort 10.10.200.136 <none> 80:30080/TCP,443:30443/TCP 39s
service/ingress-nginx-controller-admission ClusterIP 10.10.200.101 <none> 443/TCP 39s
service/ingress-nginx-controller-metrics ClusterIP 10.10.200.232 <none> 10254/TCP 39s
NAME ENDPOINTS AGE
endpoints/ingress-nginx-controller 172.16.0.3:443,172.16.0.3:80 39s
endpoints/ingress-nginx-controller-admission 172.16.0.3:8443 39s
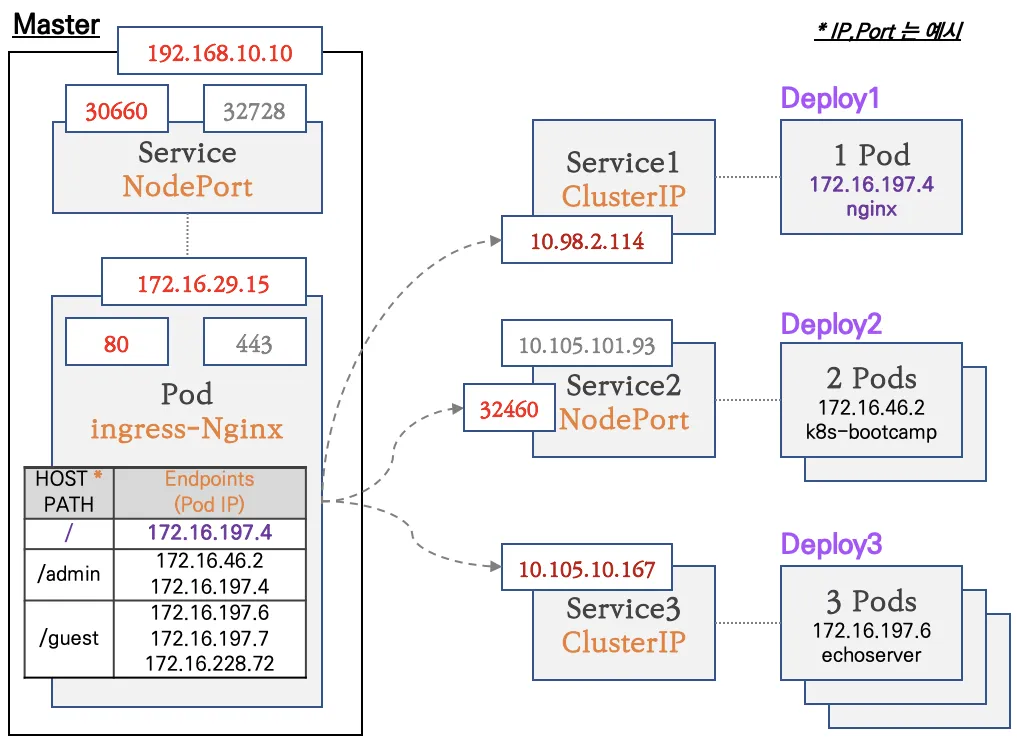
endpoints/ingress-nginx-controller-metrics 172.16.0.3:10254 39sIngress 실습 및 통신 흐름 확인
- 컨트롤플레인 노드에 인그레스 컨트롤러(Nginx) 파드를 생성, NodePort 로 외부에 노출
- 인그레스 정책 설정 : Host/Path routing, 실습의 편리를 위해서 도메인 없이 IP로 접속 설정 가능
# 모니터링
watch -d 'kubectl get ingress,svc,ep,pod -owide'

# 생성
kubectl taint nodes k3s-s role=controlplane:NoSchedule
curl -s -O https://raw.githubusercontent.com/gasida/NDKS/main/7/svc1-pod.yaml
curl -s -O https://raw.githubusercontent.com/gasida/NDKS/main/7/svc2-pod.yaml
curl -s -O https://raw.githubusercontent.com/gasida/NDKS/main/7/svc3-pod.yaml
kubectl apply -f svc1-pod.yaml,svc2-pod.yaml,svc3-pod.yaml

# 확인 : svc1, svc3 은 ClusterIP 로 클러스터 외부에서는 접속할 수 없다 >> Ingress 는 연결 가능!
kubectl get pod,svc,ep- taint / toleration
- taint: 노드가 파드 셋을 제외
- toleration: 파드에 적용
Taint가 설정된 노드에는 기본적으로 파드가 스케줄링되지 않으며, 오직 Toleration을 가진 파드만이 해당 노드에서 실행
Ingress 생성
cat <<EOT> ingress1.yaml
apiVersion: networking.k8s.io/v1
kind: Ingress
metadata:
  name: ingress-1
  annotations:
    #nginx.ingress.kubernetes.io/upstream-hash-by: "true"
spec:
  ingressClassName: nginx
  rules:
  - http:
      paths:
      - path: /
        pathType: Prefix
        backend:
          service:
            name: svc1-web
            port:
              number: 80
      - path: /guest
        pathType: Prefix
        backend:
          service:
            name: svc2-guest
            port:
              number: 8080
      - path: /admin
        pathType: Prefix
        backend:
          service:
            name: svc3-admin
            port:
              number: 8080
EOT
# 모니터링
watch -d 'kubectl get ingress,svc,ep,pod -owide'
# 생성
kubectl apply -f ingress1.yaml
# 확인
kubectl get ingress
**kc describe ingress ingress-1**
...
Rules:
Host Path Backends
---- ---- --------
***
/ svc1-web:80 ()
/guest svc2-guest:8080 ()
/admin svc3-admin:8080 ()**
...
# 설정이 반영된 nginx conf 파일 확인
kubectl exec deploy/ingress-nginx-controller -n ingress -it -- cat /etc/nginx/nginx.conf
kubectl exec deploy/ingress-nginx-controller -n ingress -it -- **cat /etc/nginx/nginx.conf | grep 'location /' -A5**
location /guest/ {
set $namespace "default";
set $ingress_name "ingress-1";
set $service_name "svc2-guest";
set $service_port "8080";
--
location /admin/ {
set $namespace "default";
set $ingress_name "ingress-1";
set $service_name "svc3-admin";
set $service_port "8080";
--
location / {
set $namespace "default";
set $ingress_name "ingress-1";
set $service_name "svc1-web";
set $service_port "80";
--
...kubectl get ingress
NAME CLASS HOSTS ADDRESS PORTS AGE
ingress-1 nginx * 10.10.200.24 80 3m44s
kubectl describe ingress ingress-1 | sed -n "5, \$p"
Rules:
Host Path Backends
---- ---- --------
* / svc1-web:80 ()
/guest svc2-guest:8080 ()
/admin svc3-admin:8080 ()
# 접속 로그 확인 : kubetail 설치되어 있음 - 출력되는 nginx 의 로그의 IP 확인
kubetail -n ingress -l app.kubernetes.io/component=controller
-------------------------------
# 자신의 집 PC에서 인그레스를 통한 접속 : 각각
echo -e "Ingress1 sv1-web URL = http://$(curl -s ipinfo.io/ip):30080"
echo -e "Ingress1 sv2-guest URL = http://$(curl -s ipinfo.io/ip):30080/guest"
echo -e "Ingress1 sv3-admin URL = http://$(curl -s ipinfo.io/ip):30080/admin"
# svc1-web 접속
MYIP=<EC2 공인 IP>
MYIP=13.124.93.150
curl -s $MYIP:30080
# svvc2-guest 접속
curl -s $MYIP:30080/guest
curl -s $MYIP:30080/guest
for i in {1..100}; do curl -s $MYIP:30080/guest ; done | sort | uniq -c | sort -nr
# svc3-admin 접속 > 기본적으로 Nginx 는 라운드로빈 부하분산 알고리즘을 사용 >> Client_address 와 XFF 주소는 어떤 주소인가요?
curl -s $MYIP:30080/admin
curl -s $MYIP:30080/admin | egrep '(client_address|x-forwarded-for)'
for i in {1..100}; do curl -s $MYIP:30080/admin | grep Hostname ; done | sort | uniq -c | sort -nr
> curl -s $MYIP:30080/admin | egrep '(client_address|x-forwarded-for)'

	client_address=172.16.0.3
x-forwarded-for=39.115.227.67- X-Forwarded-For 헤더 송신지 IP 주소가 변환되는 환경(장비, 서버, 솔루션 등)에서, 변환 전 송신지(클라이언트) IP 주소를 저장하는 헤더
- client_address
클라이언트가 서비스에 요청할 때 보이는 IP 주소
다음과 같이 Ingress pod의 IP인 것을 알 수 있다.(⎈|default:N/A) root@k3s-s:~# k get pod -o wide -A | grep ingress ingress ingress-nginx-controller-979fc89cf-9rpc7 1/1 Running 0 63m 172.16.0.3 k3s-s <none> <none>
(⎈|default:N/A) root@k3s-s:~# kubetail -n ingress -l app.kubernetes.io/component=controller
Will tail 1 logs...
ingress-nginx-controller-979fc89cf-9rpc7
[ingress-nginx-controller-979fc89cf-9rpc7] 39.115.227.67 - - [12/Oct/2024:14:14:28 +0000] "GET / HTTP/1.1" 200 615 "-" "curl/8.7.1" 83 0.002 [default-svc1-web-80] [] 172.16.3.5:80 615 0.002 200 881700c9428be8ebc9258f1b5ffdde56
[ingress-nginx-controller-979fc89cf-9rpc7] 39.115.227.67 - - [12/Oct/2024:14:14:30 +0000] "GET /guest HTTP/1.1" 200 102 "-" "curl/8.7.1" 88 0.012 [default-svc2-guest-8080] [] 172.16.1.3:8080 102 0.013 200 e8ec2956a22255c9e1eafcd676827839
[ingress-nginx-controller-979fc89cf-9rpc7] 39.115.227.67 - - [12/Oct/2024:14:14:34 +0000] "GET /admin HTTP/1.1" 200 673 "-" "curl/8.7.1" 88 0.002 [default-svc3-admin-8080] [] 172.16.2.4:8080 849 0.002 200 cda95aa5a86bf56ccce6d83e049327ec
Nginx 파드가 endpoint 정보 등을 모니터링 가능한 이유 : 클러스터롤과 롤(엔드포인트 list, watch)를 바인딩된 서비스 어카운트를 파드가 사용!
# (옵션) Nginx 파드가 endpoint 정보 등을 모니터링 가능한 이유 : 클러스터롤과 롤(엔드포인트 list, watch)를 바인딩된 서비스 어카운트를 파드가 사용!
kubectl describe clusterrole ingress -n ingress | egrep '(Verbs|endpoints)'
[root@k8s-m:~/yaml (ctx-k8s:default)]# kubectl describe clusterrole ingress-nginx -n ingress-nginx | egrep '(Verbs|endpoints)'
  Resources                           Non-Resource URLs  Resource Names  Verbs
  endpoints                           []                 []              [list watch]

kubectl describe roles ingress-nginx -n ingress | egrep '(Verbs|endpoints)'
[root@k8s-m:~/yaml (ctx-k8s:default)]# kubectl describe roles ingress-nginx -n ingress-nginx | egrep '(Verbs|endpoints)'
  Resources                           Non-Resource URLs  Resource Names                     Verbs
  endpoints                           []                 []                                 [get list watch]
Host 기반 라우팅
cat <<EOT> ingress2.yaml
apiVersion: networking.k8s.io/v1
kind: Ingress
metadata:
  name: ingress-2
spec:
  ingressClassName: nginx
  rules:
  - host: daeuk.com
    http:
      paths:
      - path: /
        pathType: Prefix
        backend:
          service:
            name: svc3-admin
            port:
              number: 8080
  - host: "*.daeuk.com"
    http:
      paths:
      - path: /echo
        pathType: Prefix
        backend:
          service:
            name: svc3-admin
            port:
              number: 8080
EOT
# 터미널1
watch -d 'kubectl get ingresses,svc,ep,pod -owide'
# 생성
kubectl apply -f ingress2.yaml,svc3-pod.yaml
# 확인
kubectl get ingress
kubectl describe ingress ingress-2
(⎈|default:N/A) root@k3s-s:~# kubectl describe ingress ingress-2 | sed -n "5, \$p"
Rules:
Host Path Backends
---- ---- --------
daeuk.com
/ svc3-admin:8080 ()
*.daeuk.com
/echo svc3-admin:8080 ()# 로그 모니터링
kubetail -n ingress -l app.kubernetes.io/component=controller
# (옵션) ingress nginx 파드 vethY 에서 패킷 캡처 후 확인 해 볼 것
------------
# 자신의 PC 에서 접속 테스트
# svc3-admin 접속 > 결과 확인 : 왜 접속이 되지 않는가? HTTP 헤더에 Host 필드를 잘 확인해보자!
curl $MYIP:30080 -v
curl $MYIP:30080/echo -v
...
(⎈|default:N/A) root@k3s-s:~# kubetail -n ingress -l app.kubernetes.io/component=controller
Will tail 1 logs...
ingress-nginx-controller-979fc89cf-9rpc7
[ingress-nginx-controller-979fc89cf-9rpc7] 39.115.227.67 - - [12/Oct/2024:15:01:16 +0000] "GET /echo HTTP/1.1" 404 153 "-" "curl/8.7.1" 87 0.002 [default-svc1-web-80] [] 172.16.3.5:80 153 0.002 404 78db29e7faa8b4e51a478cf028692ed5
...⇒ 404 실패!
# mypc에서 접속을 위한 설정
## /etc/hosts 수정 : 도메인 이름으로 접속하기 위해서 변수 지정
## 윈도우 C:\Windows\System32\drivers\etc\hosts
## 맥 sudo vim /etc/hosts=
MYDOMAIN1=daeuk.com
MYDOMAIN2=test.daeuk.com
echo $MYIP $MYDOMAIN1 $MYDOMAIN2

echo "$MYIP $MYDOMAIN1" | sudo tee -a /etc/hosts
echo "$MYIP $MYDOMAIN2" | sudo tee -a /etc/hosts
cat /etc/hosts | grep $MYDOMAIN1

~~~~# svc3-admin 접속 > 결과 확인
curl $MYDOMAIN1:30080 -v
curl $MYDOMAIN1:30080/admin
curl $MYDOMAIN1:30080/echo
curl $MYDOMAIN1:30080/echo/1

curl $MYDOMAIN2:30080 -v
curl $MYDOMAIN2:30080/admin
curl $MYDOMAIN2:30080/echo
curl $MYDOMAIN2:30080/echo/1
curl $MYDOMAIN2:30080/echo/1/2

...
(⎈|default:N/A) root@k3s-s:~# kubetail -n ingress -l app.kubernetes.io/component=controller
Will tail 1 logs...
ingress-nginx-controller-979fc89cf-9rpc7
[ingress-nginx-controller-979fc89cf-9rpc7] 39.115.227.67 - - [12/Oct/2024:15:07:33 +0000] "GET /admin HTTP/1.1" 200 658 "-" "curl/8.7.1" 83 0.001 [default-svc3-admin-8080] [] 172.16.3.4:8080 834 0.001 200 270250e7abceb5d22728cf5c0c942770
...

## (옵션) /etc/hosts 파일 변경 없이 접속 방안
curl -H "host: $MYDOMAIN1" $MYIP:30080
⇒ 200 성공!
카나리 업그레이드
# 터미널1
watch -d 'kubectl get ingress,svc,ep,pod -owide'

# 생성
curl -s -O https://raw.githubusercontent.com/gasida/NDKS/main/7/canary-svc1-pod.yaml
curl -s -O https://raw.githubusercontent.com/gasida/NDKS/main/7/canary-svc2-pod.yaml
kubectl apply -f canary-svc1-pod.yaml,canary-svc2-pod.yaml

# 확인
kubectl get svc,ep,pod

# 파드 버전 확인: 1.13.0 vs 1.13.1
for pod in $(kubectl get pod -o wide -l app=svc-v1 |awk 'NR>1 {print $6}'); do curl -s $pod:8080 | egrep '(Hostname|nginx)'; done
	Hostname: dp-v1-cdd8dc687-gcgsz
		server_version=nginx: 1.13.0 - lua: 10008
for pod in $(kubectl get pod -o wide -l app=svc-v2 |awk 'NR>1 {print $6}'); do curl -s $pod:8080 | egrep '(Hostname|nginx)'; done
	Hostname: dp-v2-785f69bd6-hh624
server_version=nginx: 1.13.1 - lua: 10008- canary-ingress1.yaml
cat <<EOT> canary-ingress1.yaml
apiVersion: networking.k8s.io/v1
kind: Ingress
metadata:
  name: ingress-canary-v1
spec:
  ingressClassName: nginx
  rules:
  - host: daeuk.com
    http:
      paths:
      - path: /
        pathType: Prefix
        backend:
          service:
            name: svc-v1
            port:
              number: 8080
EOT- canary-ingress2.yaml
cat <<EOT> canary-ingress2.yaml
apiVersion: networking.k8s.io/v1
kind: Ingress
metadata:
  name: ingress-canary-v2
  annotations:
    nginx.ingress.kubernetes.io/canary: "true"
    nginx.ingress.kubernetes.io/canary-weight: "10"
spec:
  ingressClassName: nginx
  rules:
  - host: daeuk.com
    http:
      paths:
      - path: /
        pathType: Prefix
        backend:
          service:
            name: svc-v2
            port:
              number: 8080
EOT
# 터미널1
watch -d 'kubectl get ingress,svc,ep'
# 생성
kubectl apply -f canary-ingress1.yaml,canary-ingress2.yaml
# 로그 모니터링
kubetail -n ingress -l app.kubernetes.io/component=controller
# 접속 테스트
curl -s $MYDOMAIN1:30080
curl -s $MYDOMAIN1:30080 | grep nginx
# 접속 시 v1 v2 버전별 비율이 어떻게 되나요? 왜 이렇게 되나요?
for i in {1..100}; do curl -s $MYDOMAIN1:30080 | grep nginx ; done | sort | uniq -c | sort -nr
while true; do curl -s --connect-timeout 1 $MYDOMAIN1:30080 | grep Hostname ; echo "--------------" ; date "+%Y-%m-%d %H:%M:%S" ; sleep 1; done
...
> for i in {1..100}; do curl -s $MYDOMAIN1:30080 | grep nginx ; done | sort | uniq -c | sort -nr
88 server_version=nginx: 1.13.0 - lua: 10008
12 server_version=nginx: 1.13.1 - lua: 10008
...
# 비율 조정 >> 개발 배포 버전 전략에 유용하다!
kubectl annotate --overwrite ingress ingress-canary-v2 nginx.ingress.kubernetes.io/canary-weight=50
# 접속 테스트
for i in {1..100}; do curl -s $MYDOMAIN1:30080 | grep nginx ; done | sort | uniq -c | sort -nr
...
> for i in {1..100}; do curl -s $MYDOMAIN1:30080 | grep nginx ; done | sort | uniq -c | sort -nr
53 server_version=nginx: 1.13.0 - lua: 10008
47 server_version=nginx: 1.13.1 - lua: 10008
...HTTPS 처리 (TLS 종료)
cat <<EOT> ssl-termination-ingress.yaml
apiVersion: networking.k8s.io/v1
kind: Ingress
metadata:
  name: https
spec:
  ingressClassName: nginx
  tls:
  - hosts:
    - daeuk.com
    secretName: secret-https
  rules:
  - host: daeuk.com
    http:
      paths:
      - path: /
        pathType: Prefix
        backend:
          service:
            name: svc-https
            port:
              number: 8080
EOT
# 서비스와 파드 생성
curl -s -O https://raw.githubusercontent.com/gasida/NDKS/main/7/svc-pod.yaml
kubectl apply -f svc-pod.yaml
# 인그레스 생성
kubectl apply -f ssl-termination-ingress.yaml
# 인증서 생성
# openssl req -x509 -nodes -days 365 -newkey rsa:2048 -keyout tls.key -out tls.crt -subj "/CN=dkos.com/O=dkos.com"mkdir key && cd key
MYDOMAIN1=daeuk.com
openssl req -x509 -nodes -days 365 -newkey rsa:2048 -keyout tls.key -out tls.crt -subj "/CN=$MYDOMAIN1/O=$MYDOMAIN1"
tree
# Secret 생성
kubectl create secret tls secret-https --key tls.key --cert tls.crt
# Secret 확인
kubectl get secrets secret-https
kubectl get secrets secret-https -o yaml
-------------------
# 자신의 PC 에서 접속 확인 : PC 웹브라우저
# 접속 확인 : -k 는 https 접속 시 : 접속 포트 정보 확인
curl -Lk https://$MYDOMAIN1:30443
## (옵션) /etc/hosts 파일 변경 없이 접속 방안
curl -Lk -H "host: $MYDOMAIN1" https://$MYDOMAIN1:30443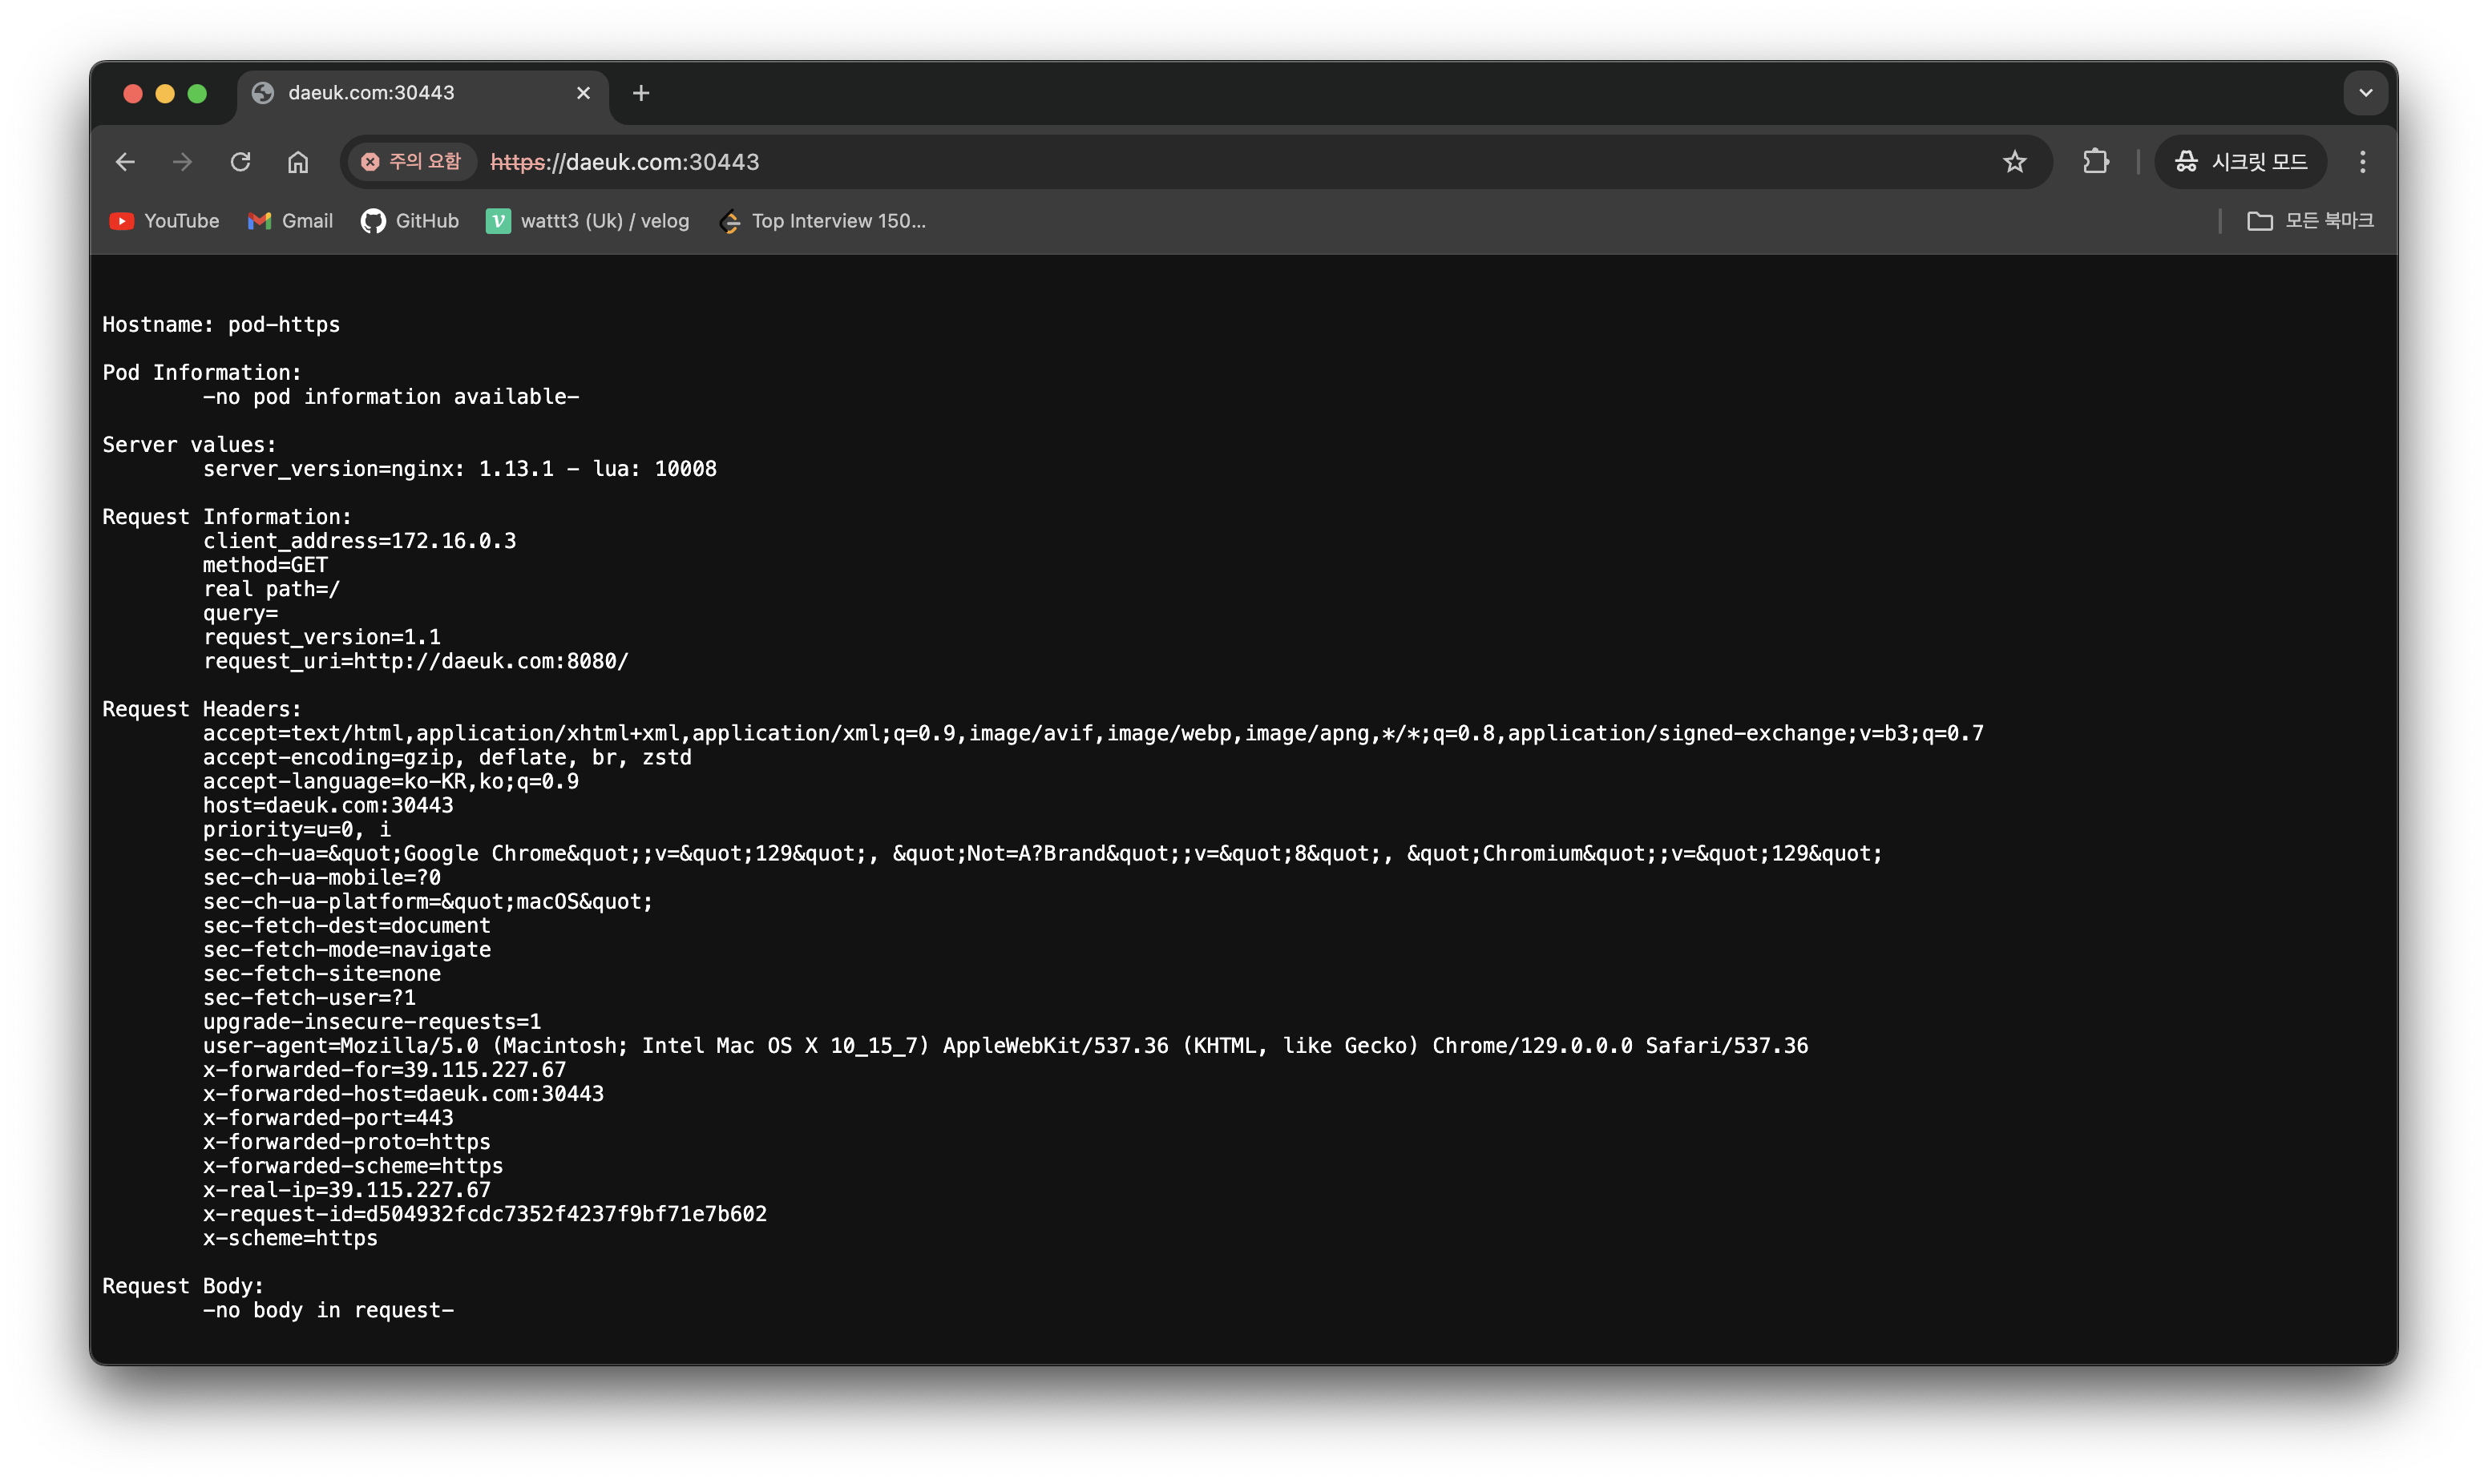
(⎈|default:N/A) root@k3s-s:~# k get svc -A
ingress       ingress-nginx-controller             NodePort    10.10.200.136   <none>        80:30080/TCP,443:30443/TCP   153m
Gateway API
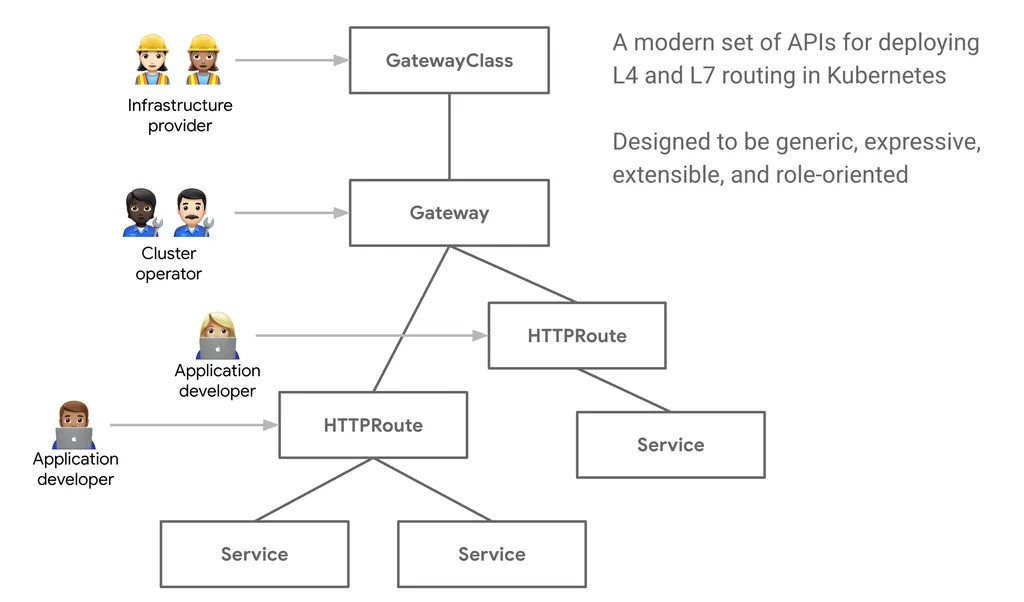
기존의 Ingress 에 좀 더 기능을 추가, 역할 분리(role-oriented)
- 서비스 메시(istio)에서 제공하는 Rich 한 기능 중 일부 기능들과 혹은 운영 관리에 필요한 기능들을 추가
- 추가 기능 : 헤더 기반 라우팅, 헤더 변조, 트래픽 미러링(쉽게 트래픽 복제), 역할 기반
주요 기능
-
개선된 리소스 모델
API는 GatewayClass, Gateway 및 Route(HTTPRoute, TCPRoute 등)와 같은 새로운 사용자 정의 리소스를 도입하여 라우팅 규칙을 정의하는 보다 세부적이고 표현력 있는 방법을 제공합니다.
-
프로토콜 독립적
주로 HTTP용으로 설계된 Ingress와 달리 Gateway API는 TCP, UDP, TLS를 포함한 여러 프로토콜을 지원합니다.
-
강화된 보안
TLS 구성 및 보다 세부적인 액세스 제어에 대한 기본 제공 지원.
-
교차 네임스페이스 지원
서로 다른 네임스페이스의 서비스로 트래픽을 라우팅하여 보다 유연한 아키텍처를 구축할 수 있는 기능을 제공합니다.
-
확장성
API는 사용자 정의 리소스 및 정책으로 쉽게 확장할 수 있도록 설계되었습니다.
-
역할 지향
클러스터 운영자, 애플리케이션 개발자, 보안 팀 간의 우려를 명확하게 분리합니다.
구성 요소
GatewayClass,Gateway,HTTPRoute,TCPRoute,Service
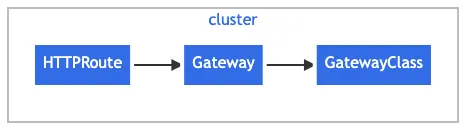
- GatewayClass 공통 설정을 가진 여러 게이트웨이를 정의하며, 해당 클래스를 구현한 컨트롤러에 의해 관리됩니다.
- Gateway 트래픽을 처리하는 인프라의 인스턴스를 정의하며, 예를 들어 클라우드 로드 밸런서 등이 있습니다.
- HTTPRoute Gateway 리스너에서 백엔드 네트워크 엔드포인트로 트래픽을 매핑하는 HTTP 전용 규칙을 정의하며, 이 엔드포인트는 보통 Service로 표현됩니다.
- Request flow
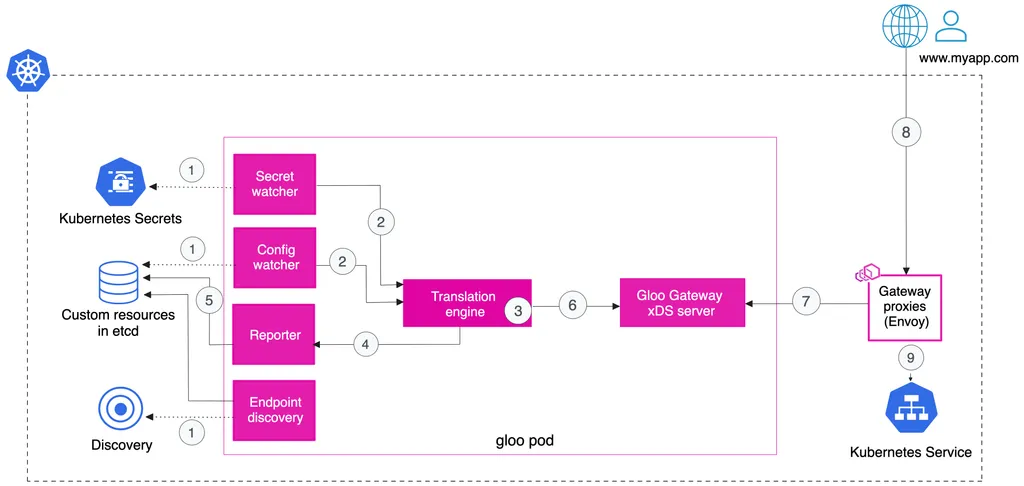
Gloo Gateway

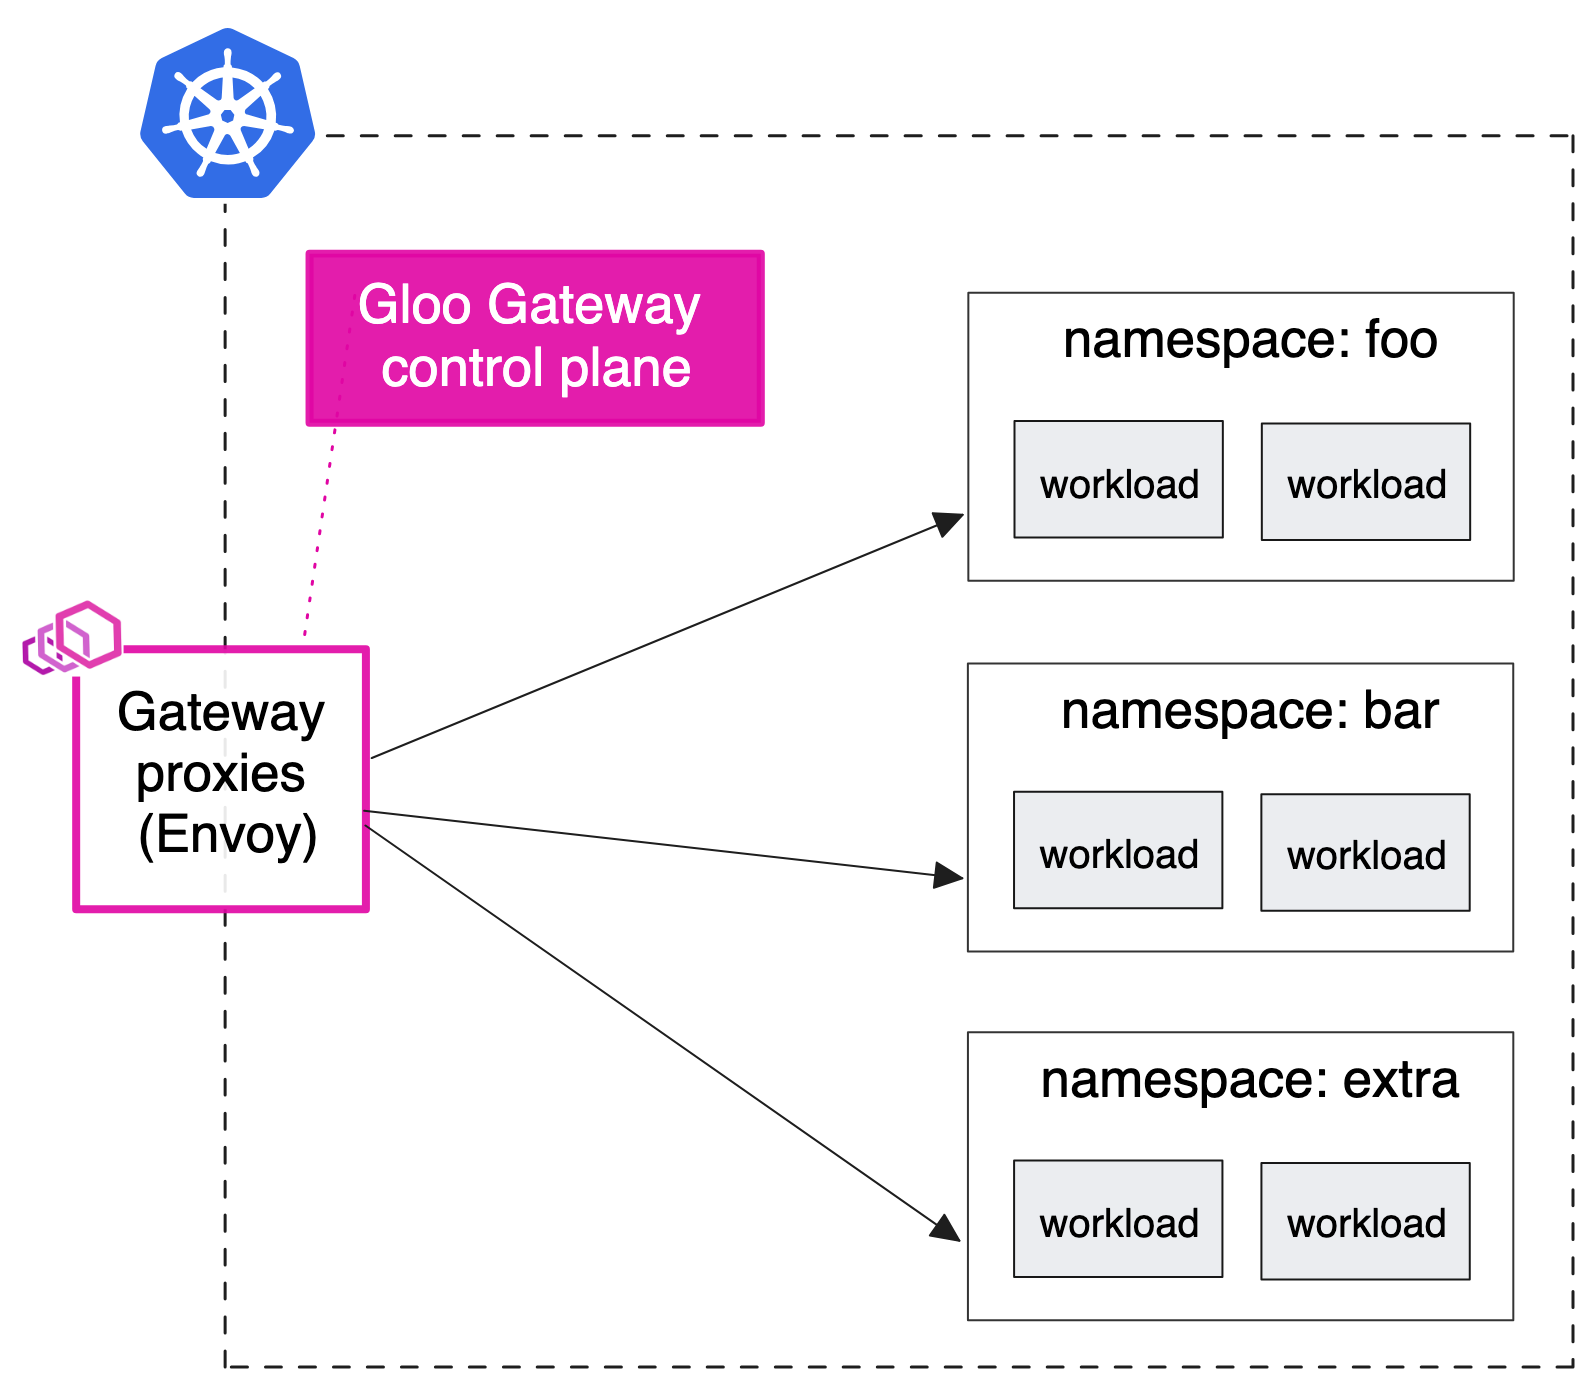
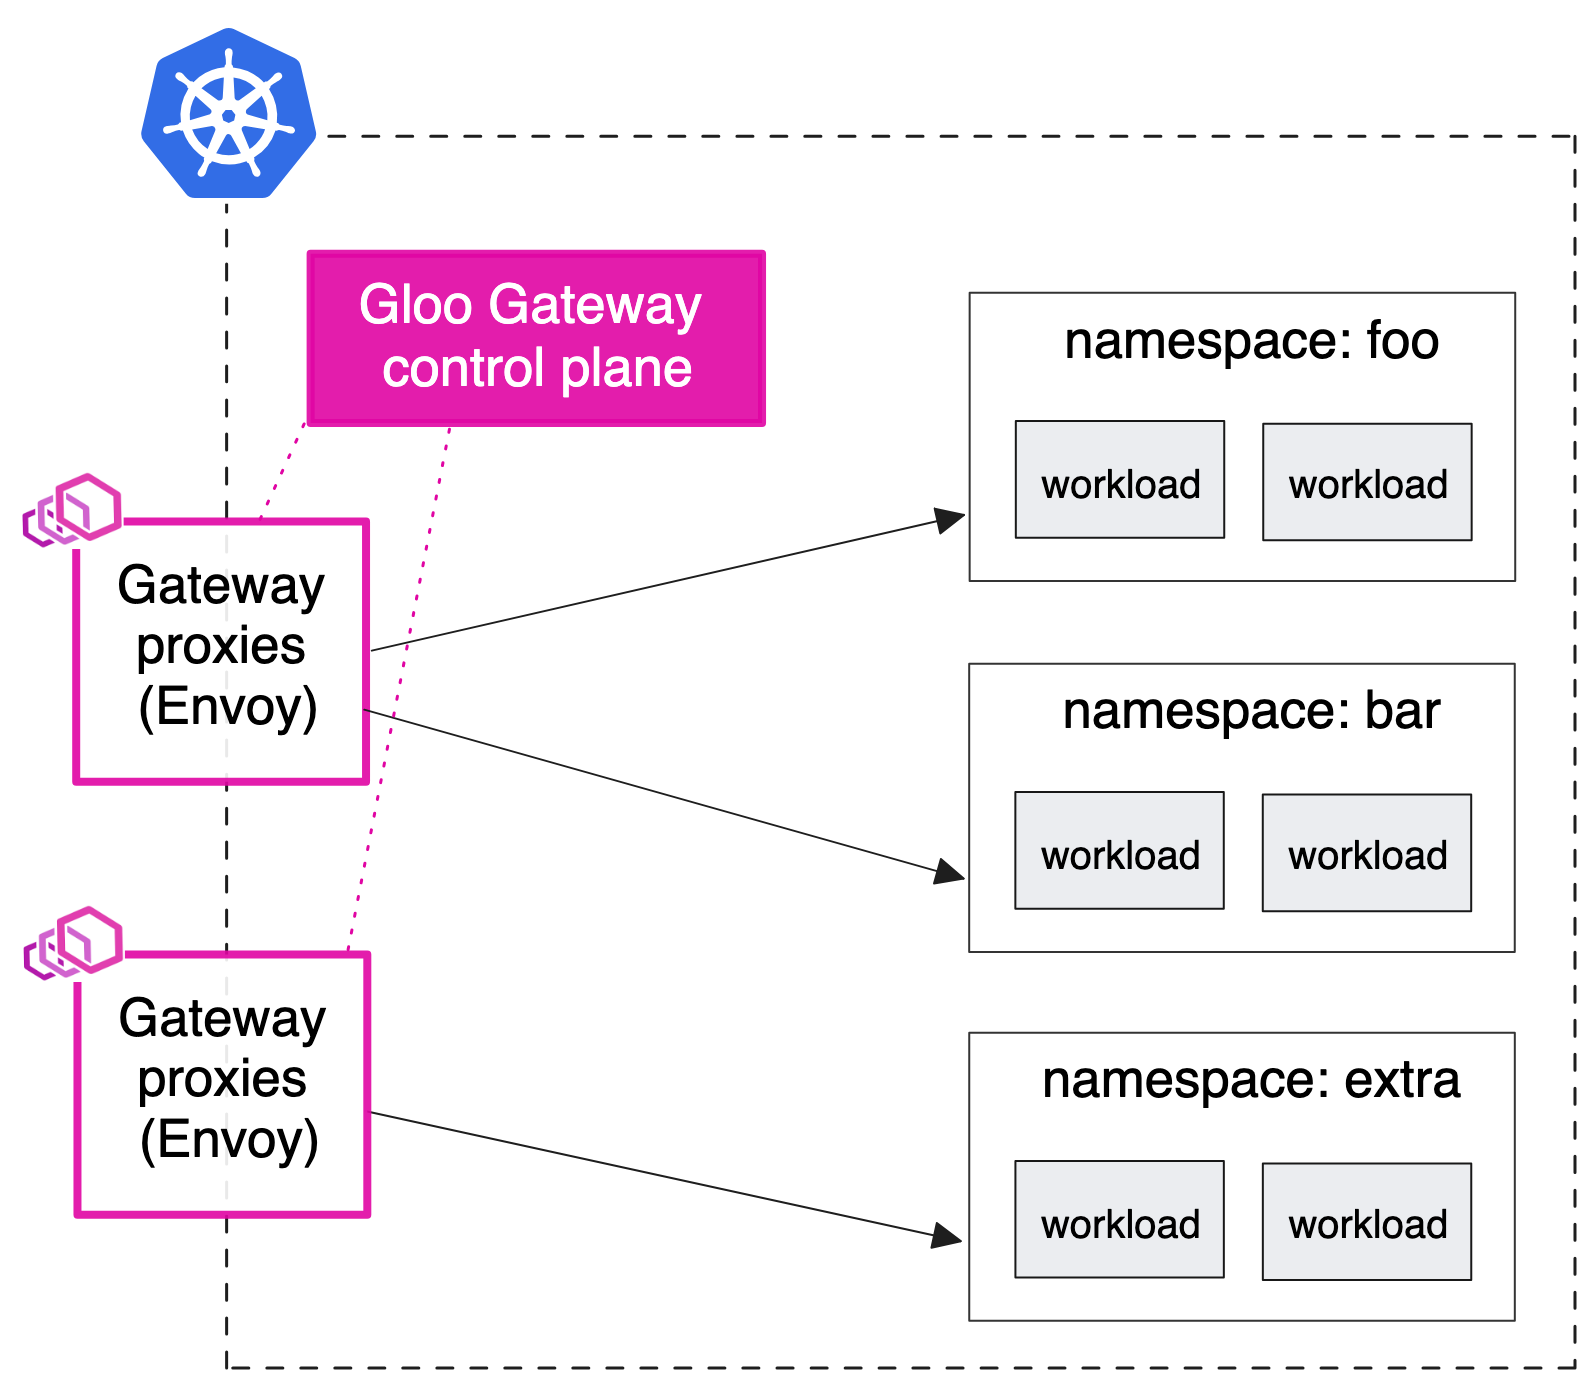
Deployment patterns - Docs
-
Simple ingress
-
Shared gateway
-
Sharded gateway with central ingress
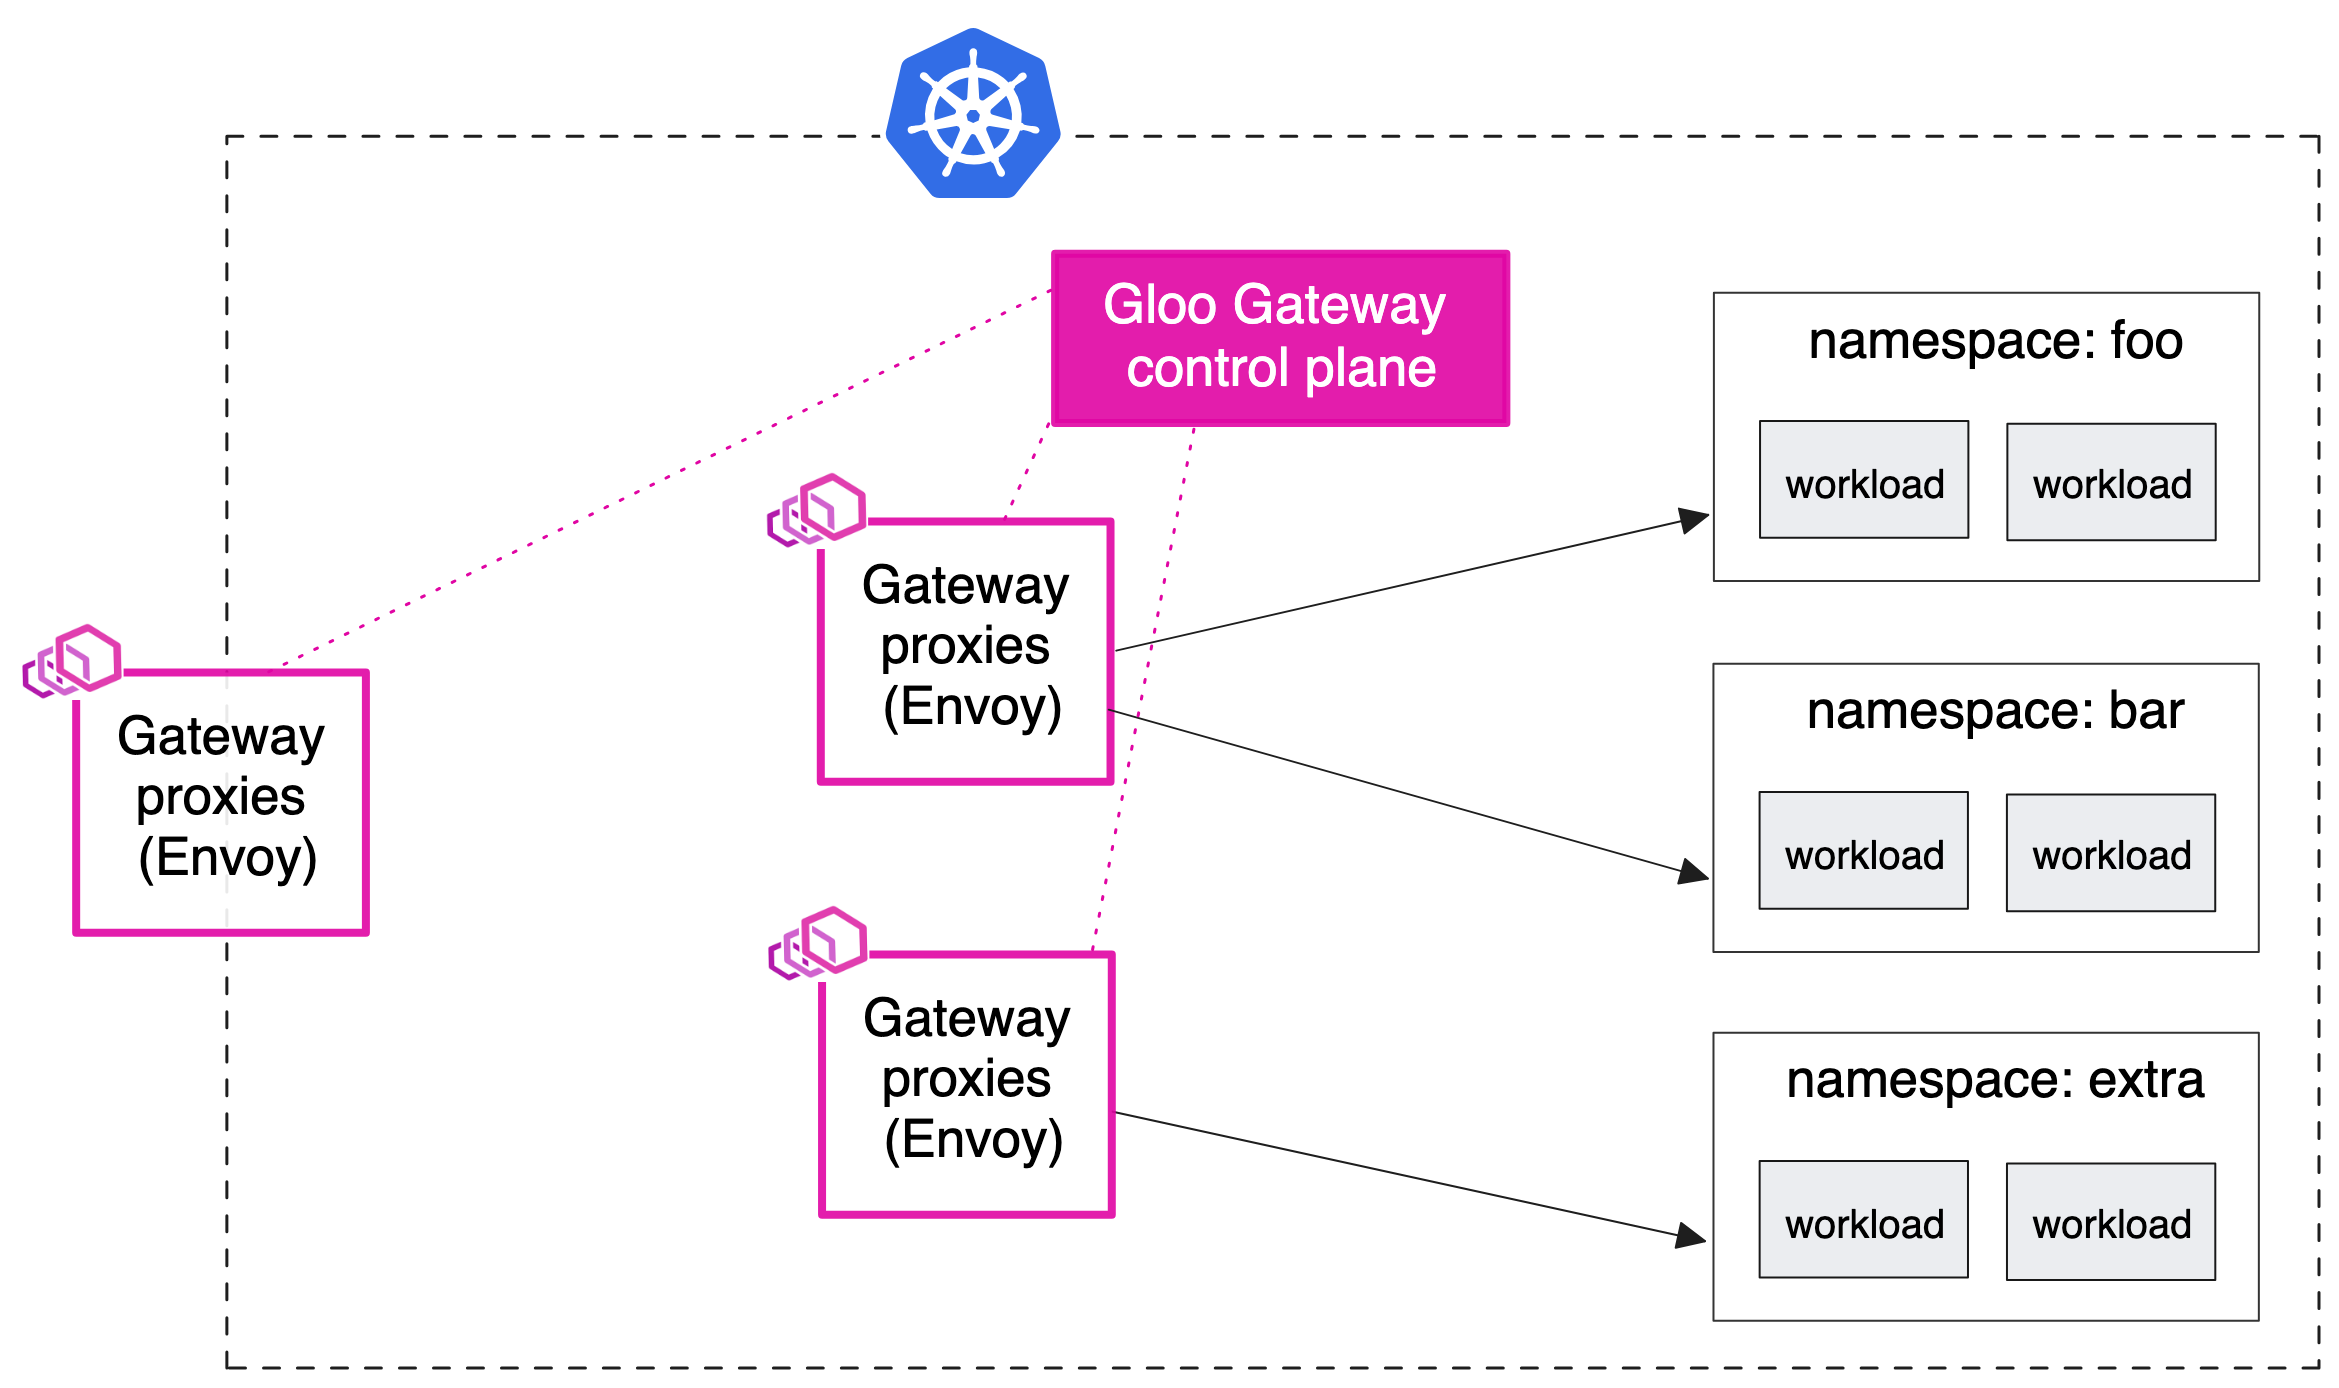
- 기존 설정에 따라 중앙 인그레스 엔드포인트로 다른 유형의 프록시를 사용하고 싶을 수 있습니다.
- 예를 들어 모든 트래픽이 통과해야 하는 HAProxy 또는 AWS NLB/ALB 인스턴스가 있을 수 있습니다
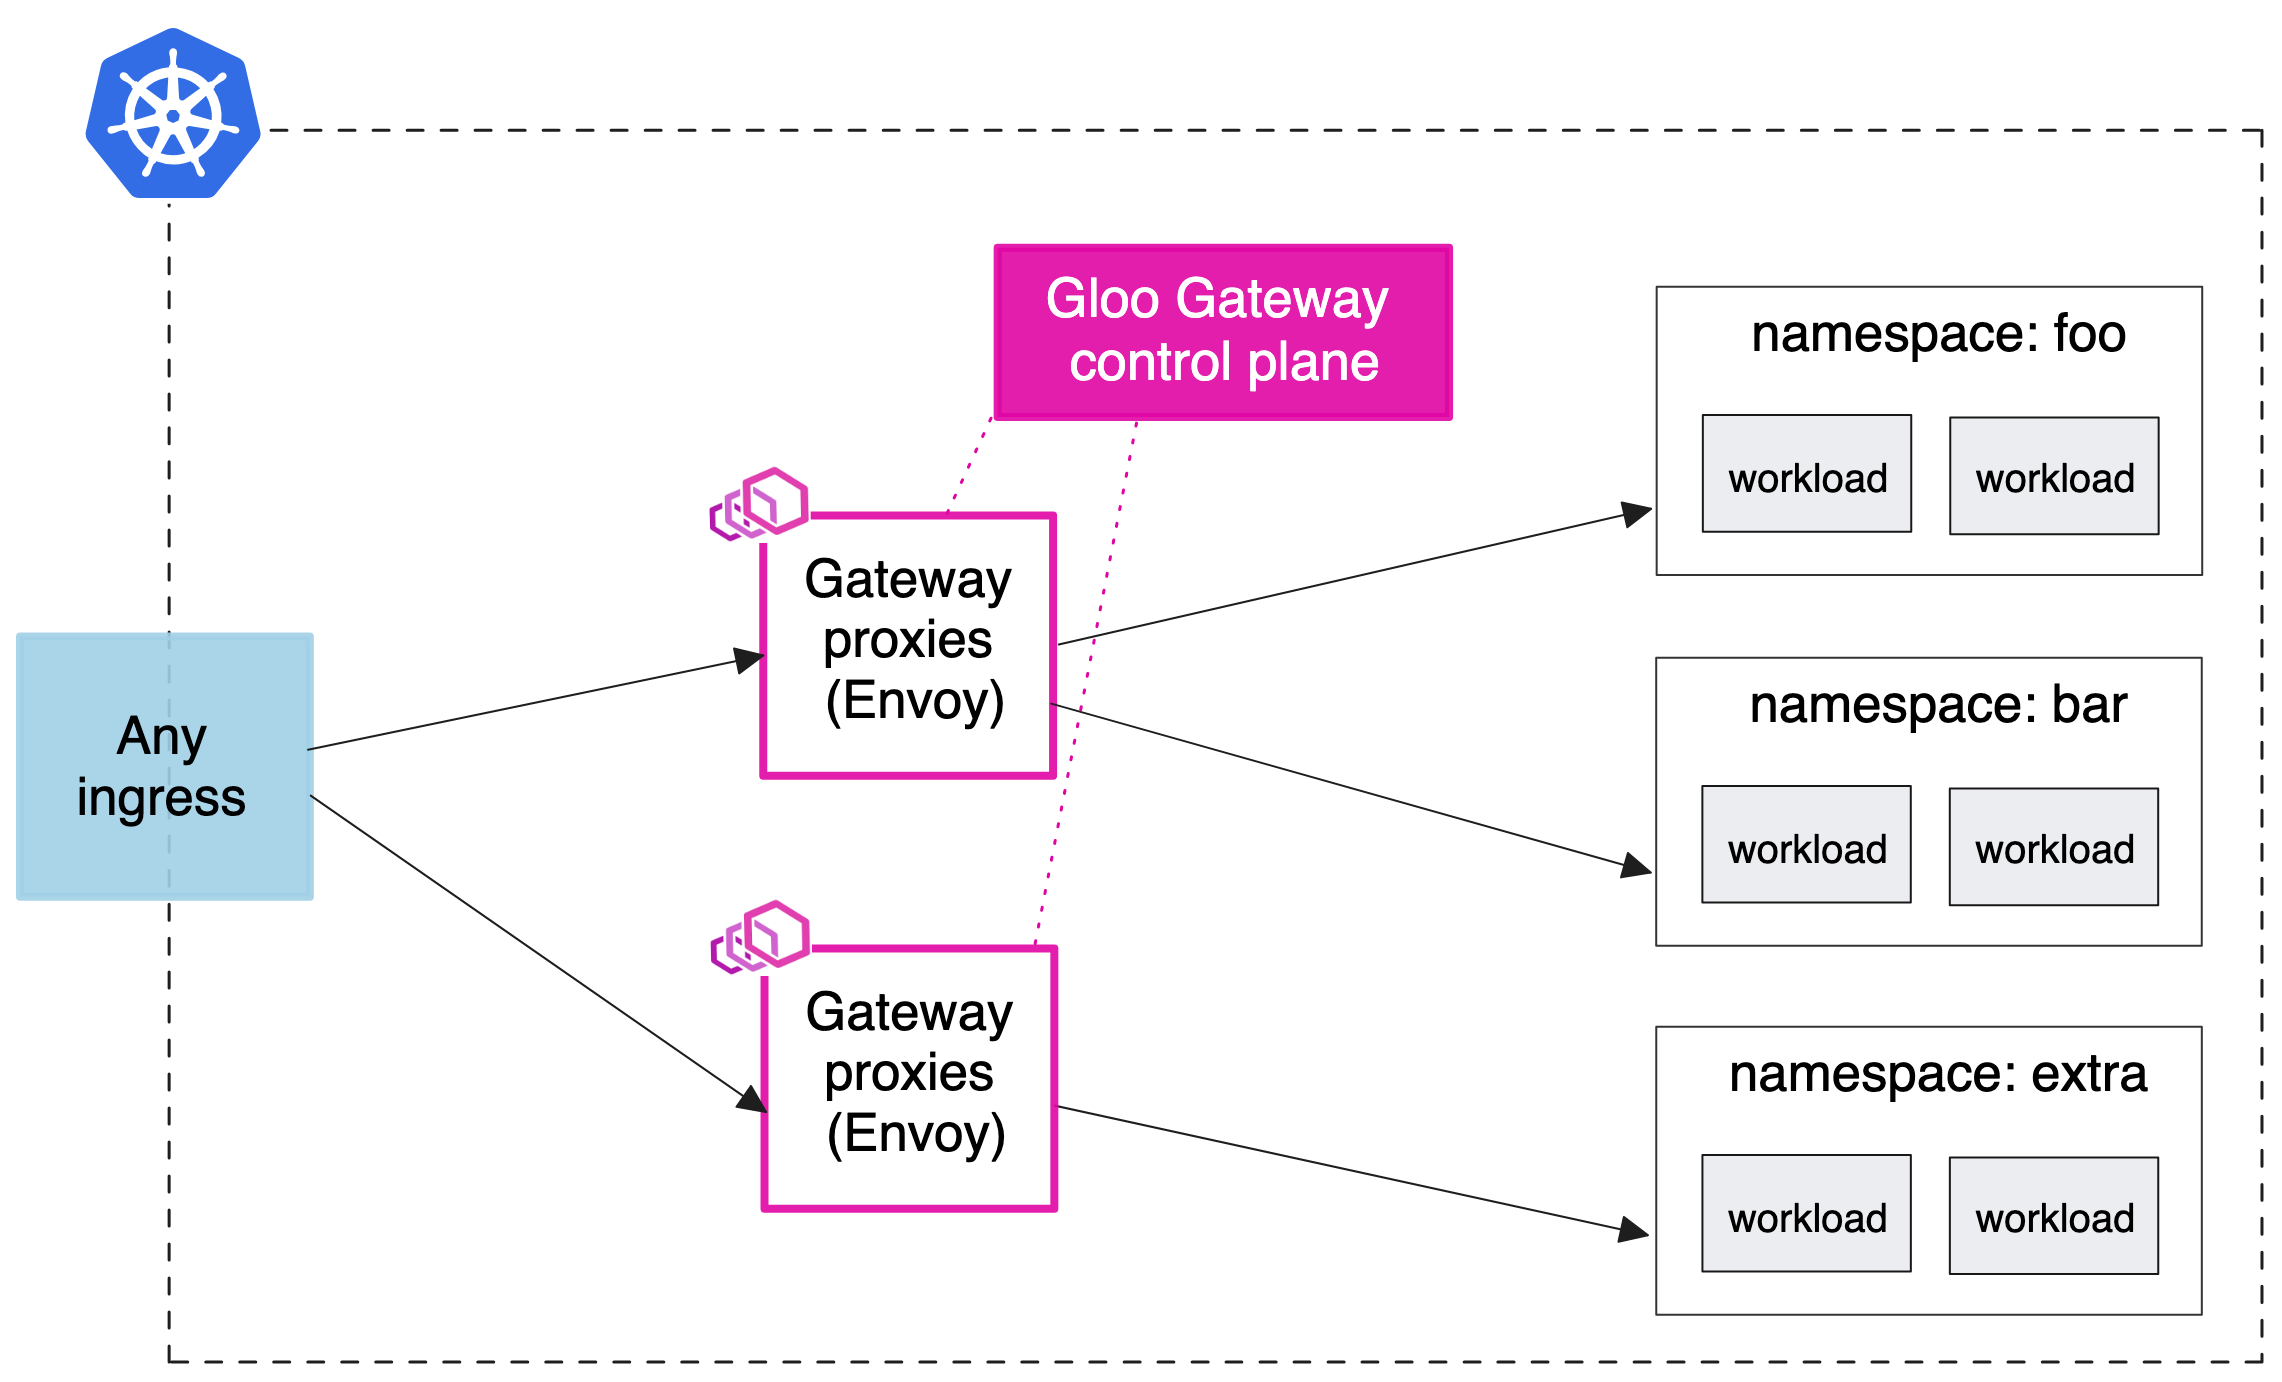
-
API gateway for a service mesh

실습
cat <<EOT> kind-1node.yaml
kind: Cluster
apiVersion: kind.x-k8s.io/v1alpha4
nodes:
- role: control-plane
  extraPortMappings:
  - containerPort: 30000
    hostPort: 30000
  - containerPort: 30001
    hostPort: 30001
  - containerPort: 30002
    hostPort: 30002
EOT

# Install KinD Cluster
kind create cluster --image kindest/node:v1.30.0 --config kind-1node.yaml --name myk8s

# 노드에 기본 툴 설치
docker exec -it myk8s-control-plane sh -c 'apt update && apt install tree psmisc lsof wget bsdmainutils bridge-utils net-tools dnsutils tcpdump ngrep iputils-ping git vim -y'

# 노드/파드 확인
kubectl get nodes -o wide
kubectl get pod -A
# CRDs 설치 및 확인
kubectl apply -f https://github.com/kubernetes-sigs/gateway-api/releases/download/v1.0.0/standard-install.yaml
kubectl get crd# [신규 터미널] 아래 bash 진입 후 glooctl 툴 사용
docker exec -it myk8s-control-plane bash
----------------------------------------
# Install Glooctl Utility
## glooctl install gateway # install gloo's function gateway functionality into the 'gloo-system' namespace
## glooctl install ingress # install very basic Kubernetes Ingress support with Gloo into namespace gloo-system
## glooctl install knative # install Knative serving with Gloo configured as the default cluster ingress
## curl -sL https://run.solo.io/gloo/install | sh
curl -sL https://run.solo.io/gloo/install | GLOO_VERSION=v1.17.7 sh
export PATH=$HOME/.gloo/bin:$PATH
# 버전 확인
glooctl version
----------------------------------------- Use Rosetta 비활성!

# [신규 터미널] 모니터링
watch -d kubectl get pod,svc,endpointslices,ep -n gloo-system

# Install Gloo Gateway
## --set kubeGateway.enabled=true: Kubernetes Gateway 기능을 활성화합니다.
## --set gloo.disableLeaderElection=true: Gloo의 리더 선출 기능을 비활성화합니다. (단일 인스턴스에서 Gloo를 실행 시 유용)
## --set discovery.enabled=false: 서비스 디스커버리 기능을 비활성화합니다.
helm repo add gloo https://storage.googleapis.com/solo-public-helm
helm repo update
helm install -n gloo-system gloo-gateway gloo/gloo \
--create-namespace \
--version 1.17.7 \
--set kubeGateway.enabled=true \
--set gloo.disableLeaderElection=true \
--set discovery.enabled=false

# Confirm that the Gloo control plane has successfully been deployed using this command
kubectl rollout status deployment/gloo -n gloo-system

# 설치 확인
kubectl get crd | grep 'networking.k8s.io'
kubectl get crd | grep -v 'networking.k8s.io'
kubectl get pod,svc,endpointslices -n gloo-system

#
kubectl explain gatewayclasses
kubectl get gatewayclasses
NAME           CONTROLLER             ACCEPTED   AGE
gloo-gateway   solo.io/gloo-gateway   True       21m

kubectl get gatewayclasses -o yaml
apiVersion: v1
items:
- apiVersion: gateway.networking.k8s.io/v1
  kind: GatewayClass
  metadata:
    labels:
      app: gloo
    name: gloo-gateway
  spec:
    controllerName: solo.io/gloo-gateway
...- kubectl rollout 애플리케이션 배포와 관련된 상태를 모니터링하고 관리하는 데 사용
kubectl rollout history/kubectl rollout undo이력 확인 및 이전 버전으로 되돌리기 가능
#
watch -d kubectl get pod,svc,endpointslices,ep -n httpbin

# Install Httpbin Application
kubectl apply -f https://raw.githubusercontent.com/solo-io/solo-blog/main/gateway-api-tutorial/01-httpbin-svc.yaml

# 설치 확인
kubectl get deploy,pod,svc,endpointslices,sa -n httpbin
kubectl rollout status deploy/httpbin -n httpbin

# (옵션) NodePort 설정
cat <<EOF | kubectl apply -f -
apiVersion: v1
kind: Service
metadata:
  labels:
    app: httpbin
    service: httpbin
  name: httpbin
  namespace: httpbin
spec:
  type: NodePort
  ports:
  - name: http
    port: 8000
    targetPort: 80
    nodePort: 30000
  selector:
    app: httpbin
EOF

# (옵션) 로컬 접속 확인
echo "httpbin web - http://localhost:30000"     # macOS 사용자
echo "httpbin web - http://192.168.50.10:30000" # Windows 사용자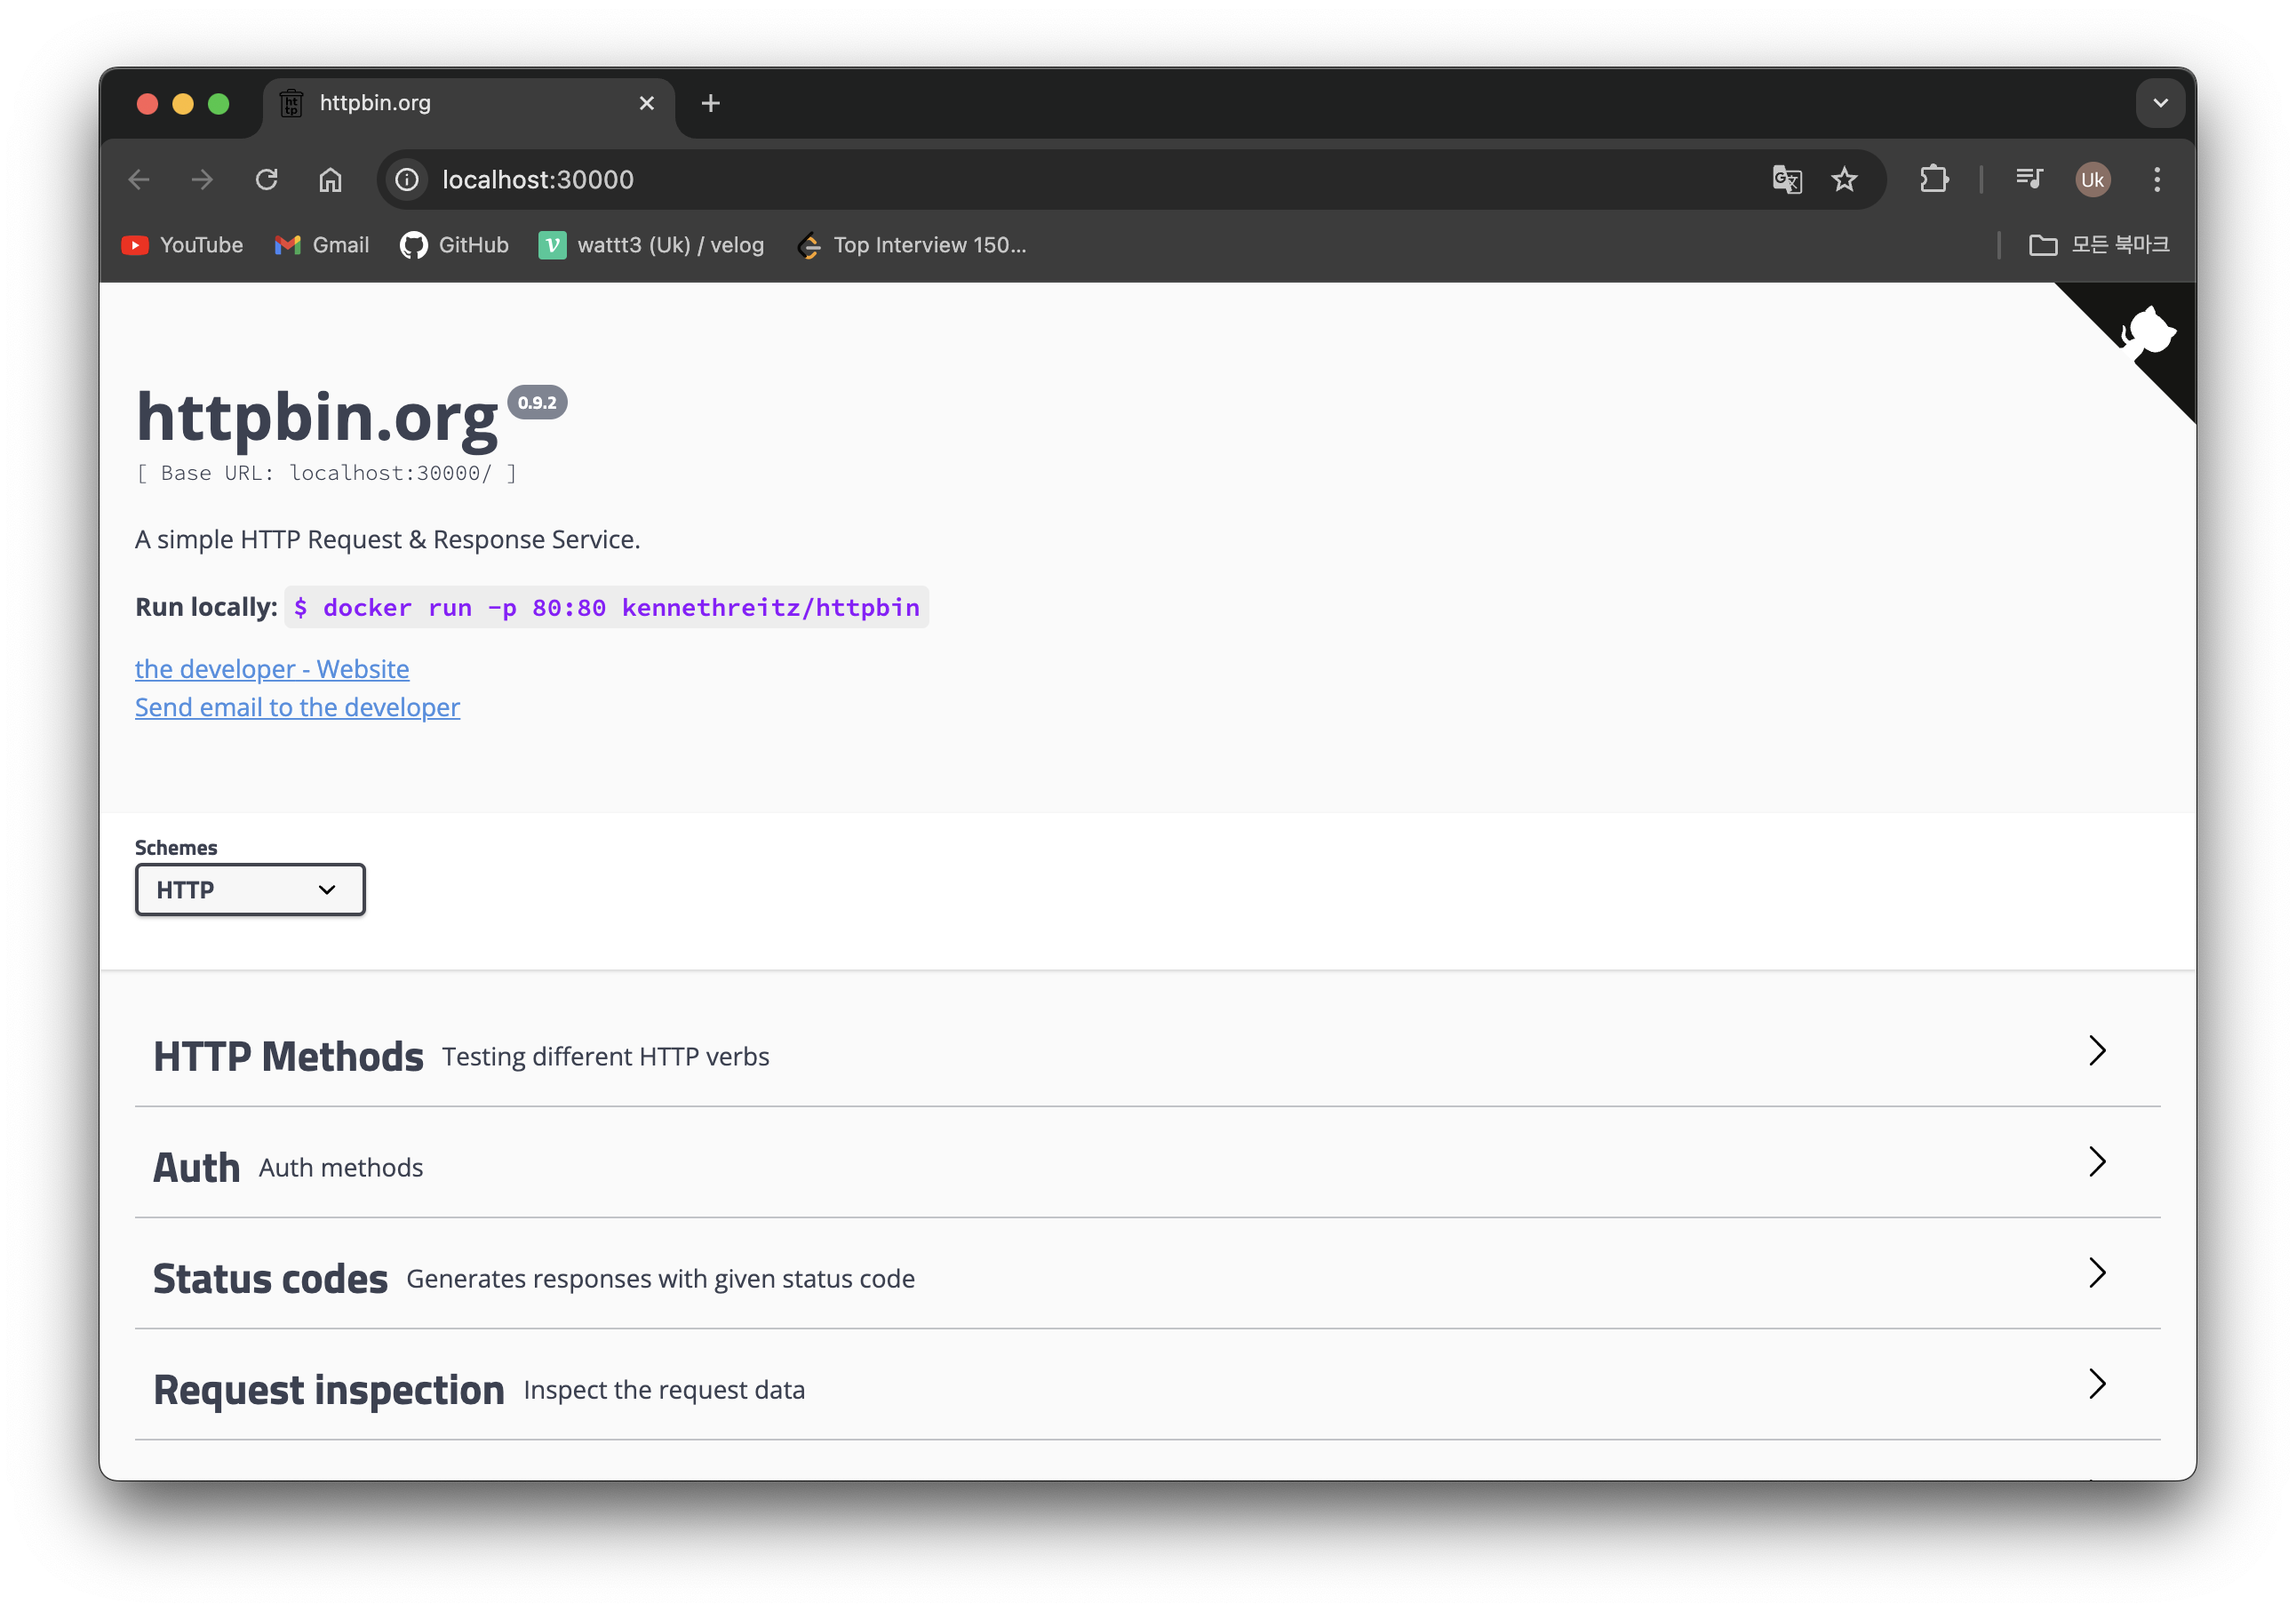
# 02-gateway.yaml
kind: Gateway
apiVersion: gateway.networking.k8s.io/v1
metadata:
  name: http
spec:
  gatewayClassName: gloo-gateway
  listeners:
  - protocol: HTTP
    port: 8080
    name: http
    allowedRoutes:
      namespaces:
        from: All

# gateway 리소스 생성
kubectl apply -f https://raw.githubusercontent.com/solo-io/gloo-gateway-use-cases/main/gateway-api-tutorial/02-gateway.yaml

# 확인 : Now we can confirm that the Gateway has been activated
kubectl get gateway -n gloo-system
kubectl get gateway -n gloo-system -o yaml | k neat
apiVersion: v1
items:
- apiVersion: gateway.networking.k8s.io/v1
  kind: Gateway
  metadata:
    name: http
    namespace: gloo-system
  spec:
    gatewayClassName: gloo-gateway
    listeners:
    - allowedRoutes:
        namespaces:
          from: All
      name: http
      port: 8080
      protocol: HTTP
...

# You can also confirm that Gloo Gateway has spun up an Envoy proxy instance in response to the creation of this Gateway object by deploying gloo-proxy-http:
kubectl get deployment gloo-proxy-http -n gloo-system
NAME              READY   UP-TO-DATE   AVAILABLE   AGE
gloo-proxy-http   1/1     1            1           5m22s

# envoy 사용 확인
kubectl get pod -n gloo-system
kubectl describe pod -n gloo-system  |grep Image:
    Image:         quay.io/solo-io/gloo-envoy-wrapper:1.17.7
    Image:          quay.io/solo-io/gloo:1.17.7
    Image:         quay.io/solo-io/gloo-envoy-wrapper:1.17.7

# gloo-proxy-http 서비스는 External-IP는 Pending 상태
kubectl get svc -n gloo-system gloo-proxy-http
NAME              TYPE           CLUSTER-IP    EXTERNAL-IP   PORT(S)          AGE
gloo-proxy-http   LoadBalancer   10.96.71.22   <pending>     8080:31555/TCP   2m4s

# gloo-proxy-http NodePort 30001 설정
cat <<EOF | kubectl apply -f -
apiVersion: v1
kind: Service
metadata:
  labels:
    app.kubernetes.io/instance: http
    app.kubernetes.io/managed-by: Helm
    app.kubernetes.io/name: gloo-proxy-http
    app.kubernetes.io/version: 1.17.7
    gateway.networking.k8s.io/gateway-name: http
    gloo: kube-gateway
    helm.sh/chart: gloo-gateway-1.17.7
  name: gloo-proxy-http
  namespace: gloo-system
spec:
  ports:
  - name: http
    nodePort: 30001
    port: 8080
  selector:
    app.kubernetes.io/instance: http
    app.kubernetes.io/name: gloo-proxy-http
    gateway.networking.k8s.io/gateway-name: http
  type: LoadBalancer
EOF

> kubectl get svc -n gloo-system gloo-proxy-http
NAME              TYPE           CLUSTER-IP     EXTERNAL-IP   PORT(S)          AGE
gloo-proxy-http   LoadBalancer   10.96.85.128   <pending>     8080:30001/TCP   73s
# Port Forward
# We will use a simple port-forward to expose the proxy’s HTTP port for us to use.
# (Note that gloo-proxy-http is Gloo’s deployment of the Envoy data plane.)
kubectl port-forward deployment/gloo-proxy-http -n gloo-system 8080:8080 &라우팅 구성을 시작하며, httpbin의 /get 작업을 노출하는 가장 간단한 route를 설정
HTTPRoute는 Gateway API에서 도입된 새로운 Kubernetes CRD 중 하나
- ParentRefs
정의된 Route가 어떤 Gateways에 연결될지 지정 - Hostnames (optional)
HTTP 요청의 Host 헤더와 일치하는 목록을 정의 - Rules
일치하는 HTTP 요청에 대해 수행할 동작 규칙 목록을 정의
apiVersion: gateway.networking.k8s.io/v1beta1
kind: HTTPRoute
metadata:
  name: httpbin
  namespace: httpbin
  labels:
    example: httpbin-route
spec:
  parentRefs:
    - name: http
      namespace: gloo-system
  hostnames:
    - "api.example.com"
  rules:
  - matches:
    - path:
        type: Exact
        value: /get
    backendRefs:
      - name: httpbin
        port: 8000
# Our route watches for HTTP requests directed at the host api.example.com with the request path /get and then forwards the request to the httpbin service on port 8000.
# Let’s establish this route now:
kubectl apply -f https://raw.githubusercontent.com/solo-io/gloo-gateway-use-cases/main/gateway-api-tutorial/03-httpbin-route.yaml
#
kubectl get httproute -n httpbin
NAME HOSTNAMES AGE
httpbin ["api.example.com"] 3m15s
kubectl describe httproute -n httpbin
...
Spec:
Hostnames:
api.example.com
Parent Refs:
Group: gateway.networking.k8s.io
Kind: Gateway
Name: http
Namespace: gloo-system
Rules:
Backend Refs:
Group:
Kind: Service
Name: httpbin
Port: 8000
Weight: 1
Matches:
Path:
Type: Exact
Value: /get
...# let’s use curl to display the response with the -i option to additionally show the HTTP response code and headers.
echo "127.0.0.1 api.example.com" | sudo tee -a /etc/hosts
echo "httproute - http://api.example.com:30001/get" # 웹브라우저
혹은
curl -is -H "Host: api.example.com" http://localhost:8080/get # kubectl port-forward 사용 시
HTTP/1.1 200 OK
server: envoy
date: Sun, 06 Oct 2024 07:55:34 GMT
content-type: application/json
content-length: 239
access-control-allow-origin: *
access-control-allow-credentials: true
x-envoy-upstream-service-time: 25
{
"args": {},
"headers": {
"Accept": "*/*",
"Host": "api.example.com",
"User-Agent": "curl/8.7.1",
"X-Envoy-Expected-Rq-Timeout-Ms": "15000"
},
"origin": "10.244.0.11",
"url": "http://api.example.com/get"
}# 호출 응답 왜 그럴까?
curl -is -H "Host: api.example.com" http://localhost:8080/delay/1
HTTP/1.1 404 Not Found
date: Wed, 03 Jul 2024 07:19:21 GMT
server: envoy
content-length: 0
#
echo "httproute - http://api.example.com:30001/delay/1" # 웹브라우저
# nodeport 직접 접속
echo "httproute - http://api.example.com:30000/delay/1" # 1초 후 응답
echo "httproute - http://api.example.com:30000/delay/5" # 5초 후 응답⇒ 위의 rules.matches.path.type: exact 이므로 안 된다.
/api/httpbin/delay/1 ⇒ /delay/1
# Here are the modifications we’ll apply to our HTTPRoute:

    - matches:
        # Switch from an Exact Matcher(정확한 매팅) to a PathPrefix (경로 매팅) Matcher
        - path:
            type: PathPrefix
            value: /api/httpbin/
      filters:
        # Replace(변경) the /api/httpbin matched prefix with /
        - type: URLRewrite
          urlRewrite:
            path:
              type: ReplacePrefixMatch
              replacePrefixMatch: /
kubectl apply -f https://raw.githubusercontent.com/solo-io/gloo-gateway-use-cases/main/gateway-api-tutorial/04-httpbin-rewrite.yaml
#
echo "httproute - http://api.example.com:30001/api/httpbin/get" # 웹브라우저
혹은
curl -is -H "Host: api.example.com" http://localhost:8080/api/httpbin/get # kubectl port-forward 사용 시
HTTP/1.1 200 OK
server: envoy
date: Sun, 06 Oct 2024 08:08:09 GMT
content-type: application/json
content-length: 289
access-control-allow-origin: *
access-control-allow-credentials: true
x-envoy-upstream-service-time: 18  # envoy 가 업스트림 httpbin 요청 처리에 걸리 시간 0.018초

{
  "args": {},
  "headers": {
    "Accept": "*/*",
    "Host": "api.example.com",
    "User-Agent": "curl/8.7.1",
    "X-Envoy-Expected-Rq-Timeout-Ms": "15000",
    "X-Envoy-Original-Path": "/api/httpbin/get"
  },
  "origin": "10.244.0.11",
  "url": "http://api.example.com/get"
}

# 아래 NodePort 와 GW API 통한 접속 비교
echo "httproute - http://api.example.com:30001/api/httpbin/get"
echo "httproute - http://api.example.com:30000/api/httpbin/get" # NodePort 직접 접근

---
#
echo "httproute - http://api.example.com:30001/api/httpbin/delay/1" # 웹브라우저
혹은
curl -is -H "Host: api.example.com" http://localhost:8080/api/httpbin/delay/1 # kubectl port-forward 사용 시
HTTP/1.1 200 OK
server: envoy
date: Wed, 03 Jul 2024 07:31:47 GMT
content-type: application/json
content-length: 342
access-control-allow-origin: *
access-control-allow-credentials: true
x-envoy-upstream-service-time: 1023   # envoy 가 업스트림 httpbin 요청 처리에 걸리 시간 1초 이상

{
  "args": {},
  "data": "",
  "files": {},
  "form": {},
  "headers": {
    "Accept": "*/*",
    "Host": "api.example.com",
    "User-Agent": "curl/8.6.0",
    "X-Envoy-Expected-Rq-Timeout-Ms": "15000",
    "X-Envoy-Original-Path": "/api/httpbin/delay/1"
  },
  "origin": "10.244.0.7",
  "url": "http://api.example.com/delay/1"
}

curl -is -H "Host: api.example.com" http://localhost:8080/api/httpbin/delay/2
[업스트림 베어러 토큰을 사용한 변환] Test Transformations with Upstream Bearer Tokens
목적 : 요청을 라우팅하는 백엔드 시스템 중 하나에서 인증해야 하는 요구 사항이 있는 경우는 어떻게 할까요? 이 업스트림 시스템에는 권한 부여를 위한 API 키가 필요하고, 이를 소비하는 클라이언트에 직접 노출하고 싶지 않다고 가정해 보겠습니다. 즉, 프록시 계층에서 요청에 주입할 간단한 베어러 토큰을 구성하고 싶습니다. (정적 API 키 토큰을 직접 주입)
# The new filters stanza in our HTTPRoute now looks like this:

      filters:
        - type: URLRewrite
          urlRewrite:
            path:
              type: ReplacePrefixMatch
              replacePrefixMatch: /

        # Add a Bearer token to supply a static API key when routing to backend system
        - type: RequestHeaderModifier
          requestHeaderModifier:
            add:
              - name: Authorization
                value: Bearer my-api-key
#
kubectl apply -f https://raw.githubusercontent.com/solo-io/gloo-gateway-use-cases/main/gateway-api-tutorial/05-httpbin-rewrite-xform.yaml
#
kubectl describe httproute -n httpbin
...
Spec:
...
Rules:
Backend Refs:
Group:
Kind: Service
Name: httpbin
Port: 8000
Weight: 1
Filters:
Type: URLRewrite
URL Rewrite:
Path:
Replace Prefix Match: /
Type: ReplacePrefixMatch
Request Header Modifier:
Add:
Name: Authorization
Value: Bearer my-api-key
Type: RequestHeaderModifier
Matches:
Path:
Type: PathPrefix
Value: /api/httpbin/- 동작 테스트
#
echo "httproute - http://api.example.com:30001/api/httpbin/get" # 웹브라우저
혹은
curl -is -H "Host: api.example.com" http://localhost:8080/api/httpbin/get # kubectl port-forward 사용 시
HTTP/1.1 200 OK
server: envoy
date: Sun, 06 Oct 2024 08:20:00 GMT
content-type: application/json
content-length: 332
access-control-allow-origin: *
access-control-allow-credentials: true
x-envoy-upstream-service-time: 11

{
  "args": {},
  "headers": {
    "Accept": "*/*",
    "Authorization": "Bearer my-api-key",
    "Host": "api.example.com",
    "User-Agent": "curl/8.7.1",
    "X-Envoy-Expected-Rq-Timeout-Ms": "15000",
    "X-Envoy-Original-Path": "/api/httpbin/get"
  },
  "origin": "10.244.0.11",
  "url": "http://api.example.com/get"
}
Migrate
# You should see the response below, indicating deployments for both v1 and v2 of my-workload have been created in the my-workload namespace.
kubectl apply -f https://raw.githubusercontent.com/solo-io/gloo-gateway-use-cases/main/gateway-api-tutorial/06-workload-svcs.yaml

# v1,v2 2가지 버전 워크로드 확인
kubectl get deploy,pod,svc,endpointslices -n my-workload
NAME                             READY   UP-TO-DATE   AVAILABLE   AGE
deployment.apps/my-workload-v1   1/1     1            1           77s
deployment.apps/my-workload-v2   1/1     1            1           77s

NAME                                  READY   STATUS    RESTARTS   AGE
pod/my-workload-v1-7577fdcc9d-4cv5r   1/1     Running   0          77s
pod/my-workload-v2-68f84654dd-8725x   1/1     Running   0          77s

NAME                     TYPE        CLUSTER-IP     EXTERNAL-IP   PORT(S)    AGE
service/my-workload-v1   ClusterIP   10.96.35.183   <none>        8080/TCP   77s
service/my-workload-v2   ClusterIP   10.96.56.232   <none>        8080/TCP   77s

NAME                                                  ADDRESSTYPE   PORTS   ENDPOINTS    AGE
endpointslice.discovery.k8s.io/my-workload-v1-bpzgg   IPv4          8080    10.244.0.9   77s
endpointslice.discovery.k8s.io/my-workload-v2-ltp7d   IPv4          8080    10.244.0.8   77s
apiVersion: gateway.networking.k8s.io/v1beta1
kind: HTTPRoute
metadata:
  name: my-workload
  namespace: my-workload
  labels:
    example: my-workload-route
spec:
  parentRefs:
    - name: http
      namespace: gloo-system
  hostnames:
    - "api.example.com"
  rules:
    - matches:
      - path:
          type: PathPrefix
          value: /api/my-workload
      backendRefs:
        - name: my-workload-v1
          namespace: my-workload
          port: 8080
#
kubectl apply -f https://raw.githubusercontent.com/solo-io/gloo-gateway-use-cases/main/gateway-api-tutorial/07-workload-route.yaml
#
kubectl get httproute -A
NAMESPACE NAME HOSTNAMES AGE
httpbin httpbin ["api.example.com"] 41m
my-workload my-workload ["api.example.com"] 39s
#
kubectl describe httproute -n my-workload
...
Spec:
Hostnames:
api.example.com
Parent Refs:
Group: gateway.networking.k8s.io
Kind: Gateway
Name: http
Namespace: gloo-system
Rules:
Backend Refs:
Group:
Kind: Service
Name: my-workload-v1
Namespace: my-workload
Port: 8080
Weight: 1
Matches:
Path:
Type: PathPrefix
Value: /api/my-workload#
curl -is -H "Host: api.example.com" http://localhost:8080/api/my-workload
HTTP/1.1 200 OK
vary: Origin
date: Sun, 06 Oct 2024 08:26:25 GMT
content-length: 294
content-type: text/plain; charset=utf-8
x-envoy-upstream-service-time: 33
server: envoy
{
"name": "my-workload-v1",
"uri": "/api/my-workload",
"type": "HTTP",
"ip_addresses": [
"10.244.0.13"
],
"start_time": "2024-10-06T08:26:25.859900",
"end_time": "2024-10-06T08:26:25.871258",
"duration": "11.359ms",
"body": "Hello From My Workload (v1)!",
"code": 200
}
- Dark Launch 일부 사용자에게 새로운 기능을 출시하여 피드백을 수집하고 잠재적으로 더 큰 사용자 커뮤니티를 방해하기 전에 개선 사항을 실험하는 클라우드 마이그레이션 기술
  rules:
    - matches:
      - path:
          type: PathPrefix
          value: /api/my-workload
        # Add a matcher to route requests with a v2 version header to v2
        # version=v2 헤더값이 있는 사용자만 v2 라우팅
        headers:
        - name: version
          value: v2
      backendRefs:
        - name: my-workload-v2
          namespace: my-workload
          port: 8080
    - matches:
      # Route requests without the version header to v1 as before
      # 대다수 일반 사용자는 기존 처럼 v1 라우팅
      - path:
          type: PathPrefix
          value: /api/my-workload
      backendRefs:
        - name: my-workload-v1
          namespace: my-workload
          port: 8080
#
kubectl apply -f https://raw.githubusercontent.com/solo-io/gloo-gateway-use-cases/main/gateway-api-tutorial/08-workload-route-header.yaml
#
kubectl describe httproute -n my-workload
...
Spec:
...
Rules:
Backend Refs:
Group:
Kind: Service
Name: my-workload-v2
Namespace: my-workload
Port: 8080
Weight: 1
Matches:
Headers:
Name: version
Type: Exact
Value: v2
Path:
Type: PathPrefix
Value: /api/my-workload
Backend Refs:
Group:
Kind: Service
Name: my-workload-v1
Namespace: my-workload
Port: 8080
Weight: 1
Matches:
Path:
Type: PathPrefix
Value: /api/my-workload# Now we’ll test the original route, with no special headers supplied, and confirm that traffic still goes to v1:
curl -is -H "Host: api.example.com" http://localhost:8080/api/my-workload
curl -is -H "Host: api.example.com" http://localhost:8080/api/my-workload | grep body
"body": "Hello From My Workload (v1)!",
# But it we supply the version: v2 header, note that our gateway routes the request to v2 as expected:
curl -is -H "Host: api.example.com" -H "version: v2" http://localhost:8080/api/my-workload
curl -is -H "Host: api.example.com" -H "version: v2" http://localhost:8080/api/my-workload | grep body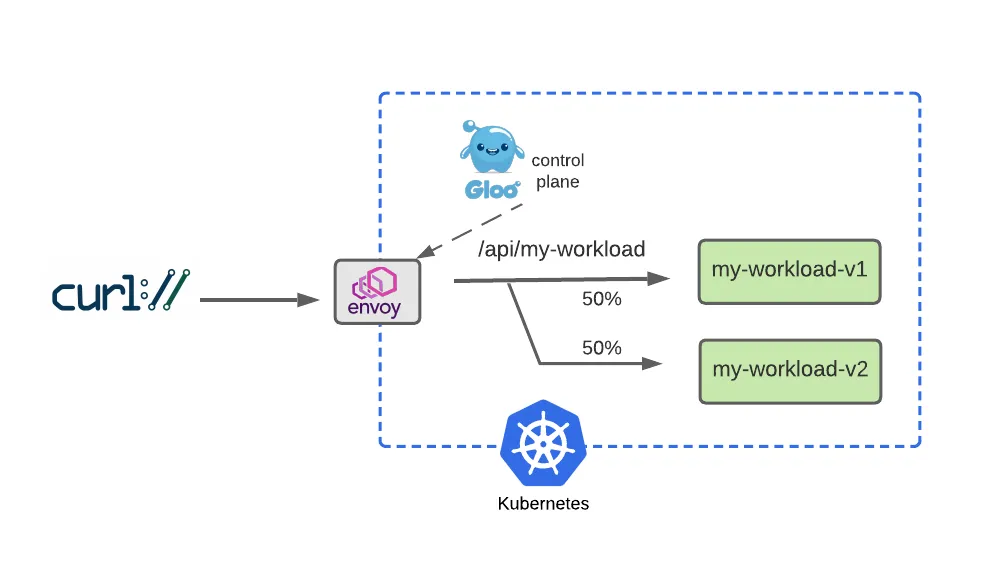
성공적인 다크 런칭 이후, 우리는 점진적으로 이전 버전에서 새 버전으로 사용자 트래픽을 옮기는 블루-그린 전략을 사용하는 기간을 원할 수 있습니다. 트래픽을 균등하게 분할하고 트래픽의 절반을 로 보내고 v1나머지 절반을 로 보내는 라우팅 정책으로 이를 살펴보겠습니다 v2.
  rules:
    - matches:
      - path:
          type: PathPrefix
          value: /api/my-workload
      # Configure a 50-50 traffic split across v1 and v2 : 버전 1,2 50:50 비율
      backendRefs:
        - name: my-workload-v1
          namespace: my-workload
          port: 8080
          weight: 50
        - name: my-workload-v2
          namespace: my-workload
          port: 8080
          weight: 50
# Apply this 50-50 routing policy with kubectl:
kubectl apply -f https://raw.githubusercontent.com/solo-io/gloo-gateway-use-cases/main/gateway-api-tutorial/09-workload-route-split.yaml
#
kubectl describe httproute -n my-workload
...