지난글
- Material
- MeshBasicMaterial
- MeshLambertMaterial
- MeshPhongMaterial
- MeshToonMaterial
- MeshStandardMaterial
- MeshPhysicalMaterial
이어서
지난 포스트에서는 주로 많이 쓰이는 텍스쳐들을 알아봤는데요. 이번 포스트에서는 카메라에 대해 알아보겠습니다. 카메라는 저희가 보는 눈을 담당하기 때문에 많이 중요합니다. 이번에는 카메라 개념을 빠르게 알아보고 예제 하나를 해보고 마무리할께요.
0.Camera
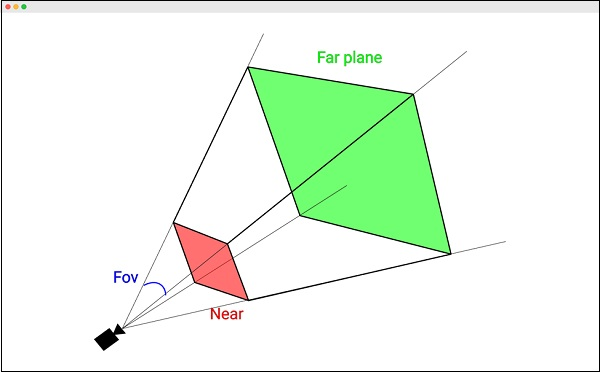
출처 : https://www.tutorialspoint.com/threejs/threejs_perspectivecamera.htm
fov는 field of view(시야각)의 줄임말입니다. 예제의 경우 수직면 75도로 설정했습니다. 알아둬야 할 건 Three.js의 대부분이 각도 단위로 호도(radians)를 사용하는데, 원근 카메라만 특이하게 도(degrees)를 인자로 받는다는 점입니다.
aspect는 canvas의 가로 세로 비율입니다. 이는 다른 글 에서 자세히 다루겠지만, 기본 설정으로 canvas의 크기는 300x150이니 비율도 300/150, 2로 설정했습니다.
Near와 Far는 카메라 앞에 렌더링되는 공간 범위를 지정하는 요소입니다. 이 공간 바깥에 있는 요소는 화면에서 잘려나가며, 렌더링되지 않을 것입니다.
위에서 살펴본 4가지 속성은 하나의 "절두체"를 만듭니다. "절두체"는 끝부분이 잘려나간 피라미드처럼 생긴 3차원 모양인데, 구, 정육면체, 각기둥(prism)처럼 3차원 모양의 하나로 생각하면 됩니다.
결국 위의 사진을 보면 Near와 Far사이의 공간만 저희 카메라로 볼 수 있다는 뜻입니다. Mesh를 조절하다가 갑자기 안보이면 Carmera 설정도 확인해보면 좋습니다.
1.사용법
사실 저희 예제에도 계속 있었습니다.
const fov = 70;
const aspect = window.innerWidth / window.innerHeight;
const near = 0.1;
const far = 100;
const camera = new THREE.PerspectiveCamera(fov, aspect, near, far);
바로 이부분인데요 near는 0.1, far은 100 즉 position 0.1~100정도 볼 수 있었던거예요. 저런식으로 4가지 요소를 주고 new THREE.PerspectiveCamera 를 해주면 됩니다. PerspectiveCamera는 원근법이 적용된 카메라인데요 원근법을 없애고 싶으면 OrthographicCamera 정사영 카메라를 사용하시면 됩니다.
2.예제 코드
예제코드는 전에 쓰던 예제코드를 변형해서 만들어볼께요
index.html
<!DOCTYPE html>
<html lang="ko">
  <head>
    <meta charset="UTF-8" />
    <meta name="viewport" content="width=device-width, initial-scale=1.0" />
    <title>Document</title>
  </head>
  <body style="margin: 0px">
    <canvas id="c"></canvas>
    <script type="module" src="./index.js"></script>
  </body>
</html>index.js
import * as THREE from './node_modules/three/build/three.module.js';
const canvas = document.querySelector('#c');
const renderer = new THREE.WebGLRenderer({ antialias: true, canvas });
renderer.setSize(window.innerWidth, window.innerHeight);
const fov = 70;
const aspect = window.innerWidth / window.innerHeight;
const near = 0.1;
const far = 100;
const camera = new THREE.PerspectiveCamera(fov, aspect, near, far);
camera.position.z = 10;
const scene = new THREE.Scene();
const color = 0xffffff;
const intensity = 10;
const light = new THREE.DirectionalLight(color, intensity);
light.position.set(0, 10, 0);
scene.add(light);
const geometry = new THREE.SphereGeometry(1);
const material = new THREE.MeshBasicMaterial({
color: '#049ef4',
clearcoat: 1, // 빤딱빤딱
clearcoatRoughness: 0.5,
});
const mesh = new THREE.Mesh(geometry, material);
scene.add(mesh);
const geometry2 = new THREE.SphereGeometry(2);
const material2 = new THREE.MeshBasicMaterial({
color: 'red',
clearcoat: 1, // 빤딱빤딱
clearcoatRoughness: 0.5,
});
const mesh2 = new THREE.Mesh(geometry2, material2);
mesh2.position.set(0, 0, 0);
scene.add(mesh2);
let angle = 0;
const radius = 5; // 공전 반경
const speed = 0.01; // 회전 속도
function animate() {
angle += speed;
mesh.position.x = Math.cos(angle) * radius;
mesh.position.z = Math.sin(angle) * radius;
renderer.render(scene, camera);
requestAnimationFrame(animate);
}
animate();
이렇게 만들어주고 보면 이렇게 태양을 도는 지구처럼 빙글빙글 돌게 됩니다. 그냥 도는거 보는건 식상해서 이번엔 저 원을 한번 따라다녀보도록 하겠습니다.
3.lookAt
lookAt은 카메라가 보는 위치를 정할 수 있는 함수입니다. lookAt(position[])을 넣어주면 그 좌표를 쳐다보게됩니다. 이것을 활용해보겠습니다. 아래쪽 animate 부분을 살짝 수정해주세요
let angle = 0;
const radius = 5;
const speed = 0.01;

function animate() {
  angle += speed;
  mesh.position.x = Math.cos(angle) * radius;
  mesh.position.z = Math.sin(angle) * radius;

  camera.lookAt(mesh.position);

  renderer.render(scene, camera);

  requestAnimationFrame(animate);
}
animate();
카메라가 지구를 따라다니는 것 보이시나요? 이런식으로 mesh의 좌표를 줘서 쳐다보게끔 할 수 있습니다.
4.camera.position
카메라가 있는 위치또한 바꿔줄 수 있습니다. camera.position = position(,,) 줄수 있고 그 위치로 카메라가 가게됩니다. position과 lookAt을 활용해서 만들어 볼게요. 지구 위를 따라다니면서 태양을 찍어보겠습니다.
let angle = 0;
const radius = 5;
const speed = 0.01;

function animate() {
  angle += speed;
  mesh.position.x = Math.cos(angle) * radius;
  mesh.position.z = Math.sin(angle) * radius;

  const cameraOffset = 3;
  camera.position.x = mesh.position.x + Math.cos(angle) * cameraOffset;
  camera.position.z = mesh.position.z + Math.sin(angle) * cameraOffset;
  camera.position.y = mesh.position.y + 3;
  camera.lookAt(mesh2.position);

  renderer.render(scene, camera);
  requestAnimationFrame(animate);
}

animate();
하지만 뭔가 아직 아쉬워서 조금 더 다이나믹하게 만들어볼게요.
import * as THREE from './node_modules/three/build/three.module.js';

const canvas = document.querySelector('#c');
const renderer = new THREE.WebGLRenderer({ antialias: true, canvas });
renderer.setSize(window.innerWidth, window.innerHeight);
const fov = 70;
const aspect = window.innerWidth / window.innerHeight;
const near = 0.1;
const far = 100;
const camera = new THREE.PerspectiveCamera(fov, aspect, near, far);
camera.position.set(0, 5, 10);

const scene = new THREE.Scene();
const light = new THREE.DirectionalLight(0xffffff, 2, 50);
light.position.set(0, 3, 0);
scene.add(light);
// 지구 (Mesh)
const geometry = new THREE.SphereGeometry(1);
const material = new THREE.MeshBasicMaterial({ color: '#049ef4' });
const mesh = new THREE.Mesh(geometry, material);
scene.add(mesh);
// 태양 (Mesh2)
const geometry2 = new THREE.SphereGeometry(2);
const material2 = new THREE.MeshBasicMaterial({ color: 'red' });
const mesh2 = new THREE.Mesh(geometry2, material2);
mesh2.position.set(0, 0, 0);
scene.add(mesh2);

let angle = 0;
const radius = 5;
const speed = 0.01;
const cameraPositions = [
  { x: 7, y: 5, z: 6 },
  { x: -6, y: 3, z: 7 },
  { x: 6, y: 1, z: -7 },
  { x: -7, y: 0, z: 6 },
];

let currentPositionIndex = 0;
function moveCameraToNextPosition() {
  currentPositionIndex = (currentPositionIndex + 1) % cameraPositions.length;
}
function animate() {
  angle += speed;
  mesh.position.x = Math.cos(angle) * radius;
  mesh.position.z = Math.sin(angle) * radius;

  const targetPosition = cameraPositions[currentPositionIndex];
  camera.position.x = targetPosition.x;
  camera.position.y = targetPosition.y;
  camera.position.z = targetPosition.z;
  camera.lookAt(mesh.position);

  renderer.render(scene, camera);
  requestAnimationFrame(animate);
}
//2초마다 바꾸기
setInterval(moveCameraToNextPosition, 2000);
animate();
2초마다 시점을 바꾸면서 지구를 따라가게 됩니다. 조금 다이나믹해진 것 같습니다.
정리
이번 포스트에서는 카메라에 대해 다뤄봤습니다. 카메라는 3D 씬에서 우리가 보는 눈이기 때문에 굉장히 중요한 요소입니다.
- 원근법(Perspective) 카메라와 정사영(Orthographic) 카메라로 나누어 집니다.
- 카메라 기본 속성 : fov, aspect, near, far
- camera.lookAt()을 사용해 카메라가 항상 특정 객체를 쳐다보도록 만들 수 있음.
- camera.position을 직접 설정하여 카메라의 위치를 변경할 수 있습니다.
감사합니다. 오늘도 굉장히 길었는데 고생하셨어요.