프로젝트에서 대댓글 부분을 맡게 되었다.
대댓글을 만들면서 어떤 고민을 했고, 또 그 생각을 어떻게 구현했는지 간단하게 이야기하고자 한다.
react 대댓글 기능 만들기
댓글 기능만 놓고 본다면, todo앱의 확장판과 별로 다른 점이 없다.
하지만 대댓글까지 구현하기 위해서는 조금 더 생각이 필요했다.
중요하게 생각해야 할 점:
- 데이터는 어떻게 다룰 것인가?
- 컴포넌트를 어떻게 나눠서 사용할 것인가?
- 댓글에 대한 대댓글을 어떻게 구분할 것인가?
1. 데이터는 어떻게 다룰 것인가?
가장 고민되었던 부분은 1번. 데이터를 다루는 방법이였다.
우선 내가 생각했던 2가지 방법은 다음과 같았다.
-
[{댓글1}, {댓글2}, {댓글1대댓글}]과 같이 배열에 지속적으로 댓글이든 대댓글이든 push 해줘서 filter를 사용해 구분하기 -
[{댓글1,[{대댓글}]}, {댓글2}]댓글에 대한 대댓글은 댓글 내부 객체에 저장시키기
최종적으로 고른 방법은 1번째 방법인데, 그 이유는 만약 댓글1에 무수히 많은 대댓글이 달리면 그만큼 용량이 커지게 되는데, 이로 인해 로딩이 느려질거라 생각이 들었다.
또한, 데이터를 다루기엔 1번째 방법이 더 편하다고 판단하여 1번째 방법을 사용하였다.
2. 컴포넌트는 어떻게 나눠서 사용할 것인가?
컴포넌트는 <Comment>, <ReplyComment> 2개를 사용하였다.
<Comment>
댓글 기능 구현
responseTo: 'root'를 사용해 'root'에 있는 댓글임을 밝혔다.
<ReplyComment>
대댓글 기능 구현
resonseTo: responseTo를 사용했다.
여기서 responseTo는 댓글의commentId를 가져와 사용하였다.
웹상에서 보여주기 위해 filter를 사용해 local state에 responseTo에서 부모 'commentId'를 가진 요소들만 필터링해서 가져왔다.
3. 댓글에 대한 대댓글을 어떻게 구분할 것인가?
2번에서도 설명했지만, filter를 사용해 부모 commentId를 필터링해서 해당하는 대댓글만 가져왔다.
특징
-
백엔드가 미구현된 관계로 데이터를 저장시키기 위해 localStorage를 사용하였다.(추후 api를 사용해 백엔드로 데이터를 저장시킬 예정)
-
matrial-ui를 사용하였다.
-
redux를 사용해
<Comment>와<ReplyComment>의 데이터가 꼬이지 않도록 store에 데이터를 저장시켰다.
<Comment>
import React, { useState, useEffect } from 'react'
import { useSelector, useDispatch } from 'react-redux'
import uuid from "react-uuid"

import { addComment } from '../redux/comment'
import ReplyComment from './ReplyComment'

import { Stack, TextField, Button, Avatar } from '@mui/material';
import { border, Box } from '@mui/system';
const Comment = () => {
    const [local, setLocal] = useState([])

    const dispatch = useDispatch()
    const comments = useSelector(state => state.comment)
    const [commentValue, setCommentValule] = useState('')
    const [text, setText] = useState('')
    const [display, setDisplay] = useState(false)
    const onSubmit = (e) => {
        e.preventDefault();
        setCommentValule(text)
        let data = {
            content: text,
            writer: 'jamong',
            postId: '123123',
            responseTo: 'root',
            commentId: uuid()
        }
        dispatch(addComment(data))

        setText('')
    }
    useEffect(() => {
        localStorage.setItem('reply', JSON.stringify(comments))
        setLocal(comments.filter(comment => comment.responseTo === 'root'))
    }, [comments])
    return (
        <Stack sx={{ m: 5 }}>
            <Box onSubmit={onSubmit}
                component="form"
            >
                <TextField
                    onChange={(e) => { setText(e.target.value) }}
                    placeholder="답변 추가"
                    value={text}
                    id="outlined-size-small"
                    size="small"
                    variant="standard"
                    sx={{ width: '30rem' }}
                />
            </Box>

            {local.map((comment, index) => (

                <Box sx={{ m: 2 }} key={comment.commentId}>
                    <Stack direction="row" spacing={2}>
                        <Avatar sx={{ bgcolor: 'orangered' }}>{comment.writer.slice(0, 2)}</Avatar>
                        <Box sx={{ color: 'gray' }}>{comment.writer}</Box>
                    </Stack>
                    <Box key={index} sx={{ padding: "20px 20px" }}>{comment.content}</Box>
                    <ReplyComment responseTo={comment.commentId} />
                    <hr style={{ borderTop: '1px solid gray' }} />
                </Box >
            ))}
        </Stack >

    )
}

export default Comment
댓글만 뽑아서 사용하기 위해 filter를 해주었다.
setLocal(comments.filter(comment => comment.responseTo === 'root'))
각각의 댓글의 고유 아이디를 어떻게 설정할 지 고민하다가 uuid 라이브러리를 사용했다. 겹칠일이 거의 0에 수렴한다고 알고 있기에 uuid를 선택하였다.
<ReplyComment>
import React, { useState, useEffect } from 'react'
import { Stack, TextField, Button, Avatar } from '@mui/material';
import { Box } from '@mui/system';
import uuid from "react-uuid"

import { useSelector, useDispatch } from 'react-redux'
import comment, { addComment } from '../redux/comment'

const ReplyComment = ({ responseTo }) => {

    const [local, setLocal] = useState([])
    const [display, setDisplay] = useState(false)


    const dispatch = useDispatch()
    const comments = useSelector(state => state.comment)
    // comments.push({ a: 'bb' })
    const [commentValue, setCommentValule] = useState('')
    const [text, setText] = useState('')
    const onSubmit = (e) => {
        e.preventDefault();
        setCommentValule(text)
        let data = {
            content: text,
            writer: 'jamong',
            postId: '123123',
            responseTo: responseTo,
            commentId: uuid()
        }
        dispatch(addComment(data))

        setText('')
    }

    useEffect(() => {
        localStorage.setItem('reply', JSON.stringify(comments))
        setLocal(comments.filter(comment => comment.responseTo === responseTo))
    }, [comments])
    return (
        <Stack sx={{ m: 1, ml: 4 }}>
            <Button onClick={() => { setDisplay(!display) }} sx={{ width: '10rem' }}>댓글</Button>
            {display &&
                <div>
                    <Box onSubmit={onSubmit}
                        component="form"
                        sx={{ m: 2 }}
                    >
                        <TextField
                            onChange={(e) => { setText(e.target.value) }}
                            placeholder="답변 추가"
                            value={text}
                            id="outlined-size-small"
                            size="small"
                            variant="standard"
                            sx={{ width: '20rem' }}
                        />
                    </Box>
                    {local.map(comment =>

                        <Box key={comment.commentId}>
                            <Stack direction="row" spacing={2}>
                                <Avatar sx={{ bgcolor: 'orangered' }}>{comment.writer.slice(0, 2)}</Avatar>
                                <Box sx={{ color: 'gray' }}>{comment.writer}</Box>
                            </Stack>
                            <Box sx={{ padding: "20px 20px" }}>{comment.content}</Box>
                            <ReplyComment responseTo={comment.commentId} />
                        </Box>
                    )}
                </div>
            }
        </Stack>
    )
}

export default ReplyComment
컴포넌트 재귀 함수처럼 사용하기
코드에서 눈여겨봐야 할 점은 <ReplyComment responseTo={comment.commentId} /> 부분이다.
<ReplyComment>에서 <ReplyComment>를 불러와도 잘 작동해 이 방법을 사용했다.
커뮤니티에 질문한 결과, 이렇게 재귀함수처럼 컴포넌트를 사용해도 괜찮다는 답변을 들었다.
대댓글 부분을 버튼을 눌렀을 때 표시되게 만들기
display && 대댓글 기능 을 사용했다.
버튼을 누를 때, display 상태가 true, false로 토글되게 만들어,
버튼을 눌렀을 때 true인 상태가 되어야 대댓글이 보이도록 만들었다.
props로 부모 댓글 commentId 전달하기
<ReplyComment responseTo={comment.commentId} /> 부분에서 볼 수 있다싶이, responseTo에 현재 댓글의 고유 ID를 전달하였다.
이렇게 props로 고유 ID를 전달하면,
대댓글에서 responseTo: responseTo가 되어 부모 ID를 저장시킬 수 있다.
import { createSlice } from "@reduxjs/toolkit";
const initialState = localStorage.getItem('reply') ? [...JSON.parse(localStorage.getItem('reply'))] : []
// 초기 상태를 localStorage에서 가져온다. 만약 'reply'가 존재하지 않으면 [] 사용
export const commentSlice = createSlice({
name: 'comment',
initialState,
reducers: {
addComment(state, action) {
const { content, writer, postId, responseTo, commentId } = action.payload
state.push({ content, writer, postId, responseTo, commentId })
}
}
})
export const { addComment } = commentSlice.actions
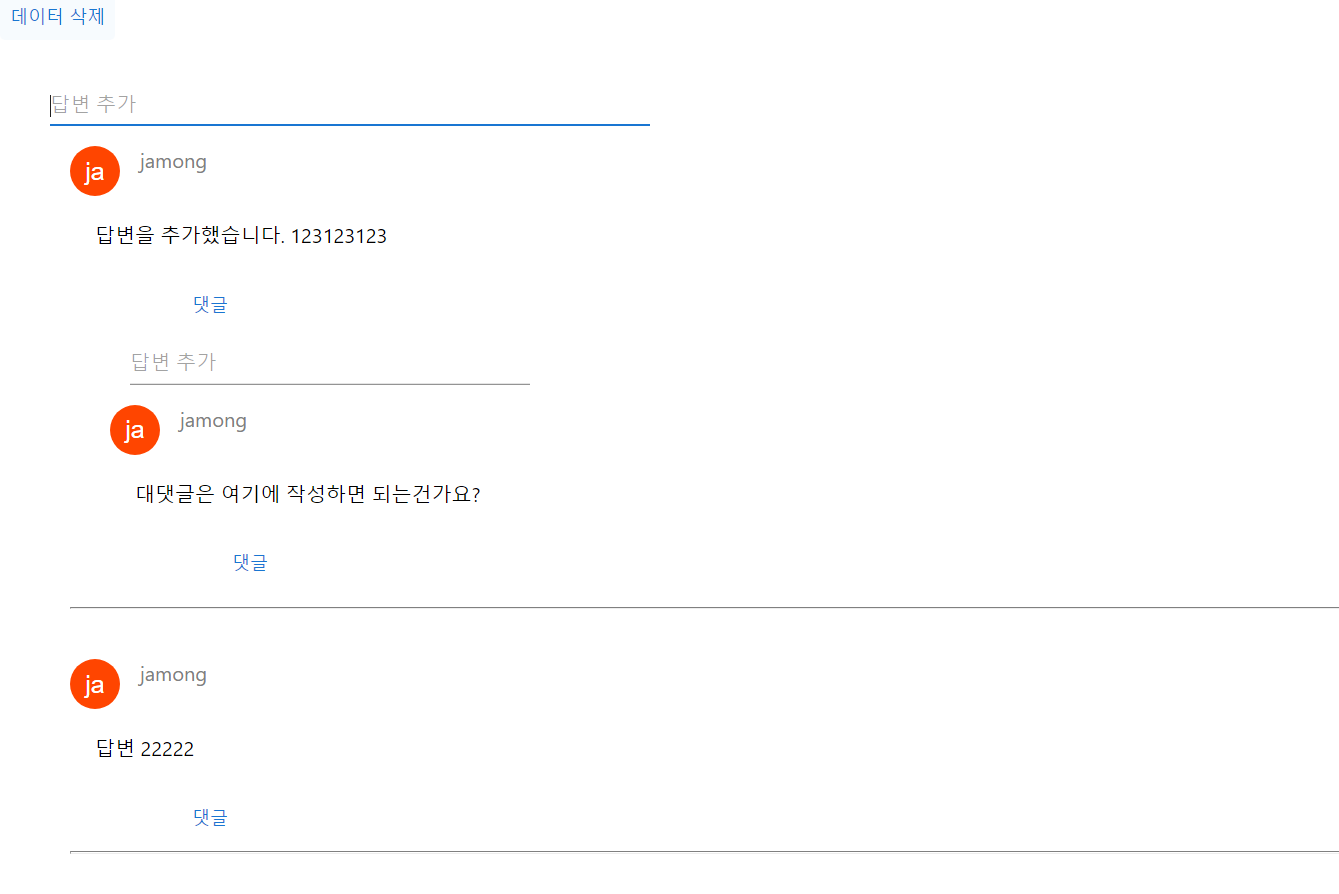
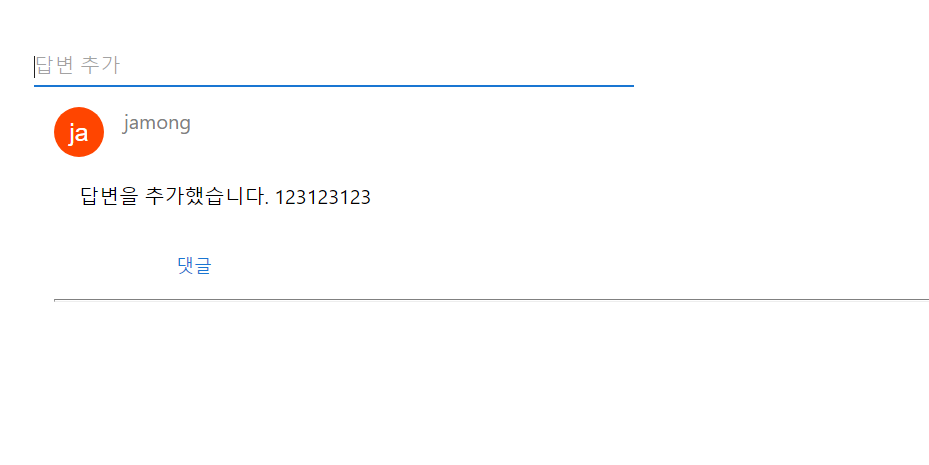
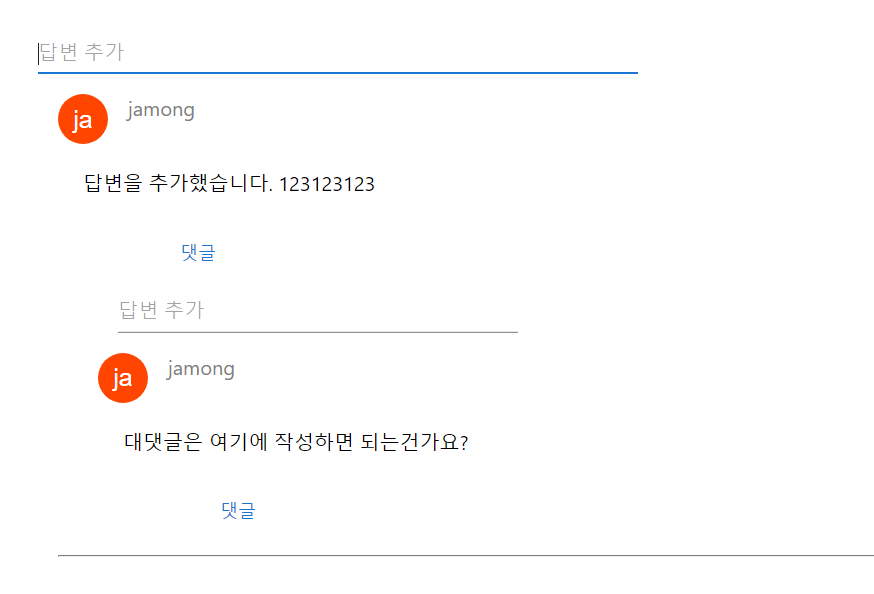
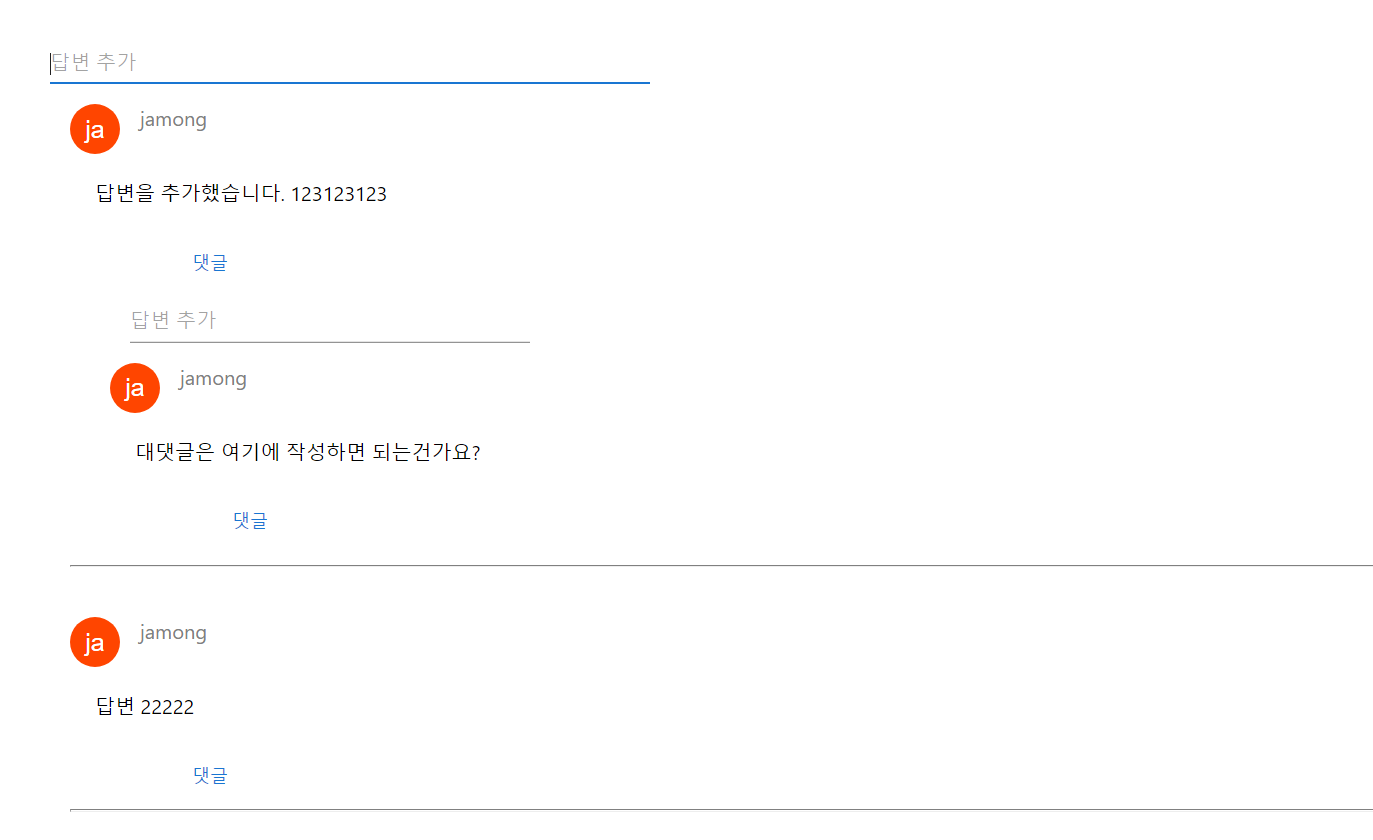
export default commentSlice.reducer작동 사진
첫 화면
댓글을 작성했을 때 보이는 화면
대댓글을 작성했을 때 보이는 화면
전체 화면
후기
아직 고쳐야 할 점들이 많아보이지만(디자인이라던가 구조라던가...)
그래도 혼자 생각하면서 대댓글 기능을 구현했다는 점이 매우 뿌듯했다.
앞으로 컴포넌트, state를 어떻게 관리할 것인지 더욱 고민해보아야 할 것 같다.

Spider Solitaire 버튼을 눌렀을 때 true인 상태가 되어야 대댓글이 보이도록 만들었다.