깃허브 코드
https://github.com/wndudwkd003/Android_Camera2_OpenCV_Calibration

스마트폰 카메라 캘리브레이션
최근에 하고 있는 작업 중에서 스마트폰으로 깊이 추정이 가능해야 진행할 수 있는 일이 있는데 사실 깊이 추정 딥러닝 모델을 쓰면 되지만 생각보다 느려서 그냥 스테레오 비전 기법으로 깊이 추정을 할까 한다. 그래서 어제 오늘 해서 예전에 못다한 작업인 스마트폰 카메라 캘리브레이션을 통해서 내부행렬과 왜곡계수를 구하는 작업을 했다.
근데 사실 완성된건 아니고 뷰 크기나 이미지 크기나 이런게 살짝 안맞는거같아서 이건 나중에 다시 수정 보완을 해야한다...
카메라 캘리브레이션
파이썬으로 웹캠가지고 캘리브레이션 하는 작업은 정말 간단하다. 위에 다른분이 티스토리에 캘리브레이션 작업에 대해 써놓으셨는데 이거 참고해서 많이 하곤 했다.
근데 스마트폰에서는 카메라 접근부터 까다로워서 시간이 꽤걸렸다. 예전에도 할 수 있었는데 카메라 연결하느라 못했지만 이번에 이악물고 작업을 하니까 되긴하더라
여튼 카메라 캘리브레이션에는 OpenCV 체커보드 인식하는 작업이 들어가고 스마트폰 카메라 연결하는 작업이 들어간다.
그리고 이 글에서는 캘리브레이션의 자세한 작업은 다루지 않는다.
준비물
- 체커보드
- 스마트폰
- 깃허브 프로젝트 (위에서 다운)
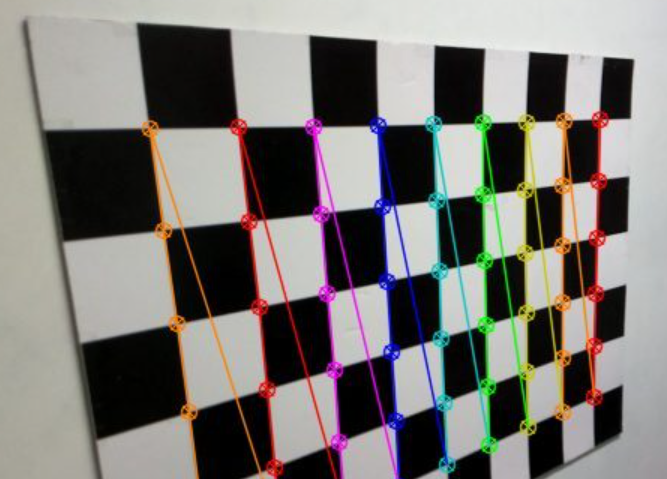
이렇게 생긴 체커보드가 필요하다.
Android Camera2 API
https://developer.android.com/media/camera/camera2/capture-sessions-requests
카메라2 API에서는 카메라와 연결하려면 세션 연결부터 직접 해줘야한다.
CameraX는 간단하게 되어 있지만 이건 아니다.
왜 CameraX로 안했는지는 그러게 왜 그랬지
Camera2 API 카메라 오픈 및 세션 주요 코드
private fun openCamera(cameraId: String) {
        val manager = getSystemService(Context.CAMERA_SERVICE) as CameraManager
        startCameraThread()  // 카메라 작업을 위한 스레드 시작

        try {
            if (ContextCompat.checkSelfPermission(this, Manifest.permission.CAMERA) != PackageManager.PERMISSION_GRANTED) {
                return
            }

            manager.openCamera(cameraId, object : CameraDevice.StateCallback() {
                override fun onOpened(camera: CameraDevice) {
                    cameraDevice = camera
                    createCameraPreviewSession(camera)
                }

                override fun onDisconnected(camera: CameraDevice) {
                    camera.close()
                    cameraDevice = null
                }

                override fun onError(camera: CameraDevice, error: Int) {
                    camera.close()
                    cameraDevice = null
                    Log.e(TAG, "CameraDevice StateCallback onError: $error")
                }
            }, cameraHandler)
        } catch (e: CameraAccessException) {
            Log.e(TAG, "openCamera CameraAccessException", e)
        }
    }

    private fun createCameraPreviewSession(camera: CameraDevice) {
        try {
            val texture = textureView.surfaceTexture
            texture!!.setDefaultBufferSize(imageSize.width.toInt(), imageSize.height.toInt())
            val surface = Surface(texture)

            val previewRequestBuilder = camera.createCaptureRequest(CameraDevice.TEMPLATE_PREVIEW)
            previewRequestBuilder.addTarget(surface)

            camera.createCaptureSession(listOf(surface), object : CameraCaptureSession.StateCallback() {
                override fun onConfigured(session: CameraCaptureSession) {
                    session.setRepeatingRequest(previewRequestBuilder.build(), null, cameraHandler)
                }

                override fun onConfigureFailed(session: CameraCaptureSession) {
                    Log.e(TAG, "createCaptureSession onConfigureFailed")
                }
            }, cameraHandler)
        } catch (e: CameraAccessException) {
            Log.e(TAG, "createCameraPreviewSession CameraAccessException", e)
        }
    }
이 코드에서 봐야할건
- 카메라 매니저를 받아오고 카메라 아이디로 카메라를 오픈한다.
- 그리고 오픈된 카메라에 세션을 등록한다.
세션을 등록하기 위해서는 texture view나 surface view를 xml에 작성해야한다.
<?xml version="1.0" encoding="utf-8"?>
<androidx.constraintlayout.widget.ConstraintLayout xmlns:android="http://schemas.android.com/apk/res/android"
    xmlns:app="http://schemas.android.com/apk/res-auto"
    xmlns:tools="http://schemas.android.com/tools"
    android:layout_width="match_parent"
    android:layout_height="match_parent"
    tools:context=".MainActivity">

    <TextureView
        android:id="@+id/texture_view"
        android:layout_width="match_parent"
        android:layout_height="match_parent"/>


    <com.google.android.material.floatingactionbutton.FloatingActionButton
        android:layout_margin="10dp"
        android:layout_width="wrap_content"
        android:layout_height="wrap_content"
        app:layout_constraintBottom_toBottomOf="parent"
        app:layout_constraintEnd_toEndOf="parent"
        android:src="@drawable/baseline_photo_camera_24"
        android:id="@+id/fab_take_picture" />

    <com.google.android.material.floatingactionbutton.FloatingActionButton
        android:layout_margin="10dp"
        android:layout_width="wrap_content"
        android:layout_height="wrap_content"
        app:fabCustomSize="30dp"
        app:layout_constraintEnd_toEndOf="parent"
        app:layout_constraintTop_toTopOf="parent"
        android:src="@drawable/baseline_published_with_changes_24"
        android:id="@+id/fab_change_camera" />

    <com.google.android.material.floatingactionbutton.FloatingActionButton
        android:layout_margin="10dp"
        android:layout_width="wrap_content"
        android:layout_height="wrap_content"
        app:fabCustomSize="30dp"
        app:layout_constraintBottom_toBottomOf="parent"
        app:layout_constraintEnd_toStartOf="@id/fab_take_picture"
        android:src="@drawable/baseline_close_24"
        android:id="@+id/fab_close_result_picture" />

    <ImageView
        android:visibility="invisible"
        android:id="@+id/iv_result_picture"
        android:layout_width="match_parent"
        android:layout_height="match_parent"
        android:layout_margin="60dp" />

    <TextView
        android:textColor="@color/black"
        android:id="@+id/tv_camera_id"
        android:text="current camera id: -1"
        android:layout_width="match_parent"
        android:layout_height="wrap_content"
        app:layout_constraintTop_toTopOf="parent"
        android:layout_margin="10dp" />

    <TextView
        android:textColor="@color/black"
        android:id="@+id/tv_picture_count"
        android:text="current picture count: 0"
        android:layout_width="match_parent"
        android:layout_height="wrap_content"
        app:layout_constraintTop_toBottomOf="@id/tv_camera_id"
        android:layout_margin="10dp" />

</androidx.constraintlayout.widget.ConstraintLayout>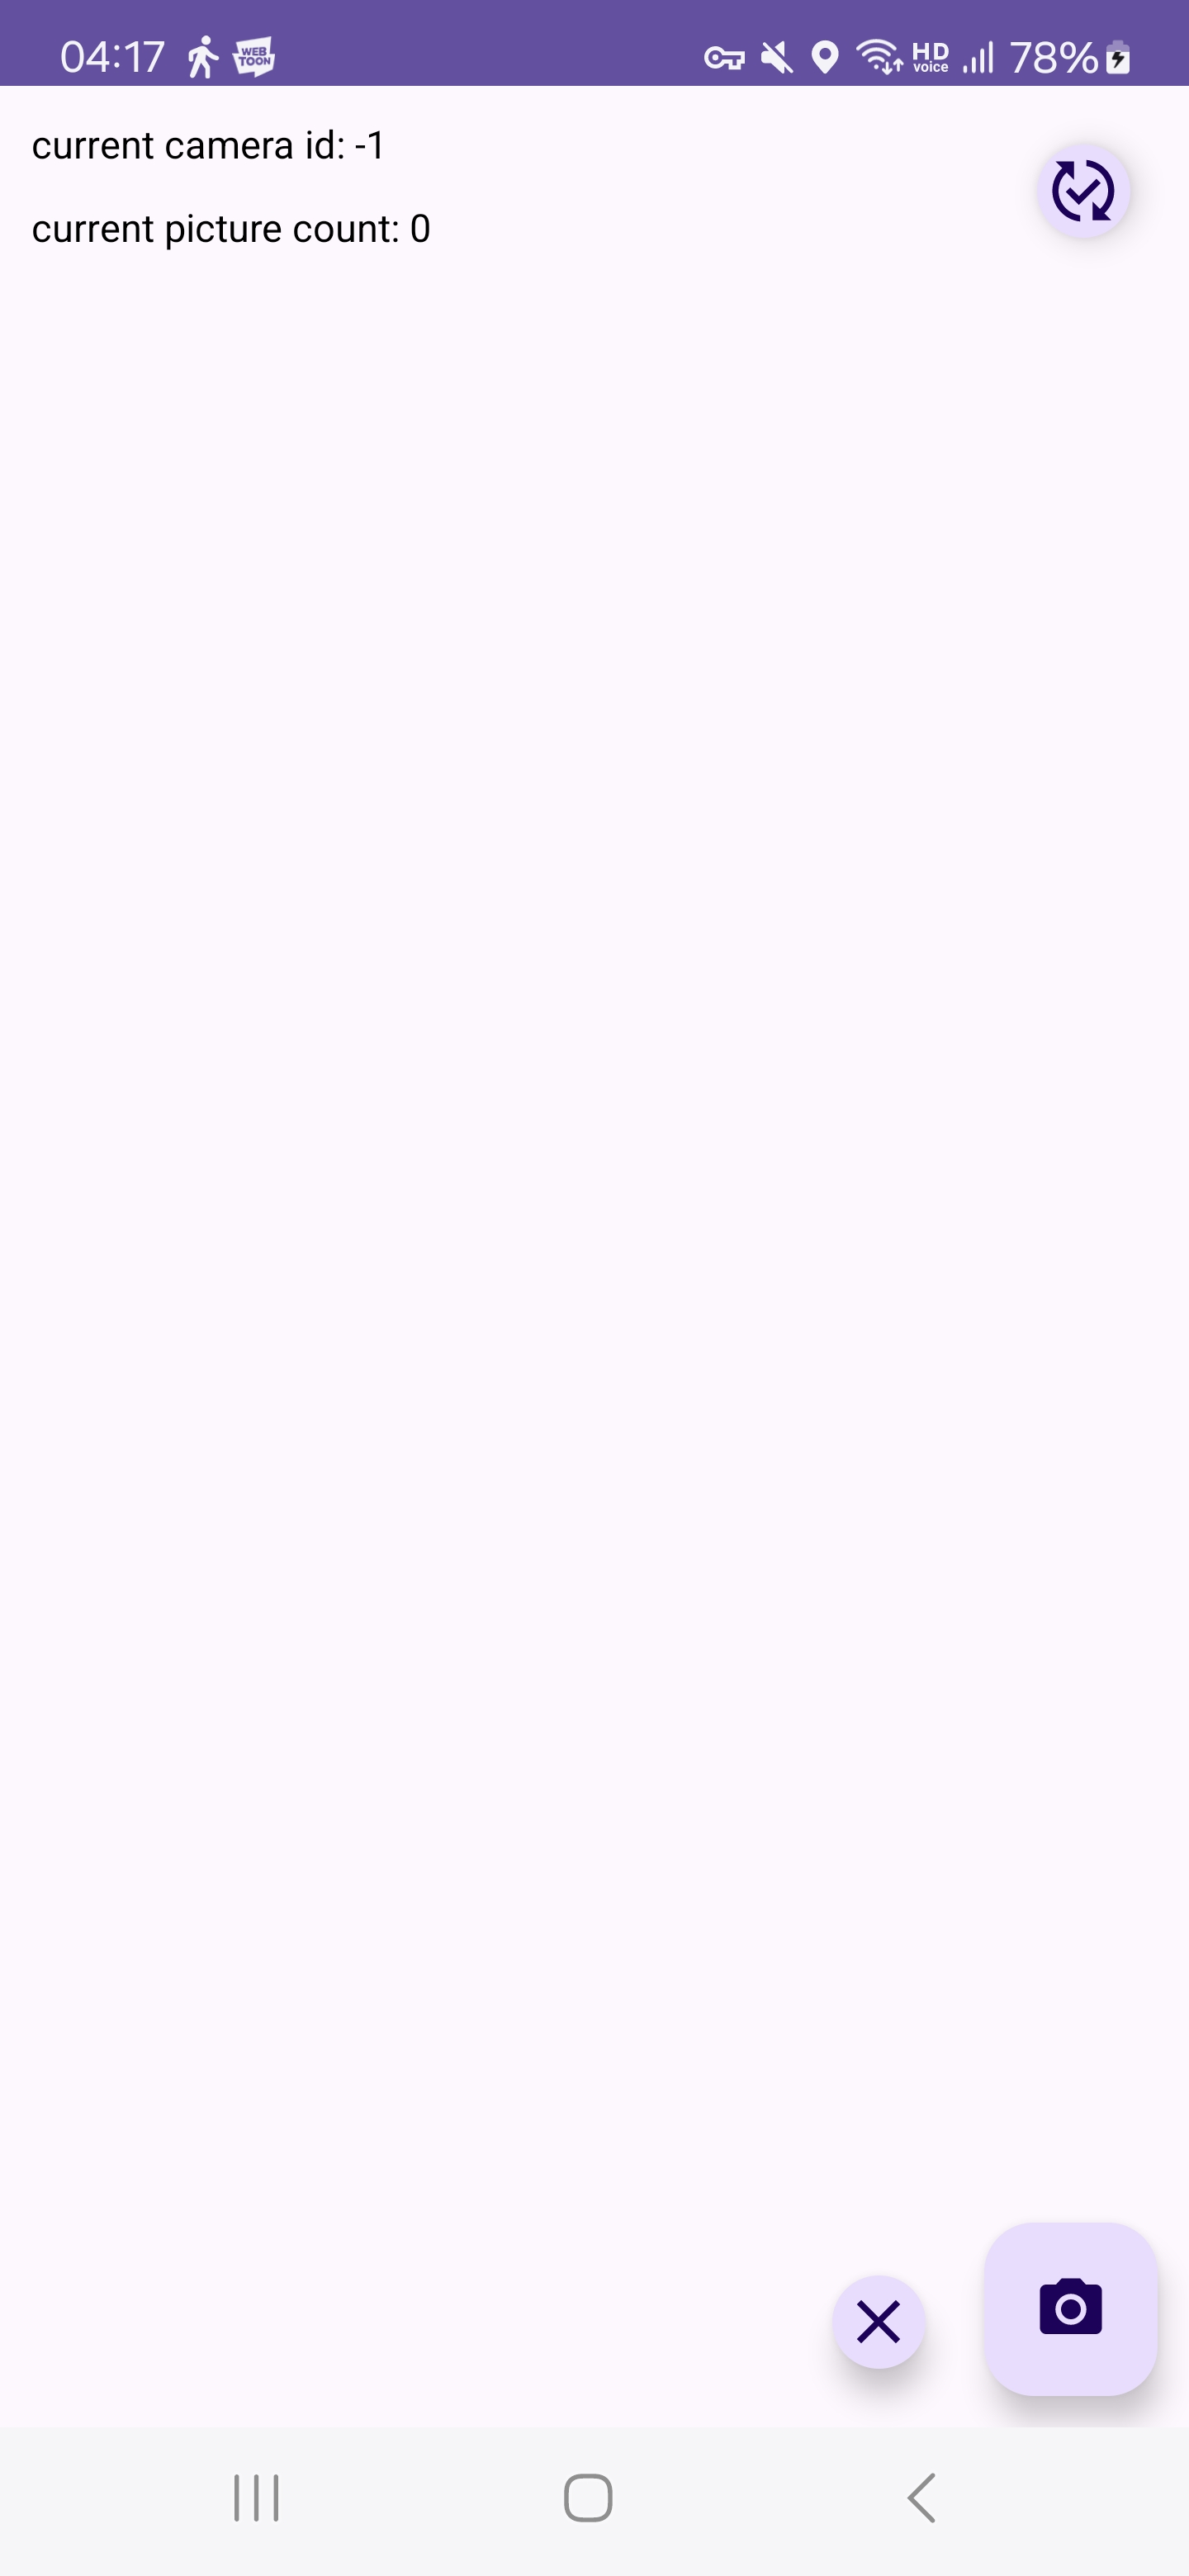
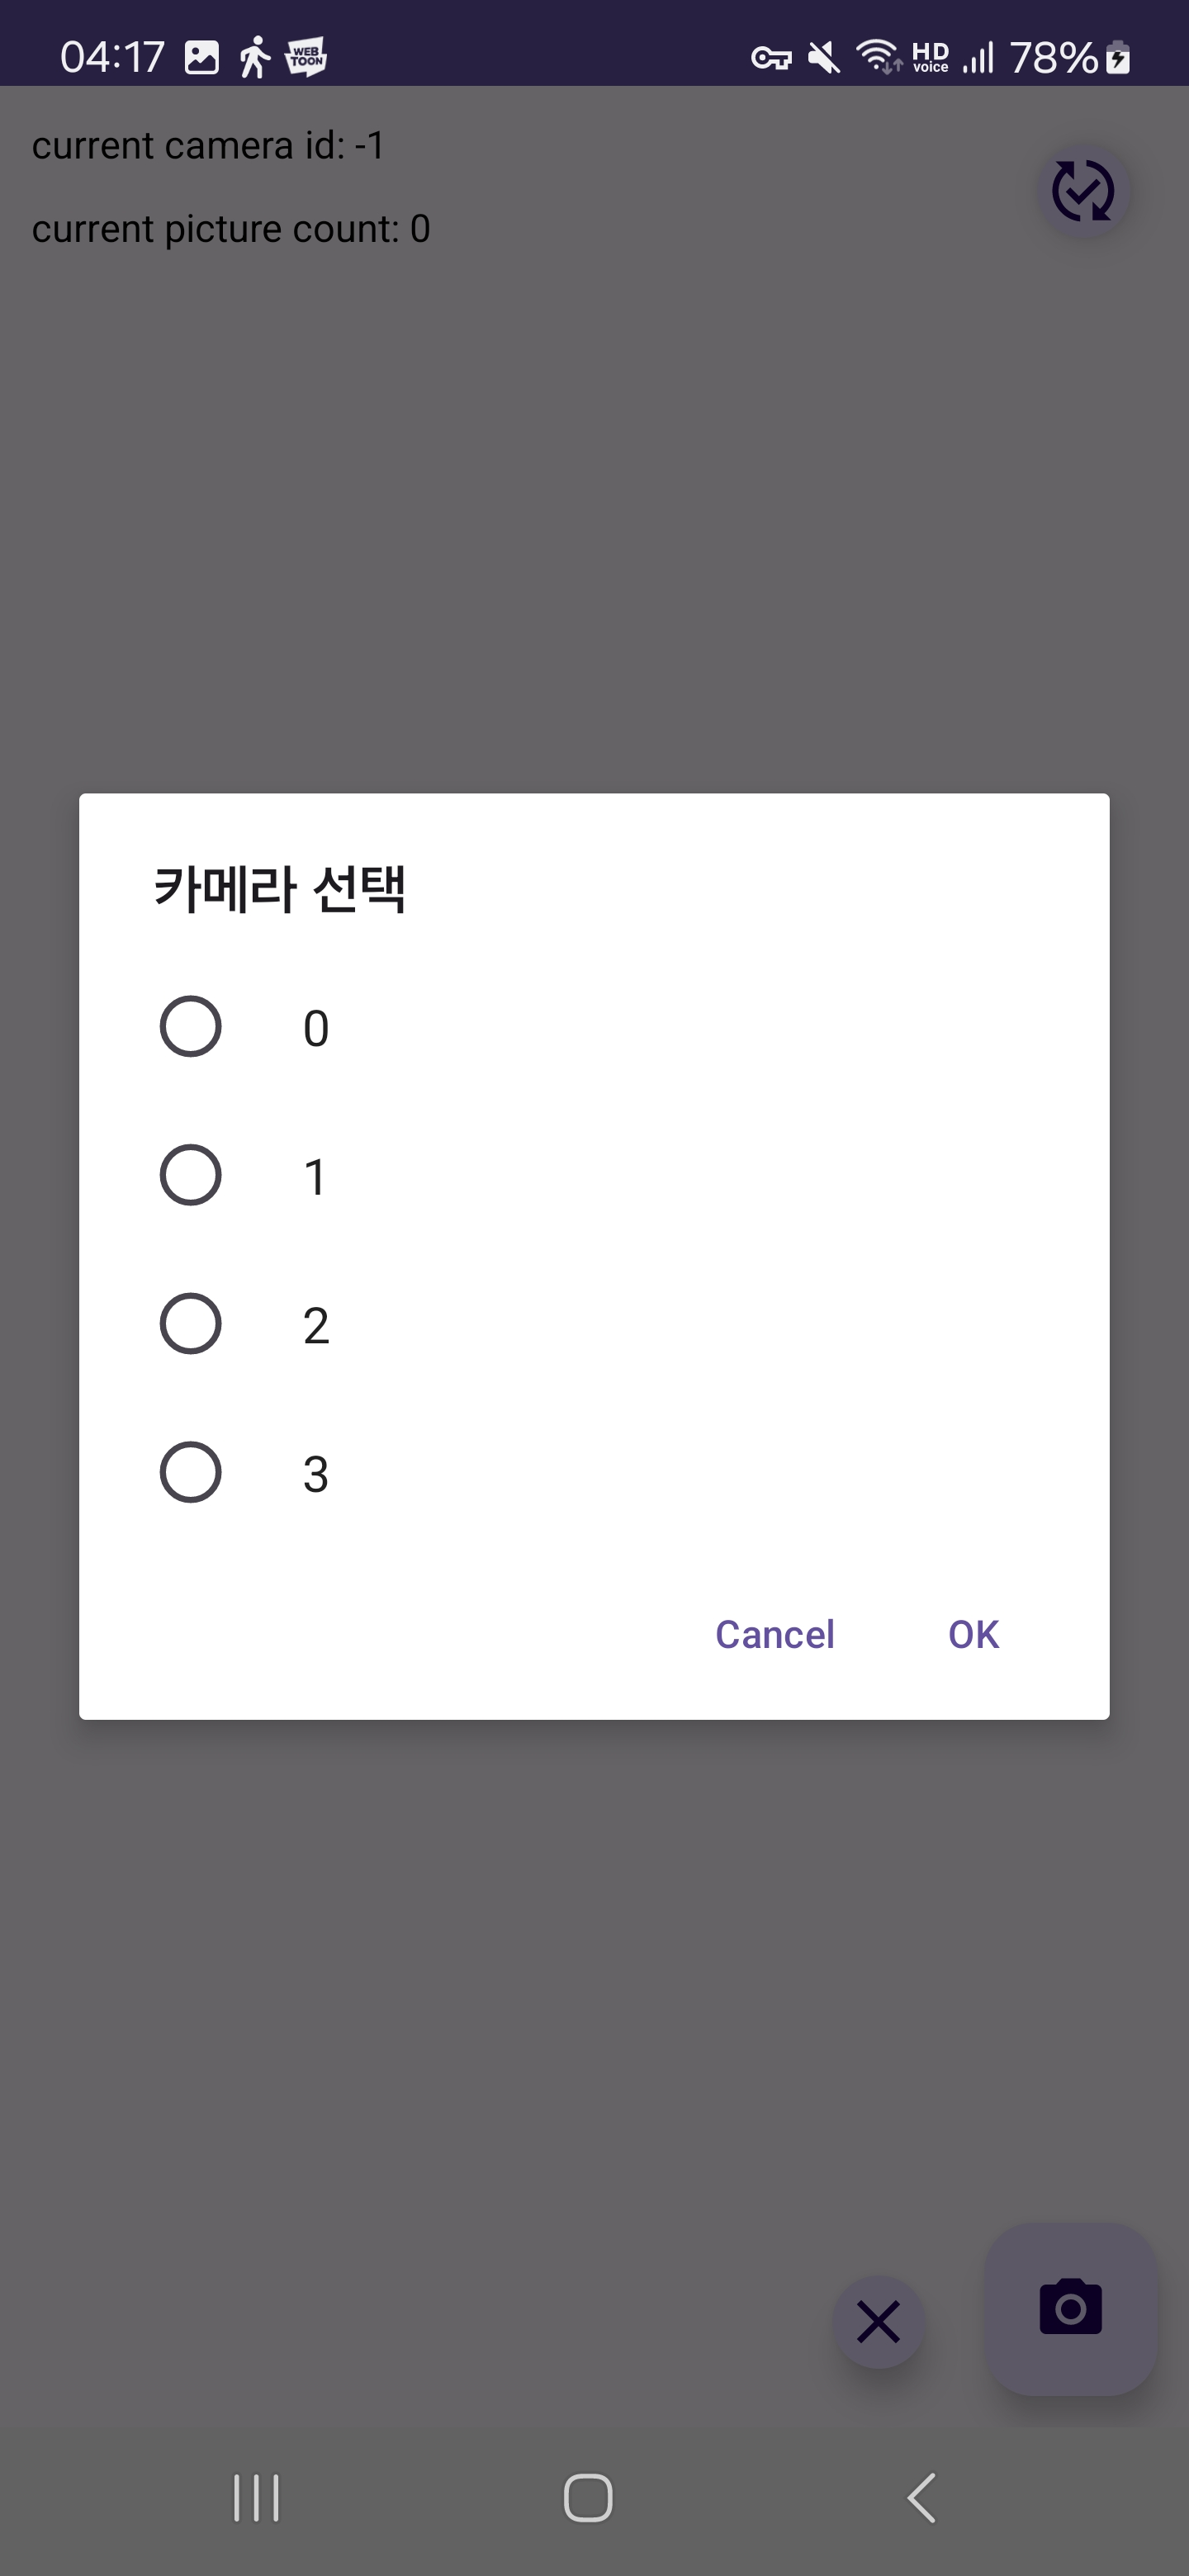
카메라 id는 manager에서 얻어서 확인할 수 있고 나는 radio buttion alter dialog를 만들어서 여기에 현재 manger에서 사용할 수 있는 카메라 아이디를 불러오고 선택하는 방식으로 작성했다.
private fun changeCameraSelect(cameraId: String) {
        // 변수 초기화
        selectedCameraId = cameraId
        images.clear()
        objectPoints.clear()
        imagePoints.clear()

        // 화면의 id, count 초기화
        binding.tvCameraId.text = getString(R.string.current_camera_id, selectedCameraId)
        binding.tvPictureCount.text = getString(R.string.current_picture_count, images.size)

        // 2번이면 와이드, 아니면 울트라 와이드
        isWide = selectedCameraId == "1"

        // 카메라가 이미 열려 있으면 닫습니다.
        cameraDevice?.close()

        // 카메라를 열고 새로운 카메라 세션을 시작합니다.
        openCamera(selectedCameraId)

        Toast.makeText(this@MainActivity, "Camera changed to $selectedCameraId", Toast.LENGTH_SHORT).show()
    }
여기서 wide는 무시해도된다. 나중에 스테레오 비전작업을하기위해 미리 작성해둔 변수임
OpenCV 캘리브레이션 작업
OpenCV를 안드로이드 플랫폼에서 사용하려면 원래는 OpenCV 공식 홈페이지에서 라이브러리를 다운받아서 설치해줘야하지만 위 깃허브에서 편리하게 종속성 한줄만 적으면 바로 사용할 수 있게 해주셨다.
참고로 그냥 OpenCV를 쓰면 안되고
implementation("com.quickbirdstudios:opencv-contrib:4.5.3.0")
이걸로 설치해야함
여튼 촬영버튼으로 현재 이미지에서 체커보드를 인식하는데 인식된 이미지를 모아뒀다가 한번에
3d 좌표를 만들고 여기에 캘리브레이션을 하는 작업임
// 촬영 버튼
        binding.fabTakePicture.setOnClickListener {
            Log.d("test", "take picture")

            // 기존에 켜져 있던 결과 이미지뷰 안보이게
            resultImageView.visibility = View.INVISIBLE

            if (images.size < takePictureMaxCount) {
                // 현재 TextureView의 내용을 비트맵으로 가져와서 처리
                val bitmap = textureView.bitmap
                val mat = bitmap2Mat(bitmap!!)
                val resultMat = findAndDrawChessboardCorners(mat)

                if (saveImageFlag) {
                    saveImageToGallery(this, bitmap, "image_${System.currentTimeMillis()}.jpg") // Save the bitmap as JPEG
                }
                if (images.size >= 1 && resultMat != null) {
                    updateImageView(resultMat)
                }
            } else {
                // takePictureMaxCount 개수만큼 리스트가 쌓이면 캘리브레이션 진행
                performCalibration()
            }


 private fun findAndDrawChessboardCorners(image: Mat): Mat? {
        val color = Mat()
        image.copyTo(color)     // 반환하기 위해 원본의 컬러 이미지 Mat을 복사해둠

        val gray = Mat()
        Imgproc.cvtColor(image, gray, Imgproc.COLOR_RGB2GRAY)

        // 체스보드 코너를 찾으면 true 반환, corners에 코너 저장
        val corners = MatOfPoint2f()
        val found = Calib3d.findChessboardCorners(gray, checkerboardSize, corners)

        if (found) {
            // 반복 알고리즘의 종료 기준 설정
            val criteria = TermCriteria(TermCriteria.EPS + TermCriteria.MAX_ITER, 10, 0.1)

            // 세밀한 코너 위치 조정
            Imgproc.cornerSubPix(gray, corners, org.opencv.core.Size(11.0, 11.0), org.opencv.core.Size(-1.0, -1.0), criteria)

            // 체커보드 코너를 이미지에 표시
            Calib3d.drawChessboardCorners(image, checkerboardSize, corners, found)
            images.add(color)
            return image
        }
        return null
    }

    /**
     * Perform calibration
     * 카메라 캘리브레이션 진행
     * 내부행렬, 외곡계수 반환
     */
    private fun performCalibration() {
        lifecycleScope.launch(Dispatchers.Default) {
            // 원점의 3D 포인트 생성
            val objp = ArrayList<Point3>().apply {
                for (i in 0 until checkerboardSize.height.toInt()) {
                    for (j in 0 until checkerboardSize.width.toInt()) {
                        val point3 = Point3(j.toDouble(), i.toDouble(), 0.0)
                        add(point3)
                        Log.d("test", "point3: $point3")
                    }
                }
            }
            val obj = MatOfPoint3f()
            obj.fromList(objp)

            // 모든 이미지에 대해 반복하여 각 이미지의 2D 포인트와 매핑된 3D 포인트를 저장합니다.
            for (image in images) {
                updateImageView(image)
                val imageCorners = findImageCorners(image)
                if (imageCorners != null) {
                    objectPoints.add(obj.clone())
                    imagePoints.add(imageCorners)
                }
            }

            val cameraMatrix = Mat()
            val distCoeffs = Mat()
            val rvecs = ArrayList<Mat>()
            val tvecs = ArrayList<Mat>()

            Calib3d.calibrateCamera(
                objectPoints,
                imagePoints,
                imageSize,
                cameraMatrix,
                distCoeffs,
                rvecs,
                tvecs
            )

            Log.d(TAG, "Camera Matrix: $cameraMatrix")
            Log.d(TAG, "Distortion Coefficients: $distCoeffs")

            logMatDetails("Camera Matrix", cameraMatrix)
            logMatDetails("Distortion Coefficients", distCoeffs)
        }
    }
결과
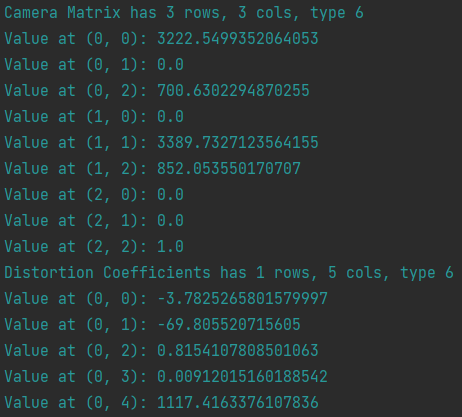
그러면 내부행렬과 왜곡계수를 구할 수 있다.
현재는 제대로된 체커보드를 사용하지 않고 인터넷에 대충 있는걸로해서 왜곡계수가 심하게 나온다.
그러나 실물 체커보드를 사용하면 괜찮을것이다.