GeometryReader는 공식문서의 내용을 통해 익히기 어렵다. 그 중요성에 비해 예제와 원리에 대한 서술이 턱없이 부족하다. 그 와중에 좋은 글을 발견하였고 번역 및 요약을 하고 호기심에 실험해 본 내용을 글로 남겨보려 한다.
Custom view를 만들 때, 많은 경우 주변이나 자신의 크기에 대해서 생각할 필요가 없다. 예를 들어 Text나 Rectangle 을 만들려고 할 때 그냥 만들면 된다. 이것은 parent에 의해 의도된 위치와 크기로 그려지게 된다(❗️정말 중요한 말이다).
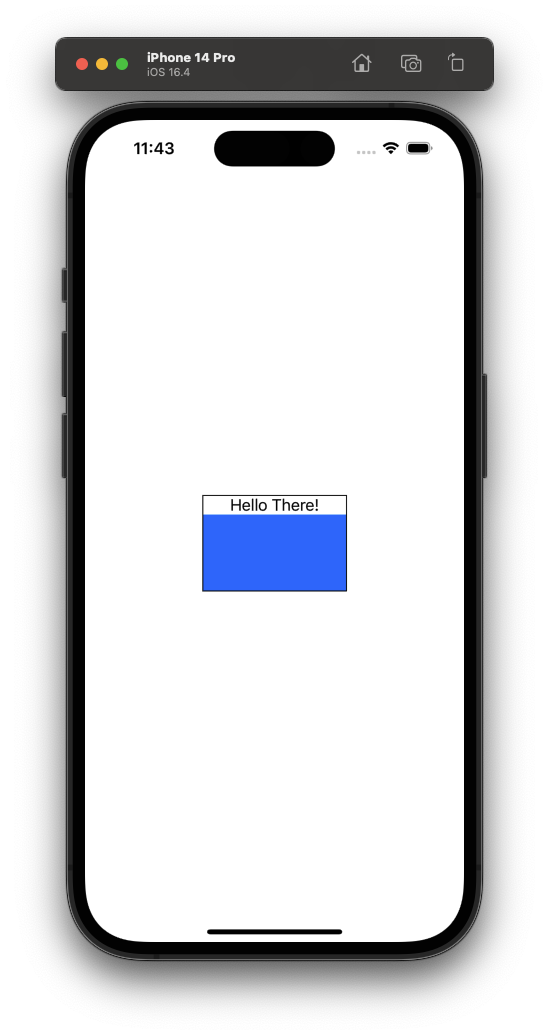
우리가 아래의 150x100 크기의 VStack을 만든다고 예를 들어보자.
struct ContentView: View {
	var body: some View {
    	VStack {
        	Text("Hello There!")
            MyRectangle()
        }
        .frame(width: 150, height: 100)
        .border(.black)
    }
}

struct MyRectangle: View {
	var body: some View {
		Rectangle()
        	.fill(Color.blue)
    }
}
MyRectangle() view는 크기에 대해서 고민하지 않는다. 이 view는 오로지 직사각형을 그리는 하나의 일 만을 수행한다. Parent가 얼마만큼의 크기를 원하는지 SwiftUI가 알아낼 것이다. 이 경우에 parent는 VStack이 되겠다.
Parent가 size와 position을 제안하지만, 실제로 그것을 어디에 어떻게 그릴지는 child view에 달려있다. 만약 child view가 제안받은 내용이 마음에 안들면 그것을 무시한다.
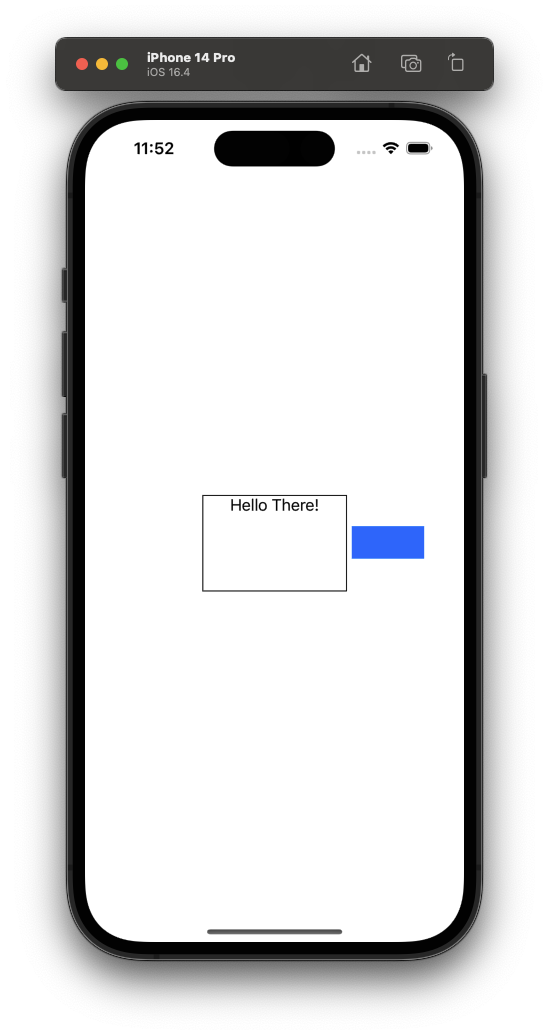
예를들어 직사각형을 parent에 의해 제안된 것의 절반의 크기로, 제안받은 장소의 가장자리에서 5 point 떨어진 곳에 그리라고 하고 싶을수도 있다. 이것은 GeometryReader를 사용한다면 어렵지 않다.
GeometryReader
공식문서에 아래와 같이 한 문장으로 짧게 설명된다:
A container view that defines its content as a function of its own size and coordinate space.
'Content를 자신만의 크기와 좌표 공간의 함수로 정의하는 컨테이너 뷰'
이것은 무슨 말일까? 기본적으로 GeometryReader는 또다른 view이다. SwiftUI에서는 거의 모든 것이 view이다. GeometryReader는 다른 view들과 같이 content를 정의하게 하게 하지만, 더 유용한 정보에 접근할 수 있다.
이 문단에 들어오기 전에 마지막 예시를 다시 생각해보자:
직사각형을 parent에 의해 제안된 것의 절반의 크기로, 제안받은 장소의 가장자리에서 5 point 떨어진 곳에 그리기
GeometryReader를 사용하여 이것을 그려보겠다:
struct ContentView: View {
	var body: some View {
    	VStack {
        	Text("Hello There!")
            MyRectangle()
        }
        .frame(width: 150, height: 100)
        .border(.black)
    }
}

struct MyRectangle: View {
	var body: some View {
		Rectangle()
        	.path(in: CGRect(x: geometry.size.width + 5, y: 0, width: geometry.size.width / 2, height: geometry.size.height / 2
        	.fill(Color.blue)
    }
}
여기에서 재미있는 실험을 하나 해볼 수 있다. 위의 코드 ContentView에서 MyRectangle()에 border(.red) 를 추가해보자:
struct ContentView: View {
	var body: some View {
    	VStack {
        	Text("Hello There!")
            MyRectangle()
            	.border(.red)
        }
        .frame(width: 150, height: 100)
        .border(.black)
    }
}
...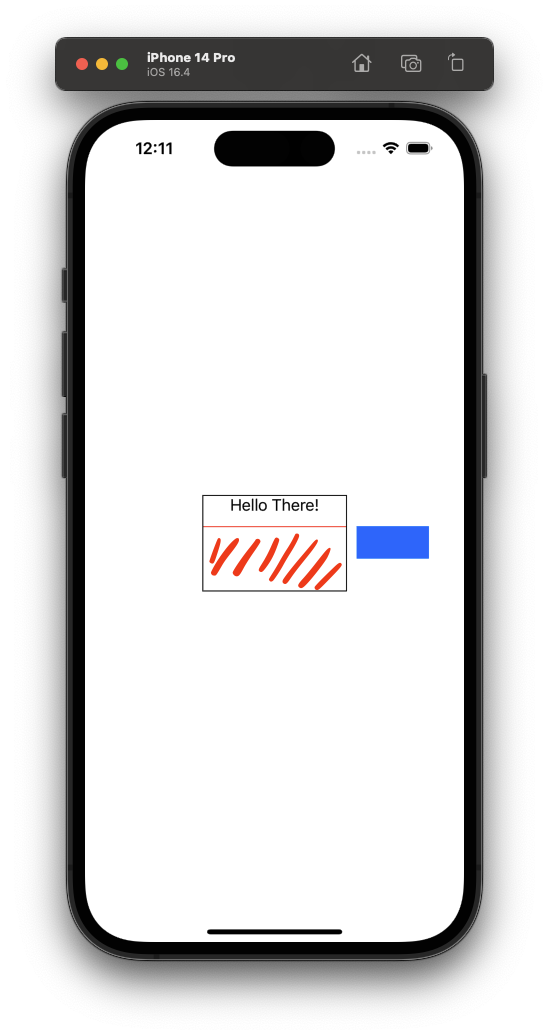
빗금친 영역이 GeometryReader의 영역이다. 즉 parent인 VStack에 의해 제안된 child view의 영역이다.
여기서 MyRectangle()을 바로 밑에 하나 더 추가하면 어떻게 될까?
struct ContentView: View {
    var body: some View {
        VStack {
            Text("Hello There!")
            MyRectangle()
                .border(.red)
            MyRectangle()
                .border(.red)
        }
        .frame(width: 150, height: 100)
        .border(.black)
    }
}
MyRectangle() 이 하나 있을 경우보다 절반 만큼 높이의 영역 2개로 분할되었다. 이 현상은 다음과 같이 풀이된다:
GeometryReader는 parent에 의해 제안된 영역이다. Parent(VStack)는 child view가 다수의 GeometryReader를 가지고 있을 시, 영역을 균등하게 나누어 분배한다.
Absorbing the Geometry of Another View
GeometryReader는 .background() 나 .overlay() modifier와 조합될 때 굉장히 강력하게 작용한다.
Text("Hello").background(Color.red) 를 보자. Color.red 는 그저 색깔이 빨간색이어야 한다는 것을 알려주는 parameter가 아니다. Color.red 는 또다른 하나의 view 이다. Parent에 의해 제안받은 영역을 빨간색으로 채우라는 것을 의미한다. 현재, parent는 background 이고, background는 Text를 수정하기 때문에, Color.red 에게 제안받은 영역은 Text("hello") 가 차지하고 있는 영역이다.
.overlay modifier는 정확히 같은 일을 수행하지만 자신의 content를 modified view의 뒤가 아닌 앞에 그리는 차이점이 있다.
.background()에는 Color() 만 넣을 수 있는 것이 아니다. 이번에는 GeometryReader와 결합한 예시를 만들어보자:
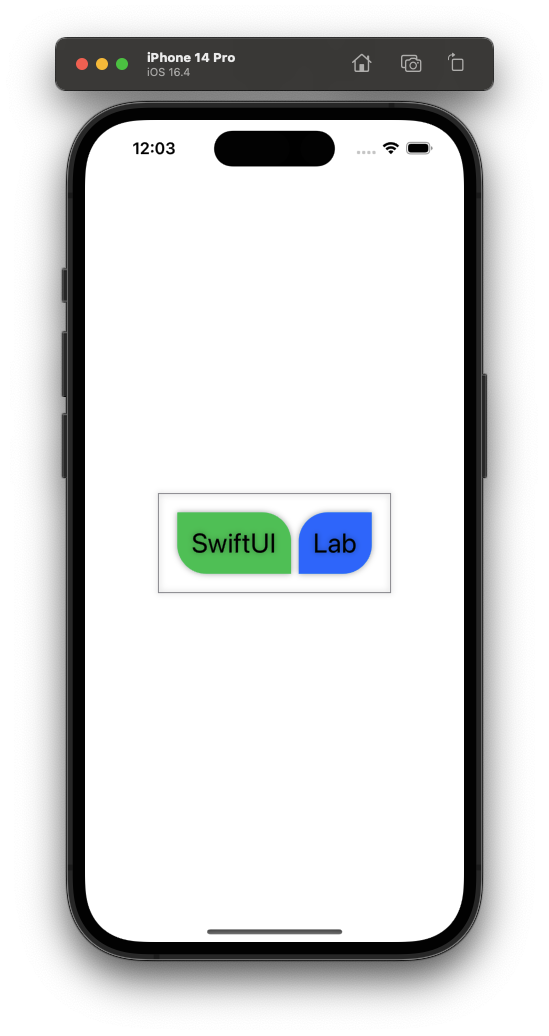
이 화면을 만드는 코드는 아래와 같다:
struct ContentView : View {
    var body: some View {

        HStack {

            Text("SwiftUI")
                .foregroundColor(.black).font(.title).padding(15)
                .background(RoundedCorners(color: .green, tr: 30, bl: 30))

            Text("Lab")
                .foregroundColor(.black).font(.title).padding(15)
                .background(RoundedCorners(color: .blue, tl: 30, br: 30))

        }.padding(20).border(Color.gray).shadow(radius: 3)
    }
}

struct RoundedCorners: View {
    var color: Color = .black
    var tl: CGFloat = 0.0 // top-left radius parameter
    var tr: CGFloat = 0.0 // top-right radius parameter
    var bl: CGFloat = 0.0 // bottom-left radius parameter
    var br: CGFloat = 0.0 // bottom-right radius parameter

    var body: some View {
        GeometryReader { geometry in
            Path { path in

                let w = geometry.size.width
                let h = geometry.size.height

                // We make sure the radius does not exceed the bounds dimensions
                let tr = min(min(self.tr, h/2), w/2)
                let tl = min(min(self.tl, h/2), w/2)
                let bl = min(min(self.bl, h/2), w/2)
                let br = min(min(self.br, h/2), w/2)

                path.move(to: CGPoint(x: w / 2.0, y: 0))
                path.addLine(to: CGPoint(x: w - tr, y: 0))
                path.addArc(center: CGPoint(x: w - tr, y: tr), radius: tr, startAngle: Angle(degrees: -90), endAngle: Angle(degrees: 0), clockwise: false)
                path.addLine(to: CGPoint(x: w, y: h - br))
                path.addArc(center: CGPoint(x: w - br, y: h - br), radius: br, startAngle: Angle(degrees: 0), endAngle: Angle(degrees: 90), clockwise: false)
                path.addLine(to: CGPoint(x: bl, y: h))
                path.addArc(center: CGPoint(x: bl, y: h - bl), radius: bl, startAngle: Angle(degrees: 90), endAngle: Angle(degrees: 180), clockwise: false)
                path.addLine(to: CGPoint(x: 0, y: tl))
                path.addArc(center: CGPoint(x: tl, y: tl), radius: tl, startAngle: Angle(degrees: 180), endAngle: Angle(degrees: 270), clockwise: false)
                }
                .fill(self.color)
        }
    }
}