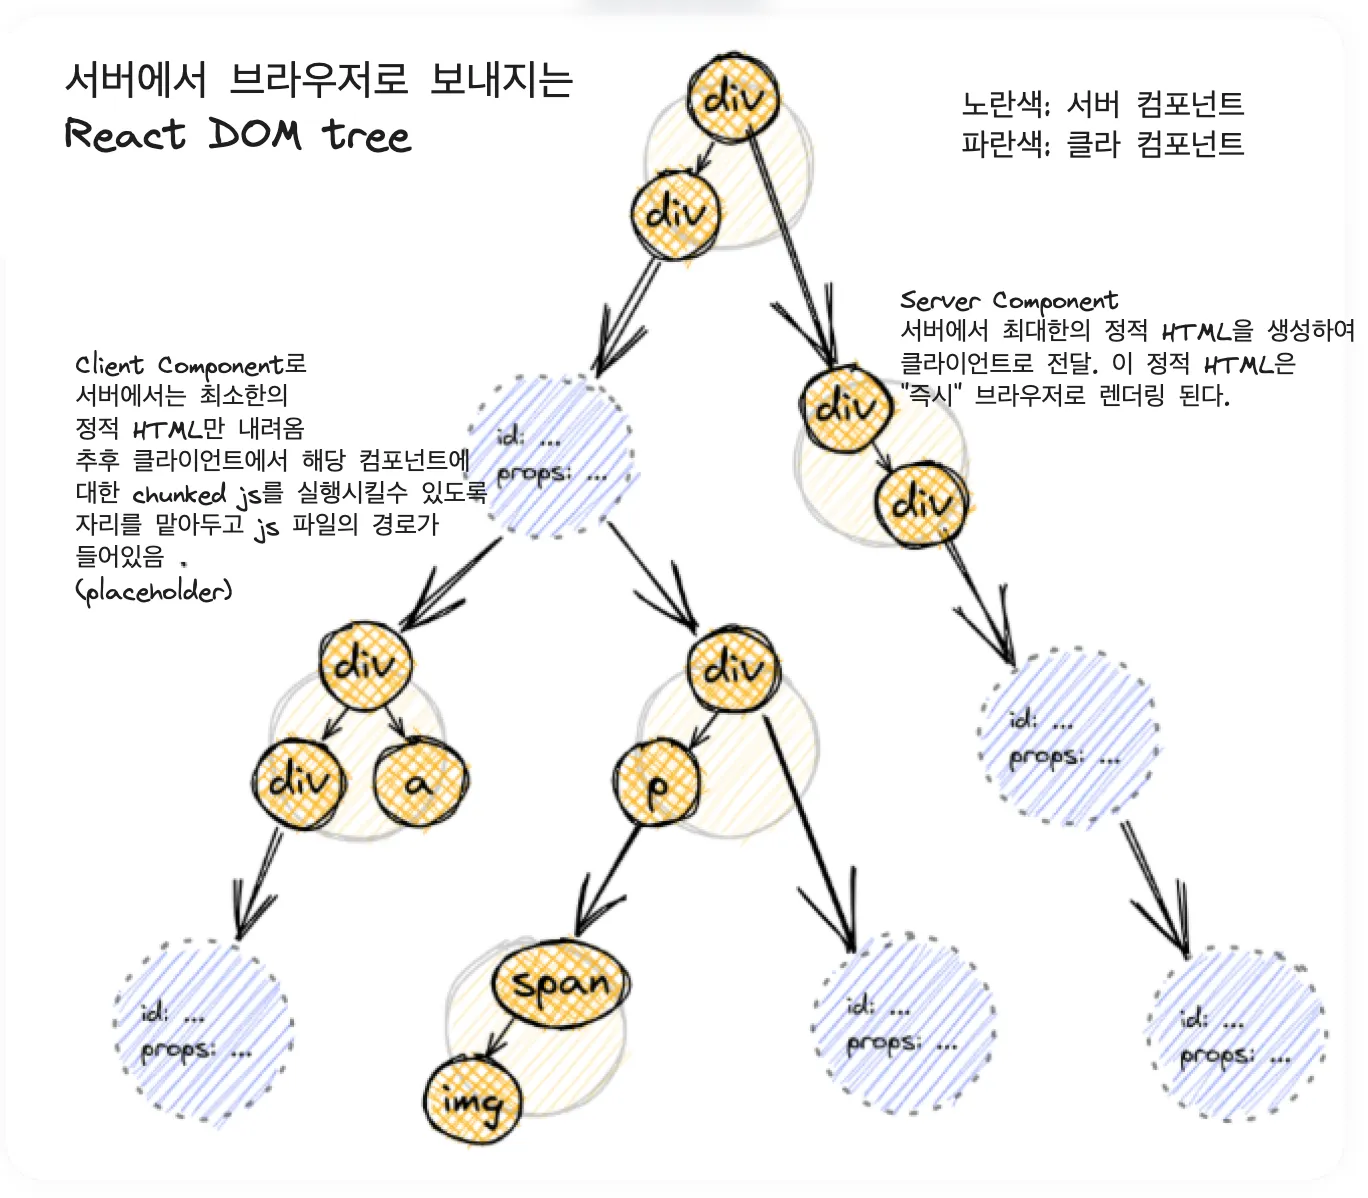
서버 컴포넌트(React Server Components란?
서버 컴포넌트는 번들링 전에 클라이언트 앱이나 SSR(Server Side Rendering) 서버와는 분리된 환경에서 미리 렌더링되는 새로운 유형의 컴포넌트이다.
서버 컴포넌트는 빌드 시간에 CI 서버에서 한 번 실행되거나 각 요청마다 웹 서버를 통해 실행될 수 있다.
특징
- 서버에서 렌더링되어 결과만 클라이언트로 전송된다.
- 데이터베이스(DB), 파일 시스템 등 서버 리소스에 직접 접근할 수 있다.
- 서버 컴포넌트 코드는 클라이언트로 전송되지 않아 번들 사이즈가 감소한다.
- 서버 컴포넌트를 리패치하더라도 클라이언트 상태를 유지할 수 있다.
장점
- 클라이언트 - 서버간 waterfall 문제 해결 및 초기 로딩 속도 개선
- 개발 경험 개선: 서버 리소스에 직접 접근 가능하여 데이터 패칭 로직 간소화
- 자동 코드 분할: 서버 컴포넌트에서 import되는 모든 클라이언트 컴포넌트가 자동으로 코드 분할 포인트가 된다.
- 유연한 렌더링 전략: Suspense와 결합하여 점진적이고 스트리밍 방식의 UI 렌더링 가능
💡 waterfall 문제란?
데이터 요청이 순차적으로 발생하여 전체 로딩 시간이 길어지는 현상을 말한다.
부모 컴포넌트의 데이터 로딩이 완료된 후에 자식 컴포넌트의 데이터 로딩이 시작되는 문제이다.
서버 컴포넌트(RSC) vs 서버 사이드 렌더링(SSR)
- 전통적인 SSR(Next.js page router 기준)
- RSC는 컴포넌트 단위, SSR은 전체 페이지 단위로 렌더링한다.
- RSC는 클라이언트 상태를 유지하며 서버 데이터를 업데이트할 수 있지만, SSR은 전체 페이지를 다시 로드해야 한다.
- RSC의 코드는 클라이언트로 전송되지 않지만(결과만 전송), SSR은 모든 컴포넌트 코드가 클라이언트로 전송된다.
- RSC는 모든 컴포넌트 레벨에서 서버 리소스에 접근 가능하지만, SSR은 페이지 최상위 레벨에서만 가능하다.
서버 컴포넌트를 지원하기 위한 리액트의 권장 사항
서버 컴포넌트는 React 19에서 안정적이며 메이저 버전 간에는 변경되지 않는다.
하지만 서버 컴포넌트를 구현하는 데 사용되는 내부 API들은 아직 안정화되지 않았고, 이 API들은 React 19의 마이너 버전(ex. 19.1, 19.2 등) 사이에서 변경될 수 있다.
번들러나 프레임워크에서 서버 컴포넌트를 지원하려면 두 가지 방법이 있다.
1. 특정 React 버전을 고정해서 사용하기
2. React의 Canary 릴리즈를 사용하기(최신 기능을 포함하지만 불안정함)
💡 React Canary란?
새로운 기능을 정식 출시 전에 미리 체험할 수 있는 특별한 버전이다.
실험적 버전보다는 안정적이지만 정식 버전만큼 완벽하지 않으며 주로 프레임워크 개발자들이 새로운 React 기능을 미리 통합해보고 피드백을 제공하는 데 사용된다.
➔ 일반적인 개발자가 서버 컴포넌트를 사용할 때는 문제가 없지만, 프레임워크 개발자같은 사람들은 내부 API가 마이너 버전 간에 변경될 수 있으므로 주의해야 한다.
서버에서 React 트리를 렌더링
renderToPipeableStream 함수는 서버 컴포넌트뿐만 아니라 일반적인 서버 사이드 렌더링에서도 사용되는 중요한 함수이다.
이 함수는 React 컴포넌트 트리를 서버에서 렌더링하고, 그 결과를 스트리밍 가능한 형태로 변환한다.
function renderToPipeableStream(
  model: ReactClientValue, // 렌더링할 React 컴포넌트
  moduleBasePath: ClientManifest, // 클라이언트 매니페스트(자원에 대한 정보)
  options?: Options, // 옵션 객체
): PipeableStream {
  // 렌더링 요청 생성
  const request = createRequest(
    model,
    moduleBasePath,
    options ? options.onError : undefined,
    options ? options.identifierPrefix : undefined,
    options ? options.onPostpone : undefined,
    options ? options.environmentName : undefined,
    options ? options.temporaryReferences : undefined,
  );
  let hasStartedFlowing = false;
  startWork(request); // 렌더링 시작
  return { // pipe, abort 메서드를 가진 객체 리턴
    // 렌더링된 결과를 쓰기 가능한 스트림으로 전달
    pipe<T: Writable>(destination: T): T {
      if (hasStartedFlowing) {
        throw new Error(
          'React currently only supports piping to one writable stream.',
        );
      }
      hasStartedFlowing = true;
      startFlowing(request, destination);
      destination.on('drain', createDrainHandler(destination, request));
      destination.on(
        'error',
        createCancelHandler(
          request,
          'The destination stream errored while writing data.',
        ),
      );
      destination.on(
        'close',
        createCancelHandler(request, 'The destination stream closed early.'),
      );
      return destination;
    },
    // 서버 렌더링 중단, 나머지를 클라이언트에서 렌더링
    abort(reason: mixed) {
      abort(request, reason);
    },
  };
}
💡
renderToPipeableStream함수에서 직렬화란?
React 컴포넌트 트리를 RSC Payload라는 특별한 데이터 형식으로 변환하는 과정이다.
서버에서 렌더링 된 React 컴포넌트를 클라이언트로 효율적으로 전송할 수 있는 형태로 만든다.
서버 컴포넌트에서 renderToPipeableStream 함수는 굉장히 중요한 역할을 하기 때문에 자세히 살펴봐야 한다.
목적
- React 컴포넌트 트리를 서버에서 RSC Payload 형식으로 직렬화
- 생성된 RSC Payload를 Node.js의 Writable 스트림으로 전송
반환 값
- pipe: RSC Payload를 제공된 Writable Node.js 스트림으로 출력하는 함수
- abort: 서버 렌더링을 중단하고 나머지를 클라이언트에서 렌더링하도록 하는 함수
주요 옵션
- bootstrapScripts: 클라이언트 측 JavaScript 파일 경로 목록
- onShellReady: 초기 셸이 준비되었을 때 호출되는 콜백
- onAllReady: 모든 콘텐츠가 준비되었을 때 호출되는 콜백
스트리밍 지원
- onShellReady에서 pipe를 호출하면 스트리밍 렌더링이 가능하다.
- onAllReady에서 pipe를 호출하면 전체 콘텐츠가 준비된 후 한 번에 전송한다.(모든 콘텐츠가 포함되어 있어 크롤러나 정적 생성에 유용)
환경
- Node.js환경에서 사용
- Deno나 최신 엣지 런타임과 같은 Web 스트림 환경에서는
renderToReadableStream을 사용해야 한다.
사용 예시
const { pipe } = renderToPipeableStream(<App />, {
  bootstrapScripts: ['/main.js'],
  onShellReady() { // 스트리밍
    response.statusCode = 200;
    response.setHeader('content-type', 'text/html');
    pipe(response); // 서버에서 생성된 RSC Payload를 HTTP 응답 스트림으로 전송
  }
});
request 객체
전체 프로세스에 대한 모든 필수 정보를 보관하는 객체이다.
export type Request = {
  status: 0 | 1 | 2 | 3, // 현재 상태
  flushScheduled: boolean, // 플래시(데이터 전송) 예약 여부
  fatalError: mixed, // 치명적 오류 발생 시 저장
  destination: null | Destination, // 렌더링 결과를 전송할 대상
  bundlerConfig: ClientManifest, // 클라이언트 측 자원 정보
  cache: Map<Function, mixed>, // 함수와 그 결과를 캐싱하는 맵 객체
  nextChunkId: number, // 다음 청크에 부여할 고유한 ID
  pendingChunks: number, // 처리 대기중인 청크 수
  hints: Hints, // 렌더링 힌트 정보
  abortListeners: Set<(reason: mixed) => void>, // 중단 리스너 집합
  abortableTasks: Set<Task>, // 중단 가능한 작업 집합
  pingedTasks: Array<Task>, // 핑된 작업 배열
  completedImportChunks: Array<Chunk>,// 완료된 임포트 청크 배열
  completedHintChunks: Array<Chunk>, // 완료된 힌트 청크 배열
  completedRegularChunks: Array<Chunk | BinaryChunk>, // 완료된 일반 청크 배열
  completedErrorChunks: Array<Chunk>, // 완료된 오류 청크 배열
  writtenSymbols: Map<symbol, number>, // 작성된 심볼 맵 객체
  writtenClientReferences: Map<ClientReferenceKey, number>, // 작성된 클라이언트 참조 맵
  writtenServerReferences: Map<ServerReference<any>, number>, // 작성된 서버 참조 맵
  writtenObjects: WeakMap<Reference, string>, // 작성된 Weakmap
  temporaryReferences: void | TemporaryReferenceSet, // 임시 참조 집합
  identifierPrefix: string, // 식별자 접두사
  identifierCount: number, // 식별자 카운트
  taintCleanupQueue: Array<string | bigint>, // 오염 정리 큐
  onError: (error: mixed) => ?string, // 오류 처리 함수
  onPostpone: (reason: string) => void, // 연기 처리 함수
  // DEV-only
  environmentName: () => string, // 환경 이름 반환 함수
  didWarnForKey: null | WeakSet<ReactComponentInfo>, // 키 경고 여부 추적
};
전체 렌더링 프로세스 시작
startWork 함수는 서버 사이드 렌더링 과정에서 React 컴포넌트 트리의 렌더링 작업을 시작하는 진입점 역할을 한다.
export const supportsRequestStorage = false;
export const requestStorage: AsyncLocalStorage<Request | void> = (null: any);
export function startWork(request: Request): void {
  // 렌더링 결과를 클라이언트로 보낼 준비가 되었는지 설정
  request.flushScheduled = request.destination !== null;
  if (supportsRequestStorage) {
    // 요청별 컨텍스트를 유지하면서 작업을 수행할 수 있게 한다.
    scheduleWork(() => requestStorage.run(request, performWork, request));
  } else {
    // performWork 함수를 호출하여 작업 수행
    scheduleWork(() => performWork(request));
  }
}

export function scheduleWork(callback: () => void) {
  setImmediate(callback);
}-
렌더링 결과를 보낼 목적지가 있다면 렌더링 프로세스가 완료되었을 때 결과를 즉시 클라이언트로 전송할 수 있다는 것을 플래그를 통해 알린다.
-
supportsRequestStorage가 true라면 각 요청에 대해 독립적인 컨텍스트를 생성하고 유지한다.(동시에 여러 요청을 처리할 때 각 요청의 데이터와 상태가 서로 섞이지 않고 격리된다.) -
supportsRequestStorage가 false라면performWork함수를 호출한다.
💡 AsyncLocalStorage란?
Node.js에서 비동기 작업 간에 로컬 상태를 유지하고 전파하는 기능이다.
주로 서버 사이드 환경에서 사용되며, 각 요청에 대한 고유한 컨텍스트를 관리하는 데 유용하다.
run메서드를 사용하여 컨텍스트를 설정한 후getStore메서드로 저장된 데이터에 접근할 수 있다.
💡 setImmediate란?
Node.js에서 제공하는 비동기 실행 함수로 현재 이벤트 루프 단계가 완료된 직후에 콜백을 실행하도록 예약한다.
- setTimeout은 최소 지연 시간(4ms)가 있는 반면 setImmediate는 현재 이벤트 루프 단계가 완료된 직후에 바로 실행되어 대부분의 상황에서 setImmediate가 먼저 실행된다.
performWork 함수는 서버 사이드 렌더링 과정에서 React 컴포넌트를 렌더링하고, 그 결과를 클라이언트로 전송하는 핵심적인 역할을 한다.
또한 작업 중 발생하는 있는 오류를 처리하고, React 내부 상태를 관리하여 안정적인 렌더링 프로세스를 보장한다.
function performWork(request: Request): void {
  // React 내부 상태를 현재 요청에 맞게 설정, Hooks 디스패처를 설정, 현재 요정 정보 저장
  // Hooks 사용을 위한 준비
  const prevDispatcher = ReactSharedInternals.H;
  ReactSharedInternals.H = HooksDispatcher;
  const prevRequest = currentRequest;
  currentRequest = request;
  prepareToUseHooksForRequest(request);

  try {
    const pingedTasks = request.pingedTasks; // 처리해야 할 작업 목록
    request.pingedTasks = [];
    for (let i = 0; i < pingedTasks.length; i++) {
      const task = pingedTasks[i];
      retryTask(request, task); // 작업 수행
    }
    if (request.destination !== null) {
      // 목적지가 설정되어 있다면 클라이언트로 전송
      flushCompletedChunks(request, request.destination);
    }
  } catch (error) {
    // 발생한 오류 로깅, 심각한 오류로 처리
    logRecoverableError(request, error, null);
    fatalError(request, error);
  } finally {
    ReactSharedInternals.H = prevDispatcher; // React 내부 상태를 이전 상태로 복원
    resetHooksForRequest(); // Hooks 관련 설정 초기화
    currentRequest = prevRequest; // 현재 요청 정보를 이전 상태로 복원
  }
}- React 내부 상태를 설정하여 Hooks 사용을 위한 준비 작업을 수행
- 처리해야 할 작업 목록을 순회하여 처리
- 요청(request)에 목적지가 설정되어 있다면, 완료된 청크들을 클라이언트로 전송
- 작업 중 발생한 오류를 로깅 및 치명적인 오류 처리
- React 내부 상태와 현재 요청 정보를 복원, Hooks 관련 설정 초기화
작업 처리(하나의 작업은 하나의 청크를 의미한다)
아래 함수에서 작업을 생성할 때 청크에 대한 고유 id를 증가하는 것을 볼 수 있듯이 하나의 작업은 하나의 청크를 의미한다.(const id = request.nextChunkId++ )
function createTask(
  request: Request,
  model: ReactClientValue,
  keyPath: null | string,
  implicitSlot: boolean,
  abortSet: Set<Task>,
): Task {
  request.pendingChunks++;
  const id = request.nextChunkId++; // 청크에 대한 고유 id 증가
  if (typeof model === "object" && model !== null) {
    if (keyPath !== null || implicitSlot) {
    } else {
      // 이미 처리된 객체 추적(순환참조 처리, 중복 직렬화 방지)
      request.writtenObjects.set(model, serializeByValueID(id));
    }
  }
  const task: Task = (({
    id,
    status: PENDING,
    model,
    keyPath,
    implicitSlot,
    ping: () => pingTask(request, task),
    toJSON: function (
      this:
        | { +[key: string | number]: ReactClientValue }
        | $ReadOnlyArray<ReactClientValue>,
      parentPropertyName: string,
      value: ReactClientValue
    ): ReactJSONValue {
      const parent = this;
      return renderModel(request, task, parent, parentPropertyName, value);
    },
    thenableState: null,
  }: Omit<
    Task,
    "environmentName" | "debugOwner" | "debugStack" | "debugTask"
  >): any);
  abortSet.add(task);
  return task;
}- 최초 청크는 Request가 처음 생성될 때 예약된다.
// createRequest 함수 내부에서 RequestInstance 호출
function RequestInstance(
  this: $FlowFixMe,
  model: ReactClientValue,
  bundlerConfig: ClientManifest,
  onError: void | ((error: mixed) => ?string),
  identifierPrefix?: string,
  onPostpone: void | ((reason: string) => void),
  environmentName: void | string | (() => string),
  temporaryReferences: void | TemporaryReferenceSet
) {
  // another code..
  // 초기 청크 생성
  const rootTask = createTask(
    this,
    model,
    null,
    false,
    abortSet,
    null,
    null,
    null
  );
  pingedTasks.push(rootTask);
}
개별 작업을 실행하고 처리
주어진 작업(task)을 실행하고, 그 결과를 처리하는 역할을 한다.
이 과정에서 다양한 상황(성공, 실패, 일시중단 등)을 처리한다.
function retryTask(request: Request, task: Task): void {
  if (task.status !== PENDING) { // PENDING 상태가 아니면 함수 종료
    return;
  }
  task.status = RENDERING; // 작업 상태 변경(렌더링 시작을 표시)

  try {
    modelRoot = task.model;
    // 작업의 모델을 렌더링
    const resolvedModel = renderModelDestructive(
      request,
      task,
      emptyRoot,
      "",
      task.model
    );
    modelRoot = resolvedModel;
    // 작업의 keyPath, implicitSlot 속성 초기화
    task.keyPath = null;
    task.implicitSlot = false;

    if (typeof resolvedModel === "object" && resolvedModel !== null) {
      // 렌더링 결과가 객체인 경우
      // writtenObjects에 저장하고 emitChunk을 호출하여 청크 생성
      request.writtenObjects.set(resolvedModel, serializeByValueID(task.id));
      emitChunk(request, task, resolvedModel);
    } else {
      // 객체가 아닌 경우 결과를 JSON으로 변환하고 emitModelChunk를 호출하여 모델 청크를 생성
      const json: string = stringify(resolvedModel);
      emitModelChunk(request, task.id, json);
    }

    request.abortableTasks.delete(task); // 작업을 abortableTasks에서 제거
    task.status = COMPLETED; // 작업 상태 변경(완료했음을 알림)
  } catch (thrownValue) {
    // 에러 처리(suspense)
    const x =
      thrownValue === SuspenseException ? getSuspendedThenable() : thrownValue;
    if (typeof x === "object" && x !== null) {
      // Promise인 경우
      if (typeof x.then === "function") {
        if (request.status === ABORTING) {
          // 중단 처리 로직
          request.abortableTasks.delete(task);
          task.status = ABORTED;
          const errorId: number = (request.fatalError: any);
          const model = stringify(serializeByValueID(errorId));
          emitModelChunk(request, task.id, model);
          return;
        }

        task.status = PENDING; // 작업 상태 변경(대기 상태)
        // Promise 해결 시 재시도 하도록 설정
        task.thenableState = getThenableStateAfterSuspending();
        const ping = task.ping;
        x.then(ping, ping);
        return;
      } else if (enablePostpone && x.$$typeof === REACT_POSTPONE_TYPE) {
        // Postpone 타입의 예외를 처리하고 관련 청크를 생성
        // Postpone은 서버 사이드 렌더링 중 특정 컴포넌트의 렌더링을 클라이언트로 연기할 수 있다.
        // lazy()와 유사하지만 서버에서 동작한다는 특징이 있다.
        request.abortableTasks.delete(task);
        task.status = ERRORED;
        const postponeInstance: Postpone = (x: any);
        logPostpone(request, postponeInstance.message, task);
        emitPostponeChunk(request, task.id, postponeInstance);
        return;
      }
    }

    if (x === AbortSigil) {
      // 중단 신호를 처리하고 작업을 중단 상태로 변경
      request.abortableTasks.delete(task);
      task.status = ABORTED;
      const errorId: number = (request.fatalError: any);
      const model = stringify(serializeByValueID(errorId));
      emitModelChunk(request, task.id, model);
      return;
    }

    // 기타 오류 처리하고 오류 청크를 생성
    request.abortableTasks.delete(task);
    task.status = ERRORED;
    const digest = logRecoverableError(request, x, task);
    emitErrorChunk(request, task.id, digest, x);
  }
}- 작업이
PENDING상태인지 확인하고, 아니면 종료한다. renderModelDestructive함수로 작업의 모델을 렌더링한다.- 작업 속성 초기화(keyPath, implicitSlot)
- 렌더링 결과가 객체인지 확인하고 적절한 방식으로 청크 생성
- 작업을
abortableTasks에서 제거하고 상태를COMPLETED로 변경 - 예외 처리
- Promise 처리: 작업을
PENDING상태로 변경하고 재시도를 설정 - Postpone 처리: Postpone 타입의 예외를 처리하고 관련 청크를 생성
- 중단 신호 처리: 중단 신호를 처리하고 작업을 중단 상태로 변경
- 기타 오류 처리: 다른 모든 오류를 처리하고 오류 청크를 생성
- Promise 처리: 작업을
💡 Postpone이란?
React 18에서 도입된 새로운 개념으로, 서버 사이드 렌더링 중 특정 컴포넌트의 렌더링을 클라이언트로 연기할 수 있게 해준다.
- 목적: 서버에서 렌더링하기 어려운 컴포넌트를 클라이언트로 넘긴다.
- 작동 방식: 서버에서 컴포넌트 렌더링 중 Postone이 발생하면, 해당 컴포넌트의 렌더링을 중단하고 클라이언트에서 처리하도록 지시한다.
데이터 흐름 시작
서버 사이드 렌더링 결과를 writable 스트림으로 연결한다. 데이터 흐름을 시작하고, 스트림의 다양한 이벤트(drain, error, close)에 대한 핸들러를 설정한다.
💡 writable 스트림이란?
데이터를 쓸 수 있는 목적지를 추상화한 것이다. 파일에 쓰기, HTTP 응답 보내기 등이 대표적인 예시이다.(데이터를 어디로가 보내는 통로와 같다)
주요 이벤트
- drain: 스트림이 더 많은 데이터를 받을 수 있을 때 발생, 버퍼가 비워졌음을 의미
- finish: 모든 데이터가 시스템에 플러시되었을 때 발생
- error: 쓰기 또는 파이핑 과정에서 오류가 발생했을 때 발생
- close: 스트림이 완전히 닫혔음을 알림(finish 이벤트 후에 발생)
주요 메서드
- write: 데이터를 스트림에 쓰기
- end: 스트림에 더 이상 쓸 데이터가 없음을 알림
pipe<T: Writable>(destination: T): T {
  if (hasStartedFlowing) { // 하나의 writable 스트림에만 파이핑할 수 있도록 체크
    throw new Error(
      'React currently only supports piping to one writable stream.',
    );
  }

  hasStartedFlowing = true;
  startFlowing(request, destination); // 데이터 흐름 시작
  // 버퍼가 비워졌을 때 추가 데이터를 쓸 수 있도록 설정
  destination.on('drain', createDrainHandler(destination, request));
  // 스트림에 오류가 발생했을 때 처리
  destination.on(
    'error',
    createCancelHandler(
      request,
      'The destination stream errored while writing data.',
    ),
  );
  destination.on(
    'close',
    createCancelHandler(request, 'The destination stream closed early.'),
  );
  return destination;
}- 이미 쓰기 작업을 하고 있는 스트림이 있다면 에러 처리
- 데이터 흐름 시작
- 스트림 이벤트 핸들러 설정
startFlowing 함수는 실제 데이터 흐름을 시작하는 함수이다. 요청 상태를 확인하고, 목적지를 설정한 후, 완료된 청크들을 전송하기 시작한다.
export function startFlowing(request: Request, destination: Destination): void {
  if (request.status === CLOSING) {
    // 상태가 CLOSING(요청 중)인 경우 상태 변경, 오류 처리
    request.status = CLOSED;
    closeWithError(destination, request.fatalError);
    return;
  }

  if (request.status === CLOSED) {
    // 상태가 CLOSED인 경우(정리 작업과 리소스 해제가 된 경우)
    return;
  }

  if (request.destination !== null) {
    // 이미 목적지가 설정되어 있다면(이미 흐름이 시작되었다면)
    return;
  }

  request.destination = destination; // 목적지 설정
  try {
    flushCompletedChunks(request, destination); // 완료된 청크 전송
  } catch (error) {
    // 오류 로깅, 처리
    logRecoverableError(request, error, null);
    fatalError(request, error);
  }
}- 요청 상태 확인
- CLOSING인 경우 상태 변경 및 오류 처리 후 함수 종료
- CLOSED인 경우 함수 종료
- 목적지가 이미 설정되어 있는 경우(이미 데이터 흐름이 시작된 경우) 함수 종료
- 목적지 설정
- 완료된 청크들 전송
- 위 과정 중 오류가 발생한 경우 로깅 및 처리
청크 처리
flushCompletedChunks 함수는 완료된 여러 유형의 청크들(임포트, 힌트, 일반, 오류)을 목적지로 순차적으로 전송한다. 모든 청크가 처리되면 요청을 종료하고 정리 작업을 수행한다.
function flushCompletedChunks(
  request: Request,
  destination: Destination,
): void {
  beginWriting(destination);
  try {
    // 임포트 청크 처리(동적 임포트)
    const importsChunks = request.completedImportChunks;
    let i = 0;
    for (; i < importsChunks.length; i++) {
      request.pendingChunks--;
      const chunk = importsChunks[i];
      const keepWriting: boolean = writeChunkAndReturn(destination, chunk);
      if (!keepWriting) {
        request.destination = null;
        i++;
        break;
      }
    }
    importsChunks.splice(0, i);
	// 임포트 외에 청크들도 임포트와 같은 방식으로 처리된다. 반복되는 코드여서 따로 첨부하지 않았다.
    // 힌트 청크 처리(미리 로드할 수 있는 리소스)
    // 일반 청크 처리(주요 코드나 컴포넌트 등)
    // 오류 청크 청리(오류 처리나 폴백 컴포넌트)
  } finally {
    request.flushScheduled = false;
    completeWriting(destination); // 쓰기 작업 완료
  }
  flushBuffered(destination); // 버퍼 플래시
  if (request.pendingChunks === 0) {
    // 모든 청크가 처리되었다면 정리 작업 수행
    if (enableTaint) {
      cleanupTaintQueue(request);
    }
    request.status = CLOSED;
    close(destination);
    request.destination = null;
  }
}- 각 청크들을 목적지로 전송
- 모든 청크가 처리되면 전송되었음을 알림
- 정리 작업(초기화) 수행
정리하기
지금까지의 과정은 서버에서 서버 컴포넌트를 렌더링하고, 그 결과를 청크 단위로 처리하여 클라이언트로 전송하는 과정만 담겨있다.
추후에 작성되는 글에서 클라이언트 측에서 전송된 청크를 해석하고 실제 DOM에 렌더링하는 과정을 다룰 예정이다.
-
서버 컴포넌트(RSC) 소개
- 서버 컴포넌트는 서버에서 React 컴포넌트를 렌더링하고 그 결과를 클라이언트로 전송하는 기술이다.
- 이를 통해 초기 로딩 시간을 단축하고 번들 크기를 줄일 수 있다.
- 데이터베이스(DB), 파일 시스템에 직접 접근할 수 있어 서버 리소스를 효율적으로 활용할 수 있다.
-
renderToPipeableStream 함수
- 서버에서 React트리를 렌더링하고 결과를 직렬화하는 핵심적인 함수이다.
- 이 함수는 RSC Payload라는 특별한 형식의 데이터 스트림을 생성한다.
- 렌더링된 결과를 쓰기 가능한 스트림(writable)으로 전달한다.
-
렌더링 프로세스 시작
- startWork 함수를 통해 렌더링 프로세스를 시작한다.
- performWork 함수에서 실제 렌더링 작업을 수행한다.
- 이 과정에서 React 내부 상태가 설정되고, Hooks 사용을 위한 준비 작업이 이루어진다.
-
작업(Task) 처리
- retryTask 함수를 통해 개별 작업을 실행하고 결과를 처리한다.
- 작업의 상태에 따라 다양한 상황(성공, 실패, 일시 중단 등)을 처리한다.
- Suspense와 Postpone과 같은 React 기능들도 이 단계에서 처리된다.
-
데이터 흐름 시작(pipe 함수)
- startFlowing 함수를 통해 실제 데이터 흐름을 시작한다.
- 완료된 청크들을 클라이언트로 전송하기 시작한다.
- 이 과정에서 Node.js 스트림 API를 활용하여 효율적인 데이터 전송이 이루어진다.
-
청크 처리
- 하나의 작업은 하나의 청크를 의미한다.
- flushCompletedChunks 함수를 통해 완료된 청크들을 목적지로 전송한다.
- 청크는 임포트, 힌트, 일반, 오류 등 여러 유형으로 나뉘어, 각 유형에 따라 다르게 처리된다.
RSC Payload
💡 서버 컴포넌트 렌더링 결과를 클라이언트로 전송하기 위한 특별한 형식의 데이터이다.
구성
- 서버 컴포넌트의 렌더링 결과
- 클라이언트 컴포넌트를 렌더링할 위치와 해당 자바스크립트 파일에 대한 참조
- 서버 컴포넌트에서 클라이언트 컴포넌트로 전달되는 props
특징
- 압축된 형식: RSC Payloa는 렌더링된 React 서버 컴포넌트 트리의 압축된 바이너리 표현이다.
- 직렬화: 서버에서 생성된 데이터를 클라이언트로 효율적으로 전송하기 위해 직렬화된다.
- 클라이언트 측 처리: 클라이언트에서 React가 이 payload를 사용하여 브라우저의 DOM을 업데이트 한다.
생성 및 사용
- React가 서버에서 컴포넌트를 렌더링하면서 RSC Payload를 생성
- 생성된 RSC Payload를 클라이언트로 전송
- 클라이언트는 RSC Payload를 받아 서버 컴포넌트와 클라이언트 컴포넌트 트리를 조정
RSC Payload 확인해보기
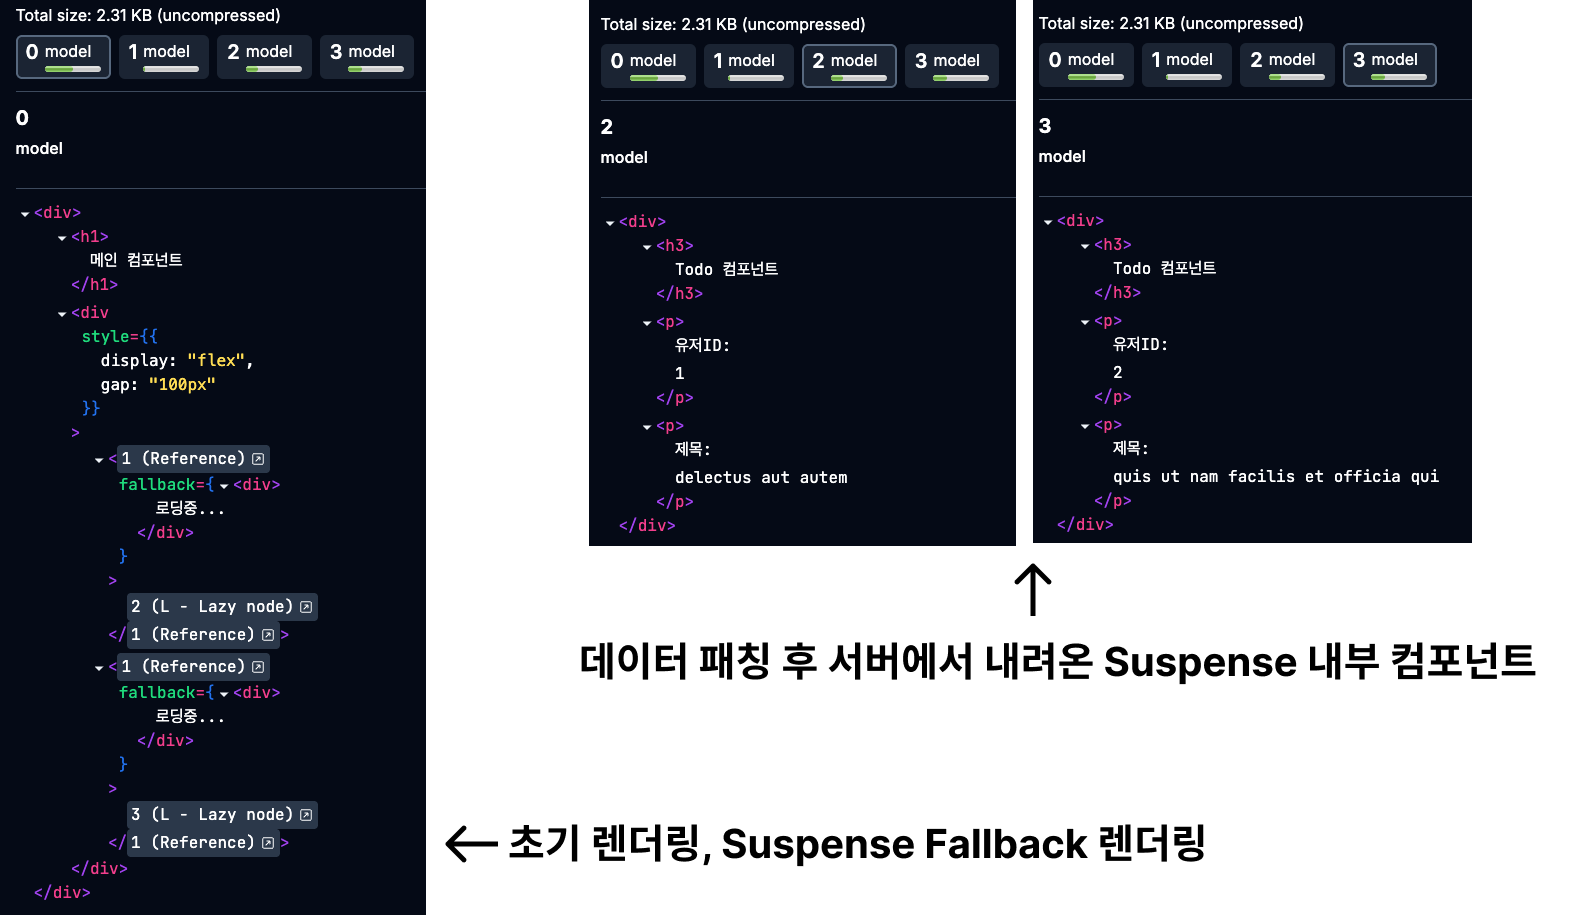
TodoComponents는 3초 후에 데이터 패칭을 시작하고 그 데이터로 화면을 그리는 컴포넌트이다.
export default function App() {
  return (
    <div>
      <h1>메인 컴포넌트</h1>
      <div style={{display: 'flex', gap: '100px'}}>
        <Suspense fallback={<div>로딩중...</div>}>
          <TodoComponents userId={1} />
        </Suspense>
        <Suspense fallback={<div>로딩중...</div>}>
          <TodoComponents userId={2} />
        </Suspense>
      </div>
    </div>
  );
}

const fetchUser = async (userId) => {
  await new Promise((resolve) => setTimeout(resolve, 3000));
  const res = await fetch(
    `https://jsonplaceholder.typicode.com/todos/${userId}`
  );
  const data = await res.json();
  return data;
};

function TodoComponents({userId}) {
  const todoData = use(fetchUser(userId));

  return (
    <div>
      <h3>Todo 컴포넌트</h3>
      <p>유저ID: {todoData.id}</p>
      <p>제목: {todoData.title}</p>
    </div>
  );
}- 실행 결과

왼쪽 터미널에 들어오는 RSC Payload를 보면 초기 컴포넌트들을 렌더링하고 추후에 데이터 패칭이 완료된 후에 추가 RSC Payload가 들어오는걸 볼 수 있다.
초기에 컴포넌트가 렌더링되면서 TodoComponents에 아직 데이터 요청이 끝나지 않았기 때문에 Fallback을 렌더링하는 것을 볼 수 있다.
청크 0번보다 청크 1번이 먼저 출력되는 이유는 flushCompletedChunks 함수에서 참조(import) 청크를 우선적으로 처리하기 때문이다.
1:"$Sreact.suspense"
0:["$","div",null,{"children":[["$","h1",null,{"children":"메인 컴포넌트"}],["$","div",null,{"style":{"display":"flex","gap":"100px"},"children":[["$","$1",null,{"fallback":["$","div",null,{"children":"로딩중..."}],"children":"$L2"}],["$","$1",null,{"fallback":["$","div",null,{"children":"로딩중..."}],"children":"$L3"}]]}]]}]
데이터가 도착한 후에는 아래와 같이 Suspense 내부 콘텐츠를 렌더링하는 것을 볼 수 있다.
2:["$","div",null,{"children":[["$","h3",null,{"children":"Todo 컴포넌트"}],["$","p",null,{"children":["유저ID: ",1]}],["$","p",null,{"children":["제목: ","delectus aut autem"]}]]}]
3:["$","div",null,{"children":[["$","h3",null,{"children":"Todo 컴포넌트"}],["$","p",null,{"children":["유저ID: ",2]}],["$","p",null,{"children":["제목: ","quis ut nam facilis et officia qui"]}]]}]
RSC Payload는 RSC Parser라는 사이트에 넣어보면 컴포넌트가 어떻게 렌더링되는지 알 수 있다.


RSC parser라는 툴도 있었군요! 좋은 글 잘 봤습니다!