📌 Notice
Kubernetes Advanced Networking Study (=KANS)
k8s 네트워크 장애 시, 네트워크 상세 동작 원리를 기반으로 원인을 찾고 해결하는 내용을 정리한 블로그입니다.
CloudNetaStudy그룹에서 스터디를 진행하고 있습니다.
Gasida님께 다시한번 🙇 감사드립니다.
EKS 관련 이전 스터디 내용은 아래 링크를 통해 확인할 수 있습니다.

📌 Summary
-
Istio는 Kubernetes 환경에서 서비스 메시를 구현하는 강력한 솔루션으로, 마이크로서비스 간의 복잡한 통신을 효율적으로 관리합니다.
-
주요 구성 요소로는 Envoy 사이드카 프록시, 컨트롤 플레인인 istiod, 그리고 다양한 정책 설정을 위한 VirtualService와 DestinationRule 등이 있습니다.
-
트래픽 관리 기능을 통해 요청 라우팅, 폴트 인젝션, 트래픽 시프팅 등 세밀한 제어가 가능하며, 보안 설정(mTLS)으로 서비스 간 통신의 암호화와 인증을 강화할 수 있습니다.
-
Kiali, Prometheus, Grafana 등을 활용하여 Istio 서비스 메시의 상태와 성능을 모니터링하고 시각화할 수 있습니다.
📌 Study
👉 Step 00. Prequisite
실습환경 구성
구성 : VPC 1개(퍼블릭 서브넷 2개), EC2 인스턴스 3대 (Ubuntu 22.04 LTS, t3.xlarge - vCPU 4 , Mem 16) , testpc 1대는 t3.small
- CloudFormation 스택 실행 시 파라미터를 기입하면, 해당 정보가 반영되어 배포됩니다.
- CloudFormation 에 EC2의 UserData 부분(Script 실행)으로 실습 환경에 필요한 기본 설정들이 자동으로 진행됩니다.
CloudFormation 스택 배포 ← 실행하는 PC에 aws cli 설치되어 있고, aws configure 자격증명 설정 상태
# YAML 파일 다운로드
curl -O https://s3.ap-northeast-2.amazonaws.com/cloudformation.cloudneta.net/kans/kans-7w.yaml

# CloudFormation 스택 배포
# aws cloudformation deploy --template-file kans-7w.yaml --stack-name mylab --parameter-overrides KeyName=<My SSH Keyname> SgIngressSshCidr=<My Home Public IP Address>/32 --region ap-northeast-2
예시) aws cloudformation deploy --template-file kans-7w.yaml --stack-name mylab --parameter-overrides KeyName=kp-gasida SgIngressSshCidr=$(curl -s ipinfo.io/ip)/32 --region ap-northeast-2

## Tip. 인스턴스 타입 변경 : MyInstanceType=t3.xlarge (vCPU 4, Mem 16)
예시) aws cloudformation deploy --template-file kans-7w.yaml --stack-name mylab --parameter-overrides MyInstanceType=t3.xlarge KeyName=kp-gasida SgIngressSshCidr=$(curl -s ipinfo.io/ip)/32 --region ap-northeast-2

# CloudFormation 스택 배포 완료 후 작업용 EC2 IP 출력
aws cloudformation describe-stacks --stack-name mylab --query 'Stacks[*].Outputs[0].OutputValue' --output text --region ap-northeast-2

# [모니터링] CloudFormation 스택 상태 : 생성 완료 확인
while true; do
  date
  AWS_PAGER="" aws cloudformation list-stacks \
    --stack-status-filter CREATE_IN_PROGRESS CREATE_COMPLETE CREATE_FAILED DELETE_IN_PROGRESS DELETE_FAILED \
    --query "StackSummaries[*].{StackName:StackName, StackStatus:StackStatus}" \
    --output table
  sleep 1
done

# 배포된 aws ec2 유동 공인 IP 확인
aws ec2 describe-instances --query "Reservations[*].Instances[*].{PublicIPAdd:PublicIpAddress,InstanceName:Tags[?Key=='Name']|[0].Value,Status:State.Name}" --filters Name=instance-state-name,Values=running --output text
k3s-s	3.38.151.222	running
k3s-w1	15.165.75.117	running
k3s-w2	3.39.223.99	running
testpc	54.180.243.135	running

# EC2 SSH 접속 : 바로 접속하지 말고, 3~5분 정도 후에 접속 할 것
ssh -i ~/.ssh/kp-gasida.pem ubuntu@$(aws cloudformation describe-stacks --stack-name mylab --query 'Stacks[*].Outputs[0].OutputValue' --output text --region ap-northeast-2)
...
(⎈|default:N/A) root@k3s-s:~# <- kubeps 가 나오지 않을 경우 ssh logout 후 다시 ssh 접속 할 것!
👉 Step 01. Istio 소개
서비스 메시(Service Mesh)란?
등장 배경
마이크로서비스 아키텍처 환경의 시스템 전체 모니터링의 어려움, 운영 시 시스템 장애나 문제 발생할 때 원인과 병목 구간 찾기 어려움
내부망 진입점에 역할을 하는 GW(예. API Gateway) 경우 모든 동작 처리에 무거워지거나, 내부망 내부 통신 제어는 어려움
개념
마이크로서비스 간에 매시 형태의 통신이나 그 경로를 제어 - 예) 이스티오(Istio), 링커드(Linkerd) - 링크
기본 동작
파드 간 통신 경로에 프록시를 놓고 트래픽 모니터링이나 트래픽 컨트롤 → 기존 애플리케이션 코드에 수정 없이 구성 가능!
- 기존 통신 환경
- 애플리케이션 수정 없이, 모든 애플리케이션 통신 사이에 Proxy 를 두고 통신
파드 내에 사이드카 컨테이너로 주입되어서 동작
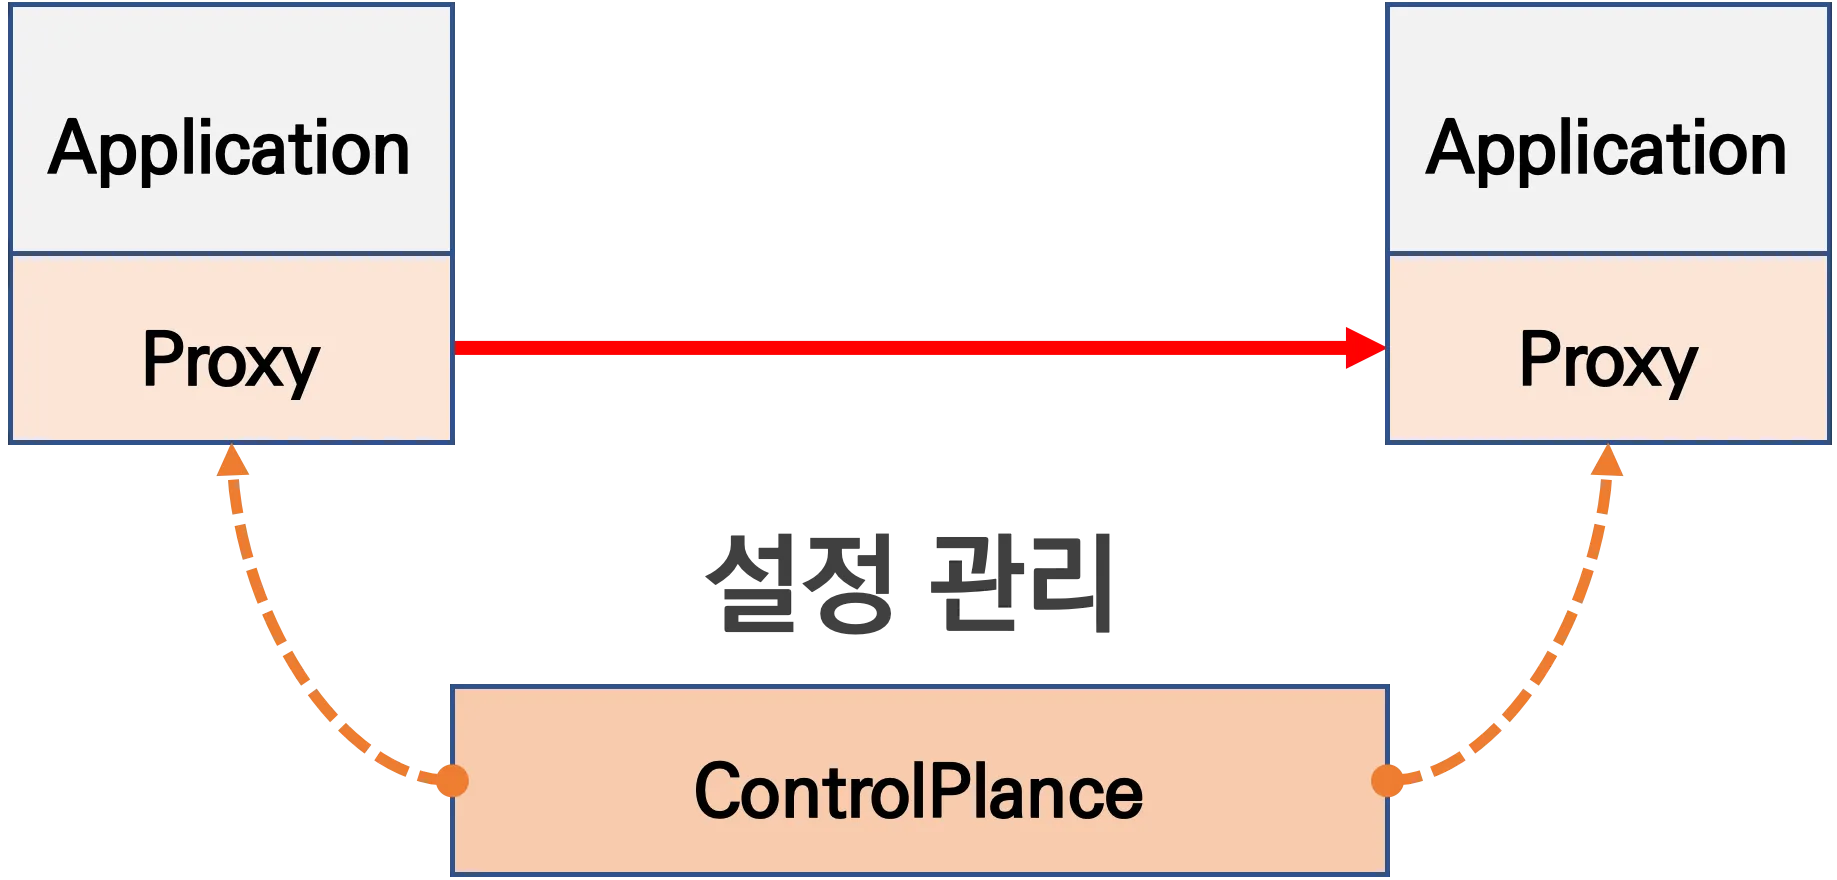
- Proxy 는 결국 DataPlane 이니, 이를 중앙에서 관리하는 ControlPlane을 두고 중앙에서 관리
- Proxy 는 중앙에서 설정 관리가 잘되는 툴을 선택. 즉, 원격에서 동적인 설정 관리가 유연해야함 → 풍부한 API 지원이 필요 ⇒ Envoy
- '구글 IBM 리프트(Lyft)'가 중심이 되어 개발하고 있는 오픈 소스 소프트웨어이며, C++ 로 구현된 고성능 Proxy 인 엔보이(Envoy)
- 네트워크의 투명성을 목표, 다양한 필터체인 지원(L3/L4, HTTP L7), 동적 configuration API 제공, api 기반 hot reload 제공

트래픽 모니터링
요청의 '에러율, 레이턴시, 커넥션 개수, 요청 개수' 등 메트릭 모니터링, 특정 서비스간 혹은 특정 요청 경로로 필터링 → 원인 파악 용이!
트래픽 컨트롤
트래픽 시프팅(Traffic shifting), 서킷 브레이커(Circuit Breaker), 폴트 인젝션(Fault Injection), 속도 제한(Rate Limit)
트래픽 시프팅(Traffic shifting): 예시) 99% 기존앱 + 1% 신규앱 , 특정 단말/사용자는 신규앱에 전달하여 단계적으로 적용하는 카니리 배포 가능
서킷 브레이커(Circuit Breaker): 목적지 마이크로서비스에 문제가 있을 시 접속을 차단하고 출발지 마이크로서비스에 요청 에러를 반환 (연쇄 장애, 시스템 전제 장애 예방)
폴트 인젝션(Fault Injection): 의도적으로 요청을 지연 혹은 실패를 구현
속도 제한(Rate Limit): 요청 개수를 제한
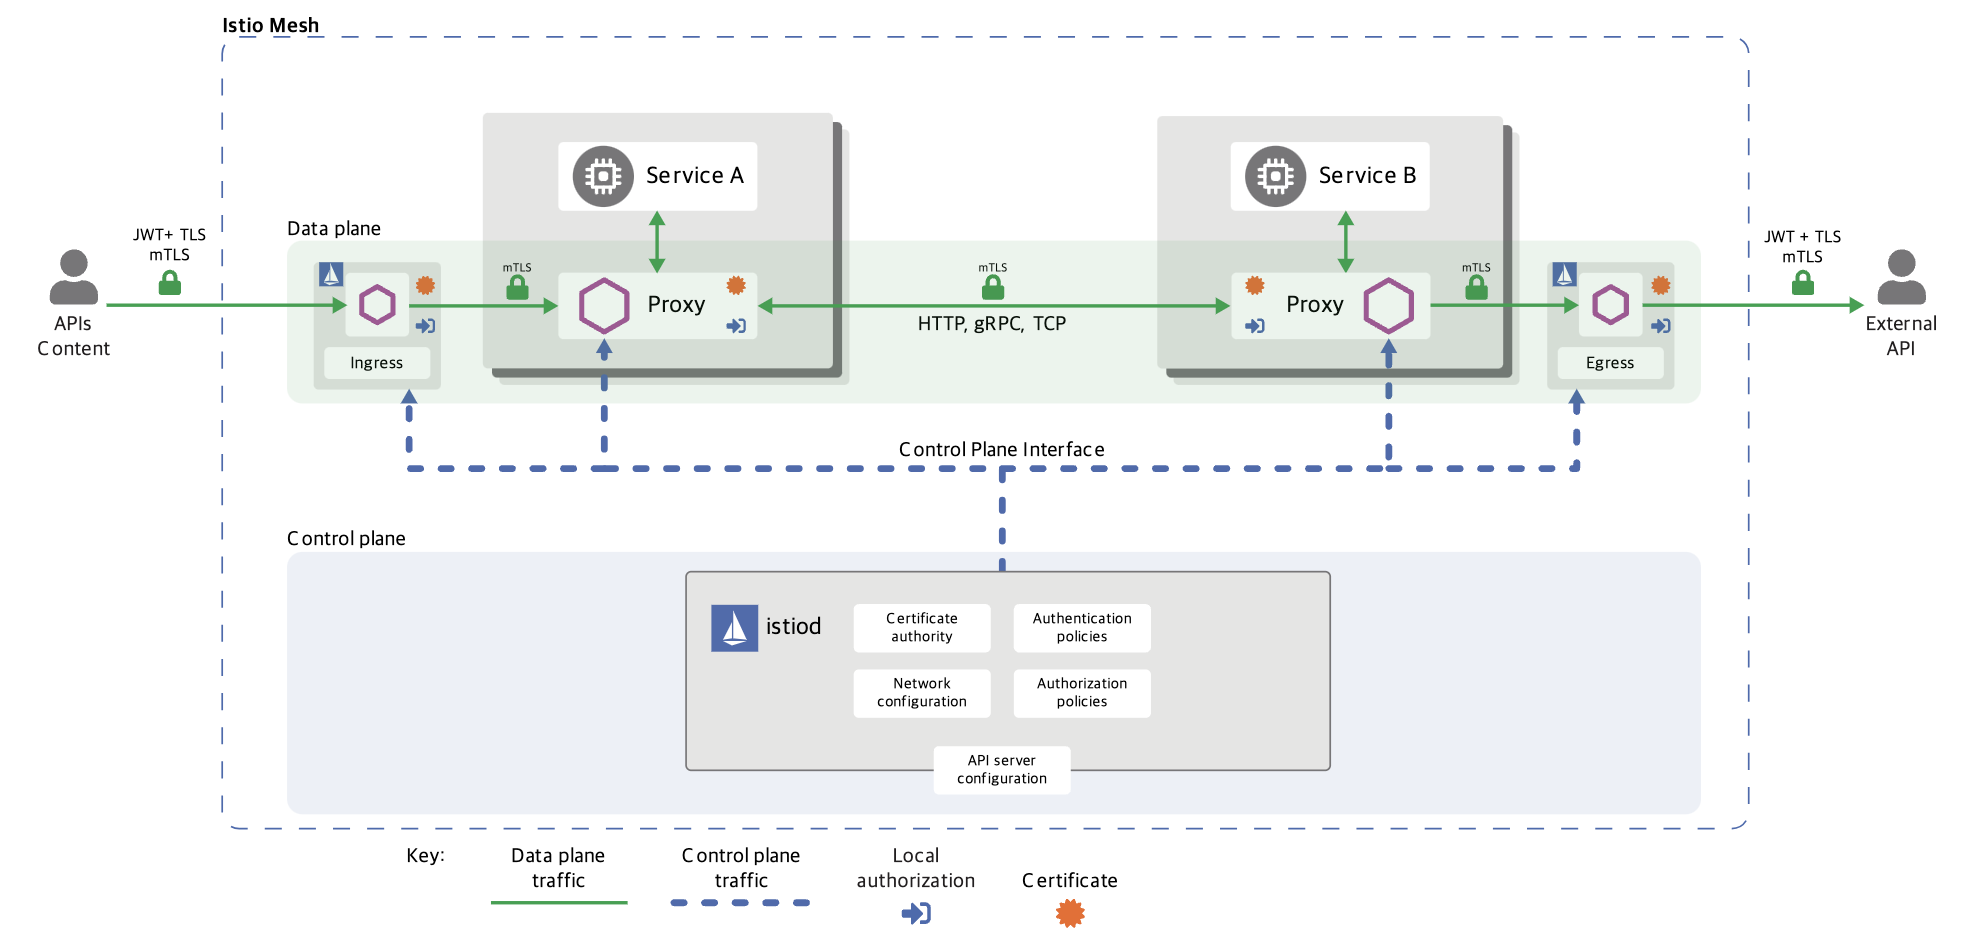
Istio 소개
출처 - https://istio.io/latest/docs/ops/deployment/architecture/
-
파일럿(Pilot): 모든 Envoy 사이드카에서 프록시 라우팅 규칙을 관리하며, 서비스 디스커버리와 로드 밸런싱 설정을 제공합니다.
-
갤리(Galley): Istio와 쿠버네티스(TLS 연결 및 파일럿에 필요한 설정)를 연결해 주는 역할을 합니다. 서비스 메시 구성 데이터를 검증하고 변환합니다.
-
시타델(Citadel): 보안 기능을 담당하며, TLS 인증서 발급 및 관리를 통해 서비스 간 통신의 암호화를 수행합니다.
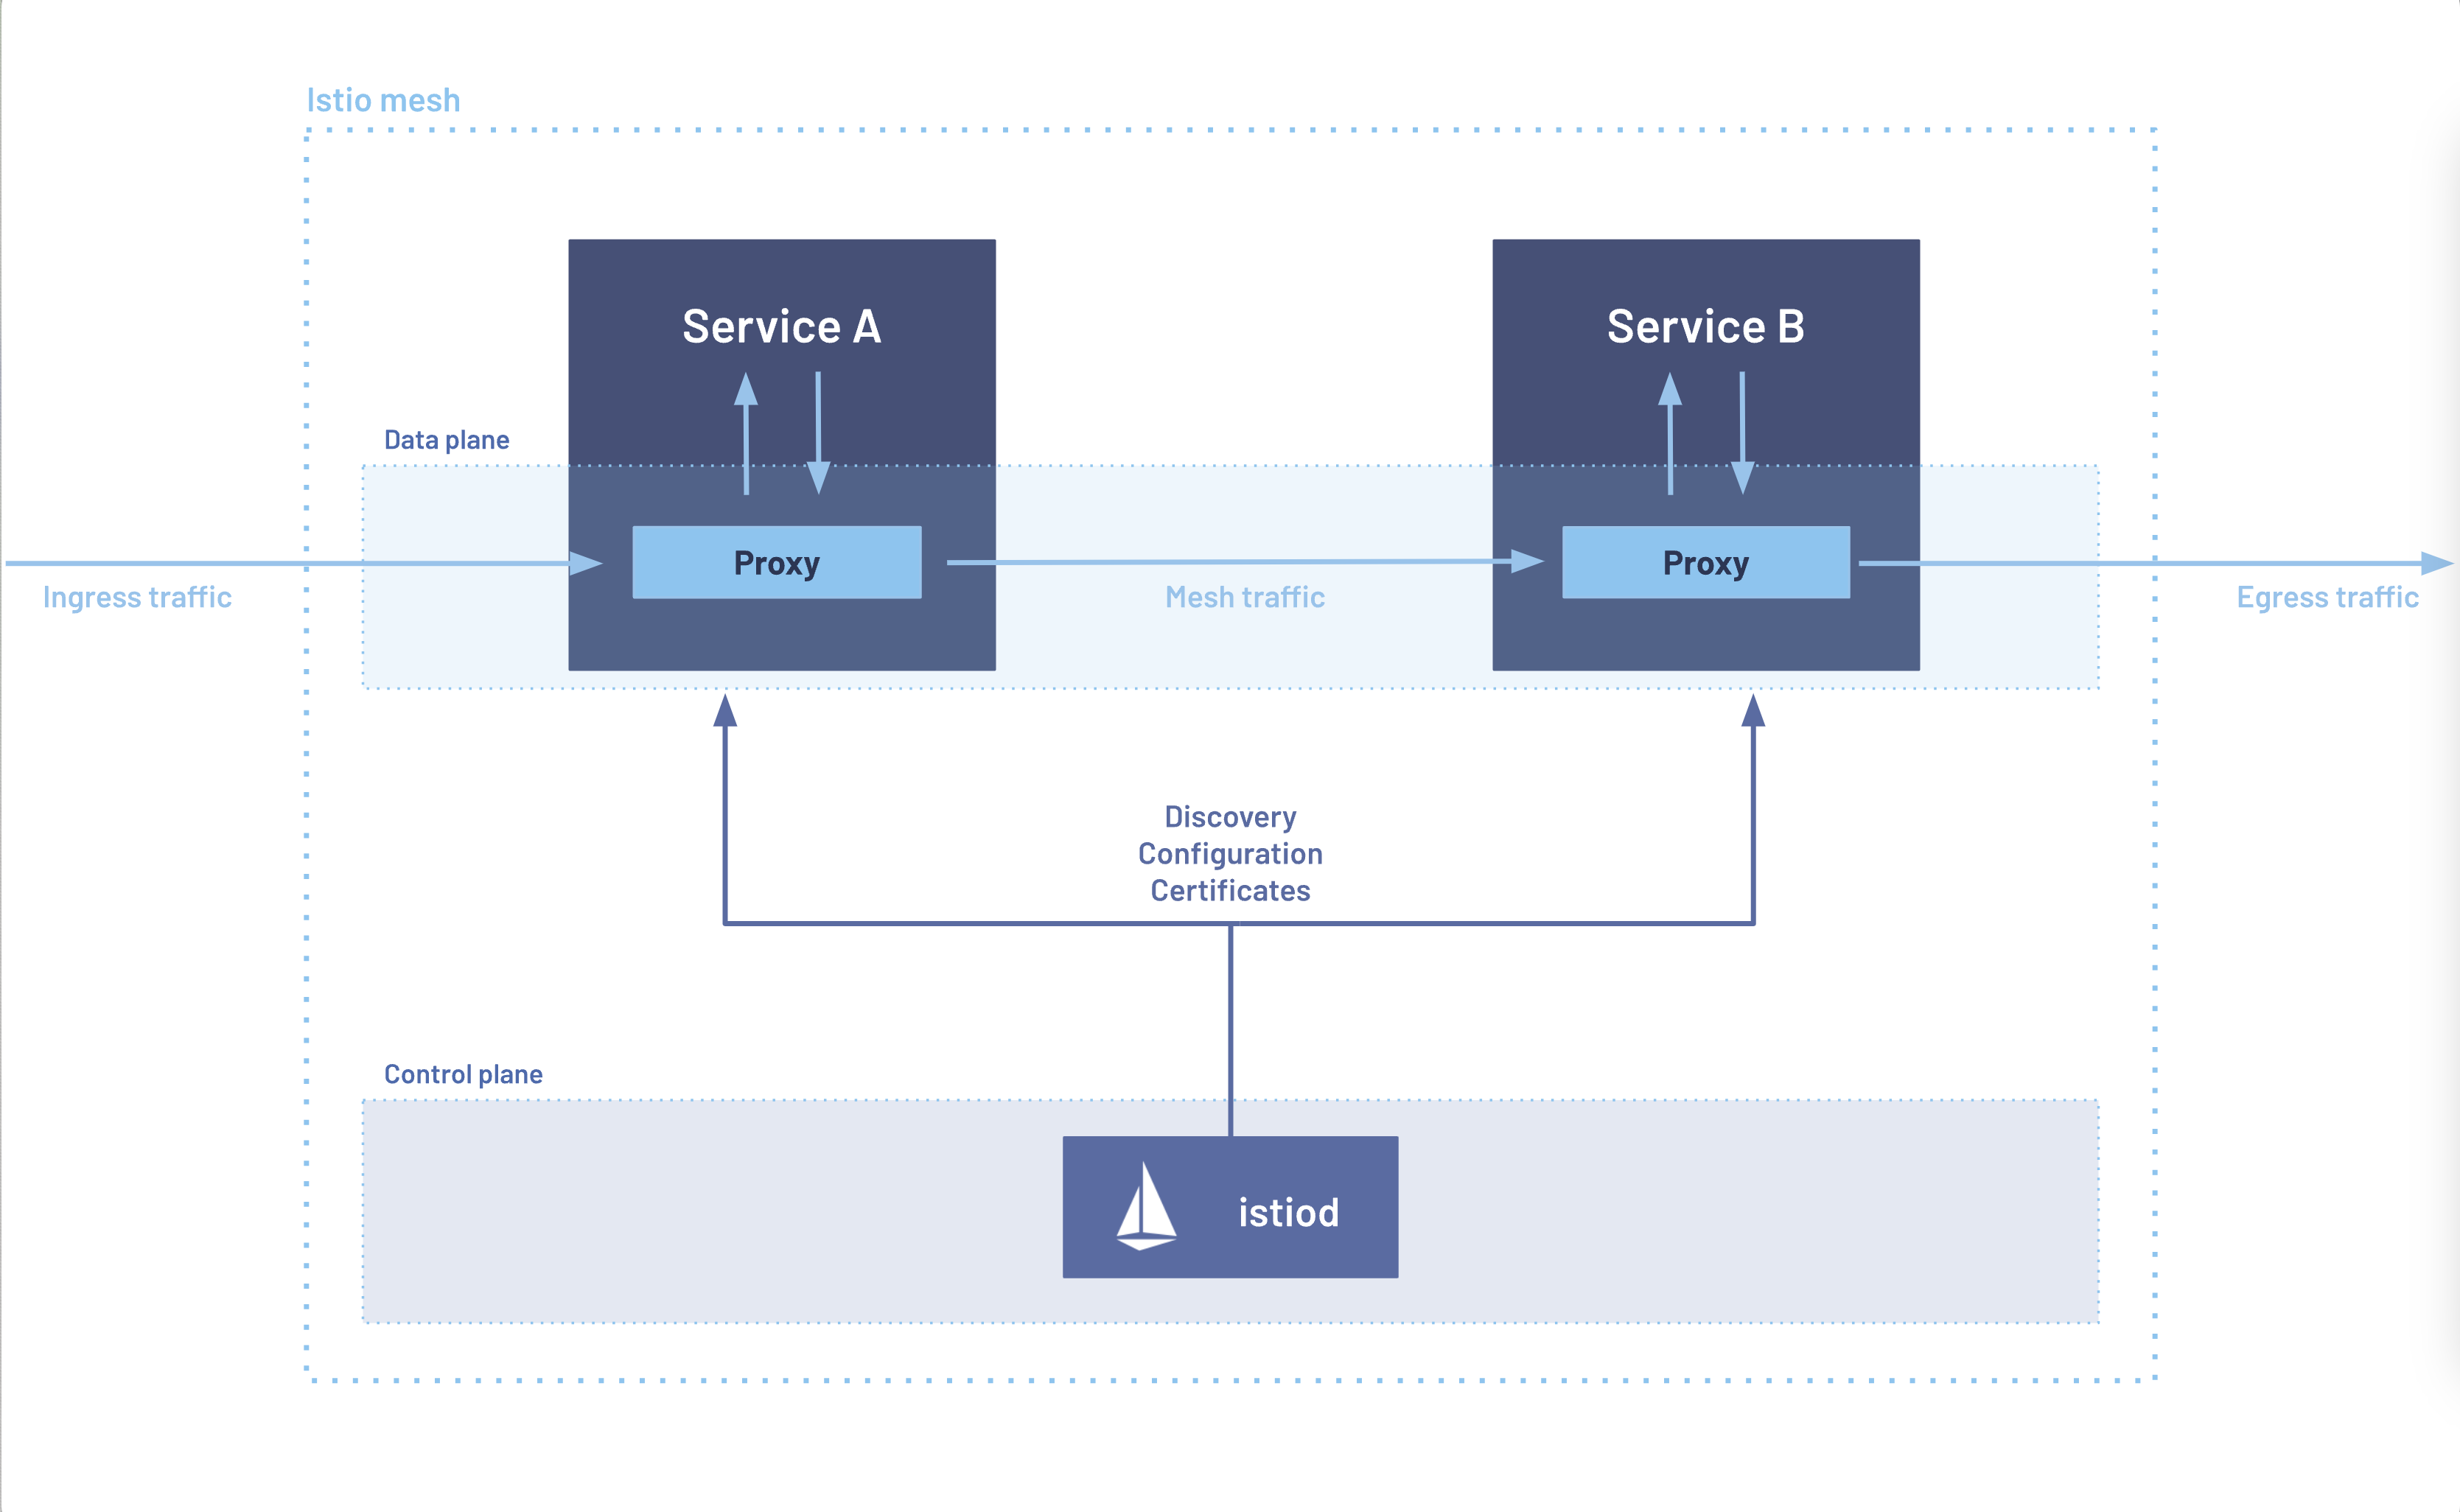
Istio 구성요소와 envoy : 컨트롤 플레인(istiod) , 데이터 플레인(istio-proxy > envoy)
- istiod : Pilot(데이터 플레인과 통신하면서 라우팅 규칙을 동기화, ADS), Gally(Istio 와 K8S 연동, Endpoint 갱신 등), Citadel(연결 암호화, 인증서 관리 등)
 출처 - https://istio.io/latest/docs/concepts/security/
Istio proxy : Golang 으로 작성되었고 envoy 래핑한 Proxy, istiod와 통신하고 서비스 트래픽을 통제, 옵저버빌리티를 위한 메트릭 제공
-
이스티오는 각 파드 안에 사이드카로 엔보이 프록시가 들어가 있는 형태
-
모든 마이크로서비스간 통신은 엔보이를 통과하여, 메트릭을 수집하거나 트래픽 컨트롤을 할 수 있음
-
트래픽 컨트롤을 하기위해 엔보이 프록시에 전송 룰을 설정 → 컨트롤 플레인의 이스티오가 정의된 정보를 기반으로 엔보이 설정을 하게 함
-
마이크로서비스 간의 통신을 mutual TLS 인증(mTLS)으로 서로 TLS 인증으로 암호화 할 수 있음
-
각 애플리케이션은 파드 내의 엔보이 프록시에 접속하기 위해 localhost 에 TCP 접속을 함
👉 Step 02. Envoy
소개 - L4/7 Proxy , Istio 의 Sidecar proxy 로 사용*
Istio 구성요소와 envoy : 컨트롤 플레인(istiod) - ADS 를 이용한 Configuration 동기화 - 데이터 플레인(istio-proxy → envoy)
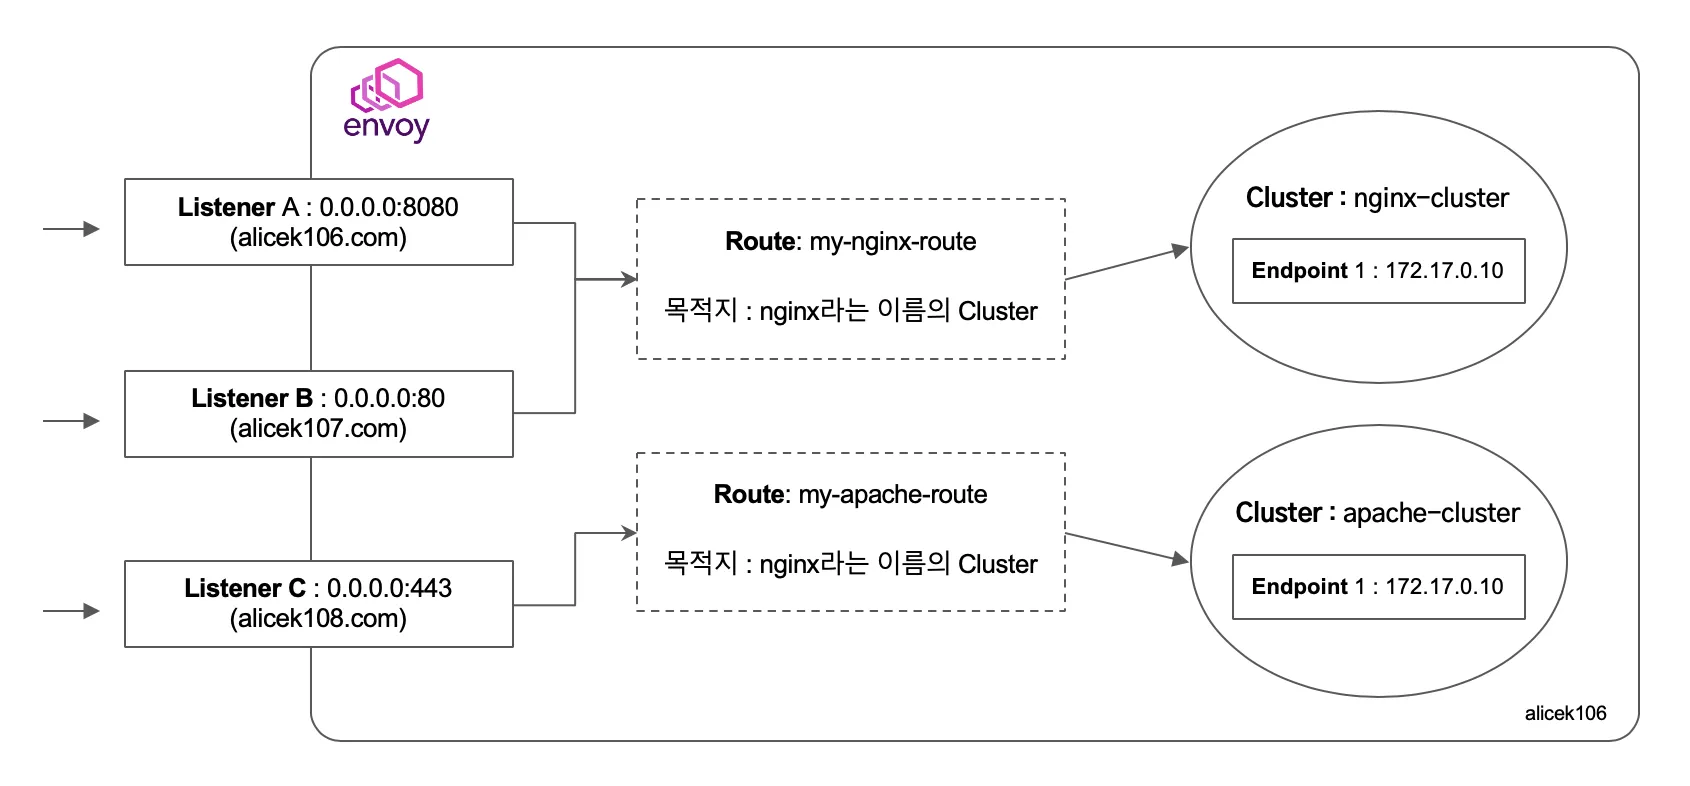 출처 - https://blog.naver.com/alice_k106/222000680202
 출처 - https://www.anyflow.net/sw-engineer/istio-internals-by-xds
-
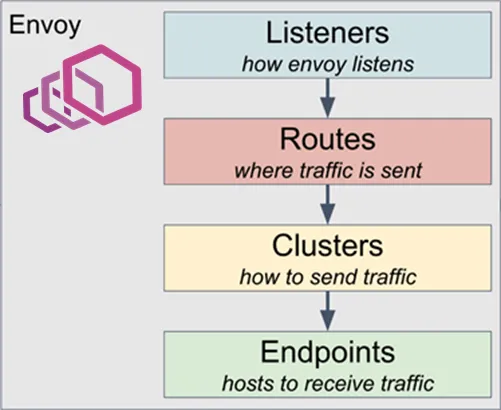
Cluster : envoy 가 트래픽을 포워드할 수 있는 논리적인 서비스 (엔드포인트 세트), 실제 요청이 처리되는 IP 또는 엔드포인트의 묶음을 의미.
-
Endpoint : IP 주소, 네트워크 노드로 클러스터로 그룹핑됨, 실제 접근이 가능한 엔드포인트를 의미. 엔드포인트가 모여서 하나의 Cluster 가 된다.
-
Listener : 무엇을 받을지 그리고 어떻게 처리할지 IP/Port 를 바인딩하고, 요청 처리 측면에서 다운스트림을 조정하는 역할.
-
Route : Listener 로 들어온 요청을 어디로 라우팅할 것인지를 정의. 라우팅 대상은 일반적으로 Cluster 라는 것에 대해 이뤄지게 된다.
-
Filter : Listener 로부터 서비스에 트래픽을 전달하기까지 요청 처리 파이프라인
-
UpStream : envoy 요청을 포워딩해서 연결하는 백엔드 네트워크 노드 - 사이드카일때 application app, 아닐때 원격 백엔드
-
DownStream : An entity connecting to envoy, In non-sidecar models this is a remote client
-
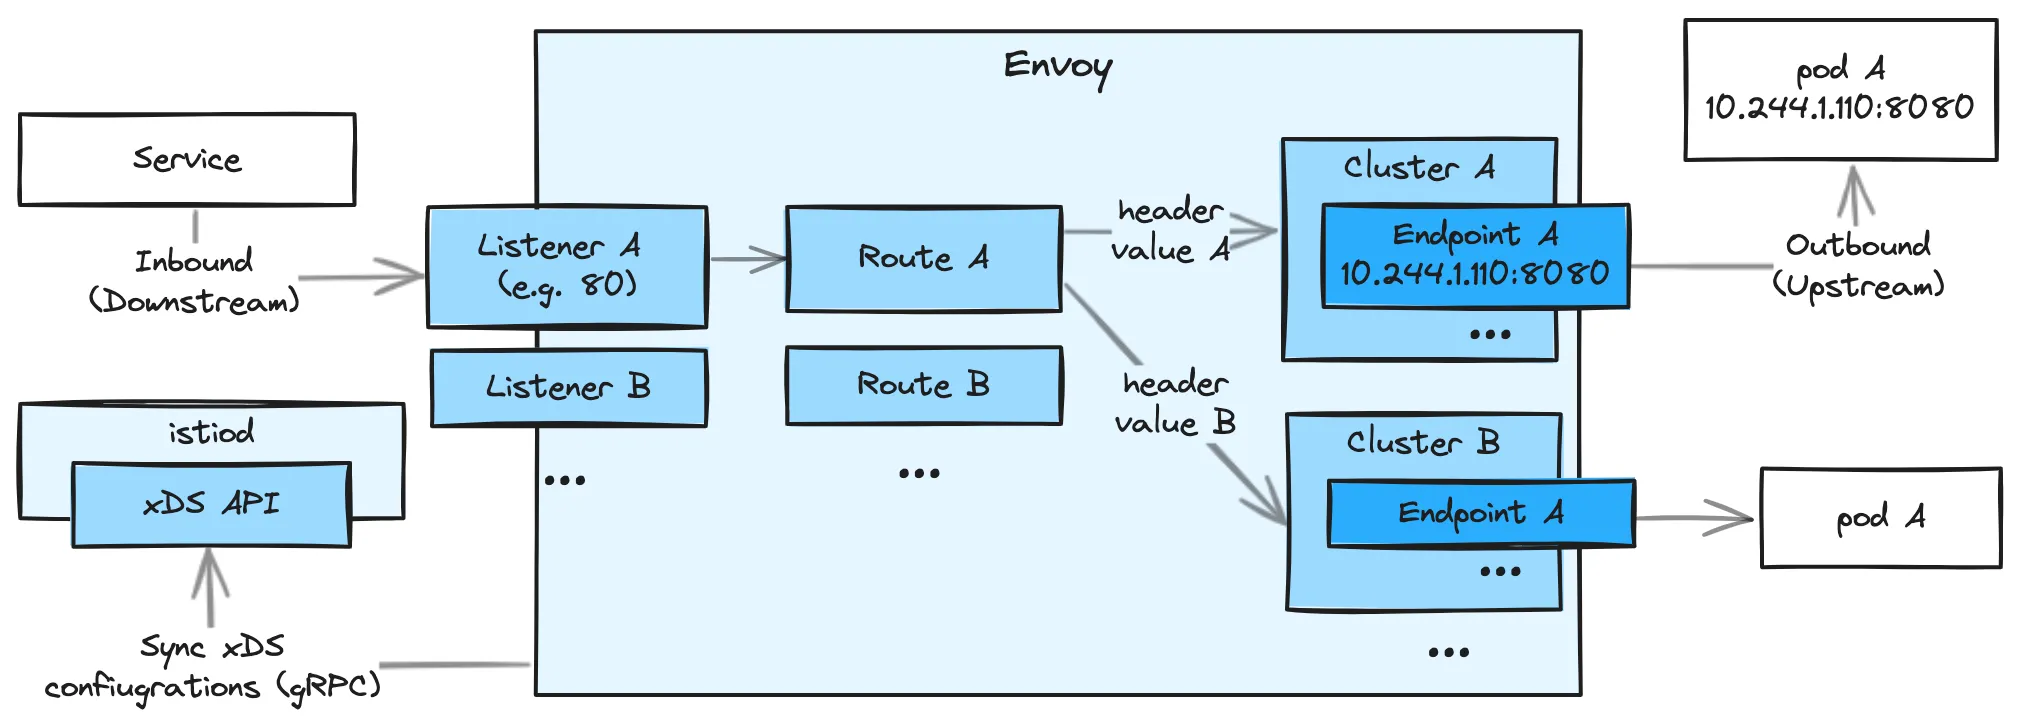
Service Mesh 솔루션이나, Gateway API 구현체들을 Enovy를 내부적으로 사용하고 있으며, Envoy가 제공하는 동적 구성을 위한
API (xDS Sync API)를 이용하여 다양한 네트워크 정책을 구성하게 됩니다. -
Envoy의
xDS Sync API는 아래와 같은 레이어에서 동작하게 됩니다.
- LDS - Listener Discovery Service
- RDS - Route Discovery Service
- CDS - Cluseter Discovery Service
- EDS - Endpoint Discovery Service
 출처 - https://blog.naver.com/yu3papa/223614975957
Envoy proxy 실습
Link - https://www.envoyproxy.io/docs/envoy/latest/start/quick-start/
# (터미널1) 데모 config 적용하여 실행
curl -O https://www.envoyproxy.io/docs/envoy/latest/_downloads/92dcb9714fb6bc288d042029b34c0de4/envoy-demo.yaml
envoy -c envoy-demo.yaml


# (터미널2) 정보 확인
ss -tnlp
State    Recv-Q  Send-Q    Local Address:Port   Peer Address:Port    Process
LISTEN   0       4096      0.0.0.0:10000        0.0.0.0:*            users:(("envoy",pid=8007,fd=18),("envoy",pid=8007,fd=16))

# 접속 테스트
curl -s http://127.0.0.1:10000 | grep -o "<title>.*</title>"

# 외부 접속 정보 출력
echo -e "http://$(curl -s ipinfo.io/ip):10000"
http://54.180.243.135:10000

--------------------
# 자신의 PC 웹브라우저에서 외부 접속 정보 접속 확인!

# k3s-s 에서 접속 테스트
curl -s http://192.168.10.200:10000 | grep -o "<title>.*</title>"
--------------------

# 연결 정보 확인
ss -tnp

# (터미널1) envoy 실행 취소(CTRL+C) 후 (관리자페이지) 설정 덮어쓰기 - 링크
cat <<EOT> envoy-override.yaml
admin:
  address:
    socket_address:
      address: 0.0.0.0
      port_value: 9902
EOT
envoy -c envoy-demo.yaml --config-yaml "$(cat envoy-override.yaml)"

# envoy 관리페이지 외부 접속 정보 출력
echo -e "http://$(curl -s ipinfo.io/ip):9902"
http://54.180.243.135:9902

--------------------
# 자신의 PC 웹브라우저에서 관리 페이지 외부 접속 정보 접속 확인!
👉 Step 03. Istio 설치 (Sidecar mode)
Istio Docs 탐방 : 익숙해지셔야 합니다! - Docs
Istio Sidecar mode
Istio Sidecar mode 설치 v1.23.2 - 버전, 설치 , without GwApi - Docs
https://istio.io/latest/docs/setup/install/operator/🚧 The Istio operator is deprecated. Operator-based Installations of Istio will continue to run indefinitely, but cannot be upgraded past 1.23.x. Please see the announcement to learn how to upgrade to a supported installation method.
https://istio.io/latest/blog/2024/in-cluster-operator-deprecation-announcement/
출처 - https://istio.io/latest/docs/setup/additional-setup/config-profiles/
- 새로운 sail operator 설치 방법 소개 : https://istio.io/latest/blog/2024/introducing-sail-operator/
👉🏻
demo profile경우 상세 로그 출력이 기본값이므로, 다음번 스터디에서는 default profile 로 할 것. k3s 경우 제공되는 Service(LoadBalancer) 를 사용해도 될 듯… k8s 나 kind 로 실습 구성 시에는 ingress 를 사용 해볼 것..
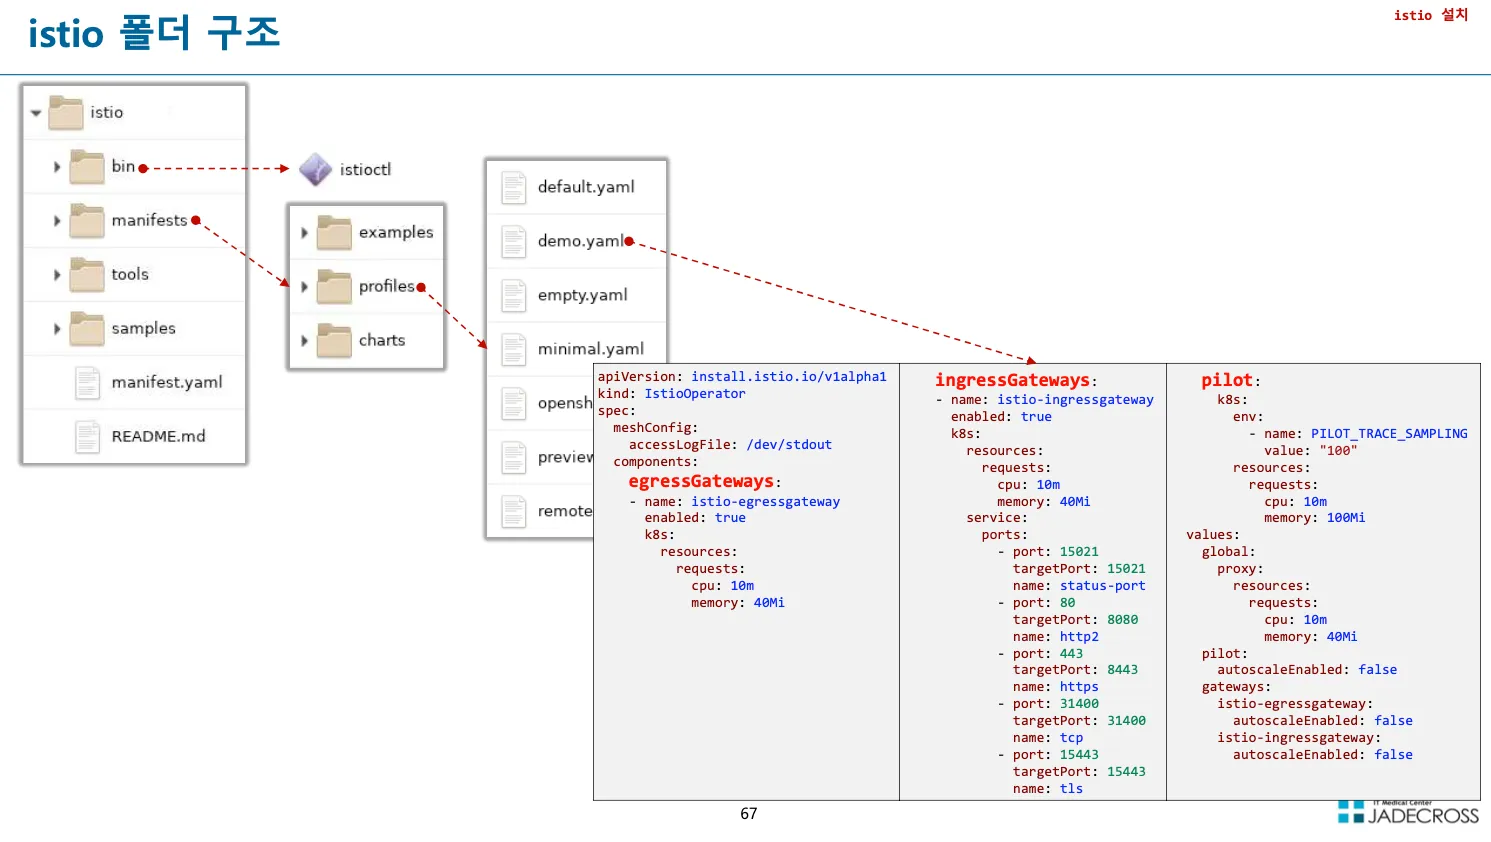
- istioctl 설치 시 폴더 구조 : 정환열님이 작성해서 공유해주신 Istio 사내 교육용 자료 내용이 좋아서 가져왔습니다.
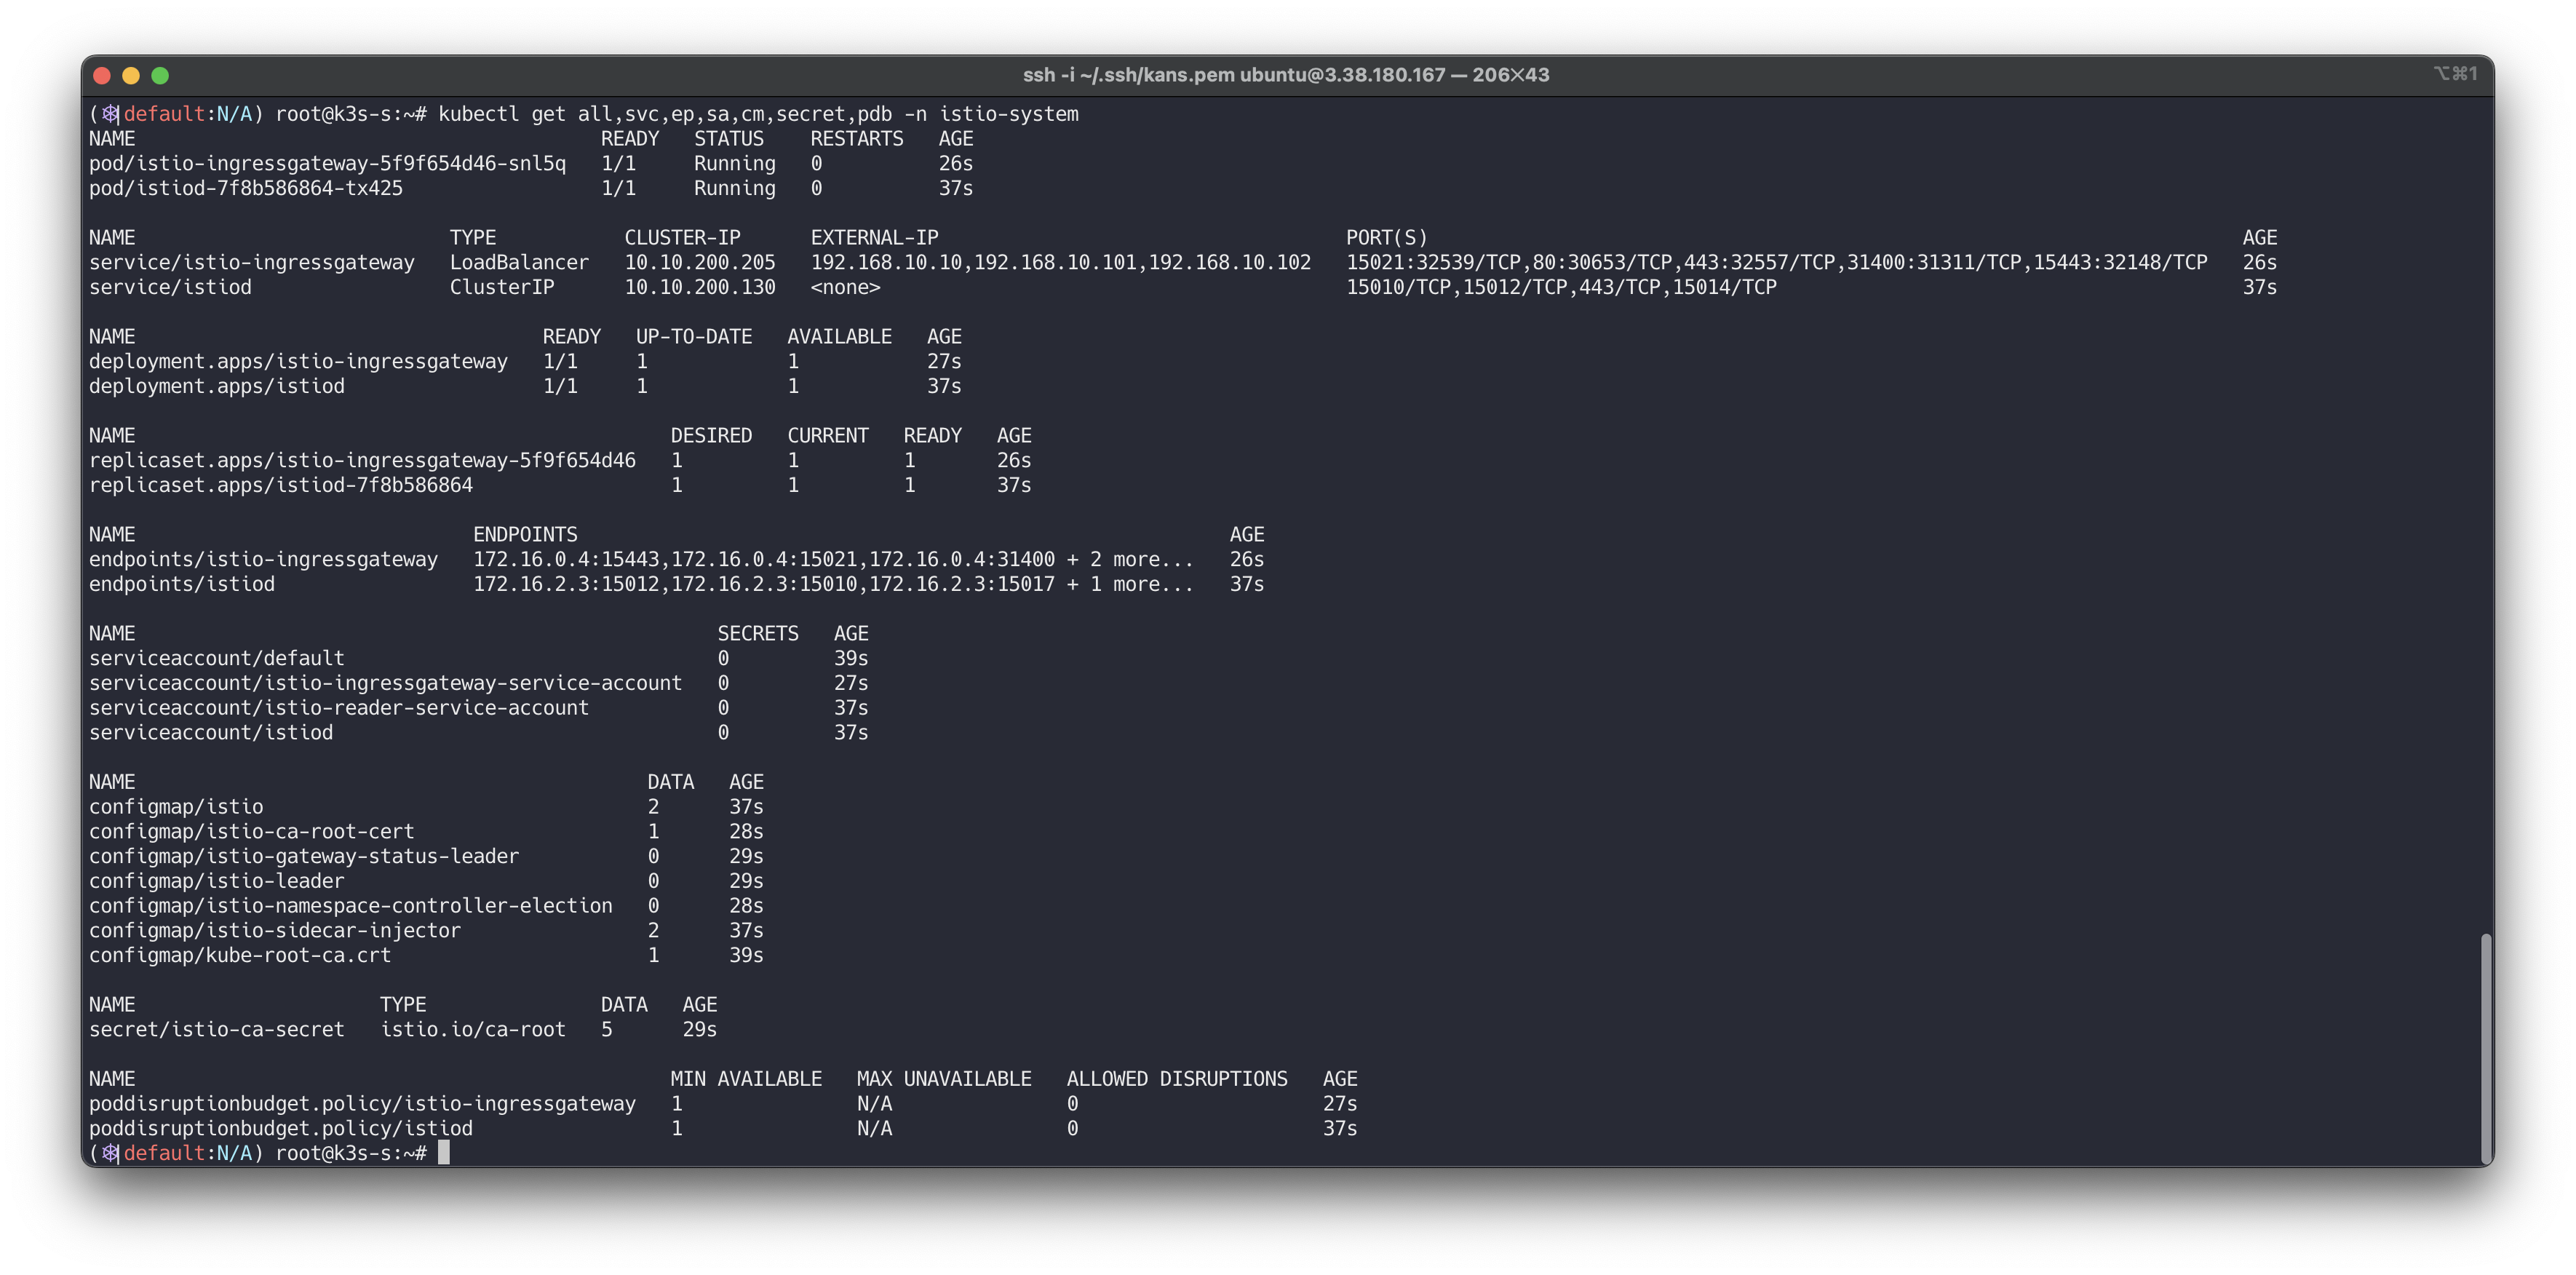
# istioctl 설치
export ISTIOV=1.23.2
echo "export ISTIOV=1.23.2" >> /etc/profile
curl -s -L https://istio.io/downloadIstio | ISTIO_VERSION=$ISTIOV TARGET_ARCH=x86_64 sh -
tree istio-$ISTIOV -L 2 # sample yaml 포함
cp istio-$ISTIOV/bin/istioctl /usr/local/bin/istioctl
istioctl version --remote=false

# (demo 프로파일) 컨트롤 플레인 배포 - 링크 Customizing
# The istioctl command supports the full IstioOperator API via command-line options for individual settings or for passing a yaml file containing an IstioOperator custom resource (CR).
istioctl profile list
istioctl profile dump default
istioctl profile dump --config-path components.ingressGateways
istioctl profile dump --config-path values.gateways.istio-ingressgateway
istioctl profile dump demo

istioctl profile dump demo > demo-profile.yaml
vi demo-profile.yaml # 복잡성을 줄이게 실습 시나리오 환경 맞춤
--------------------
    egressGateways:
    - enabled: false
--------------------

istioctl install -f demo-profile.yaml -y
✔ Istio core installed ⛵️
✔ Istiod installed 🧠
✔ Ingress gateways installed 🛬
✔ Installation complete

# 설치 확인 : istiod, istio-ingressgateway
kubectl get all,svc,ep,sa,cm,secret,pdb -n istio-system
kubectl get crd | grep istio.io | sort
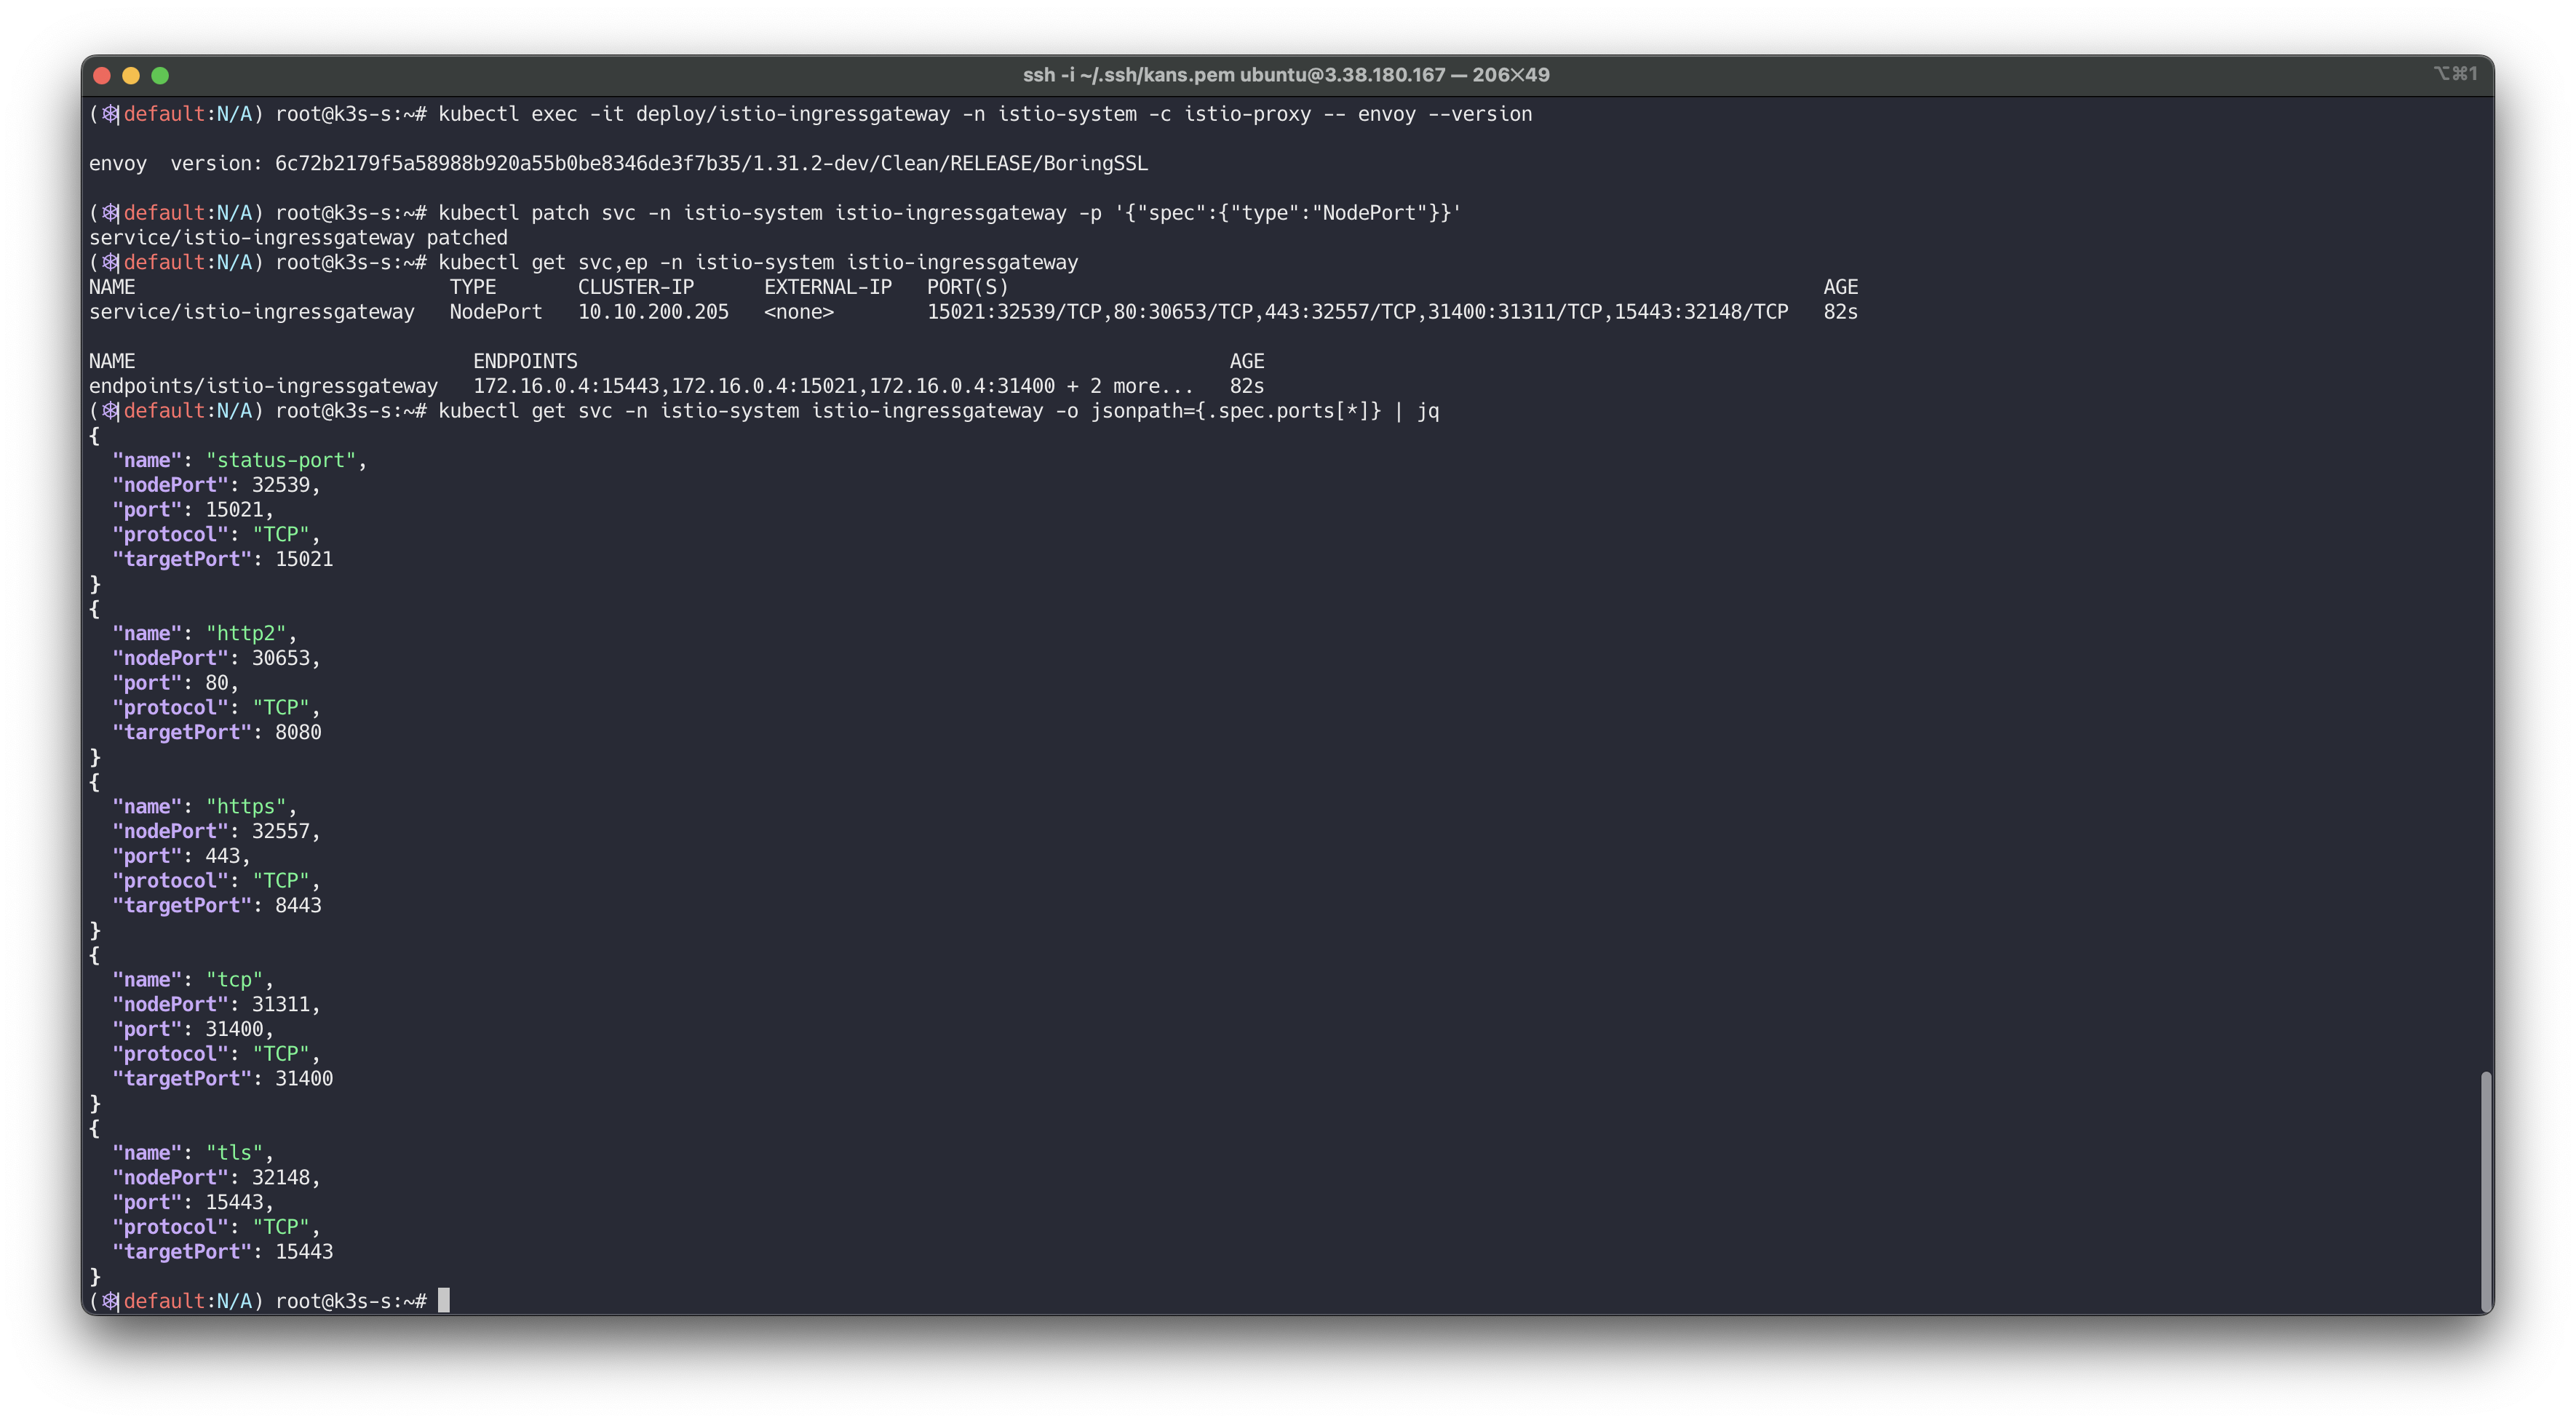
# istio-ingressgateway 의 envoy 버전 확인
kubectl exec -it deploy/istio-ingressgateway -n istio-system -c istio-proxy -- envoy --version
envoy  version: 6c72b2179f5a58988b920a55b0be8346de3f7b35/1.31.2-dev/Clean/RELEASE/BoringSSL

# istio-ingressgateway 서비스 NodePort로 변경
kubectl patch svc -n istio-system istio-ingressgateway -p '{"spec":{"type":"NodePort"}}'

# istio-ingressgateway 서비스 확인
kubectl get svc,ep -n istio-system istio-ingressgateway

## istio-ingressgateway 서비스 포트 정보 확인
kubectl get svc -n istio-system istio-ingressgateway -o jsonpath={.spec.ports[*]} | jq
## istio-ingressgateway 디플로이먼트 파드의 포트 정보 확인
kubectl get deploy/istio-ingressgateway -n istio-system -o jsonpath={.spec.template.spec.containers[0].ports[*]} | jq
kubectl get deploy/istio-ingressgateway -n istio-system -o jsonpath={.spec.template.spec.containers[0].readinessProbe} | jq

# istiod(컨트롤플레인) 디플로이먼트 정보 확인
kubectl exec -it deployment.apps/istiod -n istio-system -- ss -tnlp
kubectl exec -it deployment.apps/istiod -n istio-system -- ss -tnp
kubectl exec -it deployment.apps/istiod -n istio-system -- ps -ef
UID          PID    PPID  C STIME TTY          TIME CMD
istio-p+       1       0  0 05:27 ?        00:00:07 /usr/local/bin/pilot-discovery discovery --monitoringAddr=:15014 --log_output_l

# istio-ingressgateway 디플로이먼트 정보 확인
kubectl exec -it deployment.apps/istio-ingressgateway -n istio-system -- ss -tnlp
kubectl exec -it deployment.apps/istio-ingressgateway -n istio-system -- ss -tnp
kubectl exec -it deployment.apps/istio-ingressgateway -n istio-system -- ps -ef
istio-p+       1       0  0 05:27 ?        00:00:01 /usr/local/bin/pilot-agent proxy router --domain istio-system.svc.cluster.local
istio-p+      15       1  0 05:27 ?        00:00:11 /usr/local/bin/envoy -c etc/istio/proxy/envoy-rev.json --drain-time-s 45 --drai

kubectl exec -it deployment.apps/istio-ingressgateway -n istio-system -- cat /etc/istio/proxy/envoy-rev.json
kubectl exec -it deployment.apps/istio-ingressgateway -n istio-system -- ss -xnlp
kubectl exec -it deployment.apps/istio-ingressgateway -n istio-system -- ss -xnp
❓ istio-ingressgateway 와 기존 Ingress(구현체) 혹은 GatewayAPI(구현체) 와 어떤 차이점이 있을까요?
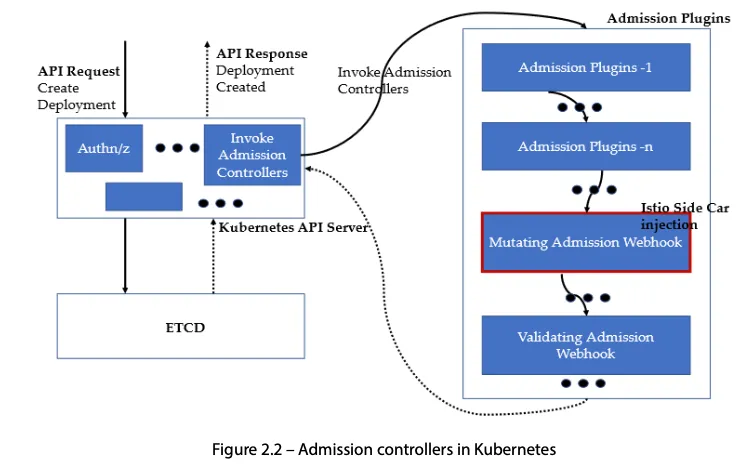
- Auto Injection with namespace label : 해당 네임스페이스에 생성되는 모든 파드들은 istio 사이드카가 자동으로 injection 됨
# mutating Webhook admisstion controller 사용
**kubectl label namespace default istio-injection=enabled**
kubectl get ns -L istio-injection
NAME              STATUS   AGE     ISTIO-INJECTION
default           Active   58m     enabled
...
Istio 접속 테스트를 위한 변수 지정*
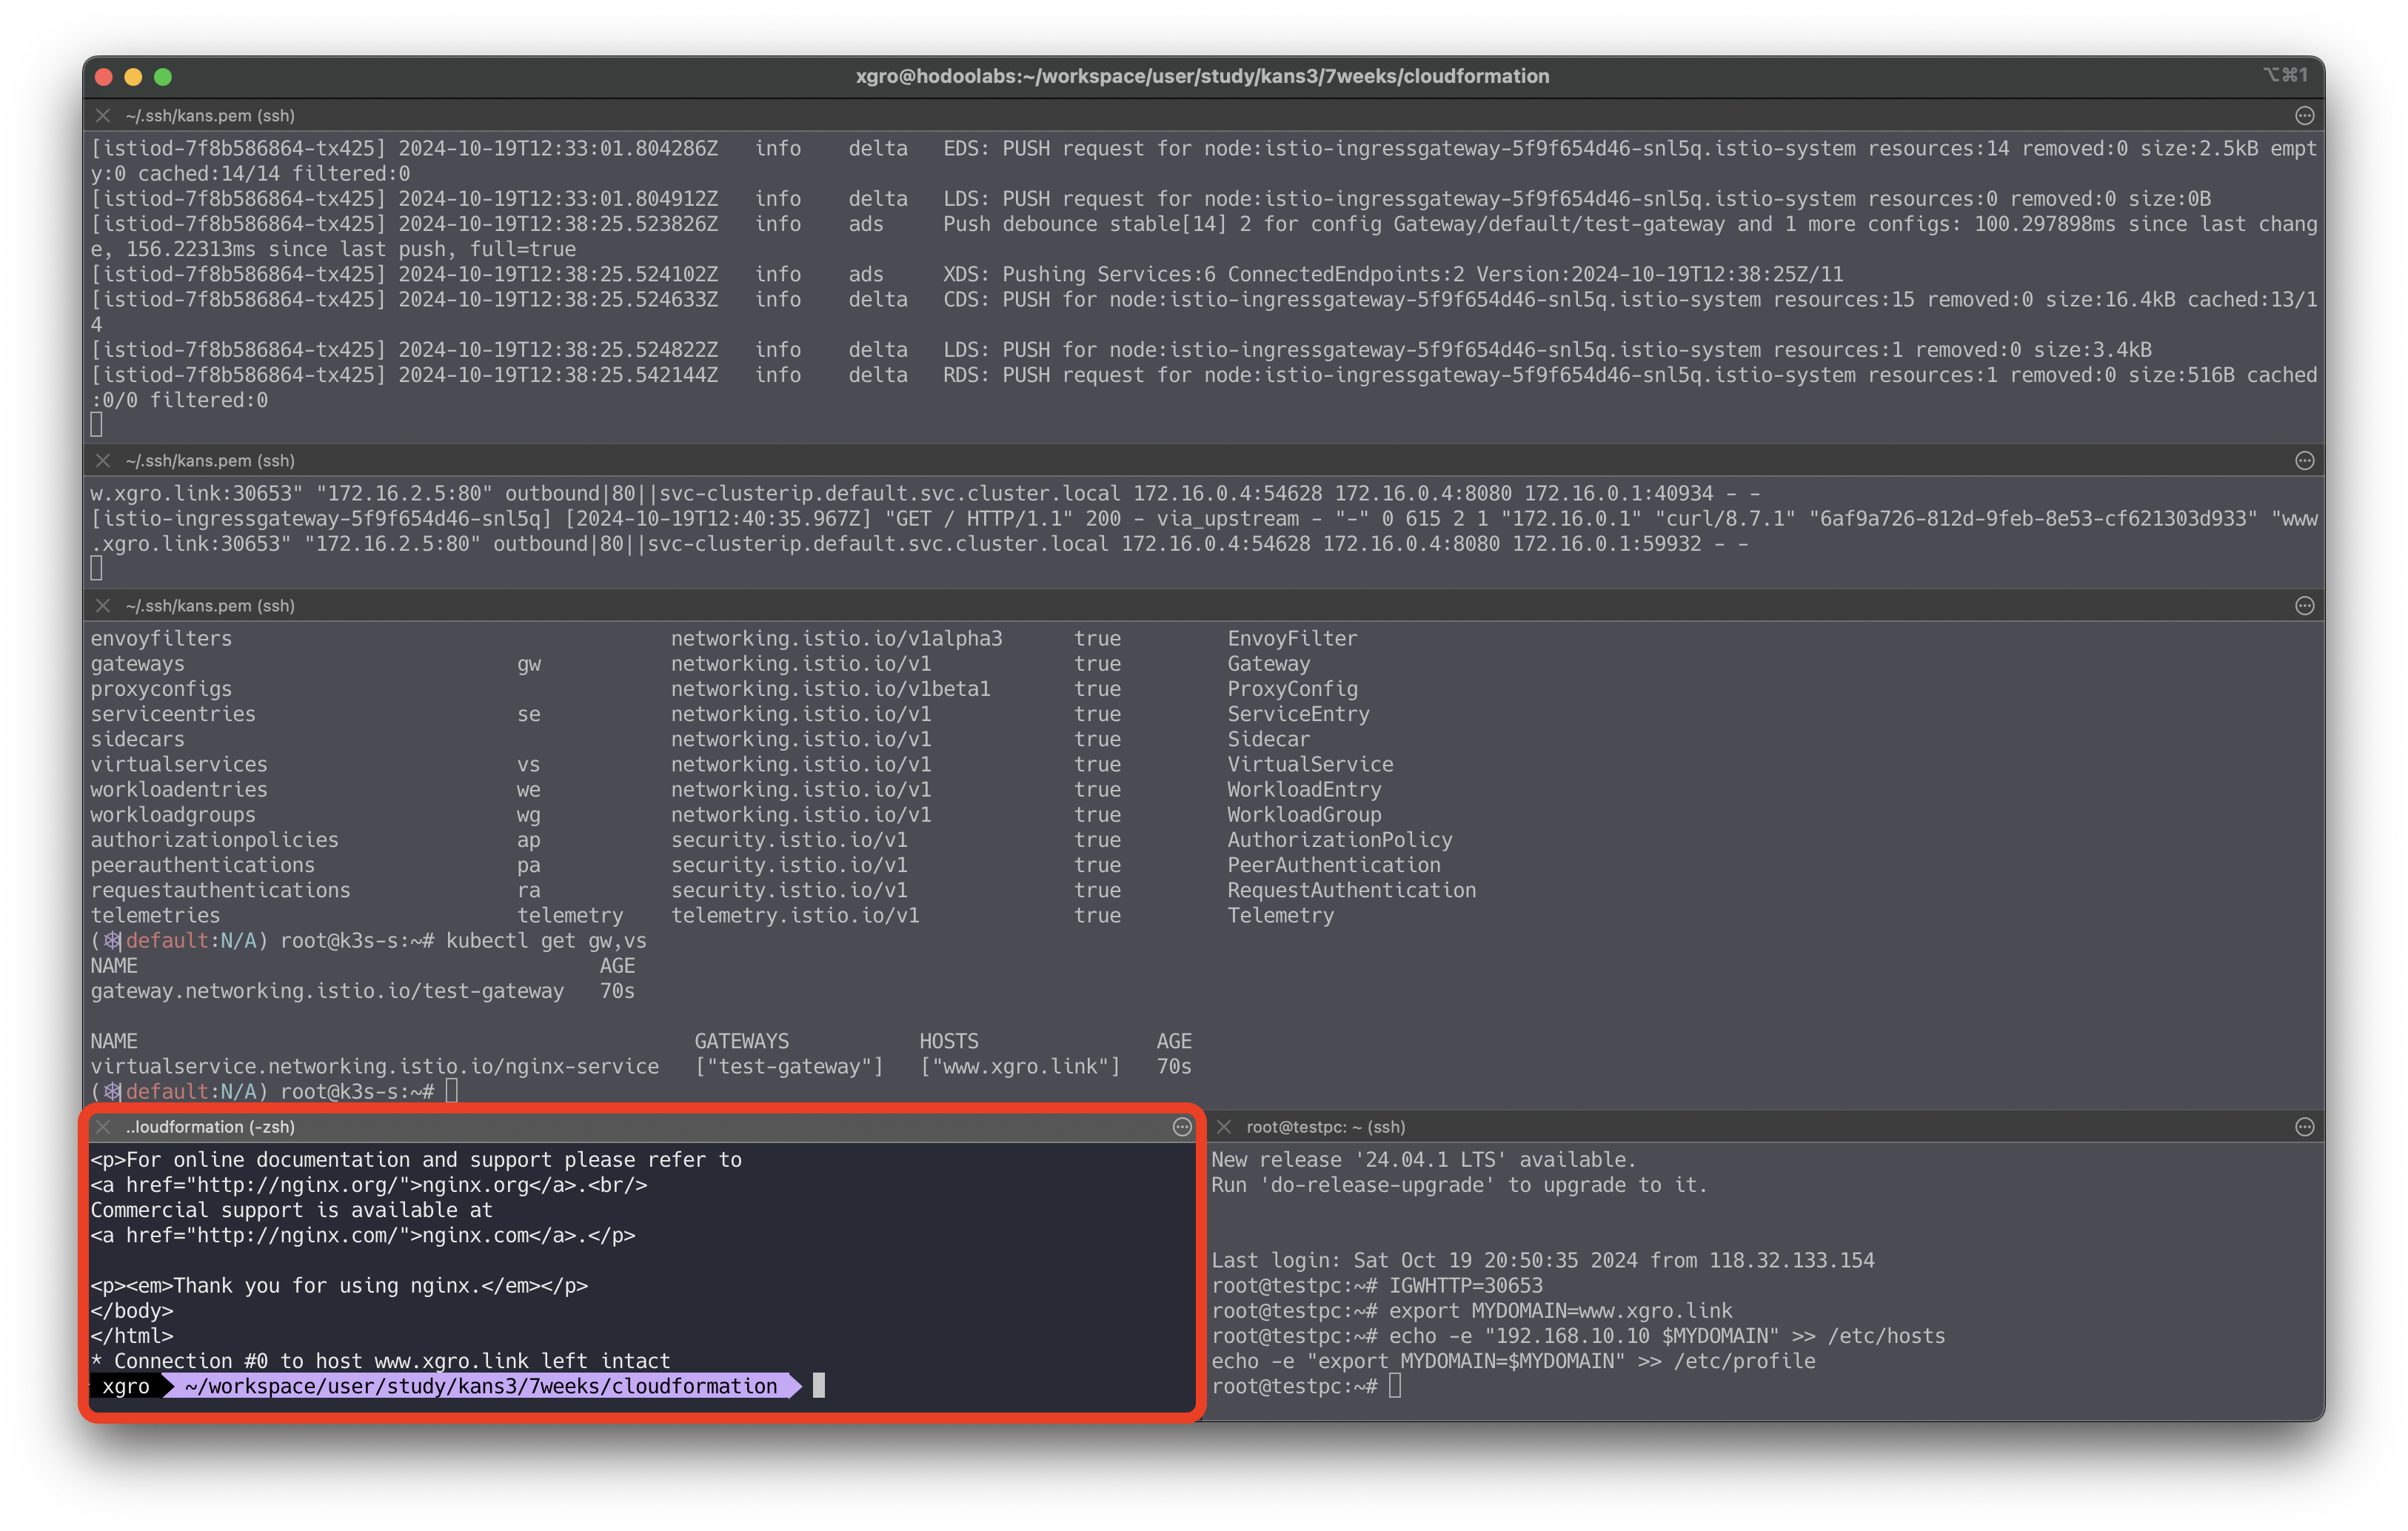
mypc)
## istio-ingressgateway 파드가 배치된 노드의 유동 공인 IP 확인
aws ec2 describe-instances --query "Reservations[*].Instances[*].{PublicIPAdd:PublicIpAddress,InstanceName:Tags[?Key=='Name']|[0].Value,Status:State.Name}" --filters Name=instance-state-name,Values=running --output text
k3s-s	3.38.151.222	running
k3s-w1	15.165.75.117	running
k3s-w2	3.39.223.99	running
testpc	54.180.243.135	running


k3s-s)
# istio ingress gw NodePort(HTTP 접속용) 변수 지정 : 아래 ports[0] 은 어떤 용도의 포트일까요?
export IGWHTTP=$(kubectl get service -n istio-system istio-ingressgateway -o jsonpath='{.spec.ports[1].nodePort}')
echo $IGWHTTP
IGWHTTP=<각자 자신의 NodePort>

# /etc/hosts 파일 수정
MYDOMAIN=<각자 자신의 www 도메인> # 단, 사용하고 있지 않는 공인 도메인을 사용 할 것
MYDOMAIN=www.xgro.link
echo "<istio-ingressgateway 파드가 있는 워커 노드> $MYDOMAIN" >> /etc/hosts

MYDOMAIN=<각자 자신의 www 도메인>
export MYDOMAIN=www.xgro.link
echo -e "192.168.10.10 $MYDOMAIN" >> /etc/hosts
echo -e "export MYDOMAIN=$MYDOMAIN" >> /etc/profile

# istio ingress gw 접속 테스트 : 아직은 설정이 없어서 접속 실패가 된다
curl -v -s $MYDOMAIN:$IGWHTTP
testpc
# 아래 변수는 각자 자신의 값을 직접 입력 할 것
IGWHTTP=<각자 출력된 NodePort>
IGWHTTP=30653
export MYDOMAIN=www.xgro.link
echo -e "192.168.10.10 $MYDOMAIN" >> /etc/hosts
echo -e "export MYDOMAIN=$MYDOMAIN" >> /etc/profile

# istio ingress gw 접속 테스트 : 아직은 설정이 없어서 접속 실패가 된다
curl -v -s $MYDOMAIN:$IGWHTTP
자신의 PC
# 아래 변수는 각자 자신의 값을 직접 입력 할 것 : ISTIONODEIP는 3개의 노드 중 아무거나 입력
IGWHTTP=<각자 출력된 NodePort>
IGWHTTP=30653
ISTIONODEIP=<k3s-s 의 유동 공인 IP>
ISTIONODEIP=3.38.180.167

MYDOMAIN=www.xgro.link
echo "$ISTIONODEIP $MYDOMAIN" | sudo tee -a /etc/hosts

# istio ingress gw 접속 테스트 : 아직은 설정이 없어서 접속 실패가 된다
curl -v -s $MYDOMAIN:$IGWHTTP
👉 Step 04. Istio 통한 외부 노출
실습 준비
Nginx 디플로이먼트와 서비스 배포
(터미널 1)
# 로그 모니터링
kubectl get pod -n istio-system -l app=istiod
kubetail -n istio-system -l app=istiod -f

(터미널 2)
kubectl get pod -n istio-system -l app=istio-ingressgateway
kubetail -n istio-system -l app=istio-ingressgateway -f
cat <<EOF | kubectl create -f - apiVersion: v1 kind: ServiceAccount metadata: name: kans-nginx --- apiVersion: apps/v1 kind: Deployment metadata: name: deploy-websrv spec: replicas: 1 selector: matchLabels: app: deploy-websrv template: metadata: labels: app: deploy-websrv spec: serviceAccountName: kans-nginx terminationGracePeriodSeconds: 0 containers: - name: deploy-websrv image: nginx:alpine ports: - containerPort: 80 --- apiVersion: v1 kind: Service metadata: name: svc-clusterip spec: ports: - name: svc-webport port: 80 targetPort: 80 selector: app: deploy-websrv type: ClusterIP EOF# 사이드카 컨테이너 배포 확인 kubectl get pod,svc,ep,sa -o wide NAME READY STATUS RESTARTS AGE IP NODE NOMINATED NODE READINESS GATES deploy-websrv-7d7cf8586c-rhhv8 2/2 Running 0 29s 172.16.2.6 k3s-w2 <none> <none> ... kc describe pod
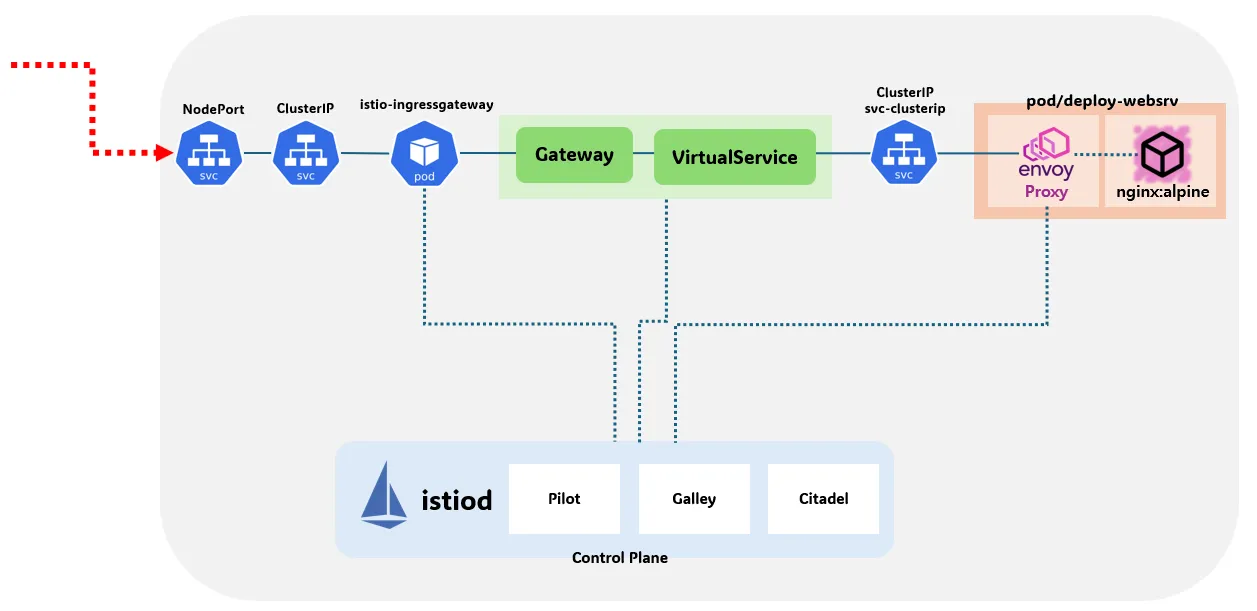
Istio Gateway/VirtualService 설정 - Host 기반 트래픽 라우팅 설정 - Gateway
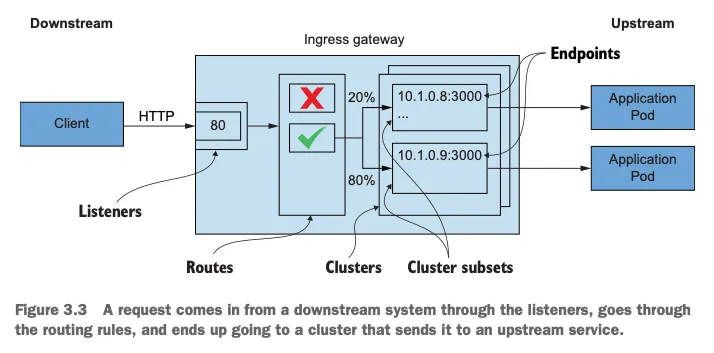
- 클라이언트 PC → (Service:NodePort) Istio ingressgateway 파드 → (Gateway, VirtualService, Service 는 Bypass) → Endpoint(파드 : 사이드카 - Application 컨테이너)
- Gateway : 지정한 인그레스 게이트웨이로부터 트래픽이 인입, 프로토콜 및 포트, HOSTS, Proxy 등 설정 가능
출처 - https://istio.io/latest/docs/setup/additional-setup/gateway/
VirtualService: 인입 처리할 hosts 설정, L7 PATH 별 라우팅, 목적지에 대한 정책 설정 가능 (envoy route config)
cat <<EOF | kubectl create -f -
apiVersion: networking.istio.io/v1
kind: Gateway
metadata:
  name: test-gateway
spec:
  selector:
    istio: ingressgateway
  servers:
  - port:
      number: 80
      name: http
      protocol: HTTP
    hosts:
    - "*"
---
apiVersion: networking.istio.io/v1
kind: VirtualService
metadata:
  name: nginx-service
spec:
  hosts:
  - "$MYDOMAIN"
  gateways:
  - test-gateway
  http:
  - route:
    - destination:
        host: svc-clusterip
        port:
          number: 80
EOF
# Istio Gateway(=gw)/VirtualService(=vs) 설정 정보를 확인 kc explain gateways.networking.istio.io kc explain virtualservices.networking.istio.io kubectl api-resources | grep istio # virtual service 는 다른 네임스페이스의 서비스(ex. svc-nn.<ns>)도 참조할 수 있다 kubectl get gw,vs NAME AGE gateway.networking.istio.io/test-gateway 21s NAME GATEWAYS HOSTS AGE virtualservice.networking.istio.io/nginx-service ["test-gateway"] ["www.gasida.dev"] 4m9s # Retrieves last sent and last acknowledged xDS sync from Istiod to each Envoy in the mesh # istioctl proxy-status command was improved to include the time since last change, and more relevant status values. istioctl proxy-status # 단축어 ps istioctl ps
Istio 를 통한 Nginx 파드 접속 테스트
Istio 를 통한 Nginx 파드 접속 테스트
 출처 - https://kschoi728.tistory.com/270
외부(자신의PC, testpc)에서 접속 테스트
# istio ingress gw 를 통한 접속 테스트
curl -s $MYDOMAIN:$IGWHTTP | grep -o "<title>.*</title>"
curl -v -s $MYDOMAIN:$IGWHTTP
curl -v -s <유동공인이IP>:$IGWHTTP
istioctl 정보 확인
출처 - https://kschoi728.tistory.com/270
#
istioctl proxy-status
NAME                                                   CLUSTER        CDS                LDS                EDS                RDS                ECDS        ISTIOD                      VERSION
deploy-websrv-7d7cf8586c-l22cs.default                 Kubernetes     SYNCED (22m)       SYNCED (22m)       SYNCED (22m)       SYNCED (22m)       IGNORED     istiod-7f8b586864-mv944     1.23.2
istio-ingressgateway-5f9f654d46-c4g7s.istio-system     Kubernetes     SYNCED (5m19s)     SYNCED (5m19s)     SYNCED (5m19s)     SYNCED (5m19s)     IGNORED     istiod-7f8b586864-mv944     1.23.2

# Envoy config dump : all, cluster, endpoint, listener 등
istioctl proxy-config --help
istioctl proxy-config all deploy-websrv-7d7cf8586c-l22cs
istioctl proxy-config all deploy-websrv-7d7cf8586c-l22cs -o json | jq
istioctl proxy-config route deploy-websrv-7d7cf8586c-l22cs -o json | jq
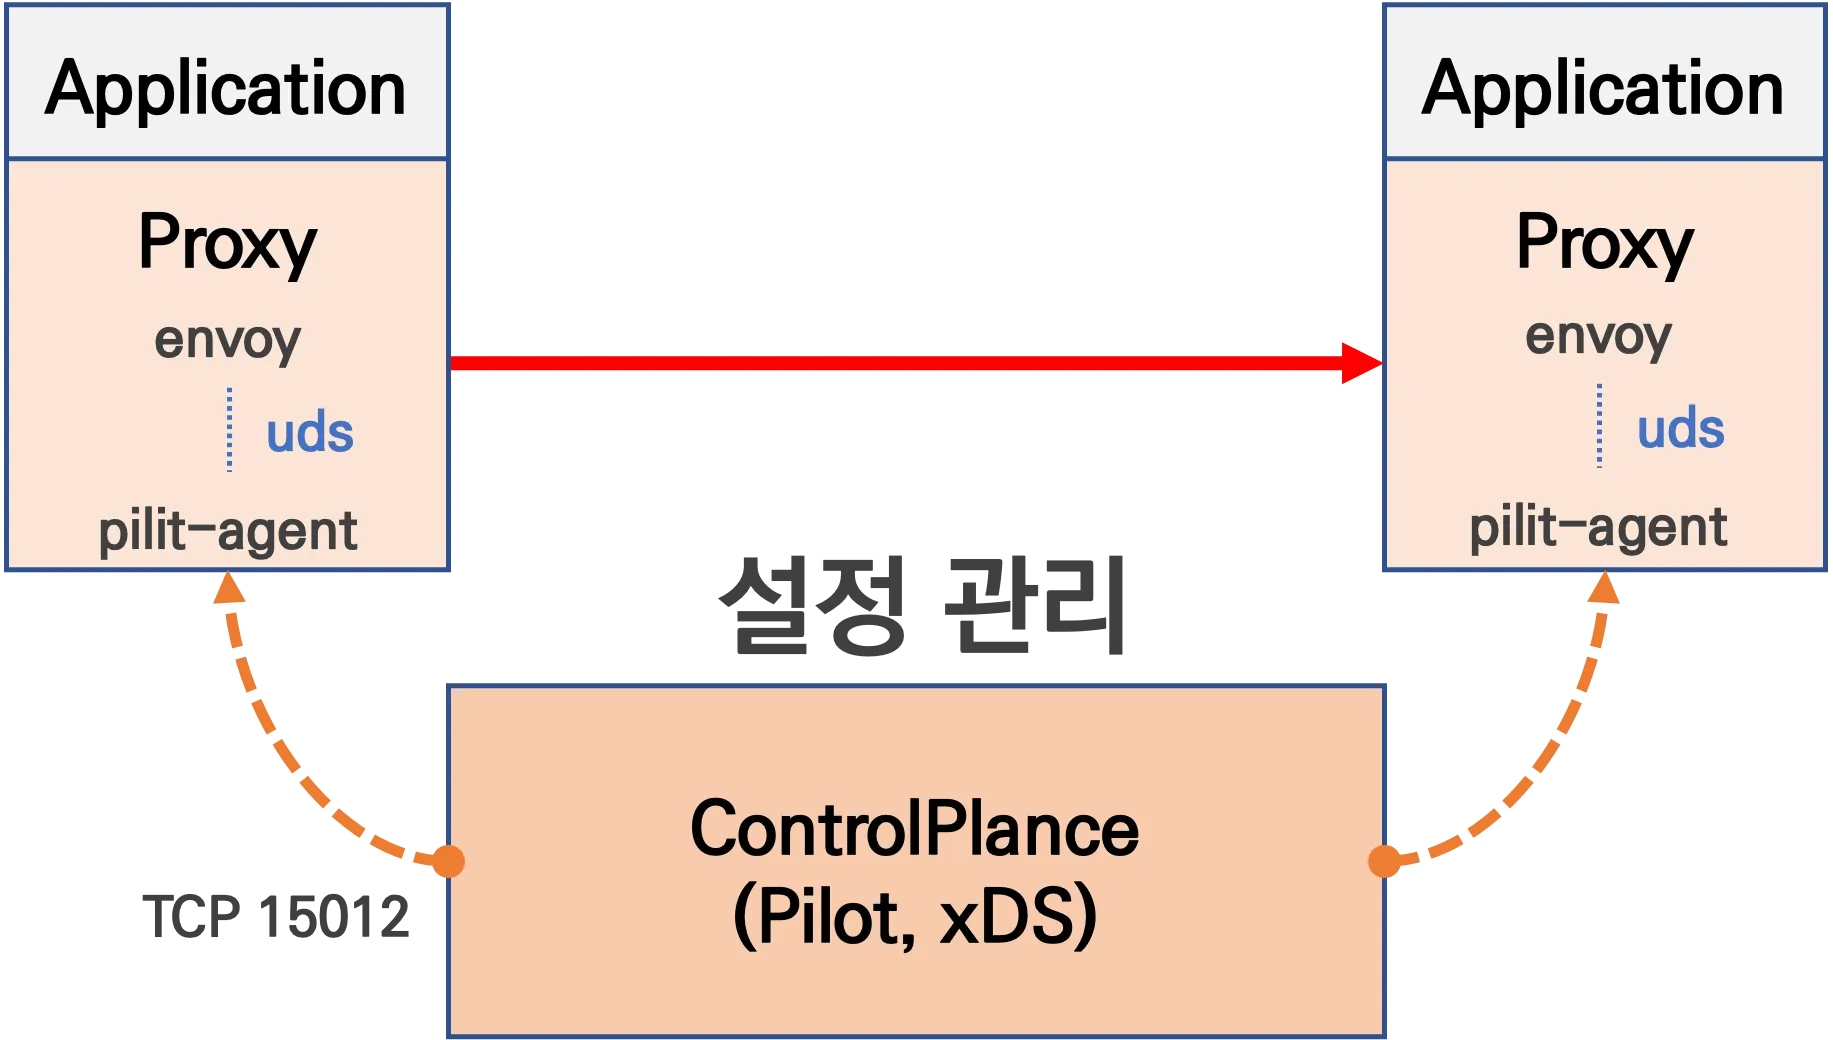
pilot : istio-proxy 내 uds 로 envoy 와 grpc 통신, istiod 받아온 dynamic config 를 envoy 에 전달
# istio-proxy 사용자 정보 확인 : uid(1337):gid(1337) 확인 -> iptables rule 에서 사용됨
kubectl exec -it deploy/deploy-websrv -c istio-proxy -- tail -n 3 /etc/passwd
ubuntu:x:1000:1000:Ubuntu:/home/ubuntu:/bin/bash
tcpdump:x:100:102::/nonexistent:/usr/sbin/nologin
istio-proxy:x:1337:1337::/home/istio-proxy:/bin/sh

# envoy 설정 정보 확인 : dynamic_resources , static_resources - listeners  : 출력되는 IP가 누구인지 확인 해보자
kubectl exec -it deploy/deploy-websrv -c istio-proxy -- cat /etc/istio/proxy/envoy-rev.json
kubectl exec -it deploy/deploy-websrv -c istio-proxy -- ss -nlp
kubectl exec -it deploy/deploy-websrv -c istio-proxy -- ss -np
kubectl exec -it deploy/deploy-websrv -c istio-proxy -- netstat -np
Active Internet connections (w/o servers)
Proto Recv-Q Send-Q Local Address           Foreign Address         State       PID/Program name
tcp        0      0 172.16.1.10:15021       172.16.1.1:49548        TIME_WAIT   -
tcp        0      0 172.16.1.10:15006       172.16.2.4:37814        ESTABLISHED 12/envoy
tcp        0      0 172.16.1.10:15021       172.16.1.1:43138        TIME_WAIT   -
tcp        0      0 127.0.0.1:39158         127.0.0.1:15020         ESTABLISHED 12/envoy
tcp        0      0 172.16.1.10:15021       172.16.1.1:42948        TIME_WAIT   -
tcp        0      0 172.16.1.10:51370       10.10.200.82:15012      ESTABLISHED 1/pilot-agent
tcp        0      0 172.16.1.10:15021       172.16.1.1:39522        TIME_WAIT   -
tcp        0      0 172.16.1.10:51360       10.10.200.82:15012      ESTABLISHED 1/pilot-agent
tcp        0      0 127.0.0.1:39172         127.0.0.1:15020         ESTABLISHED 12/envoy
tcp6       0      0 127.0.0.1:15020         127.0.0.1:39158         ESTABLISHED 1/pilot-agent
tcp6       0      0 127.0.0.1:15020         127.0.0.1:39172         ESTABLISHED 1/pilot-agent

Active UNIX domain sockets (w/o servers)
Proto RefCnt Flags       Type       State         I-Node   PID/Program name     Path
unix  3      [ ]         STREAM     CONNECTED     151002   1/pilot-agent        var/run/secrets/workload-spiffe-uds/socket
unix  3      [ ]         STREAM     CONNECTED     152729   -
unix  3      [ ]         STREAM     CONNECTED     152723   -
unix  3      [ ]         STREAM     CONNECTED     152727   -
unix  3      [ ]         STREAM     CONNECTED     150129   12/envoy
unix  3      [ ]         STREAM     CONNECTED     152726   -
unix  3      [ ]         STREAM     CONNECTED     152724   -
unix  3      [ ]         STREAM     CONNECTED     152722   -
unix  3      [ ]         STREAM     CONNECTED     150979   12/envoy
unix  3      [ ]         STREAM     CONNECTED     152728   -
unix  3      [ ]         STREAM     CONNECTED     152725   -
unix  3      [ ]         STREAM     CONNECTED     150120   1/pilot-agent        etc/istio/proxy/XDS

#
kubectl exec -it deploy/deploy-websrv -c istio-proxy -- ps -ef
UID          PID    PPID  C STIME TTY          TIME CMD
istio-p+       1       0  0 07:11 ?        00:00:00 /usr/local/bin/pilot-agent proxy sidecar --domain default.svc.cluster.local --p
istio-p+      12       1  0 07:11 ?        00:00:02 /usr/local/bin/envoy -c etc/istio/proxy/envoy-rev.json --drain-time-s 45 --drai
istio-p+      91       0  0 07:21 pts/0    00:00:00 ps -ef

# 출력되는 IP가 누구인지 확인 해보자
kubectl get pod,svc -A -owide
kubectl exec -it deploy/deploy-websrv -c istio-proxy -- netstat -antp
Active Internet connections (servers and established)
Proto Recv-Q Send-Q Local Address           Foreign Address         State       PID/Program name
tcp        0      0 0.0.0.0:80              0.0.0.0:*               LISTEN      -
tcp        0      0 127.0.0.1:15004         0.0.0.0:*               LISTEN      1/pilot-agent
tcp        0      0 127.0.0.1:15000         0.0.0.0:*               LISTEN      12/envoy
tcp        0      0 0.0.0.0:15090           0.0.0.0:*               LISTEN      12/envoy
tcp        0      0 0.0.0.0:15090           0.0.0.0:*               LISTEN      12/envoy
tcp        0      0 0.0.0.0:15021           0.0.0.0:*               LISTEN      12/envoy
tcp        0      0 0.0.0.0:15021           0.0.0.0:*               LISTEN      12/envoy
tcp        0      0 0.0.0.0:15006           0.0.0.0:*               LISTEN      12/envoy
tcp        0      0 0.0.0.0:15006           0.0.0.0:*               LISTEN      12/envoy
tcp        0      0 0.0.0.0:15001           0.0.0.0:*               LISTEN      12/envoy
tcp        0      0 0.0.0.0:15001           0.0.0.0:*               LISTEN      12/envoy
tcp        0      0 172.16.1.10:15006       172.16.2.4:37814        ESTABLISHED 12/envoy
tcp        0      0 172.16.1.10:15021       172.16.1.1:42632        TIME_WAIT   -
tcp        0      0 127.0.0.1:39158         127.0.0.1:15020         ESTABLISHED 12/envoy
tcp        0      0 172.16.1.10:15021       172.16.1.1:55752        TIME_WAIT   -
tcp        0      0 172.16.1.10:51370       10.10.200.82:15012      ESTABLISHED 1/pilot-agent
tcp        0      0 172.16.1.10:15021       172.16.1.1:50394        TIME_WAIT   -
tcp        0      0 172.16.1.10:51360       10.10.200.82:15012      ESTABLISHED 1/pilot-agent
tcp        0      0 172.16.1.10:15021       172.16.1.1:49496        TIME_WAIT   -
tcp        0      0 127.0.0.1:39172         127.0.0.1:15020         ESTABLISHED 12/envoy
tcp6       0      0 :::80                   :::*                    LISTEN      -
tcp6       0      0 :::15020                :::*                    LISTEN      1/pilot-agent
tcp6       0      0 127.0.0.1:15020         127.0.0.1:39158         ESTABLISHED 1/pilot-agent
tcp6       0      0 127.0.0.1:15020         127.0.0.1:39172         ESTABLISHED 1/pilot-agent


# istiod 정보 같이 확인 : 출력되는 IP가 누구인지 확인 해보자
kubectl get pod,svc -A -owide
kubectl exec -it deploy/istiod -n istio-system -- ps -ef
kubectl exec -it deploy/istiod -n istio-system -- netstat -antp
kubectl exec -it deploy/istiod -n istio-system -- ss -nlp
kubectl exec -it deploy/istiod -n istio-system -- ss -np
참고) istio-proxy, Istiod 가 각각 사용하는 포트 정보 - https://istio.io/latest/docs/ops/deployment/application-requirements/
istio-proxy
istiod
파드 디버깅
파드 디버깅
#
kubectl get pod
kc describe pod

# 방안1 : 파드의 복제본을 이용
kubectl debug $(kubectl get pod -l app=deploy-websrv -oname) -it --image=nicolaka/netshoot -c netdebug --share-processes --copy-to=websrv-debug --profile='sysadmin'
-----
ip -c addr
curl localhost

ps axf
PID   USER     TIME  COMMAND
    1 65535     0:00 /pause
   26 root      0:00 nginx: master process nginx -g daemon off;
   57 101       0:00 nginx: worker process
   58 101       0:00 nginx: worker process
   59 root      0:01 zsh
   89 1337      0:00 /usr/local/bin/pilot-agent proxy sidecar --domain default.svc.cluster.local --proxyLogLevel=warning --proxyC
  137 1337      0:00 /usr/local/bin/envoy -c etc/istio/proxy/envoy-rev0.json --restart-epoch 0 --drain-time-s 45 --drain-strategy
  188 root      0:00 ps axf

ss
ss -l
ss -4tpl
ss -4tp
ss -xpl
ss -xp

netstat -n

exit
-----
kubectl delete pod websrv-debug


# 방안2 : 동작 중인 파드 내 컨테이너 삽입
kubectl debug $(kubectl get pod -l app=deploy-websrv -oname) -it --image=nicolaka/netshoot -c netdebug --profile='netadmin'
-----
ip -c addr
curl localhost
ps axf
ss
ss -l
ss -4tpl
ss -4tp
ss -xpl
ss -xp

tcpdump -i. ..
네트워크 툴...

exit
-----
(심화 옵션) IPC & UDS 관련 정보
IPC & UDS 관련 정보 링크 - UDS, 소개2, IPC방법들
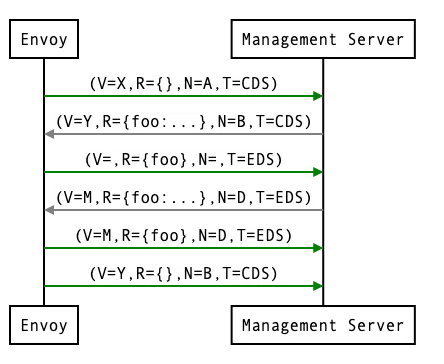
Istio - Envoy xDS (x Discovery Service, Dynamic API Configuration) - 링크
동적으로 각 영역의 설정을 로드하는 방법
Management 서비스(Istiod)와 통신하면서 configuration 을 갱신 : Istod - [Istop-proxy ↔ envoy]
gRPC, REST 방식 모두 지원
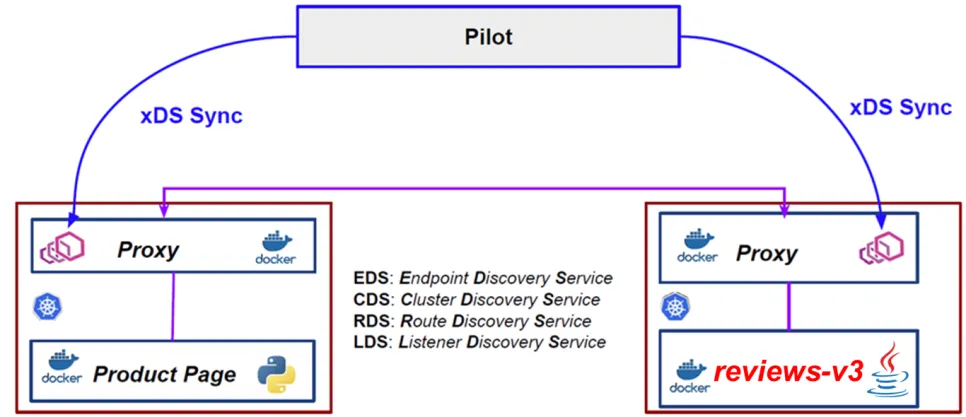
CDS(Clusters) , LDS(Listeners) , EDS(Endpoints), RDS(Routes) → Discovery Service ⇒ ADS (Aggregation Discovery Service) ↔ Istiod
# proxy 상태 확인
istioctl proxy-status
NAME                                                   CLUSTER        CDS               LDS               EDS              RDS               ECDS        ISTIOD                      VERSION
deploy-websrv-7d7cf8586c-tvzk6.default                 Kubernetes     SYNCED (55s)      SYNCED (55s)      SYNCED (55s)     SYNCED (55s)      IGNORED     istiod-7f8b586864-mv944     1.23.2
istio-ingressgateway-5f9f654d46-c4g7s.istio-system     Kubernetes     SYNCED (4m1s)     SYNCED (4m1s)     SYNCED (55s)     SYNCED (4m1s)     IGNORED     istiod-7f8b586864-mv944     1.23.2
...
- ADS 를 통해 다양한 타입의 리소스를 싱글 스트림에서 해결
# 파드 확인
kubectl get pod

# istio 컨테이너 접속
kubectl exec -it deploy/deploy-websrv -c istio-proxy -- bash
---------------------------------------------------------------
# SDS, XDS 는 소켓 타입
ls -al /etc/istio/proxy
total 28
drwxrwsrwt 2 root        istio-proxy   120 Dec 13 13:03 .
drwxr-xr-x 1 root        root         4096 Dec 13 13:03 ..
srw-rw-rw- 1 istio-proxy istio-proxy     0 Dec 13 13:03 SDS
srw-rw-rw- 1 istio-proxy istio-proxy     0 Dec 13 13:03 XDS
-rw-r--r-- 1 istio-proxy istio-proxy 17409 Dec 13 13:03 envoy-rev.json
-rw-r--r-- 1 istio-proxy istio-proxy  2967 Dec 13 13:03 grpc-bootstrap.json

# .json 파일 확인
more /etc/istio/proxy/envoy-rev.json
{
  "node": {
    "id": "sidecar~172.16.228.67~netpod-866d9d7765-tw7xd.default~default.svc.cluster.local",
    "cluster": "netpod.default",
...
"admin": {
    "access_log_path": "/dev/null",
    "profile_path": "/var/lib/istio/data/envoy.prof",
    "address": {
      "socket_address": {
        "address": "127.0.0.1",
        "port_value": 15000
      }
...
"dynamic_resources": {
    "lds_config": {
      "ads": {},
      "initial_fetch_timeout": "0s",
      "resource_api_version": "V3"
    },
    "cds_config": {
      "ads": {},
      "initial_fetch_timeout": "0s",
      "resource_api_version": "V3"
    },
    "ads_config": {
      "api_type": "GRPC",
      "set_node_on_first_message_only": true,
      "transport_api_version": "V3",
      "grpc_services": [
        {
          "envoy_grpc": {
            "cluster_name": "xds-grpc"
...
"static_resources": {
    "clusters": [
      {
        ...
        "name": "xds-grpc",
        "type" : "STATIC",
        "connect_timeout": "1s",
        "lb_policy": "ROUND_ROBIN",
        "load_assignment": {
          "cluster_name": "xds-grpc",
          "endpoints": [{
            "lb_endpoints": [{
              "endpoint": {
                "address":{
                  "pipe": {
                    "path": "./etc/istio/proxy/XDS"
                  }
...
"listeners":[
  ...
	"address": {
	           "socket_address": {
	             "protocol": "TCP",
	             "address": "0.0.0.0",
	             "port_value": 15021
	           }
	"filter_chains": [
	          {
	            "filters": [
	              {
	                "name": "envoy.filters.network.http_connection_manager",
	                "typed_config": {
	                  "@type": "type.googleapis.com/envoy.extensions.filters.network.http_connection_manager.v3.HttpConnectionManager"
	,
	                  "codec_type": "AUTO",
	                  "stat_prefix": "agent",
	                  "route_config": {
	                    "virtual_hosts": [
	                      {
	                        "name": "backend",
	                        "domains": [
	                          "*"
	                        ],
	                        "routes": [
	                          {
	                            "match": {
	                              "prefix": "/healthz/ready"
	                            },
	                            "route": {
	                              "cluster": "agent"
...
more /etc/istio/proxy/grpc-bootstrap.json

# display only Unix domain sockets : Listener 과 ESTAB 상태 정보 확인
ss -xpl
Netid   State    Recv-Q   Send-Q            Local Address:Port         Peer Address:Port   Process
u_str   LISTEN   0        4096        etc/istio/proxy/SDS 446191                  * 0       users:(("pilot-agent",pid=1,fd=13))
u_str   LISTEN   0        4096        etc/istio/proxy/XDS 446192                  * 0       users:(("pilot-agent",pid=1,fd=14))

ss -xp
Netid   State   Recv-Q   Send-Q           Local Address:Port         Peer Address:Port     Process
u_str   ESTAB   0        0          etc/istio/proxy/XDS 446483                  * 446482    users:(("pilot-agent",pid=1,fd=16))
u_str   ESTAB   0        0          etc/istio/proxy/SDS 446267                  * 446266    users:(("pilot-agent",pid=1,fd=18))
u_str   ESTAB   0        0                            * 446482                  * 446483    users:(("envoy",pid=16,fd=20))
u_str   ESTAB   0        0                            * 446266                  * 446267    users:(("envoy",pid=16,fd=19))

# display only TCP sockets and display only IP version 4 sockets
ss -4tpl
CleanUp
kubectl delete gw,vs,deploy,svc --all
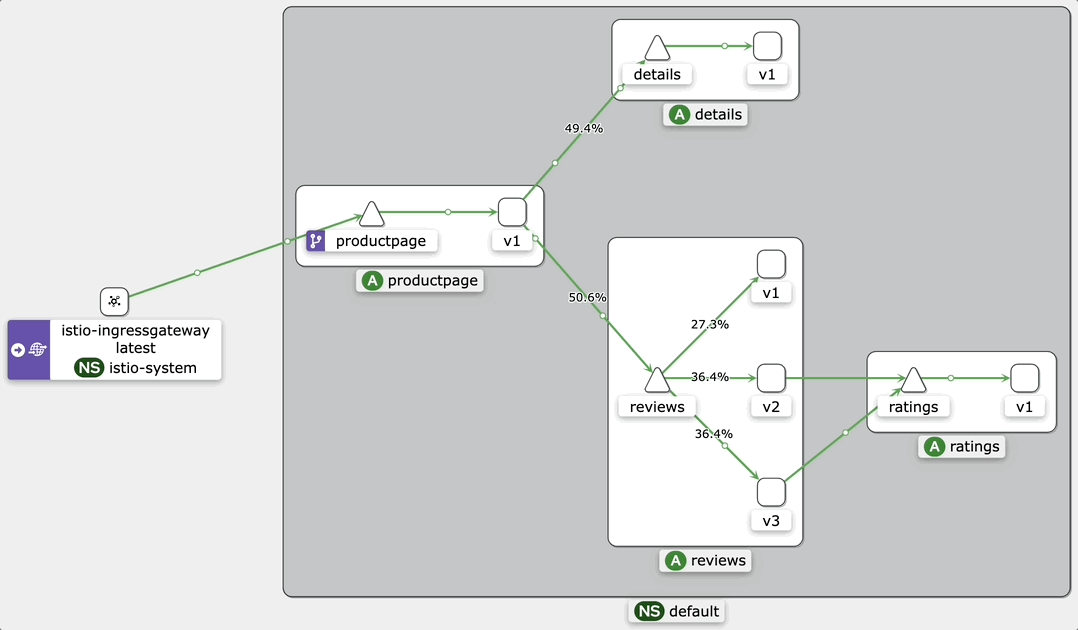
👉 Step 05. Bookinfo 실습 & Istio 기능
Bookinfo 애플리케이션 소개
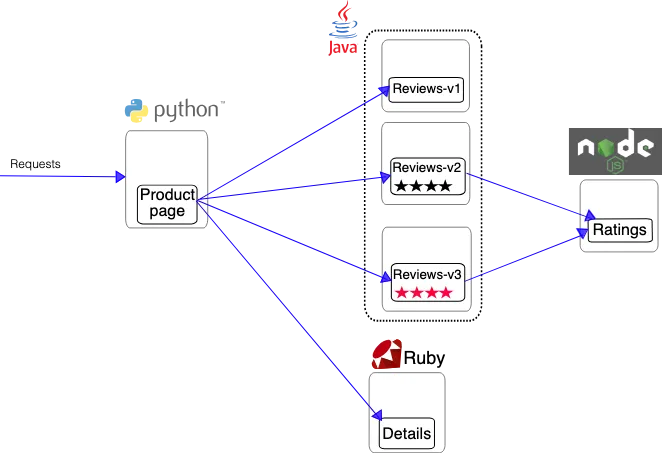
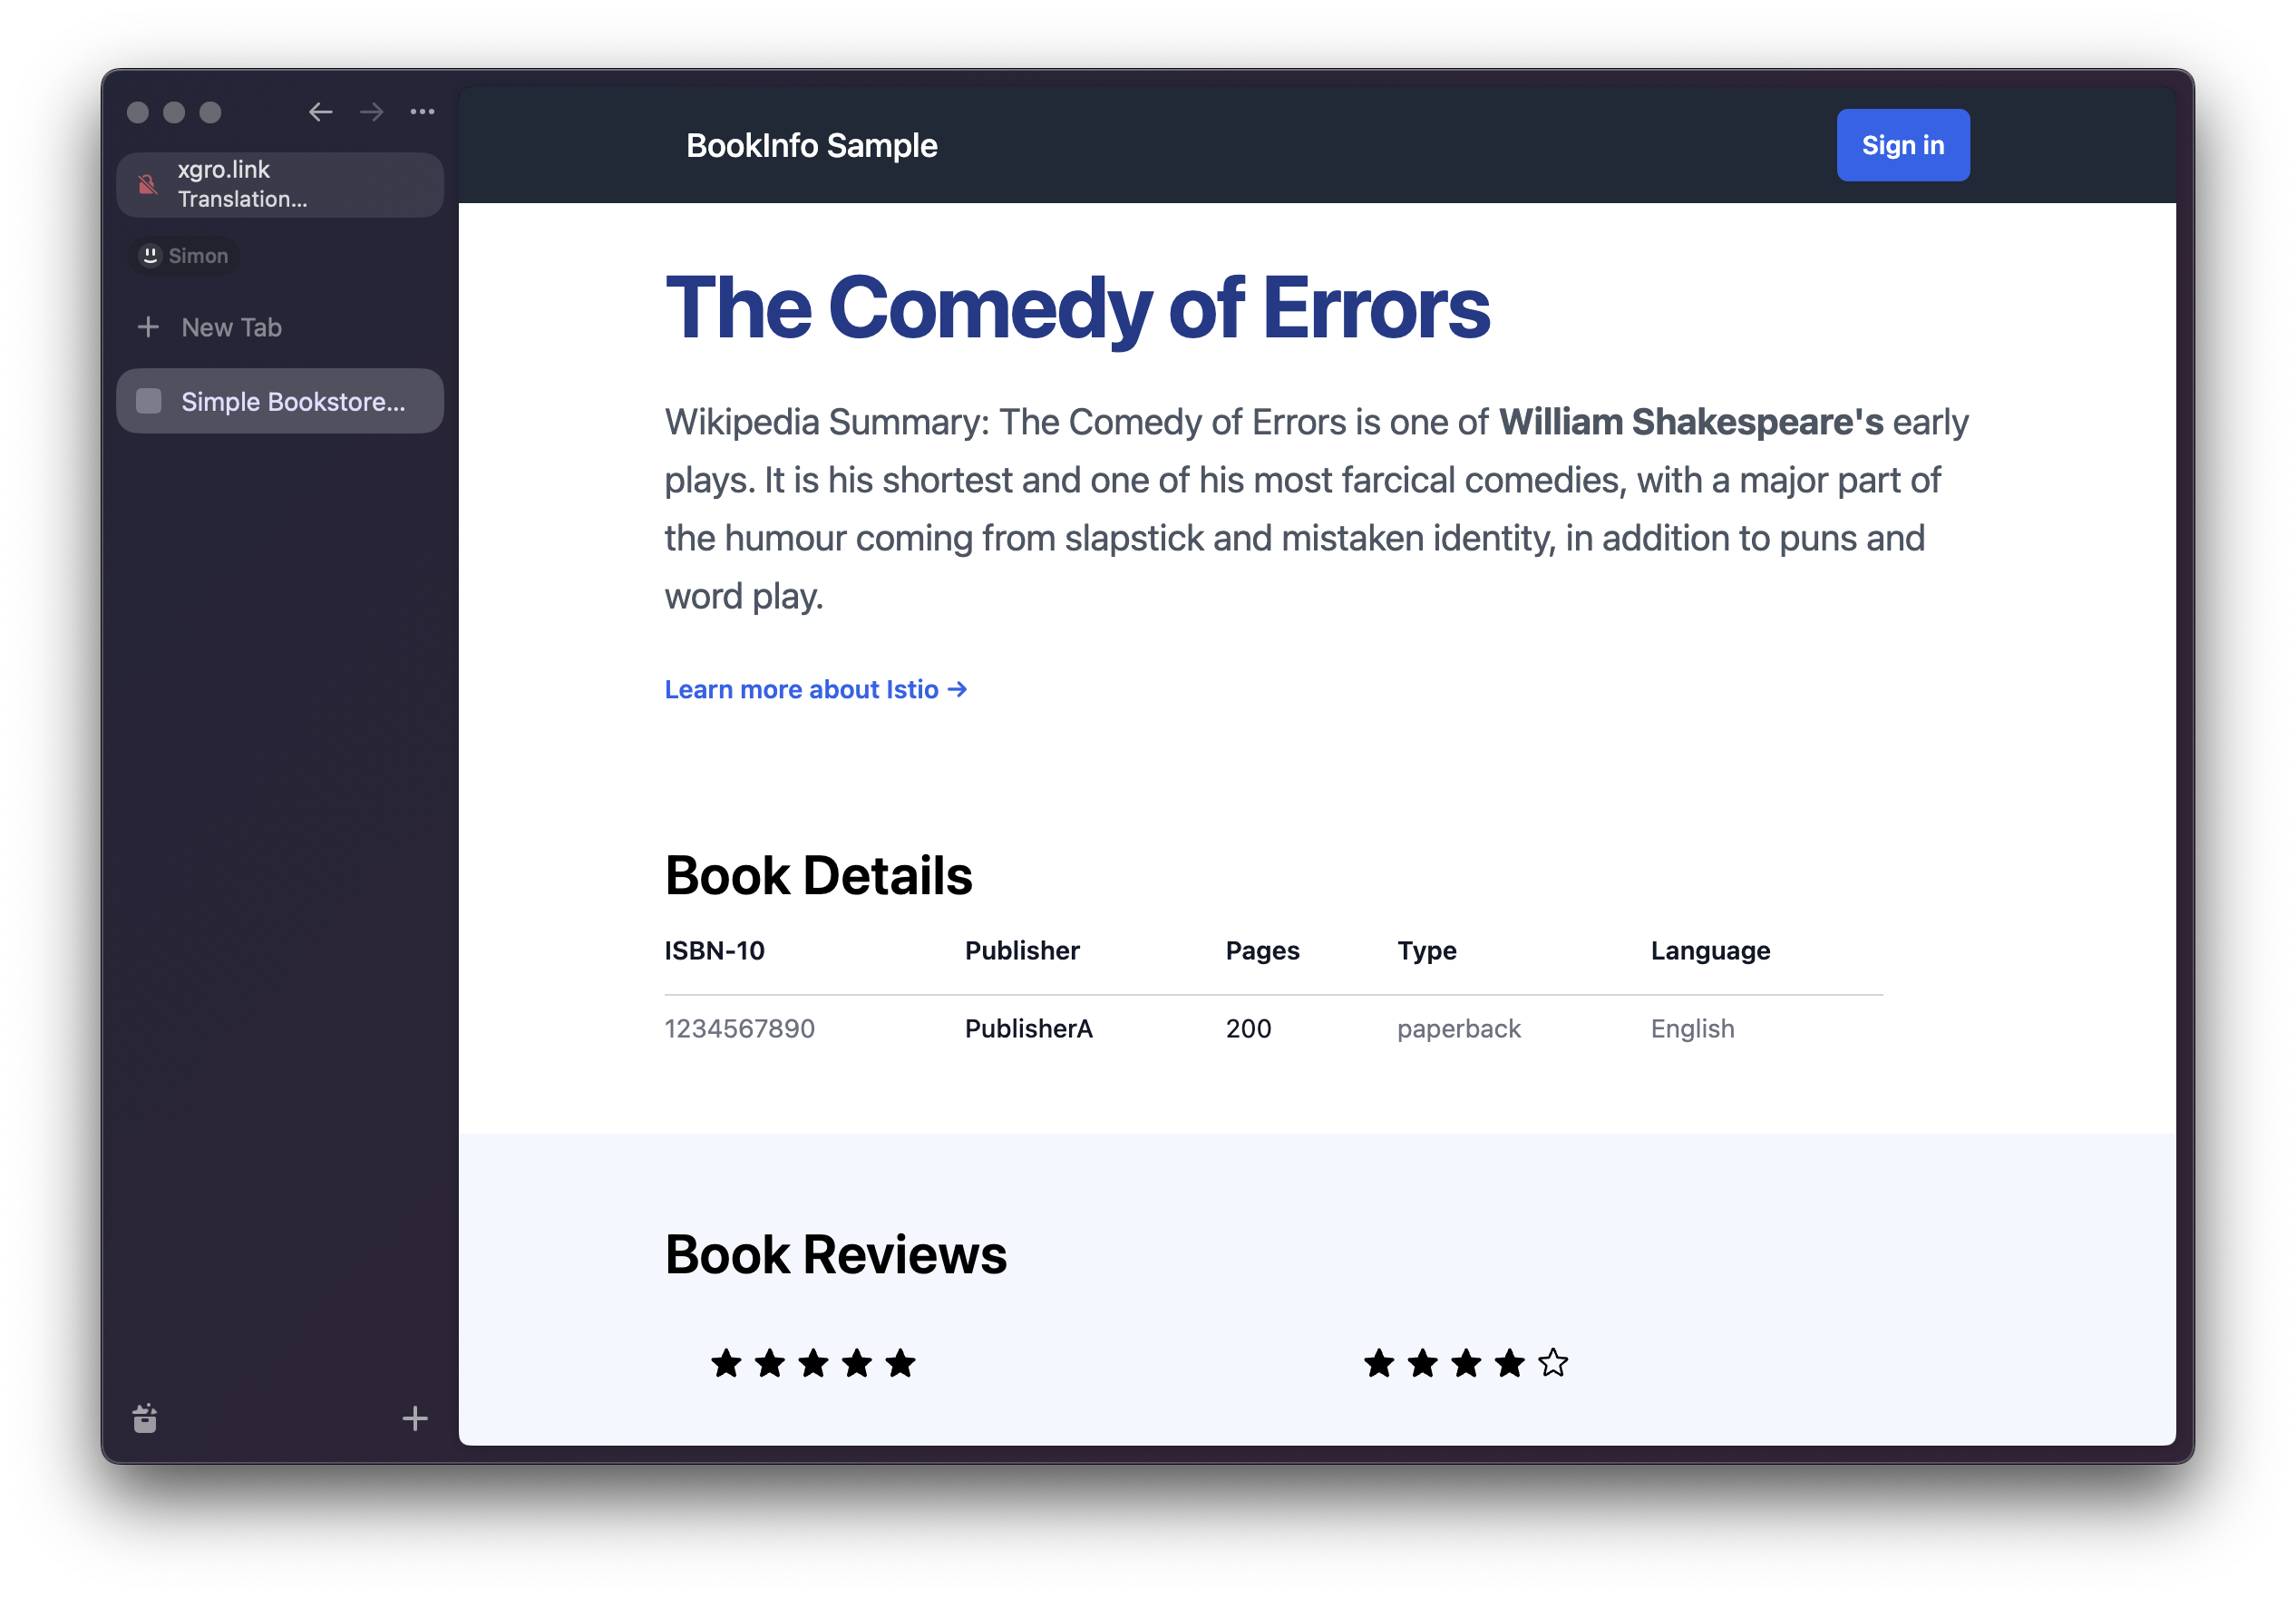
Bookinfo 애플리케이션 소개 : 4개의 마이크로서비스로 구성 : Productpage, reviews, ratings, details - 링크
-
ProductPage 페이지에서 요청을 받으면, 도서 리뷰를 보여주는 Reviews 서비스와 도서 상세 정보를 보여주는 Details 서비스에 접속하고,
-
ProductPage 는 Reviews 와 Details 결과를 사용자에게 응답한다.
-
Reviews 서비스는 v1, v2, v3 세 개의 버전이 있고 v2, v3 버전의 경우 Ratings 서비스에 접소갛여 도서에 대한 5단계 평가를 가져옴.
-
Reviews 서비스의 차이는, v1은 Rating 이 없고, v2는 검은색 별로 Ratings 가 표시되며, v3는 색깔이 있는 별로 Ratings 가 표시됨.
Bookinfo 애플리케이션 배포 - 링크
출처 - https://kschoi728.tistory.com/271
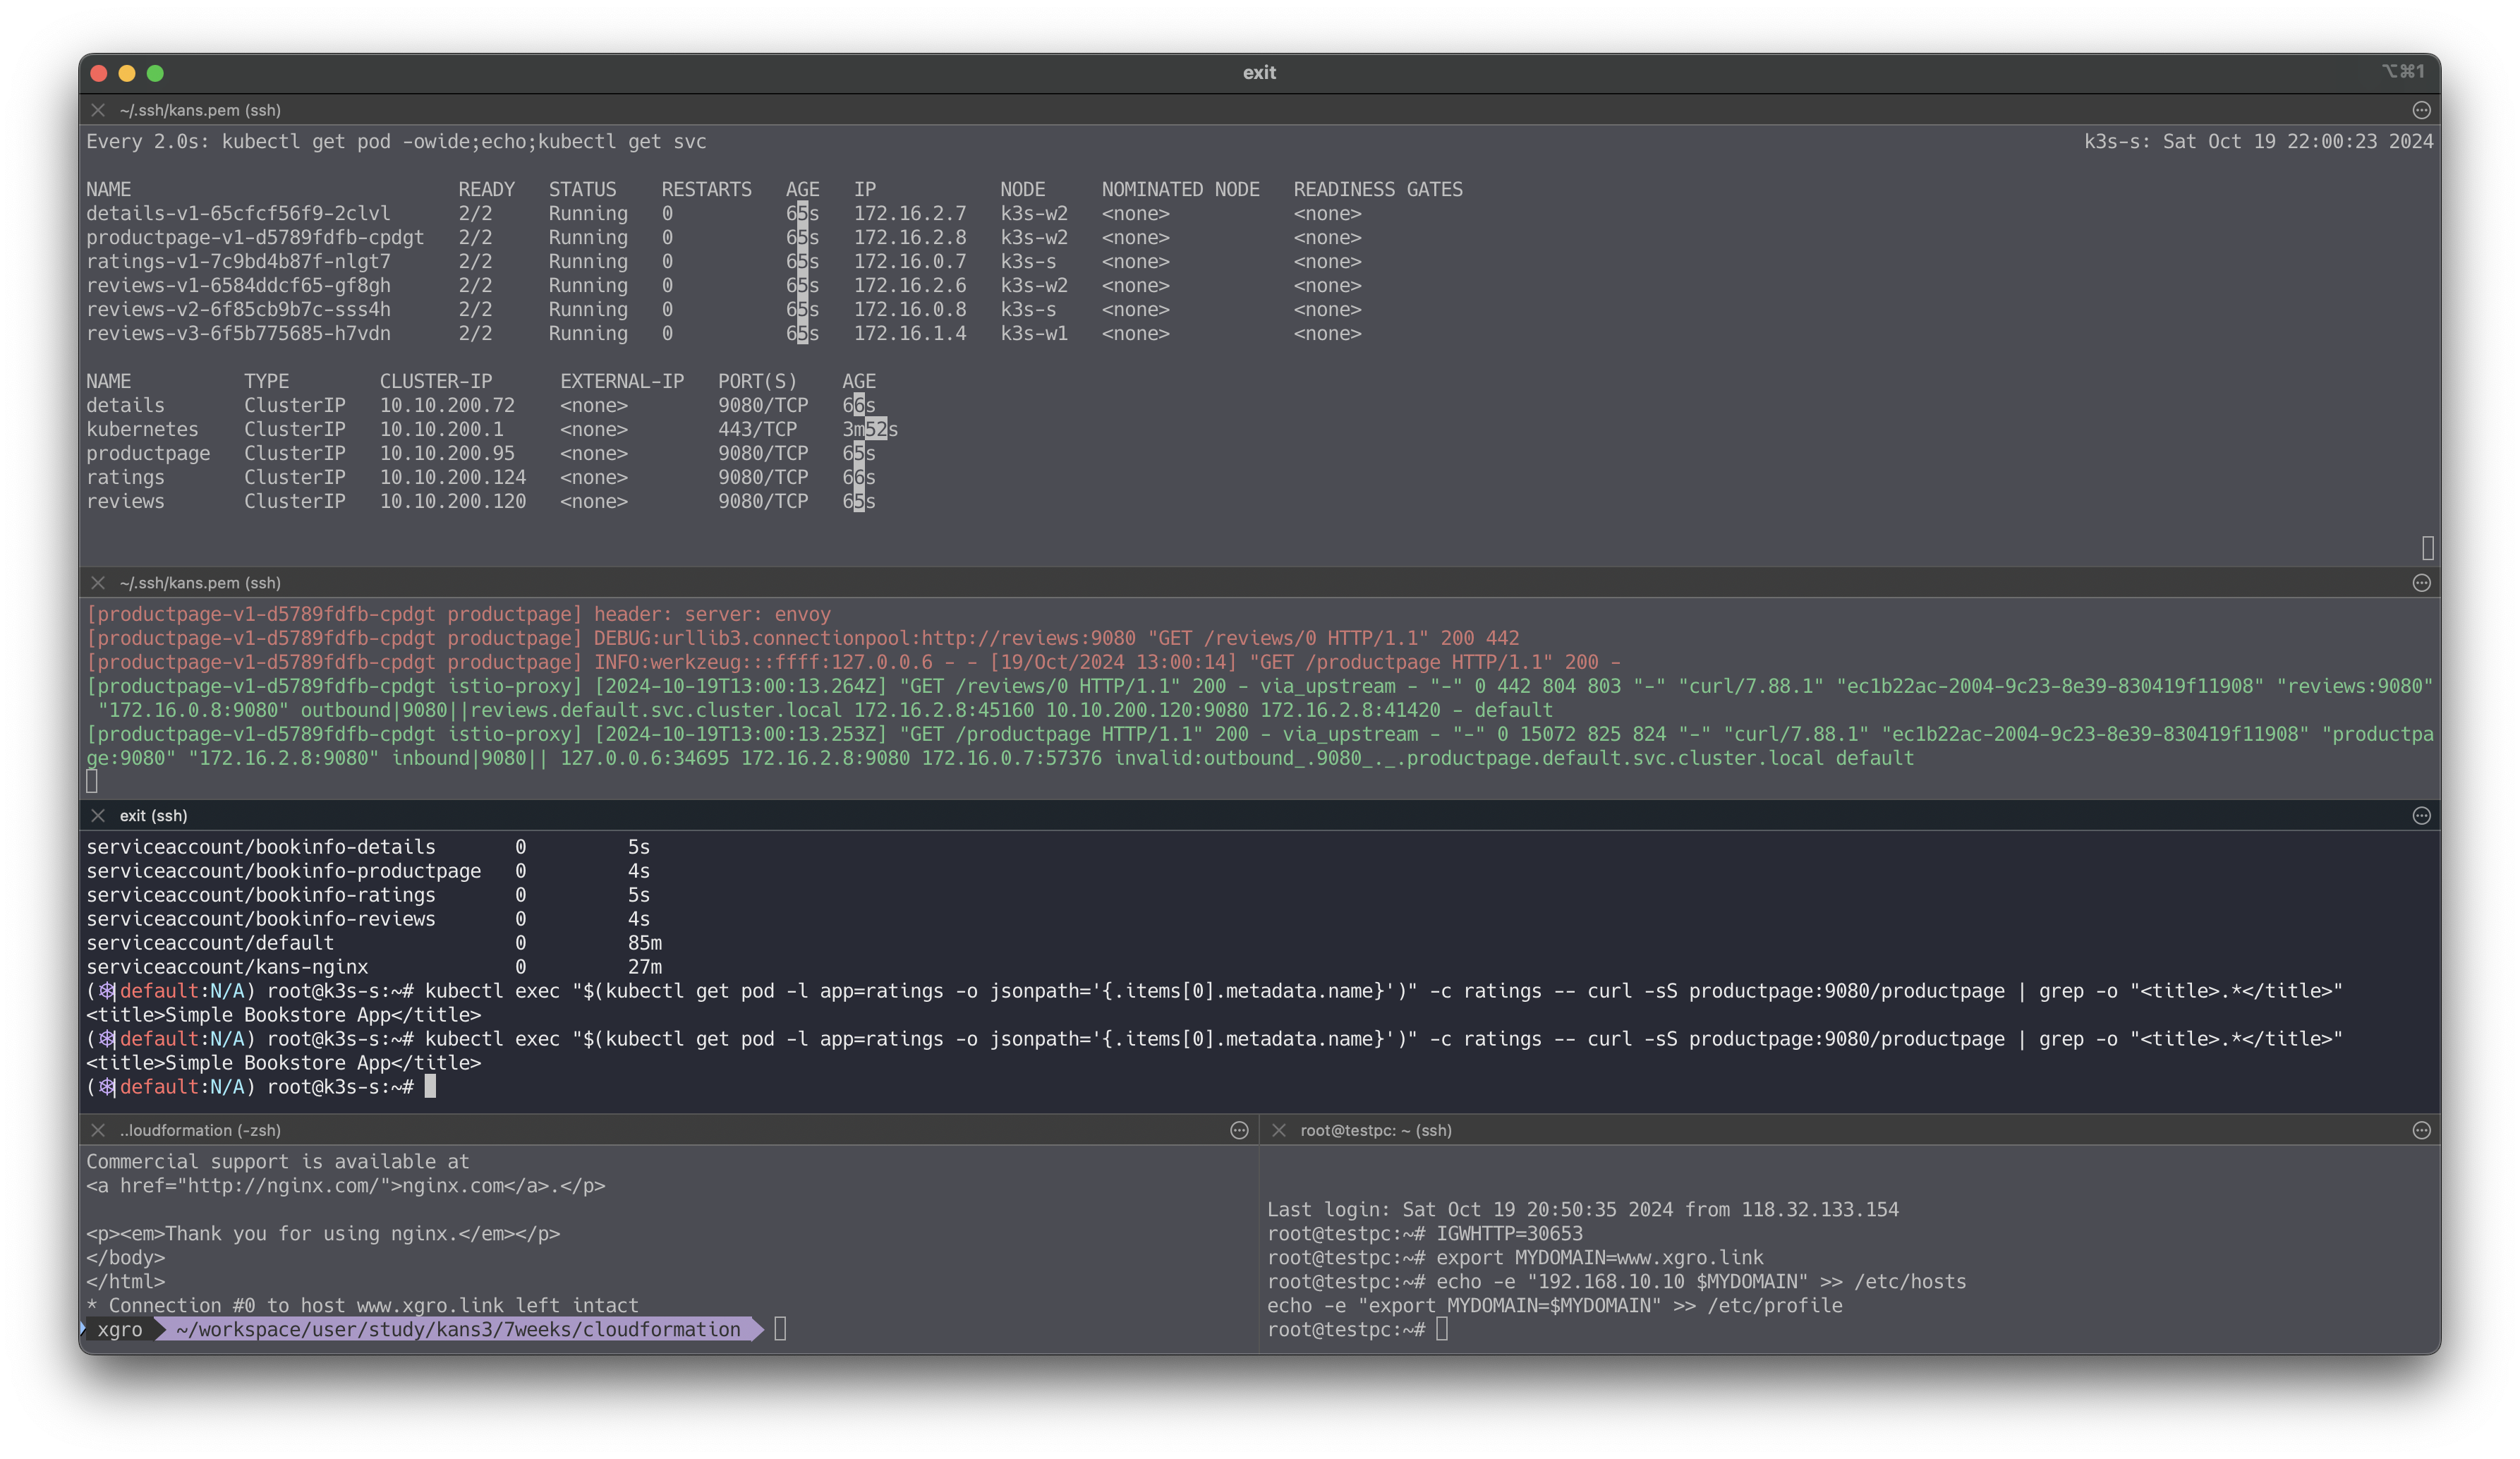
# 모니터링
watch -d 'kubectl get pod -owide;echo;kubectl get svc'

# Bookinfo 애플리케이션 배포
echo $ISTIOV
cat ~/istio-$ISTIOV/samples/bookinfo/platform/kube/bookinfo.yaml
kubectl apply -f ~/istio-$ISTIOV/samples/bookinfo/platform/kube/bookinfo.yaml

# 확인
kubectl get all,sa

# product 웹 접속 확인
kubectl exec "$(kubectl get pod -l app=ratings -o jsonpath='{.items[0].metadata.name}')" -c ratings -- curl -sS productpage:9080/productpage | grep -o "<title>.*</title>"

# 로그
kubetail -l app=productpage -f
기본 설정
Istio 를 통한 인입 기본 설정
Istio Gateway/VirtualService 설정
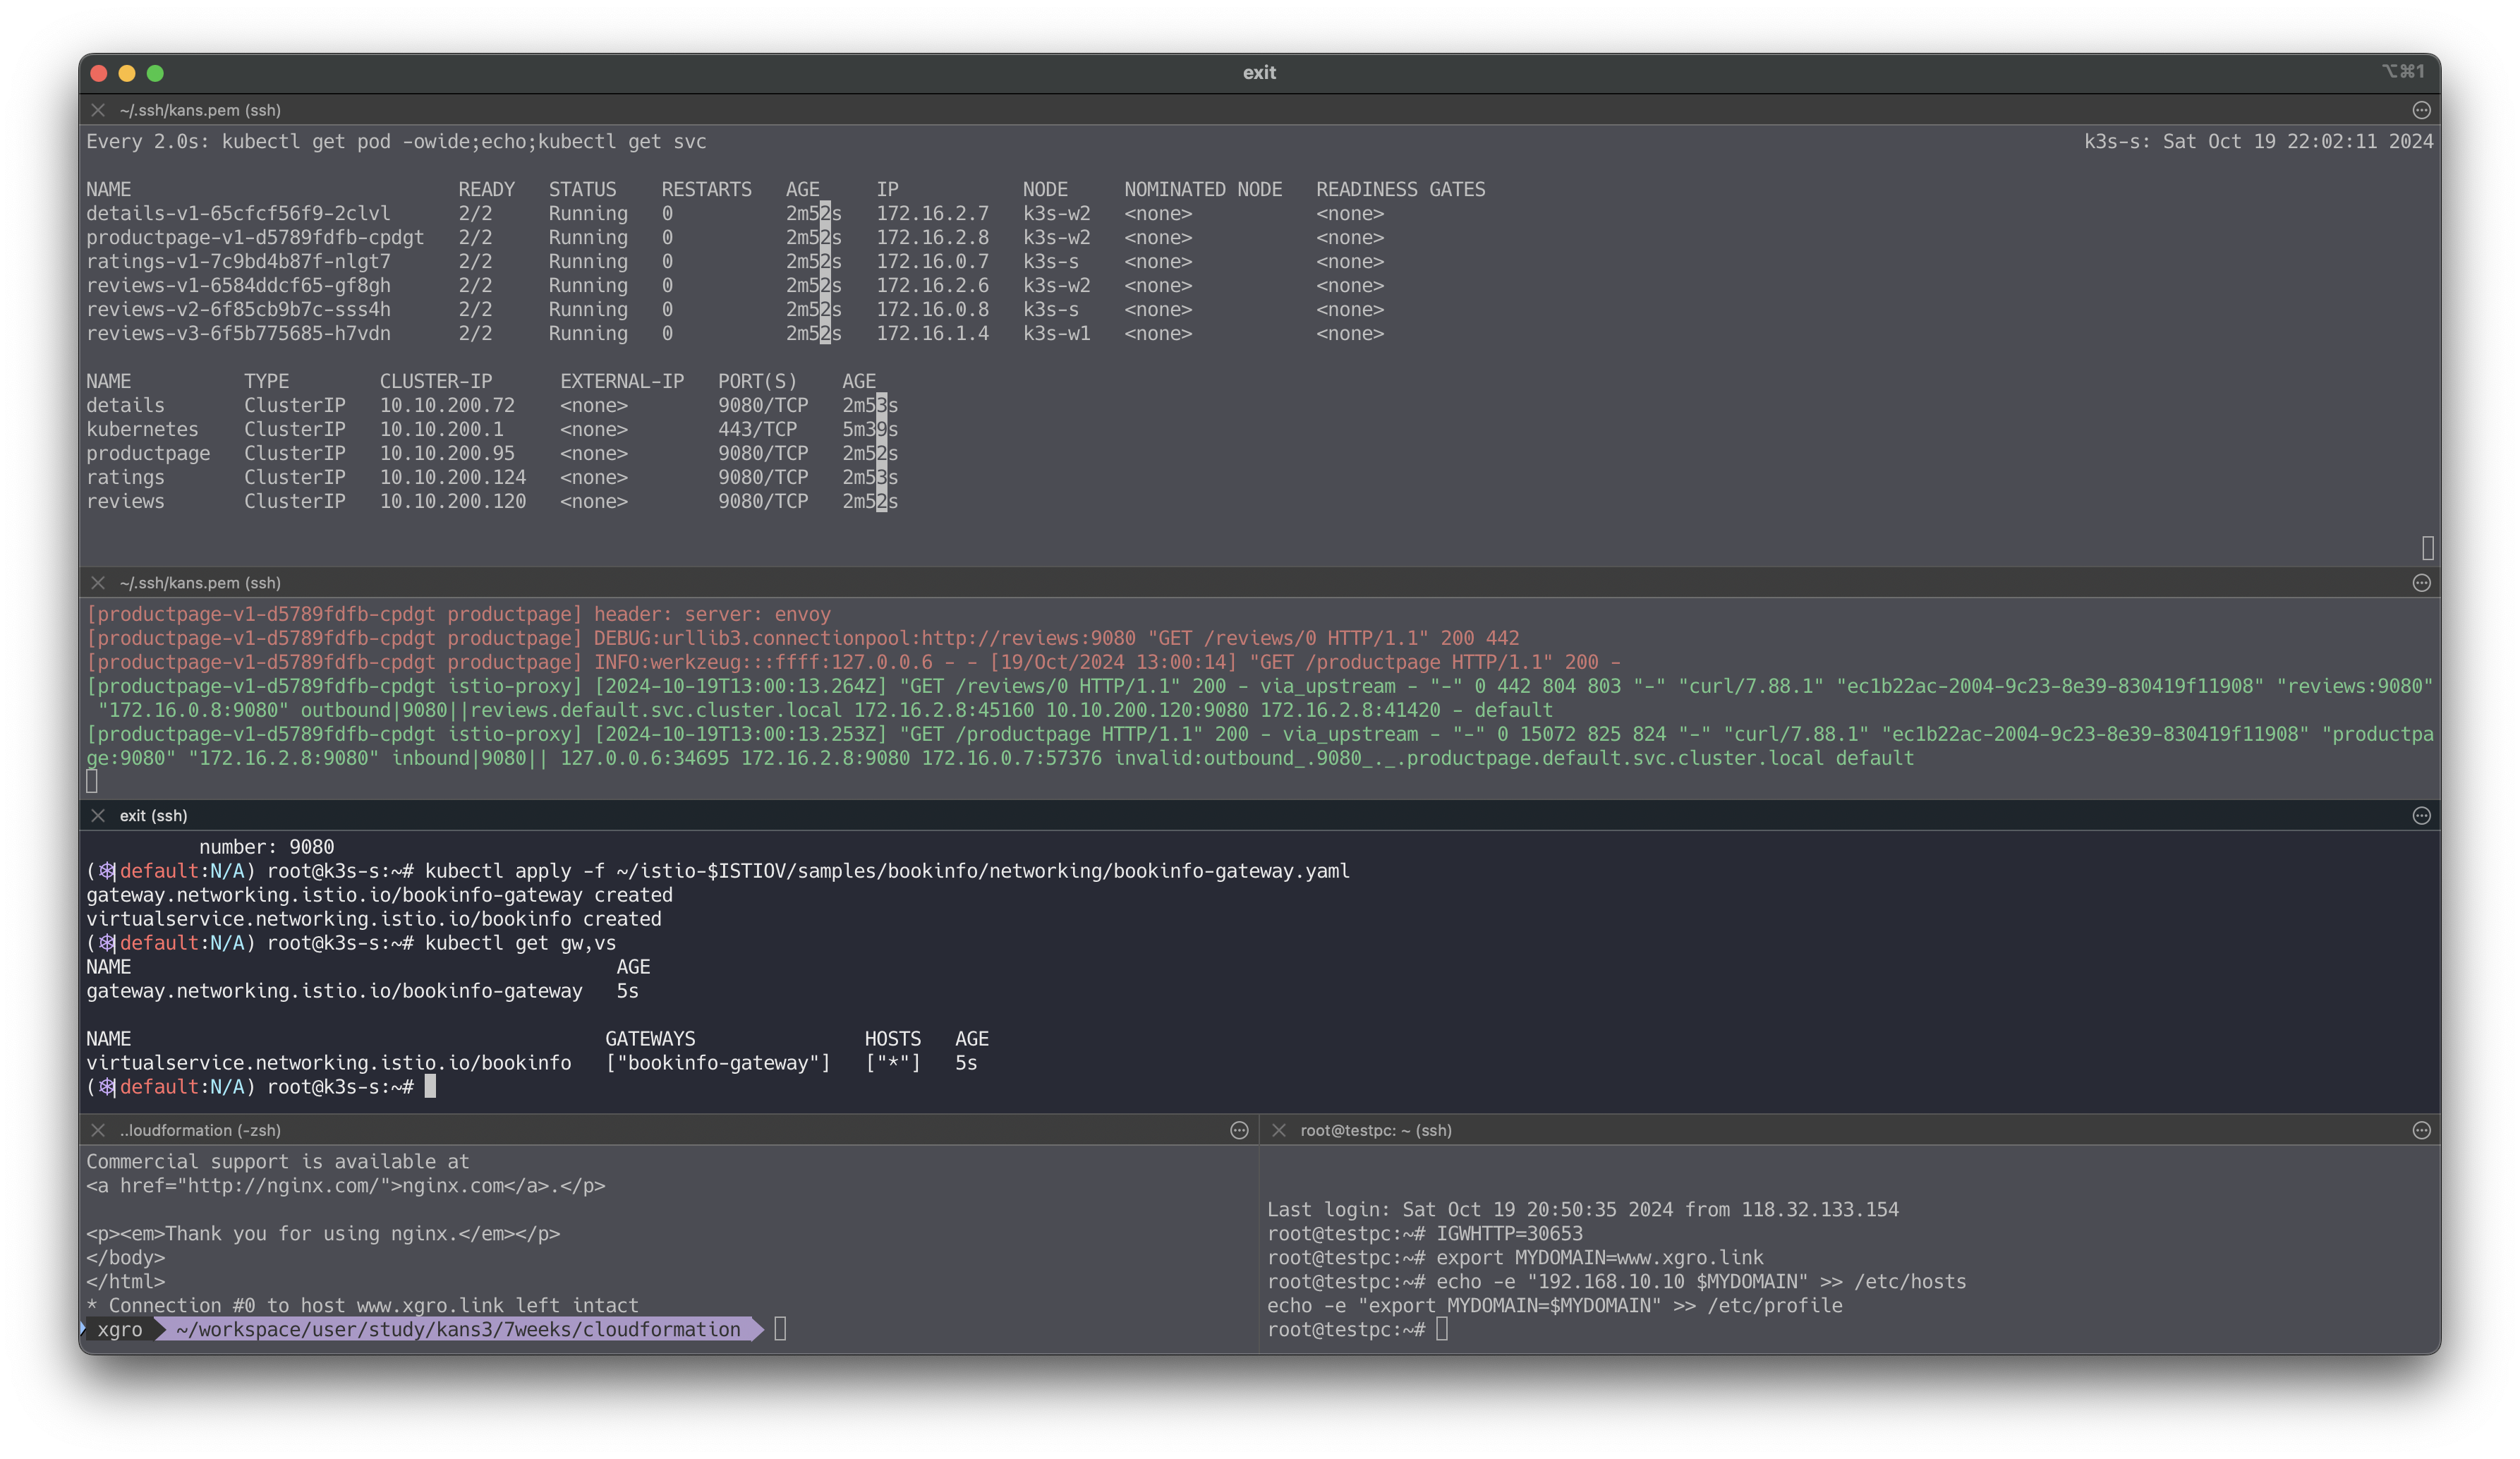
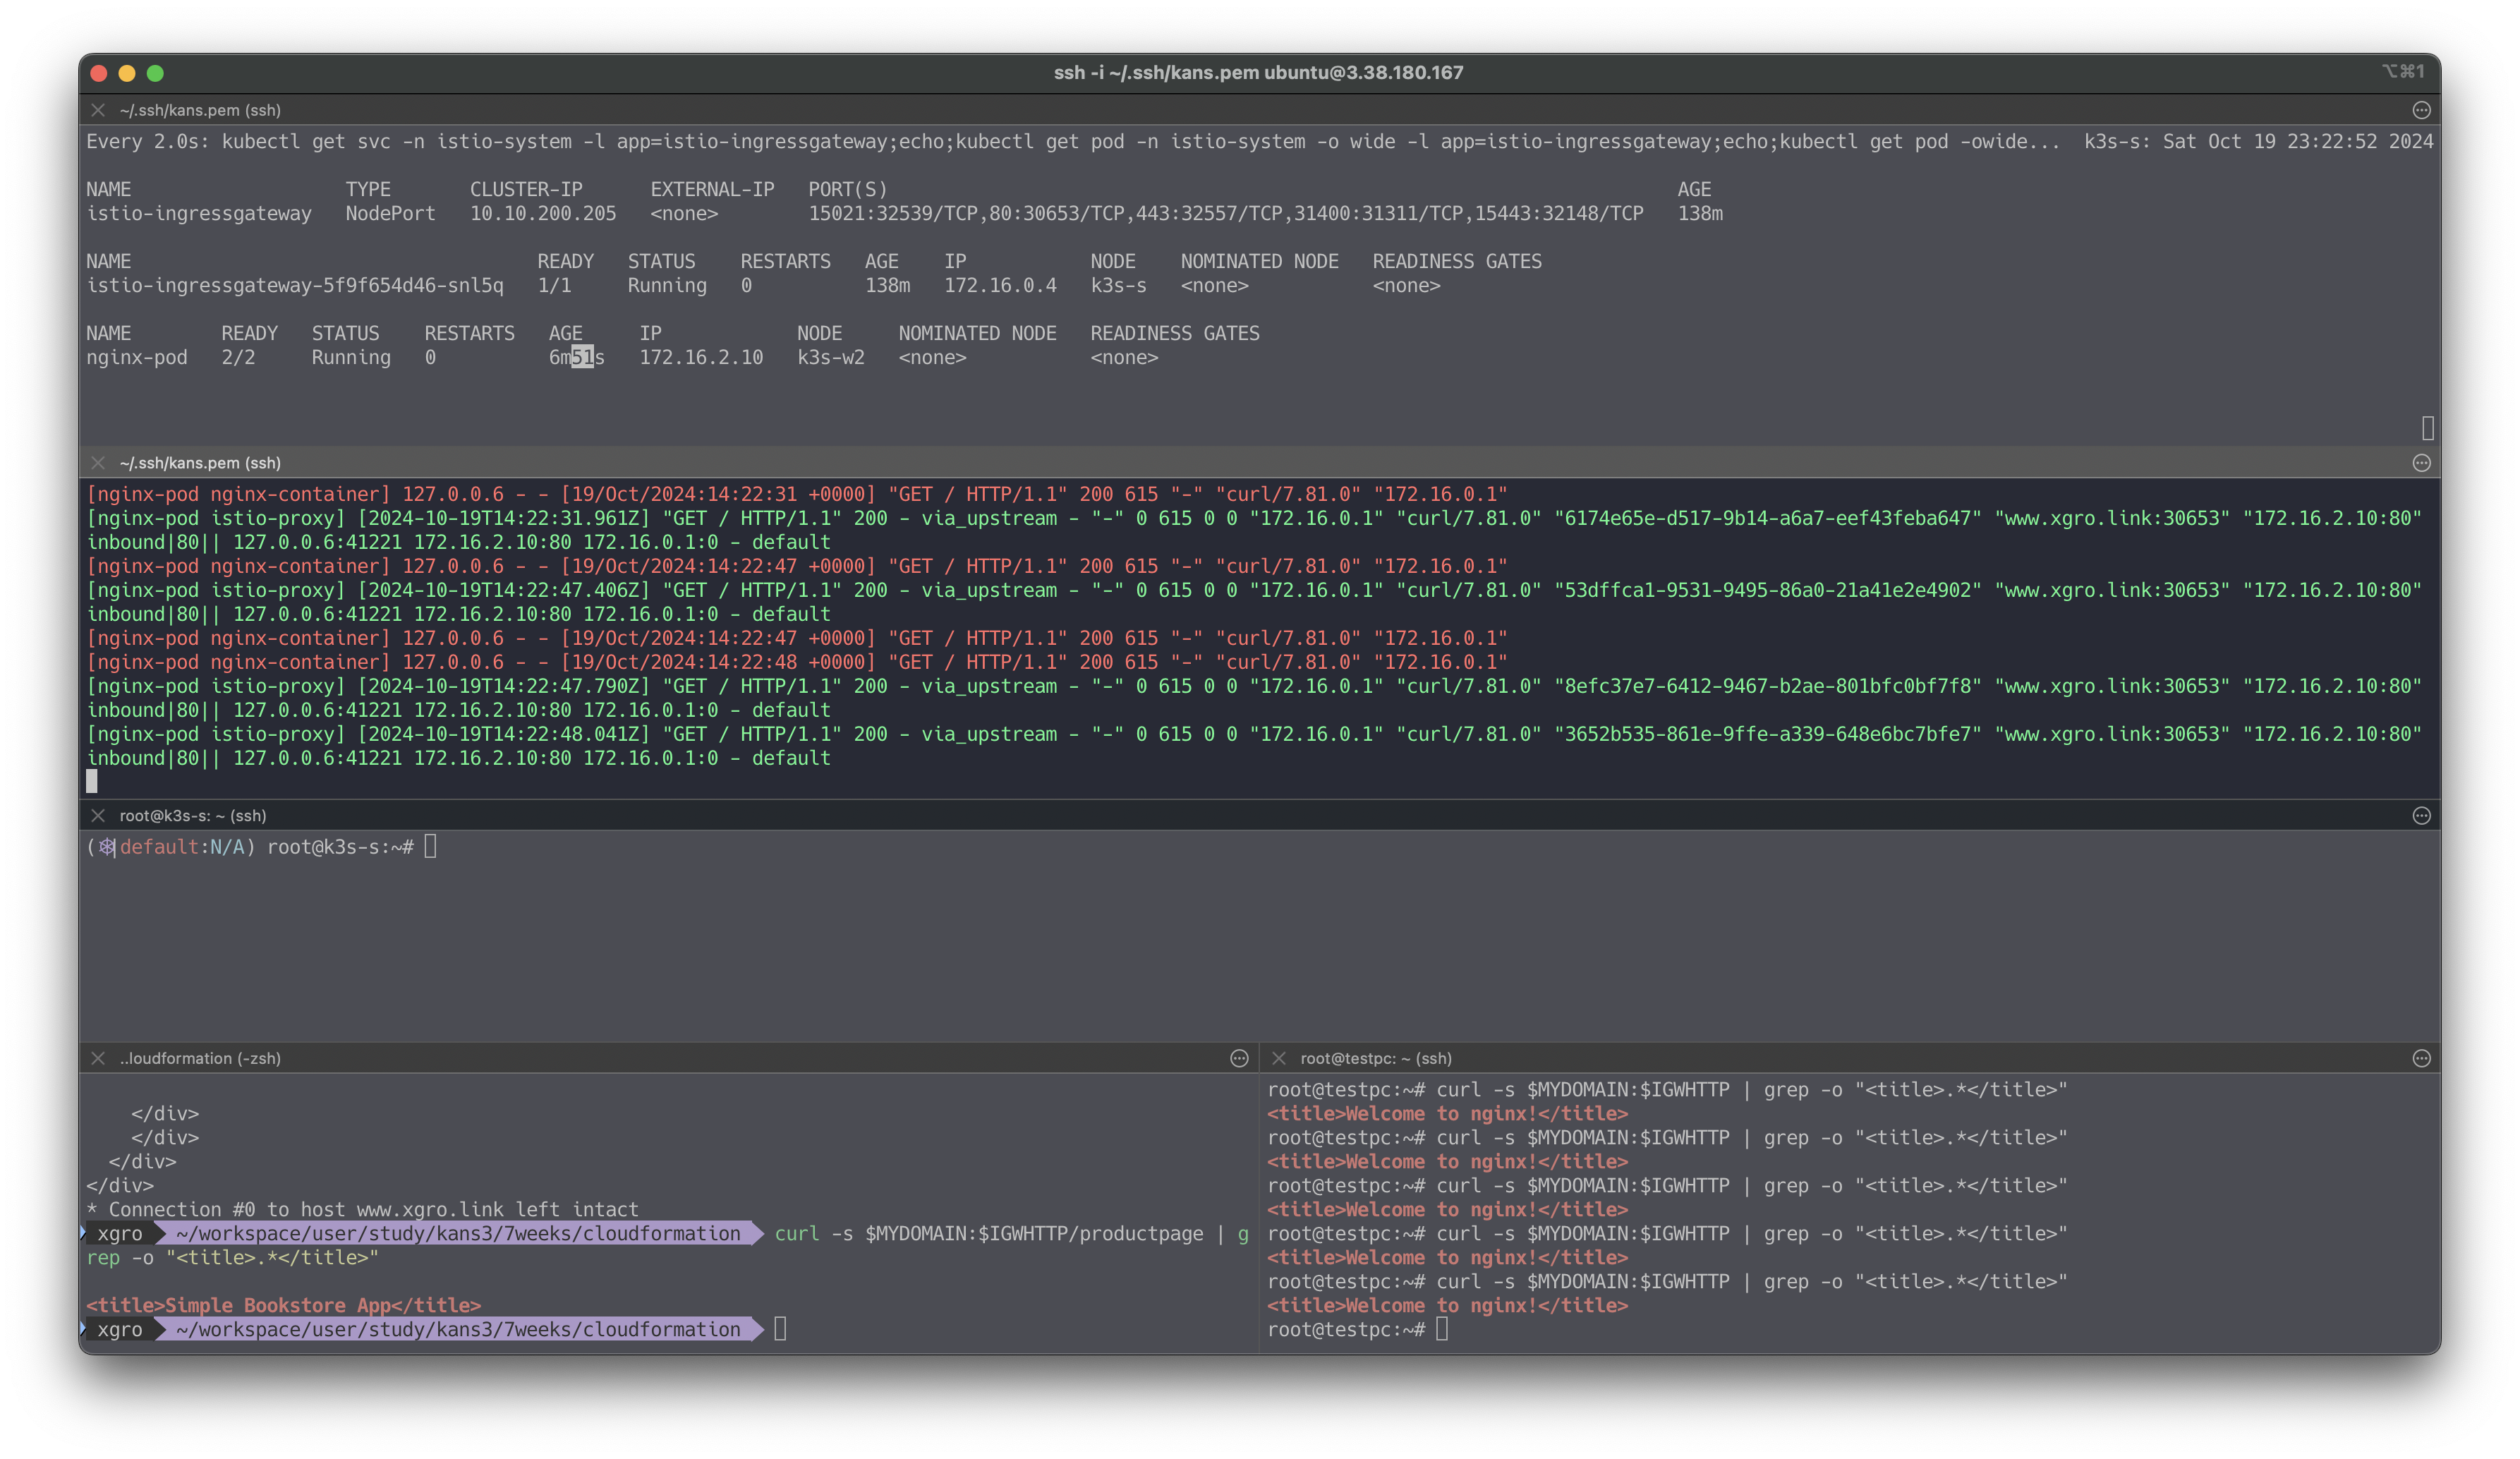
# Istio Gateway/VirtualService 설정
cat ~/istio-$ISTIOV/samples/bookinfo/networking/bookinfo-gateway.yaml
kubectl apply -f ~/istio-$ISTIOV/samples/bookinfo/networking/bookinfo-gateway.yaml

# 확인
kubectl get gw,vs
istioctl proxy-status
NAME                                                   CLUSTER        CDS                LDS                EDS                RDS                ECDS        ISTIOD                      VERSION
details-v1-65cfcf56f9-4drsk.default                    Kubernetes     SYNCED (7m4s)      SYNCED (7m4s)      SYNCED (6m57s)     SYNCED (7m4s)      IGNORED     istiod-7f8b586864-mv944     1.23.2
istio-ingressgateway-5f9f654d46-c4g7s.istio-system     Kubernetes     SYNCED (3m7s)      SYNCED (3m7s)      SYNCED (6m57s)     SYNCED (3m7s)      IGNORED     istiod-7f8b586864-mv944     1.23.2
productpage-v1-d5789fdfb-5cr6m.default                 Kubernetes     SYNCED (6m59s)     SYNCED (6m59s)     SYNCED (6m57s)     SYNCED (6m59s)     IGNORED     istiod-7f8b586864-mv944     1.23.2
ratings-v1-7c9bd4b87f-9q4nv.default                    Kubernetes     SYNCED (7m3s)      SYNCED (7m3s)      SYNCED (6m57s)     SYNCED (7m3s)      IGNORED     istiod-7f8b586864-mv944     1.23.2
reviews-v1-6584ddcf65-rqgp7.default                    Kubernetes     SYNCED (7m2s)      SYNCED (7m2s)      SYNCED (6m57s)     SYNCED (7m2s)      IGNORED     istiod-7f8b586864-mv944     1.23.2
reviews-v2-6f85cb9b7c-h6m7p.default                    Kubernetes     SYNCED (7m2s)      SYNCED (7m2s)      SYNCED (6m57s)     SYNCED (7m2s)      IGNORED     istiod-7f8b586864-mv944     1.23.2
reviews-v3-6f5b775685-rprpb.default                    Kubernetes     SYNCED (6m58s)     SYNCED (6m58s)     SYNCED (6m57s)     SYNCED (6m58s)     IGNORED     istiod-7f8b586864-mv944     1.23.2

# productpage 파드의 istio-proxy 로그 확인 Access log 가 출력 - Default access log format : 링크
kubetail -l app=productpage -c istio-proxy -f
Istio 를 통한 productpage 접속(반복) 테스트 & 웹 브라우저 접속 테스트*
출처 - https://kschoi728.tistory.com/271
k3s-s NodePort 접속 확인
#
export IGWHTTP=$(kubectl get service -n istio-system istio-ingressgateway -o jsonpath='{.spec.ports[1].nodePort}')
echo $IGWHTTP
32759

# 접속 확인
kubectl get svc -n istio-system istio-ingressgateway
curl -s http://localhost:$IGWHTTP/productpage
curl -s http://192.168.10.101:$IGWHTTP/productpage
curl -s http://192.168.10.102:$IGWHTTP/productpage

# 정보 확인
echo $MYDOMAIN
cat /etc/hosts

#
curl -s http://$MYDOMAIN:$IGWHTTP/productpage
자신의 PC 에서 웹 브라우저를 통해서 http://NodeIP:NodePort/productpage 로 접속 후 새로고침 해보자 → Reviews 와 Ratings 변경 확인!
모니터링
모니터링 - Blog
Kiali (키알리) 소개 : 주 데이터 소스(Prometheus, Jaeger)- 링크 링크2 링크3
- Kiali is an observability console for Istio with service mesh configuration and validation capabilities.
Kiali provides detailed metrics and a basic Grafana integration, which can be used for advanced queries.
Distributed tracing is provided by integration with Jaeger.
- Jaeger 와 연동을 통해서 분산 트레이싱을 제공할 수 있다
- Monitoring port of the IstioD pod : Kiali connects directly to the IstioD pod (not the Service) to check for its health.
By default, the connection is done to port 15014 which is the default monitoring port of the IstioD pod.
- 파드의 헬스체크는 Kiali 가 직접 IstioD 파드에 TCP Port 15014 를 통해서 체크한다
- Prometheus, Jaeger and Grafana - 링크
Prometheus and Jaeger are primary data sources for Kiali.
This page describes how to configure Kiali to communicate with these dependencies.
A minimalistic Grafana integration is also available.
- 주 데이터 소스는 Prometheus and Jaeger 이며, 최소 수준의 Grafana 와 연동할 수 있다
Addon 설치 : Kiali (키알리) 대시보드 along with Prometheus, Grafana, and Jaeger - 링크
# Install Kiali and the other addons and wait for them to be deployed. : Kiali dashboard, along with Prometheus, Grafana, and Jaeger.
tree ~/istio-$ISTIOV/samples/addons/
kubectl apply -f ~/istio-$ISTIOV/samples/addons # 디렉터리에 있는 모든 yaml 자원을 생성
kubectl rollout status deployment/kiali -n istio-system

# 확인
kubectl get all,sa,cm -n istio-system
kubectl get svc,ep -n istio-system

# kiali 서비스 변경
kubectl patch svc -n istio-system kiali -p '{"spec":{"type":"NodePort"}}'

# kiali 웹 접속 주소 확인
KIALINodePort=$(kubectl get svc -n istio-system kiali -o jsonpath={.spec.ports[0].nodePort})
echo -e "KIALI UI URL = http://$(curl -s ipinfo.io/ip):$KIALINodePort"

# Grafana 서비스 변경
kubectl patch svc -n istio-system grafana -p '{"spec":{"type":"NodePort"}}'

# Grafana 웹 접속 주소 확인 : 7개의 대시보드
GRAFANANodePort=$(kubectl get svc -n istio-system grafana -o jsonpath={.spec.ports[0].nodePort})
echo -e "Grafana URL = http://$(curl -s ipinfo.io/ip):$GRAFANANodePort"

# Prometheus 서비스 변경
kubectl patch svc -n istio-system prometheus -p '{"spec":{"type":"NodePort"}}'

# Prometheus 웹 접속 주소 확인
PROMENodePort=$(kubectl get svc -n istio-system prometheus -o jsonpath={.spec.ports[0].nodePort})
echo -e "Prometheus URL = http://$(curl -s ipinfo.io/ip):$PROMENodePort"
프로메테우스 확인
그라파나 확인
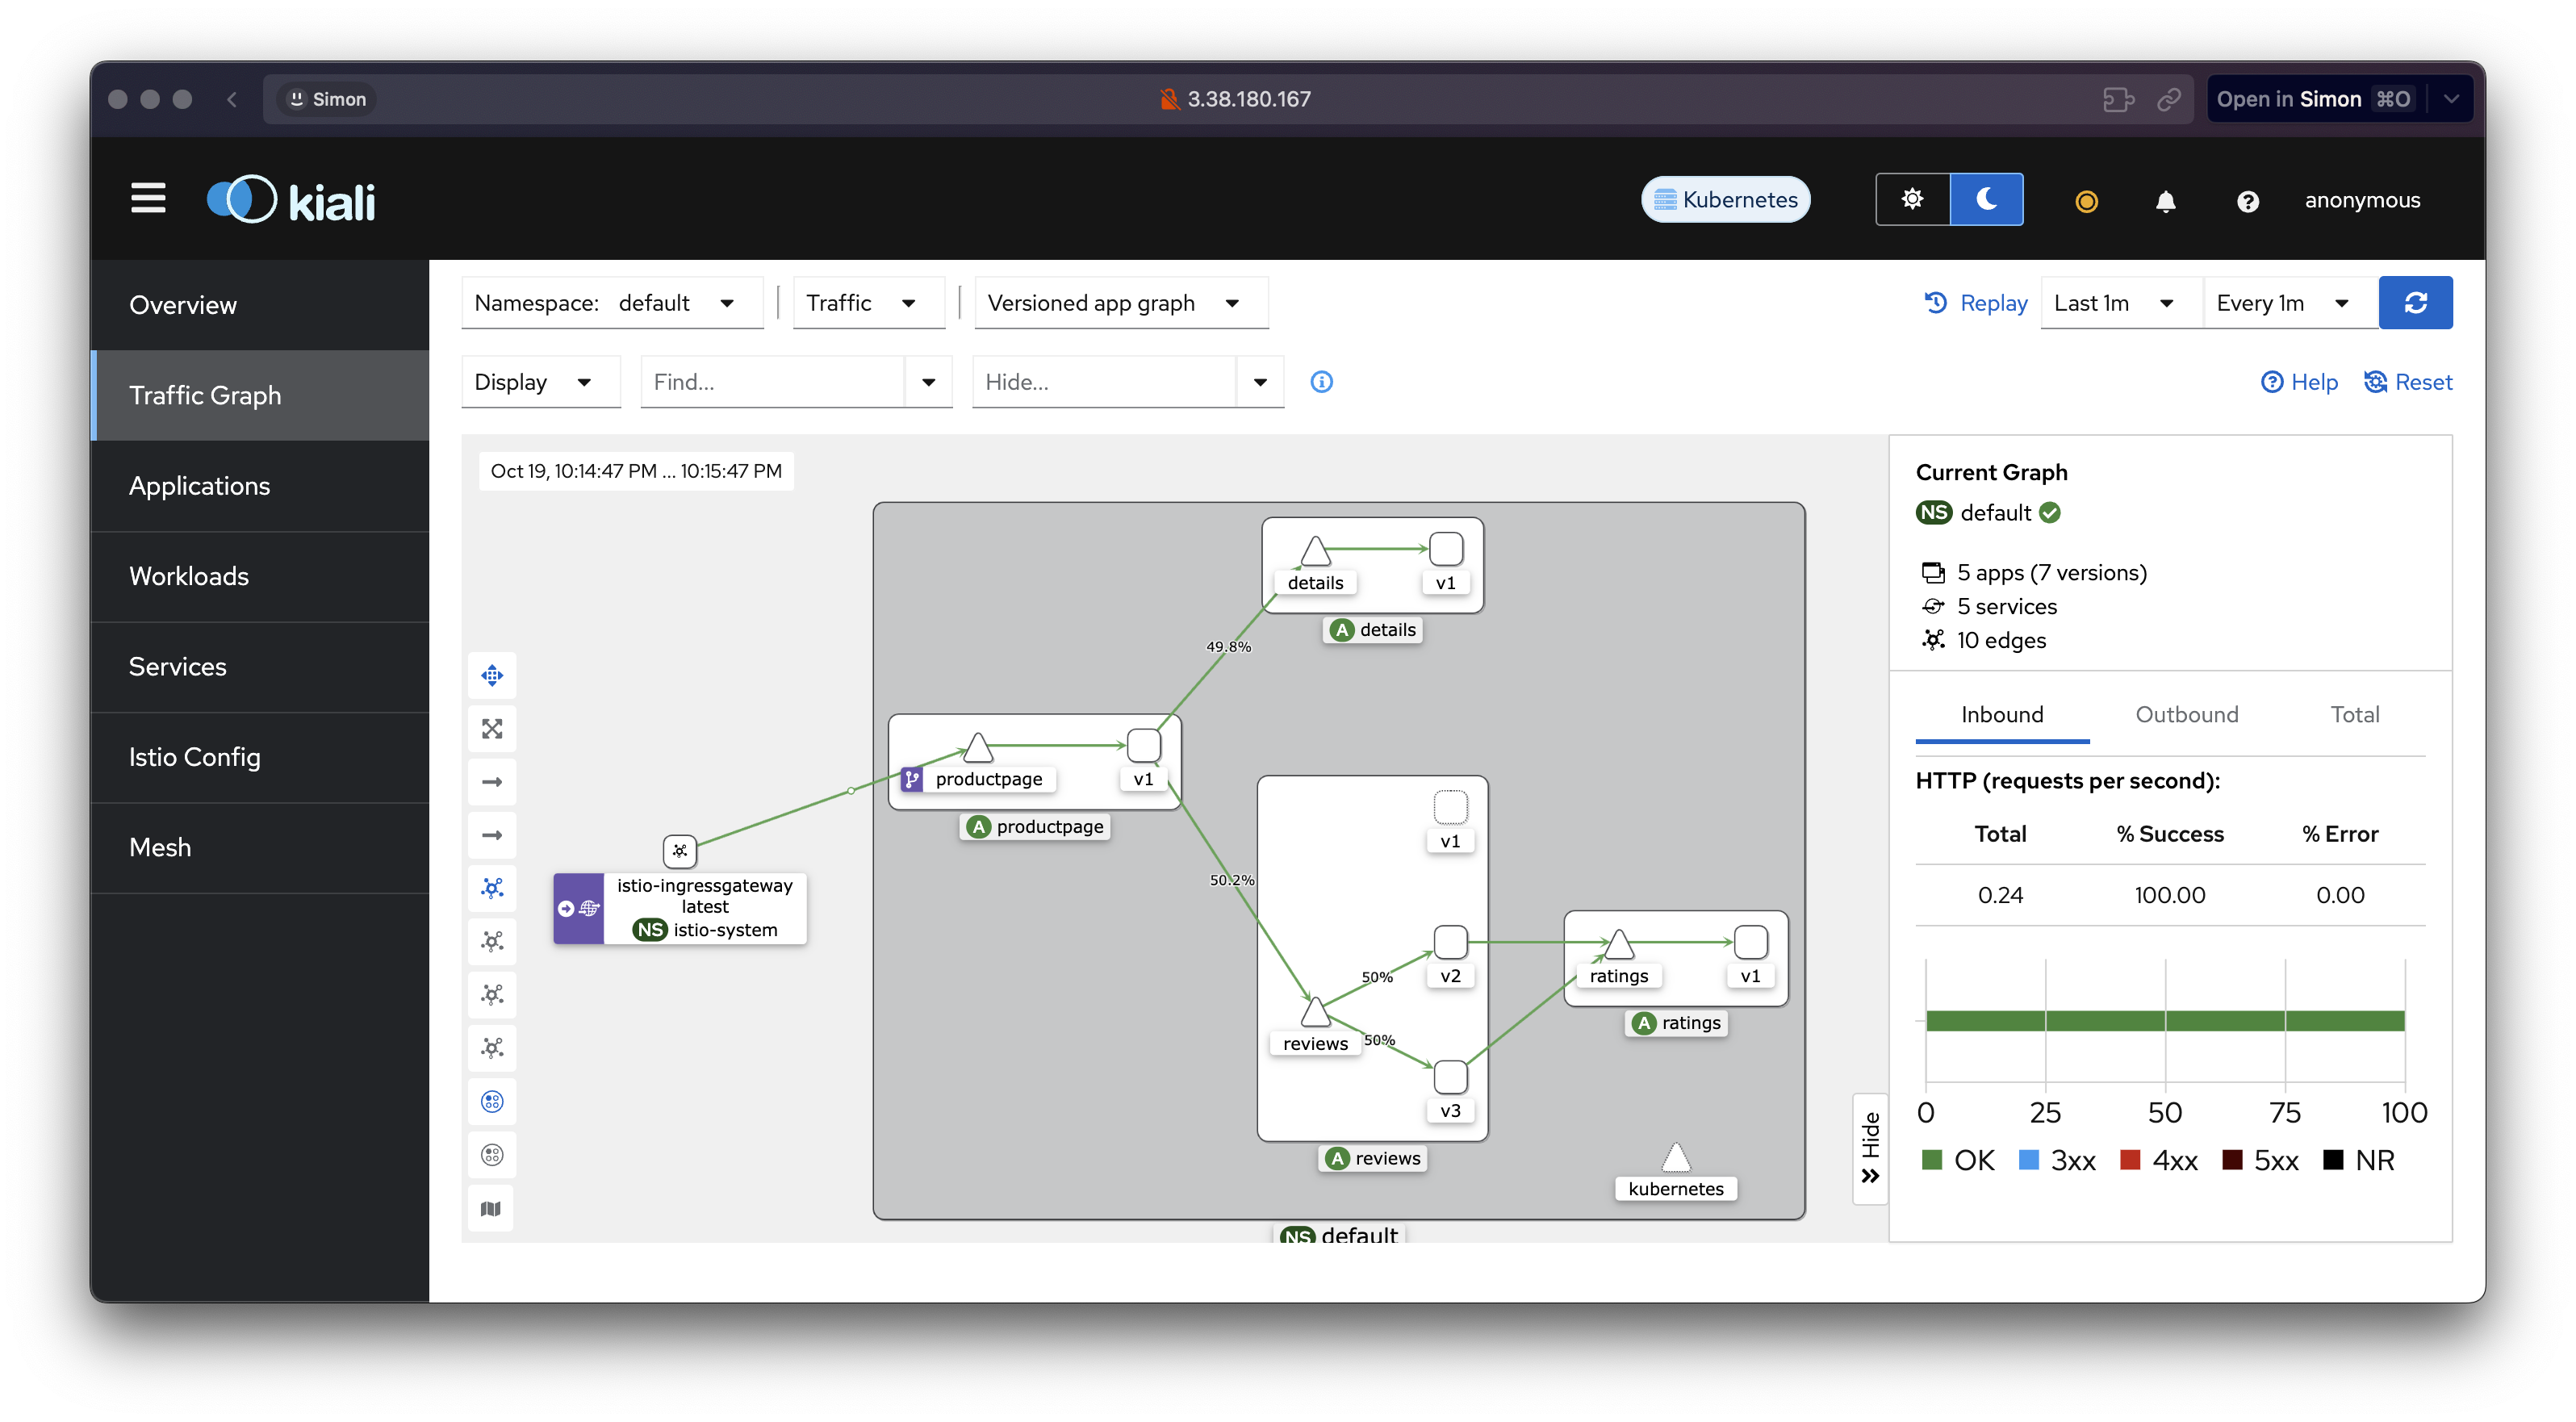
Kiali (키알리) 대시보드 둘러보기
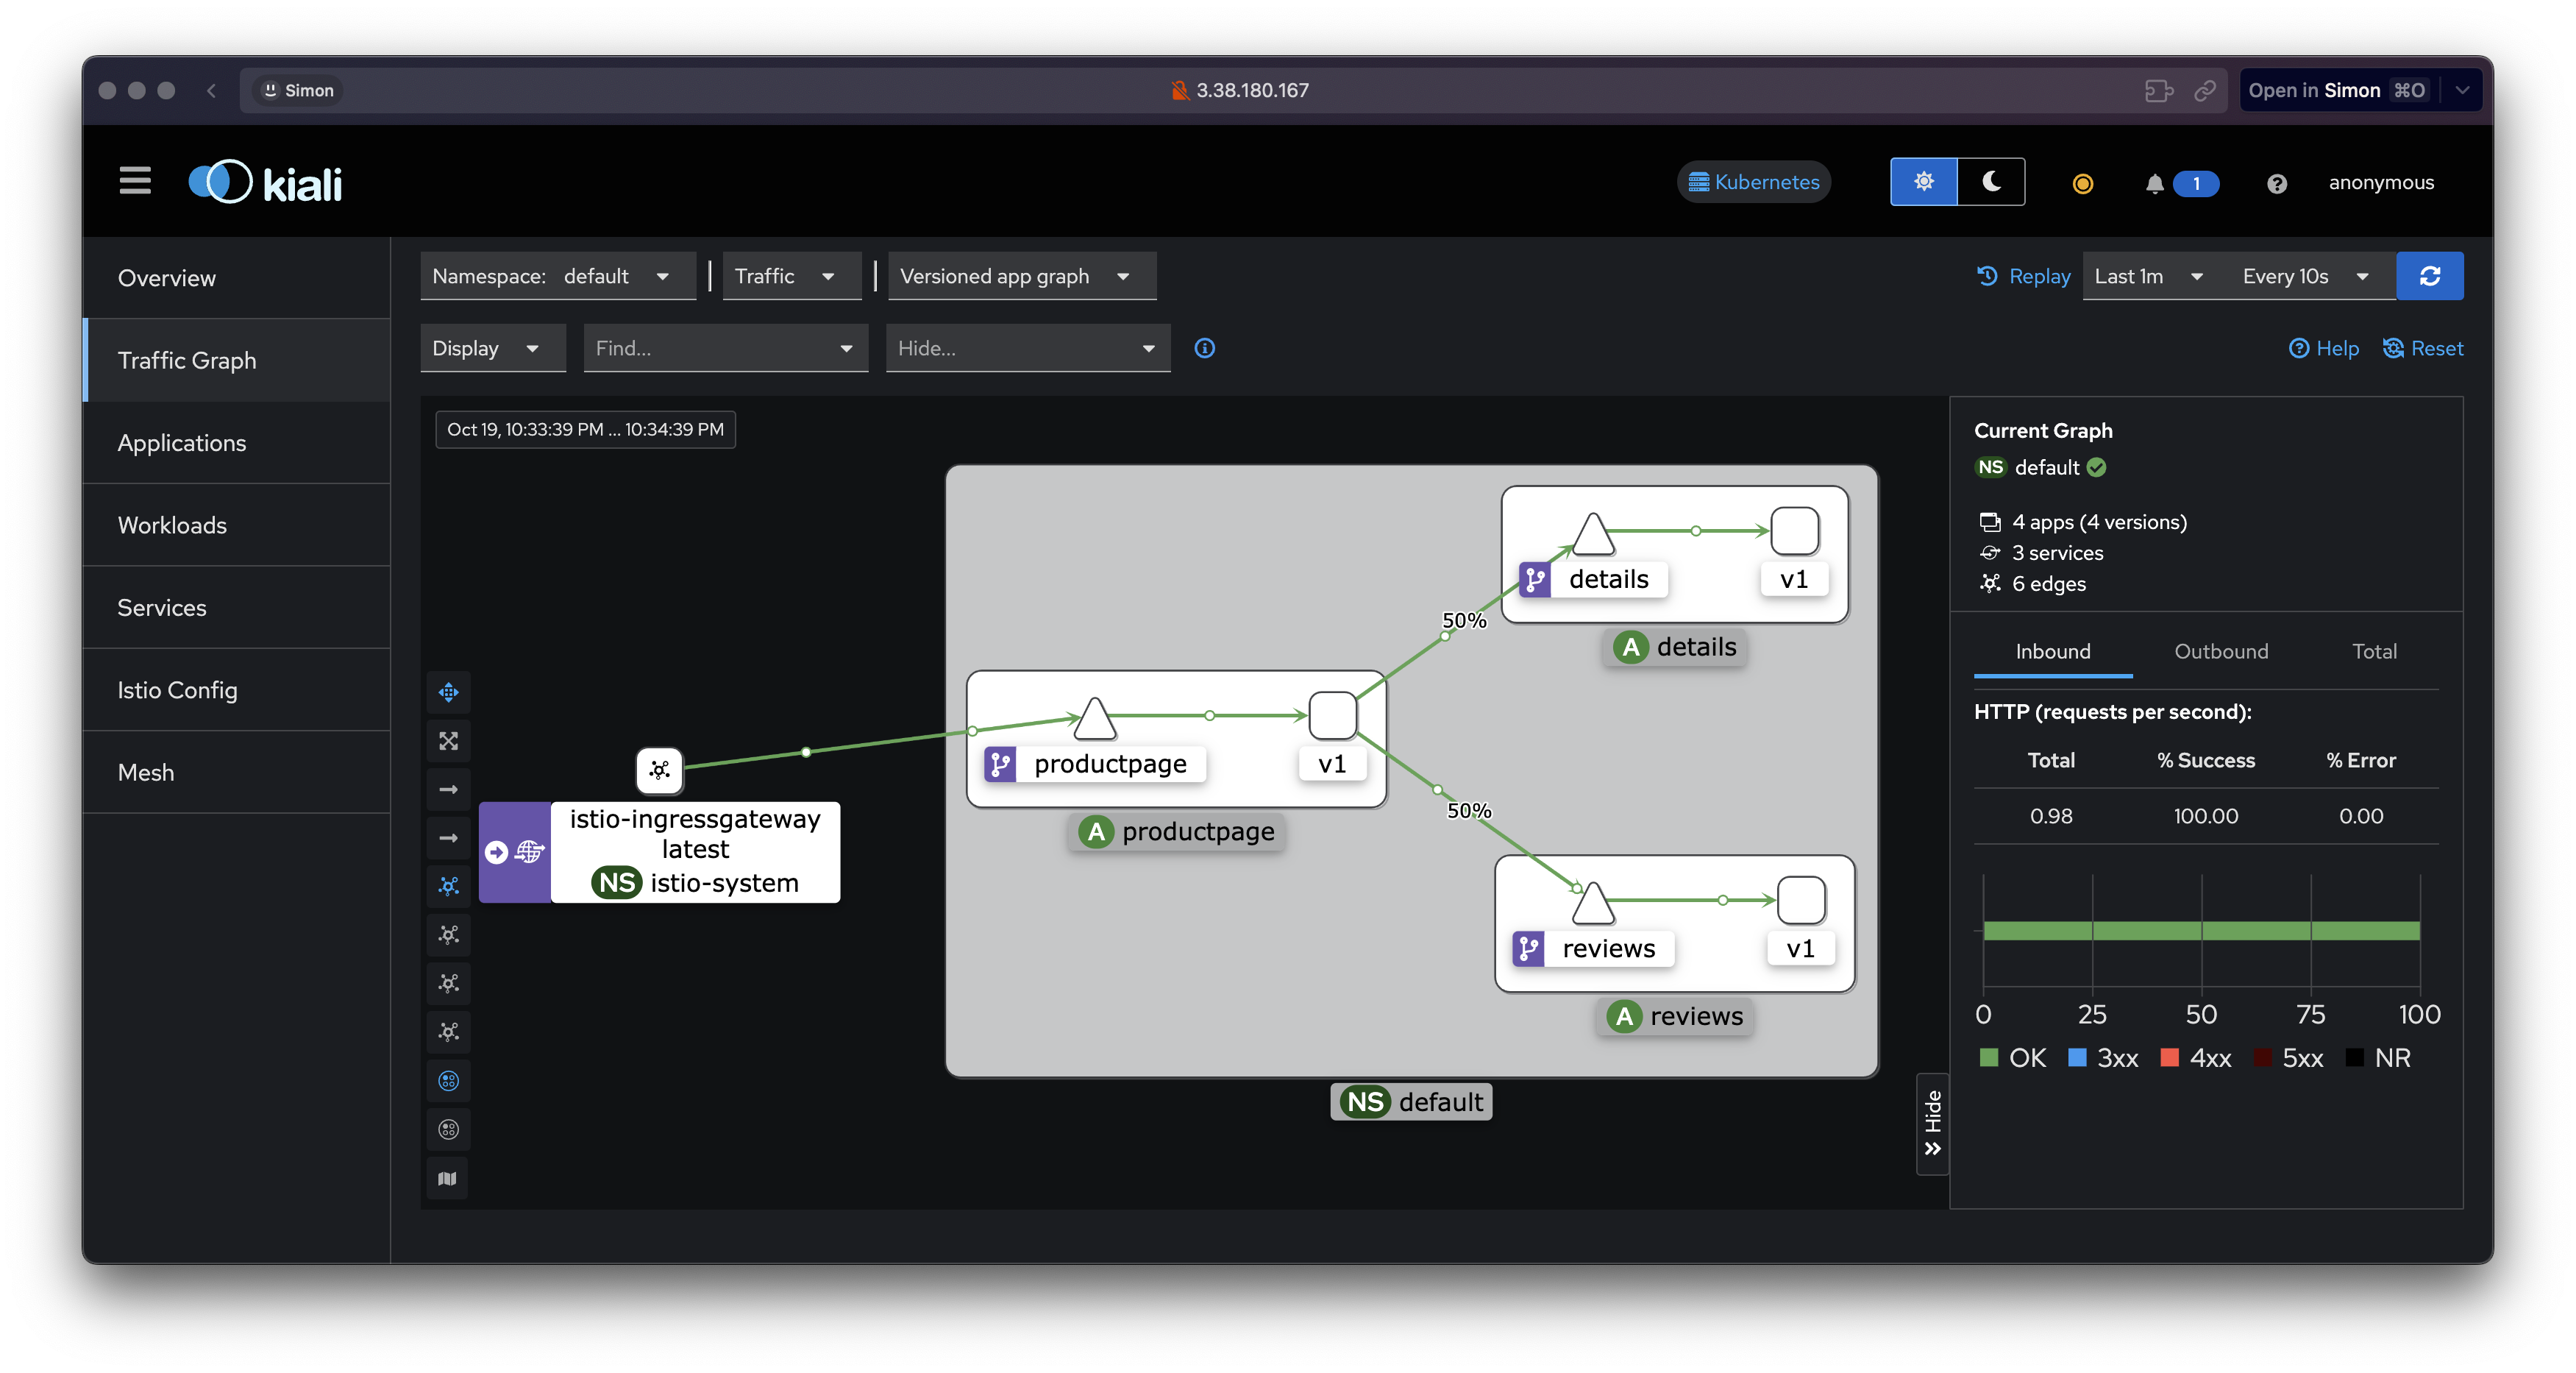
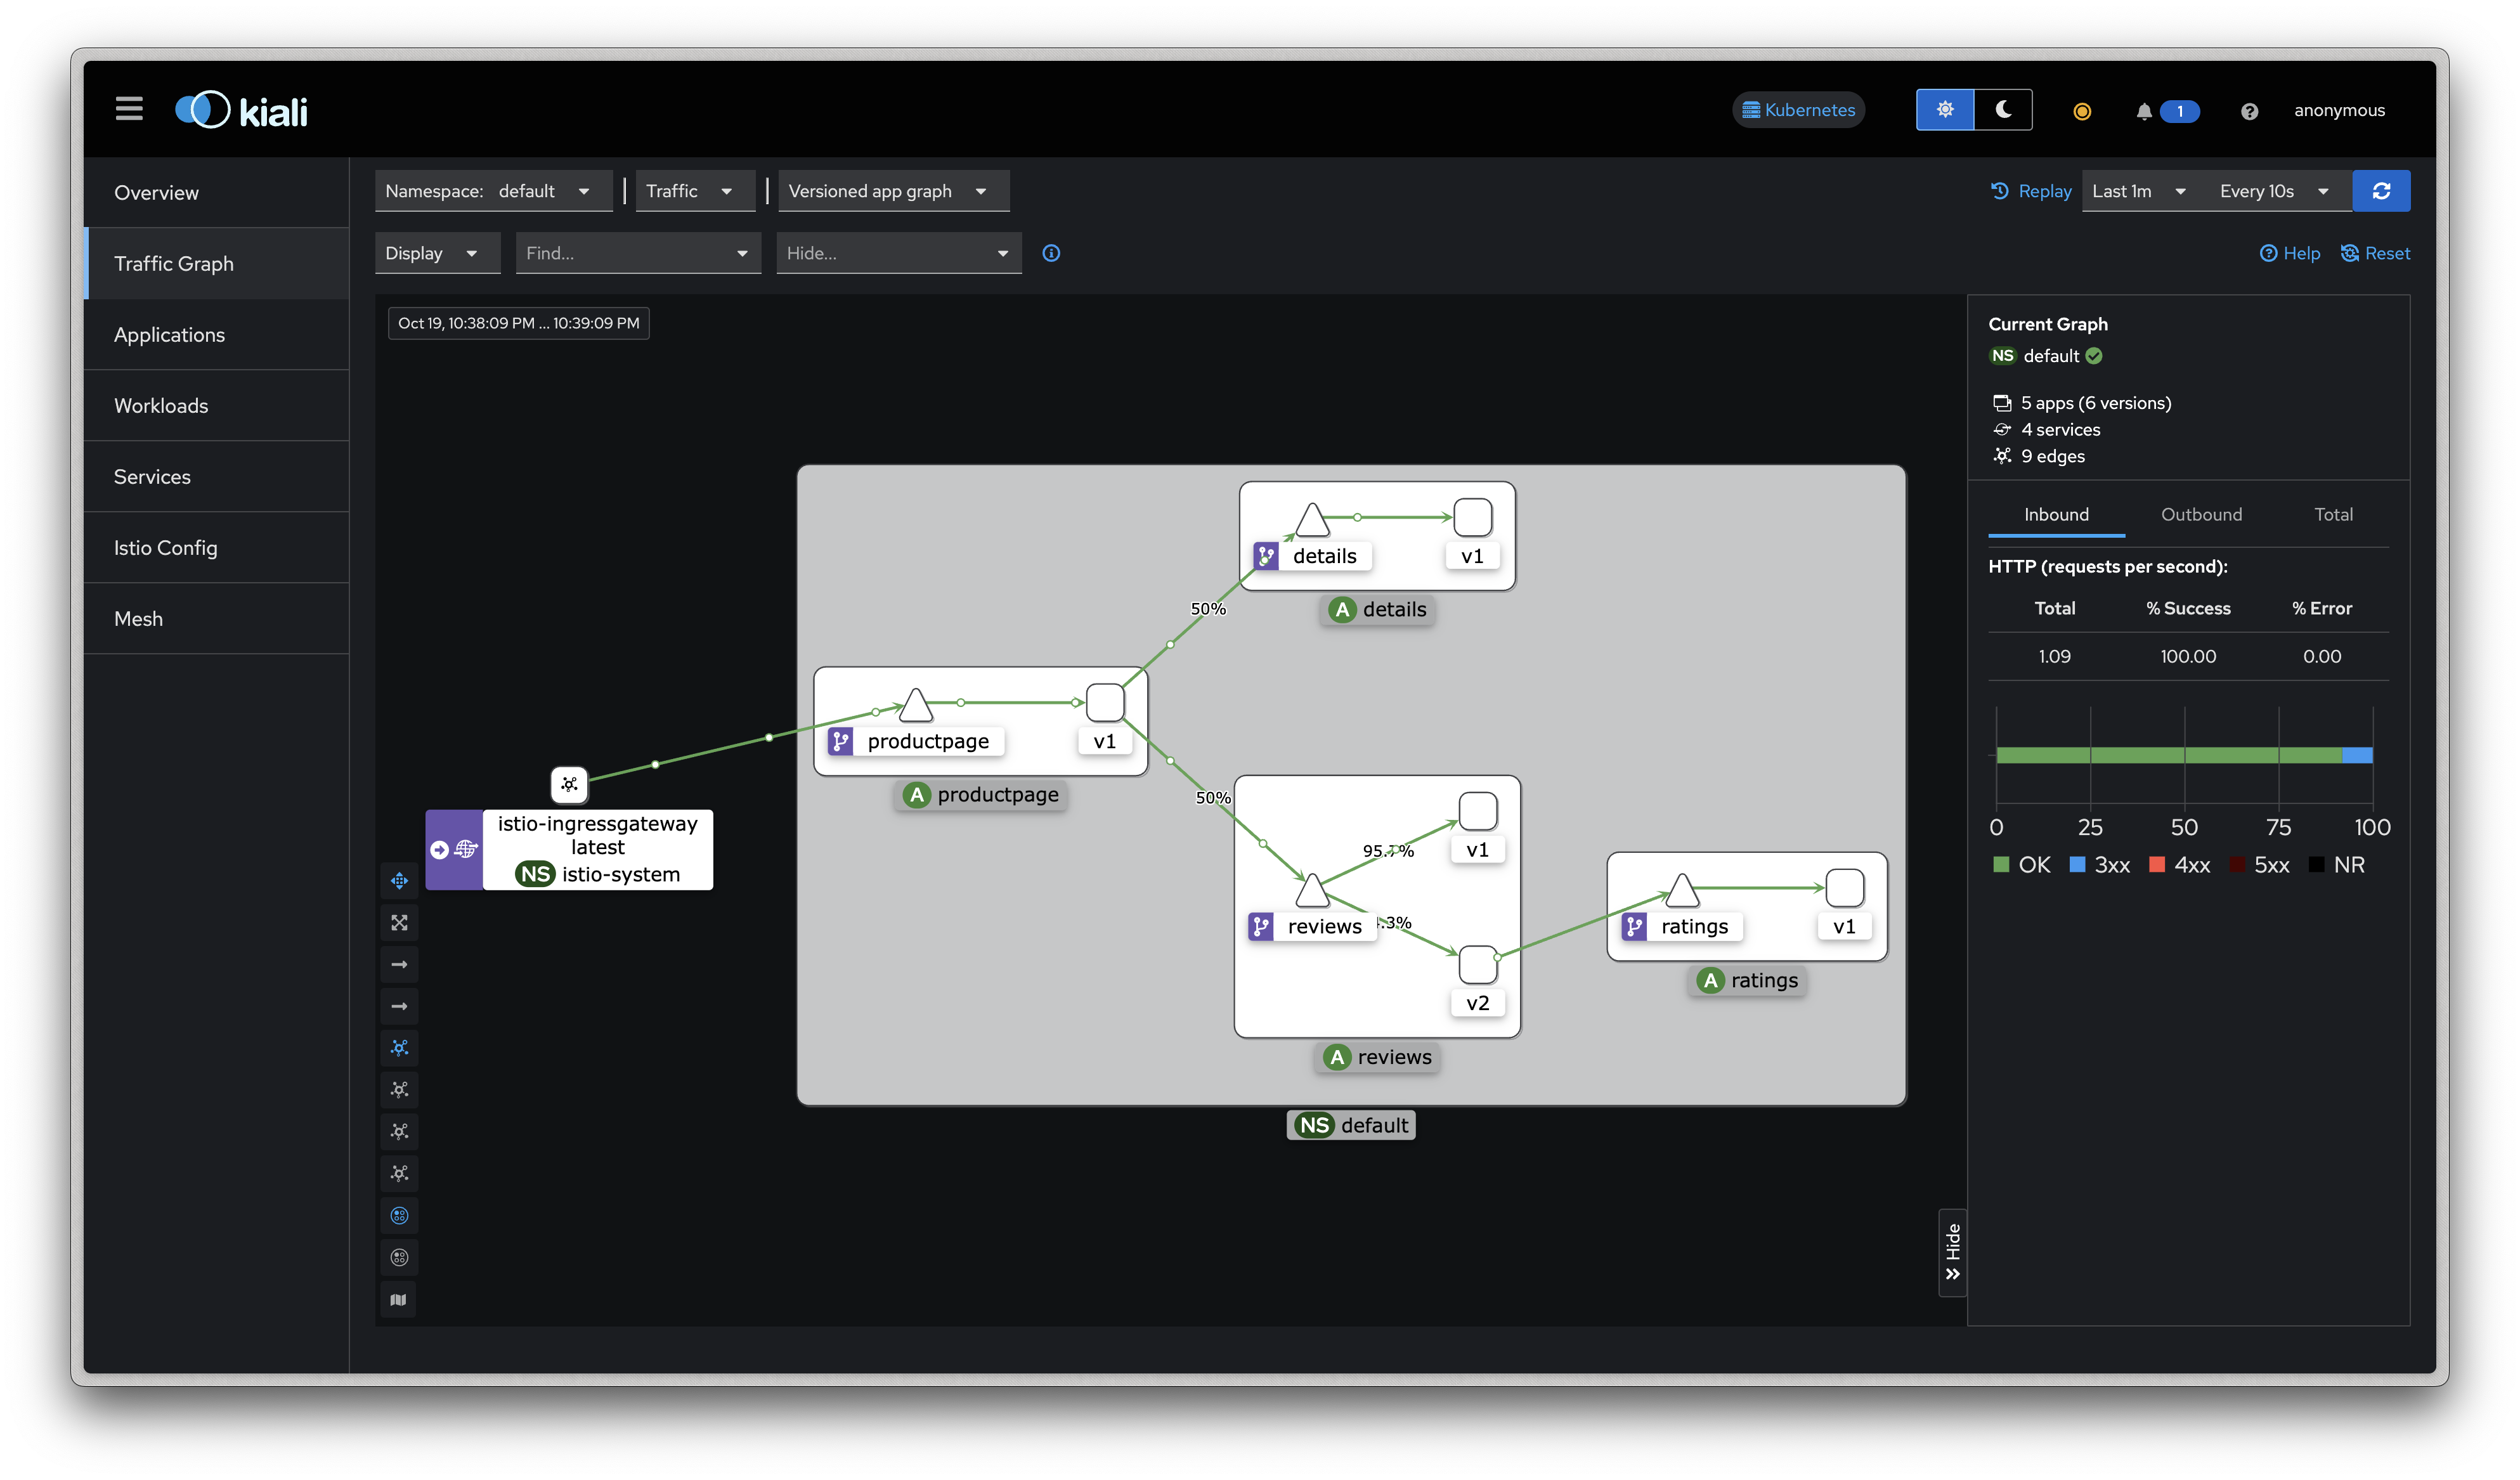
Namespace 를 default 로 선택 후 Graph (Traffic, Versioned app graph) 에서 Display 옵션 중 ‘Traffic Distribution’ 과 ‘Traffic Animation’ 활성화! , Security 체크 해보자 (Last 1m, Evety 10s) Last 5m
k8s-rtr 에서 트래픽 요청 간격을 조절해보자 (1초, 0.5초, 0.3초, 0.1초)
testpc 에서 아래 실행
# 반복 접속 테스트
while true; do curl -s $MYDOMAIN:$IGWHTTP/productpage | grep -o "<title>.*</title>" ; echo "--------------" ; sleep 1; done
while true; do curl -s $MYDOMAIN:$IGWHTTP/productpage | grep -o "<title>.*</title>" ; echo "--------------" ; sleep 0.1; done
while true; do curl -s $MYDOMAIN:$IGWHTTP/productpage | grep -o "<title>.*</title>" ; echo "--------------" ; sleep 0.5; done
for i in {1..100};  do curl -s $MYDOMAIN:$IGWHTTP/productpage | grep -o "<title>.*</title>" ; done
for i in {1..1000}; do curl -s $MYDOMAIN:$IGWHTTP/productpage | grep -o "<title>.*</title>" ; done
Workloads 에서 Logs(istio-proxy, app) 를 확인할 수 있고, Envoy 관련 설정 정보(Clusters, Listeners, Routes, Config 등)를 편리하게 볼 수 있다 ![]
Step 06. Traffic Management
Traffic Managenet : 트래픽 컨트롤은 VirtualService 와 DestinationRule 설정을 통해서 동작한다 - Concepts
 출처 - https://faun.pub/on-premise-to-cloud-migration-mock-drills-using-istio-ea89aee5ea38
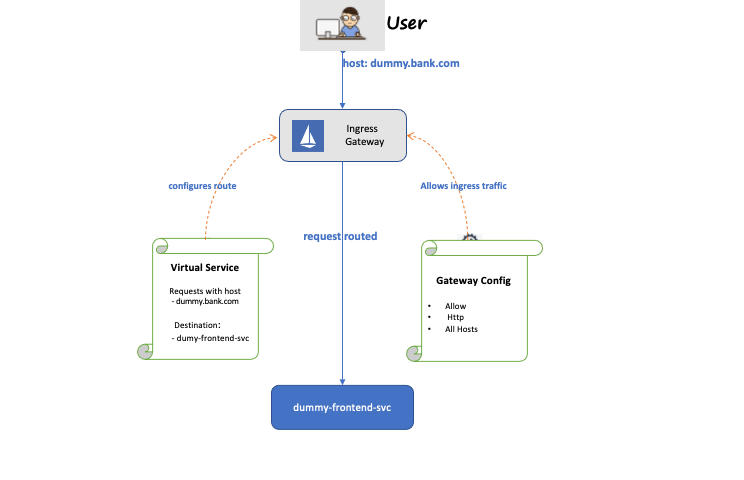
동작 소개 : 클라이언트 PC → Istio ingressgateway 파드 → (Gateway, VirtualService + DestinationRule) → Cluster(Endpoint - 파드)
Gateway: 지정한 인그레스 게이트웨이로부터 트래픽이 인입, 프로토콜 및 포트, HOSTS, Proxy 등 설정 가능
VirtualService: 인입 처리할 hosts 설정, L7 PATH 별 라우팅, 목적지에 대한 정책 설정 가능 (envoy route config) - 링크
- VirtualService 는 DestinationRule 에서 설정된 서브셋(subset)을 사용하여 트래픽 컨트롤을 할 수 있다
- hosts 필드 : 목적지 주소 - IP address, a DNS name (FQDN), 혹은 k8s svc 이름 , wildcard (”*”) prefixes
- Routing rules : HTTP 경우 - Match 필드(예, 헤더) , Destination(istio/envoy 에 등록된 대상, subnet 에 DestinationRule 활용)
- HTTPRoute : redirect , rewrite , fault(장애 주입) , mirror(복제, 기본 100%) , corsPolicy(CORS 삽입) , headers(헤더 조작) 등 - 링크
- Routing rule precedence : Routing rules are evaluated in sequential order from top to bottom - 위에서 순차적 적용
Request Routing
Request Routing - 링크
실습 전 기본 DestinationRule 적용 : 각각의 파드에 subset 지정
# 샘플 파일들 확인
cd ~/istio-$ISTIOV/samples/bookinfo/networking
tree

# 기본 DestinationRule 적용
kubectl apply -f destination-rule-all.yaml

# DestinationRule 확인 dr(=destinationrules) : KIALI Services 확인 시 GW, VS, DR 확인
kubectl get dr
NAME          HOST          AGE
details       details       16m
productpage   productpage   16m
ratings       ratings       16m
reviews       reviews       16m
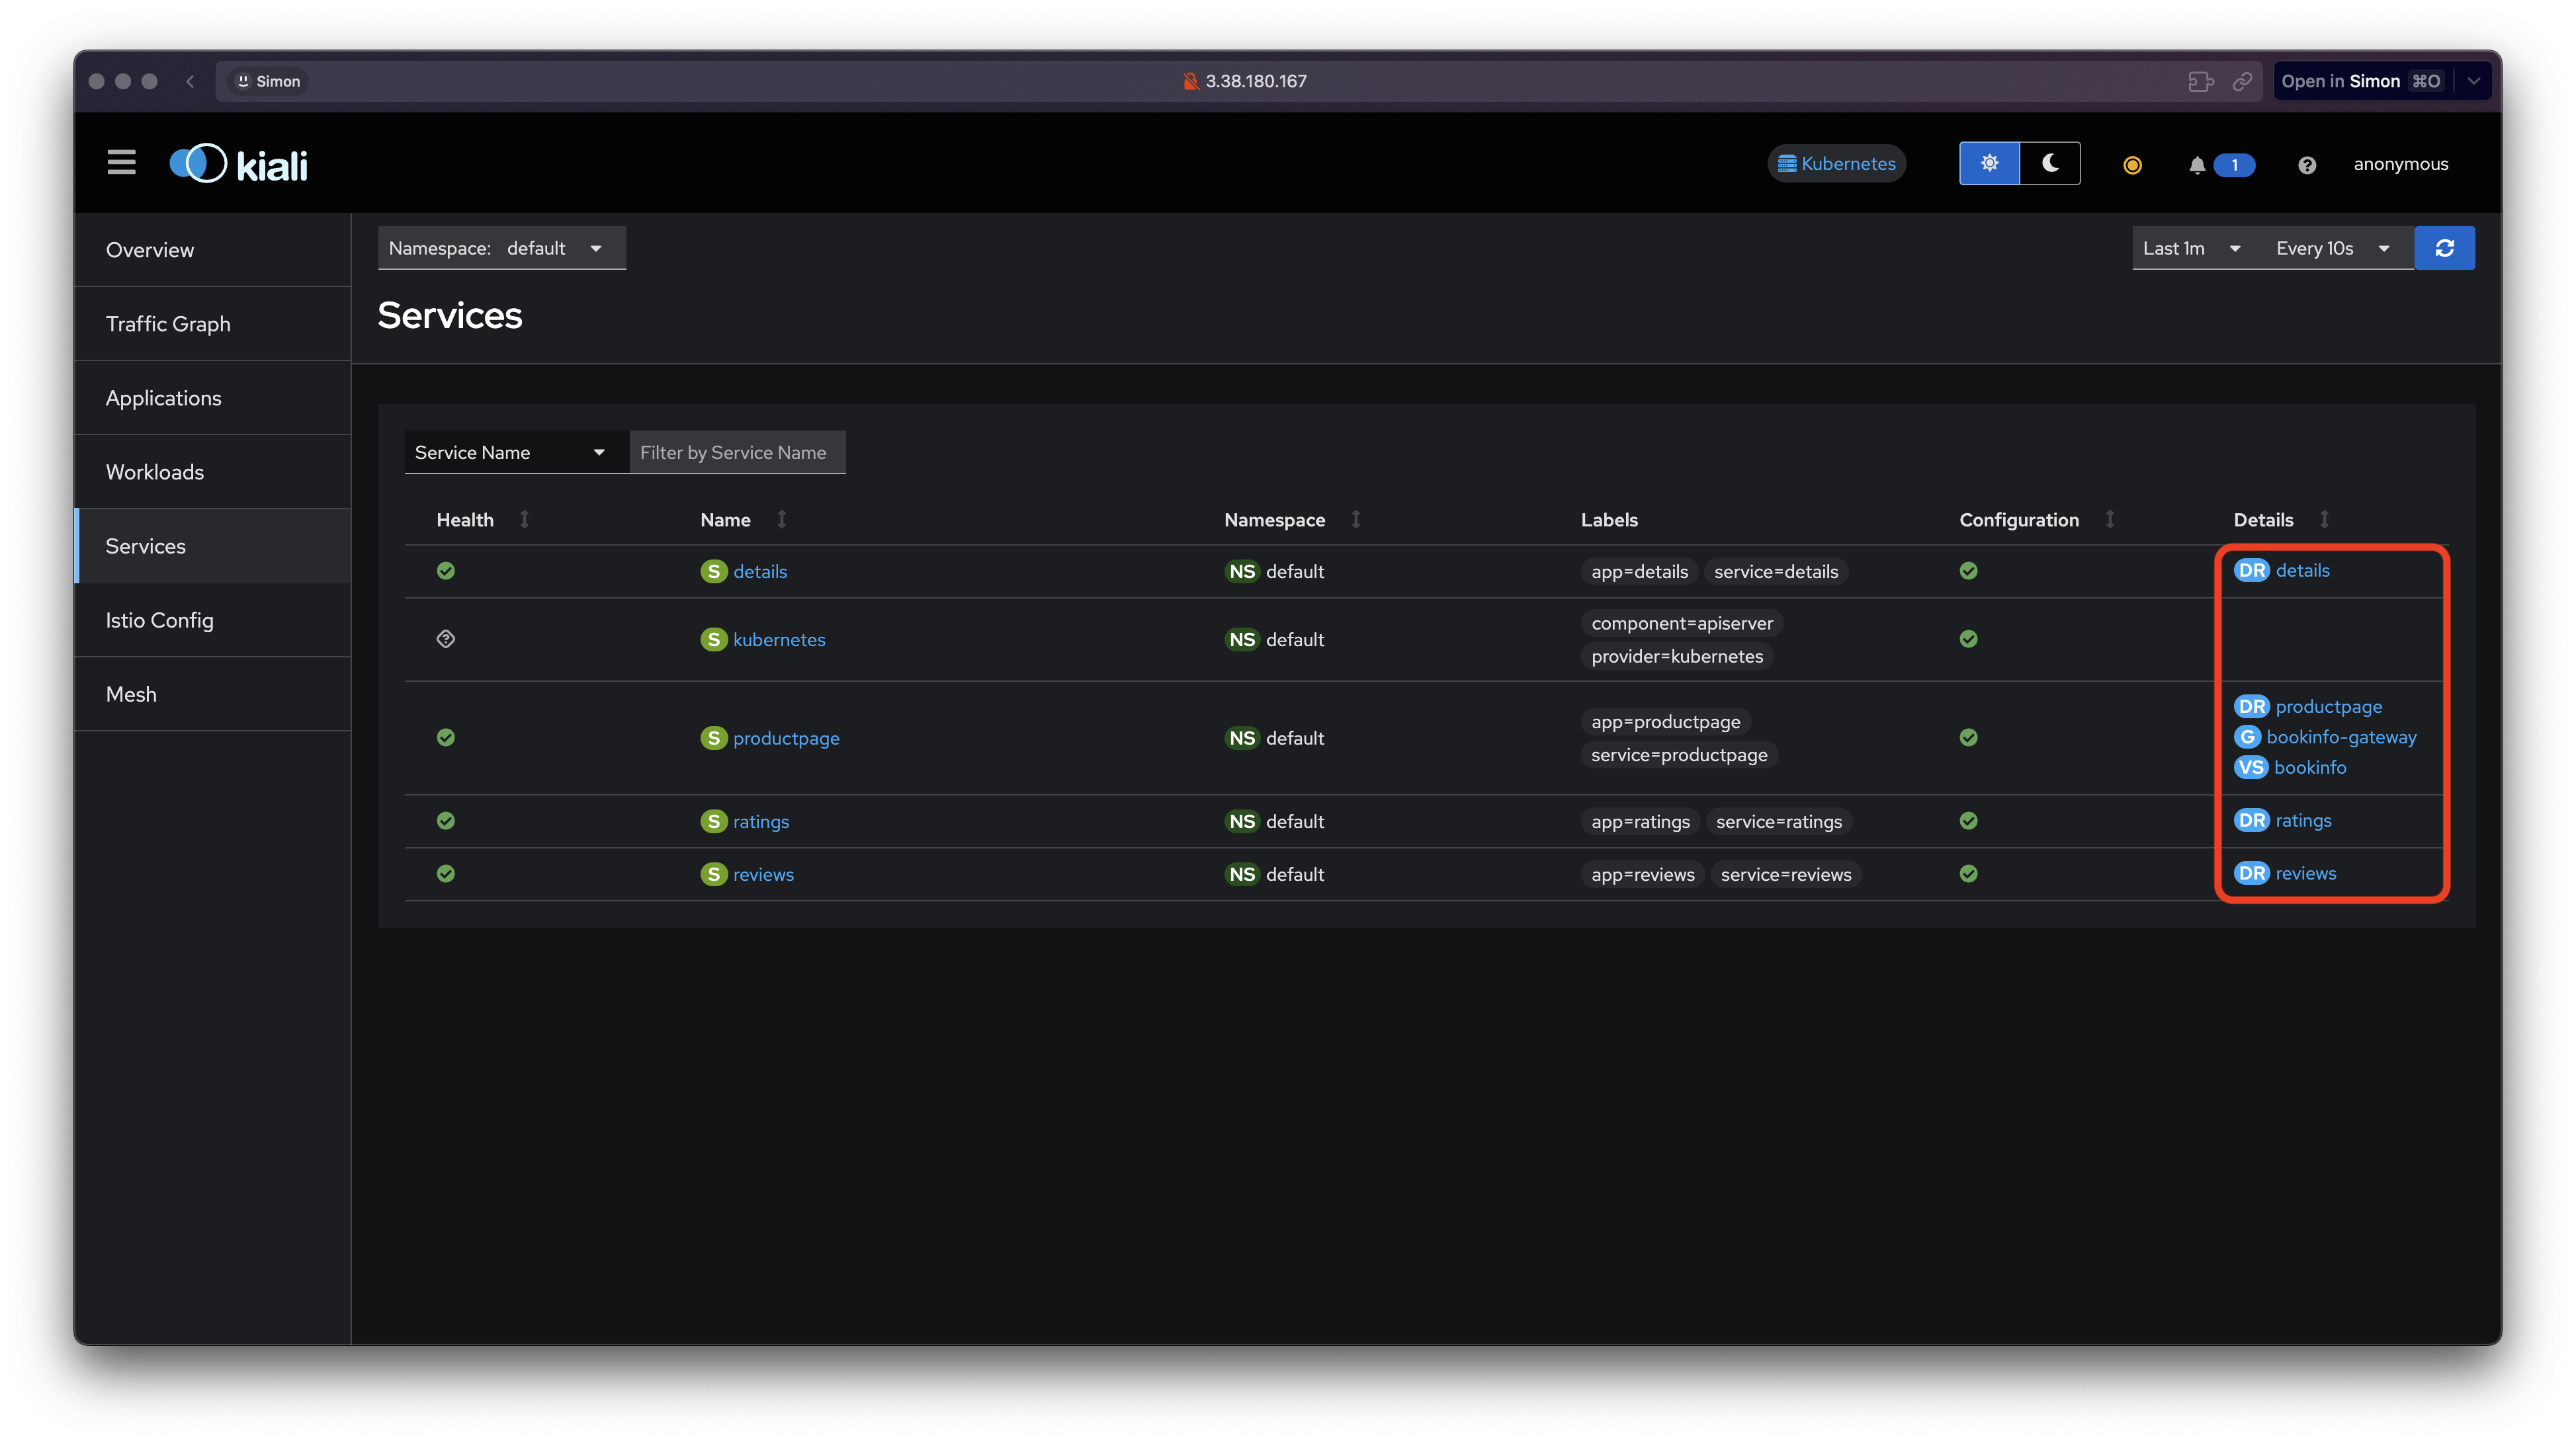
virtual-service-all-v1.yaml : 4개 서비스 모두 v1 의 서브셋(subset) 에 전송하는 정책 테스트
apiVersion: networking.istio.io/v1alpha3
kind: VirtualService
metadata:
  name: productpage
spec:
  hosts:
  - productpage
  http:
  - route:
    - destination:
        host: productpage
        subset: v1
---
apiVersion: networking.istio.io/v1alpha3
kind: VirtualService
metadata:
  name: reviews
spec:
  hosts:
  - reviews
  http:
  - route:
    - destination:
        host: reviews
        subset: v1
---
apiVersion: networking.istio.io/v1alpha3
kind: VirtualService
metadata:
  name: ratings
spec:
  hosts:
  - ratings
  http:
  - route:
    - destination:
        host: ratings
        subset: v1
---
apiVersion: networking.istio.io/v1alpha3
kind: VirtualService
metadata:
  name: details
spec:
  hosts:
  - details
  http:
  - route:
    - destination:
        host: details
        subset: v1
---
# istio vs(virtualservices) 확인 kubectl get vs NAME GATEWAYS HOSTS AGE bookinfo ["bookinfo-gateway"] ["*"] 85m # 모든 마이크로서비스에 대해 v1 의 서브셋(subset) 에 전송되게 virtualservices 적용 kubectl apply -f virtual-service-all-v1.yaml # istio vs(virtualservices) 확인 >> KIALI 에서 reviews v2,v3 향하는 트래픽 경로가 사라진다! kubectl get virtualservices NAME GATEWAYS HOSTS AGE bookinfo ["bookinfo-gateway"] ["*"] 85m details ["details"] 9s productpage ["productpage"] 9s ratings ["ratings"] 9s reviews ["reviews"] 9s
virtual-service-reviews-test-v2.yaml : User Identity 기반 라우팅, end-user 커스텀 헤더에 jason 매칭 시 reviews v2 로 전달
apiVersion: networking.istio.io/v1alpha3
kind: VirtualService
metadata:
  name: reviews
spec:
  hosts:
    - reviews
  http:
  - match:
    - headers:
        end-user:
          exact: jason
    route:
    - destination:
        host: reviews
        subset: v2
  - route:
    - destination:
        host: reviews
        subset: v1
# 모든 마이크로서비스에 대해 v1 의 서브셋(subset) 에 전송되게 virtualservices 적용 kubectl apply -f virtual-service-reviews-test-v2.yaml # jason 로그인 시 로그 확인 kubetail -l app=productpage -f [productpage-v1-6b746f74dc-7ptpj productpage] INFO:werkzeug:127.0.0.6 - - [13/Feb/2022 09:00:37] "POST /login HTTP/1.1" 302 - [productpage-v1-6b746f74dc-7ptpj productpage] DEBUG:urllib3.connectionpool:Starting new HTTP connection (1): details:9080 [productpage-v1-6b746f74dc-7ptpj productpage] send: b'GET /details/0 HTTP/1.1\r\nHost: details:9080\r\nuser-agent: Mozilla/5.0 (Macintosh; Intel Mac OS X 10_15_7) AppleWebKit/537.36 (KHTML, like Gecko) Chrome/98.0.4758.80 Safari/537.36\r\nAccept-Encoding: gzip, deflate\r\nAccept: */*\r\nConnection: keep-alive\r\nX-B3-TraceId: 5d48ade1f048c3fc7ebe4197c22c3275\r\nX-B3-SpanId: 675da1ab468945b5\r\nX-B3-ParentSpanId: 7ebe4197c22c3275\r\nX-B3-Sampled: 1\r\nend-user: jason\r\nx-request-id: 95907bc3-1a86-9f1d-8963-3723b9fb1e21\r\n\r\n' [productpage-v1-6b746f74dc-7ptpj productpage] reply: 'HTTP/1.1 200 OK\r\n' [productpage-v1-6b746f74dc-7ptpj productpage] header: content-type: application/json [productpage-v1-6b746f74dc-7ptpj productpage] header: server: envoy [productpage-v1-6b746f74dc-7ptpj productpage] header: date: Sun, 13 Feb 2022 09:00:37 GMT [productpage-v1-6b746f74dc-7ptpj productpage] header: content-length: 178 [productpage-v1-6b746f74dc-7ptpj productpage] header: x-envoy-upstream-service-time: 1 [productpage-v1-6b746f74dc-7ptpj productpage] DEBUG:urllib3.connectionpool:http://details:9080 "GET /details/0 HTTP/1.1" 200 178 [productpage-v1-6b746f74dc-7ptpj productpage] DEBUG:urllib3.connectionpool:Starting new HTTP connection (1): reviews:9080 [productpage-v1-6b746f74dc-7ptpj productpage] send: b'GET /reviews/0 HTTP/1.1\r\nHost: reviews:9080\r\nuser-agent: Mozilla/5.0 (Macintosh; Intel Mac OS X 10_15_7) AppleWebKit/537.36 (KHTML, like Gecko) Chrome/98.0.4758.80 Safari/537.36\r\nAccept-Encoding: gzip, deflate\r\nAccept: */*\r\nConnection: keep-alive\r\nX-B3-TraceId: 5d48ade1f048c3fc7ebe4197c22c3275\r\nX-B3-SpanId: 675da1ab468945b5\r\nX-B3-ParentSpanId: 7ebe4197c22c3275\r\nX-B3-Sampled: 1\r\nend-user: jason\r\nx-request-id: 95907bc3-1a86-9f1d-8963-3723b9fb1e21\r\n\r\n' [productpage-v1-6b746f74dc-7ptpj productpage] reply: 'HTTP/1.1 200 OK\r\n' [productpage-v1-6b746f74dc-7ptpj productpage] header: x-powered-by: Servlet/3.1 [productpage-v1-6b746f74dc-7ptpj productpage] header: content-type: application/json [productpage-v1-6b746f74dc-7ptpj productpage] header: date: Sun, 13 Feb 2022 09:00:37 GMT [productpage-v1-6b746f74dc-7ptpj productpage] header: content-language: en-US [productpage-v1-6b746f74dc-7ptpj productpage] header: content-length: 379 [productpage-v1-6b746f74dc-7ptpj productpage] header: x-envoy-upstream-service-time: 32 [productpage-v1-6b746f74dc-7ptpj productpage] header: server: envoy [productpage-v1-6b746f74dc-7ptpj productpage] DEBUG:urllib3.connectionpool:http://reviews:9080 "GET /reviews/0 HTTP/1.1" 200 379 [productpage-v1-6b746f74dc-7ptpj productpage] INFO:werkzeug:127.0.0.6 - - [13/Feb/2022 09:00:37] "GET /productpage HTTP/1.1" 200 -
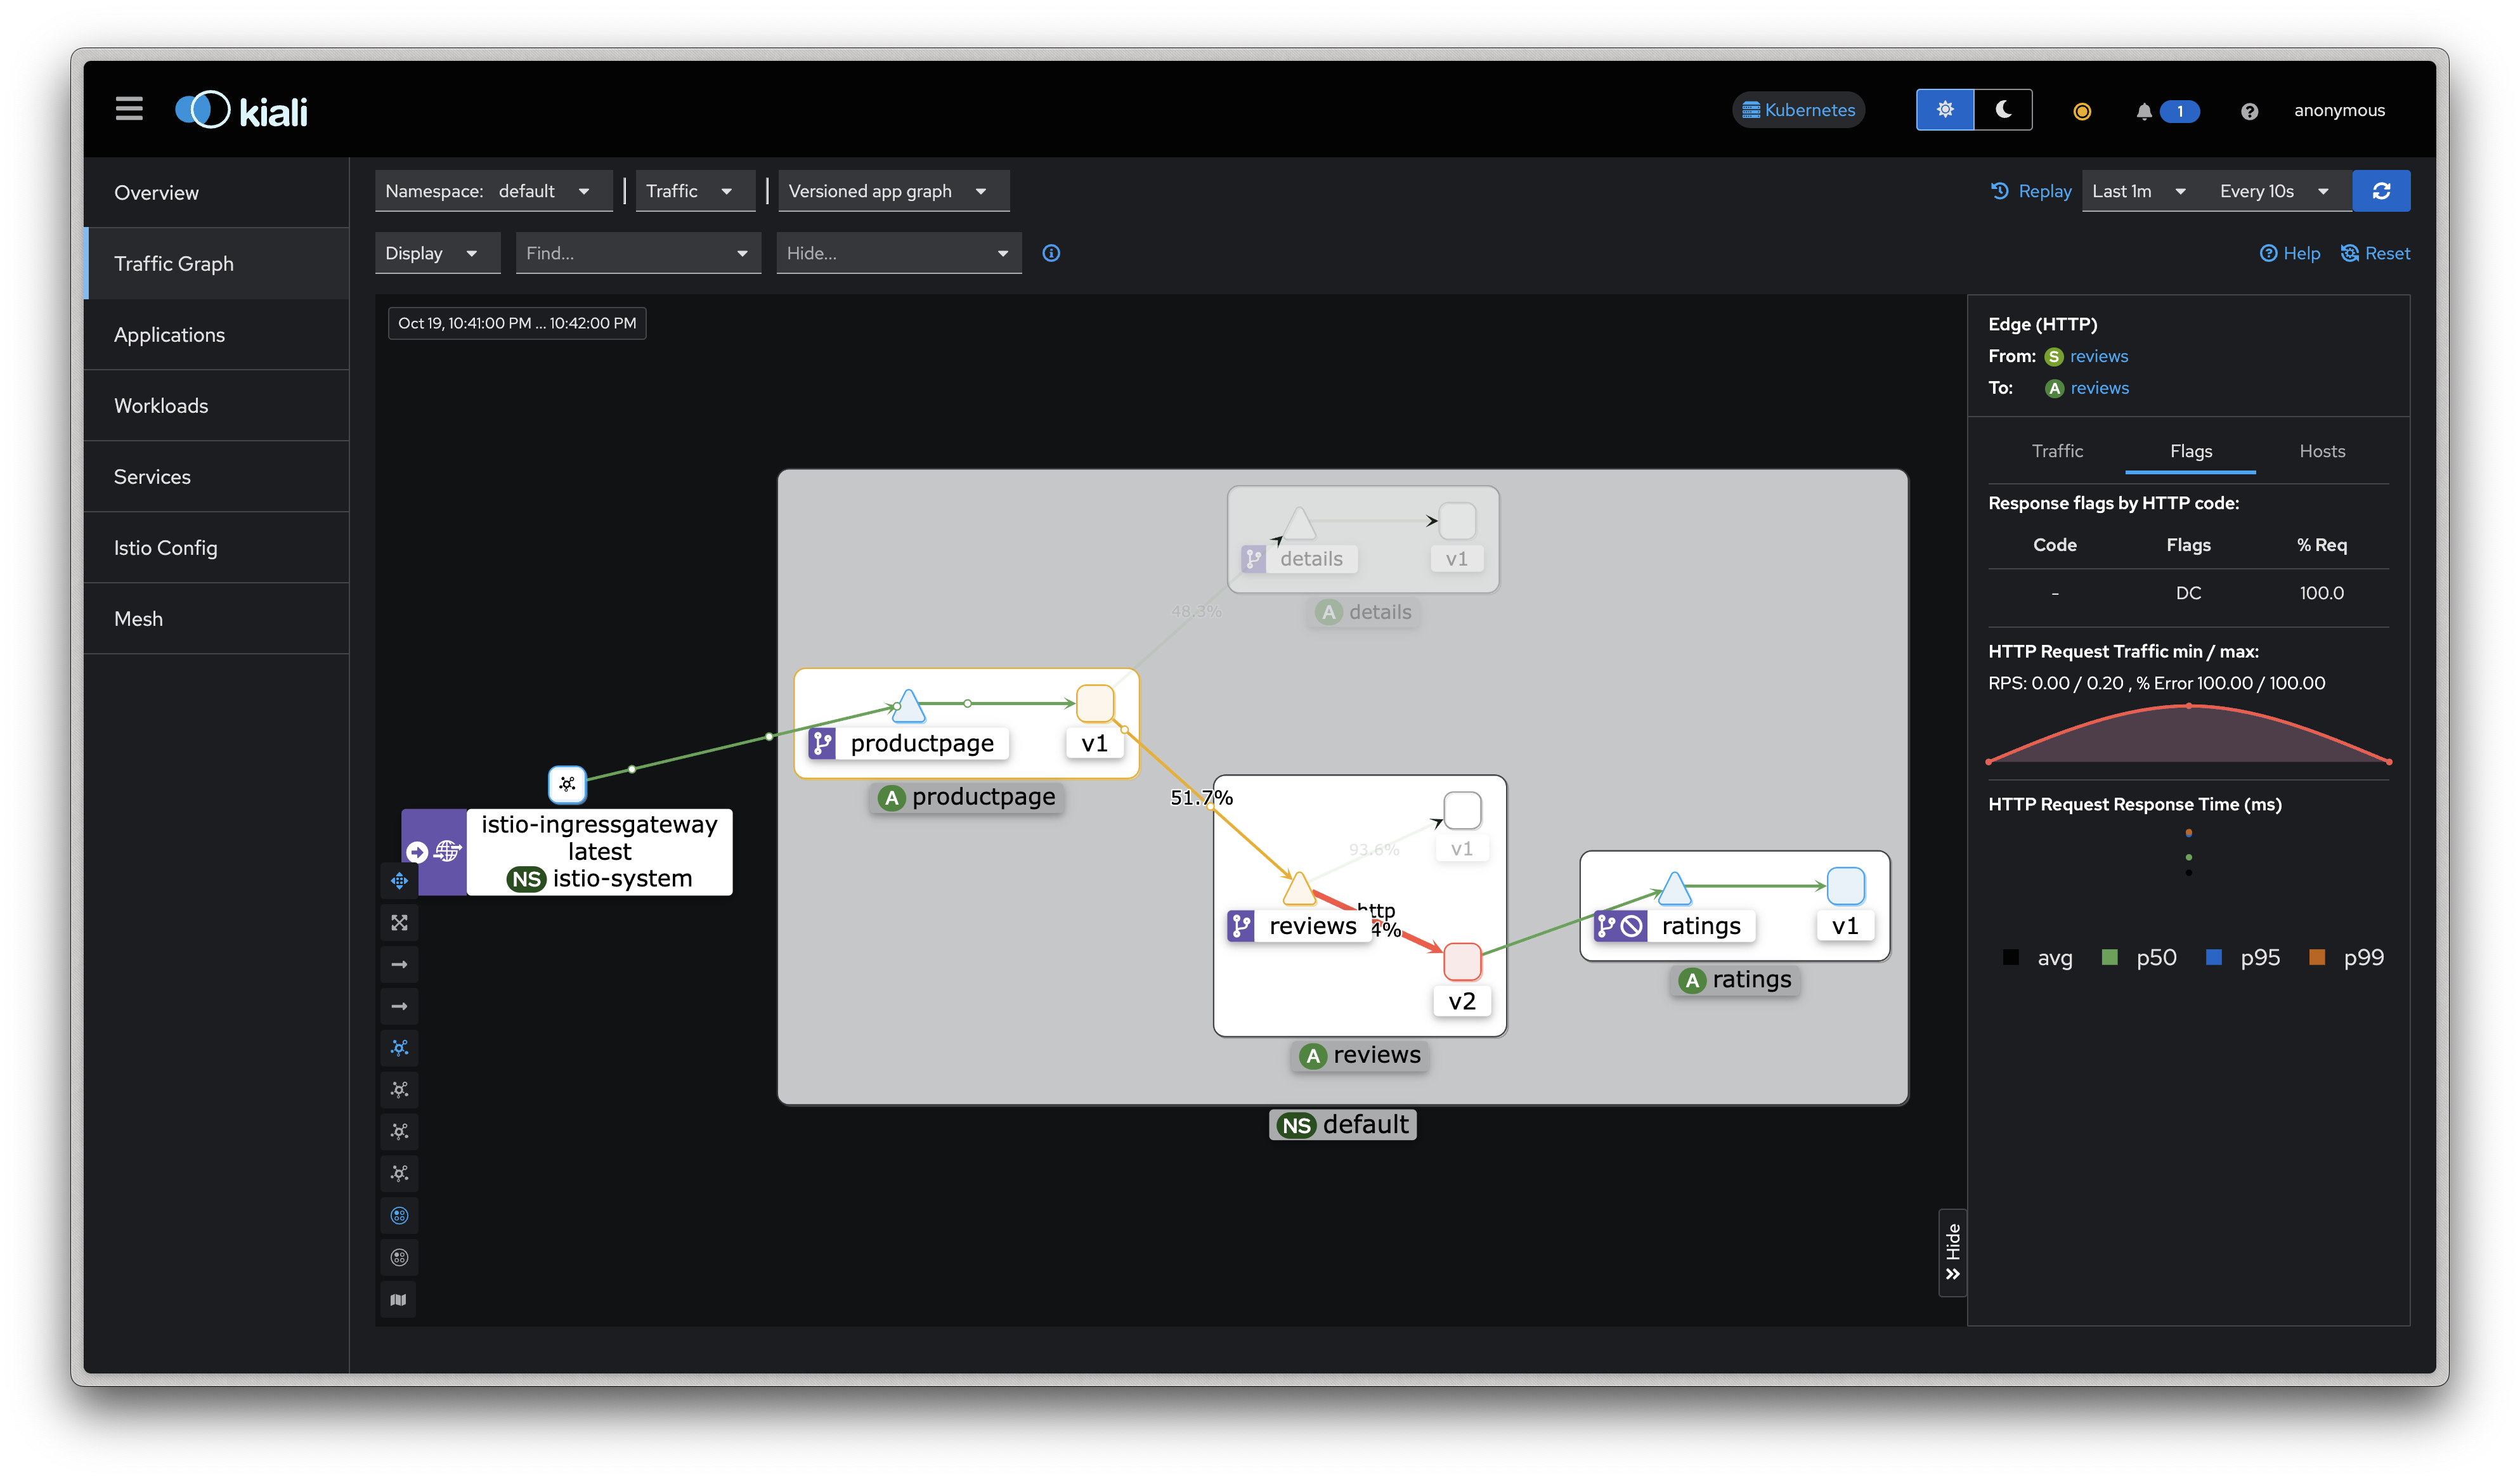
Fault Injection
Fault Injection (HTTP 결함 주입) - 의도적으로 지연(Latency)를 발생시키거나 중단 - 링크
apiVersion: networking.istio.io/v1alpha3
kind: VirtualService
metadata:
  name: ratings
spec:
  hosts:
  - ratings
  http:
  - match:
    - headers:
        end-user:
          exact: jason
    fault:
      delay:
        percentage:
          value: 100.0
        fixedDelay: 7s
    route:
    - destination:
        host: ratings
        subset: v1
  - route:
    - destination:
        host: ratings
        subset: v1
# virtualservices 적용 kubectl apply -f virtual-service-ratings-test-delay.yaml # 로그 확인 : product 입장에서 접속 사용자(clinet) 연결을 끊어버림 0 DC downstream_remote_disconnect kubetail -l app=productpage -f [productpage-v1-6b746f74dc-7ptpj istio-proxy] [2022-02-13T09:23:01.300Z] "POST /login HTTP/1.1" 302 - via_upstream - "-" 29 285 2 2 "192.168.10.1" "Mozilla/5.0 (Macintosh; Intel Mac OS X 10_15_7) AppleWebKit/537.36 (KHTML, like Gecko) Chrome/98.0.4758.80 Safari/537.36" "e6a380e6-7de8-9555-9cbb-d13b70bf6e55" "192.168.10.101:31198" "172.16.158.5:9080" inbound|9080|| 127.0.0.6:56481 172.16.158.5:9080 192.168.10.1:0 outbound_.9080_._.productpage.default.svc.cluster.local default [productpage-v1-6b746f74dc-7ptpj istio-proxy] [2022-02-13T09:23:01.311Z] "GET /details/0 HTTP/1.1" 200 - via_upstream - "-" 0 178 2 1 "-" "Mozilla/5.0 (Macintosh; Intel Mac OS X 10_15_7) AppleWebKit/537.36 (KHTML, like Gecko) Chrome/98.0.4758.80 Safari/537.36" "df1ff5a9-009f-9008-a67e-be495f109dbb" "details:9080" "172.16.158.3:9080" outbound|9080||details.default.svc.cluster.local 172.16.158.5:55976 10.109.236.60:9080 172.16.158.5:45710 - default [productpage-v1-6b746f74dc-7ptpj productpage] send: b'GET /reviews/0 HTTP/1.1\r\nHost: reviews:9080\r\nuser-agent: Mozilla/5.0 (Macintosh; Intel Mac OS X 10_15_7) AppleWebKit/537.36 (KHTML, like Gecko) Chrome/98.0.4758.80 Safari/537.36\r\nAccept-Encoding: gzip, deflate\r\nAccept: */*\r\nConnection: keep-alive\r\nX-B3-TraceId: bf5f7702da5020ac4d0295dad1fc186d\r\nX-B3-SpanId: 78e269a1d2ed831e\r\nX-B3-ParentSpanId: 4d0295dad1fc186d\r\nX-B3-Sampled: 1\r\nend-user: jason\r\nx-request-id: df1ff5a9-009f-9008-a67e-be495f109dbb\r\n\r\n' [productpage-v1-6b746f74dc-7ptpj productpage] DEBUG:urllib3.connectionpool:Starting new HTTP connection (1): reviews:9080 [productpage-v1-6b746f74dc-7ptpj istio-proxy] [2022-02-13T09:23:01.316Z] "GET /reviews/0 HTTP/1.1" 0 DC downstream_remote_disconnect - "-" 0 0 3003 - "-" "Mozilla/5.0 (Macintosh; Intel Mac OS X 10_15_7) AppleWebKit/537.36 (KHTML, like Gecko) Chrome/98.0.4758.80 Safari/537.36" "df1ff5a9-009f-9008-a67e-be495f109dbb" "reviews:9080" "172.16.184.1:9080" outbound|9080|v2|reviews.default.svc.cluster.local 172.16.158.5:51808 10.99.123.193:9080 172.16.158.5:57772 - - [productpage-v1-6b746f74dc-7ptpj productpage] send: b'GET /reviews/0 HTTP/1.1\r\nHost: reviews:9080\r\nuser-agent: Mozilla/5.0 (Macintosh; Intel Mac OS X 10_15_7) AppleWebKit/537.36 (KHTML, like Gecko) Chrome/98.0.4758.80 Safari/537.36\r\nAccept-Encoding: gzip, deflate\r\nAccept: */*\r\nConnection: keep-alive\r\nX-B3-TraceId: bf5f7702da5020ac4d0295dad1fc186d\r\nX-B3-SpanId: 78e269a1d2ed831e\r\nX-B3-ParentSpanId: 4d0295dad1fc186d\r\nX-B3-Sampled: 1\r\nend-user: jason\r\nx-request-id: df1ff5a9-009f-9008-a67e-be495f109dbb\r\n\r\n' [productpage-v1-6b746f74dc-7ptpj productpage] INFO:werkzeug:127.0.0.6 - - [13/Feb/2022 09:23:07] "GET /productpage HTTP/1.1" 200 - [productpage-v1-6b746f74dc-7ptpj istio-proxy] [2022-02-13T09:23:04.335Z] "GET /reviews/0 HTTP/1.1" 0 DC downstream_remote_disconnect - "-" 0 0 3003 - "-" "Mozilla/5.0 (Macintosh; Intel Mac OS X 10_15_7) AppleWebKit/537.36 (KHTML, like Gecko) Chrome/98.0.4758.80 Safari/537.36" "df1ff5a9-009f-9008-a67e-be495f109dbb" "reviews:9080" "172.16.184.1:9080" outbound|9080|v2|reviews.default.svc.cluster.local 172.16.158.5:37756 10.99.123.193:9080 172.16.158.5:57796 - - [productpage-v1-6b746f74dc-7ptpj istio-proxy] [2022-02-13T09:23:01.307Z] "GET /productpage HTTP/1.1" 200 - via_upstream - "-" 0 3992 6033 6032 "192.168.10.1" "Mozilla/5.0 (Macintosh; Intel Mac OS X 10_15_7) AppleWebKit/537.36 (KHTML, like Gecko) Chrome/98.0.4758.80 Safari/537.36" "df1ff5a9-009f-9008-a67e-be495f109dbb" "192.168.10.101:31198" "172.16.158.5:9080" inbound|9080|| 127.0.0.6:37143 172.16.158.5:9080 192.168.10.1:0 outbound_.9080_._.productpage.default.svc.cluster.local default
- KIALI 에서 상태 확인 , Flags (DC) - 링크
Traffic Shifting
Traffic Shifting (트래픽 전환) : 카나라 배포 전략 등 활용 - 링크
기본 virtualservices 설정
kubectl apply -f virtual-service-all-v1.yamlvirtual-service-reviews-50-v3.yaml : 가중치 (weight-based routing), reviews 에 v1(50%), v3(50%)
apiVersion: networking.istio.io/v1alpha3
kind: VirtualService
metadata:
  name: reviews
spec:
  hosts:
    - reviews
  http:
  - route:
    - destination:
        host: reviews
        subset: v1
      weight: 50
    - destination:
        host: reviews
        subset: v3
      weight: 50
# virtualservices 적용 kubectl apply -f virtual-service-reviews-50-v3.yaml
Request Timeouts (타임아웃 제어)
기본 virtualservices 설정
cd ~/istio-$ISTIOV/samples/bookinfo/networking
kubectl apply -f virtual-service-all-v1.yaml
기본적으로 HTTP request timeout is disabled 이지만, 설정(override) 가능하다
Route requests to v2 of the reviews service ⇒ Add a 2 second delay to calls to the ratings service (2초 지연 설정)
# reviews service 는 reviews v2 만 호출 설정
kubectl apply -f - <<EOF
apiVersion: networking.istio.io/v1alpha3
kind: VirtualService
metadata:
  name: reviews
spec:
  hosts:
    - reviews
  http:
  - route:
    - destination:
        host: reviews
        subset: v2
EOF

# ratings service 호출 시 2초 지연 설정 >> 가장 끝단에서 장애 상황이라고 재연 >> 앞단의 모든 서비스가 영향을 받는다
kubectl apply -f - <<EOF
apiVersion: networking.istio.io/v1alpha3
kind: VirtualService
metadata:
  name: ratings
spec:
  hosts:
  - ratings
  http:
  - fault:
      delay:
        percent: 100
        fixedDelay: 2s
    route:
    - destination:
        host: ratings
        subset: v1
EOF
👉 Step 07. Security 보안
요구사항
- To defend against man-in-the-middle attacks, they need traffic encryption.
- To provide flexible service access control, they need mutual TLS and fine-grained access policies.
- To determine who did what at what time, they need auditing tools.
- Security by default: no changes needed to application code and infrastructure
- Defense in depth: integrate with existing security systems to provide multiple layers of defense
- Zero-trust network: build security solutions on distrusted networks

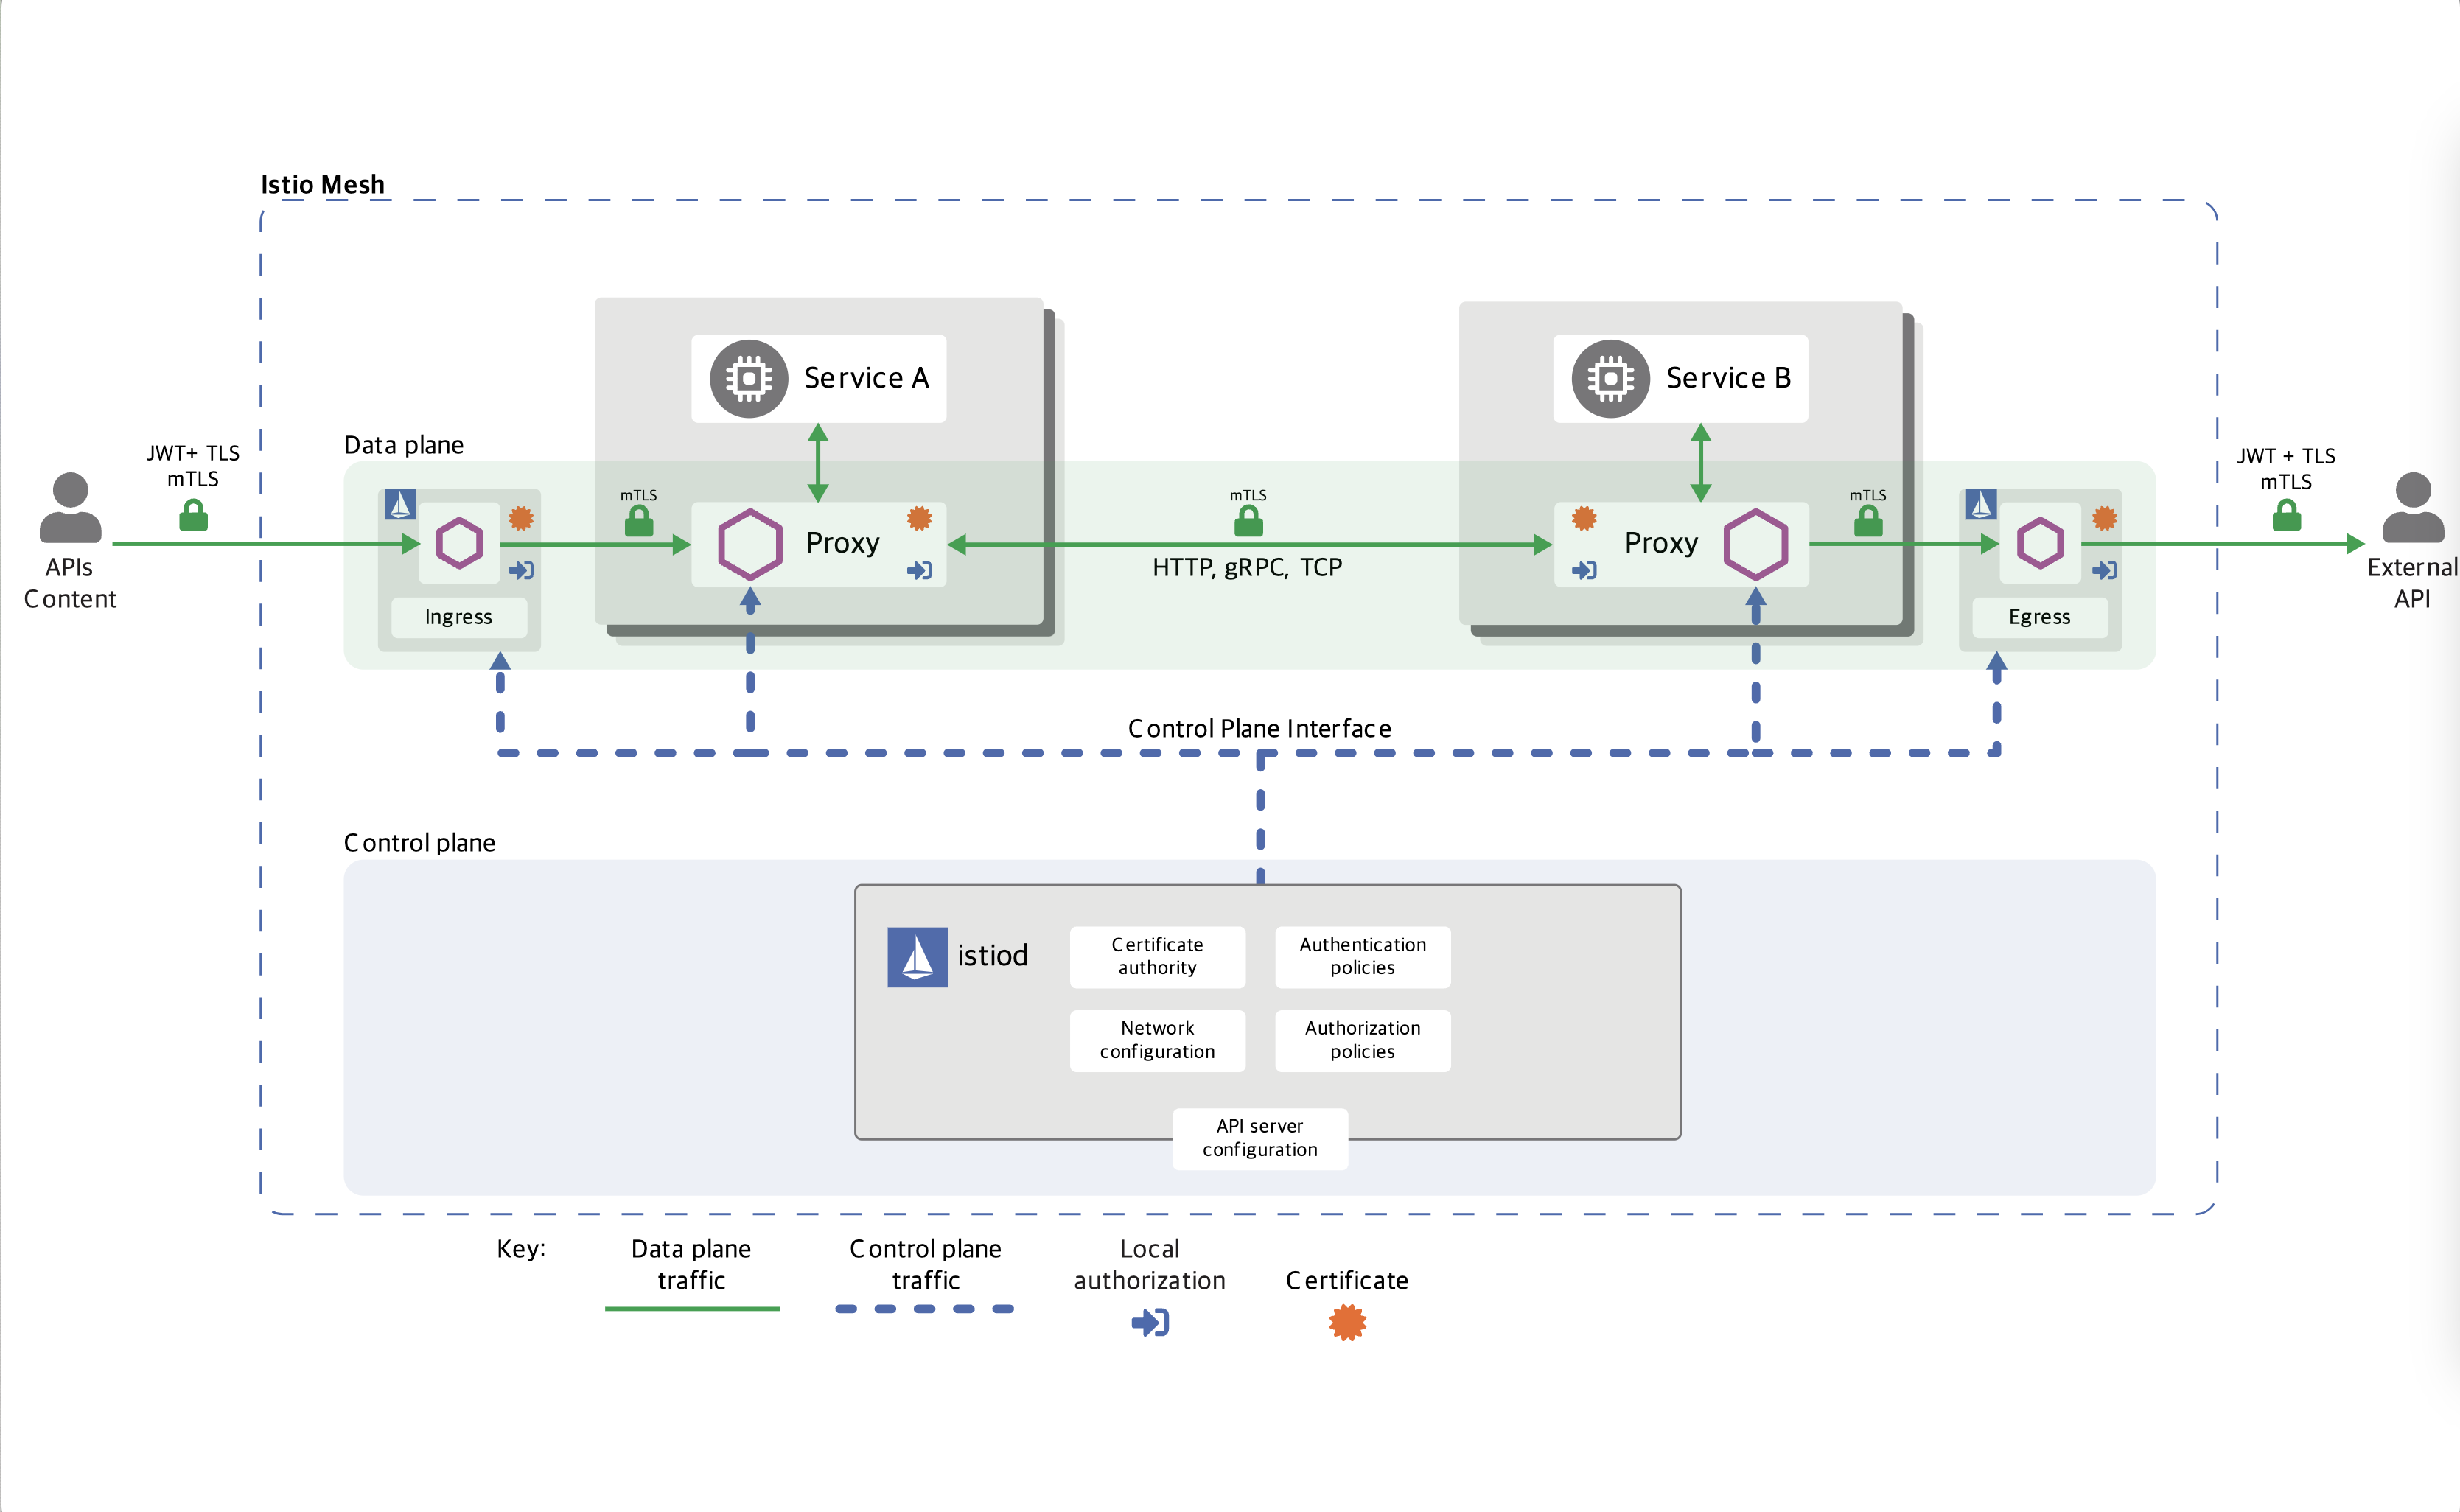
구성요소
- A Certificate Authority (CA) for key and certificate management
- The configuration API server distributes to the proxies:
- Sidecar and perimeter proxies work as Policy Enforcement Points (PEPs) to secure communication between clients and servers.
- A set of Envoy proxy extensions to manage telemetry and auditing
아키텍처
제로 트러스트 (ZT: Zero Trust)
‘아무것도 신뢰할 수 없다는 가정하에, 사용자 및 다양한 정보를 바탕으로 최소한의 권한과 세밀한 통제를 지속적으로 수행하는 보안 활동’ - 링크
TLS vs mTLS
TLS- 암호화방식 인증서 Handshake
- TLS는 네트워크로 통신을 하는 과정에서 도청, 간섭, 위조를 방지하기 위해서 설계됨. 암호화를 통해 인증, 통신 기밀성을 제공.
- TLS의 3단계 기본 절차: (1) 지원 가능한 알고리즘 서로 교환 (2) 키 교환, 인증 (3) 대칭키 암호로 암호화하고 메시지 인증
TLSvsMTLS- 링크 소개
- MTLS 절차 : 서버측도 클라이언트측에 대한 인증서를 확인 및 액세스 권한 확인
출처 - https://blog.cloudflare.com/protecting-the-origin-with-tls-authenticated-origin-pulls/
SPIFFE : 워크로드 식별 표준 집합 - 링크
이기종 환경에서 서비스 ID를 발급할 수 있는 프레임워크
istio 와 SPIFFE는 SVID 공유 → 이를 통해 istio 서비스는 다른 SPIFFE 호환 시스템과 연결 설정 및 수락 가능
Authentication, Authorization (Auto mutual TLS)
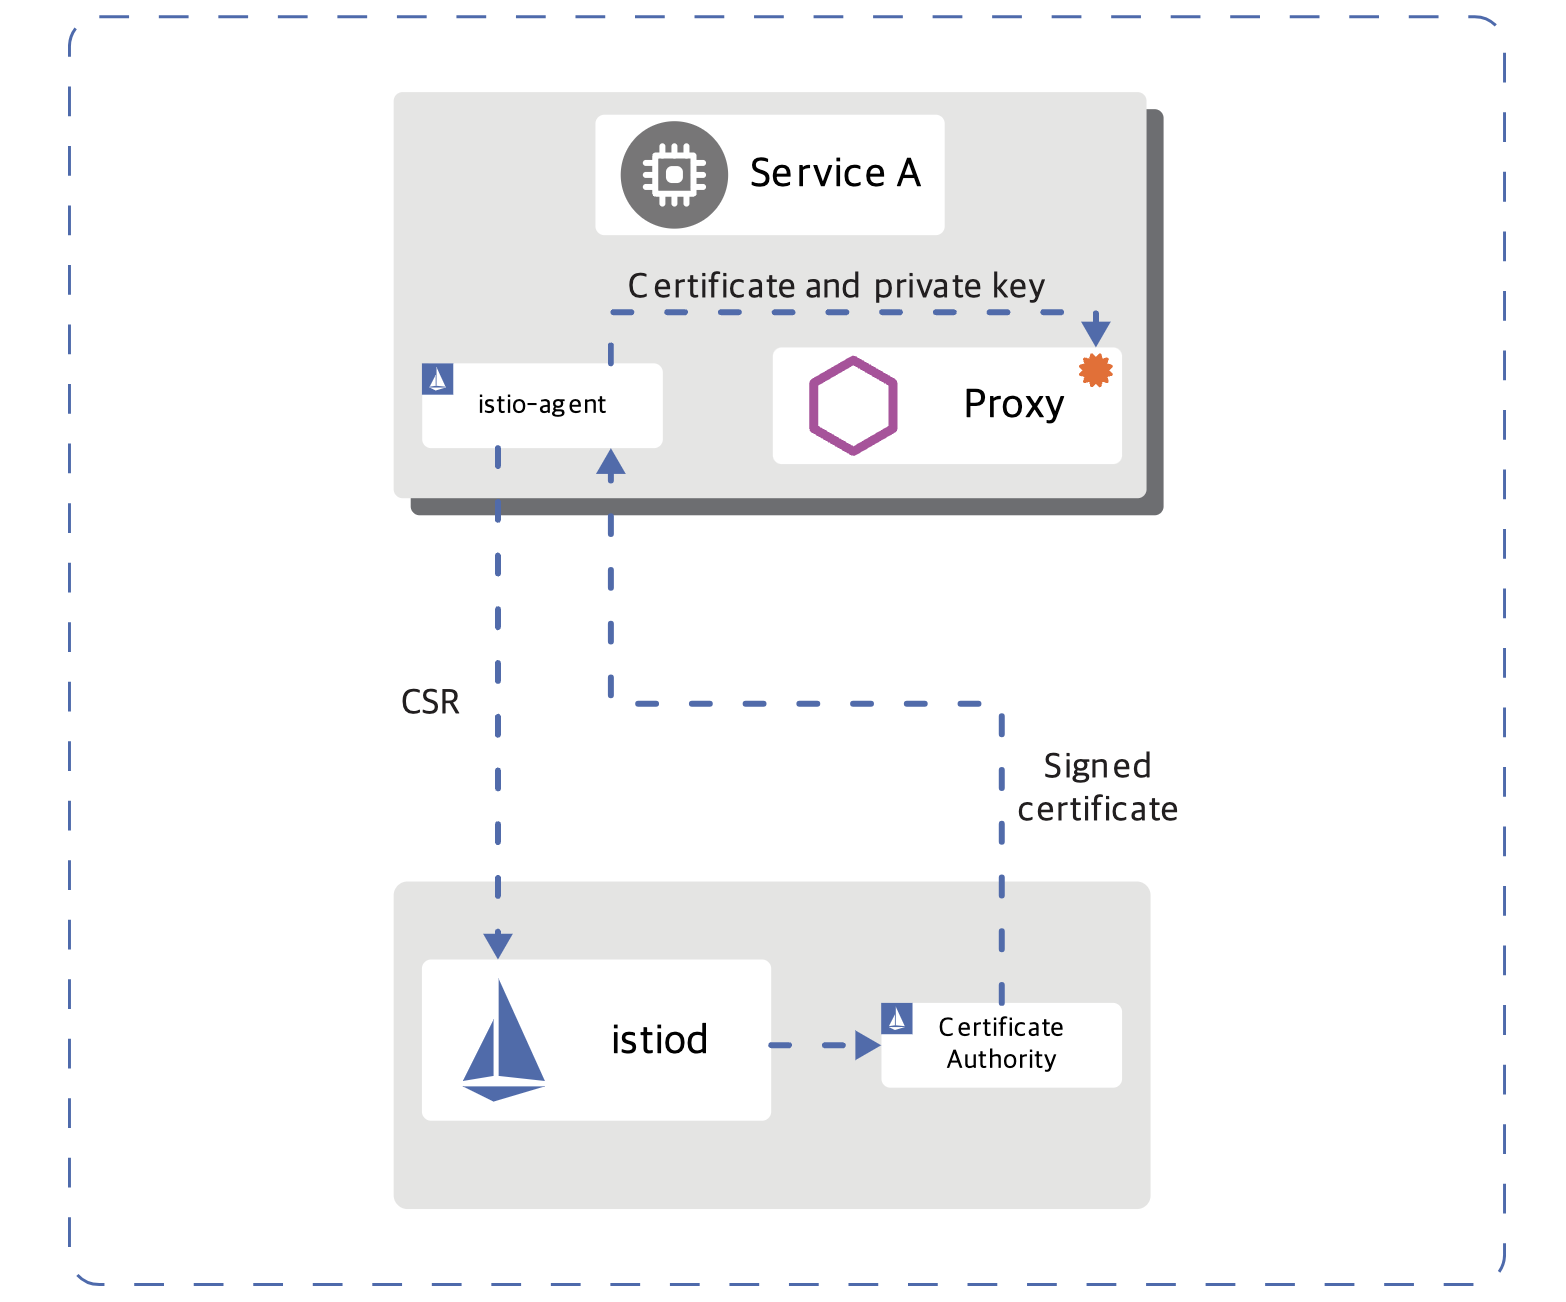
Identity and certificate managementIstio securely provisions strong identities to every workload with X.509 certificates. Istio agents, running alongside each Envoy proxy, work together with
istiodto automate key and certificate rotation at scale. The following diagram shows the identity provisioning flow.
istiodoffers a gRPC service to take certificate signing requests (CSRs).- When started, the Istio agent creates the private key and CSR, and then sends the CSR with its credentials to
istiodfor signing.- The CA in
istiodvalidates the credentials carried in the CSR. Upon successful validation, it signs the CSR to generate the certificate.- When a workload is started, Envoy requests the certificate and key from the Istio agent in the same container via the Envoy secret discovery service (SDS) API.
- The Istio agent sends the certificates received from
istiodand the private key to Envoy via the Envoy SDS API.- Istio agent monitors the expiration of the workload certificate. The above process repeats periodically for certificate and key rotation.
Authentication : 2가지 타입 인증 제공
- Peer authentication : used for service-to-service authentication to verify the client making the connection. Istio offers mutual TLS as a full stack solution for transport authentication, which can be enabled without requiring service code changes. This solution:
- Provides each service with a strong identity representing its role to enable interoperability across clusters and clouds.
- Secures service-to-service communication.
- Provides a key management system to automate key and certificate generation, distribution, and rotation.
- Request authentication : Used for end-user authentication to verify the credential attached to the request. Istio enables request-level authentication with JSON Web Token (JWT) validation and a streamlined developer experience using a custom authentication provider or any OpenID Connect providers, for example:
- ORY Hydra , Keycloak , Auth0 , Firebase Auth , Google Auth
Authentication (Auto mutual TLS) 실습
- Authentication (Auto mutual TLS) 실습 : mTLS - 링크 & PeerAuthentication - 링크 링크2
기존 파드에 로그에서 인증서 등 보안 관련 내용 확인# CA Endpoint, CA(/var/run/secret/istio/root-cert,pem), citadelclient, SDS server 등등 k logs rating-v -c istio-proxy - kubetail # envoy 에 cert 정보 확인 : istio-proxy 에 admin페이지 접속 or kaila 에서 envoy 에서 확인
- bookinfo → kiali → product 계속 접속
- kiali 에서 Display(Security 체크) 후 자물쇠 클릭 후 오른쪽 창에 정보 확인 : mTLS Enabled, spiffe(Secure name)
test 네임스페이스 생성 후 파드 생성(sidecar 미적용) 후 ratings 접속
# 네임스페이스 생성
kubectl create ns test

# 파드 생성
cat <<EOF | kubectl create -f -
apiVersion: v1
kind: Pod
metadata:
  name: netpod
  namespace: test
spec:
  containers:
  - name: netshoot-pod
    image: nicolaka/netshoot
    command: ["tail"]
    args: ["-f", "/dev/null"]
  terminationGracePeriodSeconds: 0
EOF

# 확인 : sidecar 미적용
kubectl get pod -n test

# ratings 서비스 확인
kubectl get svc ratings

# ratings 접속 시도 : 성공
kubectl exec -it -n test netpod -- curl ratings.default:9080/health ;echo
{"status":"Ratings is healthy"}

# 로그 확인
kubetail -l app=ratings -f
👉 Step 08. Istio 트래픽 흐름
Istio 통신 : 호스트의 tcp/ip 와 iptables 과 파드 내에 iptables 와 envoy 를 경유
- 달리기에 비유하자면, Istio 가 없을 경우를
운동장 한바퀴라면, istio 사용 시 대략운동장 세바퀴라고 볼 수 있습니다. - Istio 사용 시 장점도 있지만, 없을 경우 대비 비용(지연 추가, 프로세싱 추가, 복잡한 구조 등)이 추가됩니다.
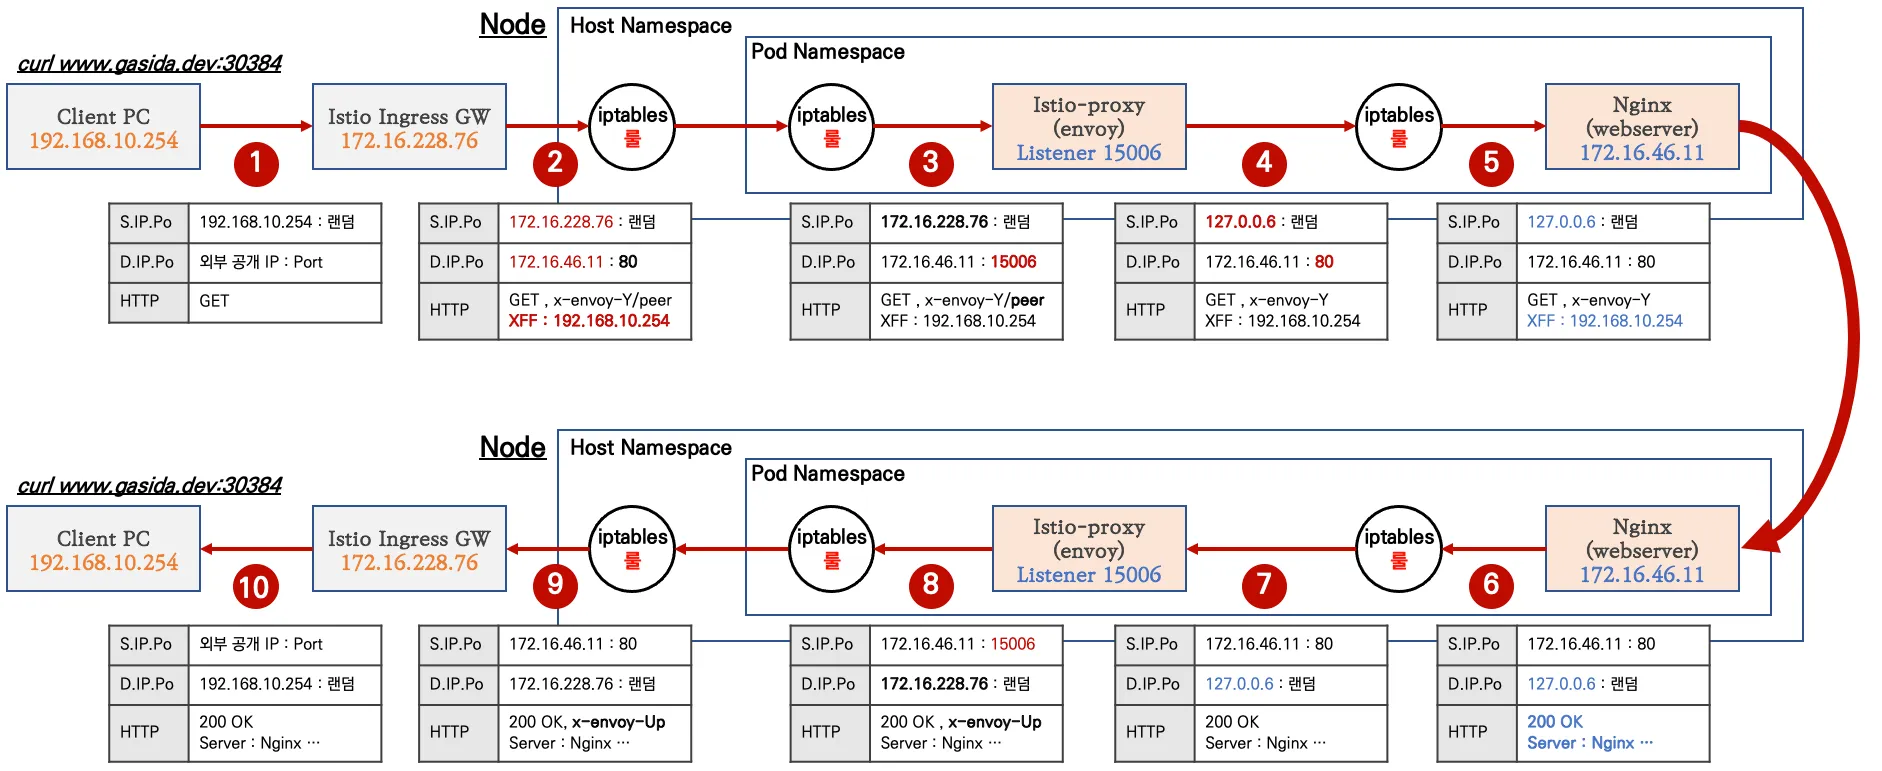
외부 클라이언트 PC에서 K8S 파드(웹서버)로 접속 과정

실습을 위한 환경 설정 및 배포
nginx-app 로 향하는 통신의 경우 peer 간 mtls 끄기cat <<EOF | kubectl apply -f - apiVersion: v1 kind: Pod metadata: name: nginx-pod labels: app: nginx-app spec: terminationGracePeriodSeconds: 0 containers: - name: nginx-container image: nginx ports: - containerPort: 80 --- apiVersion: v1 kind: Service metadata: name: svc-nginx spec: ports: - name: svc-nginx port: 80 targetPort: 80 selector: app: nginx-app type: ClusterIP --- apiVersion: networking.istio.io/v1alpha3 kind: Gateway metadata: name: test-gateway spec: selector: istio: ingressgateway servers: - port: number: 80 name: http protocol: HTTP hosts: - "*" --- apiVersion: networking.istio.io/v1alpha3 kind: VirtualService metadata: name: nginx-service spec: hosts: - "$MYDOMAIN" gateways: - test-gateway http: - route: - destination: host: svc-nginx port: number: 80 EOF# 모니터링 watch -d "kubectl get svc -n istio-system -l app=istio-ingressgateway;echo;kubectl get pod -n istio-system -o wide -l app=istio-ingressgateway;echo;kubectl get pod -owide nginx-pod" watch -d "kubectl get pod -n istio-system -o wide -l app=istio-ingressgateway;echo;kubectl get pod -owide nginx-pod"testpc 에서 아래 실행 # istio ingress 를 통한 접속 curl -s -v $MYDOMAIN:$IGWHTTP curl -s $MYDOMAIN:$IGWHTTP | grep -o "<title>.*</title>" while true; do curl -s $MYDOMAIN:$IGWHTTP | grep -o "<title>.*</title>" ; echo "--------------" ; sleep 1; done while true; do curl -s $MYDOMAIN:$IGWHTTP | grep -o "<title>.*</title>" ; echo "--------------" ; sleep 0.1; done
- istio-proxy peer 간 mtls 끄기
# 서비스 중 app: nginx-app 로 향하는 통신의 경우 peer 간 mtls 끄기(istio-ingressgw 와 목적지 워커노드의 파드에 istio-proxy 간)
cat <<EOF | kubectl create -f -
apiVersion: security.istio.io/v1beta1
kind: PeerAuthentication
metadata:
  name: "example-workload-policy"
spec:
  selector:
     matchLabels:
       app: nginx-app
  portLevelMtls:
    80:
      mode: DISABLE
EOF
클라이언트(요청) → 파드(인입)
트래픽 흐름
- 외부 클라이언트 PC에서 k8s 클러스터 내부의 웹 서버 파드로 인입 시 트래픽 흐름입니다.
- 기존 패킷 내용 중 변경 전(굵음)과 변경 후(빨간 색)으로 표현하였습니다.

파드 내 IPTables 적용 흐름 : 아래 (1) ~ (8) 까지의 과정을 먼저 설명합니다.
Client PC → Istio IngressGateway 파드 구간
외부 클라이언트 PC(192.168.10.254) 에서 웹 서버 파드로 접속 시도
# 아래 처럼 정상적으로 웹 서버 접속 정보 출력 확인
curl -s -v $MYDOMAIN:$IGWHTTP
curl -s $MYDOMAIN:$IGWHTTP | grep -o "<title>.*</title>"
while true; do curl -s $MYDOMAIN:$IGWHTTP | grep -o "<title>.*</title>" ; echo "--------------" ; sleep 1; done
while true; do curl -s $MYDOMAIN:$IGWHTTP | grep -o "<title>.*</title>" ; echo "--------------" ; sleep 0.1; done

curl -s --user-agent "IPHONE" $MYDOMAIN:$IGWHTTP | grep -o "<title>.*</title>"
while true; do curl -s $MYDOMAIN:$IGWHTTP | grep -o "<title>.*</title>"; date "+%Y-%m-%d %H:%M:%S" ; echo "--------------" ; sleep 1; done

# 로그 확인
kubetail -l app=nginx-app -f
[파드 내부] IPTables 적용 → Istio-proxy 컨테이너 인입*
'PAUSE 컨테이너'가 파드 네트워크 네임스페이스를 생성하여 제공하며, 'Init 컨테이너'는 Istio-proxy가 트래픽을 가로챌 수 있게 파드 내에 iptables rules 설정을 완료합니다.
# 아래 처럼 'istio-init 컨테이너' 의 로그에 iptables rules 설정을 확인할 수 있습니다.
# 참고로, NAT Tables 만 설정되고, 그외(filter, mangle, raw 등)은 설정하지 않습니다.
(istio-k8s:default) root@k8s-m:~# kubectl logs nginx-pod -c istio-init
* nat
-N ISTIO_INBOUND
-N ISTIO_REDIRECT
-N ISTIO_IN_REDIRECT
-N ISTIO_OUTPUT
-A ISTIO_INBOUND -p tcp --dport 15008 -j RETURN
-A ISTIO_REDIRECT -p tcp -j REDIRECT --to-ports 15001
-A ISTIO_IN_REDIRECT -p tcp -j REDIRECT --to-ports 15006
-A PREROUTING -p tcp -j ISTIO_INBOUND
-A ISTIO_INBOUND -p tcp --dport 22 -j RETURN
-A ISTIO_INBOUND -p tcp --dport 15090 -j RETURN
-A ISTIO_INBOUND -p tcp --dport 15021 -j RETURN
-A ISTIO_INBOUND -p tcp --dport 15020 -j RETURN
-A ISTIO_INBOUND -p tcp -j ISTIO_IN_REDIRECT
-A OUTPUT -p tcp -j ISTIO_OUTPUT
-A ISTIO_OUTPUT -o lo -s 127.0.0.6/32 -j RETURN
-A ISTIO_OUTPUT -o lo ! -d 127.0.0.1/32 -m owner --uid-owner 1337 -j ISTIO_IN_REDIRECT
-A ISTIO_OUTPUT -o lo -m owner ! --uid-owner 1337 -j RETURN
-A ISTIO_OUTPUT -m owner --uid-owner 1337 -j RETURN
-A ISTIO_OUTPUT -o lo ! -d 127.0.0.1/32 -m owner --gid-owner 1337 -j ISTIO_IN_REDIRECT
-A ISTIO_OUTPUT -o lo -m owner ! --gid-owner 1337 -j RETURN
-A ISTIO_OUTPUT -m owner --gid-owner 1337 -j RETURN
-A ISTIO_OUTPUT -d 127.0.0.1/32 -j RETURN
-A ISTIO_OUTPUT -j ISTIO_REDIRECT
COMMIT
파드 내 IPTables Chains/Rules 적용 (NAT 테이블) → 'Istio-proxy 컨테이너'로 인입됩니다.
- PREROUTING → ISTIO_INBOUND → ISTIO_IN_REDIRECT (redir ports 15006)
nginx 파드가 배치된 노드에서 아래 실행
# 아래 확인은 istio-proxy 대신 pause 에서 iptables 확인 해보자...

# 변수 지정 : C1(Istio-proxy, Envoy , 단축키 지정
lsns -t net
ps -ef |grep istio
1337      347173  347155  0 18:52 ?        00:00:01 /usr/local/bin/envoy -c etc/istio/proxy/envoy-rev.json --drain-time-s 45 --drain-strategy immediate --local-address-ip-version v4 --file-flush-interval-msec 1000 --disable-hot-restart --allow-unknown-static-fields -l warning --component-log-level misc:error --concurrency 2
C1PID=347173
alias c1="nsenter -t $C1PID -n"

crictl ps
CONTAINER           IMAGE               CREATED             STATE               NAME                     ATTEMPT             POD ID              POD
b6a2265bd4e09       25eeeeca367cf       6 minutes ago       Running             istio-proxy              0                   adfe596135f4e       nginx-pod
adbc8a95a979f       7f553e8bbc897       6 minutes ago       Running             nginx-container          0                   adfe596135f4e       nginx-pod
fee76dda9c16d       f9095e2f0444d       About an hour ago   Running             grafana                  0                   79122dcc70e1c       grafana-7f76bc9cdb-jqs29
ef150da585889       a342234ebb356       5 hours ago         Running             discovery                0                   549480847b6d1       istiod-7f8b586864-mv944
31fecdd35c503       5d221316a3c61       6 hours ago         Running             local-path-provisioner   0                   c1fe2cf4bd962       local-path-provisioner-6795b5f9d8-64b8j

crictl exec -it b6a2265bd4e09 ip -c a
alias c1="crictl exec -it b6a2265bd4e09"

sudo crictl exec -it b6a2265bd4e09 ip -c a

# Istio-proxy 컨테이너의 iptables 확인
c1 iptables -t nat --zero # 패킷 카운트 초기화

# 트래픽 인입 시 TCP 경우 모든 트래픽을 15006 으로 리다이렉트한다, 일부 포트는 제외(22, 15008, 15020, 15021, 15090)
c1 iptables -t nat -L -n -v
Chain PREROUTING (policy ACCEPT 44 packets, 2640 bytes)
 pkts bytes target     prot opt in     out     source               destination
   45  2700 ISTIO_INBOUND  tcp  --  *      *       0.0.0.0/0            0.0.0.0/0

Chain ISTIO_INBOUND (1 references)
 pkts bytes target             prot opt in     out     source               destination
...
    1    60 ISTIO_IN_REDIRECT  tcp  --  *      *       0.0.0.0/0            0.0.0.0/0

Chain ISTIO_IN_REDIRECT (3 references)
 pkts bytes target     prot opt in     out     source               destination
    1    60 REDIRECT   tcp  --  *      *       0.0.0.0/0            0.0.0.0/0            redir ports 15006

# 모니터링 >> 아래 ss 소켓 강제 Reset 참고
c1 iptables -t nat --zero
c1 iptables -t nat -S | grep 15006
c1 iptables -v --numeric --table nat --list ISTIO_IN_REDIRECT
watch -d "nsenter -t $C1PID -n iptables -v --numeric --table nat --list PREROUTING ; echo ; nsenter -t $C1PID -n iptables -v --numeric --table nat --list ISTIO_INBOUND; echo ; nsenter -t $C1PID -n iptables -v --numeric --table nat --list ISTIO_IN_REDIRECT"
watch -d "nsenter -t $C1PID -n iptables -t nat -L -n -v"
'Istio-proxy 컨테이너'의
15006 Listener확인# ss (socket statistics)로 시스템 소켓 상태 확인 : 15006 은 envoy 프로세스가 Listen 하고 있다 root@k8s-w2:~# c1 ss -tpnl '( dport = :15006 or sport = :15006 )' State Recv-Q Send-Q Local Address:Port Peer Address:Port Process LISTEN 0 4096 0.0.0.0:15006 0.0.0.0:* users:(("envoy",pid=3928,fd=37)) LISTEN 0 4096 0.0.0.0:15006 0.0.0.0:* users:(("envoy",pid=3928,fd=36)) # 확인 예시 c1 ss -tpnt '( dport = :15006 or sport = :15006 or sport = :80 or dport = :80 )' watch -d "nsenter -t $C1PID -n ss -tpnt '( dport = :15006 or sport = :15006 or sport = :80 or dport = :80 )'" # 연결된 소켓 강제 Reset # c0 ss -K dst 172.16.228.66 dport = 44526 c1 ss -K dst 172.16.228.66 c1 ss -K dst 172.16.46.13
[파드 내부] Istio-proxy 컨테이너 → IPTables 적용
'Istio-proxy 컨테이너' 는 대리인(Proxy) 역할로, 출발지 IP를 127.0.0.6 으로 변경하여 'Nginx 컨테이너'와 연결을 한다
'Istio-proxy 컨테이너'의 로그 확인
# 로그 내용 중 출발지 정보(127.0.0.6:50763)를 변경하고 전달하는 것을 알 수 있다
(istio-k8s:default) root@k8s-m:~# kubectl logs nginx-pod -c istio-proxy -f
[2021-12-15T18:05:56.334Z] "GET / HTTP/1.1" 200 - via_upstream - "-" 0 615 0 0 "192.168.10.254" "curl/7.68.0" "0844349b-d290-994b-93b2-da36bf929c62" "www.gasida.dev:30384" "172.16.46.11:80" inbound|80|| 127.0.0.6:50763 172.16.46.11:80 192.168.10.254:0 - default
파드 내에서 패킷 덤프 후 확인 : 출발지 IP가 127.0.0.6 으로 변경되었다!
# 패킷 덤프 (예시)
c1 tcpdump -nni any  not net 10.0.2.15 and not udp and not tcp port 15012 and not tcp port 15020 -q
c1 tcpdump -nni any  not net 10.0.2.15 and not udp and not tcp port 15012 and not tcp port 15020 -q -w /tmp/istio-nginx.pcap
c1 tcpdump -nni lo   not net 10.0.2.15 and not udp and not tcp port 15012 and not tcp port 15020 -q
c1 tcpdump -nni eth0 not net 10.0.2.15 and not udp and not tcp port 15012 and not tcp port 15020 -q

c2 tcpdump -nni any  not net 10.0.2.15 and not udp and not tcp port 15012 and not tcp port 15020 -q
c2 tcpdump -nni any  not net 10.0.2.15 and not udp and not tcp port 15012 and not tcp port 15020 -q -w /tmp/istio-nginx.pcap
c2 tcpdump -nni lo   not net 10.0.2.15 and not udp and not tcp port 15012 and not tcp port 15020 -q
c2 tcpdump -nni eth0 not net 10.0.2.15 and not udp and not tcp port 15012 and not tcp port 15020 -q

#
kubectl exec nginx-pod -c istio-proxy -- bash
------------------
tcpdump -i any -nnq
------------------

# debug 컨테이너
tcpdump -i any -nnq
07:09:19.911008 eth0  In  IP 10.0.2.15.35822 > 172.16.184.18.15021: tcp 0
07:09:19.911029 eth0  Out IP 172.16.184.18.15021 > 10.0.2.15.35822: tcp 0
07:09:19.911048 eth0  In  IP 10.0.2.15.35822 > 172.16.184.18.15021: tcp 0
07:09:19.911286 eth0  In  IP 10.0.2.15.35822 > 172.16.184.18.15021: tcp 119
07:09:19.911293 eth0  Out IP 172.16.184.18.15021 > 10.0.2.15.35822: tcp 0
07:09:19.911587 lo    In  IP 127.0.0.1.60644 > 127.0.0.1.15020: tcp 216
07:09:19.911756 lo    In  IP 127.0.0.1.15020 > 127.0.0.1.60644: tcp 75
07:09:19.911770 lo    In  IP 127.0.0.1.60644 > 127.0.0.1.15020: tcp 0
07:09:19.911950 eth0  Out IP 172.16.184.18.15021 > 10.0.2.15.35822: tcp 143
07:09:19.911966 eth0  In  IP 10.0.2.15.35822 > 172.16.184.18.15021: tcp 0
[파드 내부] IPTables 적용 → Nginx 컨테이너 인입
파드 내에 IPTables 는 전역(?)으로 적용되므로, 'Istio-proxy' 의 인/아웃 시 트래픽 구별이 중요하다.
- 'Istio-proxy' 를 빠져나올때는 출발지 IP가 127.0.0.6 이므로 ISTIO_OUTPUT 에 적용되어 리턴되어 POSTROUTING 를 통해 nginx 로 도착한다
- IPTables 확인 : istio-proxy → OUTPUT → ISTIO_OUTOUT(맨 상단 Rule 매칭으로 RETURN) -> POSTROUTING -> NGINX 컨테이너
# 출발IP가 127.0.0.6 이고, 빠져나오는 인터페이스가(-o lo)에 매칭되어 리턴됨
c1 iptables -v --numeric --table nat --list ISTIO_OUTPUT
Chain ISTIO_OUTPUT (1 references)
 pkts bytes target     prot opt in     out     source               destination
    2   120 RETURN     all  --  *      lo      127.0.0.6            0.0.0.0/0

# POSTROUTING 은 특별한 rule 이 없으니 통과!
Chain POSTROUTING (policy ACCEPT 144 packets, 12545 bytes)
 pkts bytes target     prot opt in     out     source               destination

# 모니터링 예시
c1 iptables -t nat --zero
c1 iptables -v --numeric --table nat --list ISTIO_OUTPUT
watch -d "nsenter -t $C1PID -n iptables -v --numeric --table nat --list OUTPUT; echo ; nsenter -t $C1PID -n iptables -v --numeric --table nat --list ISTIO_OUTPUT; echo ; nsenter -t $C1PID -n iptables -v --numeric --table nat --list POSTROUTING"
watch -d "nsenter -t $C1PID -n iptables -t nat -L -n -v"
- 최종적으로 nginx 컨테이너에 클라이언트의 요청 트래픽이 도착한다.
- nginx 컨테이너의 웹 액세스 로그에서 확인 : XFF 헤더에서 클라이언트의 출발지 IP를 확인!
# nginx 웹 데몬에 도착하여 액세스 로그 기록되고, 이후 200ok 리턴되며, XFF 헤더에서 클라이언트의 IP를 확인 할 수 있다
(istio-k8s:default) root@k8s-m:~# kubectl logs nginx-pod -f
127.0.0.6 - - [15/Dec/2021:18:37:38 +0000] "GET / HTTP/1.1" 200 615 "-" "curl/7.68.0" "192.168.10.254"
127.0.0.6 - - [15/Dec/2021:18:40:52 +0000] "GET / HTTP/1.1" 200 615 "-" "curl/7.68.0" "192.168.10.254"
...
파드(리턴 트래픽) → 클라이언트
트래픽 흐름
- nginx (웹 서버)컨테이너에서 리턴 트래픽(응답, 200 OK)를 클라이언트에 전달합니다.
- IPTables CT(Connection Table)에 정보를 참고해서 역변환 등이 적용되어 전달됩니다.
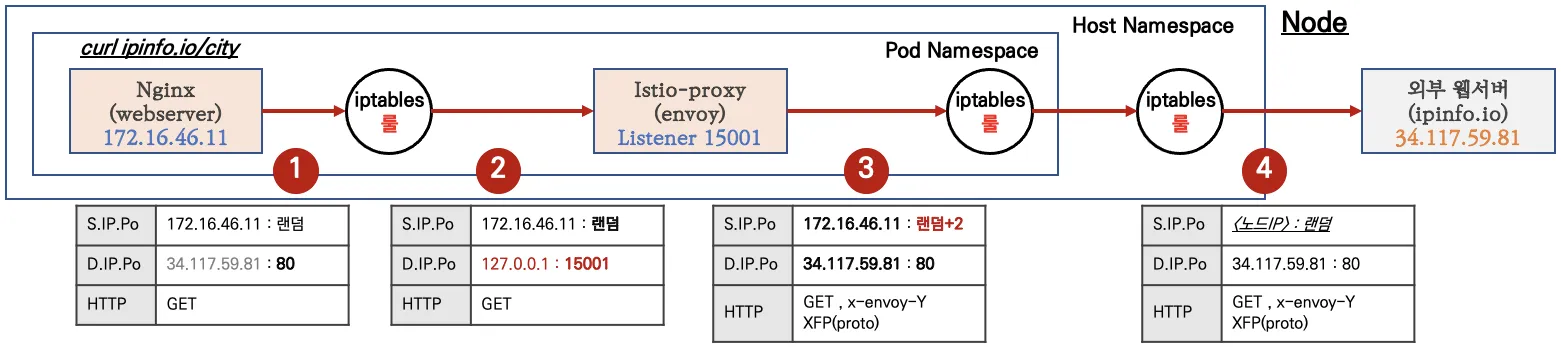
파드(요청) → 외부 웹서버
트래픽 흐름
- 파드에서 업데이트 나 패치 다운로드 처럼 외부 웹서버 나 인터넷 연결 과정에서의 트래픽의 흐름입니다.
[파드 내부] Client PC → Istio IngressGateway 파드 구간
'nginx 컨테이너' 에서 외부 웹서버 요청을 합니다.
# 아래 처럼 'nginx 컨테이너' 에서 외부 웹서버 요청
kubectl exec -it nginx-pod -c nginx-container -- curl -s 192.168.10.254
kubectl exec -it nginx-pod -c nginx-container -- curl -s http://wttr.in/seoul
kubectl exec -it nginx-pod -c nginx-container -- curl -s wttr.in/seoul?format=3
kubectl exec -it nginx-pod -c nginx-container -- curl -s 'wttr.in/{London,Busan}'
kubectl exec -it nginx-pod -c nginx-container -- curl -s http://ipinfo.io/city
kubectl exec -it nginx-pod -c nginx-container -- curl -k https://www.google.com | grep -o "<title>.*</title>";echo
while true; do kubectl exec -it nginx-pod -c nginx-container -- curl -s http://ipinfo.io/city; date "+%Y-%m-%d %H:%M:%S" ; echo "--------------" ; sleep 3; done
[파드 내부] IPTables → Istio-proxy 컨테이너 인입
파드 내 IPTables Chains/Rules 적용 (NAT 테이블) → 'Istio-proxy 컨테이너'로 인입됩니다.
- OUTPUT → ISTIO_OUTPUT → ISTIO_REDIRECT (redir ports 15001)
# iptables 확인
c1 iptables -t nat --zero
c1 iptables -v --numeric --table nat --list ISTIO_REDIRECT
watch -d "nsenter -t $C1PID -n iptables -v --numeric --table nat --list OUTPUT; echo ; nsenter -t $C1PID -n iptables -v --numeric --table nat --list ISTIO_OUTPUT; echo ; nsenter -t $C1PID -n iptables -v --numeric --table nat --list ISTIO_REDIRECT"
watch -d "nsenter -t $C1PID -n iptables -t nat -L -n -v"

# nginx 파드에서 TCP 트래픽 요청으로 인입 시, ISTIO_REDIRECT 에서 redir ports 15001 되어 'Istio-proxy 컨테이너'로 인입됩니다.
c1 iptables -t nat -L -n -v
Chain OUTPUT (policy ACCEPT 5 packets, 455 bytes)
 pkts bytes target        prot opt in     out     source               destination
    0     0 ISTIO_OUTPUT  tcp  --  *      *       0.0.0.0/0            0.0.0.0/0

Chain ISTIO_OUTPUT (1 references)
 pkts bytes target          prot opt in     out     source               destination
 ...
    0     0 ISTIO_REDIRECT  all  --  *      *       0.0.0.0/0            0.0.0.0/0

Chain ISTIO_REDIRECT (1 references)
 pkts bytes target     prot opt in     out     source               destination
    0     0 REDIRECT   tcp  --  *      *       0.0.0.0/0            0.0.0.0/0            redir ports 15001
[파드 내부] Istio-proxy 컨테이너 → 노드의 호스트 네임스페이스
'Istio-proxy 컨테이너' 는 대리인(Proxy) 역할로, 출발지 포트를 변경(+2) 후 외부 웹서버에 연결을 한다
- 'Istio-proxy 컨테이너'의 로그 확인
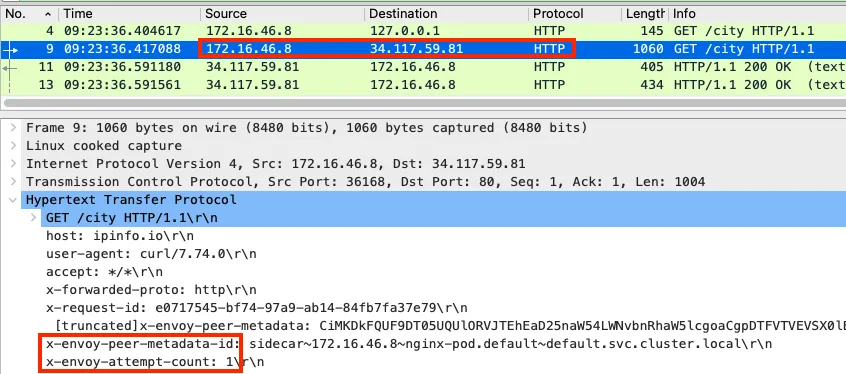
(istio-k8s:default) root@k8s-m:~# kubectl logs nginx-pod -c istio-proxy -f
[2021-12-15T21:13:34.787Z] "GET /loc HTTP/1.1" 200 - via_upstream - "-" 0 17 187 187 "-" "curl/7.74.0" "d86b9c0b-9519-9c96-9b06-17938fa6ed3b" "ipinfo.io" "34.117.59.81:80" PassthroughCluster 172.16.46.11:36198 34.117.59.81:80 172.16.46.11:36196 - allow_any
- 파드 내에서 패킷 덤프 후 확인 : 출발지 포드를 변경(+2) 및 x-envoy 헤더를 추가
파드를 빠져나가기 전, 다시 한번 더 IPTables 적용 된다 ⇒ 이때, 이전 트래픽과 매칭되는 Rule 이 다른 것은 UID 1337 때문입니다.
- OUTPUT → ISTIO_OUTPUT
# iptables 확인
c1 iptables -t nat --zero # 패킷 카운트 초기화

# 아래 처럼 Istio-proxy(15001)에서 빠져나온 부분은 UID 1337 매칭되어서 RETURN 되어 파드를 빠져나오게 됩니다!
c1 iptables -t nat -L -n -v
Chain ISTIO_OUTPUT (1 references)
 pkts bytes target             prot opt in     out     source               destination
    0     0 RETURN             all  --  *      lo      127.0.0.6            0.0.0.0/0
    0     0 ISTIO_IN_REDIRECT  all  --  *      lo      0.0.0.0/0           !127.0.0.1            owner UID match 1337
    0     0 RETURN             all  --  *      lo      0.0.0.0/0            0.0.0.0/0            ! owner UID match 1337
    2   120 RETURN             all  --  *      *       0.0.0.0/0            0.0.0.0/0            owner UID match 1337
    0     0 ISTIO_IN_REDIRECT  all  --  *      lo      0.0.0.0/0           !127.0.0.1            owner GID match 1337
    0     0 RETURN             all  --  *      lo      0.0.0.0/0            0.0.0.0/0            ! owner GID match 1337
    0     0 RETURN             all  --  *      *       0.0.0.0/0            0.0.0.0/0            owner GID match 1337
    0     0 RETURN             all  --  *      *       0.0.0.0/0            127.0.0.1
    2   120 ISTIO_REDIRECT     all  --  *      *       0.0.0.0/0            0.0.0.0/0
노드 → 외부
노드에 SNAT(masquerading) 설정이 되어 있을 경우, 출발지 IP 를 노드의 NIC IP로 변환하여 외부 웹서버에 요청을 전달합니다.
외부 웹서버(리턴 트래픽) → 파드
웹 서버에서 리턴 트래픽이 파드에 돌아오는 과정은 1.2 에서 알아본 흐름과 유사합니다.
다만, 파드 내로 인입 시 목적지 포트(+2) 이므로, ‘Nginx 컨테이너’ 로 바로 가지 않고, 'Istio-proxy 컨테이너' 로 먼저 가게 됩니다.
📌 Conclusion
이번 Istio 네트워크 스터디를 통해 쿠버네티스의 고급 네트워킹 솔루션에 대해 심도 있게 이해할 수 있었습니다. 특히 Istio의 서비스 메시 아키텍처와 그 구성 요소들을 탐구하며, 마이크로서비스 간 통신을 어떻게 효율적으로 관리하고 보안을 강화하는지 학습했습니다.
Envoy 프록시 기반의 Istio 트래픽 관리 기술을 통해 요청 라우팅, 폴트 인젝션, 트래픽 시프팅 등 다양한 기능을 실습하면서 서비스 배포 전략을 최적화하는 방법을 파악하였습니다. 이를 통해 서비스의 안정성과 유연성을 높일 수 있음을 확인했습니다.
mTLS를 활용한 보안 설정으로 서비스 간 통신의 암호화와 인증을 강화하는 방법을 이해하였으며, 인증과 인가 정책을 통해 세밀한 접근 제어를 구현하는 방법을 배웠습니다.
또한 Kiali, Prometheus, Grafana를 활용한 모니터링 설정을 실습하면서 Istio 환경에서의 서비스 상태와 성능 지표를 실시간으로 수집하고 시각화하는 방법을 익혔습니다. 이는 서비스 메시 내의 문제 진단과 성능 최적화에 큰 도움이 될 것으로 기대됩니다.
Istio는 복잡하면서도 강력한 서비스 메시 솔루션으로서, 쿠버네티스 환경에서 안정적이고 효율적인 서비스 통신 인프라를 제공합니다. 이번 스터디를 통해 Istio의 기본 원리와 실제 구성 방법을 숙지하게 되었으며, 향후 마이크로서비스 아키텍처의 네트워크 설계 및 문제 해결 시 이 지식을 적극 활용할 수 있을 것으로 기대됩니다.
🔗 Reference
Istio 공식 문서: https://istio.io/latest/docs/
Envoy 공식 문서: https://www.envoyproxy.io/docs/envoy/latest/
쿠버네티스 공식 문서: https://kubernetes.io/ko/docs/home/
Kiali 프로젝트: https://kiali.io/
서비스 메시란?: https://layer5.io/service-mesh-landscape
mTLS와 보안: https://www.cloudflare.com/ko-kr/learning/access-management/what-is-mutual-tls/
SPIFFE 및 SPIRE: https://spiffe.io/
실습에 사용된 GitHub 리포지토리: https://github.com/istio/istio