<script> 태그 위치는 어디에?
브라우저 동작방식
-
브라우저가 웹 페이지 접속 시 서버로 요청
-
HTML Parsing
: 컴퓨터가 이해할 수 있는 코드로 바꾸는 작업 -
DOM Tree 생성
-
Render Tree 생성
: DOM 트리 + CSSOM(CSS Object Model) -
브라우저에 출력
상단에서의 script태그
- 브라우저는 script태그를 만나면 HTML Parsing을 중단한다
- 중단하고 script 다운 후 script를 parsing
- 그 이후에 HTML parsing을 이어서 한다
async와 defer
async
HTML Parsing이 안 끝났더라도 script가 로드되면 즉시 script를 실행한다
<script async src="index.js"></script>defer
HTML Parsing이 모두 끝나면 script가 실행된다
<script defer src="index.js"></script>🔥 결론
<sciprt>태그는</body>닫는 태그 직전에 넣는 것이 좋다
- script 삽입 위치에 따라 브라우저 렌더링, script 실행 순서에 영향이 있기 때문.
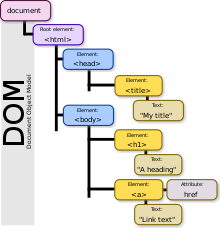
DOM ?
Document Object Model 문서객체모델
: HTML을 Object처럼 조작할 수 있는 Model.
이는 원본 HTML이 아니라 DOM을 조작하는 것이다
- 문서객체란?
<html>,<body>,<div>등의 태그들을 자바스크립트에서 조작 가능한 Object로 만드는 것이다.
-
'노드 트리' 구조
부모는 하나고, 여러 개의 자식을 가진다 -
JavaScript의 일부가 아니고 Web APIs다.
-
document, window 개체에 대한 api를 사용한다
ex)document.body
CREATE 추가
const newDiv = document.createElement('div')APPEND 부모노드에 자식노드 추가
- append
- 노드객체, 문자열(DOM string)을 추가 가능
- 다중으로 추가가능
document.body.append(newDiv, 'hello', span)- appendChild
- 노드객체만 추가가능
- 다중 추가 불가
// 이미 다른 부모에 위치한 자식노드를 다른 부모노드 밑으로 이동시킬때
const span = document.querySelector(‘span’);
const divB = document.querySelector(‘.b’);
// divA에 span이 이미 위치했음을 가정
divB.appendChild(span);
// divB로 span이 이동. 클론하는 것 아님
READ 조회
추천방법 - querySelector
.hello#hello처럼 셀렉터로 해당 요소를 가져온다- className, Id, Tag 를 다 포함하여 적용할 수 있기 때문에 가장 효율적인 접근 방법이다.
- document.querySelector()
- Element.querySelector()도 있다
// <style>HTML 문서 본문에 유형이 없거나, "text/css" 유형이 있는 첫 번째 요소가 반환 var el = document.body.querySelector("style[type='text/css'], style:not([type])"); - querySelectorAll
해당되는 요소들을 모두 가져온다
// 해당 셀럭터의 1번째만 가져오기
const title = document.querySelector('.hello h1');

// 조건 만족한 것 모두 가져오기
const title = document.querySelectorAll('div h1');
- 구식방법
// getElementById - id를 통해 el 가져오기
const title = document.getElementById('title');
title.innerText = 'got you';

// getElementByClassName - class명으로 가져오기
const hello = document.getElementByClassName('hello');

// getElementByTagName - 태그명으로 가져오기
const hello = document.getElementByTagName('h1');
input의 value값 접근하기
document.querySelector('#username').value = '새로운 값';UPDATE 변경
innerText, innerHTML, textContent
: 노드나 요소의 텍스트값을 읽거나 변경할 수 있다
innerText
- HTMLElement.innerText - Element 속성
element 안에 text 값만 가져온다 - 문자열 안에 태그가 있다면 문자열로 인식한다
innerHTML
- Element.innerHTML - Element 속성
- element안에 html이나 xml을 반환
- 문자열 안에 태그가 있다면 태그로 인식한다
- XSS(Cross-Site Scripting) 공격에 취약한 이슈 있음
textContent ✅
- Node.textContent - 노드 속성
노드 속성이기때문에 노드 유형들과 문자열 모두 가져온다 - 성능과 보안에 강점이 있으므로 권장됨
// .textContent = '입력'
const oneDiv = document.createElement('div');
console.log(oneDiv)  // <div></div>
oneDiv.textContent = 'dev';
console.log(oneDiv) // <div>dev</div>
classList.add
요소에 class 추가하기
.classList.add('hello')
oneDiv.classList.add('hello')
console.log(oneDiv)
console.log(oneDiv) // <div class="hello">dev</div>
DELETE 삭제
- 해당 요소만 삭제하기
.remove()
const container = document.querySelector('#container')
const tweetDiv = document.createElement('div')
container.append(tweetDiv)
tweetDiv.remove() // 삭제- 여러 자식요소를 삭제하기 1
.innerHTML = '';
보안이슈가 있어서 다른 메서드를 사용한다
document.querySelector('#container').innerHTML = '';- 여러 자식요소를 삭제하기 2
.removeChild
반복문 활용가능
// 자식요소가 없어질때까지 1번째 자식요소 삭제하기
const container = document.querySelector('#container');
while (container.firstChild) {
  container.removeChild(container.firstChild);
}- 첫번째 자식만 남기고 다 삭제하기
const container = document.querySelector('#container');
while (container.children.length > 1) {
  container.removeChild(container.lastChild);
}- 해당 class만 골라서 삭제하기
.forEach,for of문
const tweets = document.querySelectorAll('.tweet')
// 방법 1 ) forEach
tweets.forEach(function(tweet){
    tweet.remove();
})
// 방법 2 ) for of
for (let tweet of tweets){
    tweet.remove()
}
event
.classList
- 새로운 class 추가하기
- className은 기존 클래스를 수정한다
inputBox.classList.add('클래스명');.toggle
- 새로운 class를 추가/제거를 반복하는 것
ex) 다크모드추가/제거, 클릭시 색상변경/제거, 좋아요버튼 등
function handleTitleClick(){
  h1.classList.toggle('clicked');
}- toggle 없었을 때 구현하던 방법
function handleTitleClick(){
  const clickedClass = 'clicked';
  if(h1.classList.contains(clickedClass)){
    h1.classList.remove(clickedClass);
  } else {
    h1.classList.add(clickedClass);
  }
}
이벤트 관련 메서드는 on이 접두어로 붙는다
onclick,onmouseenter,onkeyup
이벤트 핸들러 함수 만들기
1. onclick에 직접할당
-
방법 1
el.onclick = function (){}btn.onclick = function() { console.log('버튼이 눌렸습니다!'); } -
방법 2
el.onclick = handle할 함수명;
- 함수 실행()이 아니라 함수 그자체를 등록하면 된다function handler() { console.log('버튼이 눌렸습니다!'); } btn.onclick = handler; // 함수 자체를 등록
2. addEventListener
el.addEventListener('event', event발생시 실행할 함수);
- addEventListener는 나중에 removeEventListener로 이벤트 삭제도 가능하다
- onclick 이벤트면 => on 떼고 click만 입력하면 된다
// 방법1
btn.addEventListener('click', function() {
  console.log('버튼이 눌렸습니다!');
});

// 방법2
function handleClick() {
  console.log('버튼이 눌렸습니다!');
}
btn.addEventListener('click', handleClick);
이벤트 객체
사용자의 입력(onclick, onkeyup ...)을 트리거로 발생한 이벤트 정보를 담은 객체
event.target;
function handleClick(e) {
        let currentMenu = e.target.textContent;
        console.log(currentMenu + "를 클릭하셨습니다.");
      }
참조
https://ko.wikipedia.org/wiki/%EB%AC%B8%EC%84%9C_%EA%B0%9D%EC%B2%B4_%EB%AA%A8%EB%8D%B8