이번 내용은 본인이 pytorch에 대해서 생소하기도 하고 모듈 자체를 만들어서 하나의 프로그램 구조로 만드는 것에 저어어어엉말 안 익숙하기 때문에 힘들었다,,, 그래도 수업 두 번씩 들으니 그때서야 이해가 되더라ㅎㅎㅎㅎ,,, 배운 내용 중에 포스트로 올리면 좋을 만한 것을 추려보았다.
💡 Tensor Handling
- view, squeeze, unsqueeze 등으로 tensor 조정가능
-
view: reshape과 동일하게 tensor의 shape을 변환 (reshape과 거의 유사)
- 기존의 메모리 주소를 사용해서 형태만 바꿔준 것
- 그렇기에 복사의 개념이 아니다
- 그러나 reshape은 복사의 개념으로 알아두면 된다
- view와 reshape은 contiguity 보장의 차이
- 값이 메모리에 할당이 될 때 이것을 보장해주는 것이 view, 보장이 안 되는 상황에서 copy를 하는 reshape
-
squeeze: 차원의 개수가 1인 차원을 삭제 (압축)
-
unsqueeze: 차원의 개수가 1인 차원을 추가
-
# # #
# # #
tensor([[[0.7466, 0.5440], [0.7145, 0.2119],
[0.8279, 0.0697]],
[[0.8323, 0.2671], [0.2484, 0.8983], [0.3228, 0.2254]]])

tensor_ex.view([-1, 6])
# tensor([[0.7466, 0.5440, 0.7145, 0.2119, 0.8279, 0.0697],
# [0.8323, 0.2671, 0.2484, 0.8983, 0.3228, 0.2254]])

tensor_ex.reshape([-1,6])
# tensor([[0.7466, 0.5440, 0.7145, 0.2119, 0.8279, 0.0697],
# [0.8323, 0.2671, 0.2484, 0.8983, 0.3228, 0.2254]])

a = torch.zeros(3, 2)
b = a.view(2, 3)
a.fill_(1)
# b에도 1로 가득찬 모습을 보인다
a = torch.zeros(3, 2)
b = a.t().reshape(6)
a.fill_(1)
# 이 경우에는 b가 1로 가득차있지 않다
💡 Tensor Handling Sequeeze, unsqueeze
- Squeeze는 dimension을 추가하는 것
- UnSqueeze는 dimension을 삭제하는 것
- 이때에 dim을 통해 axis를 지정해준다.
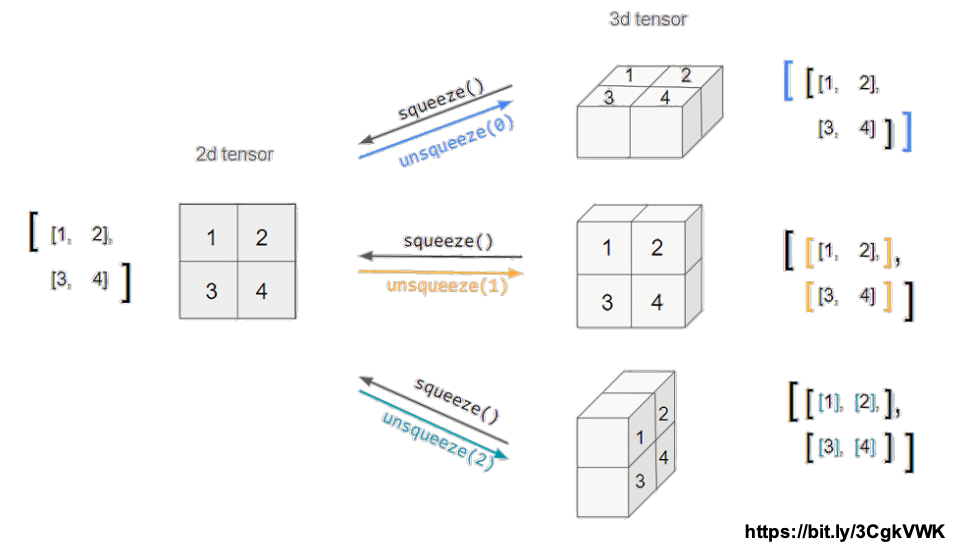
tensor_ex = torch.rand(size=(2, 1, 2))
tensor_ex.squeeze()
# tensor([[0.8510, 0.8263],
# [0.7602, 0.1309]])

tensor_ex = torch.rand(size=(2, 2))
tensor_ex.unsqueeze(0).shape
# torch.Size([1, 2, 2])

tensor_ex.unsqueeze(1).shape
# torch.Size([2, 1, 2])
tensor_ex.unsqueeze(2).shape
# torch.Size([2, 2, 1])
💡 Tensor Operations
- 기본적인 tensor의 operations는 numpy와 거의 동일
- 행렬곱셈 연산은 함수는 dot(내적)이 아닌 mm(행렬곱) 사용
- dot은 벡터의 내적, mm은 행렬 간의 곱으로 파악하면 된다
n1 = np.arange(10).reshape(2,5)
n2 = np.arange(10).reshape(5,2)
t1 = torch.FloatTensor(n1)
t2 = torch.FloatTensor(n2)

t1.mm(t2)
# tensor([[ 60., 70.],
# [160., 195.]])

t1.dot(t2)
# RuntimeError

t1.matmul(t2)
# tensor([[ 60., 70.], # [160., 195.]])

a = torch.rand(10)
b = torch.rand(10)
a.dot(b)

a = torch.rand(10)
b = torch.rand(10)
a.mm(b)- mm과 matmul은 broadcasting 지원 차이
- matmul은 broadcasting을 지원, mm은 지원 X
- matmul의 경우 [5, 2, 3]라고 한다면 5는 batch size 그러므로 2 X 3의 행렬과 3 X 1의 연산이 5 batch 만큼 일어난다고 생각하면 된다
a = torch.rand(5, 2, 3)
b = torch.rand(5)
a.mm(b)
#  5, 2, 3 와 5의 연산이므로 연산이 불가능

a = torch.rand(5, 2, 3)
b = torch.rand(3)
a.matmul(b)
# 위와 아래는 같은 것
a[0].mm(torch.unsqueeze(b,1)).squeeze()
a[1].mm(torch.unsqueeze(b,1)).squeeze()
a[2].mm(torch.unsqueeze(b,1)).squeeze()
a[3].mm(torch.unsqueeze(b,1)).squeeze()
a[4].mm(torch.unsqueeze(b,1)).squeeze()
💡 Tensor Operations for ML/DL formula
- nn.functional 모듈을 통해 다양한 수식 변환을 지원함
import torch
import torch.nn.functional as F
tensor = torch.FloatTensor([0.5, 0.7, 0.1])
h_tensor = F.softmax(tensor, dim=0)
h_tensor
# tensor([0.3458, 0.4224, 0.2318])

y = torch.randint(5, (10,5))
# 최대 4인 rand int를 10by5 tensor로 구현
y_label = y.argmax(dim=1)

torch.nn.functional.one_hot(y_label)- 이런 것도 있다

- 모든 경우의 수를 보여주는 것
💡 Auto Grad
- PyTorch의 핵심은 자동 미분의 지원→backward 함수 사용
- w = torch.tensor(2.0, requires_grad=True)을 통해서 w를 통해 미분을 할 것임을 말한다
- 우리가 사용할 때는 Linear 함수나 이미 구현된 것들에 대해 진행할텐데 거기에는 이미 requires_grad가 True로 설정이 되어 있다.
w = torch.tensor(2.0, requires_grad=True)
# 미분이 되는 대상
y = w**2
z = 10*y + 25
z.backward()
w.grad

a = torch.tensor([2., 3.], requires_grad=True)
b = torch.tensor([6., 4.], requires_grad=True)
Q = 3*a**3 - b**2

external_grad = torch.tensor([1., 1.])
Q.backward(gradient=external_grad)

a.grad
# a.grad ([36, 81])

b.grad
# tensor([-12., -8.])
💡 chunk, swapdims, zeros_like
- chunk는 조금 신기한 특성을 갖고 있다.
import torch
import numpy as np

t = torch.tensor([[1, 2, 3],
                  [4, 5, 6]])

print(torch.chunk(t, 2, 0))
print(torch.chunk(t, 2, 1))

> (tensor([[1, 2, 3]]), tensor([[4, 5, 6]]))
(tensor([[1, 2],
        [4, 5]]), tensor([[3],[6]]))
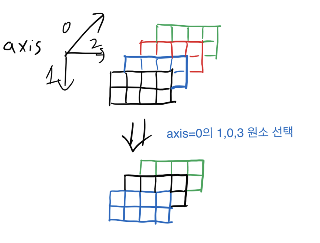
- 이처럼 axis에 맞게 잘라준다.
- 그리고 자를 때에 두 개로 자르려면 2, 1로 잘라야 하는데 이때 많은 것을 무조건 앞에 하도록 한다(다른 설정은 아마 내부에 구현이 되어 있을 것)
x = torch.tensor([[[0,1],[2,3]],[[4,5],[6,7]]])
> tensor([[[0, 1],
         [2, 3]],

        [[4, 5],
         [6, 7]]])

torch.swapdims(x, 0, 1)
> tensor([[[0, 1],
         [4, 5]],

        [[2, 3],
         [6, 7]]])

torch.swapdims(x, 0, 2)
> tensor([[[0, 4],
         [2, 6]],

        [[1, 5],
[3, 7]]])- swapdims(어떤 tensor, 교체할 dimension, 교체할 특정 dimension)
- 두개의 axis 축이 완전히 전환되는 형태로 보면된다
- 처음 보면 상당히 난해해서 많이 공부하는 게 좋을 듯,,
- scatter
- 먼저 index를 설정해줘야 한다.
self[index[i][j][k]][j][k] = src[i][j][k]  # if dim == 0
self[i][index[i][j][k]][k] = src[i][j][k]  # if dim == 1
self[i][j][index[i][j][k]] = src[i][j][k] # if dim == 2- 이것에 따라서 데이터들이 우리가 만든 tensor에 흩뿌려진다고 생각하면 된다.
- gather와 유사한데 둘다 쉽지 않다
src = torch.arange(1, 11).reshape((2, 5))
src
index = torch.tensor([[0, 1, 2, 0]])
torch.zeros(3, 5, dtype=src.dtype).scatter_(0, index, src)
index = torch.tensor([[0, 1, 2], [0, 1, 4]])
torch.zeros(3, 5, dtype=src.dtype).scatter_(1, index, src)

torch.full((2, 4), 2.).scatter_(1, torch.tensor([[2], [3]]),
           1.23, reduce='multiply')
torch.full((2, 4), 2.).scatter_(1, torch.tensor([[2], [3]]),
1.23, reduce='add')- 좀 어렵기에 시간을 들여서 위에 작성된 documentation 대로 하는 것이 좋다
참고 : https://pytorch.org/docs/stable/generated/torch.Tensor.scatter_.html?highlight=scatter#torch.Tensor.scatter_
네이버 부스트캠프 자료

프리미어와 IDE만 있다면 무엇이든 만들 수 있어