html에 사용되는 태그들을 모두 정리해놓은 글이다.
이 글에서 나오는 모든 소스코드와 실행 결과는
http://marin.dothome.co.kr/2020Camp/class/index.html
에 들어가면 볼 수 있다.
html, head, body, style(background-color), h1, p, br
HTML은 Hyper Text Markup Language의 약자이다.
The <!DOCTYPE>은 document type이고 browser가 웹페이지에 맞게 보여줄 수 있도록 돕는다.
<!DOCTYPE html>
html: whole document (html 안에 language 설정이 가능하다)
head: container for metadata
표시되지 않지만 효과를 주는 data가 들어간다.html 안에 body 위에 적힘
body: document body
style: 태그 안에서 사용가능
background-color:powderblue; -> 배경색을 powderblue로 바꿔줌
h1: heading
p: paragraph
br: empty element(enter 친 효과) close tag 필요 없음
<html lang="en" dir="ltr">
  <head>
    <meta charset="utf-8">
    <title>html practice</title>
  </head>
  <body style="background-color:powderblue;">
    <h1>html, head, body, style(background-color), h1, p, br</h1>
    <h2>My First Heading</h2>
    <p>My first paragraph</p>
    <p>쓰다가 <br> 넘길 수 있다.</p>
  </body>
</html>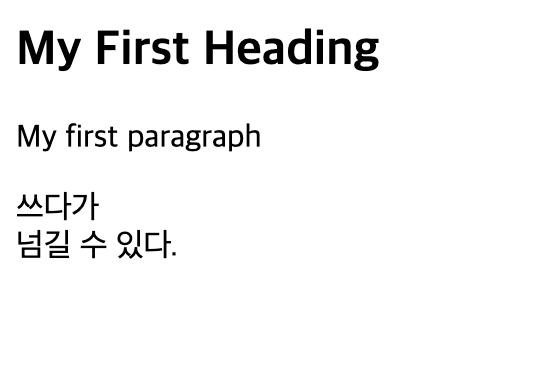
a, img, style(color),title
a href: 링크 주소
img: 사진
(src: 사진 주소, width: 너비, height: 높이, alt: 만약 사진을 찾지 못했을때 대신 나오는 것, style: 너비 높이 등을 한꺼번에 표시할 수 있음 float로 왼쪽이나 오른쪽 둘 중에 어디에 위치할지도 정할 수 있음)
사진 주소는 내가 웹사이트에 저장한 파일 위치를 적으면 됩니다.
style: 태그 안에 적으면 style을 변경해줌(style="color:red"라고 적으면 빨강색으로)
title: 웹페이지에서 그 태그에 마우스를 올리면 제목이 뜬다.
태그 뒤에 값을 넣을때 ""로 묶어주는 것이 좋다. ""로 묶지 않으면 동작하지 않는 경우 있음
ex)
-> 이런 식으로쓰는 것이 좋음
-> 이것 보다
<h1>a, img, style(color),title</h1>
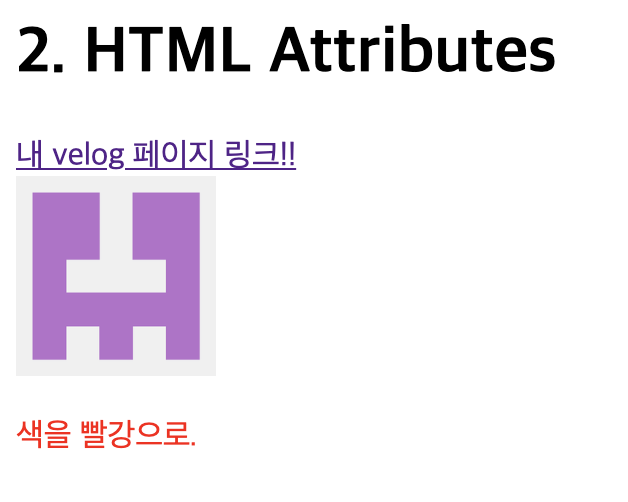
<a href = "https://velog.io/@ye050425"> 내 velog 페이지 링크!!</a><br>
<img src="../img/velog.png" width="100" height="100" alt="velog img">
<!--<img src="../img/velog.png" style="width:100px;height:100px;">
이런 식도 가능함-->
<p style="color:red" title="red">색을 빨강으로.</p>
h1~h6, style(font-size), hr
h1~h6까지 사용 가능하다 크기 보고 고르면 된다.
style ="font-size:60px;": 폰트 크기를 60px로 하는 것으로 태그 안에 적는다.
hr: 가로선 close 태그가 필요 없다.
<h1>h1~h6, style(font-size), hr</h1>
    <h2 style= "font-size:60px;">heading2</h2>
    <h3>heading3 아래에 hr 씀</h3>
    <hr>
    <h4>heading4</h4>
    <h5>heading5</h5>
    <h6>heading6</h6>
p, br, pre
p: paragraph
엔터쳐도 웹페이지에서는 이어진 것처럼 보임
다음줄로 내리고 싶으면
써야 함
pre: br 테그 없이 스페이스와 엔터 모두 인식해서 포멧을 만들어줌
<p>paragraph</p>
    <p>여기서 엔터 쳐도(여기서 엔터 침)
      어차피 웹페이지에서 보일때는 이어진 것처럼 보인다.</p>
    <p>다음 줄로 내리고 싶으면<br>써야 한다.<br> end tag 까먹으면 안된다.</p>
    <pre>
      pre 태그 쓰면

      스페이스와 엔터 모두 인식 해준다!!

      정렬을 해준다.지금까지 br 안 쓴거다!!
    </pre>
style(font-family, font-size, text-align)
style은 태그 안에서 간단하게 바꿀때 사용한다. 나중에 많이 바꿀 때는 이렇게 하기는 번거로우므로 css 사용해서 바꿀 것이다.
font-family: 글씨체 바꿔줌
font-size: 폰트 크기 바꿔줌
text-align: 글씨가 왼쪽에 있을지 가운데에 있을지 오른쪽에 있을지 정해줌 default는 left다.
<p>이건 아무 것도 추가 옵션이 없다.</p>
<p style="font-family:verdana;">font-family가 verdana다</p>
<p style="font-family:courier;">font-family가 courier다</p>
<p style="font-size:160%">이건 font-size가 160이다.</p>
<p style="text-align:center;">이건 textalign이 center다.</p>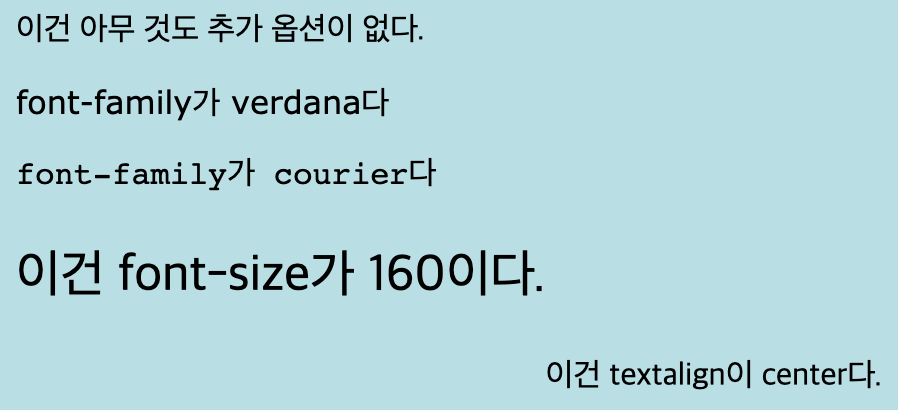
b, strong, i, em, mark, small, del, ins, sub, sup
- Bold text 굵게
- Important text 굵게(위에랑 차이 없다.)
- Italic text 기울어지게
- Emphasized text 강조
- Marked text 마크하기
- Small text 작게
- Deleted text 삭제(중간에 줄 그어짐)
- Inserted text 삽입(아래에 밑줄)
- Subscript text 글씨가 원래보다 아래쪽에 적혀짐
- Superscript text 글씨가 원래보다 조금 위쪽에
이건 예시로 봐야 확실히 알 수 있다. 밑에 예시가 있다.
<p>
    이건 <b>bold</b>
    이건 <strong>strong</strong>
    이건 <i>i</i>
    이건 <em>em</em>
    이건 <mark>mark</mark>
    이건 <small>small</small>
    이건<del>del</del>
    이건 <ins>ins</ins>
    이건 <sub>sub</sub>
    이건 <sup>sup</sup>
</p>
q, blockquote, abbr,address, cite, bdo
q: 짧게 인용할때 사용
blockquote: 이것은 인용해와서 section을 정해서 그 안에 인용한 것을 쓸때 사용한다.
abbr: 유용한 정보를 주고 싶을때 사용 여기서 정보는 번역한 결과나 브라우저의 정보 같은 것이다.(마우스를 올리면 정보가 뜸)
address: document 소유자와 연결하기 위한 정보를 주고 싶을때 사용 (보통 italic체로 뜨며 정보의 앞뒤에
로 띄워준다)
cite: 중간에 제목 쓸 때 사용(italic 체로 뜬다)
bdo: 이것은 글자가 써지는 방향을 조정해주고 싶을때 사용한다. 태그 안쪽 옵션의 default 값은 dir = "ltr"로 왼쪽에서 오른쪽으로 써지는 것이고, dir="rtl"로 하면 오른쪽에서 왼쪽으로 써진다.
<p>옆에는 짧게 인용한 것. <q>웹페이지 연동하면서 써보는 글이다!!</q>->""이거도 자동으로 써진 것이다.</p>
    <p>이건 quote한 것이다. 인용한 것. 난 내 것 게시글 중에 글을 조금 가져왔다. 아래같이 된다.</p>
    <blockquote cite="https://velog.io/@ye050425/vscode-atom-%EC%9B%B9%ED%8E%98%EC%9D%B4%EC%A7%80-%EC%97%B0%EB%8F%99%ED%95%98%EA%B8%B0-jwk4h40me9">
      이번에 컴퓨터 포맷하고 다시 웹페이지 연동하면서 써보는 글이다!!
      내가 사용했던 방식 그대로 쓰겠다.
    </blockquote>
    <p>abbr을 써보쟈<abbr title="Hyper Text Markup Language">HTML</abbr>태그위에 마우스를 올리면 전체 뜻이 뜬다.</p>
    <address>
      웹페이지 주소는 <br>
      https://velog.io/@ye050425<br>
      여기다.<br>
      이거는 address를 썼다
    </address>
    <p> cite를 써보자<cite>cite</cite>이렇게!!</p>
    <bdo dir="rtl">이거는 오른쪽에서 왼쪽으로 써질거다</bdo>
주석 처리
: 주석처리한다.이번 것은 웹사이트에 뜨는것이 없으므로 코드만 예시를 들겠다.
<!-- 이것은 주석처리!! -->
    <!-- 길게도
      된다!! 엔터 쳐도 된다!!
      -->
link
a 태그를 쓴다.
전체 주소를 다 적어도 되고 쓰는 파일 위치와 link를 걸 파일의 위치가 같다면 파일 이름만 적어도 된다. 그리고 현재 위치에 있는 폴더 안에 있는 파일에 link를 걸고 싶다면 그냥 현재 위치부터 그 파일까지 가는 경로만 적어줘도 된다.
- a태그 안의 옵션
href = "link 걸 주소"
title = "link가 걸린 곳 위에 마우스 올리면 뜨는 정보"
target = "링크가 어디에 열려야 하는지 -> _blank, _self, _parent, _top 이렇게 4가지 중 하나"
_blank: 새로운 윈도우나 탭에 파일 열기
_self: 링크를 누른 화면에 링크 파일 열기
_parent: 부모창에서 열기(부모가 없으면 _self와 같음)
_top: 가장 상위의 창에서 열기(상위 창이 없으면 _self와 같음)
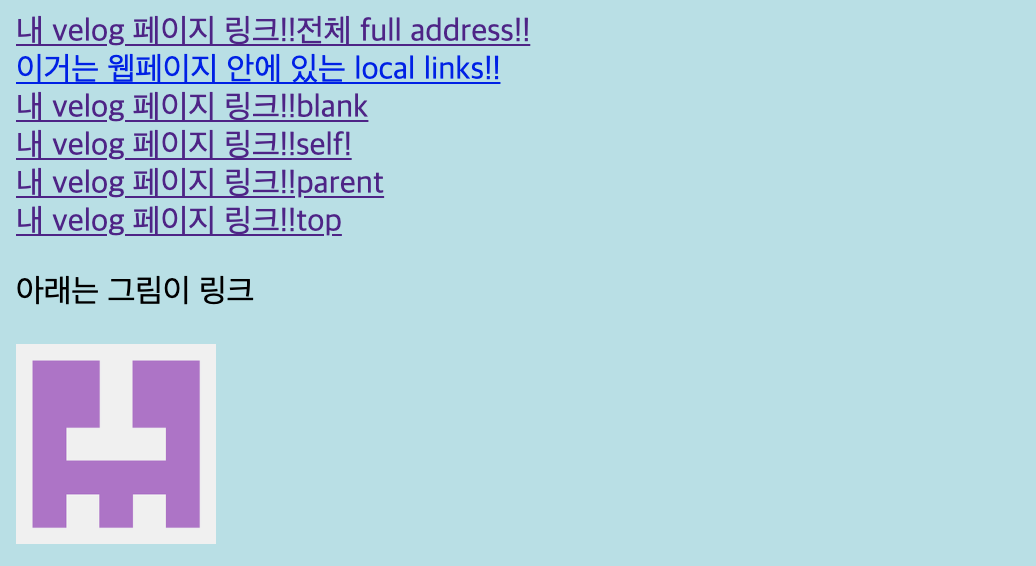
<a href = "https://velog.io/@ye050425" title="go my velog!!"> 내 velog 페이지 링크!!전체 full address!!</a><br>
<a href = "stylesheet.php">이거는 웹페이지 안에 있는 local links!!</a><br>
<a href = "https://velog.io/@ye050425" target="_blank"> 내 velog 페이지 링크!!blank</a><br>
<a href = "https://velog.io/@ye050425" target="_self"> 내 velog 페이지 링크!!self!</a><br>
<a href = "https://velog.io/@ye050425" target="_parent"> 내 velog 페이지 링크!!parent</a><br>
<a href = "https://velog.io/@ye050425" target="_top"> 내 velog 페이지 링크!!top</a><br>
<p>아래는 그림이 링크</p>
<a href = "https://velog.io/@ye050425"><img src="../img/velog.png" width="100" height="100" alt="velog img"></a><br>
link colors
a:linked -> 링크로 타고간 적 있을 때 상태
a:visited -> 링크를 타고간 적 없을 때 상태
a:hover -> 마우스를 위에 올렸을때 상태
a:active -> 눌렀을때 상태
아래 예시에서 background-color: transparent는 바탕이 투명한 것을 의미하고
text-decoration: none;은 밑줄 같이 텍스트에 꾸며져 있는 것들을 없애는 것을 의미한다.
<style>
      a:link {
        color: green;
        background-color: transparent;
        text-decoration: none;
      }
      a:visited {
        color: pink;
        background-color: transparent;
        text-decoration: none;
      }
      a:hover {
        color: red;
        background-color: transparent;
        text-decoration: underline;
      }
      a:active {
        color: yellow;
        background-color: transparent;
        text-decoration: underline;
      }
    </style>
사진에 분홍색이 한 번도 안 갔을때 녹색이 한 번 이상 갔을 때이다.

link bookmarks
페이지에서 원하는 곳으로 옮겨갈때 사용한다
원하는 곳에 id를 지정하고 아래에서 이런 식으로 태그를 주면 된다
<a href = "https://velog.io/@ye050425" id="here"> 내 velog 페이지 링크!!</a><br>


<a href="#here">id가 here인 곳으로!!</a>
img
map: 사용해서 특정 위치를 클릭했을때 링크로 연결된 문서로 넘어가게 할 수 있음 map 뒤에는 이름들어감
area:
shape-> 특정 범위가 rect,circle, poly,default 중에 어떤 모양인지
coords->점의 좌표
alt->
<map name="workmap">
	<area shape="rect" coords="34,44,270,350" alt="Computer" href="computer.htm">
  <area shape="rect" coords="290,172,333,250" alt="Phone" href="phone.htm">
</map>
background-image: url();: 바탕에 쓸 그림 지정 가능
background-repeat: no-repeat;: 바탕 그림이 반복되지 않고 한 개만 들어감
background-attachment: fixed; : 스크롤이 내려가는 것과 상관 없이 이미지는 고정되어있음
background-size: 100% 100%;:바탕 사이즈
<style>
body {
  background-image: url('img_girl.jpg');
  background-repeat: no-repeat;
  background-attachment: fixed;
  background-size: cover;
}
</style>

or

<div style="background-image: url('img_girl.jpg');"></div>
tables
table: 표만들기 -> 전체 틀
tr: table rows
rowspan: 세로로 합침
th: table header
td: table data
colspan: 가로로 합침
border: 가장자리 두께, 모양, 색
border-collapse: collapse; -> table 안에서 서로 붙어있을 수 있도록
padding: 내부에 공간 주기
table, th, td {
	border: 1px solid black;
	border-collapse: collapse;
}
th, td{
	padding: 15px;
}

<table style="width:100%">
     <tr>
        <th>이름</th>
        <th>나이</th>
        <th>거주지</th>
     </tr>
     <tr>
        <td>mary</td>
        <td>23</td>
        <td>서울</td>
      </tr>
     <tr>
        <td>Eve</td>
        <td>25</td>
        <td>광주</td>
    </tr>
</table>
Lists
unordered list
순서를 매기지 않은 리스트
style에서 list-style-type: 여기에 기호 모양 적기
(disc, none,circle, square 있음)
ordered list
순서를 매기는리스트
type="1" -> 숫자로 셈 (default)
type="A" -> 영어 대문자로 셈
type="a" -> 영어 소문자로 셈
type="I" -> 로마기호 대문자로 셈
type="i" -> 로마기호 소문자로 셈
<p> disc</p>
    <ul style="list-style-type:disc;">
      <li>Coffee</li>
      <li>Tea</li>
      <li>Milk</li>
    </ul>
    <p> disc</p>
    <ul style="list-style-type:none;">
      <li>Coffee</li>
      <li>Tea</li>
      <li>Milk</li>
    </ul>
    <p>circle</p>
    <ul style="list-style-type:circle;">
      <li>Coffee</li>
      <li>Tea</li>
      <li>Milk</li>
    </ul>
    <p>square</p>
    <ul style="list-style-type:square;">
      <li>Coffee</li>
      <li>Tea</li>
      <li>Milk</li>
    </ul>
    <p>ordered list: type: 1</p>
    <ol type="1">
      <li>Coffee</li>
      <li>Tea</li>
      <li>Milk</li>
    </ol>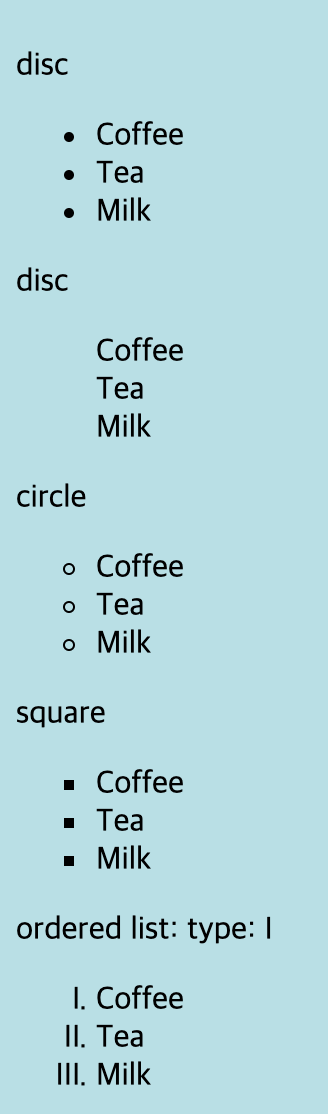
blocks
blocks는 새로운 line에서 시작하고 전체 너비를 가진다.
전체 너비를 가지는 만큼 그 너비 안에서 공간을 자유롭게 사용할 수 있다.
Block 태그 종류:
-
이중에
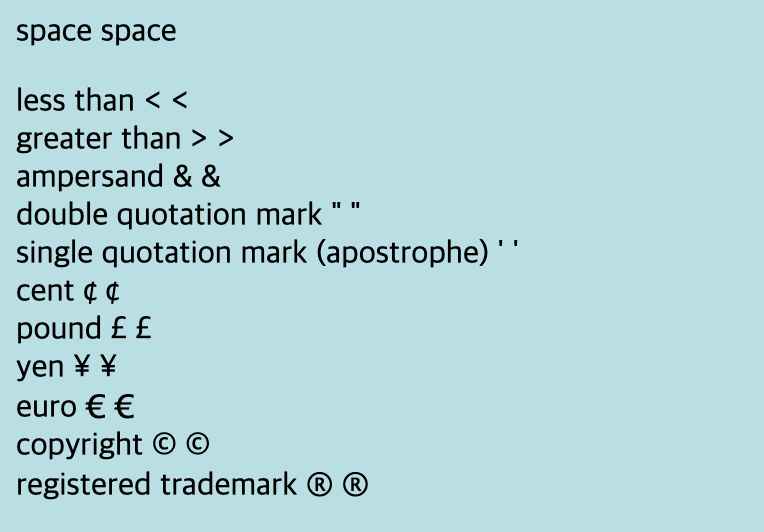
Result Description Entity Name Entity Number non-breaking space nbsp; #160; < less than lt; #60; > greater than gt; #62; & ampersand amp; #38; " double quotation mark quot; #34; ' single quotation mark (apostrophe) apos; #39; ¢ cent cent; #162; £ pound pound; #163; ¥ yen yen; #165; € euro euro; #8364; © copyright copy; #169; ® registered trademark reg; #174; <p>space space</p> <p>less than < <<br> greater than > ><br> ampersand & &<br> double quotation mark " "<br> single quotation mark (apostrophe) ' '<br> cent ¢ ¢<br> pound £ £<br> yen ¥ ¥<br> euro € €<br> copyright © ©<br> registered trademark ® ®</p>
diacritical mark를 문자와 함께 결합해서 사용이 가능하다. 문자와 #~ 가운데 공백에 &을 넣고 쓰면 된다
Mark Character Construct Result ̀ a a #768; à ́ a a #769; á ̂ a a #770; â ̃ a a #771; ã ̀ O O #768; Ò ́ O O #769; Ó ̂ O O #770; Ô ̃ O O #771; Õ <p> ̀ a à à<br> ́ a á á<br> ̂ a â â<br> ̃ a ã ã<br> ̀ b b̀ <br> ́ b b́ <br> ̂ b b̂ <br> ̃ b b̃ <br> ̀ O Ò Ò<br> ́ O Ó Ó<br> ̂ O Ô Ô<br> ̃ O Õ Õ</p>
수학 문자, 그리스 문자, 기타 기호들도 표현 가능하다.
XHTML
EXtensible HyperText Markup Language의 약자이다.
HTML과 같은 표현 능력을 지닌 마크업 언어
HTML보다 엄격하다.
예를 들어 HTML은 태그 안에 color=red; 이런 식으로 써도 허용해주지만
XHTML은 color="red"; 이런 식으로 써야 허용해준다.
여기까지 하고 form에 관한 것은 다음 포스팅에서 정리하겠다.