시작
npm install @react-navigation/native- Expo 관리 프로젝트에
dependencies설치
expo install react-native-gesture-handler react-native-reanimated react-native-screens react-native-safe-area-context @react-native-community/masked-view
네비게이터
웹 브라우저
- 웹 브라우저에서는 앵커 (
<a>) 태그를 사용하여 다른 페이지에 연결할 수 있다. - 사용자가 링크를 클릭하면 URL이 브라우저 히스토리 스택으로 푸쉬된다.
- 사용자가 뒤로 버튼을 누르면 브라우저가 기록 스택의 맨 위에서 항목을
pop하므로 활성 페이지는이전에 방문한 페이지이다.
React Native
React Native는 웹 브라우저처럼 글로벌 히스토리 스택에 대한 기본 개념을 가지고 있지 않다.React Navigation의stack navigator는 앱이 화면간에 전환하고 탐색 기록을 관리 할 수있는 방법을 제공한다.- 사용자가 앱과 상호 작용할 때 앱이
stack navigator에서 항목을push및pop하여 사용자에게 다른 화면이 표시된다. 웹 브라우저와React Navigation에서 작동하는 방식의 주요차이점은React Navigation의stack navigator는스택의 경로 사이를 탐색 할 때 Android 및 iOS에서 예상되는 제스처 및 애니메이션을 제공한다는 것이다.
01. 가장 일반적인 네비게이터(createStackNavigator)를 사용한 화면구성
01-1. stack navigator library 설치
`npm install @react-navigation/stack` 설치01-2. createStackNavigator
Screen및Navigator라는 두 가지 속성이 포함 된 객체를 반환하는 함수이다.- 둘 다 네비게이터 구성에 사용되는 React 구성 요소이다. 네비게이터는 경로 구성을 정의하기 위해
Screen요소를 하위 요소로 포함해야합니다.
01-3. NavigationContainer
NavigationContainer는navigation tree를 관리하고navigation state를 포함하는 구성 요소이다. 이 구성 요소는 모든 네비게이터 구조를 랩핑해야한다- 일반적으로 우리는이 컴포넌트를 앱의 루트 (일반적으로 App.js에서 내 보낸 컴포넌트)에 렌더링한다
01-4. 화면구성
import * as React from 'react';
import { View, Text } from 'react-native';
import { NavigationContainer } from '@react-navigation/native';
import { createStackNavigator } from '@react-navigation/stack';

function HomeScreen() {
  return (
    <View style={{ flex: 1, alignItems: 'center', justifyContent: 'center' }}>
      <Text>Home Screen</Text>
    </View>
  );
}

function DetailsScreen() {
  return (
    <View style={{ flex: 1, alignItems: 'center', justifyContent: 'center' }}>
      <Text>Details Screen</Text>
    </View>
  );
}

const Stack = createStackNavigator();

function App() {
  return (
    <NavigationContainer>
      <Stack.Navigator initialRouteName="Home">
        // initialRouteName : 맨처음 보여줄 화면이름
        <Stack.Screen
          name="Home"
          component={HomeScreen}
          options={{ title: 'GAGURI' }} // 각 화면 타이틀(헤더에 렌더링됨)
        />
        <Stack.Screen
          name="Details"
          component={DetailsScreen}
          options={{ title: 'PROJECT LIST' }}
        />
      </Stack.Navigator>
    </NavigationContainer>
  );
}

export default App;
01-5 화면구성에 들어간 개념들
Stack.Navigator는Stack.Screen구성 요소를 사용하여 콘텐츠를 렌더링하는 구성 요소이다Stack.Screen구성 요소의 필수props- 경로 이름을 나타내는
name - 경로에 렌더링 할 구성 요소를 지정하는
component
- 경로 이름을 나타내는
- 스택의
초기 경로를 지정하는 방법<Stack.Navigator initialRouteName="Home"> - 화면마다 타이틀을 다르게 설정하려면
<Stack.Screen name="Home" component={HomeScreen} options={{ title: 'GAGURI' }} /> - 타이틀을 고정하려면
<Stack.Navigator
  initialRouteName="Home"
  screenOptions={{ title: 'GAGURI' }}
>
01-6 Passing additional props
컴포넌트
prop은render function이 아닌컴포넌트를 허용합니다. 인라인 함수를 전달하지 마십시오 (예 : component = {() => }). 대안에 대해서는Passing additional props을 참조하십시오.
<Stack.Screen name="Home">
  {props => <HomeScreen {...props} extraData={someData} />}
</Stack.Screen>
02. 화면 간 이동
navigation prop은 모든 화면 component (라우트 구성에서 화면으로 정의되고 React Navigation에서 경로로 렌더링되는 구성 요소)에 사용할 수 있다.
import * as React from 'react';
import { Button, View, Text } from 'react-native';
import { NavigationContainer } from '@react-navigation/native';
import { createStackNavigator } from '@react-navigation/stack';

function HomeScreen({ navigation }) {
  return (
    <View style={{ flex: 1, alignItems: 'center', justifyContent: 'center' }}>
      <Text>Home Screen</Text>
      <Button
        title="Go to Details"
        onPress={() => navigation.navigate('Details')}
      />
    </View>
  );
}
02-1. 같은 경로 여러번 탐색
navigation.push( 'RouteName')는 원하는만큼 호출 할 수 있으며 계속 경로를stack에push함navigation.navigate( 'RouteName')는stack navigator가stack에 없으면 새 경로를stack navigator로push한다.
function DetailsScreen({ navigation }) {
  return (
    <View style={{ flex: 1, alignItems: 'center', justifyContent: 'center' }}>
      <Text>Details Screen</Text>
      <Button
        title="Go to Details... again"
        // onPress={() => navigation.navigate('Details')}
        // navigate는 같은 경로를 여러번 탐색 안함,
        onPress={() => navigation.push('Details')}
      />
    </View>
  );
}
02-2. Going back
stack navigater가 제공하는header는 활성 화면에서 되돌아 갈 수있을 때 자동으로 뒤로 버튼을 포함한다.- 프로그래밍 방식으로
되돌아가기기능을trigger할 수 있다.navigation.goBack ()
<Button title="Go back" onPress={() => navigation.goBack()} />
02-3. popToTop
스택에 여러 화면이 쌓였을때, 스택의 첫 번째 화면으로 돌아가고싶을때 사용함.
<Button
  title="Go back to first screen in stack"
  onPress={() => navigation.popToTop()}
/>
03. 경로에 매개 변수 전달
03-1. 경로에 매개 변수 전달하는 방법
navigation.navigate함수의 두번째params전달navigation.navigate('RouteName', { /* params go here */ })- 화면
component의params읽기route.params - 전달하는 매개 변수는
JSON 직렬화 가능합니다. 이렇게하면 상태 지속성을 사용할 수 있으며 화면 구성 요소는 딥 링크를 구현하기위한 올바른 계약을 갖게된다.
03-2. 매개 변수 전달 코드
function HomeScreen({ navigation }) {
  return (
    <View style={{ flex: 1, alignItems: 'center', justifyContent: 'center' }}>
      <Text>Home Screen</Text>
      <Button
        title="Go to Details"
        onPress={() => {
          /* 1. Navigate to the Details route with params */
          navigation.navigate('Details', {
            itemId: 86,
            otherParam: 'anything you want here',
          });
        }}
      />
    </View>
  );
}

function DetailsScreen({ route, navigation }) {
  /* 2. Get the param */
  const { itemId, otherParam } = route.params;
  return (
    <View style={{ flex: 1, alignItems: 'center', justifyContent: 'center' }}>
      <Text>Details Screen</Text>
      <Text>itemId: {JSON.stringify(itemId)}</Text>
      <Text>otherParam: {JSON.stringify(otherParam)}</Text>
      <Button
        title="Go to Details... again"
        onPress={() =>
          navigation.push('Details', {
            itemId: Math.floor(Math.random() * 100),
          })
        }
      />
      <Button title="Go to Home" onPress={() => navigation.navigate('Home')} />
      <Button title="Go back" onPress={() => navigation.goBack()} />
    </View>
  );
}
03-3. Updating params
- 초기 매개 변수를 화면에 전달할 수도 있다.
- 이 화면으로 이동할 때 매개 변수를 지정하지 않은 경우 초기 매개 변수가 사용된다
<Stack.Screen
  name="Details"
  component={DetailsScreen}
  initialParams={{ itemId: 42 }} // 초기 매개변수 설정
/>navigation.setParams(setParams 참고블로그)
setParams메소드를 사용하면 현재 화면의 매개변수(route.params)를 업데이트할 수 있다.setParams는React의setState처럼 작동한다
function ProfileScreen({ navigation: { setParams } }) {
  render() {
    return (
      <Button
        onPress={() =>
          navigation.setParams({
            friends:
              route.params.friends[0] === 'Brent'
                ? ['Wojciech', 'Szymon', 'Jakub']
                : ['Brent', 'Satya', 'Michaś'],
            title:
              route.params.title === "Brent's Profile"
                ? "Lucy's Profile"
                : "Brent's Profile",
          })
        }
        title="Swap title and friends"
      />
    );
  }
}
03-4. 이전 화면으로 매개 변수 전달
params를 사용하면 일부 데이터를 새 화면으로 전달하는 유용하다.- 데이터를 이전 화면으로 전달하는 경우에도
params가 유용하다
-navigate를 사용하여 매개변수를 전달하여 데이터를 다시 전달할 수 있다.
function HomeScreen({ navigation, route }) {
React.useEffect(() => {
if (route.params?.post) {
// Post updated, do something with `route.params.post`
// For example, send the post to the server
}
}, [route.params?.post]);
return (
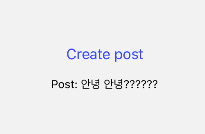
<View style={{ flex: 1, alignItems: 'center', justifyContent: 'center' }}>
<Button
title="Create post"
onPress={() => navigation.navigate('CreatePost')}
/>
<Text style={{ margin: 10 }}>Post: {route.params?.post}</Text>
</View>
);
}
function CreatePostScreen({ navigation, route }) {
const [postText, setPostText] = React.useState('');
return (
<>
<TextInput
multiline
placeholder="What's on your mind?"
style={{ height: 200, padding: 10, backgroundColor: 'white' }}
value={postText}
onChangeText={setPostText}
/>
<Button
title="Done"
onPress={() => {
// Pass params back to home screen
navigation.navigate('Home', { post: postText });
}}
/>
</>
);
}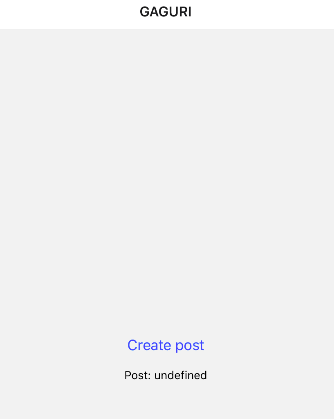
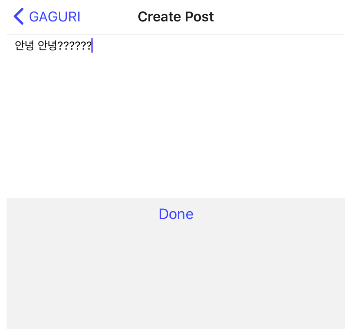
Done 버튼을 클릭하면 HomeScreen 컴포넌트의 route.param이 업데이트된다.
04. header bar
04-1. Using params in the title
import * as React from 'react';
import { View, Text, Button } from 'react-native';
import { NavigationContainer } from '@react-navigation/native';
import { createStackNavigator } from '@react-navigation/stack';

function HomeScreen({ navigation }) {
  return (
    <View style={{ flex: 1, alignItems: 'center', justifyContent: 'center' }}>
      <Text>Home Screen</Text>
      <Button
        title="Go to Profile"
        onPress={() =>
          navigation.navigate('Profile', { name: 'Custom profile header' })
           // point !!
          // name props 전달
        }
      />
    </View>
  );
}

function ProfileScreen({ navigation }) {
  return (
    <View style={{ flex: 1, alignItems: 'center', justifyContent: 'center' }}>
      <Text>Profile screen</Text>
      <Button title="Go back" onPress={() => navigation.goBack()} />
    </View>
  );
}

const Stack = createStackNavigator();

function App() {
  return (
    <NavigationContainer>
      <Stack.Navigator>
        <Stack.Screen
          name="Home"
          component={HomeScreen}
          options={{ title: 'My home' }}
        />
        <Stack.Screen
          name="Profile"
          component={ProfileScreen}
          options={({ route }) => ({ title: route.params.name })} // point !!
        />
      </Stack.Navigator>
    </NavigationContainer>
  );
}

export default App;
04-1. setOptions
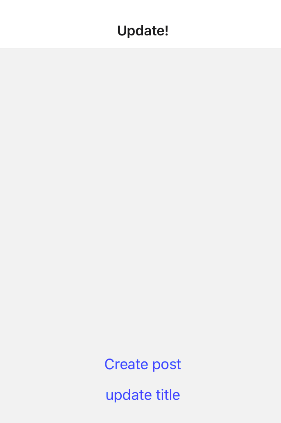
마운트 된 화면 구성 요소 자체에서 활성 화면의 옵션 구성을 업데이트해야하는 경우에 navigation.setOptions를 사용하여이 작업을 수행 할 수 있다.
<Button
  title="update title"
  onPress={() => navigation.setOptions({ title: 'Update!' })}
/>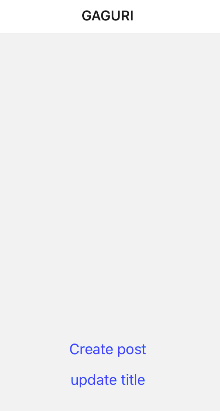
현재 화면 타이틀에서 update title 버튼을 클릭하면 아래와같이 업데이트 된다..!
04-2. 헤더 스타일 조정
헤더 스타일을 사용자 정의 할 때 사용하는 세 가지 주요 특성,
headerStyle- 헤더를 감싸는 뷰에 적용될 스타일 객체.
backgroundColor를 설정하면 헤더의 색상이된다
- 헤더를 감싸는 뷰에 적용될 스타일 객체.
headerTintColor
-back button과title은 모두 이 속성을 색상으로 사용합니다. 아래 예에서는 색조 버튼을 흰색 (#fff)으로 설정하여 뒤로 버튼과 머리글 제목이 흰색이되도록합니다.headerTitleStyle
- 제목의fontFamily,fontWeight및기타 Text 스타일 속성을 사용자 정의하려는 경우 이 속성을 사용하여 제목을 지정할 수 있습니다.
function StackScreen() {
return (
<Stack.Navigator>
<Stack.Screen
name="Home"
component={HomeScreen}
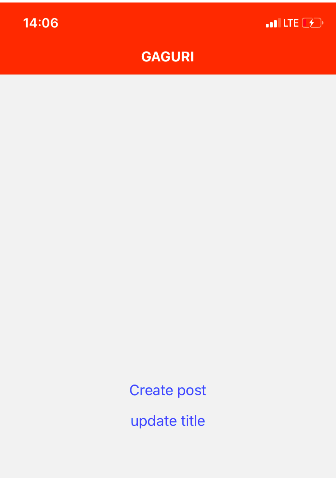
options={{
title: 'GAGURI',
headerStyle: {
backgroundColor: '#f4511e',
},
headerTintColor: '#fff',
headerTitleStyle: {
fontWeight: 'bold',
},
}}
/>
</Stack.Navigator>
);
}이렇게 해주면 아래와같이 header에 스타일이 적용된다.. 와우..
04-3 여러화면에서 공통 옵션 공유하기
Stack.Navigator에 screenOptions props를 사용하면 공통 옵션을 공유할 수 있다.
<Stack.Navigator
  initialRouteName="Home"
  screenOptions={{
    headerStyle: {
      backgroundColor: '#f4511e',
    },
    headerTintColor: '#fff',
    headerTitleStyle: {
      fontWeight: 'bold',
    },
  }}
>
  <Stack.Screen
    name="Home"
    component={HomeScreen}
    options={{
      title: 'GAGURI',
    }}
  />
</Stack.Navigator>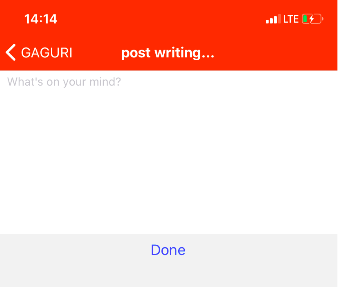
...튜토리얼이 너무 많아서 ..ㅎ 프로젝트에 필요한 네비게이션은 Tab nagigation이니까 그것도 한번 따라해보는걸로...ㅎ

👩🏻💻 🚀