1. DFS
tree의 DFS는 직관적으로 알겠는데 Graph의 DFS는 명확하게 다가오지 않는다. 여기서 말하는 DFS는 한 방향으로 나아가는 것을 뜻한다. 우선 이전의 만들었던 method를 이용해서 Graph를 간단하게 만들어보자.
var g = new Graph();
g.addVertex("a");
g.addVertex("b");
g.addVertex("c");
g.addVertex("d");
g.addVertex("e");
g.addVertex("f");

g.addEdge("a", "b");
g.addEdge("a", "c");
g.addEdge("b", "d");
g.addEdge("c", "e");
g.addEdge("d", "e");
g.addEdge("d", "f");
g.addEdge("e", "f");
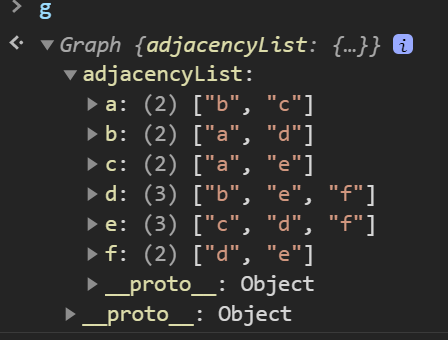
Adjacency List 로 저장되는 것을 볼 수 있다.

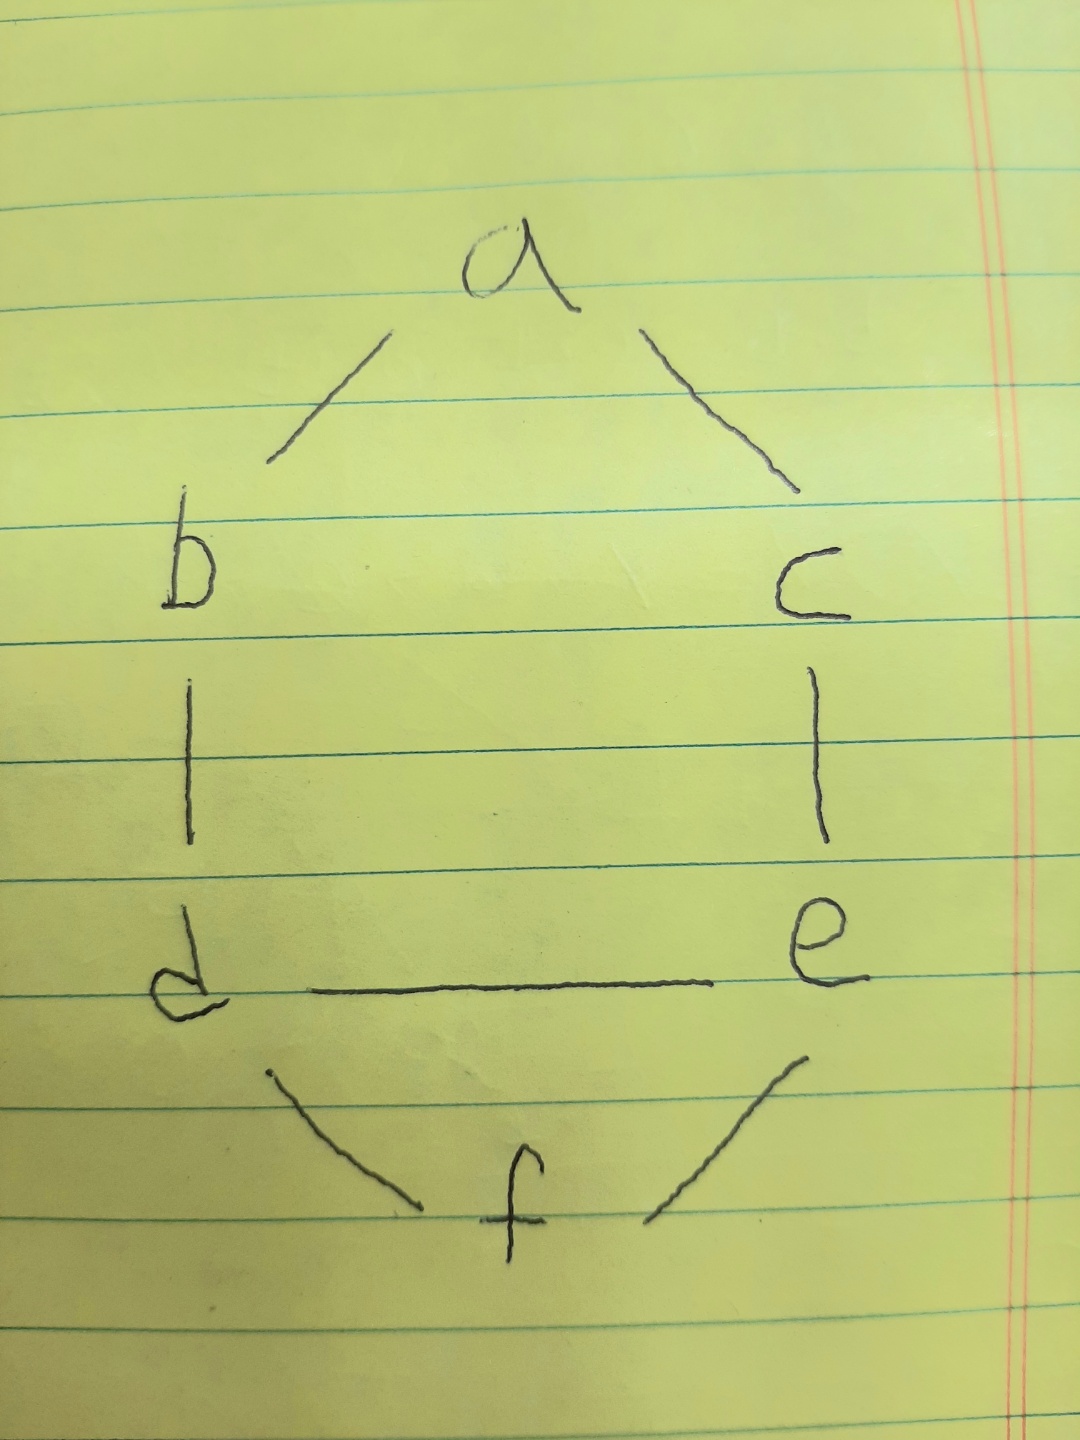
그리고, 그림으로 나타내면 아래와 같다.

그럼 여기서 a에서 출발하여 한 방향으로 움직인다고 하자. 그럼 [a,b,d,f,e,c] 가 될 수도 있고 [a,c,e,d,b,f]가 될 수도 있다. 방향이 한곳으로 흘러간다고 생각하면 된다. 두가지 방법으로 구현가능하다.
- 재귀함수
- 반복문
일단 재귀로 구현해보자.
- Depth first: Explore as far as possible down one branch before ‘backtracking’. So It doesn’t matter if it’s not alphabetical order so long as it goes in one direction.
1-1. Recursive DFS
로직을 살펴보자!
--pseudo Code:
- the function should accept a starting node
- Create a list to store the end result, to be returned at the very end
- Create an object to store visited vertices
- Create a helper function which accepts a vertex
-- helper(vertex):
- if vertex is not in the adjacency list: return(this is base case)
- add vertex to results list
- mark vertex as visited
- for each neighbor in vertex’s neighbors:
- if neighbor is not visited:
- recursively call DFS on neighbor
시작점을 mark와 result에 추가하고 이웃을 iterate한다. 이때 mark에 있으면 건너뛰고 없으면 재귀함수에 pass한다.
// 해내다니... 너무 자랑스럽다 내 자신이..
// DFS -- One direction / undirction
DFSRecur(start) {
  let mark = {};
  let result = [];

  // this를 넘겨주는 또 다른 방법!
  // const adjacencyList = this.adjacencyList 라고 선언하고 dfs 안에서 adjacencyList[v] 처럼 사용해도 됨!!
  // 참고로 dfs 안에서 this가 undefined 되는 이유는 this가 class 를 가리키는게 아니라 함수를 가리키기 때문. this 가 속한 곳이 this이다.
  const dfs = v => {
    var node = this.adjacencyList[v];
    // console.log(node, v);
    if (!node) return null;
    result.push(v);
    mark[v] = true;

    for (var nei of node) {
      if (mark[nei]) {
        continue;
      } else {
        dfs(nei);
      }
    }
  };

  dfs(start);

  return result;
}

result = ["a", "b", "d", "e", "c", "f"]
그럼 이제 반복문으로 구현해보자.
1-2. Iterative DFS
이번에는 stack 구조를 사용하려고 한다. stack에 추가한다음 뒤에서 부터 잘라서 분석하고 다시 추가하기 위해선 stack의 개념을 도입해야하기 때문이다. tree traverse BFS와 같은 방식이다.(이땐 QUEUE를 사용했지만) 그럼 로직을 살펴보자.
-- first push the starting node into stacks and mark it as visited.
- then take out what's inside the stacks, parse the its neighbors and push each of its neighbhor into the stacks if it hasn't been visited.
- keep looping until you hit stack size 0
DFSIter(start) {
  // stack에 있는것을 꺼내서 result에 넣는 방식으로 진행한다.
  // tree Travese BFS 에서 사용했던 방식과 거의 비슷하다

  var result = [];
  var visited = {};
  var stack = new Stack();

  // 처음 방문하는 node는 vistied와 stack에 일단 저장해 줌
  stack.push(start);
  visited[start] = true;

  while (stack.size) {
    var vtx = stack.pop();
    result.push(vtx);
    this.adjacencyList[vtx].forEach(neighbor => {
      if (!visited[neighbor]) {
        visited[neighbor] = true;
        stack.push(neighbor);
      }
    });
  }

  return result;
}

result = ["a", "c", "e", "f", "d", "b"]
이제는 BFS를 보도록 하자.
2. BFS
Graph에서 BFS는 가장 가까운 이웃을 모두 방문하고 나서 그 다음 가까운 이웃을 방문한다. 이때는 QUEUE를 쓴다. 이웃들을 추가하고 나서 그 이웃들의 이웃들을 방문하지 않고 추가한 이웃들을 먼저 방문해야 하기 때문이다.(FIFO)
- BFS: first, give height on every nearest neighbhor and visit every neighbors before you give another height to the neibhors’ neighbor on first height. Again, order of visiting doesn’t matter so long as we visit every nodes on the same height first.
 BFS(start) {
  var result = [];
  var visited = {};
  var queue = new Queue();
  visited[start] = true;
  queue.enqueue(start);

  while (queue.size) {
    var vtx = queue.dequeue();
    result.push(vtx);
    this.adjacencyList[vtx].forEach(neighbor => {
      if (!visited[neighbor]) {
        visited[neighbor] = true;
        queue.enqueue(neighbor);
      }
    });
  }

  return result;
}

result = ["a", "b", "c", "d", "e", "f"]
로직은 Iterative DFS와 완전히 같다. QUEUE구조만 사용하는 차이밖에 없다.
3. Graph 의 DFS와 BFS를 구현하는데 있어서 기억해야할 점
Key to realize BFS and DFS for Graphs
-
key is to whether you use queue or stack. Think about the way you search inside Graphs. If you follow in only one line, which is DFS, you have to use stack concept to realize the concept of DFS. Because stack pops from the end. Last In First Out. So that there is always certain node to be waited until you hit the node.
-
Whereas BFS, you have to distribute your attention evenly. So you want to make sure there are no nodes to be waited before you traverse over to next height. which means you have to use queue concept to take node one by one.
