
면접 준비하면서 리액트 공식문서안에 있는 MAIN/ADVANCED CONCEPTS를 쭉 한 번 읽어 보았다.
그 중에서 내가 중요하다고 생각되었던것 혹은 몰랐던것을 적어보려고 한다.
MAIN CONCEPTS
JSX ELEMENT
JSX Prevents Injection Attacks
: innerHTML 처럼 주입하는 것을 막는다. 이는 XXS를 방지하기 위해서이다
const title = response.potentiallyMaliciousInput;
// This is safe:
const element = <h1>{title}</h1>
결국 객체
: JSX 컴파일의 최종결과물은 결국 객체이다.
// 컴파일 전
const element = (
  <h1 className="greeting">
    Hello, world!
  </h1>
);

// 버그체크
const element = React.createElement(
  'h1',
  {className: 'greeting'},
  'Hello, world!'
);

// vDOM
// 최종 컴파일후 결과. 아래와 같은 식으로.(simplified)
const element = {
  type: 'h1',
  props: {
    className: 'greeting',
    children: 'Hello, world!'
  }
};
이러한 객체를 React elements 라고 한다. 스크린에 어떻게 표시될지 알려주는 설명서라고 보면 될것이다.(description)
jsx는 자바스크립트 코드가 아니기 때문에 컴파일 되어야 한다. 컴파일러는 주로 babel을 이용한다. 더 자세한 내용은 링크 에 매우 자세하게 정리되어있으니 들어가 볼것
Rendering Elements
딱 필요한것만 업데이트
: 시계 앱을 보자면 시간이 바뀔때 텍스트만 바꾸면 된다. 나머지 element는 그대로 존재한다.

그래서 레이아웃같은경우는 그대로 존재했던것이다.
Components and Props
: 모든 컴포넌트는 순수함수 로 취급. props으로 들어온 값을 가공해서 항상 같은 값을 리턴함. 밖에서 들어온 props을 결코 modify하지 않는다.
function withdraw(account, amount) {
  account.total -= amount;
}
리액트에서 하면 안되는일 이다.
State and Lifecycle
클래스로 캡슐화
: 시계 앱을 다시 만든다고 하자 그럼 아래와 같이 만들수 있다.
const root = ReactDOM.createRoot(document.getElementById('root'));

function Clock(props) {
  return (
    <div>
      <h1>Hello, world!</h1>
      <h2>It is {props.date.toLocaleTimeString()}.</h2>
    </div>
  );
}

function tick() {
  root.render(<Clock date={new Date()} />);
}

setInterval(tick, 1000);
그러나 리액트가 제공하는 Component를 상속받아서 리액트 클래스를 만들수 있다. 리액트 클래스는 life cycle, state, render같은 메소드를 상속받기 때문에 위에 보다 더 알찬 캡슐화가 가능하다.
class Clock extends React.Component {
  constructor(props) {
    super(props);
    this.state = {date: new Date()};
  }

  componentDidMount() {
    this.timerID = setInterval(
      () => this.tick(),
      1000
    );
  }

  componentWillUnmount() {
    clearInterval(this.timerID);
  }

  tick() {
    this.setState({
      date: new Date()
    });
  }

  render() {
    return (
      <div>
        <h1>Hello, world!</h1>
        <h2>It is {this.state.date.toLocaleTimeString()}.</h2>
      </div>
    );
  }
}

const root = ReactDOM.createRoot(document.getElementById('root'));
root.render(<Clock />);
하나의 컴포넌트는 되도록 한개의 일만하도록 하는게 훨씬 낫다. 그래서 UI가 복잡해지면 랜더링되는 컴포넌트를 나누어 리턴되는 JSX와 관리하려는 state를 컴포넌트별로 분리시키자. 이러한 원칙을 single responsibility principle(단일 책임 원칙) 이라고 한다.
Thinking in React
: 어떻게 하면 리액트스럽게 사고할 수 있을까? 간단한 앱을 예시로 들면서 단계별로 살펴보자. 아래와 같은 데이터를 아래 UI처럼 랜더링하려고 한다.
data
[
  {category: "Sporting Goods", price: "$49.99", stocked: true, name: "Football"},
  {category: "Sporting Goods", price: "$9.99", stocked: true, name: "Baseball"},
  {category: "Sporting Goods", price: "$29.99", stocked: false, name: "Basketball"},
  {category: "Electronics", price: "$99.99", stocked: true, name: "iPod Touch"},
  {category: "Electronics", price: "$399.99", stocked: false, name: "iPhone 5"},
  {category: "Electronics", price: "$199.99", stocked: true, name: "Nexus 7"}
];
UI
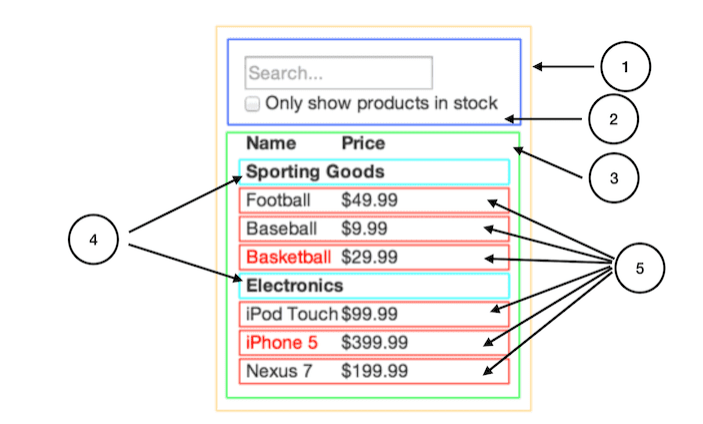
Break The UI Into A Component Hierarchy
: 우선 UI를 컴포넌트 별로 쪼개자
Build A Static Version in React
: 그리고 JSX부터 하드코딩하자
Identify The Minimal (but complete) Representation Of UI State
: state로 될만한 것을 정하자. 아래와 같은 기준을 가지고 state가 될만한것을 정한다.
- Does it chang over time? If so, it probably is state.
- Can you compute it based on any other state or props in your component? If not, it is state.
계속 바뀌어야하고 다른것으로부터 파생해서 추출해낼 수 없는게 state이다. 그럼 여기서는 search text랑 check box value가 state가 된다.
Identify Where Your State Should Live
: state가 존재해야할 곳을 정한다. checkbox state와 searchInput state는 공유해야하므로 최상단 부모컴포넌트에 선언하는게 좋을것 으로 판단
Add Inverse Data Flow
: 데이터를 아래로 흘려보내면 끝!
ADVANCED CONCEPTS
Forwarding refs
:Forwarding refs api는 컴포넌트가 리턴하는 DOM Elements에 접근가능하도록 해준다. 사실 대부분의 상황에서 사용할 필요가 없다. DOM structure에 의존하게 되기 때문이다. 그러나 button이나 input element같은경우 콕찝어서 사용할 경우가 있으므로 종종 쓰일 수 있다.
사용방법은 아래와 같다.
const FancyButton = React.forwardRef((props, ref) => (
  <button ref={ref} className="FancyButton">
    {props.children}
  </button>
));

// You can now get a ref directly to the DOM button:
const ref = React.createRef();
<FancyButton ref={ref}>Click me!</FancyButton>;
그럼 이제 ref를 통해서 버튼에 접근 가능하다. 원래라면 FancyButton 컴포넌트가 리턴하는 element에 접근 불가능하지만 요런식으로 접근할 수 있다.
이런경우를 다른 말로, forwarding이라고도 한다. 앞으로 넘겨주는 이미지를 그리면 될듯.
HOC를 이용해서 더 캡슐화를 진행 할 수 도 있다.
// logProps.jsx
function logProps(WrappedComponent) {
  class LogProps extends React.Component {
    componentDidUpdate(prevProps) {
      console.log('old props:', prevProps);
      console.log('new props:', this.props);
    }

    render() {
      return <WrappedComponent {...this.props} />;
    }
  }

  return LogProps;
}

// FancyButton.jsx
class FancyButton extends React.Component {
  focus() {
    // ...
  }

  // ...
}

// Rather than exporting FancyButton, we export LogProps.
// It will render a FancyButton though.
export default logProps(FancyButton);
아님 HOC를 안쓰고 캡슐화도 가능
function logProps(Component) {
 class LogProps extends React.Component {
   componentDidUpdate(prevProps) {
     console.log('old props:', prevProps);
     console.log('new props:', this.props);
   }

   render() {
     const {forwardedRef, ...rest} = this.props;

     // Assign the custom prop "forwardedRef" as a ref
     return <Component ref={forwardedRef} {...rest} />;
   }
 }

 // Note the second param "ref" provided by React.forwardRef.
 // We can pass it along to LogProps as a regular prop, e.g. "forwardedRef"
 // And it can then be attached to the Component.
 return React.forwardRef((props, ref) => {
   return <LogProps {...props} forwardedRef={ref} />;
 });
}
Portals
: 이름 그대로 return문에 보이는 DOM tree structure대로 랜더링 되는것이 아니라, 완전 다른 DOM에 랜더링 될 수 있게 해주는 API이다. Modal처럼 parent에 영향을 받지 않아야 하는, 동떨어진 컴포넌트를 랜더링할때 주로 사용된다.
사용법
ReactDOM.createPortal(child, container)container는 DOM element이고 child는 랜더링 될 수 있는 모든것이다(string, element, fragment..). container안에 child가 append된다.
우선 역시나 예시를 들어 적용해보자. 어느 컴포넌트에서 Modal을 선언하든간에, <div id="modal"></div> 안에 랜더링 되게 하려 한다. HTML부터 보자.
 <body>
    <div id="root"></div>
    <div id="modal"></div>
  </body>
그럼 이제 ModalPortal을 만들자
//Portal.js

import reactDom from "react-dom";

const ModalPortal = ({ children }) => {
  const el = document.getElementById("modal");
  return reactDom.createPortal(children, el);
};

export default ModalPortal;
ModalPortal의 children으로 들어오는 element는 바로 <div id="modal"></div> 안에 랜더링 된다. 어디서 랜더링 되든 상관없이 말이다. 그럼 바로 적용해보자. Carousel 안에서 Modal을 띄운다고 해보자.
// Modal.js
const Modal = ({ onClose}) => {

  return (
      <Background>
        <Content>
  //  ... modal 안의 contents 코드 ...
         </ Content>
      </Background>
  );
};

// Carousel.js
import ModalPortal from "../Components/Modal/Portal";
import Modal from "./Modal/Modal";

const Carousel = props => {
  const [modalOn, setModalOn] = useState(false);

  const handleModal = () => {
    setModalOn(!modalOn);
  };

  return (
    <>
      <Container>
    	<button onClick={handleModal}/>
		// ... 코드 생략 ...
        <ModalPortal>
          {modalOn && <Modal onClose={handleModal} />}
        </ModalPortal>
      </Container>
    </>
  );
};

export default Carousel;
이때 Modal은 Container안에 랜더링되는것이 아닌 <div id="modal"></div>안에 랜더링 된다.
profiler
: chrome extension중에 React Developer Tools가 제공하는 기능이다. 컴포넌트가 얼마나 자주랜더링 되고, 랜더링시 소모하는 비용을 계산하여 보여준다. 주로 memo로 인해 최적화 할때 사용되곤 한다.
개발모드에서만 사용가능.
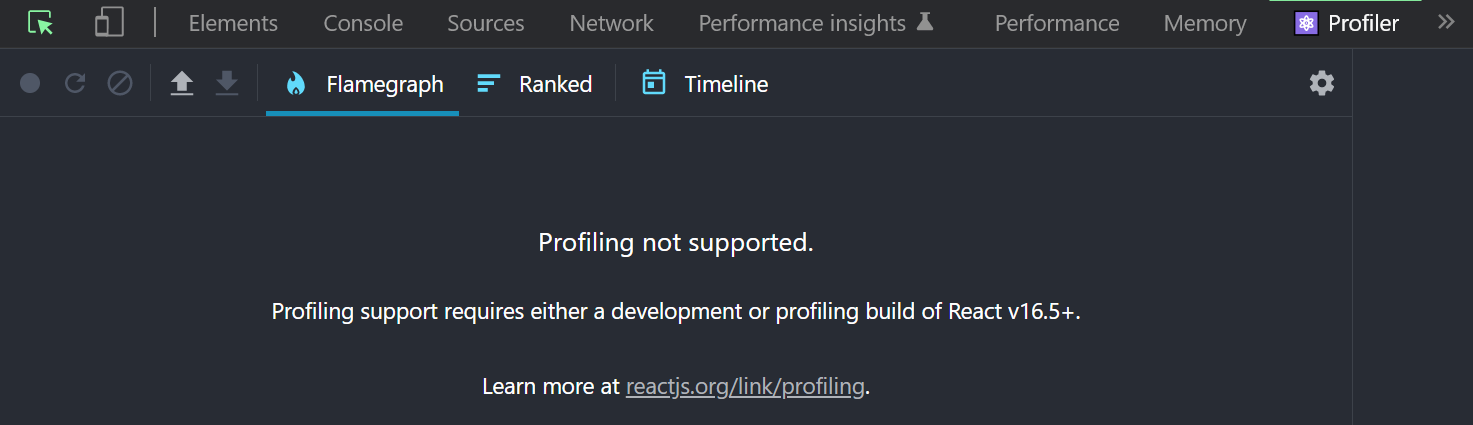
녹음 버튼처럼 생긴것을 누르면 각각의 컴포넌트 랜더링 관련된 수치를 계산해서 잘 보여준다.
render prop
: prop에 function을 넣는걸 의미.
https://reactjs.org/docs/render-props.html#use-render-props-for-cross-cutting-concerns 참고
mouse의 위치를 따라가는 Cat을 랜더링하는 class이다. 마우스의 위치를 Cat의 prop으로 넘겨주어도 되지만 mouse에 따라 Cat이 랜더링 되도록 하는 함수를 넘겨주어도 된다.