독스 : https://docs.flutter.dev/ui/animations
https://www.youtube.com/watch?v=wnARLByOtKA
로티 : https://medium.com/@moralmk/lottie-%EC%83%88%EB%A1%9C%EC%9A%B4-%EC%98%A4%ED%94%88-%EC%86%8C%EC%8A%A4-%EC%95%A0%EB%8B%88%EB%A9%94%EC%9D%B4%EC%85%98-%EB%8F%84%EA%B5%AC-4488d3da6e26
이 포스트에서는 위젯 등 코드 기반 요소에 적용하기 쉬운 애니메이션에 대해 작성
(Code-based animations)
결정
어떤 것을 사용해서 애니메이션을 구현할 것인가?
큰 분류
적용 대상에 따라 두 가지로 크게 분류할 수 있음
- Code-based animations : 표준 레이아웃/스타일, 원시형(컬럼, 텍스트 등)에 적용
- 플러터에서 제공하는 애니메이션 위젯, 커스텀 애니메이션, 라이브러리 사용
- Drawing-based animations : 움직이는 캐릭터 들에 적용. (벡터, 레스터 이미지)
- 외부 프레임워크를 통해서 전처리 한 뒤 프로젝트에 넣는 것이 타당
- Flare, Lottie (로티는 After effect를 실시간 렌더링하는 도구라는듯)
코드기반 애니메이션의 하위 분류
두 가지로 분류 가능
- Implicit animation : Animated 위젯의 프로퍼티 값 변화에 따라 자동으로 애니메이션 적용 (색 변화, 사이즈 변화, 로테이팅 등)
- Explicit animation : AnimationController필요. 컨트롤러의 라이프 사이클 관리(상태) 필요. 컨트롤러는 위젯이 아니기 때문에 StatefulWidget내부에 들어가야 함.
Explicit animation을 사용해야 하는 경우 : 아래 질문 중 1개 이상에 Yes로 답할 때
- Does it repeat forever?
- Is it discontinuous? (크기 0에서 10으로 커졌다가, 그 다음 프레임이 크기 0으로 뚝 떨어지는 경우 --> 비연속적이라고 함)
- Do multiple widgets animate together?
위 질문에 해당하지 않는 경우는 Implicit 애니메이션을 쓰는 것으로 충분(적절)
코드기반 애니메이션은 어떤 것으로 구현하는가?
각 애니메이션 분류에 실제로 사용해야 하는 위젯은 다음과 같음
- Implicit animation
- 내장 implicit animation (animated foo) 위젯 : 찾는 효과가 딱 있는 경우
- 예시 : Padding의 애니메이션 버전 위젯으로 AnimatedPadding이 있음
- TweenAnimationBuilder : 커스텀 implicit 애니메이션을 만드는 위젯.
- 내장 implicit animation (animated foo) 위젯 : 찾는 효과가 딱 있는 경우
- Explicit animation
- 내장 explicit animation (foo transition) : 찾는 효과가 딱 있는 경우
- Custom explicit animation
- AnimatedWidget : standalone위젯에 대해
- AnimationBuilder : 다른 위젯에 둘러싸인 위젯에 대해.
- CustomPainter : 앞의 2개가 성능이유가 있으면, 수동 메모리 관리를 하는 이 기능을 쓸 수 있다. 근데 이거 잘못쓰면 성능 더 엉망진창 될테니까 자신있으면 함 써보든지 말든지
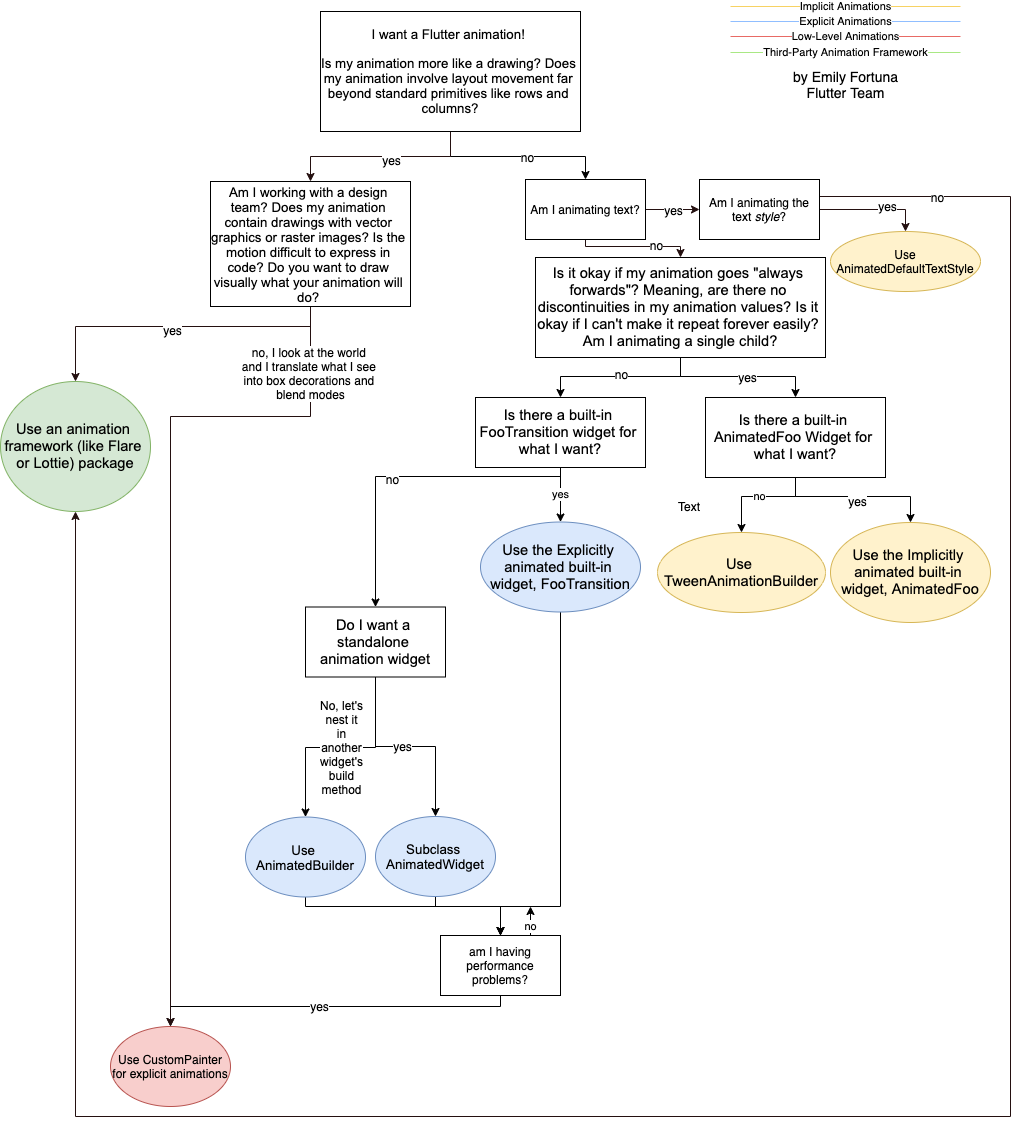
내용을 정리하기 위해 아래 순서도를 찬찬히 살펴보면 좋다. 읽기 싫게 생겼지만.
Built-in Implicit Animation
aka animatedFoo
플러터 기본 위젯들에는 이에 대응되는 animated위젯들이 있다.
- Container -> AnimatedContainer
- Opacity -> AnimatedOpacity
- Padding -> AnimatedPadding
AnimatedContainer의 배경색을 변경한다고 하면
- 원래 색과 새로운 색을 보간하고 (둘 사이의 값 만들어주기)
- 설정한대로 서서히(smoothly) 색이 변한다.
넣을 수 있는 주요 프로퍼티는
- duration : 얼마나 길게 애니메이션 주냐?
- curve : 특정 프레임 사이에 변하는 정도는 어떤 함수를 사용하냐? (일정하게? 느리다가 빠르게?)
AnimatedFoo(
duration : Duration(seconds: 5),
curve : Curves.easeOut,
...
(원래 Foo위젯에 있는 프로퍼티들),
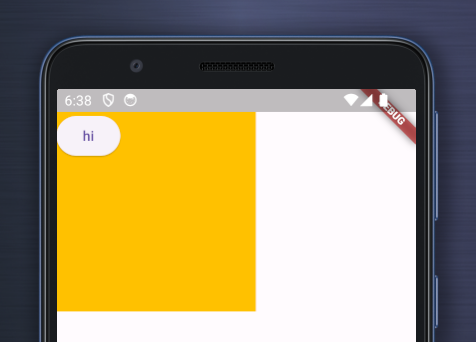
)실제로 어떤 컨테이너의 사이즈를 변하게 하는 예시를 들면
import 'package:flutter/material.dart';
void main() {
runApp(const MyApp());
}
class MyApp extends StatelessWidget {
const MyApp({super.key});
Widget build(BuildContext context) {
const appTitle = 'Theme Demo';
return MaterialApp(
title: appTitle,
home: Scaffold(
body: SafeArea(
child: DemoBody(),
),
),
);
}
}
class DemoBody extends StatefulWidget {
const DemoBody({super.key});
State<DemoBody> createState() => _DemoBodyState();
}
class _DemoBodyState extends State<DemoBody> {
bool active = false;
Widget build(BuildContext context) {
return Stack(
children: [
AnimatedContainer(
// 애니메이션을 위한 설정값
duration: Duration(milliseconds: 300),
curve: Curves.easeInOut,
// 원래 Container에도 있던 프로퍼티들
width: active ? 200 : 0,
height: active ? 200 : 0,
padding: const EdgeInsets.all(10),
alignment: Alignment.center,
color: Colors.amber,
),
ElevatedButton(
child: Text('hi'),
onPressed: () {
setState(() {
active = !active;
});
},
)
],
);
}
}TweenAnimationBuilder
AnimatedFoo가 없을 경우 커스텀 implicit 애니메이션을 만들기 위한 위젯
tween과 builder가 추가됐다.
- tween은 내장 AnimatedFoo에서 Foo의 종류에 해당하는 내용이다.
- 예를 들어, 색이 변화하는 트윈을 만들고 싶다면
ColorTwin을 twin값으로 던져준다. - 숫자 변화 트윈을 원한다면
Tween<double>이다. - Tween은 begin과 end가 지정돼야 한다.
- 예를 들어, 색이 변화하는 트윈을 만들고 싶다면
- builder는 애니메이션을 적용할 대상 위젯을 리턴한다
TweenAnimationBuilder(
duration : Duration(seconds: 42),
curve : Curve.적당한_커브,
tween : 적절한_트윈_클래스,
builder: (_, 트윈의 현재 값 파라미터, __) {
return 애니메이션 적용할_위젯(),
}
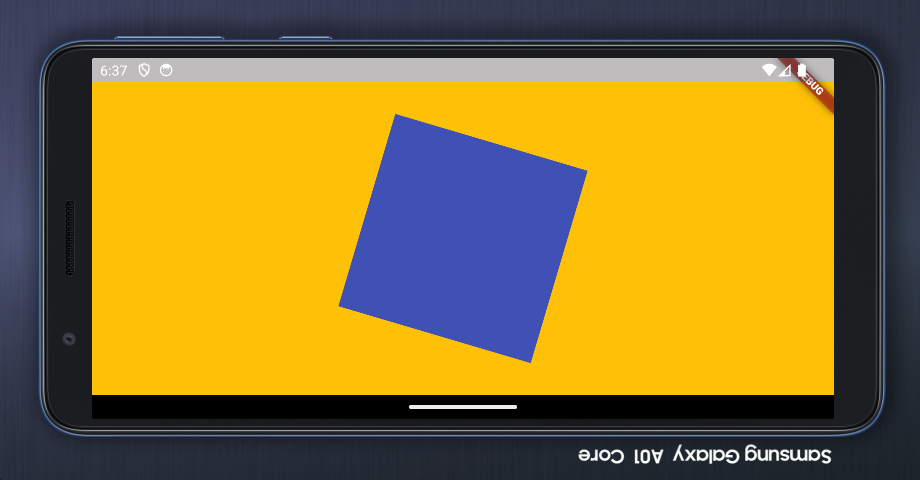
)예를 들면 다음과 같다. (실행하면 파란 사각형이 360도 돌아간다)
import 'package:flutter/material.dart';
void main() {
runApp(const MyApp());
}
class MyApp extends StatelessWidget {
const MyApp({super.key});
Widget build(BuildContext context) {
const appTitle = 'Theme Demo';
return MaterialApp(
title: appTitle,
home: Scaffold(
body: SafeArea(
child: DemoBody(),
),
),
);
}
}
class DemoBody extends StatefulWidget {
const DemoBody({super.key});
State<DemoBody> createState() => _DemoBodyState();
}
class _DemoBodyState extends State<DemoBody> {
bool active = false;
Widget build(BuildContext context) {
return Container(
color: Colors.amber,
alignment: Alignment.center,
child: TweenAnimationBuilder(
tween: Tween<double>(begin: 0, end: 360),
duration: Duration(seconds: 60),
builder: (_, double ang, __) {
return Transform.rotate(
angle: ang,
child: Container(
alignment: Alignment.center,
width: 200,
height: 200,
padding: EdgeInsets.all(20),
color: Colors.indigo,
),
);
}),
);
}
}Built-in Explicit Animations
FooTransition 위젯과 AnimationController의 조합으로 Explicit애니메이션을 구성할 수 있다.
Explicit 애니메이션은 StatefulWidget에 들어간다.
FooTransition 생성자 값으로 일단 turns가 들어가고, 그 외 각기 다른 FooTransition위젯마다 요구하는 프로퍼티가 더 있다.
어떤 프로퍼티는 애니메이션 컨트롤러를 값으로 받는다.
- 내가 이 애니메이션을 얼마나 진행했는지 기억하고 있고,
- 역재생, 일시정지 등도 할 수 있다.
- 사실상 Explicit 애니메이션을 쓰는 이유 그 자체다.
애니메이션 컨트롤러 생성자를 호출할 때 vsync를 넣어줘야 한다. 수직동기화 해주는 역할이다.
- 인생이 피곤하니까 값으로 this를 던져주도록 하자.
- 그러러면 그냥 이 Stateful위젯의 State클래스에
with SingleTickerProviderStateMixin을 붙여주면 된다.
설명도, 코드도. 딱 보면 읽기 싫게 생겼다. 라이프사이클 관리도 해줘야된다.
가능하다면 Implicit 애니메이션 선에서 컷해버리면 삶에 도움이 된다.
class WidgetName extends StatefulWidget {
_WidgetNameState createState() => _WidgetNameState();
}
class _WidgetNameState extends State<WidgetName>
with SingleTickerProviderStateMixin {
AnimationController _ac;
void initState() {
super.initState();
_ac = AnimationController(
duration : Duration(seconds: 123),
vsync : this, // 플러터에게 변화를 알려주는 ticker provider. (수직동기화)
// 이 위젯(_WidgetNameState)을 vsync값으로 넘겨준다.
// ** 위에서 with로 믹스인을 가져왔으니까 가능한 일
);
}
Widget build(BuildContext context) {
return 뭐시기Transition(
애니메이션_컨트롤러_받는_프로퍼티 : 애니메이션_컨트롤러,
// 그리고 이 트랜지션 위젯이 요구하는 다른 프로퍼티들.
);
}
void dispose() {
_ac.dispose();
super.dispose();
}
}그래서 실제로 동작하는 예를 들면 다음과 같다.
TweenAnimationBuilder와 마찬가지로 사각형이 회전하는 예제다.
차이점은
- TweenAnimationBuilder에서는 : 설정한 Tween범위 내에서 설정한 시간동안 재생된다. 그냥 재생된다. 일시정지 역재생 다시재생 그런거 없다.
- RotationTransition에서는 : 무한으로 돌릴 수 있다. 역재생도 된다. 일시정지도 된다. 코드가 길어서 다 쓰고나면 기분이 좋다.
import 'package:flutter/material.dart';
void main() {
runApp(const MyApp());
}
class MyApp extends StatelessWidget {
const MyApp({super.key});
Widget build(BuildContext context) {
const appTitle = 'Theme Demo';
return MaterialApp(
title: appTitle,
home: Scaffold(
body: SafeArea(
child: DemoBody(),
),
),
);
}
}
class DemoBody extends StatefulWidget {
const DemoBody({super.key});
State<DemoBody> createState() => _DemoBodyState();
}
class _DemoBodyState extends State<DemoBody>
with SingleTickerProviderStateMixin {
late AnimationController _controller;
void initState() {
super.initState();
_controller = AnimationController(
duration: const Duration(seconds: 2),
vsync: this,
);
_controller.repeat();
}
Widget build(BuildContext context) {
return Center(
child: RotationTransition(
alignment: Alignment.center,
turns: _controller,
child: Container(
color: Colors.amber,
width: 100,
height: 100,
),
),
);
}
void dispose() {
_controller.dispose();
super.dispose();
}
}
AnimatedBuilder
Custom Explicit 애니메이션을 만든다.
별거 없다.
FooTransition에서 했던 아래 내용은 다 똑같다
- AnimationController 선언
- initState, dispose로 라이프사이클 관리하기
달라지는건 FooTransition 대신 AnimatedBuilder를 쓴다는 것 뿐
builder함수에 내부구현이 좀 들어가겠지만, 난이도는 별 차이가 없다. 그게 그거다.
// FooTransition 시절의 build 메소드
Widget build(BuildContext context) {
return 뭐시기Transition(
애니메이션_컨트롤러_받는_프로퍼티 : 애니메이션_컨트롤러,
// 그리고 이 트랜지션 위젯이 요구하는 다른 프로퍼티들.
);
}
// -------------------------
Widget build(BuildContext context) {
return AnimatedBuilder(
animation : 애니메이션_컨트롤러
builder : (_, __) {
return 애니메이션_적용할_위젯
}
);
}
사각형 돌아가는걸 RotationTransition말고 AnimatedBuilder로 구현하면 아래와 같다.
import 'package:flutter/material.dart';
void main() {
runApp(const MyApp());
}
class MyApp extends StatelessWidget {
const MyApp({super.key});
Widget build(BuildContext context) {
const appTitle = 'Theme Demo';
return MaterialApp(
title: appTitle,
home: Scaffold(
body: SafeArea(
child: DemoBody(),
),
),
);
}
}
class DemoBody extends StatefulWidget {
const DemoBody({super.key});
State<DemoBody> createState() => _DemoBodyState();
}
class _DemoBodyState extends State<DemoBody>
with SingleTickerProviderStateMixin {
late AnimationController _controller;
void initState() {
super.initState();
_controller = AnimationController(
duration: const Duration(seconds: 5),
vsync: this,
);
_controller.repeat();
}
Widget build(BuildContext context) {
return Center(
child: AnimatedBuilder(
animation: _controller,
builder: (_, __) {
return Transform.rotate(
angle: _controller.value * 2 * 3.14,
child: Stack(
children: [
Container(
color: Colors.amber,
width: 100,
height: 100,
),
Text(_controller.value.toString().substring(0, 4)),
],
),
);
},
),
);
}
void dispose() {
_controller.dispose();
super.dispose();
}
}