
VSC Set up
Prettier
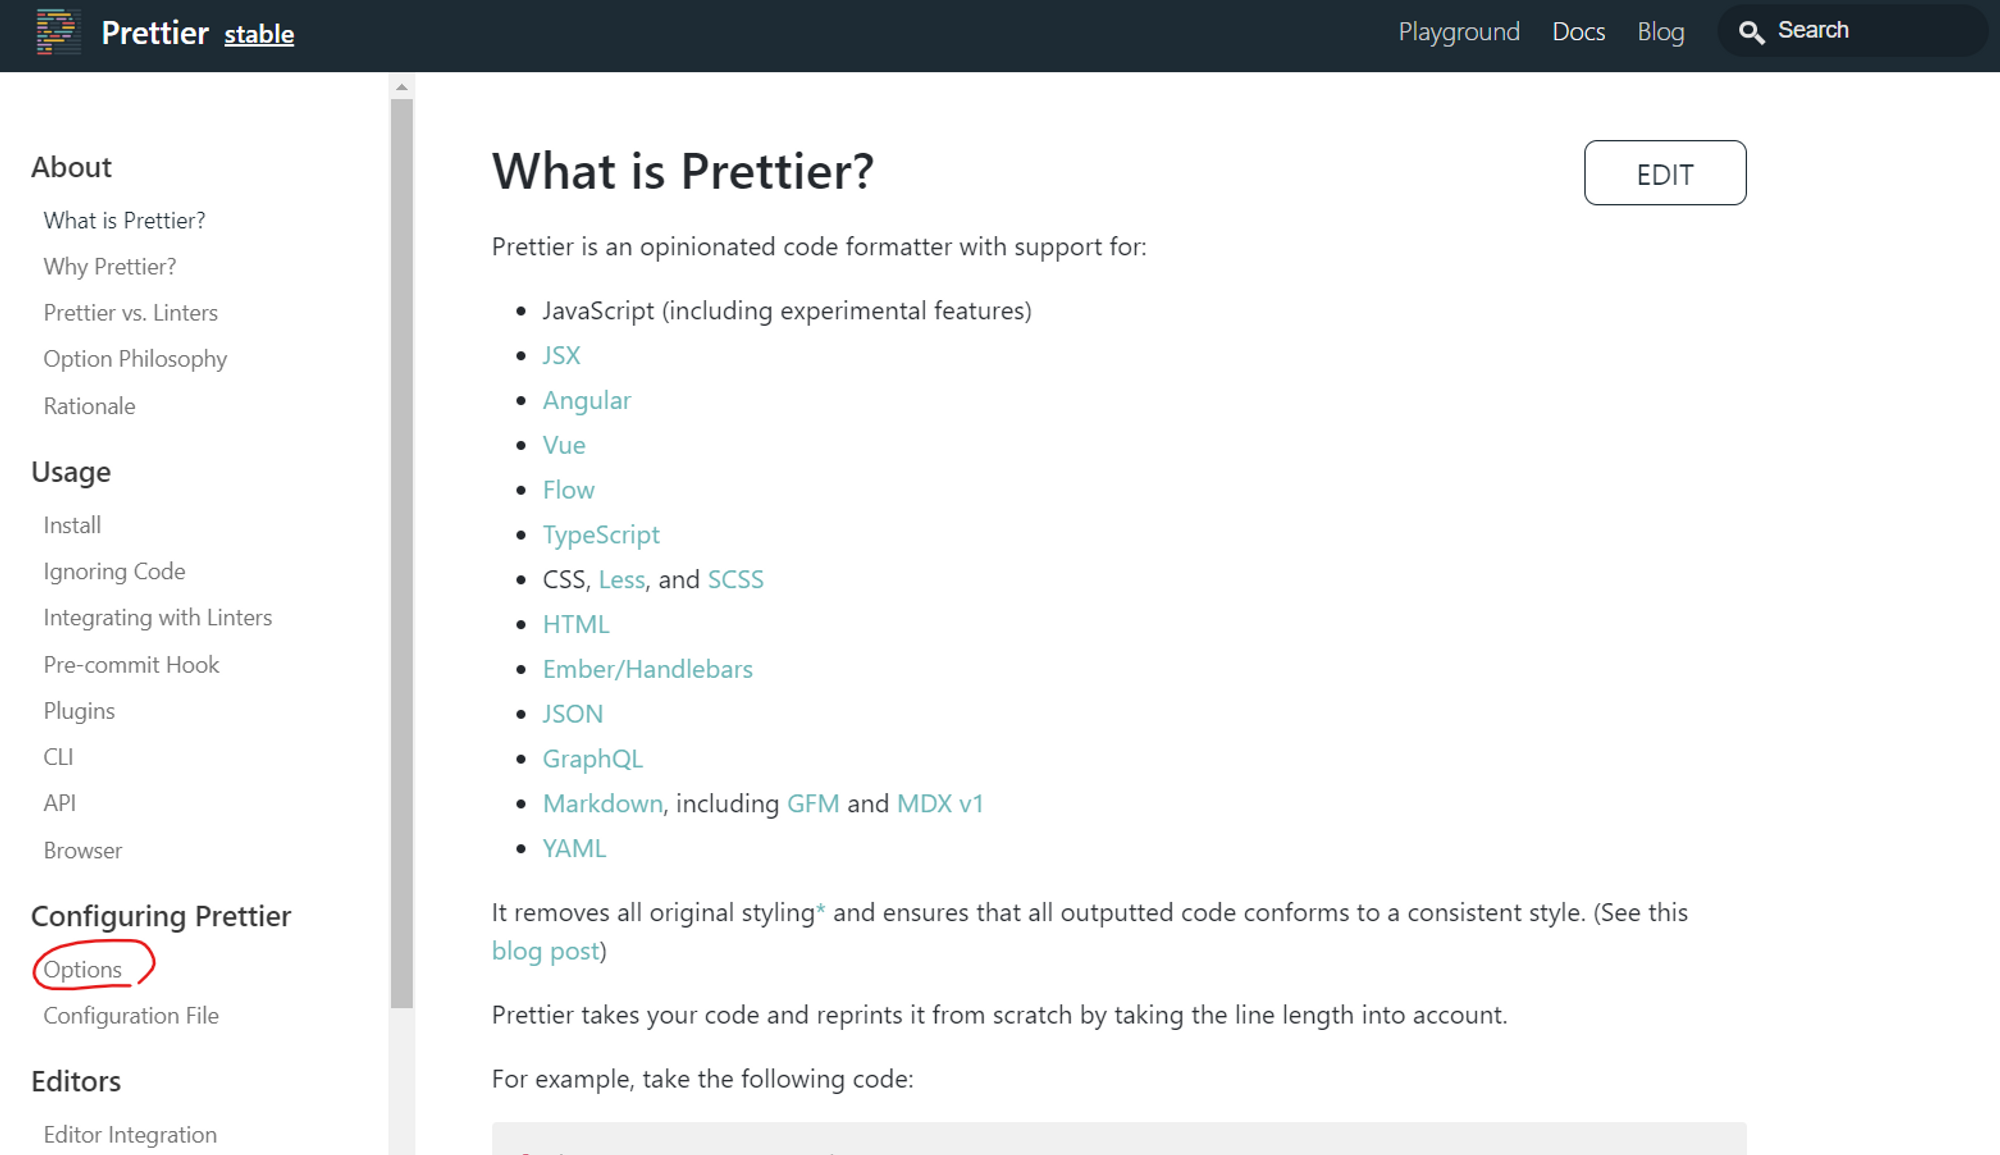
- prettier 공식 문서
- Prettier - Docs - Configuring Prettier - Options
Prettier 옵션 변경: Quotes
- 작은 따옴표를 쓸지 큰 따옴표를 쓸지 정할 수 있다.
- 디폴트 값은
false로 큰 따옴표이고,true로 바꾸면 작은 따옴표를 쓸 수 있다.- 가장 쉬운 방법:
-
현재 폴더에 .prettierrc 파일 만들기
-
객체 작성하기
{
  "singleQuote": true,
}
-
- 가장 쉬운 방법:
Prettier 옵션 변경: 화살표 함수의 매개변수가 1개일 때 괄호 넣지 않기
const calcAge = (birthYear) => 2037 - birthYear;

// 위와 같은 JS 파일이 있을때,  .prettierrc 파일 안에 아래와 같이 넣으면
// .prettierrc 파일
{
  "singleQuote": true,
	"arrowParens": "avoid"
}

// 저장하면 괄호가 사라진다.
const calcAge = birthYear => 2037 - birthYear;
Prettier 옵션 변경
- 그 외에 한 줄의 너비, 탭 크기 , 탭을 쓸지 띄어쓰기를 쓸지, 끝에 세미콜론을 붙일지 말지 등을 정할 수 있다.
code snippet 설정
snippet은 작은 조각이라는 뜻으로,
코드 스니펫(Code Snippet)은 '코드 조각', 즉 재사용 가능한 소스 코드, 기계어, 텍스트의 작은 부분을 의미한다.
코드를 재사용할 수 있게 해줌으로써 반복 타이핑을 회피할 수 있게 도와준다.
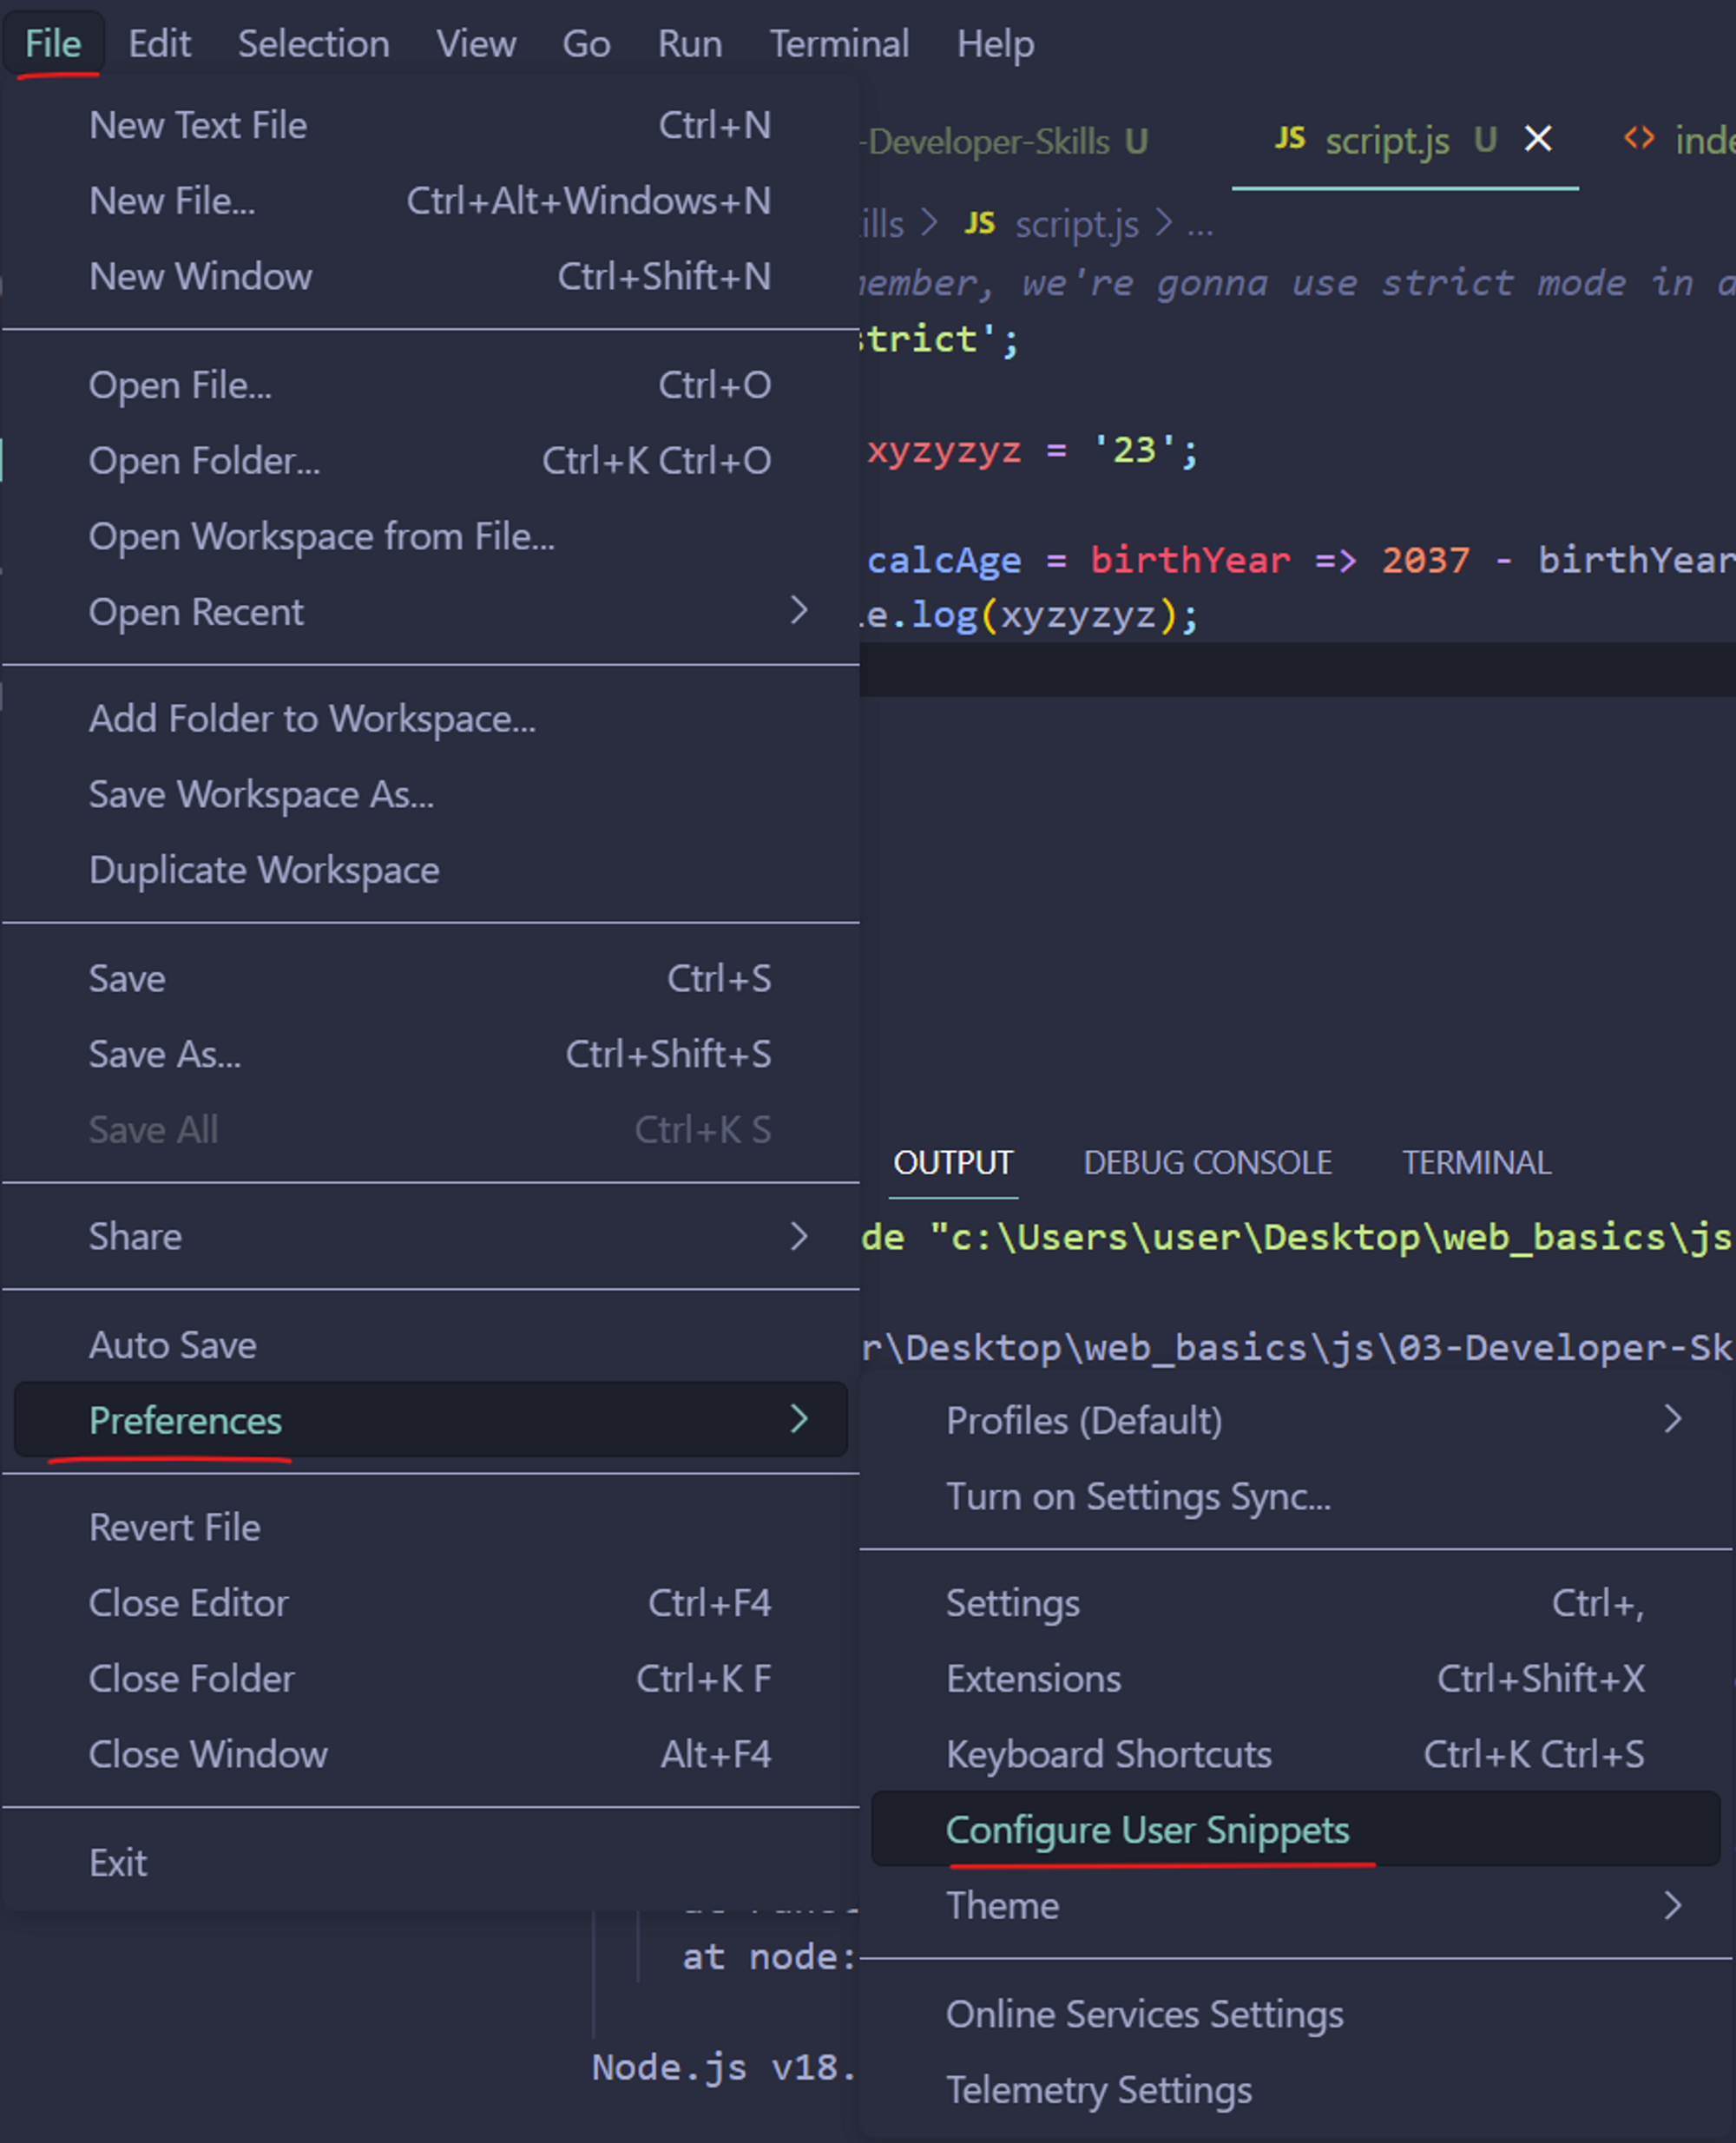
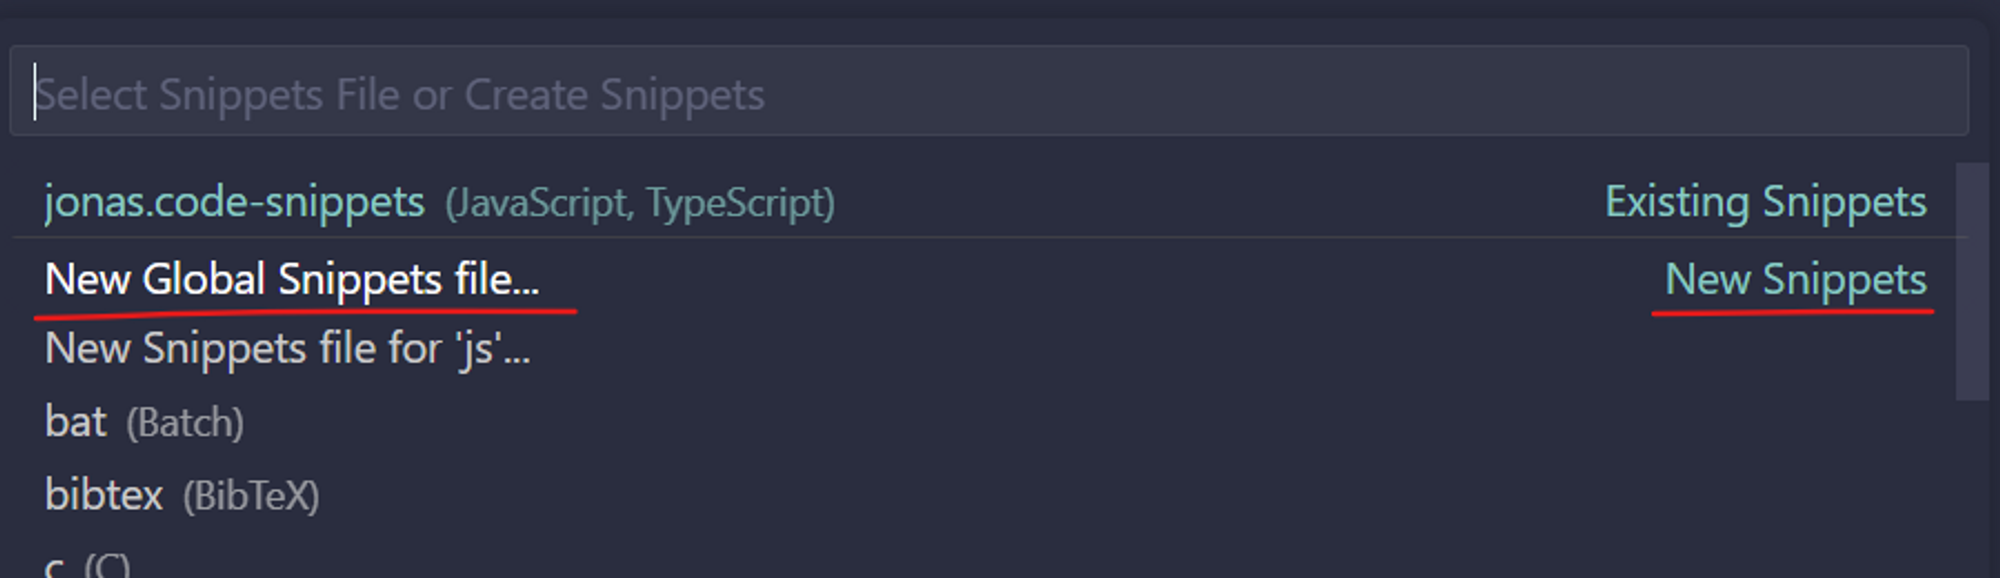
- File - Preferences - Configure User Snippets에서 New Snippets 선택 (기존의 것을 선택해도 됨)
- 자동으로 console.log() 만드는 약어 만들기
{
  // Place your global snippets here. Each snippet is defined under a snippet name and has a scope, prefix, body and
  // description. Add comma separated ids of the languages where the snippet is applicable in the scope field. If scope
  // is left empty or omitted, the snippet gets applied to all languages. The prefix is what is
  // used to trigger the snippet and the body will be expanded and inserted. Possible variables are:
  // $1, $2 for tab stops, $0 for the final cursor position, and ${1:label}, ${2:another} for placeholders.
  // Placeholders with the same ids are connected.
  // Example:
  "Print to console": {
    "scope": "javascript,typescript",
    "prefix": "cl",
    "body": ["console.log($1);"],
    "description": "Log output to console"
  }
}
→ 자바스크립트, 타입스크립트에서 사용된다.
→ cl을 쓰고 엔터를 누르면 console.log()가 생성된다.
→ 커서가 console.log()에서 괄호 안에 들어간다. ( $1을 빼면 맨 끝으로 커서가 지정된다.)
Live Server
node.js와 npm으로 live server 구동하기
-
node.js 설치
-
VSC 터미널에서 live server를 설치한다.
(터미널은 기본적으로 컴퓨터에 지시를 내리는 방식이다.)

-
VSC 터미널에서 liver server를 실행한다.

- 브라우저가 실행되고, 파일을 수정하고 저장하면 자동으로 반영된다.

- 브라우저가 실행되고, 파일을 수정하고 저장하면 자동으로 반영된다.
Learning How to Code⭐
초보자로서 어떻게 코딩을 배워야 하는가?
코딩을 처음 배울 때 실패하는 방법
- 처음 여정을 시작할 때 명확한 목표가 없다.
- 강의를 시청하고 튜토리얼을 읽기 시작했지만, 코드를 어떻게 작동하는지 신경쓰지 않고 그냥 복사/붙여넣기 한다.
- 작은 챌린지들을 통해 배우는 내용을 보강하지 않고, 필기도 하지 않는다.
- 코딩 연습을 하지 않으며, 자신의 프로젝트 아이디어를 떠올리지 않는다.
- 코드가 완벽하게 깔끔하거나 효율적이지 않을 때 빠르게 좌절감을 느낀다.
- 모든 것을 알 수 없다는 생각에 동기 부여를 잃는다.
- 고립된 환경에서 혼자 학습한다.
- 몇 개의 강의를 마친 후에도 스스로 앱을 만들지 못한다.
해결 방법
- 처음 여정을 시작할 때 명확한 목표가 없다.
→ 구체적이고 측정 가능하며 현실적이며 시간 내에 달성할 수 있는 목표를 설정하세요.
→ 왜 코딩을 배우려고 하는지 정확히 알아보세요: 직업 전환? 더 나은 직장 찾기?
→ 스스로가 만들고 싶은 큰 프로젝트를 상상해 보세요!
→ 필요한 기술을 연구하고 그런 다음 그것들을 배우세요.
- 강의를 시청하고 튜토리얼을 읽기 시작했지만, 코드를 어떻게 작동하는지 신경쓰지 않고 그냥 복사/붙여넣기 한다.
→ 공부하고 있는 코드를 이해하세요.
→ 코드를 직접 입력하고 복사 붙여넣기를 하지 마세요!
- 작은 챌린지들을 통해 배우는 내용을 보강하지 않고, 필기도 하지 않는다.
→ 새로운 기능이나 개념을 배운 후에는 즉시 사용해 보세요.
→ 필기하세요.
→ 스스로 도전하고 작은 코딩 연습과 도전 과제를 통해 연습하세요.
→ 강좌를 빠르게 완료하려고 급하게 하지 마세요!
- 코딩 연습을 하지 않으며, 자신의 프로젝트 아이디어를 떠올리지 않는다.
→ 스스로 연습하는 것이 가장 중요합니다.
→ 이것은 선택사항이 아닙니다! 강좌 이외의 연습 없이는 어떤 발전도 이루지 못할 것입니다!
→ 자체 프로젝트 아이디어를 생각하거나 인기 있는 사이트나 애플리케이션을 모방하거나, 처음에는 그들의 일부분만 복사하세요.
→ "튜토리얼 지옥"에 갇히지 마세요.
- 코드가 완벽하게 깔끔하거나 효율적이지 않을 때 빠르게 좌절감을 느낀다.
→ 완벽한 코드를 작성하려고 노력하다가 갇히지 마세요!
→ 단순히 많은 코드를 작성하세요. 품질은 중요하지 않습니다!
→ 깨끗하고 효율적인 코드는 시간이 지나면서 나타날 것입니다.
→ 코드를 언제든지 리팩토링할 수 있습니다.
- 모든 것을 알 수 없다는 생각에 동기 부여를 잃는다.
→ 결코 모든 것을 알 수 없을 것임을 받아들이세요.
→ 목표를 달성하기 위해 필요한 것에만 집중하세요!
- 고립된 환경에서 혼자 학습한다.
→ 다른 사람에게 새로운 개념을 설명하세요. 설명할 수 있다면, 정말로 이해한 것입니다!
→ 목표를 공유하여 자신에게 책임을 부여하세요.
→ 웹 개발 커뮤니티와 학습 진행 상황을 공유하세요. (#100DaysOfCode, #CodeNewbie, #webdev 등)
- 몇 개의 강의를 마친 후에도 스스로 앱을 만들지 못한다.
→ 사람들이 가지는 가장 큰 오해!
→ 강좌는 놀라운 시작점이지만 여정의 시작에 불과합니다!
개발자로서 어떻게 문제를 해결해야 하는가?
문제를 해결할 때 실패하는 방법
- 고민하지 않고 급하게 문제에 접근한다.
- 구조화되지 않은 방식으로 해결책을 구현한다.
- 일이 제대로 작동하지 않을 때 스트레스를 받는다.
- 자신만의 해결책이 없는데 자존심 때문에 조사하지 않다.
해결 방법
- 차분하게 머리를 식히고, 계획 없이 문제에 달려들지 않는다.
- 매우 논리적이고 합리적인 접근을 취한다. (최종적으로 프로그래밍은 논리이다.)
- 어떤 문제든 해결하기 위해 나만의 4단계 프레임워크를 활용한다.
4단계 프레임워크
- 문제를 100% 이해했는지 확인한다. 문제의 명확한 상황을 파악하기 위해 올바른 질문을 한다.
- Q) 이 문맥에서 "무엇이든"이 정확히 무슨 의미인가요? 무엇을 뒤집어야 할까요?
A) 문자열, 숫자 및 배열만 뒤집는 것이 의미가 있습니다. - Q) 다른 것이 전달되면 어떻게 해야 할까요?
- Q) 무엇을 반환해야 할까요? 항상 문자열이어야 하거나 전달된 타입과 동일한 타입이어야 할까요?
- Q) 전달된 인수가 숫자인지, 문자열인지, 배열인지 어떻게 인식할 수 있을까요?
- Q) 숫자, 문자열 및 배열을 어떻게 뒤집어야 할까요?
- **Divide and Conquer: 큰 문제를 작은 하위 문제로 나눈다.**
- 하위 문제
- 전달된 인수가 숫자인지, 문자열인지, 배열인지 확인하기
- 숫자 뒤집기 구현하기
- 문자열 뒤집기 구현하기
- 배열 뒤집기 구현하기
- 뒤집힌 값 반환하기
- 구현하기 위해서 많은 조사를 하는 것을 두려워하지 않는다.
- 조사할 내용
- JavaScript에서 값이 숫자인지 확인하는 방법
- JavaScript에서 값이 문자열인지 확인하는 방법
- JavaScript에서 값이 배열인지 확인하는 방법
- JavaScript에서 숫자를 뒤집는 방법
- JavaScript에서 문자열을 뒤집는 방법
- JavaScript에서 배열을 뒤집는 방법
- 더 큰 문제에 대해서는 실제 코드를 작성하기 전에 의사 코드를 작성한다.
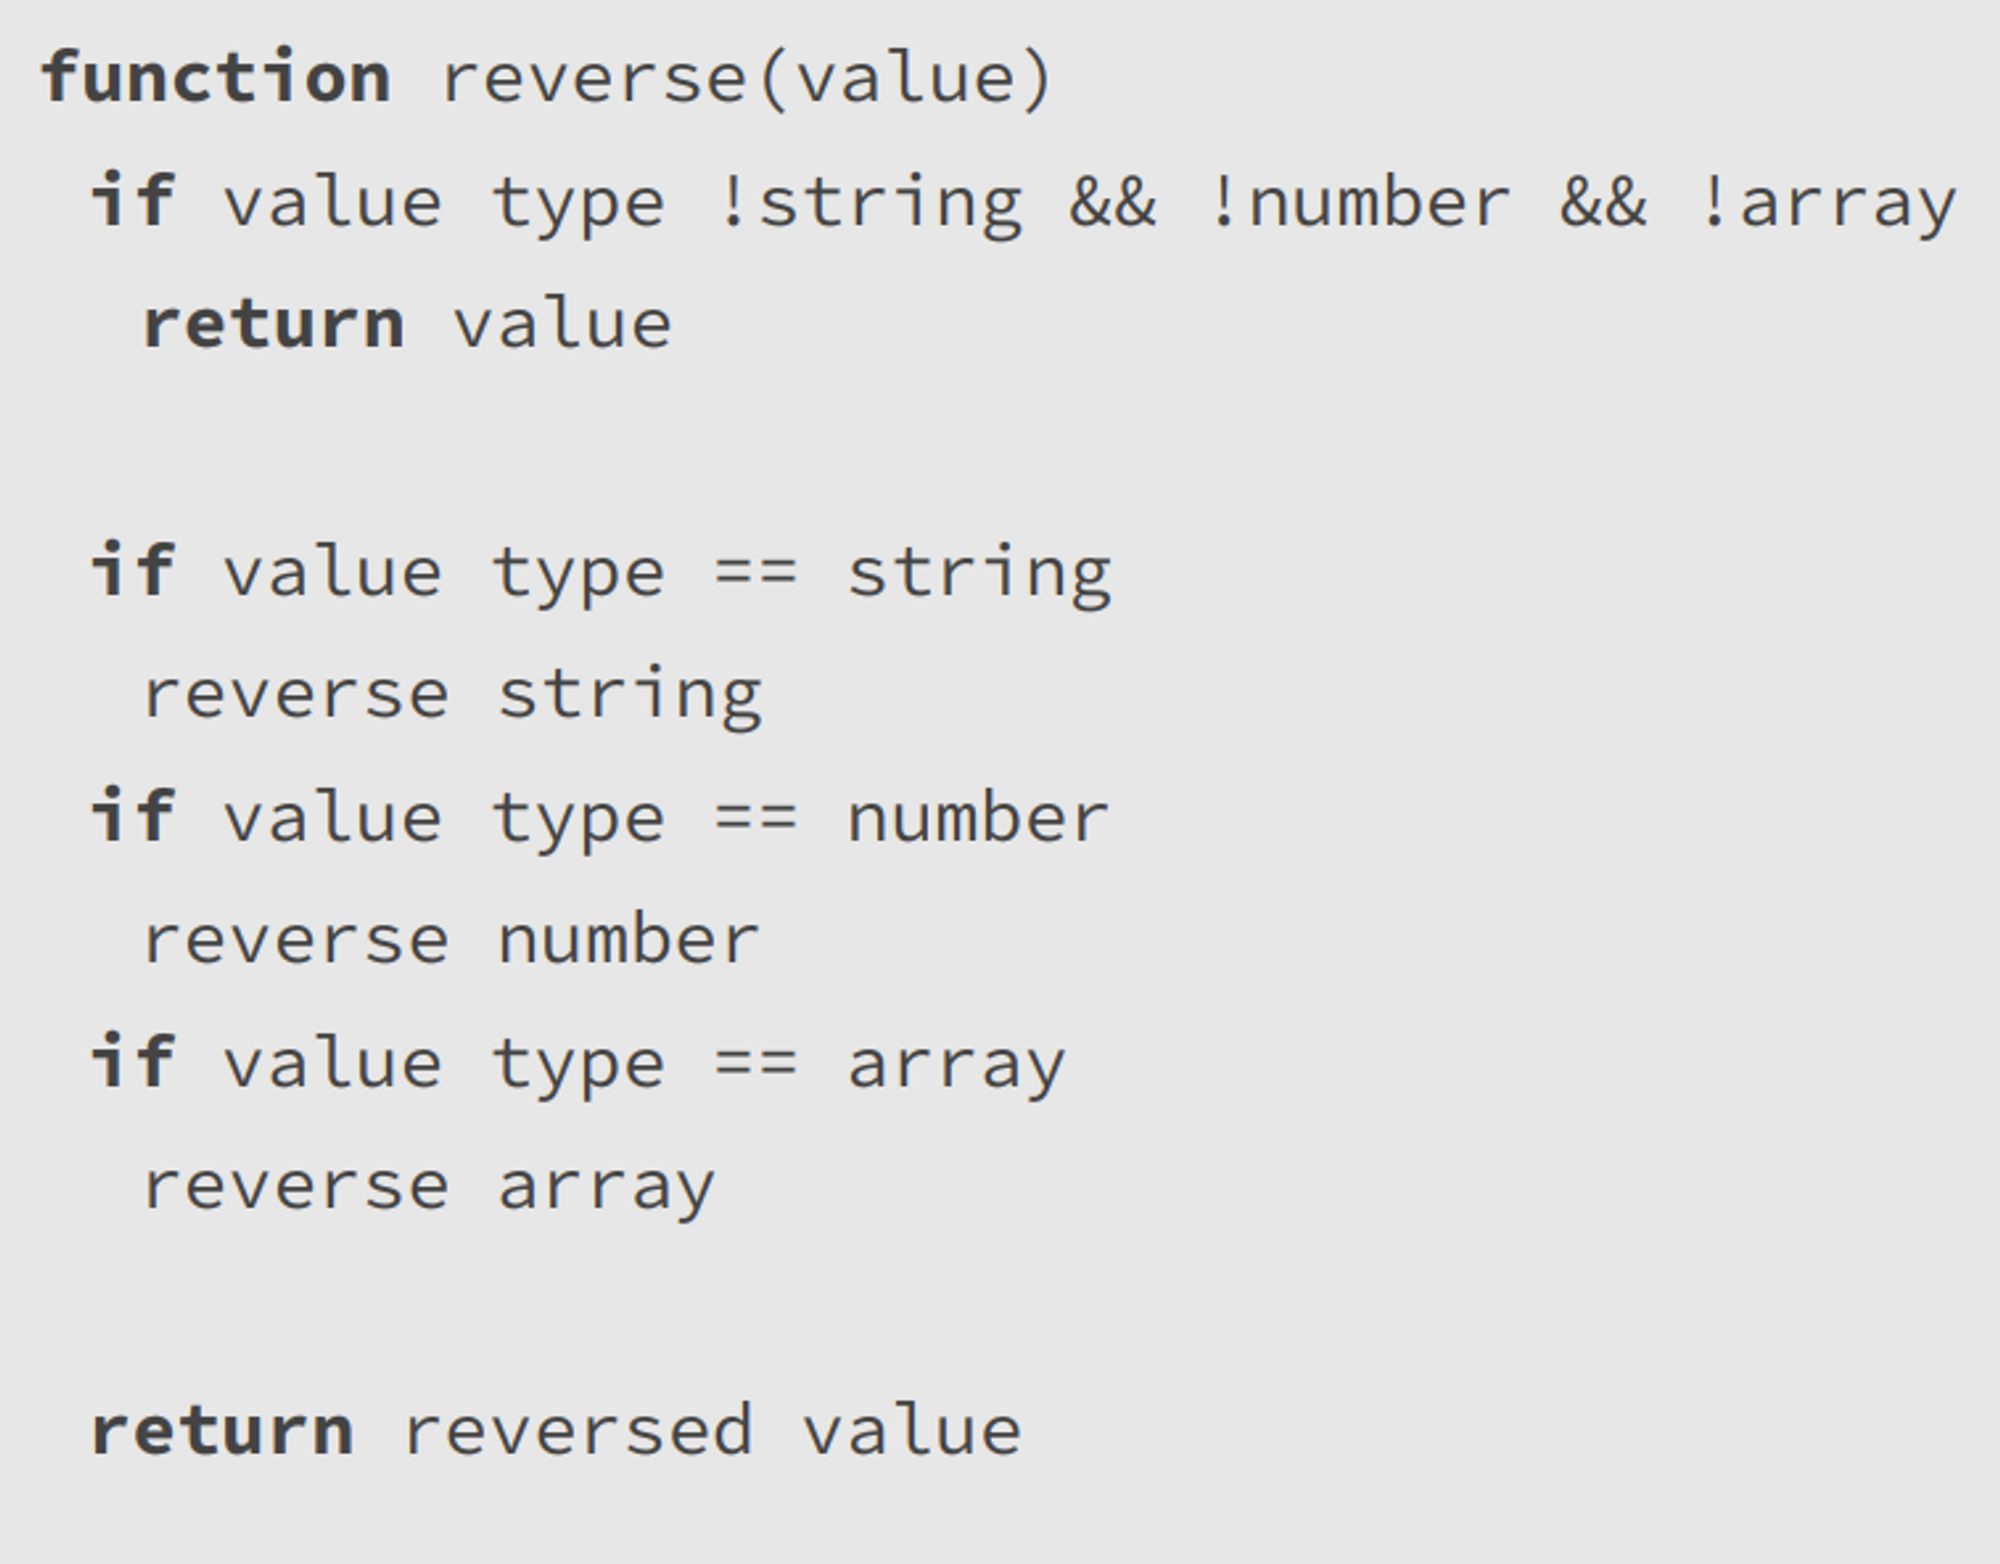
의사 코드 (pseudo code). 코드 제작에 정해진 규칙은 없다.
Google, StackOverflow, and MDN 활용하기
(+ ChatGPT)
문제 해결 예시
문제1
우리는 스마트홈 온도계를 제작하고 있다.
하루 동안 주어진 온도들의 배열이 주어졌을 때, temperature amplitude를 계산하라.
단, 종종 센서에 에러가 있다는 것을 염두해야 한다.
const temperatures = [3, -2, -6, -1, 'error', 9, 13, 17, 15, 14, 9, 5];1. 문제 이해하기
- Q) temperature amplitude란 무엇인가?
A) 가장 높은 온도와 가장 낮은 온도의 차이. - Q) 어떻게 최대와 최소 온도를 계산할지?
- Q) 센서 에러란 무엇이고, 무엇을 해야하는가?
2. 하위 문제로 나누기
- 최대 온도 값을 찾는다.
-
구글 검색: javascript get max value in array
const calcTempAmplitude = function (temps) {
	let max = temps[0];
	for(let i=0 ; i<temps.length ; i++){
		if(temps[i]>max) max = temps[i];
	}
	console.log(max);
};
calcTempAmplitude([3,7,5]);
-
- 최소 온도 값을 찾는다.
const calcTempAmplitude = function (temps) { let max = temps[0]; let min = temps[0]; for(let i=0 ; i<temps.length ; i++){ const curTemp = temps[i]; if(curTemp>max) max = curTemp; if(curTemp<min) min = curTemp; } }; - 최대 값에서 최소 값을 뺀다. (temperature amplitude)
const calcTempAmplitude = function (temps) { let max = temps[0]; let min = temps[0]; for(let i=0 ; i<temps.length ; i++){ const curTemp = temps[i]; if(curTemp>max) max = curTemp; if(curTemp<min) min = curTemp; } console.log(max-min); }; calcTempAmplitude([3,7,4,1,8]); - 어떻게 에러를 무시할 것인가?
const calcTempAmplitude = function (temps) {
	let max = temps[0];
	let min = temps[0];
	for(let i=0 ; i<temps.length ; i++){
		const curTemp = temps[i];
		if(typeof curTemp !== 'number') continue;
		if(curTemp>max) max = curTemp;
		if(curTemp<min) min = curTemp;
	}
	console.log(max-min);
};

calcTempAmplitude([3,7,4,1,8]);
calcTempAmplitude(temperatures);
문제2
이제는 온도들의 배열이 2개 주어진다.
const temperatures = [3, -2, -6, -1, 'error', 9, 13, 17, 15, 14, 9, 5];1. 문제 이해하기
- Q) 배열이 2개면 같은 기능을 2번 구현해야 하는가?
A) 아니다. 그냥 두 배열을 합치면 된다.
2. 하위 문제로 나누기
- 두 배열을 합치는 방법
-
구글 검색: javascript merge two arrays
const calcTempAmplitude = function (temps1, temps2) {
	const temps = temps1.concat(temps2);
	let max = temps[0];
	let min = temps[0];
	for(let i=0 ; i<temps.length ; i++){
		const curTemp = temps[i];
		if(typeof curTemp !== 'number') continue;
		if(curTemp>max) max = curTemp;
		if(curTemp<min) min = curTemp;
	}
	console.log(max-min);
};
calcTempAmplitude([3,7,5],[4,18,2,'error',1]);
-
Debugging (Fixing Errors)
- Software Bug: 컴퓨터 프로그램 내의 결함 또는 문제. 기본적으로 컴퓨터 프로그램의 예기치 않거나 의도하지 않은 동작.
- 버그는 소프트웨어 개발에서 완전히 정상이다. 모든 복잡한 앱에는 버그가 포함되어 있다.
- 오랫동안 발견되지 않은 버그의 심각한 경우 보안 상 문제를 일으키지만, 보통의 경우 작은 버그이므로 그러지 않는다.
Debugging Process
- production 단계에서 버그가 발견되면 좋지 않다.
- 버그가 어디 있는지 알 수 없다면 Debugger 소프트웨어를 사용해야 한다.
Console과 Breakpoints를 이용해 디버깅하기
온도 단위를 C에서 K로 바꿔주는 함수 디버깅하기
const measureKelvin = function(){
  const measurement = {
    type: 'temp',
    unit: 'celsius',
    value: prompt('Degrees celcius:'),
  };

  const kelvin = measurement.value + 273;
  return kelvin;
};

console.log(measureKelvin());- Identify
- console에 찍을 수 있는 다양한 메서드들
console.log(measurement);
console.table(measurement);
console.log(measurement.value);
console.warn(measurement.value);
console.error(measurement.value);
-
Find
value에 들어있는 값이 문자열임을 알았다.
-
Fix
value: Number(prompt('Degrees celcius:')) // Number() 사용해서 숫자형으로 바꿔주기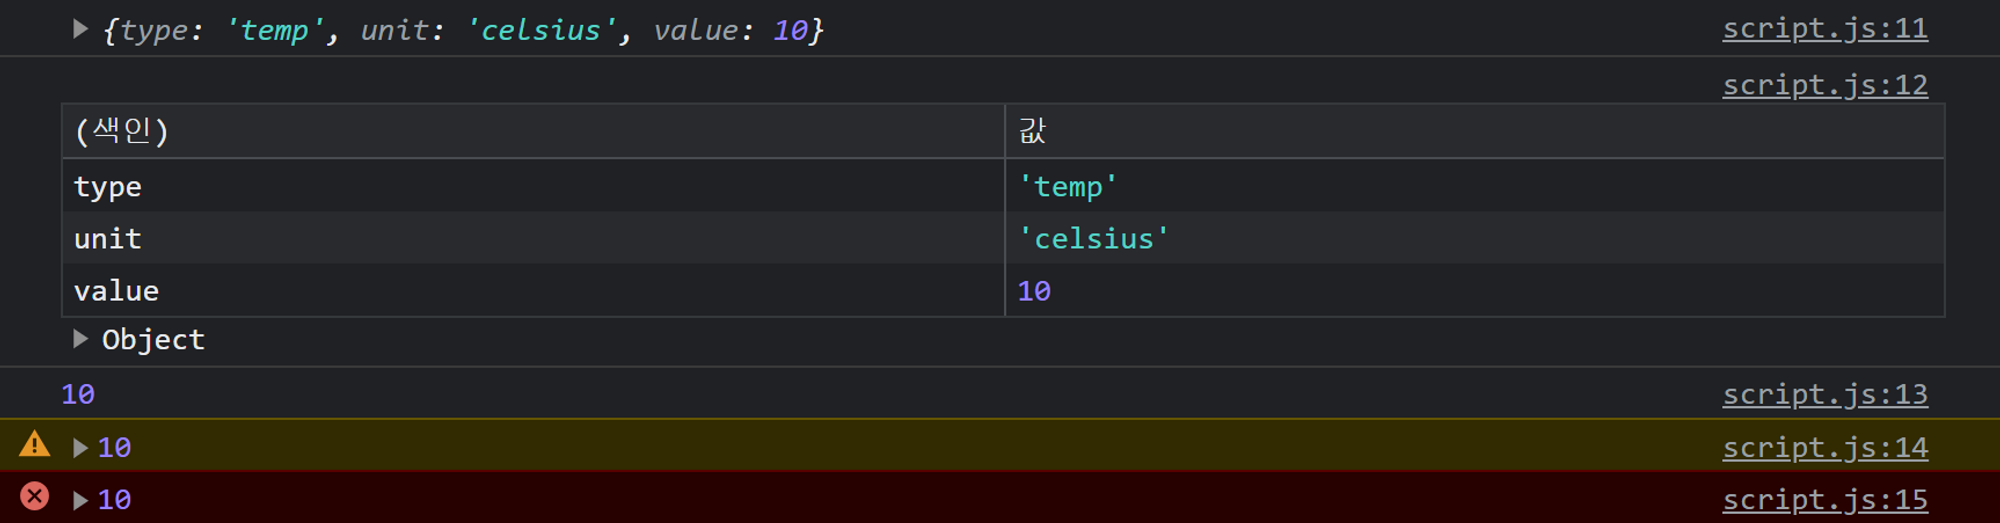
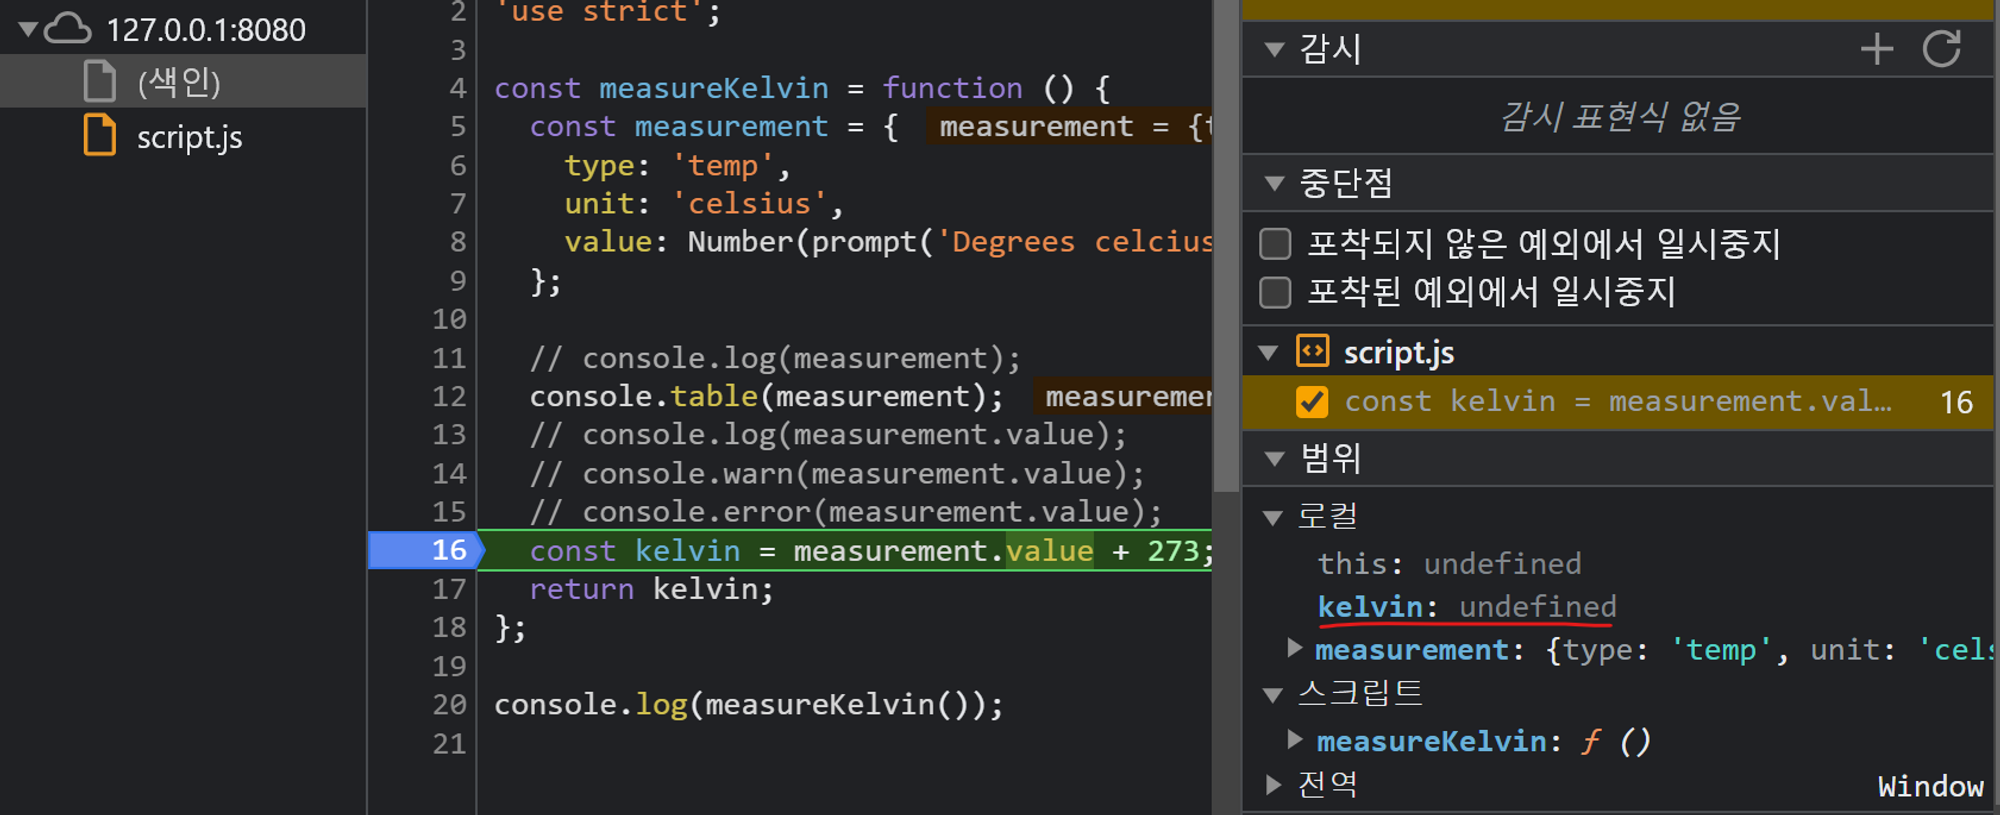
👨🏻🔧 개발자 도구에서 중단점 사용하기
- F12 - 소스 - script.js
- const kelvin에 중단점을 찍으면 아직 kelvin에 값이 들어있지 않은 것을 확인할 수 있다.
-
console.log()를 일일히 찍지 않아도 되는 장점이 있다.
-
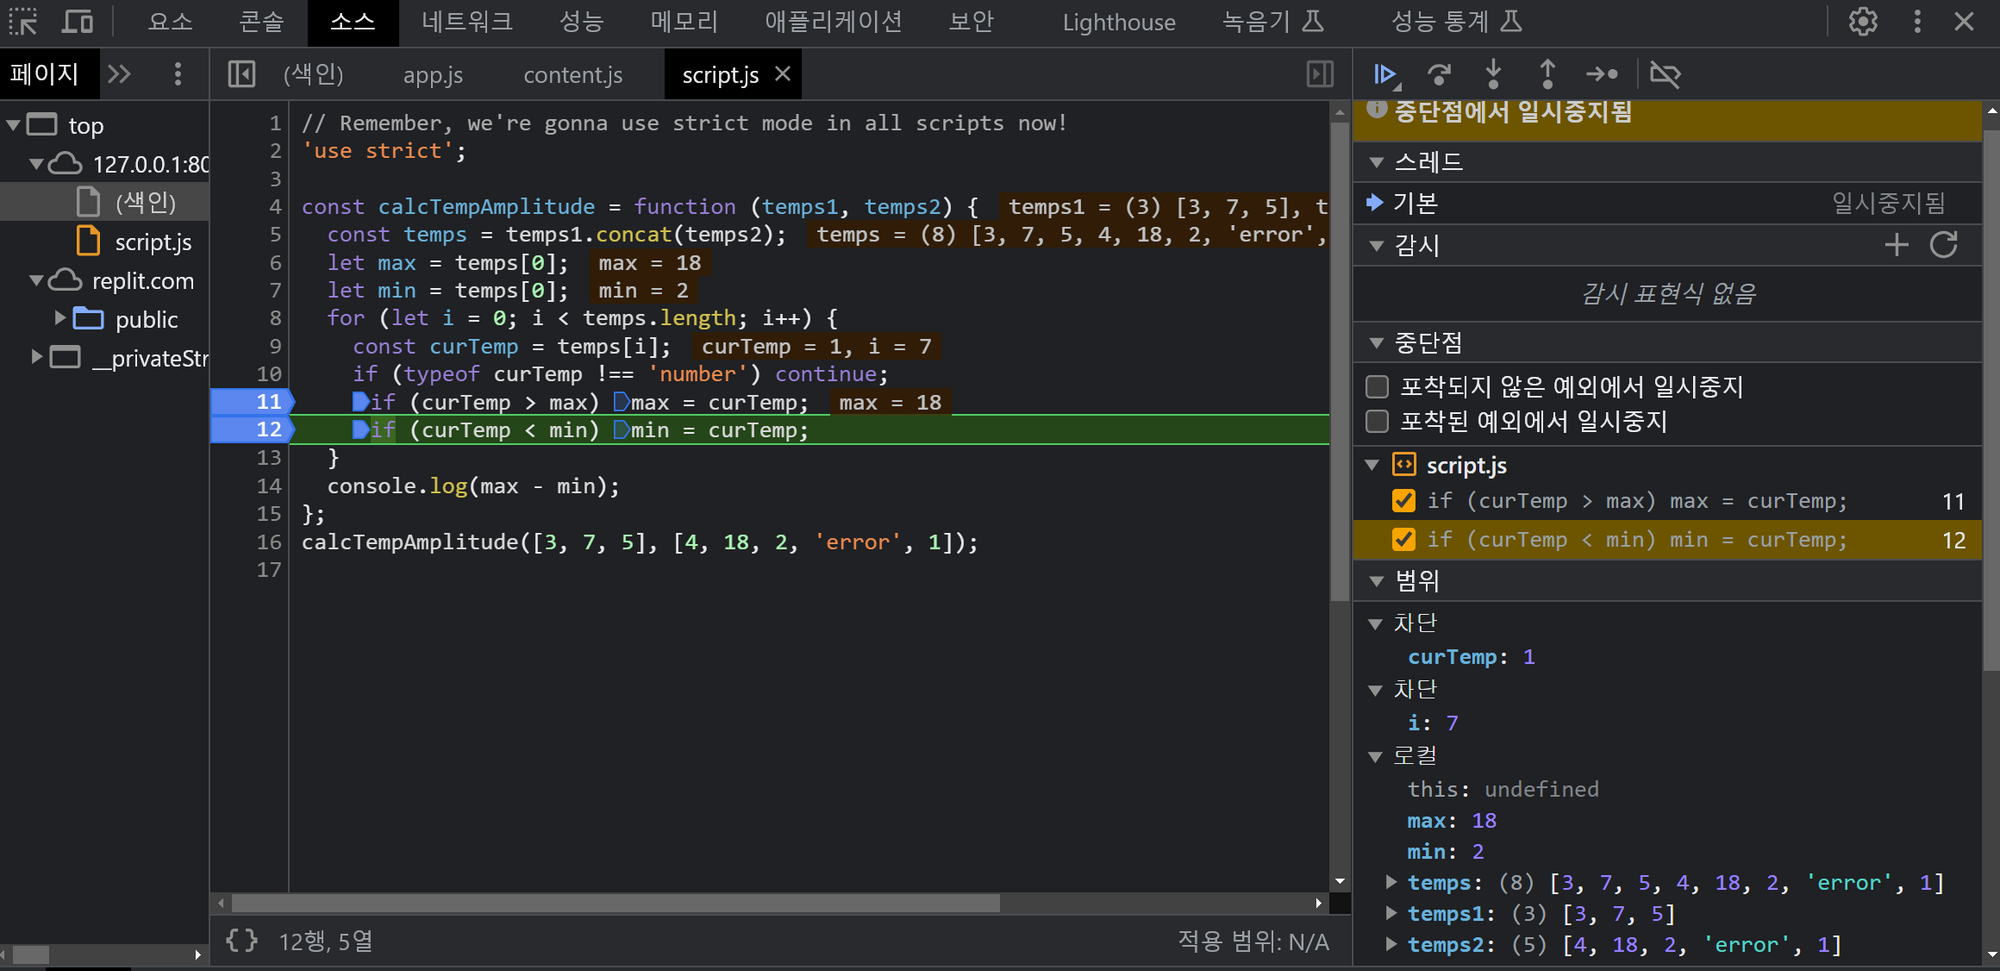
단계 - F9를 누르면 한 줄씩 코드가 진행된다.

-
- 중단점 사용 후에는 제거해야 한다.
스마트홈 온도계 디버깅하기
- 아래의 경우 버그는 없지만, 중단점을 찍어 루프를 도는 모습을 확인할 수 있다.
- 코드에 debugger 위치를 설정해주어서 디버깅할 수도 있다.
const calcTempAmplitude = function (temps1, temps2) {
  const temps = temps1.concat(temps2);
  let max = temps[0];
  let min = temps[0];
  for (let i = 0; i < temps.length; i++) {
    const curTemp = temps[i];
    if (typeof curTemp !== 'number') continue;

    debugger;
    if (curTemp > max) max = curTemp;
    if (curTemp < min) min = curTemp;
  }
  console.log(max - min);
};
calcTempAmplitude([3, 7, 5], [4, 18, 2, 'error', 1]);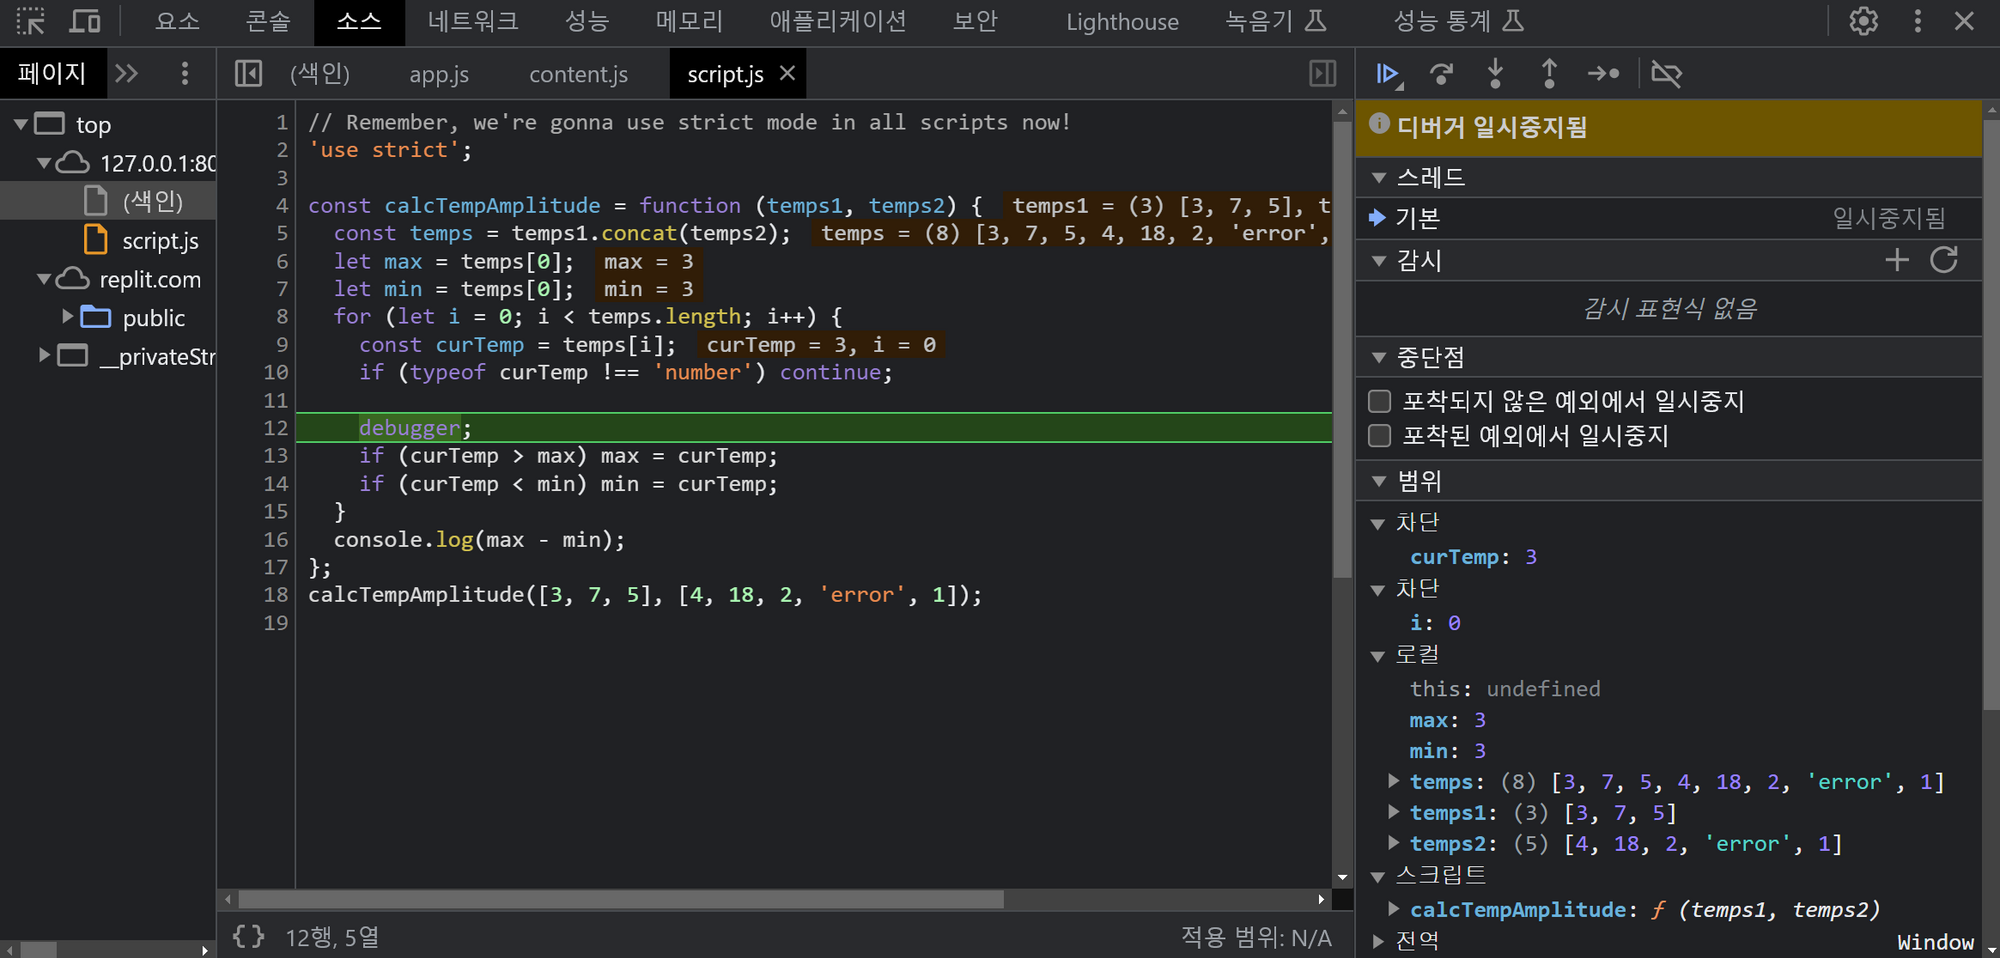

좋은 글 감사합니다. 자주 올게요 :)