Section
Pricing 섹션 만들기
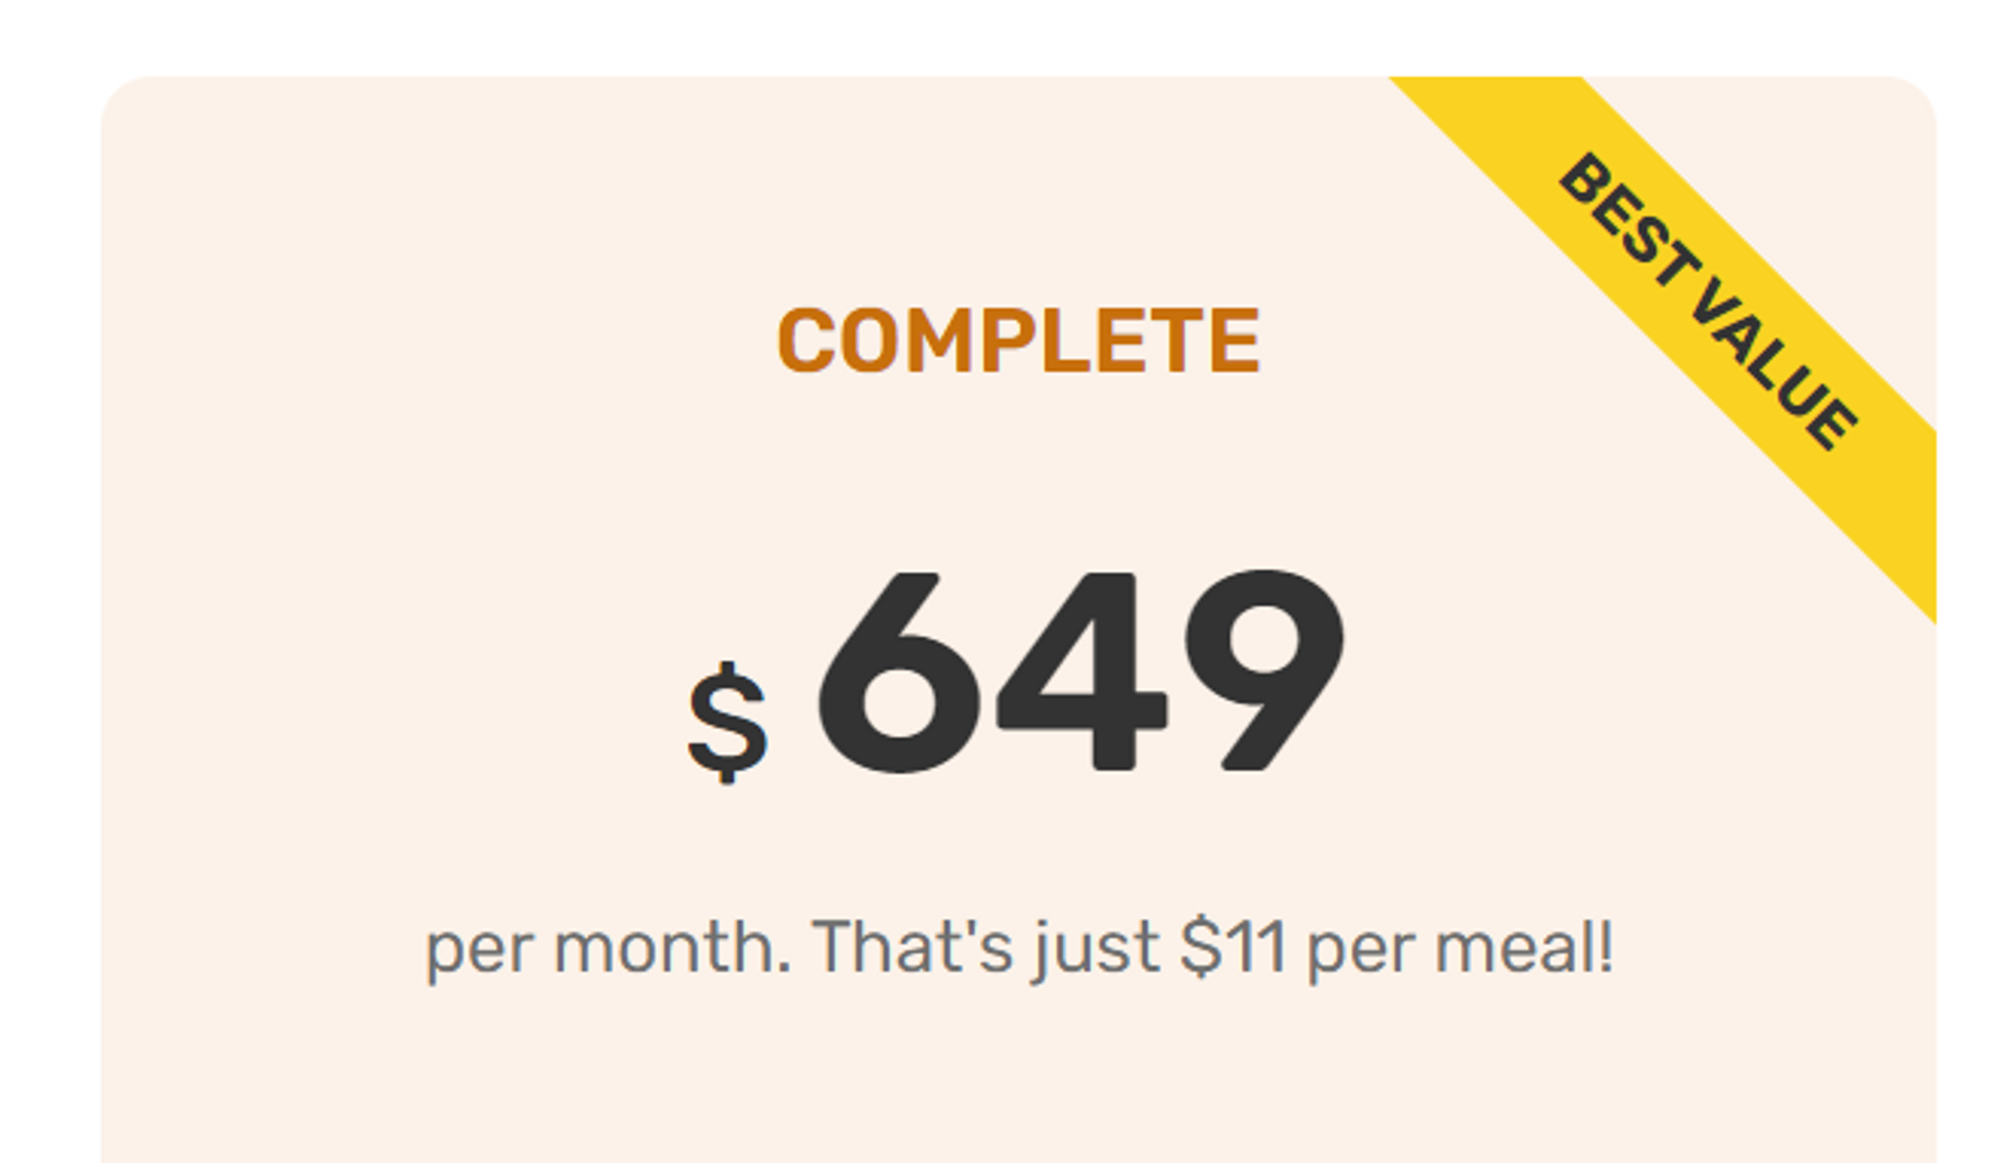
border를 추가했을 때 레이아웃이 border 크기만큼 틀어질 때
-
왼쪽 카드에 2px의 border를 추가했을 때 버튼의 높낮이가 2px만큼 틀어진다.

-
이 때 padding을 2px만큼 조정해주면 해결할 수 있다.
(여기서 1rem은 10px로 정해놓음)
.pricing-plan--starter{
  justify-self: end;
  border: 2px solid #fdf2e9;
  padding:4.6rem;
}

.pricing-plan--complete{
  background-color:#fdf2e9;
}

.plan-header{
  text-align: center;
  margin-bottom: 4.8rem;
}
카드 오른쪽 상단에 best value 표시 붙이기
.pricing-plan--complete{
  background-color:#fdf2e9;
  position: relative;
  overflow: hidden;
}

.pricing-plan--complete::after{
  content: "Best value";
  position: absolute;
  top: 6%;
  right: -18%;

  text-transform: uppercase;
  font-size: 1.4rem;
  font-weight: 700;
  color: #333;
  background-color: #ffd43b;
  padding: 0.8rem 8rem;

  transform: rotate(45deg);
}- top, right, padding 등은 개발자 도구에서 직접 숫자를 입력해가며 원하는 수치를 찾으면 좋다.
overflow: hidden을 사용한다.
last-child인 grid에만 마진을 주지 않기
- 모든 grid에 margin을 주고 last-child의 경우에 0을 줄 수도 있지만,
- 이를 한 줄로 줄일 수 있다. not 의사 클래스를 사용하면 된다.
.grid{
  display: grid;
  column-gap: 6.4rem;
  row-gap: 9.6rem;

  margin-bottom: 9.6rem;
}

.grid:last-child{
  margin-bottom:0;
}.grid{
display: grid;
column-gap: 6.4rem;
row-gap: 9.6rem;
/* margin-bottom: 9.6rem; */
}
/* .grid:last-child{
margin-bottom:0;
} */
.grid:not(:last-child){
margin-bottom:9.6rem;
}- last-child가 아닌 grid에 대해
!important로 적용된 margin이 있으면, 이는 해당 margin이 우선 적용된다.
.margin-bottom-md{
  margin-bottom: 4.8rem !important;
}
CTA(Call To Action) 섹션 만들기
배경에 그라데이션 주기
/* 45도 경사를 기준으로
  파란색에서 시작해서 빨간색으로 변화하는 그라데이션 */
linear-gradient(45deg, blue, red);

/* 오른쪽 아래에서 왼쪽 위로,
  파란색에서 시작해서 빨간색으로 변화하는 그라데이션 */
linear-gradient(to left top, blue, red);
배경에 이미지 사용하기
background-size,background-position등의 속성이 있다.
.cta-img-box{
  background-image: url('../img/eating.jpg');
  background-size: cover;
  background-position: center;
}
배경에 이미지와 투명한 그라데이션 주기
.cta-img-box{
  background-image: linear-gradient(to right bottom,rgba(235, 151, 78, 0.35),
	rgba(230, 125, 34, 0.35)), url('../img/eating.jpg');
  background-size: cover;
  background-position: center;
}
div를 img처럼 사용하기
role="img"를 사용한다.aria-label: img 태그의 alt와 같은 기능을 한다. 접근성 측면에서 필요하다.
<div
  class="cta-img-box"
  role="img"
  aria-albel="Woman enjoying food"
></div>
form 만들기
<form class="cta-form" action="#">
  <input type="text" />
  <input type="email" />
  <!-- <input type="submit" value="Sign up now" /> -->
  <button class="btn">Sign up now</button>
</form>- form을 제출하는 형식은
<input type=”submit”/>을 사용하는 방법과<button>을 사용하는 방법 두 가지가 있다. - html로 데이터를 모을 수 있지만, 어디로 데이터를 보내거나 받을 순 없다.
- 데이터를 전송하려면 action 속성을 사용해 url을 설정해줄 수 있다.
그러려면 서버에 코드가 필요하다. 현재는 서버를 구현하지 않을 것이므로 일단 action="#"으로 쓸 수 있다.
양식을 보내고 url을 보면 #로 보내진 것을 볼 수 있다.
form 만들기 - label 사용하기
<form class="cta-form" action="#">
  <div>
    <label for="full-name">Full Name</label>
    <input
      id="full-name"
      type="text"
      placeholder="Your name"
      required
    />
  </div>
  <div>
    <label for="email">Email address</label>
    <input
      id="email"
      type="email"
      placeholder="me@example.com"
      required
    />
  </div>

  <div>
    <label for="selelct-where">Where did you hear from us?</label>
    <select id="select-where" required>
      <option value="">Please choose one option:</option>
      <option value="friends">Friends and family</option>
      <option value="youtube">YouTube video</option>
      <option value="podcast">Podcast</option>
      <option value="ad">Facebook ad</option>
      <option value="others">Others</option>
    </select>
  </div>

  <!-- <input type="submit" value="Sign up now" /> -->
  <button class="btn">Sign up now</button>

  <!-- <input type="checkbox"/>
  <input type="number"/> -->
</form>
<input type="checkbox"/>과 라벨을 같이 사용하면 라벨을 눌렀을 때 체크박스가 체크되거나 해제되는 것을 볼 수 있다.select-option에서 태그 안 내용을 선택해서 전송하면 해당value가 보내진다.
input 내 font-family 상속
- 어떤 이유로 input 필드 안에서 본문에서 정의한 글꼴 패밀리를 상속 되지 않는다.
- 이를 상속시키도록 하는 방법으로
inherit을 사용할 수 있다.
.cta-form input{
  width: 100%;
  padding: 1.2rem;
  font-size: 1.8rem;
  font-family: inherit;
}
button에 적용한 btn 클래스가 나타나지 않는 이유
<button class="btn">Sign up now</button>.btn:link,.btn:visited{
display: inline-block;
text-decoration: none;
font-size: 2rem;
padding: 1.6rem 3.2rem;
border-radius: 9px;
font-weight: 600;
/* Put transition on original "state" */
/* transition: background-color 0.3s; */
transition: all 0.3s;
}- 위 css는
:link,:visited를 지정해주고 있다. 이는href를 가진a에만 적용되는 속성이다. - 이를 해결하기 위해서는 아래와 같이 해주면 된다.
.btn,.btn:link,.btn:visited{
  display: inline-block;
  text-decoration: none;
  font-size: 2rem;
  padding: 1.6rem 3.2rem;
  border-radius: 9px;
  font-weight: 600;
  /* Put transition on original "state" */
  /* transition: background-color 0.3s; */
  transition: all 0.3s;

  /* Only necessary for .btn */
  border: none;
  cursor: pointer;
  font-family: inherit;
}
:focus에 대해 박스 테두리 만들어주기
- focus했을 때 디폴트 아웃라인을 없애고 커스텀하는 방법을 알아보자.

*:focus{
  outline: none;
  /* outline: 4px dotted #e67e22;
  outline-offset: 8px; */
  box-shadow: 0 0 0 0.8rem rgba(230, 125, 34, 0.5);
}
.cta *:focus{
outline: none;
/* outline: 4px dotted #e67e22;
outline-offset: 8px; */
box-shadow: 0 0 0 0.8rem rgba(253,242,233,0.5);
}Footer 섹션 만들기
<br>: 줄 바꿈
margin auto 활용하기

<div class="logo-col">
...
<p class="copyright">
Copyright © 2027 by Omnifood, Inc. All rights reserved.
</p>
</div>.logo-col{
display: flex;
flex-direction: column;
}
.copyright{
font-size: 1.4rem;
line-height:1.6;
color: #767676;
margin-top: auto;
}
감사합니다. 이런 정보를 나눠주셔서 좋아요.