🔗 이 포스트에 대해 더 궁금하신가요? 다음 주소를 참고해주세요!
🗒️ 이 글의 수정 내역 (마지막 수정 일자: 없음)
🚀 시작하며
드디어 이것으로 메타볼 애니메이션 구현 시리즈를 마칠 수 있게 됐군요!
사실 처음에는 힘들었는데요. 제가 이뤘던 것들을 간만에 다시 살펴보니, 꽤나 저 역시 이를 이해하느라 고생 많이 했다는 것을 다시금 느꼈습니다. 🥰
여튼, 기존에 했던 융합은 캔버스의 전체 픽셀에 대해 완전탐색을 하고 있었죠?
그리고 이로 인한 가장 큰 한계는 성능이 굉장히 느리다는 것이었습니다.
그렇다면 저는 어떻게 이를 해결해나갔는지, 한 번 살펴봅시다!
🚦 본론
어떻게 설계할 것인가
일단 기존에는 픽셀을 하나의 공간이라 치면, 그 공간에 대해 각 메타볼 도형간의 영향력을 고려하여, 이 영향력이 역치를 넘어서면 융합하는 방식으로 구현을 했습니다.
그런데 생각해봅시다.
애초에 메타볼끼리만 비교하면 안될까요? 🥹
물론 메타볼의 공식 그대로 구현하는 것이 가장 정확하지만, 저는 메타볼이 융합하는 느낌만 가져가도 충분했습니다.
따라서 paperJS라는 캔버스 라이브러리를 참고하며 다음과 같이 하나씩 정복해나갔어요.
- 두 원의 거리, 각도 등을 비교한다.
- 두 원이 가진 외접선을 비교한다.
- 두 원이 포개져 있다면 내접점을 비교한다.
- 1 ~ 3의 정보를 활용하여 fuse할 수 있는지를 계산한다.
- 이후 융합하는 듯한 애니메이션의 모양을 결정할 핸들의 위치와 값을 계산한다.
- 핸들과 기존에 구했던 각 점들을
path로 그려내며 결과값을 반환한다.
기존의 전략 객체를 대체할 객체 생성
이전 포스트에서 FuseStrategy를 만들었던 것 기억나시나요?
이제 이를 대체할 새로운 FuseStrategy의 뼈대를 생성해볼게요.
OptimizedFuseStrategy
  before?: (...args: unknown[]) => void;

  after?: (...args: unknown[]) => void;

  constructor(public fuseWeight: number = 1.2) {}

  setBefore(callback: (...args: unknown[]) => void) {
    this.before = callback.bind(this);
  }

  setAfter(callback: (...args: unknown[]) => void) {
    this.after = callback.bind(this);
  }

  setFuseWeight(weight: number) {
    this.fuseWeight = weight;
  }

  exec(ctx: Canvas['ctx'], balls: (DynamicMetaball | StaticMetaball)[]) {
  }
이후에는 이 객체를 기존의 fuseStrategy에 대해 대체해봅시다.
App.ts
function main() {
  const moveStrategy = new MoveStrategy();
  const drawStrategy = new DrawStrategy();
  // const fuseStrategy = new FuseStrategy();
  const fuseStrategy = new OptimizedFuseStrategy();

  app.setDynamicMetaballMove({
    moveStrategy,
    key: EMetaballObserverKeys.dynamic,
  });

  app.setDynamicMetaballDraw({
    drawStrategy,
    key: EMetaballObserverKeys.dynamic,
  });

  moveStrategy.setBefore(() => {
    fuseStrategy.exec(app.canvasCtx, app.allMetaballs);
  });

  app.mount($target);
}

main();
어떤가요?
원래였다면 이를 대체하기 위해 새로운 메타볼 클래스를 만들어서 상속해야 했는데, 그냥 전략만 대체함으로써 해결해냈어요.
물론 어느 상황에서나 좋은 건 아니지만, 그래도 객체 지향적으로 문제를 개방-폐쇄 원칙에 맞게 잘 해결하게 되었군요!
그럼, 이제 본격적으로 로직을 분석하러 가볼까요?
원들끼리 비교하기
일단 exec이 실행되면, 원들 간의 융합을 할지말지를 결정해야 합니다.
이를 위해서는 필수적으로 각 원들간의 비교가 선행돼요.
이를 한 번 exec에서 구현해봅시다.
export class OptimizedFuseStrategy implements Strategy {
  // 기존 코드 생략 ...

  exec(ctx: Canvas['ctx'], balls: (DynamicMetaball | StaticMetaball)[]) {
    for (let i = 0; i < balls.length; i += 1) {
      const nowBall = balls[i];

      for (let j = i; j < balls.length; j += 1) {
        const cmpBall = balls[j];

        this.fuse(ctx, nowBall, cmpBall);
      }
    }
  }

  fuse(
    ctx: Canvas['ctx'],
    ball1: DynamicMetaball | StaticMetaball,
    ball2: DynamicMetaball | StaticMetaball,
  ) {}
}
모든 메타볼들에 대해 비교를 해줌으로써 융합에 대해 fuse 메서드에서 판단하고 그려줄 거에요.
그렇다면 이제, fuse를 구현하러 가봅시다.
최대 거리 구하기
메타볼이 융합이 될지 여부는, 서로간에 가까운지에 대한 여부겠죠?
따라서 먼저 두 원을 불러준 다음, 현재의 거리와 최대 거리를 구해줍시다.
    const {x: x1, y: y1, r: r1} = ball1;
    const {x: x2, y: y2, r: r2} = ball2;

    const totalRadiusSum = r1 + r2;

    const getDist = (x1: number, y1: number, x2: number, y2: number): number =>
      Math.sqrt((x1 - x2) ** 2 + (y1 - y2) ** 2);

    const dist = getDist(x1, y1, x2, y2);
    const maxDist = totalRadiusSum * this.fuseWeight;

    if (dist >= maxDist) {
      return;
    }
이제 결과적으로 최대 거리를 넘어가면 계산을 하지 않도록 early return하게 되었어요! 👏🏻
융합에 대한 최소 각도 구하기
그렇다면 이제 이전의 코드를 넘어가면 모두 융합해야 하는 메타볼이겠죠?!
우리는 이후 두 원의 내접점에 대한 각도를 구해야 해요. 이를 통해 최소 확산 거리를 알 수 있게 됩니다.
왜냐하면, 두 내 접점 미만의 각도로는 이미 합쳐져 있으니 융합을 계산할 필요가 없기 때문이죠.
    // 기존 코드 생략...
    const isOverlapping = dist < totalRadiusSum;

    const squaredR1 = r1 ** 2;
    const squaredR2 = r2 ** 2;
    const squaredDist = dist ** 2;

    /**
     * @description
     * 내접하는 각 메타볼의 가운데와 접점을 이어 삼각형을 만들었을 때, 해당 각도를 구하는 공식.
     * 세 변을 알 수 있다면 각도를 구할 수 있다.
     * @see: https://en.wikipedia.org/wiki/Law_of_cosines
     */
    const u1 = isOverlapping
      ? Math.acos((squaredDist + squaredR1 - squaredR2) / (2 * r1 * dist))
      : 0;

    const u2 = isOverlapping
      ? Math.acos((squaredDist + squaredR2 - squaredR1) / (2 * r2 * dist))
      : 0;
외접점을 통해 최대 확산 각도 구하기
반대로 왜 외접점을 구해야 하는지는 눈치가 빠르시다면 이해하셨을 것 같아요! 🙇🏻♂️
가령 메타볼이 존재한다면, 마치 융합하는 듯한 사이의 애니메이션은 두 원의 외접점들을 넘어갈 수 없어요. 따라서 이 외접점을 미리 구함으로써 우리는 유효한 거리에 있는 두 원 간에 대해 최대로 늘릴 수 있는 limit를 정해줄 수 있습니다.
이를 구하기 위해 여러 자료를 찾아본 결과, 다음 공식이 유효했어요.
이를 통해 현재 메타볼의 외접점과 중심, 그리고 비교할 메타볼의 중심을 이었을 때의 각도를 알 수 있습니다.
const maxSpread = Math.acos((r1 - r2) / dist);이후 이 확산할 수 있는 각도를 찾았다면, 외접점을 구해주면 됩니다.
이때, 우리는 융합에 대한 좌표를 찾아야 하는데요. 미리 이를 구할 함수 getVector을 해당 클래스의 메서드로 구현해놓을게요.
  getVector(
    x: number,
    y: number,
    angle: number,
    radius: number,
  ): [number, number] {
    return [x + radius * Math.cos(angle), y + radius * Math.sin(angle)];
  }
const v = 0.5;
/**
* @description
* 결국 두 원의 중심 간에 애초에 존재하던 각도를 베이스로 잡기 위해 정의한다.
*/
const baseAngle = getAngle(x2, y2, x1, y1);
const spreadV1 = u1 + (maxSpread - u1) * v;
const spreadV2 = Math.PI - u2 - (Math.PI - u2 - maxSpread) * v;
const angle1a = baseAngle + spreadV1;
const angle1b = baseAngle - spreadV1;
const angle2a = baseAngle + spreadV2;
const angle2b = baseAngle - spreadV2;
const p1a = this.getVector(x1, y1, angle1a, r1);
const p1b = this.getVector(x1, y1, angle1b, r1);
const p2a = this.getVector(x2, y2, angle2a, r2);
const p2b = this.getVector(x2, y2, angle2b, r2);여기서 특이한 점은 v입니다. v는 무엇이길래 0.5라는 수치를 spreadV1, spreadV2에 곱해주는 걸까요?
저 역시 이 값이 이해가 되지 않았으나 추측하기로는 평균을 내기 위함인 것 같아요.
결국 외접점에 대한 최대 각도와, 내접점에 대한 최소 각도의 평균으로 가중치를 줌으로써, 메타볼의 융합하는 효과를 적절하게 핸들링하는 것으로 파악할 수 있습니다!
이후에는 해당 각도를 구하여(angle), 융합하는 곳을 그릴 각 4지점 좌표를 구합니다.
핸들지점 구하기
휴! 이제 거의 다 구현했어요.
이제 핸들할 곳을 구할 건데요. 이 용도는, 추후 베지어 곡선을 그려, 자연스러운 융합 효과를 구현하는 데 사용할 거에요.
	const handleLength = 2.4;
    const baseHandleDist =
      Math.min(v * handleLength, getDist(...p1a, ...p2a) / totalRadiusSum) *
      Math.min(1, (dist * 2) / totalRadiusSum);

    const handleRadius1 = r1 * baseHandleDist;
    const handleRadius2 = r2 * baseHandleDist;

    const h1a = this.getVector(...p1a, angle1a - PIH, handleRadius1);
    const h1b = this.getVector(...p1b, angle1b + PIH, handleRadius1);
    const h2a = this.getVector(...p2a, angle2a + PIH, handleRadius2);
    const h2b = this.getVector(...p2b, angle2b - PIH, handleRadius2);
휴! 결과적으로 우리는 필요한 정보들을 모두 구했네요.
그리기
최종적으로 그릴 시간입니다.
여기서는 bazierCurve라는 것을 사용할 거에요. 이를 통해 핸들 축을 2개 지정하여 베지에 곡선을 그림으로써 자연스러운 곡선을 연출할 거에요.
    ctx.beginPath();

    ctx.moveTo(...p1a);

    ctx.bezierCurveTo(...h1a, ...h2a, ...p2a);
    ctx.lineTo(...p2b);
    ctx.bezierCurveTo(...h2b, ...h1b, ...p1b);

    ctx.closePath();

    ctx.fill();
자, 이제 모든 게 끝났어요.
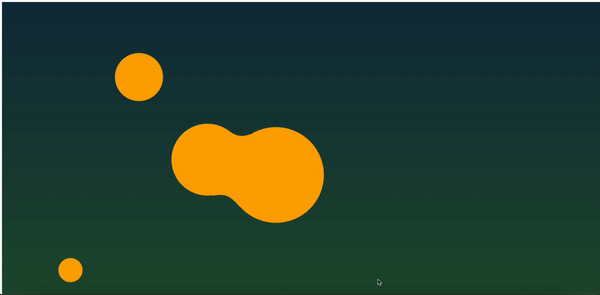
한 번 결과를 확인해볼까요?

잘 나오는군요!
OptimizedFuseStrategy 전체 코드
export class VectorFuseStrategy implements Strategy {
  before?: (...args: unknown[]) => void;

  after?: (...args: unknown[]) => void;

  constructor(public fuseWeight: number = 1.2) {}

  setBefore(callback: (...args: unknown[]) => void) {
    this.before = callback.bind(this);
  }

  setAfter(callback: (...args: unknown[]) => void) {
    this.after = callback.bind(this);
  }

  setFuseWeight(weight: number) {
    this.fuseWeight = weight;
  }

  exec(ctx: Canvas['ctx'], balls: (DynamicMetaball | StaticMetaball)[]) {
    for (let i = 0; i < balls.length; i += 1) {
      const nowBall = balls[i];

      for (let j = 0; j < balls.length; j += 1) {
        const cmpBall = balls[j];

        this.fuse(ctx, nowBall, cmpBall);
      }
    }
  }

  getVector(
    x: number,
    y: number,
    angle: number,
    radius: number,
  ): [number, number] {
    return [x + radius * Math.cos(angle), y + radius * Math.sin(angle)];
  }

  fuse(
    ctx: Canvas['ctx'],
    ball1: DynamicMetaball | StaticMetaball,
    ball2: DynamicMetaball | StaticMetaball,
  ) {
    const {x: x1, y: y1, r: r1} = ball1;
    const {x: x2, y: y2, r: r2} = ball2;

    /**
     * @see: https://github.com/paperjs/paper.js/blob/develop/examples/Paperjs.org/MetaBalls.html
     */
    const v = 0.5;
    const handleLength = 2.4;

    const totalRadiusSum = r1 + r2;

    const dist = getDist(x1, y1, x2, y2);
    const maxDist = totalRadiusSum * this.fuseWeight;

    if (dist >= maxDist) {
      return;
    }

    const maxSpread = Math.acos((r1 - r2) / dist);

    const isOverlapping = dist < totalRadiusSum;

    const squaredR1 = r1 ** 2;
    const squaredR2 = r2 ** 2;
    const squaredDist = dist ** 2;

    /**
     * @description
     * 내접하는 각 메타볼의 가운데와 접점을 이어 삼각형을 만들었을 때, 해당 각도를 구하는 공식.
     * 세 변을 알 수 있다면 각도를 구할 수 있다.
     * @see: https://en.wikipedia.org/wiki/Law_of_cosines
     */
    const u1 = isOverlapping
      ? Math.acos((squaredDist + squaredR1 - squaredR2) / (2 * r1 * dist))
      : 0;

    const u2 = isOverlapping
      ? Math.acos((squaredDist + squaredR2 - squaredR1) / (2 * r2 * dist))
      : 0;

    /**
     * @description
     * 결국 두 원의 중심 간에 애초에 존재하던 각도를 베이스로 잡기 위해 정의한다.
     */
    const baseAngle = getAngle(x2, y2, x1, y1);

    const spreadV1 = u1 + (maxSpread - u1) * v;
    const spreadV2 = Math.PI - u2 - (Math.PI - u2 - maxSpread) * v;

    const angle1a = baseAngle + spreadV1;
    const angle1b = baseAngle - spreadV1;

    const angle2a = baseAngle + spreadV2;
    const angle2b = baseAngle - spreadV2;

    const p1a = this.getVector(x1, y1, angle1a, r1);
    const p1b = this.getVector(x1, y1, angle1b, r1);
    const p2a = this.getVector(x2, y2, angle2a, r2);
    const p2b = this.getVector(x2, y2, angle2b, r2);

    const baseHandleDist =
      Math.min(v * handleLength, getDist(...p1a, ...p2a) / totalRadiusSum) *
      Math.min(1, (dist * 2) / totalRadiusSum);

    const handleRadius1 = r1 * baseHandleDist;
    const handleRadius2 = r2 * baseHandleDist;

    const h1a = this.getVector(...p1a, angle1a - PIH, handleRadius1);
    const h1b = this.getVector(...p1b, angle1b + PIH, handleRadius1);
    const h2a = this.getVector(...p2a, angle2a + PIH, handleRadius2);
    const h2b = this.getVector(...p2b, angle2b - PIH, handleRadius2);

    ctx.beginPath();

    ctx.moveTo(...p1a);

    ctx.bezierCurveTo(...h1a, ...h2a, ...p2a);
    ctx.lineTo(...p2b);
    ctx.bezierCurveTo(...h2b, ...h1b, ...p1b);

    ctx.closePath();

    ctx.fill();
  }
}
퍼포먼스 비교
드디어! 퍼포먼스를 비교할 수 있게 되었어요. 한 번 성능을 살펴볼까요?
똑같은 조건에서 동일하게 10초간 아무런 동작 없이 렌더링한 결과입니다.
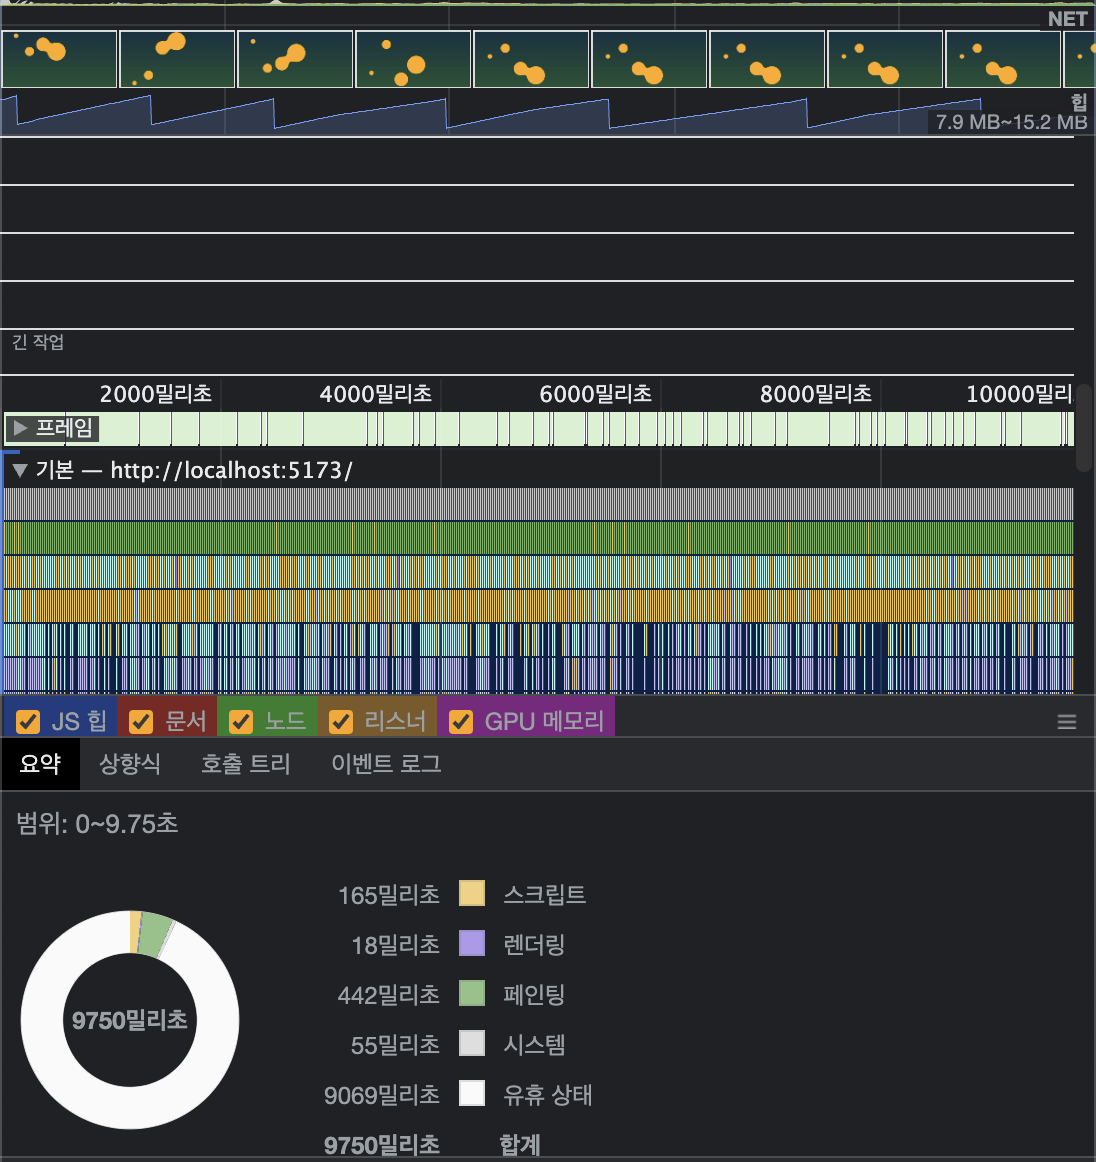
헉! 스크립트 성능이 약 50~60배를 왔다갔다 하는군요 🫣
유휴 상태 역시 적지는 않지만 넉넉하기에, 이는 필요한 애니메이션이라면 실제로 쓸 수 있겠군요!
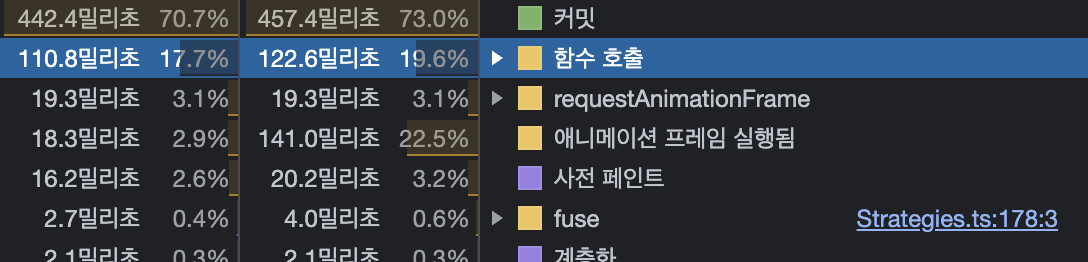
함수 호출 시간 역시 상당히 짧아졌음을 확인했습니다.
한계
그러나 분명 단점 역시 존재해요.
- 그리는 로직이 원과 별도로 존재하게 되어 조금씩
sync가 맞지 않는 이슈가 생깁니다. 이는 어쩔 수 없다고 생각하는 게,canvas는 래스터 기반으로 비트맵 단위로 조작할 수 있게되는데요. 소수점 단위까지는 커버할 수 없기에 발생한 이슈라 생각해요. - 메타볼 특성상 융합된 결과로 메타볼 원자가 커져야 합니다. 그러나 이를 핸들링할 수 없다는 건 마음이 아프네요 🥲
🎉 마치며
제가 가장 애정을 쏟았던 작업이니만큼, 꽤나 오랜 시간이 걸렸네요.
힘도 빠질 법 하지만, 오히려 기분이 좋았어요.
- 이 글을 쓰면서 디자인 패턴에 대해 복습하게 되어 진심으로 기분이 좋았고,
- 이전의 제가 열심히 살았구나~하는 느낌을 받았습니다.
실제로 수정할 때마다 delete되는 코드들이 거의 없고, 확장에만 코드 작성이 집중되었음을 확인하며 설계가 나쁘지 않았다는 것을 느꼈어요.
아무래도 이제 저의 경우, 포트폴리오 사이트를 바꿀 계획인데요. 바꾸게 되면 이 코드는 사용하지 않게 될지도 모르겠네요. 그러나 누군가에게 어떤 방식으로든 도움이 되었으면 좋겠어서 글로 남기게 되었네요.
그렇다면, 긴 글 읽으시느라 고생하셨습니다 🥰
.jpg)
재밌는 시리즈네요!