[Android] FCM 이용 _ notification 구현하기
참고 사이트 : firebase cloud messaging 공식 홈페이지
들어가기 전에,
firebase를 안드로이드 스튜디오에서 이용하기 위해 셋팅하기는
여기서 잘 설명이 되어있다.
혹은 firebase 홈페이지에서 프로젝트를 생성 후, 안드로이드 아이콘을 눌러서 앱 등록을 할 경우, 셋팅 과정이 잘 설명되어있음으로 그걸 따라가기로 하자.
FireBase Cloud Messaging (FCM) 메세지
FCM 메세지 유형
알림 메세지 :
- 종종 '표시 메세지'로 간주.
- FCM이 클라이언트 앱을 대신해 최종사용자 기기에 자동으로 메세지를 표시 (앱 백그라운드 상태일 경우)
: 즉, 앱이 백그라운드에 있을 경우 따로 처리할 수 없고, 바로 푸시가 보이게 됨을 의미.
-
백그라운드 외, 포그라운드 상태의 경우 콜백 함수로 메세지를 처리함. onMessageReceived() 이용 -> 포그라운드 상태에서는 메세지 따로 처리
-
전송방법 :
1. Firebase 콘솔을 사용, 알림 메세지를 전송할 수 있음.
+) 콘솔 이용에 필요한 토큰 가져오는 법 :
    FirebaseMessaging.getInstance().token
            .addOnCompleteListener{ task->
                if(task.isSuccessful){
                    val token = task.result
                    Log.d("FIREBASE_TOKEN****************", token.toString())
                }
}- Cloud Functions 또는 앱 서버와 같은 신뢰할 수 있는 환경에서 Admin SDK 또는 FCM 서버 프로토콜을 사용하여 notification 키를 설정하여 전송할 수도 있음. _ 방법은 데이터 메세지 쪽에서,,,
+) 선택사항으로 사용자 정의의 key-value 데이터 페이로드를 추가 가능. 항상 축소형임.
- json 형식의 알림 메세지 구조 EX.
{
  "message":{
    "token":"bk3RNwTe3H0:CI2k_HHwgIpoDKCIZvvDMExUdFQ3P1...",
    "notification":{
      "title":"Portugal vs. Denmark",
      "body":"great match!"
    }
  }
}- 정리 :
데이터 메세지에 비해 구현이 쉽지만, 앱이 백그라운드에 있을 때 따로 처리할 수 없고 바로 푸시가 보이게 됨. -> 유연하게 대처하기 어렵
하지만 별도의 처리없이 백에서만 간단하게 notification을 구성할 때는 괜찮을 것으로 보임.
데이터 메세지 :
-
클라이언트 앱에서 데이터 메세지를 처리.
-
백그라운드, 포그라운드 모두 콜백 함수로 메세지를 처리함. onMessageReceived() 이용 _ 메세지 수신 시 따로 처리를 해줘야함.
-
전송방법 :
(1) Cloud Functions 또는 앱 서버와 같은 신뢰할 수 있는 환경에서 Admin SDK 또는 FCM 서버 프로토콜을 사용하여 data 키만을 설정하여 전송
_ 알림 메세지 전송방법에도 있었지만 이 방법은, 실제로 메세지를 송신하려면 별도의 서버나 API 요청(CRUD)를 해야함. 글쓴이는 api 요청을 firebase 홈페이지에서 메세지 수신용으로 제공 중인 툴을 이용하여 함.firebase 홈페이지 제공 _ api 이용하기
firebase api 링크에 들어가면 api를 이용할 수 있는 창이 뜨게 됨.여기서 parent의 string값에는 "projects/project_id"를 입력해주고, 푸시를 보낼 메세지 내용은 request body에 입력해주어 보내면 된다.
projects/project_id에서 "project_id"값은 안드로이드 스튜디오에 추가해준 google-services.json 파일에서 확인할 수 있다.
또한, "request body"에 넣어줄 메세지의 구조는 여기서 확인하도록 하자.
- json 형식의 데이터 메세지 구조 EX
{
  "message":{
    "token":"bk3RNwTe3H0:CI2k_HHwgIpoDKCIZvvDMExUdFQ3P1...",
    "data":{
      "Nick" : "Mario",
      "body" : "great match!",
      "Room" : "PortugalVSDenmark"
    }
  }
}- 정리 :
알림 메세지에 비해 구현해야할 거리가 있음.하지만 푸시를 따로 처리할 수 있어 유연하게 대처하기 좋음.
메세지 처리 :
FirebaseMessagingService
- 메세지를 수신하려면 FirebaseMessagingService라는 서비스를 확장하는 클래스를 이용. 메세지를 처리할 수 있다.
_ onMessageReceived()와 onNewToken(), 그리고 onDeletedMessages() 콜백 함수를 재정의하여 처리할 수 있음.
(주의 : 모든 메시지는 수신된 지 20초 이내에 처리되어야 함)
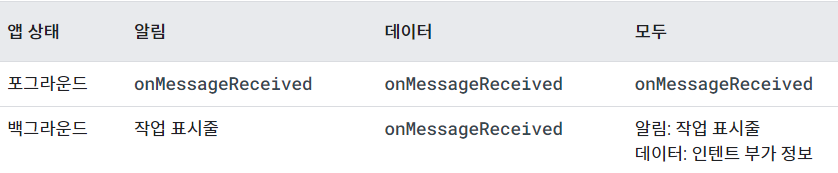
여기서 onMessageReceived() 콜백 함수가 중요한데, 위의 메세지 유형에서 notification을 포그라운드, 백그라운드 등에서 처리해 푸시한다~ 처럼 중간중간 언급했지만, 요약하자면 아래 그림과 같다.
구현해보기
- 먼저 Manifest.xml 수정하기.
//아래에서 MyFirebaseMessagingService는 FirebaseMessagingService()를 확장한 클래스.
(1) 서비스 추가하기.
<service
	android:name=".MyFirebaseMessagingService"
      	android:exported="false">
        <intent-filter>
            <action android:name="com.google.firebase.MESSAGING_EVENT"/>
        </intent-filter>
 </service>
(2) meta-data 추가하기
 <!-- 기본 알림 아이콘 및 색상을 설정 - 수신 알림 메시지에 별도 설정되지 않을 경우 사용됨. -->
        <meta-data
            android:name="com.google.firebase.messaging.default_notification_icon"
            android:resource="@drawable/ic_launcher_foreground" />

        <meta-data
            android:name="com.google.firebase.messaging.default_notification_color"
            android:resource="@color/teal_700" />

        <!-- 기본 알림 채널 _ 객체 id 설정 - 수신 알림 메시지에 별도 설정되지 않을 경우 사용됨. -->
        <meta-data
            android:name="com.google.firebase.messaging.default_notification_channel_id"
android:value="@string/noti_channel_id" />- onNewToken() 재정의 하기 (필수)
등록 토큰이 앱 데이터 삭제, 재설치, 복원 등의 상황에서 변경 가능.
때문에 앱에서 토큰이 갱신 될 경우 서버에 해당 토큰을 갱신됐다고 알려주는 콜백함수.
override fun onNewToken(token: String) {
        super.onNewToken(token)
        Log.d(TAG, "Refreshed token: $token")
}- onMessagingReceived() 재정의 하기
- onMessageReceived는 각 메세지를 수신할 때마다 호출되는 콜백함수로서 이를 통해 notification을 생성, 설정할 수 있음. _ 백그라운드 상태의 알림 메세지는 제외. < 이 경우는 별도의 처리없이 자동으로 처리되어 푸시됨.
- 아래 코드에서는 수신이 될 때마다 호출, 알림 메세지의 경우는 sendNotification()함수를 호출하고, 데이터 메세지의 경우 sendDataMessage() 함수를 호출하여 notification을 구현.
override fun onMessageReceived(remoteMessage: RemoteMessage){
        super.onMessageReceived(remoteMessage)

        //받은 remoteMessage의 값 출력해보기. 데이터메세지 / 알림메세지
        Log.d("FirebaseMessagingService*************", "Message data : ${remoteMessage.data}")
        Log.d("FirebaseMessagingService*************", "Message noti : ${remoteMessage.notification}")

        //알림 메세지의 경우.
        remoteMessage.notification?.let {
            Log.d("FirebaseMessagingService*************", "Message Notification Body: ${it.body}")
            //알림 메세지 _ 포그라운드에서도 알림 받은 것 처럼 받은 정보를 가지고 notification 구현하기.
            sendNotification(remoteMessage.notification!!)
        }

        //데이터 메세지의 경우.
        if(remoteMessage.data.isNotEmpty()) {
            sendDataMessage(remoteMessage.data)
        }

}- notification 구현 전 : 채널 구현
안드로이드 Oreo (8.0, API Level 26) 이상 버전일 경우 채널 관리를 해줘야함. 채널을 생성하지 않으면 알림을 받을 수 없게 됨. _ 이하의 경우는 해당X
- 채널을 항목 별로 여러 개 만들 경우, 사용자는 해당 분류에 따른 notification만 받도록 설정하거나, notification을 받지 않도록 끌 수 있게 된다. (ex clock 앱의 알람 관련 notification만 키고, 스톱워치 기능 관련 notification은 꺼버리는 등... )
 private fun createNotificationChannel(){
        if (Build.VERSION.SDK_INT >= Build.VERSION_CODES.O) {
            val channel = NotificationChannel(
                CHANNEL_ID,
                CHANNEL_NAME,
                NotificationManager.IMPORTANCE_DEFAULT
            )

            channel.enableLights(true)
            channel.enableVibration(true)

            (getSystemService(Context.NOTIFICATION_SERVICE) as NotificationManager).createNotificationChannel(channel)
        }
    }

    companion object {
        private const val CHANNEL_NAME = "FCM STUDY"
        private const val CHANNEL_ID = "FCM__channel_id"

}- sendNotification() / sendDataMessage()
아래 코드 전문은 sendDataMessage()일 경우임. 차이점은 매개변수로 notification을 받아와 쓰느냐, key-value의 map을 받아와 쓰느냐의 차이. (나중에 둘이 공통되는 부분 묶어서 아예 하나로 만들어보자....)- 이미지 load : 매개변수를 보고, image 주소가 있으면 bitmap을 다운받아 notification에 적용함. (Glide 라이브러리를 이용)
private fun sendDataMessage(data: MutableMap<String, String>) {
val intent = Intent(this, MainActivity::class.java)
intent.addFlags(Intent.FLAG_ACTIVITY_CLEAR_TOP)
val pendingIntent = PendingIntent.getActivity(
this, 0, intent, PendingIntent.FLAG_UPDATE_CURRENT
)
val notificationManager = getSystemService(Context.NOTIFICATION_SERVICE) as NotificationManager
createNotificationChannel()
val notificationBuilder = NotificationCompat.Builder(this, CHANNEL_ID)
notificationBuilder.setContentTitle(data["title"])
.setSmallIcon(R.drawable.ic_launcher_foreground)
.setContentText(data["message"])
.setPriority(NotificationCompat.PRIORITY_DEFAULT)
.setContentIntent(pendingIntent)
.setAutoCancel(true)
//큰 이미지가 따로 올 경우. data에 imageUrl이 들어있을 경우
if(data["image"] != null) {
Log.d("imageUri2***********************", data["image"].toString())
Glide.with(applicationContext)
.asBitmap()
.load(data["image"])
.into(object : CustomTarget<Bitmap>() {
override fun onResourceReady(
resource: Bitmap,
transition: Transition<in Bitmap>?
) {
Log.d("imageObject2*********************", resource.toString())
notificationBuilder.setStyle(NotificationCompat.BigPictureStyle()
.bigPicture(resource))
}
override fun onLoadCleared(placeholder: Drawable?) {}
})
}
notificationManager.notify(100, notificationBuilder.build() )
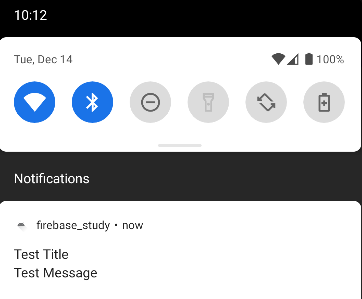
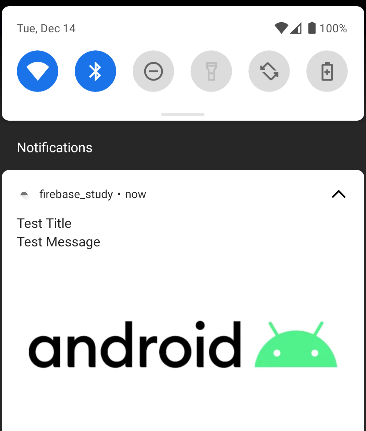
}- 결과 :
title과 content만 넣은 경우 :
title, content, image를 함께 넣은 경우 :
// 추가로 해 볼 것들 :
- 현재 알림을 여러개 보내도, 가장 최신의 알림 1개로 업데이트만 되고, 쌓이지 않음. < 알림 여러개 쌓이게 하기. _ 아마 id값을 다른 값으로 주면 같은 알림이라고 인식 안 할 것 같다.
- 현재 그림이 확장되는 BigPictureStyle()만 적용해봤는데, 다른 스타일의 notificaiton도 확인하고 적용해보자.
- notification 채널을 여러개 혹은 notification 그룹 설정을 해 알림 받아보기.