
이전 글(notification 구현)에서 추가로 해 볼려고 한 것들 + a로 정리
현 상태 : fcm을 이용 notification 구현함. (이전글)
-
이 글에서 할 것.
- (수정하기) 현재 알림을 여러개 보내도, 가장 최신의 알림 1개로 업데이트만 되고, 쌓이지 않음. < 알림 여러개 쌓이게 하기. _ 아마 id값을 다른 값으로 주면 같은 알림이라고 인식 안 할 것 같다.
- 현재 그림이 확장되는 BigPictureStyle()만 적용해봤는데, 다른 스타일의 notificaiton도 확인하고 적용해보자.
- notification 그룹 설정을 해 알림 받아보기
- notification 속성 + a 몇가지 정리하고 넘어가기
1. 알림 여러개 쌓이게 하기
예상 원인 :
_ notificationManager의 notiy() 호출 시 id값을 그때그때 다르게 주면 여러개가 쌓일 것이다.
-> 알아본 결과 : id 값을 다르게 주는게 맞음.
많이 보이는 방법은 System.currentTimeMills()를 이용, 현재 시간을 받아와 대입하여 그때그때 id값을 다르게 지정해주는 방법.
notificationManager.notify((System.currentTimeMillis()).toInt(), notificationBuilder.build() )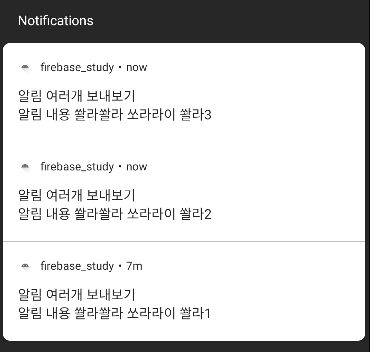
noticiation이 갱신되지 않고, 여러개 쌓이는 것을 확인 할 수 있음.
여기서 확인된 추가 문제 :
위의 사진에서 제일 최근에 보낸 notification _ 쏼라3의 경우 클릭 시 PendingIntent가 잘 작동하여, 앱으로 이동하는 것을 확인할 수 있지만, 그 이전에 보낸 쏼라2나 1의 경우에는 클릭을 하더라도 아무 이벤트도 일어나지 않는 것을 확인.
문제해결 : pendingIntent의 request code도 개별적으로 설정해줘야, 각각의 notification이 제대로 일을 함.
즉, 다중 noticiation을 주어 클릭 시 데이터 전달 등 각각의 일을 처리하게하고 싶다면 pendingIntent의 request code도 다르게 주어야함.
val pendingIntent = PendingIntent.getActivity(
            this, (System.currentTimeMillis()).toInt(), intent, PendingIntent.FLAG_UPDATE_CURRENT
        )
PendingIntent 막간 정리
-
pendingIntent란 intent를 가지곤 있으나, 당장 수행하지 않고, 특정 시점에 수행하도록하는 랩퍼 클래스이다. 보통 앱이 백그라운드 등에 있을 때, 현재 구동 중이지 않을 때 수행될 수 있도록 한다.
-
대표적인 사용처는 Notification이나, AlarmManger이다.
-
주요메서드
- 무엇을 실행할지에 따라서 아래와 같이 나뉜다.- PendingIntent.getActivity(Context, Request_Code, Intent, Flag)
- PendingIntent.getService(Context, Request_Code, Intent, Flage)
- PendingIntent.getBroadcast(Context, Request_Code, Intent, Flag)
- 매개변수는 차례대로, context정보, pendingIntent 구분을 위한 고유코드, 실행할 Intent, 플래그이다.
- 플래그 종류 :
- FLAG_UPDATE_CURRENT : 이미 생성된 pendingIntent 존재 시, 이를 업데이트함.
- FLAG_CANCEL_CURRENT : 이미 생성된 pendingIntet 존재 시, 이를 취소하고 새로 생성함.
- FLAG_ONE_SHOT : 해당 pendingIntent를 일회성으로 사용
- FLAG_NO_CREATE : 이미 생성된 pendingIntent 존재 시, 이를 재사용한다. (생성된 것이 없다면 NULL을 리턴한다)
결론 :
notification _ 다중 알림을 받아 쌓고 싶다면, notificationManager의 notiy()의 id값과 pendingIntent의 request 코드 값을 각각 다르게 부여해야한다.
2. notification에 여러가지 스타일 적용해보기
결과물 :
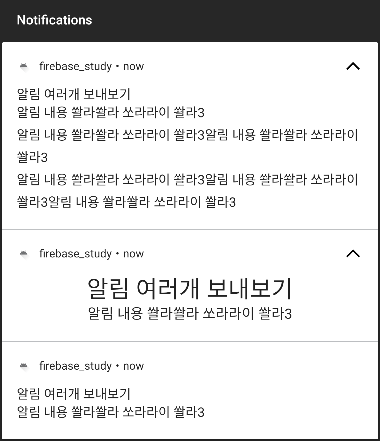
위에서 부터 차례대로. BigTextStyle(), DecoratedCustomViewStyle(), 그리고 따로 스타일을 적용하지않은 기본형이다.
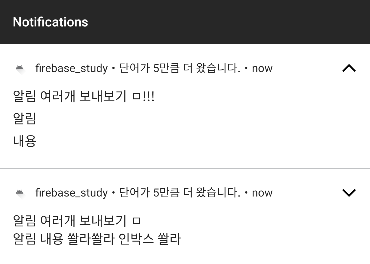
이것은 InboxStyle()을 확장했을 경우와, 기본으로 접혀있을 때의 모습.
구현 코드.
 when(NotificationStyle.valueOf(data["type"]!!)){
            NotificationStyle.NORMAL -> Unit
            NotificationStyle.BIG_TEXT -> {
                notificationBuilder.setStyle(
                    NotificationCompat.BigTextStyle()
                        .bigText(data["message"] + "\n"+ data["message"] + data["message"] + "\n"
                        + data["message"] + data["message"] + data["message"])
                )
            }

            NotificationStyle.CUSTOM -> {
                notificationBuilder.setStyle(NotificationCompat.DecoratedCustomViewStyle())
                    .setCustomContentView(
                        RemoteViews(
                            packageName,
                            R.layout.custom_view_notification
                        ).apply {
                            setTextViewText(R.id.tv_custion_title, data["title"])
                            setTextViewText(R.id.tv_custion_message, data["message"])
                        }
                    )
            }
            NotificationStyle.INBOX->{
                val token = data["message"]?.split(' ');
                if(token != null && token.size >= 3){
                    notificationBuilder.setStyle(
                        NotificationCompat.InboxStyle()
                            .addLine(token[0])
                            .addLine(token[1])
                            .addLine(token[2])
                            .setBigContentTitle(data["title"] + "!!!")
                            .setSummaryText("단어가 ${token.size - 3}만큼 더 왔습니다.")
                    )
                }
            }
기존에 보냈던 request body에 type이라는 키값을 추가로 주어, type 값에 따라 스타일을 적용시키도록 구현함.
- BigText : 기존 알림은 허용 텍스트를 넘어갈 경우 (1줄을 초과할 경우) 가차없이 텍스트를 잘라버렸지만, 이 경우에는 확장하여 여러 줄의 텍스트를 볼 수 있는 알림이다. BigPictureStyle과 비슷.
- Custom : 커스텀 뷰. 안드로이드에선 커스텀하기 보다는 표준 알림 템플릿을 사용할 것을 권장한다. _ < 커스텀하는 만큼 다양한 기기등에서 보여질 때 짤리거나 원하는대로 안나올 수 있음.
- DecoratedCustomViewStyle()의 setCustomView() 함수 이용.
- 커스텀 뷰로 사용할 레이아웃을 미리 만들어, remote view로 작업해주고, 코드에서와 같이 text 등을 설정해주면 된다.
- 이때 remote 뷰는 다른 프로세스에서 표시하기 위한 보기 계층 구조 (설계도에 가까운 듯) 로서 레이아웃 리소스 파일에서 확장된다.
자세한 내용은 안드로이드 스튜디오에서 확인해보자
- Inbox : 보통 이메일과 같이 짧은 요약줄 여러 개를 추가하여 보여줄 때 사용.
- addLine() : 알림 내용의 한줄 한줄 요약 섹션 추가
- setBigContentTitle() : 확장한 상태에서 content의 title을 재정의
- setSummaryText() : 요약 텍스트 _ notification의 맨 윗줄에 추가, 설정됨.
- 그 외에도 MessagingStyle, MediaStyle, CallStyle 등이 존재함.
3.notification 그룹 적용하기
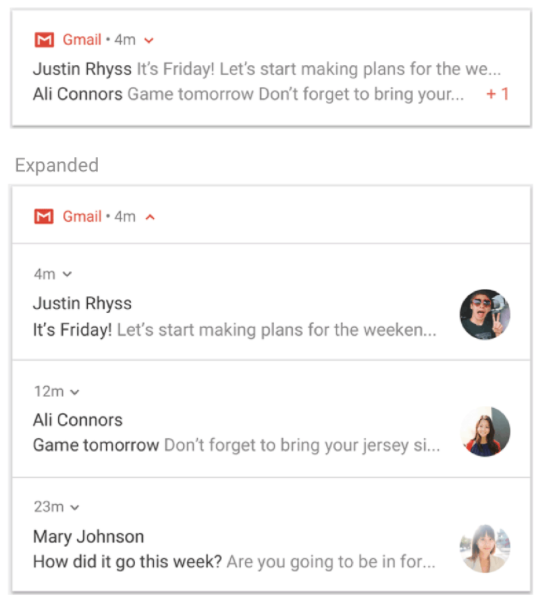
: 안드로이드 7.0부터는 관련 알림을 그룹으로 표시 가능 -> 이메일 앱 등에서 알림 표시 시 동일한 그룹으로 알림을 포함하여 축소할 수 있도록 만들 수 있다. 아래 사진과 같은 스타일 알림이 좋은 예시.
(참고) 알림 그룹 != 알림 채널 그룹
- 다음과 같은 조건들이 모두 참일 경우는 알림 그룹을 사용해야한다.
- 하위 알림은 완전한 알림이며, 그룹 요약을 사용하지 않고 개별적으로 표시 할 수 있다.
- 하위 알림을 개별적으로 표시 _ 알림을 실행할 수 있으며 고유 작업이 있다.
- 각 알림에 사용자가 확인해야하는 더 많은 정보가 존재한다.
구현해보기
1. 그룹 아이디 설정하기
val NOTI_GROUP_ID = "com.study.aos.noti_group"2. notificationBuilder에 .setGroup(그룹 아이디) 추가하기
notificationBuilder.setContentTitle(data["title"])
            .setSmallIcon(R.drawable.ic_launcher_foreground)
            .setSubText("SubText 줄")
            .setContentText(data["message"])
            .setPriority(NotificationCompat.PRIORITY_DEFAULT)
            .setContentIntent(pendingIntent)
            .setAutoCancel(true)
            .setGroup(NOTI_GROUP_ID)
3. 그룹 요약 추가하기. _ summary notification
val notiSummaryBuilder = NotificationCompat.Builder(this, CHANNEL_ID)
            .setContentTitle("Summary Noti Title")
            .setContentText("new message")
            .setSmallIcon(R.drawable.ic_launcher_foreground)
            .setGroup(NOTI_GROUP_ID)
            .setGroupSummary(true)
4. 호출하기
 NotificationManagerCompat.from(this).apply{
            notify((System.currentTimeMillis()/1000).toInt(), notificationBuilder.build())
            notify(123, notiSummaryBuilder.build())
        }
5. 결과
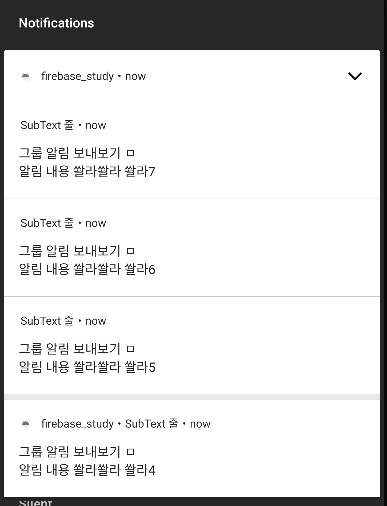
6. 문제점? 궁금한 점 :
맨 아래 notification을 보면 알다시피, 맨 처음에 보낸 notification은 그룹에 들어가지않고 홀로 있게 된다.... 두번째 보낸 애들부터는 잘 그룹으로 만들어지는 것을 확인할 수 있음.
참고한 android developer 사이트에서 나온 것 처럼 summary 외에 한번에 2개 이상의 메세지를 보낼 경우에는 잘 작동된다. 내가 잘못한건지, 원래이런지 이유 알아내자.
//아래 코드 = 잘 돌아가는 경우. << 아예 notification으로 푸시할 내용 리스트로 만들어서 for문 돌리면서 여러번 보내도 잘 동작하는 것 확인.
	NotificationManagerCompat.from(this).apply{
            notify((System.currentTimeMillis()).toInt(), notificationBuilder.build())
            notify((System.currentTimeMillis()).toInt(), notificationBuilder.build())
            notify((System.currentTimeMillis()).toInt(), notificationBuilder.build())
            notify(123, notiSummaryBuilder.build())
        }
7. 참고로
Android 7.0 이상부터는 앱이 4개 이상의 알림을 보내면서 그룹을 지정하지 않으면 시스템에서 이러한 알림을 자동으로 그룹화를 해줌.
4. notification 속성 이모저모
기본 속성

중요도 속성
notification은 중요도에 따라 알림의 형태가 달라진다.
중요도는 android 8.0 이상에서는 채널에 설정하고, 7.1 이하는 notification 자차에 설정한다.
- 8.0 이상일 경우
   	val channel = NotificationChannel(
                CHANNEL_ID,
                CHANNEL_NAME,
                NotificationManager.IMPORTANCE_DEFAULT //중요도
)- 7.1 이하일 경우
notificationBuilder.setContentTitle(notification.title)
            .setSmallIcon(R.drawable.ic_launcher_foreground)
            .setContentText(notification.body)
            .setPriority(NotificationCompat.PRIORITY_DEFAULT) //중요도
            .setContentIntent(pendingIntent)
.setAutoCancel(true)- 종류 (channel / notification) 순
- 긴급 (알림음o, 헤드업) : IMPORTANCE_HIGH / PRIORITY_HIGH , PRIORITY_MAX
- 높음 (알림음o) : IMPORTANCE_DEFAULT / PRIORITY_DEAFAULT
- 중간 (알림음x) : IMPORTANCE_LOW / PRIORITY_LOW
- 낮음 (알림음x, 상태줄 표시x) : IMPORTANCE_MIN / PRIORITY_MIN
Notifiation Visibility
잠금화면상태(system ui가 신뢰할 수 없는)에서 알림의 존재와 내용을 표시하는 방법, 가시성을 설정 (setVisibility()를 이용해 notificaiton에서 설정)
1. VISIBILITY_PUBLIC : 잠금화면 위에서도 내용을 다 읽을 수 있음.
2. VISIBILITY_PRIVATE : 기본상태, icon이나 tickerText가 표시됨. (내용은 해제 후)
3. VISIBILITY_SECRET : 사용자가 잠금화면을 풀 때까지 icon과 ticker 등 알림 일체 표시X
그 외
setAutoCancel() : 알림 탭할 경우 시 알림이 지워짐.
setContentIntent() : 알림 탭할 시 작동할 pendingIntent가 담김.
setOnlyAlertOnce() : 처음 알림 올 경우에만 알림 발생, 업데이트나 중복 시에 알림 별도로 알리지 않음.
setTicker() : 알림이 상태바에 있을 때 나타날 텍스트
setOngoing() : 알림 리스트에서 사용자가 알림을 탭하거나 스와이프해도 알림이 사라지지 않음.


잘읽었습니다. 많이 도움 되었어요