
💡 이미지 저장과정
✔️ 이미지 업로드
-> 파일을 선택하여
uploadFile이라는api를 요청하게 되면,backend에서storage(클라우드)로 파일을 전송(업로드)!
다운로드한 url(https://강아지.png)을 백엔드에 건네주고 그걸 브라우저에 전달해줌.
그 url주소를 가지고 등록하기(creatBoard해주면) 누르면 사진주소가 데이터베이스에 저장됨
blob을 사용해 파일로 저장하는 방법도 있지만 권장하지 않음!✔️ 이미지 조회
-> 이미지를 보기 위해 클라우드에 주소(URl)로 접근,
storage(클라우드)에서는backend로 이미지를 조회할 수 있는 이미지 주소를 넘겨주게 되고,
database에 이미지 주소를 저장한다.
(파일을 저장하는 것이 아닌, 주소를 저장!)
frontend에서도 이미지 주소를 통해 이미지를 조회!
(imgFile에 접근할수있는 주소만 저장, file 없음)
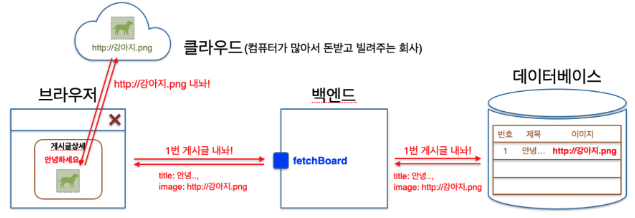
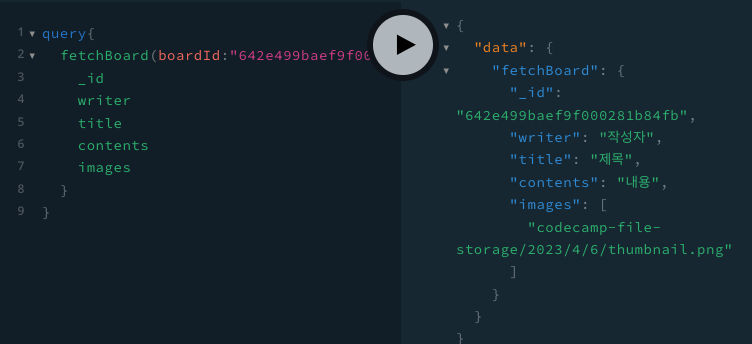
백엔드에 useQuery fetchBoard하여 등록된 게시글을 요청하면,
백엔드는 데이터베이스에서 해당하는 게시글을 찾아 주소를 반환해줌.
사진주소인 작은 text(string)을 가져옴
이미지는 img태그 안에다가 넣어준다
이제서야 요청이 들어감!
클라우드에서 그 주소를 기반으로 접속하여 다운을 받아온다.
당연히 텍스트보다 느릴 수 밖에 없음.
작은 문자열을 클라우드로부터 받아오고 그것을 디비에 작은 문자열을 저장하는 것
패치보드해서 디비로 갔더니
주소를 가지고 와서 img태그에 넣는다.
img태그는 다운로드 하는 역할을 한다.
해당스토리지에 접속해서 다운로드 해서 옴.
파일받아옴
❗️storage가 있는 곳
AWS,GCP,AZURE와 같은 클라우드 안에 storage가 있다. -> 개인 프로젝트용 storage만드는 방법이 있음
💡 이미지 업로드 해보기
업로드에 사용할 api는 uploadFile
uploadFile에서 받아온 이미지 url을 createBoard에 넣어준다.
✔️ url 가져오기 위한 아폴로 라이브러리 설치 및 세팅
파일전송하는 세팅을 해줘야함!
- _app.tsx -> apollo setting
- 명령어
yarn add apollo-upload-client
yarn add --dev @types/apollo-upload-client
✔️ app.tsx에서 세팅해주기
- apollo -> index.tsx
import {
  ApolloClient,
  ApolloLink,
  ApolloProvider,
  InMemoryCache,
} from "@apollo/client";
import { createUploadLink } from "apollo-upload-client";
const GLOBAL_STATE = new InMemoryCache(); //아래쪽에서 리렌더되든말든 얘는 계속 유지됨
interface IApolloSettingProps {
  children: JSX.Element;
}
export default function ApolloSetting(props: IApolloSettingProps): JSX.Element {
  const uploadLink = createUploadLink({
    uri: "http://backend-practice.codebootcamp.co.kr/graphql",
  });
  //기본세팅
  const client = new ApolloClient({
    link: ApolloLink.from([uploadLink]), //확장방식 설정 (이미지주고받기 기능 추가됨)
    cache: GLOBAL_STATE, //컴퓨터의 메모리(rem)에 백엔드에서 받아온 데이터 모두 임시저장! usequery로 받아온 데이터 여기있음 ,모든페이지에서 접근할 수 있는globalstate
  });
  //prettier-ignore
  return (
    <>
      <div>Hi</div>
      	<ApolloProvider client={client}>
					{props.children}
				</ApolloProvider>
      <div>Hi</div>
    </>
  );
}
✔️ 파일 업로드할 수 있도록 화면 그려주기
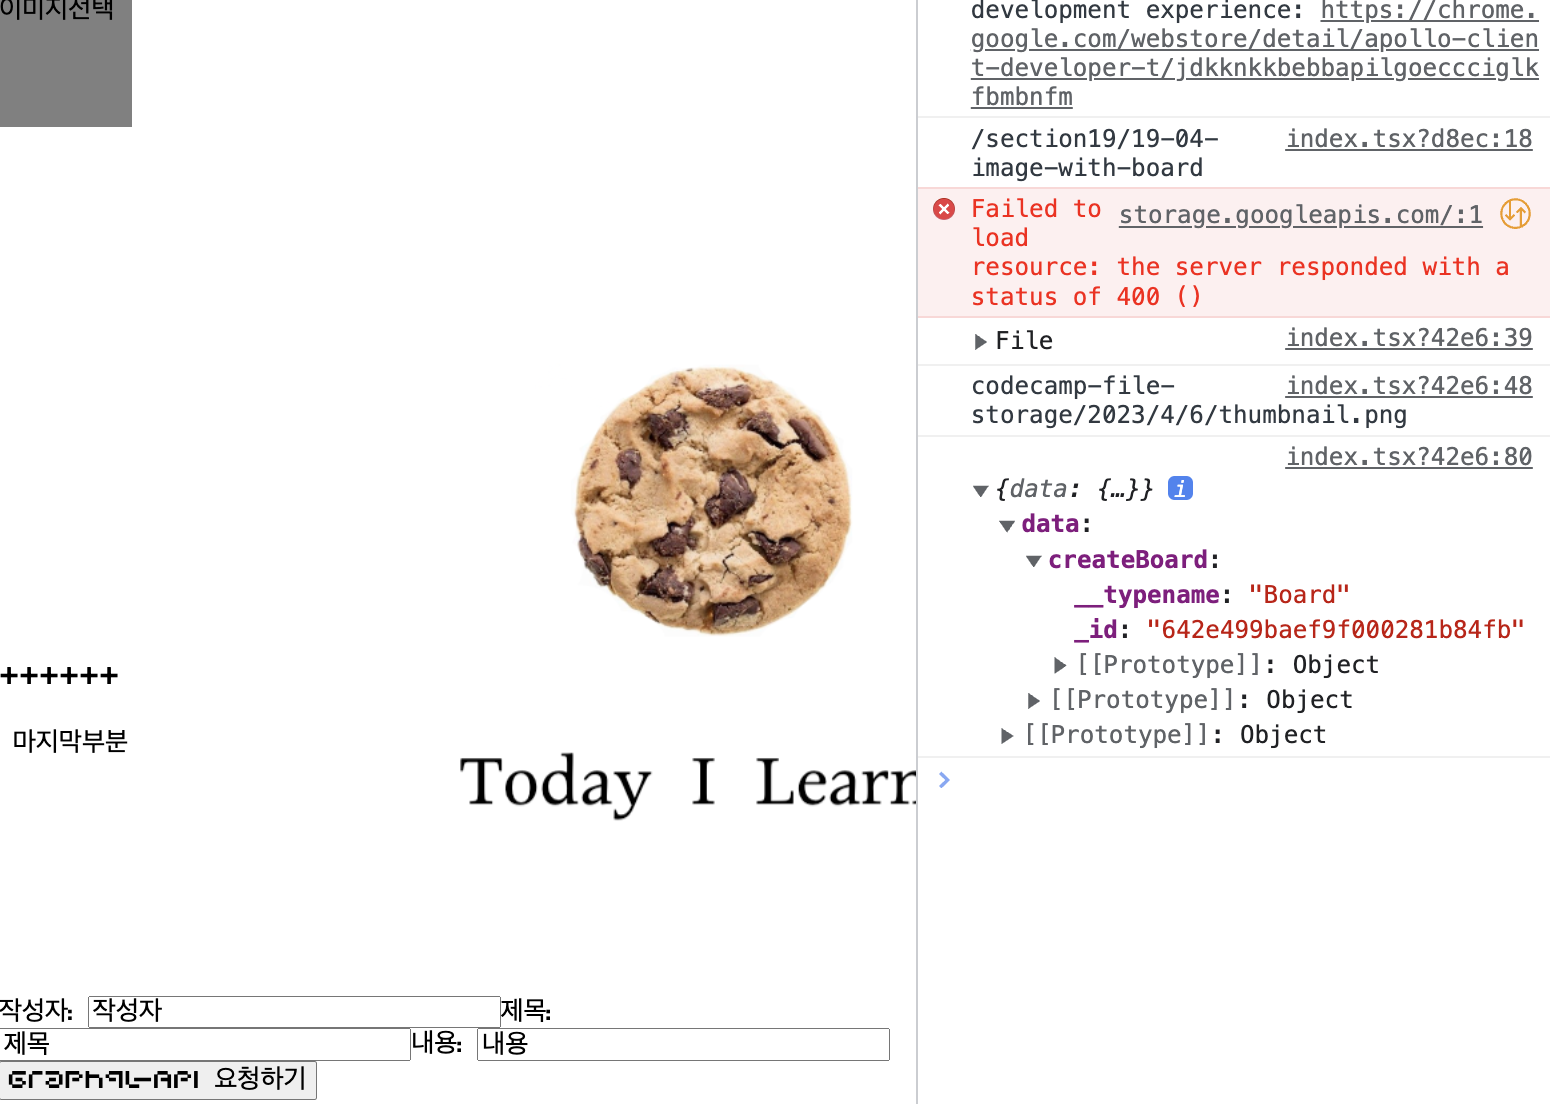
import { gql, useMutation } from "@apollo/client";
import { ChangeEvent, useState } from "react";
import {
  IMutation,
  IMutationUploadFileArgs,
} from "../../../src/commons/types/generated/types";
// 이미지 업로드 api 사용을 위한 쿼리 작성
const UPLOAD_FILE = gql`
  mutation uploadFile($file: Upload!) {
    uploadFile(file: $file) {
      url
    }
  }
`;
export default function ImageUploadPage(): JSX.Element {
  const [imgUrl, setImgUrl] = useState<string | undefined>("");
  // const [imgUrl, setImgUrl] = useState(""); //빈문자열 넣는 순간 스트링 타입이라고 추론할 수 있다!
  const [uploadFile] = useMutation<
    Pick<IMutation, "uploadFile">,
    IMutationUploadFileArgs>(UPLOAD_FILE); //타입지정해주기
  // 이미지 업로드 함수
  const onChangeFile = async (
    event: ChangeEvent<HTMLInputElement>
  ): Promise<void> => {
    const file = event.target.files?.[0];
    //배열로 들어오는 이유: <input type="file" multiple /> 일 때, 여러개 드래그 가능
    //배열앞에도 옵셔널 체이닝 가능!
    console.log(file);
    const result = await uploadFile({
      //result에는 백엔드에서 요청하고 받아온 주소가 들어있음.
      variables: { file },
    });
    console.log(result.data?.uploadFile.url); // 잘 들어왔는지 확인하고 아래 img src에 넣어주기! -> state이용
    setImgUrl(result.data?.uploadFile.url ?? "");//파일이 없을 수도 있는데 어떻게 확신해??
    // setImgUrl(result.data?.uploadFile.url ?? "초기이미지"); //위에서 undefined안해줄거면 이렇게 해줘야함!
  };
  return (
    <>
      <input type="file" onChange={onChangeFile} />
      <img src={`https://storage.googleapis.com/${imgUrl}`} />
      {/* 사진요청을 하게 됨 */}
    </>
  );
}
<url 받아오는 과정>
1. input의 onChange를 통해 이미지 파일을 가져와 file에 넣어준다.
2. file을 variables에 넣어 uploadFile mutation을 날려준다.(api요청)
3. 이미지가 정해둔 storage에 들어가고, 해당 스토리지에서 url을 반환 받아 가지고 온다.
4. 콘솔에 받아온 이미지 URL이 찍히는 것을 확인할 수 있다.
❗️해당 url의 이미지를 보고싶다면,
저장해둔 스토리지 주소의 뒤에 이미지 url을 적어준다.
구글컴퓨터 주소 : http://storage.goolgeapis
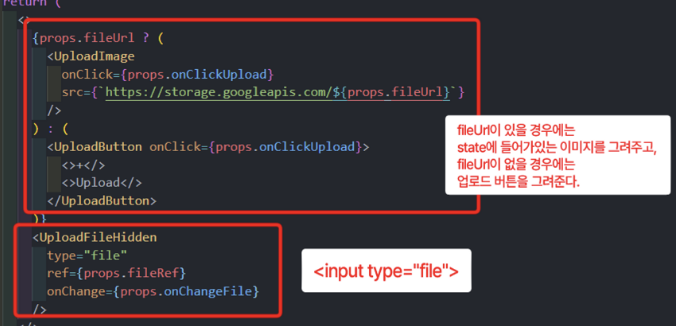
💡 파일 아이콘 변경하기
✔️ useRef 이용하기
: HTML 태그에 접근을 도와주는 역할
import { ChangeEvent, useRef, useState } from "react";
export default function ImageUploadPage(): JSX.Element {
  const [imgUrl, setImgUrl] = useState<string | undefined>("");
  const fileRef = useRef<HTMLInputElement>(null);
  const [uploadFile] = useMutation<
    Pick<IMutation, "uploadFile">,
    IMutationUploadFileArgs>(UPLOAD_FILE);
  //클릭 함수 만들기
  const onClickImg = (): void => {
    fileRef.current?.click(); //있다면 클릭해줘
    // 기존 방식: document.getElementById("파일태그ID")?.click();
  };
  return (
    <>
      <div
        style={{ width: "100px", height: "100px", backgroundColor: "gray" }}
        onClick={onClickImg}

        이미지선택
      </div>
      <input
        style={{ display: "none" }}
        type="file"
        onChange={onChangeFile}
        ref={fileRef}
      />
      <img src={`https://storage.googleapis.com/${imgUrl}`} />
    </>
  );
}
file 타입의 input 태그는 파일 업로드 기능을 가지고 있다.
file은 css적용 안됨 ref사용!
display: none 으로 실제론 존재하나 안보이게 숨겨준다
버튼을 만들고 클릭했을 때 명령어를 줘서
원래 파일선택 그 버튼이 눌려질 수 있도록 유도해줘야 한다.
즉, useRef를 이용해서, 따로 만든 파일 업로드 버튼 요소와 file input을 연결해준다.
fileRef.current?.click();
❗️ label 태그와 htmlFor 사용하기
: 속성에 값을 넣으면 값과 똑같은 id를 찾아 그 태그의 기능과 연결<div> <label htmlFor="fileTag">이거 눌러도 실행돼요!</label> <img style={{ width: '500px' }} id="image" /> <input id="fileTag" type="file" onChange={readImage}></input> </div>
💡 이미지 검증하기
사이즈나 확장자 등이 맞는지 검증이 필요함!
✔️ 이미지 유무와 사이즈 검증하기
- 방법 1) 조건문으로 사진 선택 시 호출되는 함수에서 확장자 추가검증하기
//validationFile.ts로 컴포넌트 분리
export const checkValidationFile = (file?: File): Boolean => {
  if (typeof file === "undefined") {
    alert("파일이 없습니다!");
    return false;
  }
  if (file?.size > 5 * 1024 * 1024) {
    //mb , kb , b
    alert("파일용량이 너무 큽니다.(제한:5MB)");
    return false; //크면 종료 early-exit
  }
  if (!file.type.includes("jpeg") && !file.type.includes("png")) {
    alert("jpeg 또는 png파일만 업로드 가능합니다!");
    return false;
  }
//또는
  // if (file.type.includes("jpeg") || file.type.includes("png")){
  //   const result = await uploadFile({
  //     variables: { file },
  //   });
  // console.log(result.data?.uploadFile.url); // 잘 들어왔는지 확인하고 아래 img src에 넣어주기! -> state이용
  // setImgUrl(result.data?.uploadFile.url ?? "");
  // }
  return true;
};
- 방법 2) 지정하지 않은 확장자의 파일은 선택 불가능하게 하기
//index.tsx
import { checkValidationFile } from "../../../src/commons/libraries/validationFile";
export default function ImageUploadPage(): JSX.Element {
 			.
            .
            .
    const isValid = checkValidationFile(file);
    if (!isValid) return;
			.
            .
  return (
    <>
      <div
        style={{ width: "100px", height: "100px", backgroundColor: "gray" }}
        onClick={onClickImg}

        이미지선택
      </div>
      <input
        style={{ display: "none" }}
        type="file"
        onChange={onChangeFile}
        ref={fileRef}
        accept="image/jpeg,image/png"
      />
      <img src={`https://storage.googleapis.com/${imgUrl}`} />
      {/* 사진요청을 하게 됨 */}
    </>
  );
}
💡 게시판등록방법
import { gql, useMutation } from "@apollo/client";
import { ChangeEvent, useRef, useState } from "react";
import { checkValidationFile } from "../../../src/commons/libraries/validationFile";
import {
  IMutation,
  IMutationUploadFileArgs,
} from "../../../src/commons/types/generated/types";
const 나의그래프큐엘세팅 = gql`
  mutation createBoard($createBoardInput: CreateBoardInput!) {
    createBoard(createBoardInput: $createBoardInput) {
      _id
    }
  }
`;
const UPLOAD_FILE = gql`
  mutation uploadFile($file: Upload!) {
    uploadFile(file: $file) {
      url
    }
  }
`;
export default function ImageUploadPage(): JSX.Element {
  const [imgUrl, setImgUrl] = useState<string | undefined>("");
  const fileRef = useRef<HTMLInputElement>(null);
  const [uploadFile] = useMutation<
    Pick<IMutation, "uploadFile">,
    IMutationUploadFileArgs
(UPLOAD_FILE);
  const onChangeFile = async (
    event: ChangeEvent<HTMLInputElement>
  ): Promise<void> => {
    const file = event.target.files?.[0];
    console.log(file);
    // 이미지 적합성 체크 (Uploads01.validation.ts에서 함수 import)
    const isValid = checkValidationFile(file);
    if (!isValid) return;
    const result = await uploadFile({
      //result에는 주소가 들어있음.
      variables: { file },
    });
    console.log(result.data?.uploadFile.url);
    setImgUrl(result.data?.uploadFile.url ?? "");
  };
  const onClickImg = (): void => {
    fileRef.current?.click(); //있다면 클릭해줘
  };
  //===============================================
  const [writer, setWriter] = useState("");
  const [title, setTitle] = useState("");
  const [contents, setContents] = useState("");
  const [나의함수] = useMutation(나의그래프큐엘세팅);
  const onClickSubmit = async (): Promise<void> => {
    const result = await 나의함수({
      variables: {
        //variables가 $역할을 한다.
        createBoardInput: {
          password: "1234",
          writer,
          title,
          contents,
          images: [imgUrl], //state에 저장된 url(string)을 백엔드에 보내기
        },
      },
    });
    console.log(result);
  };
  function onChangeWriter(event: ChangeEvent<HTMLInputElement>): void {
    setWriter(event.target.value);
  }
  function onChangeTitle(event: ChangeEvent<HTMLInputElement>): void {
    setTitle(event.target.value);
  }
  function onChangeContents(event: ChangeEvent<HTMLInputElement>): void {
    setContents(event.target.value);
  }
  return (
    <>
      <div
        style={{ width: "100px", height: "100px", backgroundColor: "gray" }}
        onClick={onClickImg}>이미지선택
      </div>
      <input
        style={{ display: "none" }}
        type="file"
        onChange={onChangeFile}
        ref={fileRef}
      />
      <img src={`https://storage.googleapis.com/${imgUrl}`} />
      작성자: <input type="text" onChange={onChangeWriter} />
      제목: <input type="text" onChange={onChangeTitle} />
      내용: <input type="text" onChange={onChangeContents} />
      <button onClick={onClickSubmit}>Graphql-API 요청하기</button>
    </>
  );
}
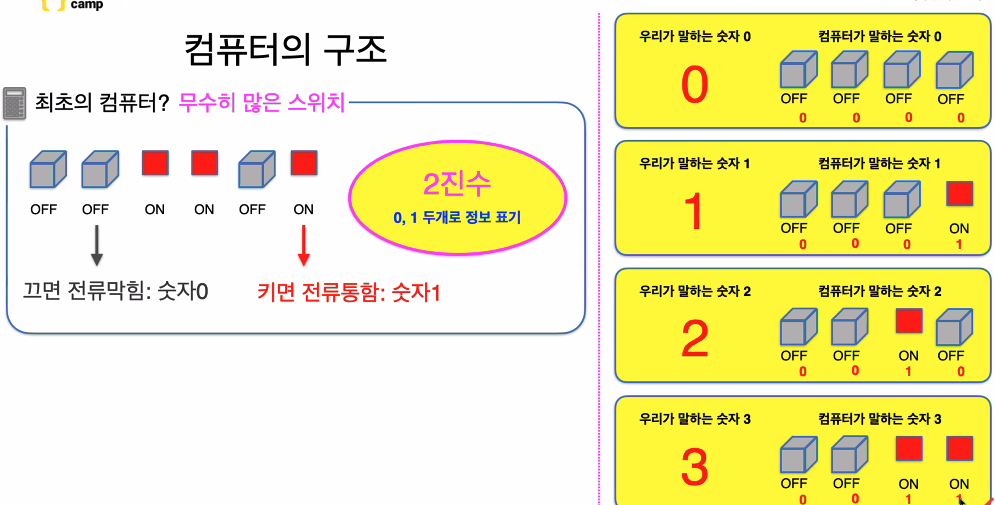
- 컴퓨터의 구조
백엔드부터 클라우드까지 왔다갔다 할 수 있는 과정?
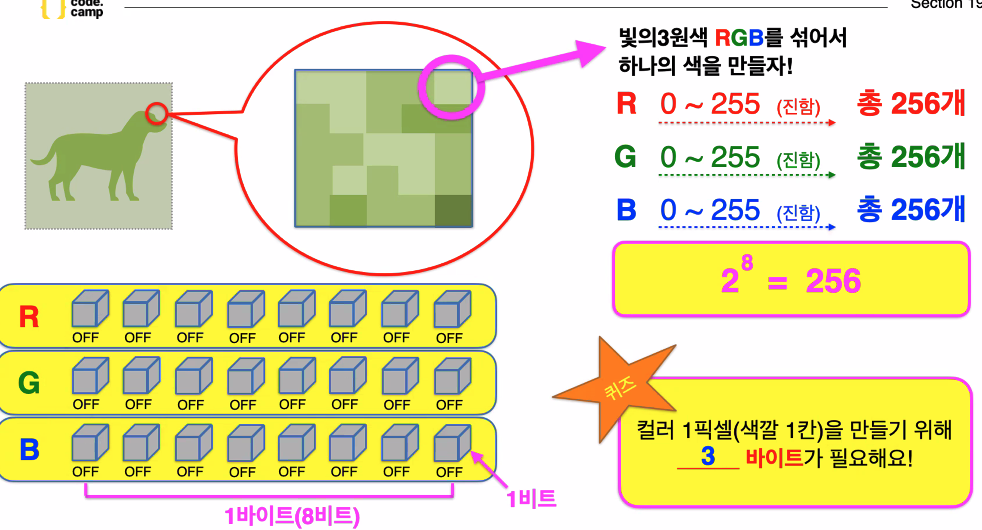
사진의 픽셀 하나하나 rgb를 조합해서 하나의 색을 만드는데
3개의 숫자조합으로 이뤄져 있음!
-> 따라서 용량이 크다.
-> 설치한 라이브러리 버전과 통일시켜줘야함!