수학을 배울 때는 기초 원리부터 개념들을 차곡차곡 쌓아가며 배우지만, 연구나 계측을 위해 수학을 사용할 때는 기초 원리부터 생각하기보다는 그런 개념들을 포장해놓은 계산기나 프로그램들을 사용하듯이, 인공지능을 배울 때도 기본 원리부터 배우지만 실제 적용할 때는 이미 만들어진 모델들을 사용하는 경우가 대부분인 것 같습니다. 아무래도 컴퓨팅 파워와 데이터를 많이 가지고 있는 팀들이 pretraining 시켜놓은 모델들을 사용하는 것이 퍼포먼스가 더 좋을 수 밖에 없기도 하구요. 그래서 인공지능을 다루는 많은 엔지니어들이 모델의 골격을 짜는 일보다는 이미 있는 모델과 야생에 존재하는 데이터 사이에 다리를 놓아주는 역할을 하게 되는 것 같습니다. 심지어 object detection과 같이 유용한 모델들은 사용하기 쉽게 보급형으로 포장되어 나오기 때문에 잘 활용한다면 시간절약도 많이 할 수 있습니다. 그런 맥락에서 YOLOv5 object detection모델을 쓰기 쉽게 해놓은 Ultralytics의 YOLOv5모델을 가져와 추가 데이터를 통해 사용한 예시를 소개하고자 합니다.
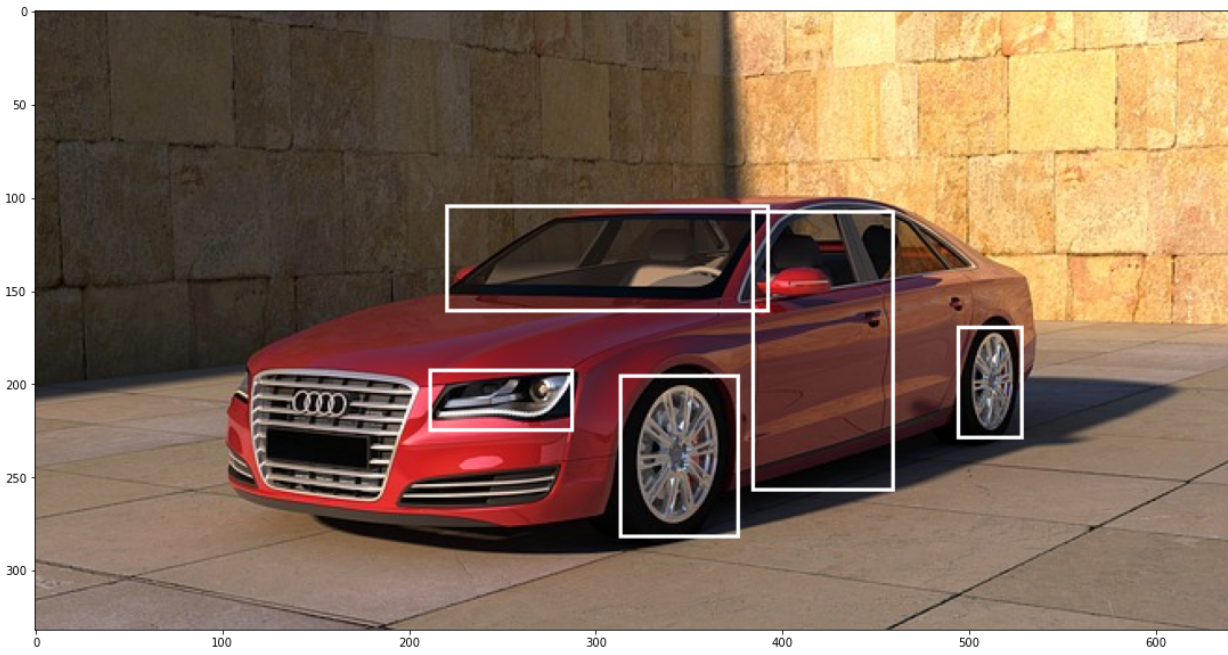
YOLOv5는 COCO dataset으로 트레이닝 되어있기 때문에 이미 car, person, bicycle 등 다양한 물체를 detection할 수 있는데, 이 포스팅에선 새로운 물체를 detection할 수 있도록 YOLOv5모델을 추가 트레이닝 (transfer learning) 해보겠습니다: YOLOv5는 'car' 즉 차 자체는 detection할 수 있지만, 바퀴/문/사이드미러 등 차의 개별 부위를 detection하도록 트레이닝 되어있진 않은데, 이런 차의 개별 부위들을 따로 detection할 수 있도록 하는 것이 목표입니다.
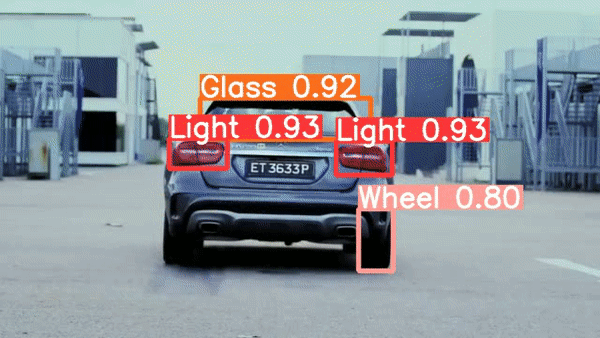
결과물:
 | 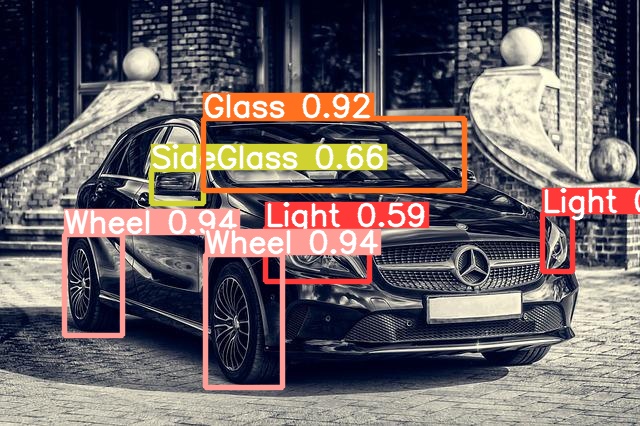 |
|---|
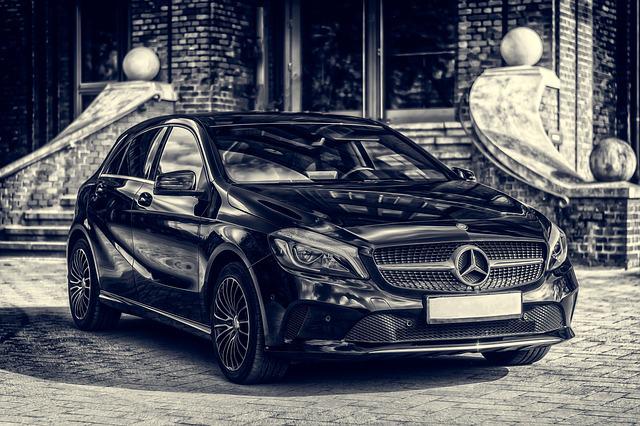
Modified from image by Tama66 under Pixabay License. Mercedes Daimler Automobile - Free photo on Pixabay
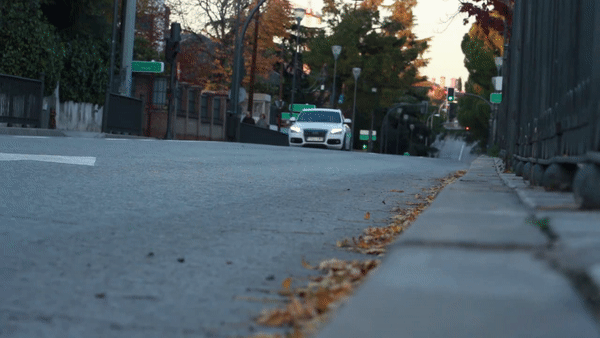

Modification of videos by fernanfazio and Vimeo-Free-Videos respectively under Pixabay license.
Road Car Tire - Free video on Pixabay
Mercedes Glk Car Test - Free video on Pixabay
Ultralytics YOLOv5 모델 가져오기
정말 쉽습니다. Ultralytics의 Github에서 clone해오면 YOLOv5모델과 함께 YOLOv5모델을 추가 트레이닝할 수 있는 코드, detection에 이용할 수 있는 코드까지 가져올 수 있습니다.!git clone https://github.com/ultralytics/yolov5
%cd yolov5/
!pip install -r requirements.txt
!pip install -U roboflow
!wget https://github.com/ultralytics/yolov5/releases/download/v6.0/yolov5s.pt각 명령의 상세 설명은 Ultralytics의 Quick Start - YOLOv5 Documentation (ultralytics.com) 에 더 자세히 나와있습니다.
추가 트레이닝을 위한 데이터
라이트, 바퀴, 문 등 차의 부위를 라벨링 해놓은 데이터는 다음 링크에서 찾을 수 있었습니다:- Car segmentation | Kaggle
- CarPartsDetectionChallenge/Annotations-export.csv at master · bhadreshpsavani/CarPartsDetectionChallenge · GitHub
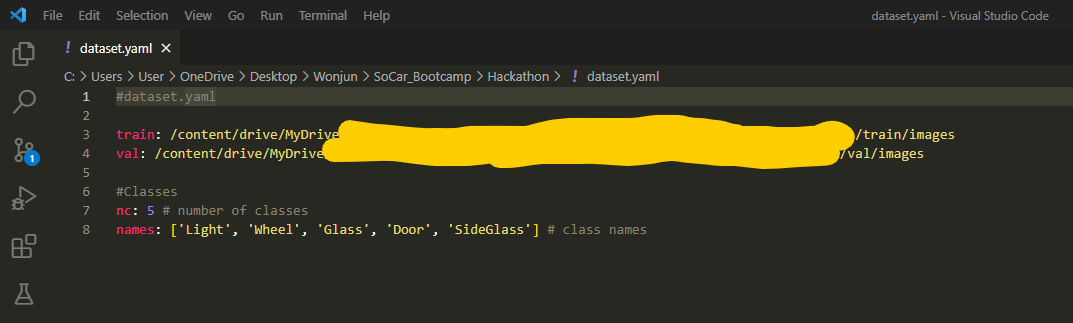
단, YOLOv5를 트레이닝하기 위해선 각 label과 bounding box를 그 박스의 중심점 (x, y), 그리고 그 박스의 넓이(width)와 높이(height)로 표현해주어야 하기 때문에 (Train Custom Data 📌 - YOLOv5 Documentation (ultralytics.com) 참고), YOLOv5 형식으로 데이터를 바꿔주어야 합니다. 저는 Light를 0, Wheel을 1, Glass를 2, Door를 3, SideGlass를 4로 지정하고 다음과 같은 방법으로 json형식으로 되어있는 bhadreshpsavani님의 데이터를 YOLOv5형식의 txt파일로 바꿔주었습니다:
import re
import json
import os
import csv

training_images_folder = os.path.join(os.getcwd(), "CarPartsDetectionChallenge", "Data", "Source_Images", "Training_Images")
jpegs = []
jsons = []
for f in os.listdir(training_images_folder):
    if f[-4:] == ".jpg":
        jpegs.append(f)
    if f[-5:] == ".json":
        jsons.append(f)

def save_as_yolo_format(destination_folder, json_data):
    img_width = json_data['asset']['size']['width']
    img_height = json_data['asset']['size']['height']

    yolov5_format_list = []
    for i in json_data['regions']:
        if i['tags'][0] == 'Light':
            region_num = 0
        if i['tags'][0] == 'Wheel':
            region_num = 1
        if i['tags'][0] == 'Glass':
            region_num = 2
        if i['tags'][0] == 'Door':
            region_num = 3
        if i['tags'][0] == 'SideGlass':
            region_num = 4
        xcentre = (i['boundingBox']['left'] + i['boundingBox']['width']/2)/img_width
        ycentre = (i['boundingBox']['top'] + i['boundingBox']['height']/2)/img_height
        bbox_width = i['boundingBox']['width']/img_width
        bbox_height = i['boundingBox']['height']/img_height
        yolov5_format = [region_num, xcentre, ycentre, bbox_width, bbox_height]
        yolov5_format_list.append(yolov5_format)

    file = open(os.path.join(destination_folder, re.sub(r'[^.]+$', 'txt', json_data['asset']['name'])), 'w', newline='')
    with file:
        write = csv.writer(file, delimiter= ' ')
        write.writerows(yolov5_format_list)

training_images_folder = os.path.join(os.getcwd(), "CarPartsDetectionChallenge", "Data", "Source_Images", "Training_Images")
destination_folder = os.path.join(os.getcwd(), "CarParts_yolov5labels")

for j in jsons:
    with open(os.path.join(training_images_folder, j)) as json_file:
        json_data = json.load(json_file)
    save_as_yolo_format(destination_folder, json_data)
Bounding box들이 제대로 그려지는지는 다음과 같이 확인해볼 수 있습니다:
import json
import csv
import os
from PIL import Image, ImageDraw
import cv2
import matplotlib.pyplot as plt
%matplotlib inline

training_images_folder = os.path.join(os.getcwd(), "CarPartsDetectionChallenge", "Data", "Source_Images", "Training_Images")

img_path = os.path.join(os.getcwd(), "CarPartsDetectionChallenge", "Data", "Source_Images", "Training_Images", "example.jpg")
img = cv2.imread(img_path)
img = cv2.cvtColor(img, cv2.COLOR_BGR2RGB)

draw_img = Image.fromarray(img)
draw = ImageDraw.Draw(draw_img)

img_width = img.shape[1]
img_height = img.shape[0]
print(img_width, img_height)

with open(os.path.join(os.getcwd(), 'CarParts_yolov5labels', 'example.txt')) as f:
    csv_reader = csv.reader(f, delimiter=' ')
    for row in csv_reader:
        xcentre = float(row[1]) * img_width
        ycentre = float(row[2]) * img_height
        bbox_width = float(row[3]) * img_width
        bbox_height = float(row[4]) * img_height
        x0 = xcentre - bbox_width/2
        x1 = xcentre + bbox_width/2
        y0 = ycentre - bbox_height/2
        y1 = ycentre + bbox_height/2

        draw.rectangle([x0, y0, x1, y1], outline='white', width=2)

plt.figure(figsize=(20, 10))
plt.imshow(draw_img)
Output:
Modified from Image by PIRO4D under Pixabay License. Car Vehicle Wheels - Free image on Pixabay.
이렇게 이미지와 각 이미지에 상응하는 label을 담은 txt파일을 training set과 validation set으로 나누어 서로 다른 폴더에 넣고, training set과 validation set이 있는 폴더의 위치를 보여주는 yaml파일을 다음과 같이 만들면 트레이닝을 한 준비가 모두 끝납니다:
YOLOv5 트레이닝과 사용
이제 그냥 Ultralytics YOLOv5 GitHub에서 clone해 온 train.py를 이용하면 됩니다. Train.py 파일을 열어보면 안내가 잘 되어있는데, 플래그들을 이용해 batch size나 epoch 수 등 옵션을 세팅할 수 있습니다. --data 플래그 뒤에는 트레이닝에 사용될 데이터 폴더의 위치 정보를 담고 있는 yaml파일의 위치를 명시해주면 되고, --weights 플래그 뒤에는 트레이닝을 할 모델을 선택해주면 됩니다 (clone한 repo의 yolov5폴더 내에 yolov5s 등 모델이 들어있는데 그 중 하나 선택하시면 됩니다. 단순한 detection 문제는 small 모델인 yolov5s로도 성능이 잘 나오는 것 같습니다):!python train.py --img 640 --batch 8 --epochs 150 --data /content/drive/MyDrive --weights /content/yolov5/yolov5s.pt --nosave --noval --cache트레이닝 된 모델은 자동으로 저장이 yolov5 폴더 내에 저장이 되며, loading하여 사용할 수 있습니다. 이렇게 저장 된 모델을 사용할 땐 detect.py를 이용하면 됩니다. --source 플래그로 적용할 이미지나 영상이 있는 위치를 명시해주고 --weights 플래그로 사용할 모델의 위치를 명시해줍니다:
!python detect.py --source /content/drive/MyDrive/ --weights /content/yolov5/runs/train/exp11/weights/best.ptDetect.py는 이미지 파일들 (jpg, png, tiff 등)과 비디오 파일들 (mp4 등) 모두에 적용가능하니, 파일포멧에 상관없이 위 명령 실행하시면 됩니다. 결과물은 yolov5폴더 내 runs 폴더에 자동으로 저장되어 확인이 가능합니다 :D
마무리
몇 백장의 이미지만 가지고 추가 트레이닝을 했는데도 결과가 굉장히 잘 나오는 것 같습니다. 아마 YOLO모델이 'car'라는 물체에 대해 어느 정도 이미 파악하고 있어서 그런게 아닐까 하는 생각이 드네요. 오늘은 이미 존재하는 라벨들을 가져다 썼지만, 사실 사진 수백장 라벨링하는건 labelimg같은 툴들을 이용한다면 금방할 수 있어서 custom object detection 모델이 필요하다면 하루이틀만에 만들어서 사용할 수도 있을 것 같습니다. 여러 사람들의 노력덕분에 인공지능의 사용성이 이렇게 좋아지고 모두 오픈소스로 공개되어 누구나 사용할 수 있다는게 너무 감사하기도 하고 더 발전의 사이클을 빠르게 하지 않나 싶네요.
Modification of video by Vimeo-Free-Videos under Pixabay license. Mercedes Glk Car Test - Free video on Pixabay
