오늘 인공지능시간에서 배우고 해본것들을 적어보자!
여러가지 명령어 (블러, 캐니, 딜레이션, 에로드
import cv2
import numpy as np
from matplotlib import pyplot as plt
img = cv2.imread('data/lena.jpg')
img = cv2.cvtColor(img, cv2.COLOR_BGR2GRAY)
kernal = np.ones((5,5), np.uint8)
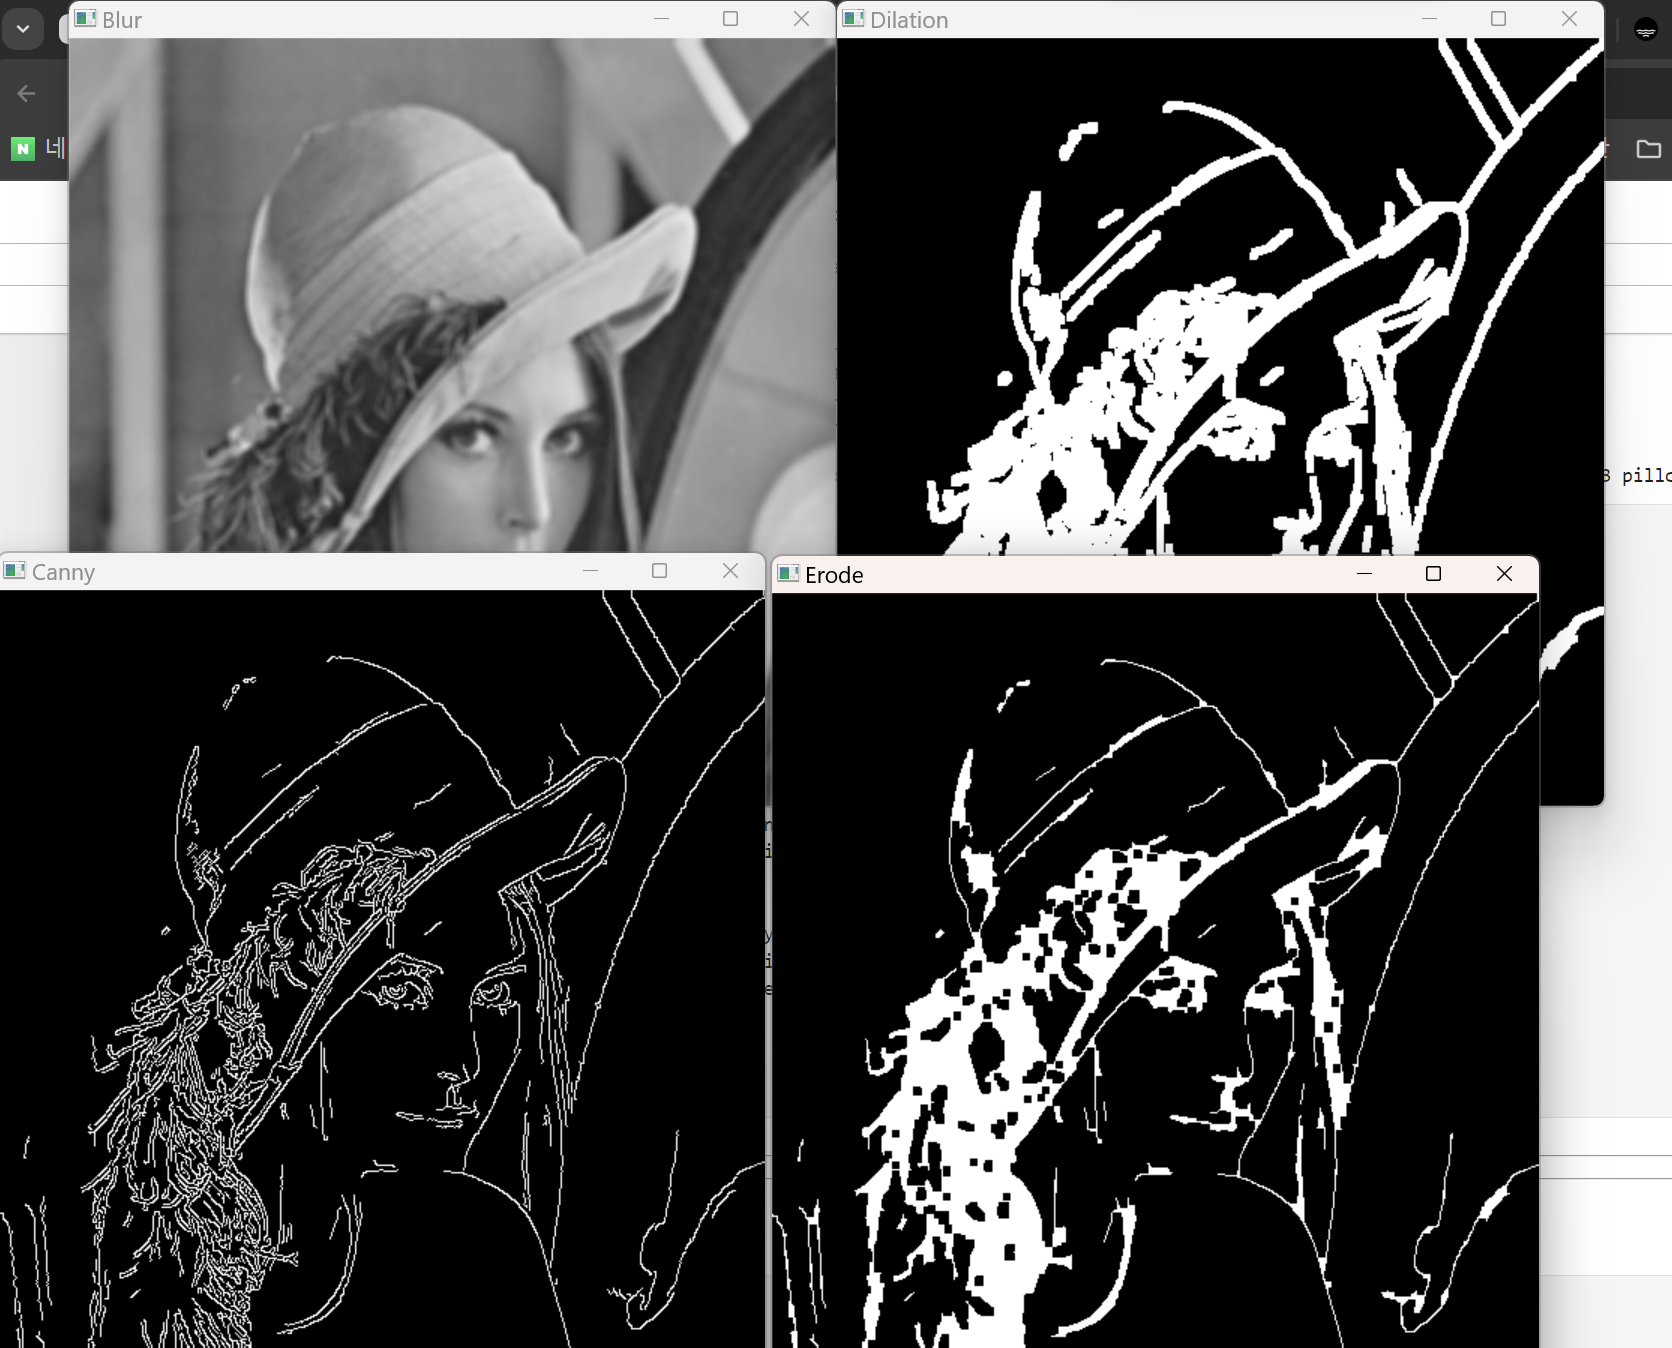
blur = cv2.blur(img, (5, 5))
canny = cv2.Canny(img, 100, 200)
dilation = cv2.dilate(canny, kernal, iterations = 1)
eroded = cv2.erode(dilation, kernal, iterations = 1)
cv2.imshow('Blur', blur)
cv2.imshow('Canny', canny)
cv2.imshow('Dilation', dilation)
cv2.imshow('Erode', eroded)
cv2.waitKey()
cv2.destroyAllWindows()사이즈 바꾸기
import cv2
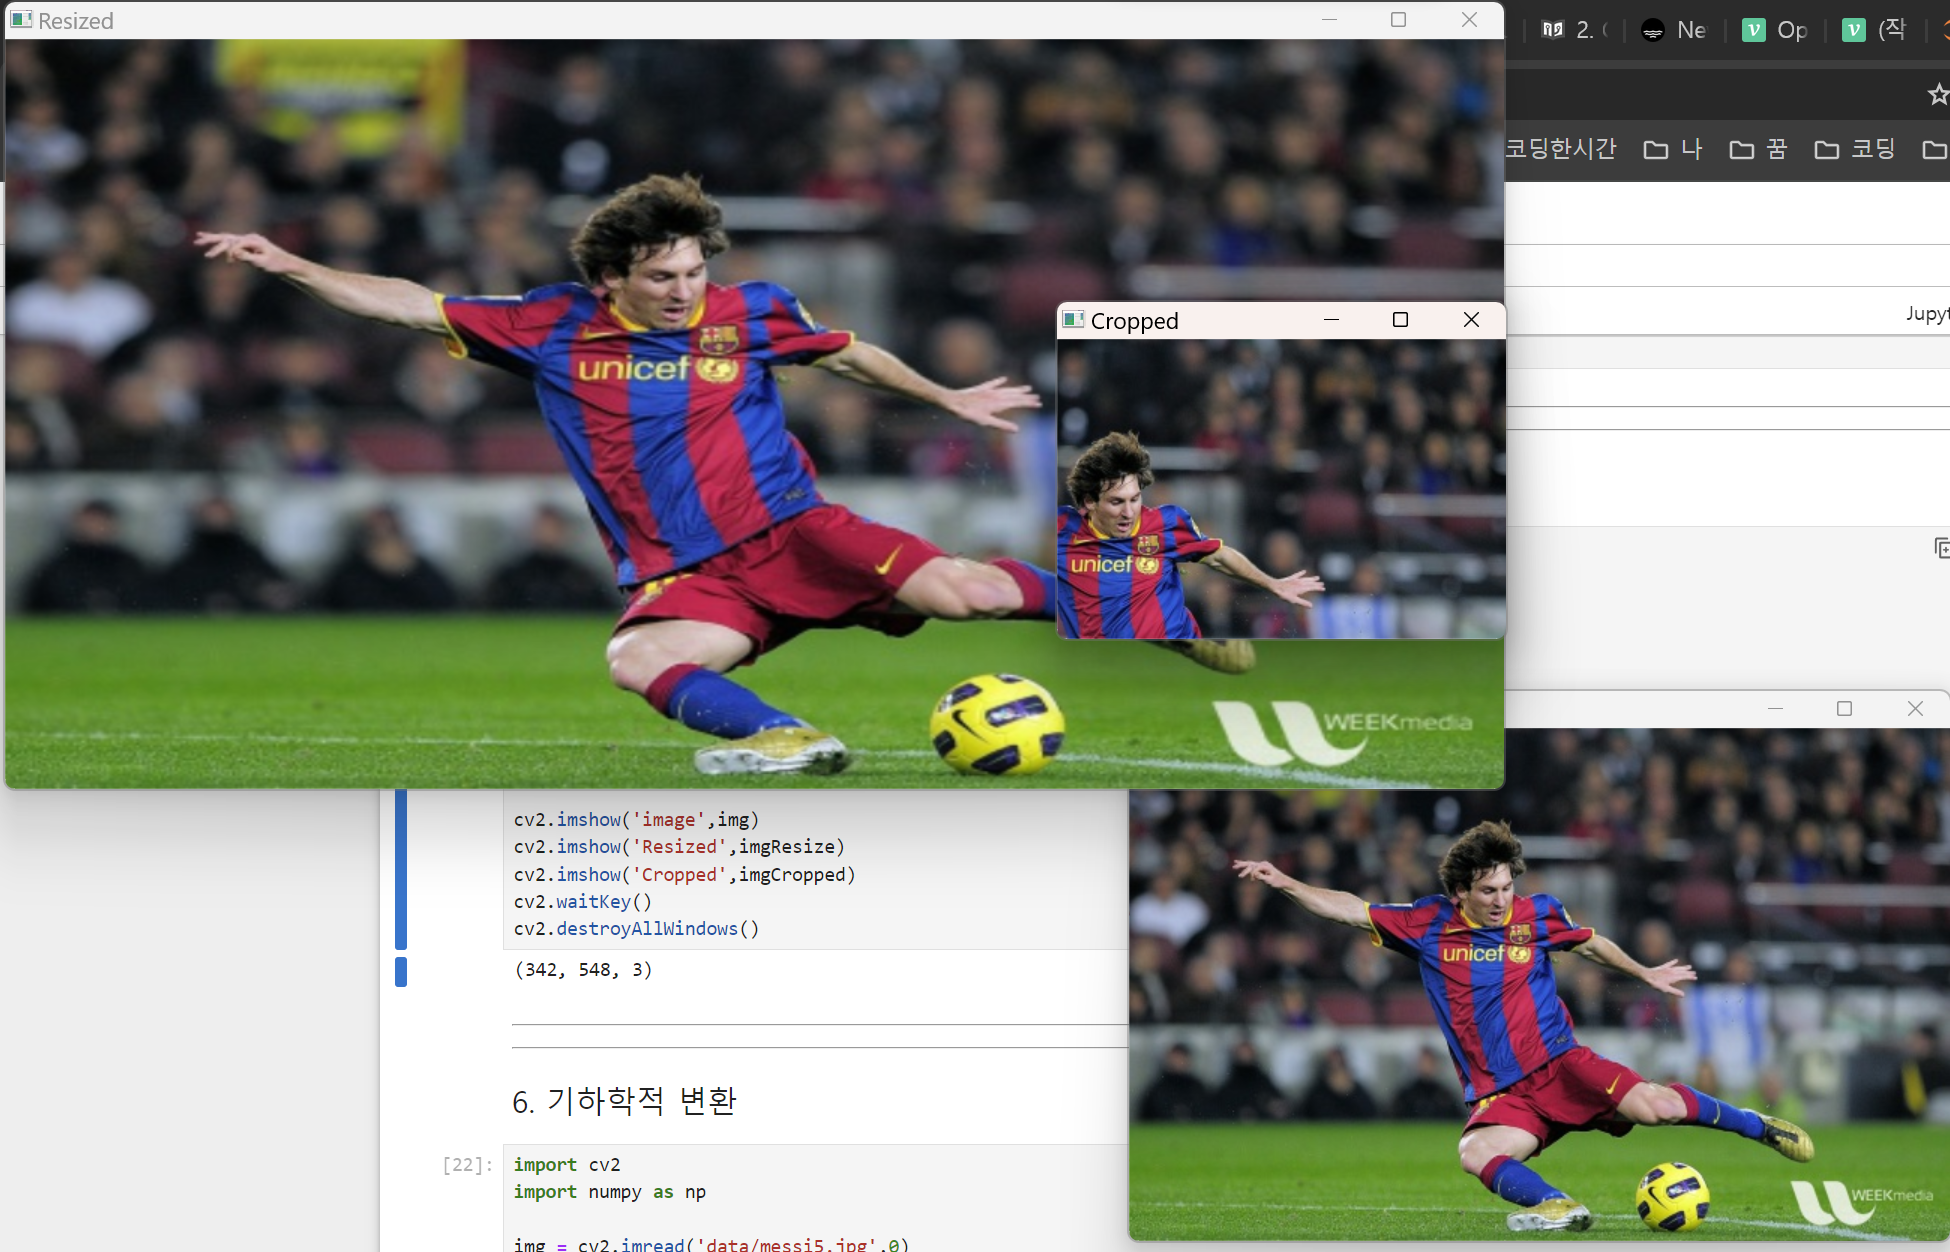
img = cv2.imread('data/messi5.jpg')
print(img.shape)
imgResize = cv2.resize(img, (1000, 500))
imgCropped = img[0:200, 200:500]
cv2.imshow('image',img)
cv2.imshow('Resized',imgResize)
cv2.imshow('Cropped',imgCropped)
cv2.waitKey()
cv2.destroyAllWindows()기하학적 변환
import cv2
import numpy as np
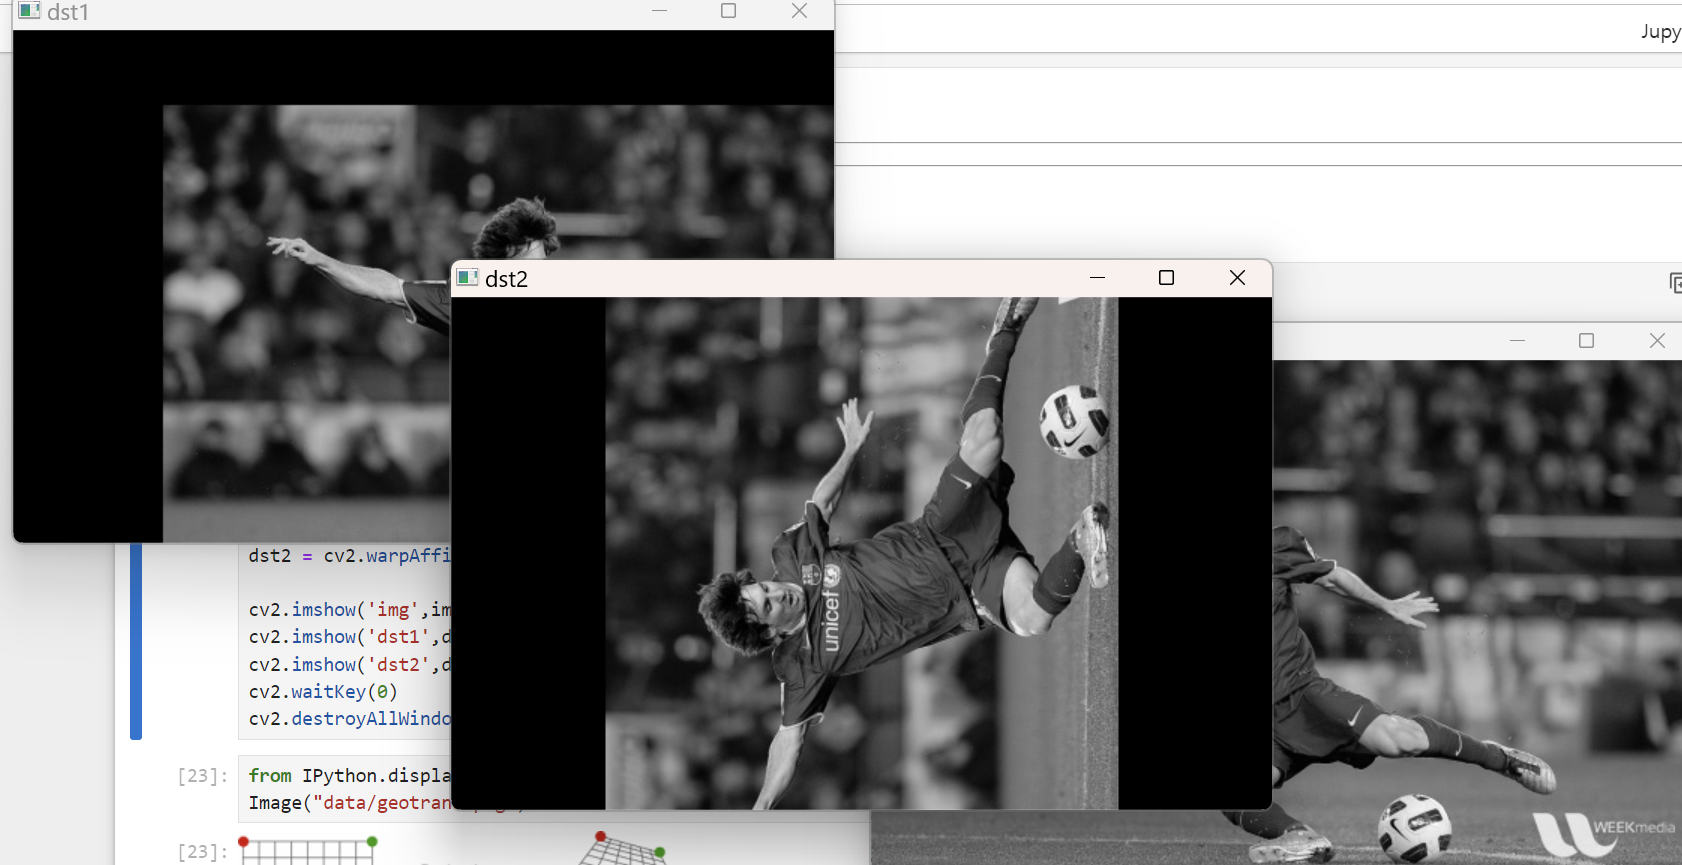
img = cv2.imread('data/messi5.jpg',0)
rows,cols = img.shape
M1 = np.float32([[1,0,100],[0,1,50]])
dst1 = cv2.warpAffine(img,M1,(cols,rows))
M2 = cv2.getRotationMatrix2D((cols/2,rows/2),90,1)
dst2 = cv2.warpAffine(img,M2,(cols,rows))
cv2.imshow('img',img)
cv2.imshow('dst1',dst1)
cv2.imshow('dst2',dst2)
cv2.waitKey(0)
cv2.destroyAllWindows()퀴즈 1
- 내 노트북 찍기
- 내 노트북 사진 열기
- 내 노트북 사진 캐리로 외곽선 따기
- 내 노트북 사진 erode dilation blur 등을 이용해서 외곽선 잘 뜨게 해보기
- 노트북 삐딱한거 affine 써서 직사각형 만들기
내 노트북 찍기
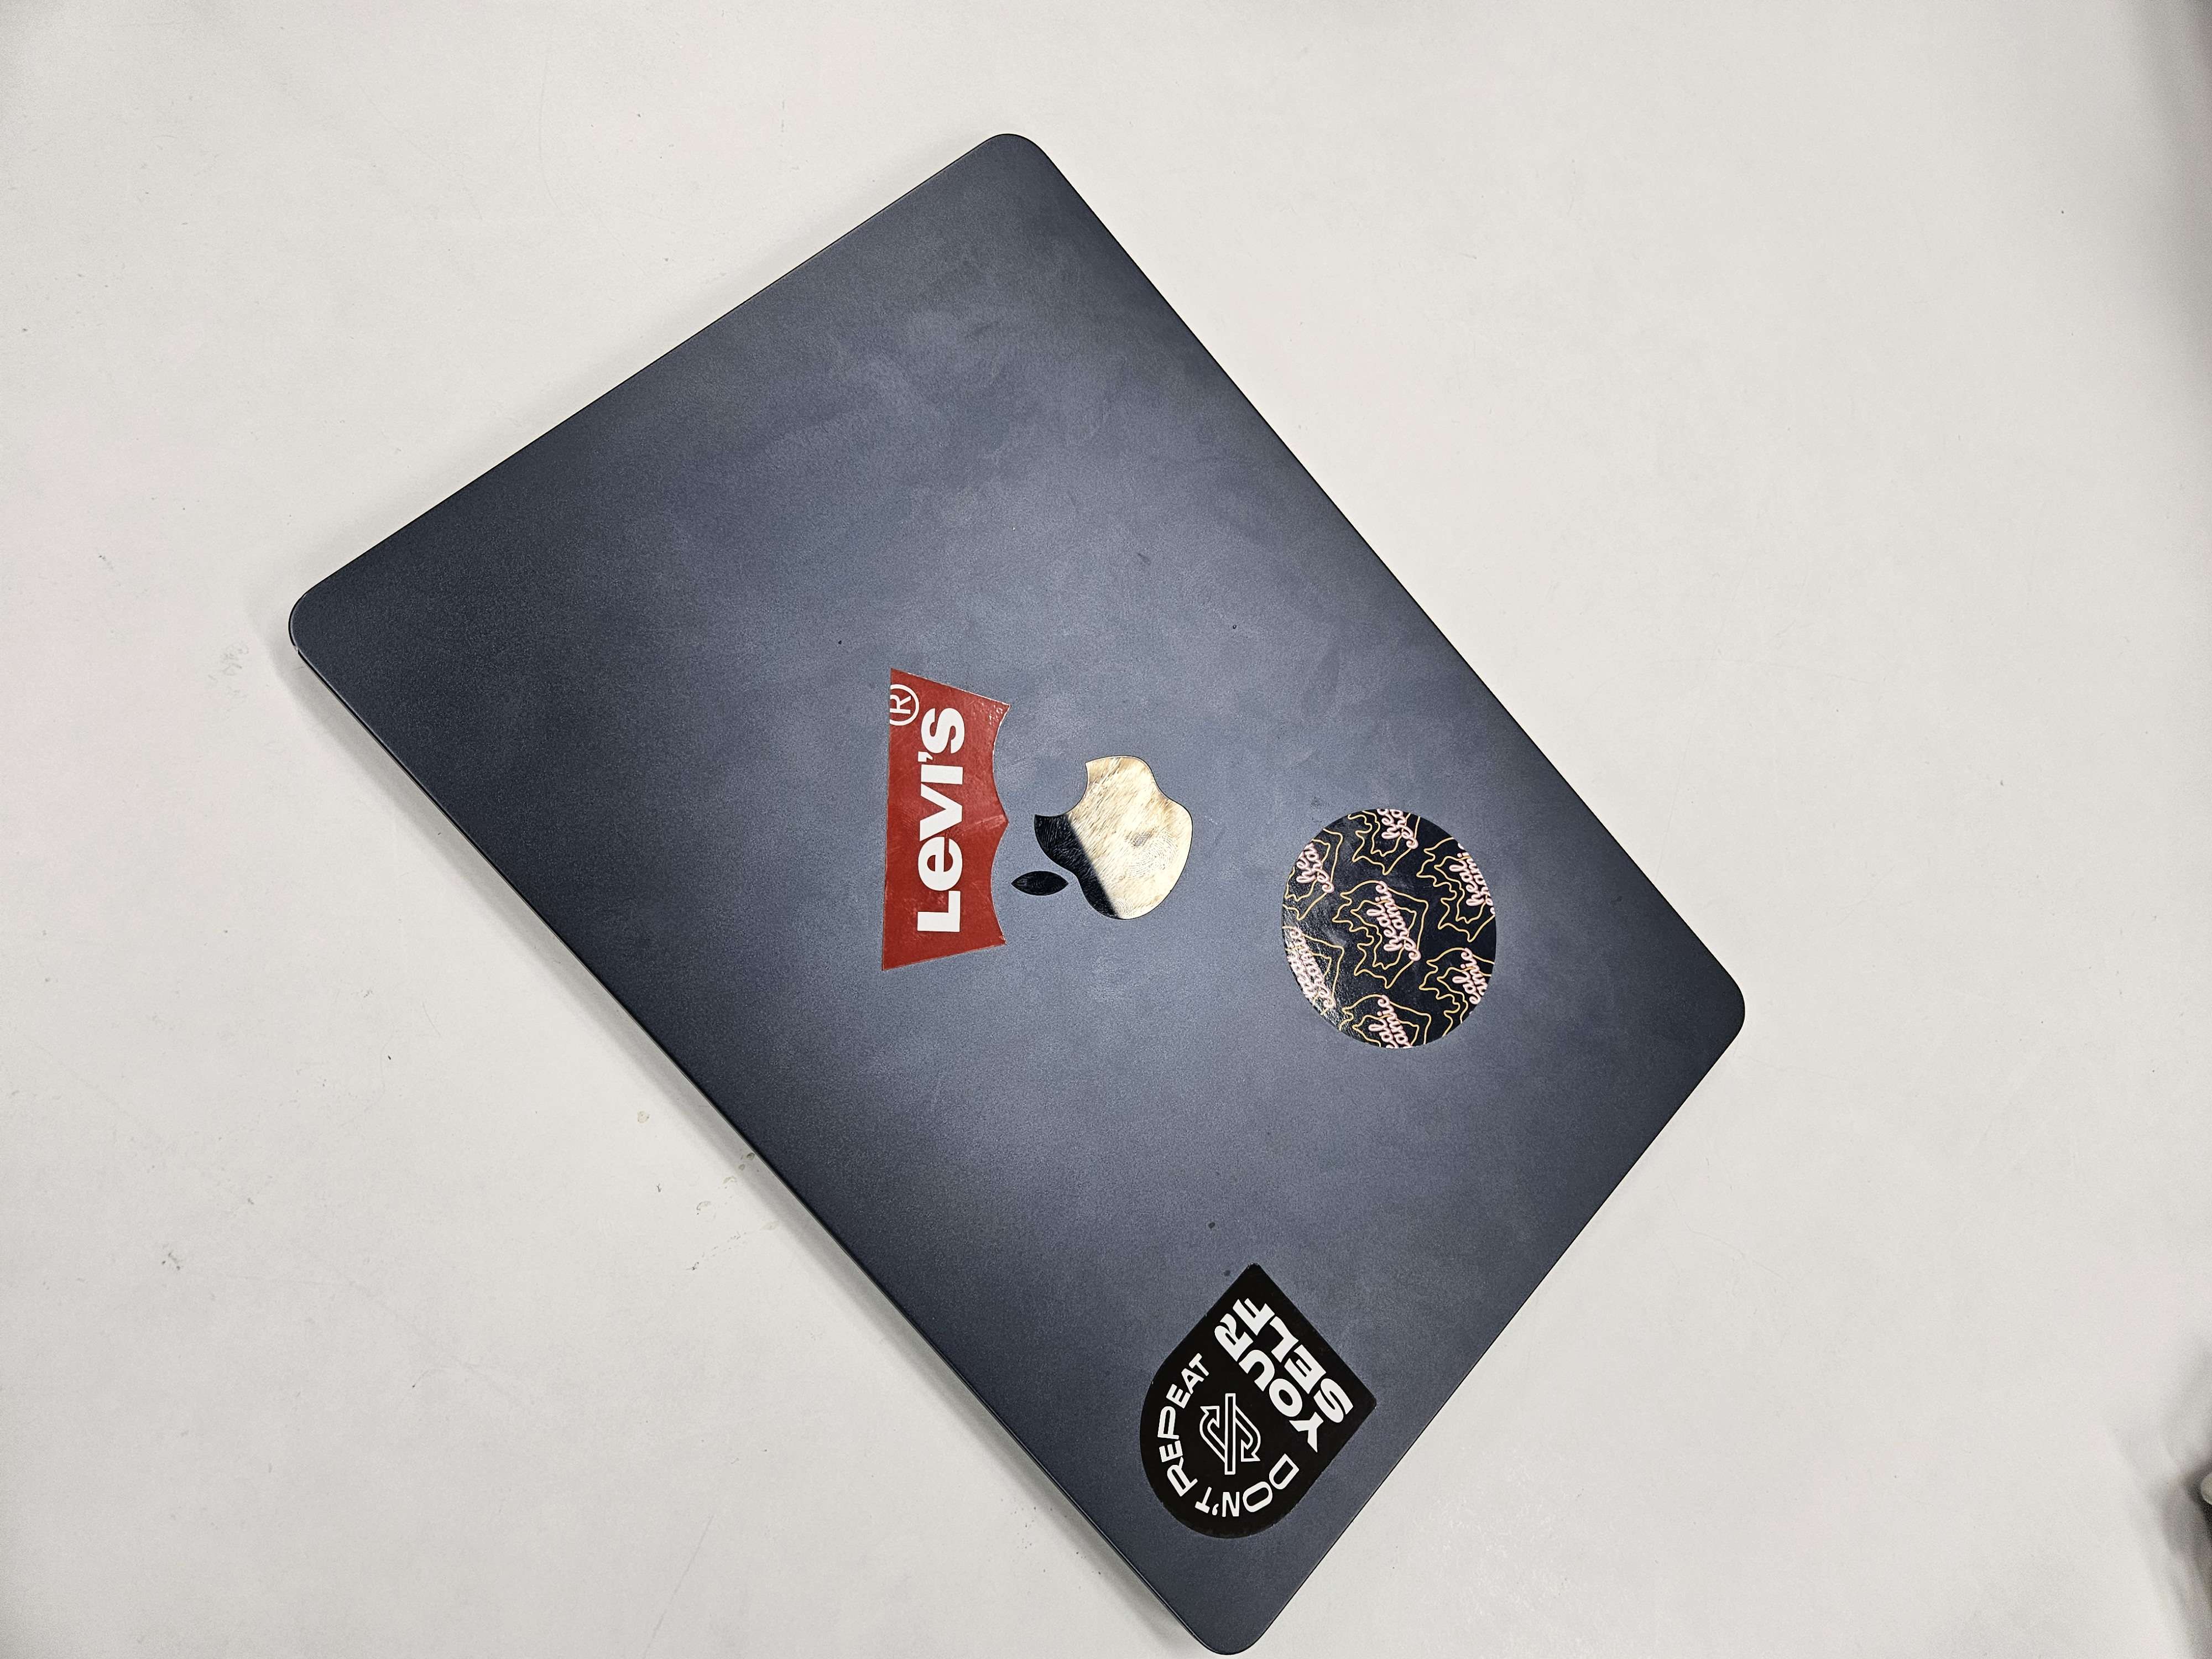
내 노트북은 아니지만 일단 클리어
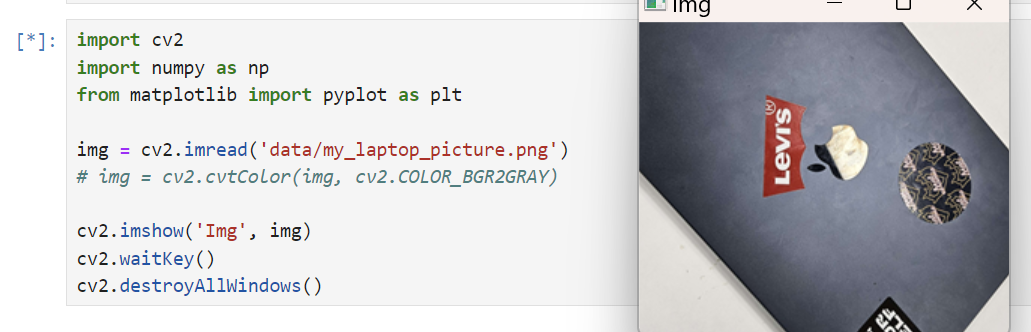
내 노트북 사진 열기
import cv2
import numpy as np
from matplotlib import pyplot as plt

img = cv2.imread('data/my_laptop_picture.png')
# img = cv2.cvtColor(img, cv2.COLOR_BGR2GRAY)

cv2.imshow('Img', img)
cv2.waitKey()
cv2.destroyAllWindows()
OK! 클리어!
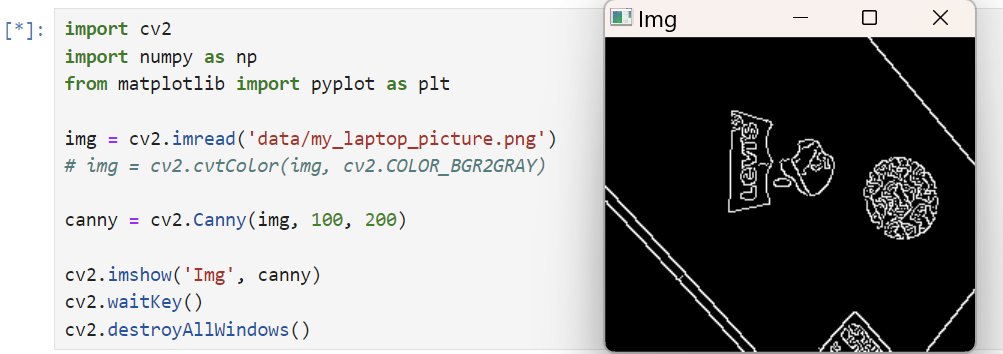
내 노트북 사진 캐리로 외곽선 따기
import cv2
import numpy as np
from matplotlib import pyplot as plt

img = cv2.imread('data/my_laptop_picture.png')
# img = cv2.cvtColor(img, cv2.COLOR_BGR2GRAY)

canny = cv2.Canny(img, 100, 200)

cv2.imshow('Img', canny)
cv2.waitKey()
cv2.destroyAllWindows()
오께잉 굿 !
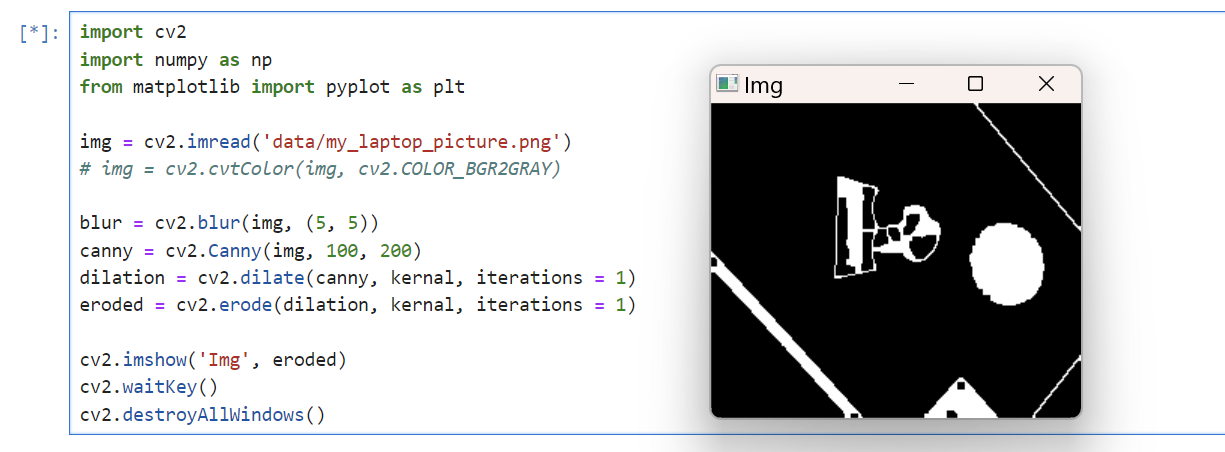
내 노트북 사진 erode dilation blur 등을 이용해서 외곽선 잘 뜨게 해보기
import cv2
import numpy as np
from matplotlib import pyplot as plt

img = cv2.imread('data/my_laptop_picture.png')
# img = cv2.cvtColor(img, cv2.COLOR_BGR2GRAY)

blur = cv2.blur(img, (5, 5))
canny = cv2.Canny(img, 100, 200)
dilation = cv2.dilate(canny, kernal, iterations = 1)
eroded = cv2.erode(dilation, kernal, iterations = 1)

cv2.imshow('Img', eroded)
cv2.waitKey()
cv2.destroyAllWindows()
이게 외각선이 잘 뜬 건가?
노트북 삐딱한거 affine 써서 직사각형 만들기
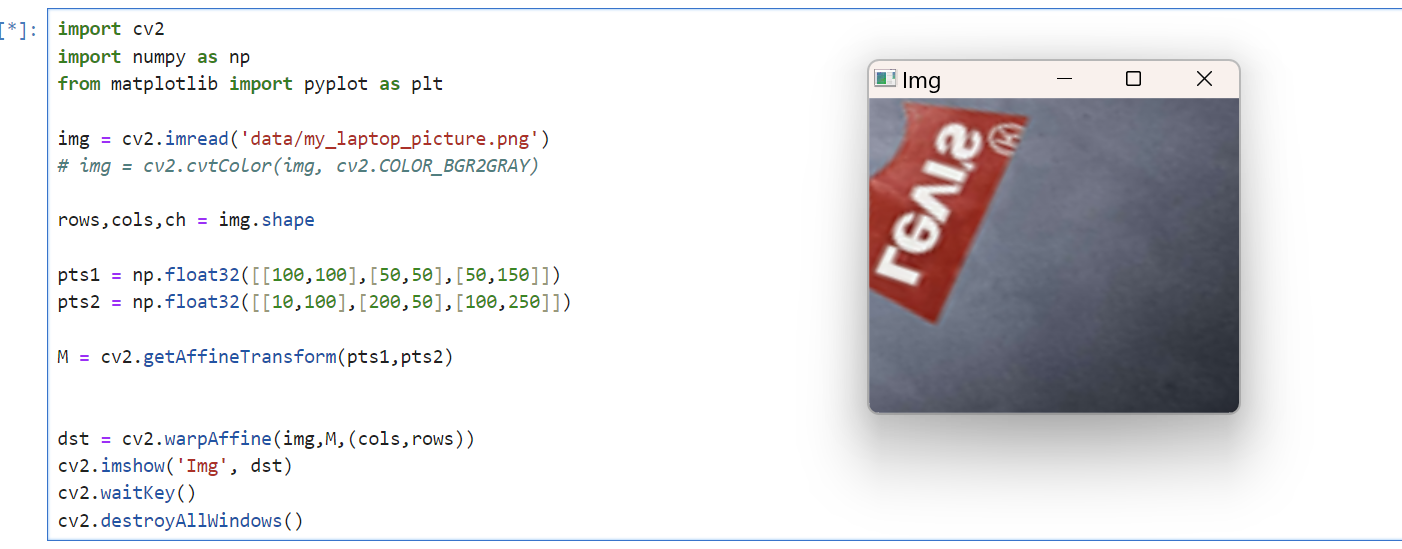
import cv2
import numpy as np
from matplotlib import pyplot as plt

img = cv2.imread('data/my_laptop_picture.png')
# img = cv2.cvtColor(img, cv2.COLOR_BGR2GRAY)

rows,cols,ch = img.shape

pts1 = np.float32([[100,100],[50,50],[50,150]])
pts2 = np.float32([[10,100],[200,50],[100,250]])

M = cv2.getAffineTransform(pts1,pts2)


dst = cv2.warpAffine(img,M,(cols,rows))
cv2.imshow('Img', dst)
cv2.waitKey()
cv2.destroyAllWindows()
gg 솔직히 이거는 어떤식으로 하는지 모르겠어서 대충 아무렇게나 만들었다.
색상 구분

import cv2
import numpy as np

def nothing(x):
    pass

cv2.namedWindow("Tracking")
cv2.createTrackbar("LH", "Tracking", 90, 255, nothing)
cv2.createTrackbar("LS", "Tracking", 125, 255, nothing)
cv2.createTrackbar("LV", "Tracking", 206, 255, nothing)
cv2.createTrackbar("UH", "Tracking", 133, 255, nothing)
cv2.createTrackbar("US", "Tracking", 255, 255, nothing)
cv2.createTrackbar("UV", "Tracking", 255, 255, nothing)

while True:
    frame = cv2.imread('data/smarties.png')

    hsv = cv2.cvtColor(frame, cv2.COLOR_BGR2HSV)

    l_h = cv2.getTrackbarPos("LH", "Tracking")
    l_s = cv2.getTrackbarPos("LS", "Tracking")
    l_v = cv2.getTrackbarPos("LV", "Tracking")

    u_h = cv2.getTrackbarPos("UH", "Tracking")
    u_s = cv2.getTrackbarPos("US", "Tracking")
    u_v = cv2.getTrackbarPos("UV", "Tracking")

    l_b = np.array([l_h, l_s, l_v])
    u_b = np.array([u_h, u_s, u_v])

    mask = cv2.inRange(hsv, l_b, u_b)

    res = cv2.bitwise_and(frame, frame, mask=mask)

    cv2.imshow("frame", frame)
    cv2.imshow("mask", mask)
    cv2.imshow("res", res)

    key = cv2.waitKey(1)
    if key == 27:
        break

cv2.destroyAllWindows()
빨간색만 보이게 하려서 값을 바꿔야 한다.
등고선
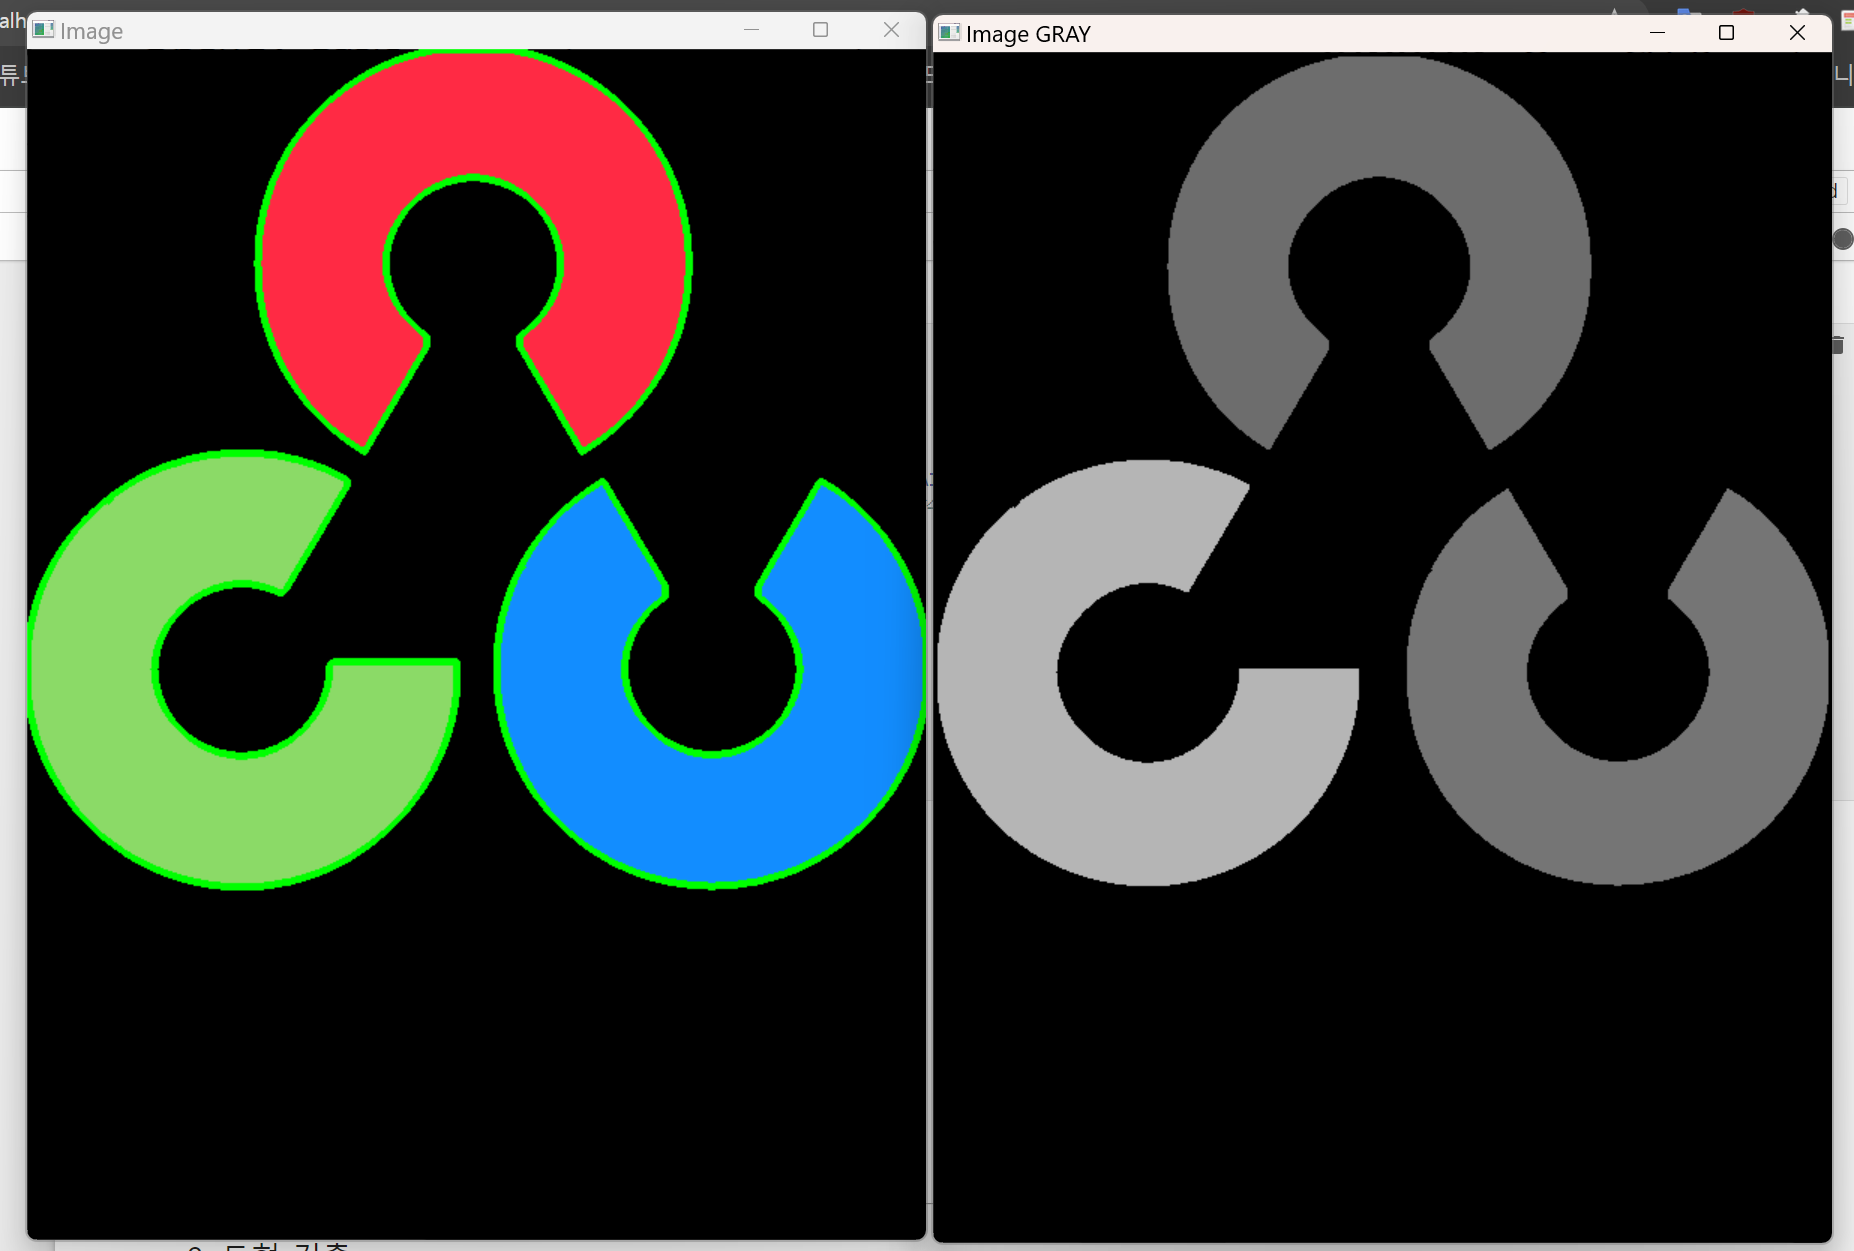
import cv2

img = cv2.imread('data/opencv-logo.png')
imgray = cv2.cvtColor(img, cv2.COLOR_BGR2GRAY)
ret, thresh = cv2.threshold(imgray, 70, 255, 0)
contours, hierarchy = cv2.findContours(thresh, cv2.RETR_TREE, cv2.CHAIN_APPROX_NONE)
#등치선 추출 대상 이미지, 등치선 추출 방식, 등치선 결과에 대한 근사치화 방식
print("Number of contours = " + str(len(contours)))
print(contours[0])

cv2.drawContours(img, contours, -1, (0, 255, 0), 3)
cv2.drawContours(imgray, contours, -1, (0, 255, 0), 3)

cv2.imshow('Image', img)
cv2.imshow('Image GRAY', imgray)
cv2.waitKey(0)
cv2.destroyAllWindows()
도형을 딸 수 있다.
도형 검출
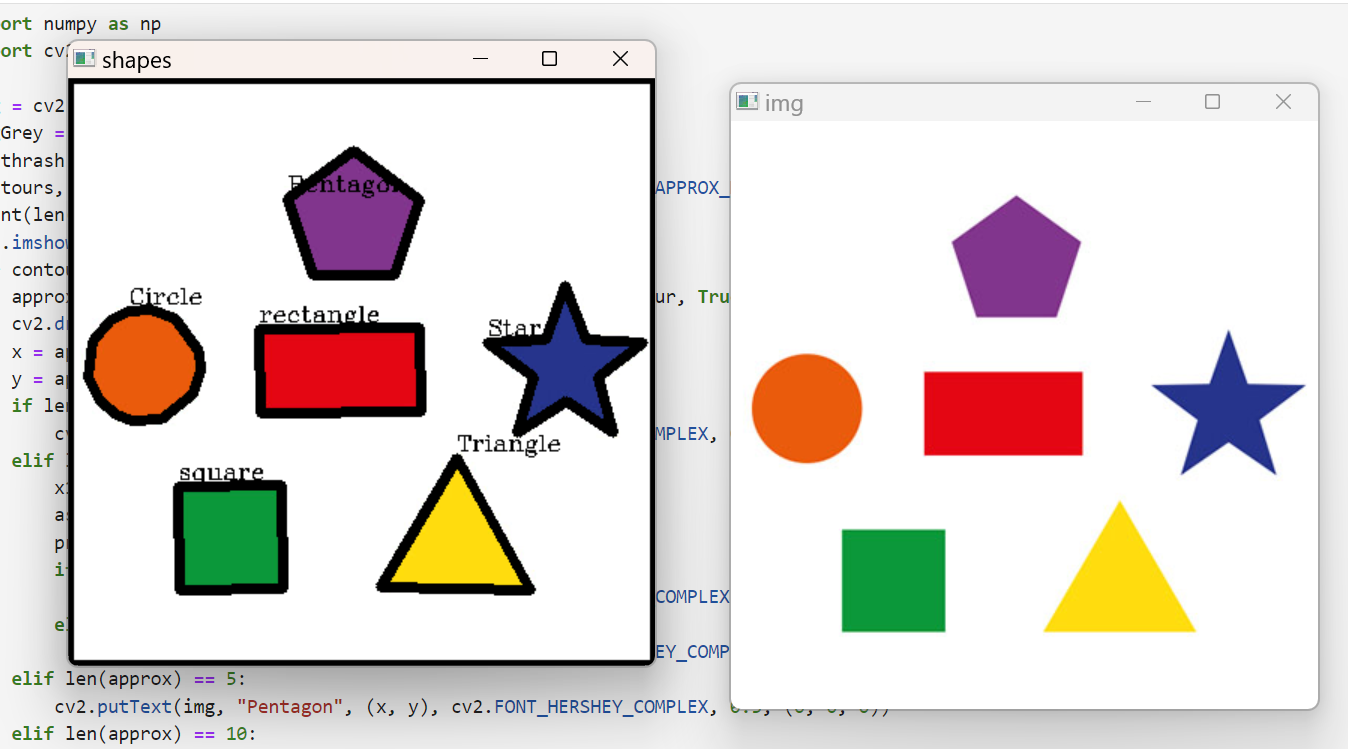
import numpy as np
import cv2

img = cv2.imread('data/shapes.jpg')
imgGrey = cv2.cvtColor(img, cv2.COLOR_BGR2GRAY)
_, thrash = cv2.threshold(imgGrey, 220, 255, cv2.THRESH_BINARY)
contours, _ = cv2.findContours(thrash, cv2.RETR_TREE, cv2.CHAIN_APPROX_NONE)
print(len(contours))
cv2.imshow("img", img)
for contour in contours:
    approx = cv2.approxPolyDP(contour, 0.01* cv2.arcLength(contour, True), True)
    cv2.drawContours(img, [approx], 0, (0, 0, 0), 5)
    x = approx.ravel()[0]
    y = approx.ravel()[1] - 5
    if len(approx) == 3:
        cv2.putText(img, "Triangle", (x, y), cv2.FONT_HERSHEY_COMPLEX, 0.5, (0, 0, 0))
    elif len(approx) == 4:
        x1 ,y1, w, h = cv2.boundingRect(approx)
        aspectRatio = float(w)/h
        print(aspectRatio)
        if aspectRatio >= 0.95 and aspectRatio <= 1.05:
            cv2.putText(img, "square", (x, y), cv2.FONT_HERSHEY_COMPLEX, 0.5, (0, 0, 0))
        else:
            cv2.putText(img, "rectangle", (x, y), cv2.FONT_HERSHEY_COMPLEX, 0.5, (0, 0, 0))
    elif len(approx) == 5:
        cv2.putText(img, "Pentagon", (x, y), cv2.FONT_HERSHEY_COMPLEX, 0.5, (0, 0, 0))
    elif len(approx) == 10:
        cv2.putText(img, "Star", (x, y), cv2.FONT_HERSHEY_COMPLEX, 0.5, (0, 0, 0))
    else:
        cv2.putText(img, "Circle", (x, y), cv2.FONT_HERSHEY_COMPLEX, 0.5, (0, 0, 0))


cv2.imshow("shapes", img)
cv2.waitKey(0)
cv2.destroyAllWindows()
퀴즈 2
- 노트북 사진 contour하기 (등고선)
- 노트북이 무슨 도형에 가까운지 검출 and 근처로 글자 띄우기
노트북 사진 contour하기
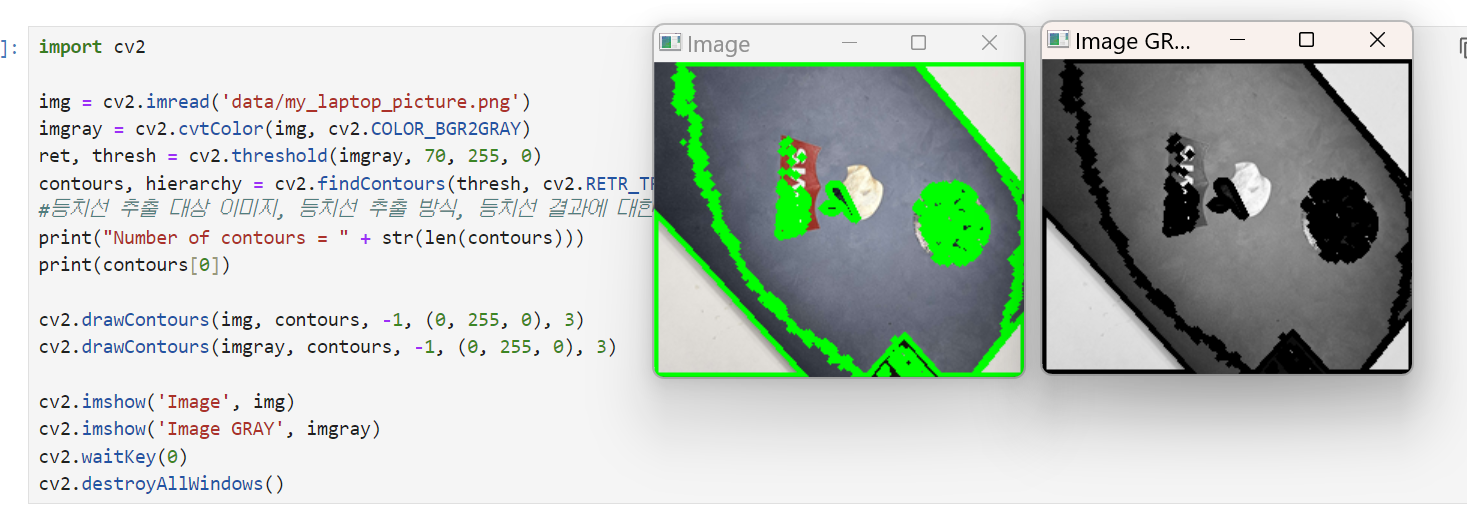
import cv2

img = cv2.imread('data/my_laptop_picture.png')
imgray = cv2.cvtColor(img, cv2.COLOR_BGR2GRAY)
ret, thresh = cv2.threshold(imgray, 70, 255, 0)
contours, hierarchy = cv2.findContours(thresh, cv2.RETR_TREE, cv2.CHAIN_APPROX_NONE)
#등치선 추출 대상 이미지, 등치선 추출 방식, 등치선 결과에 대한 근사치화 방식
print("Number of contours = " + str(len(contours)))
print(contours[0])

cv2.drawContours(img, contours, -1, (0, 255, 0), 3)
cv2.drawContours(imgray, contours, -1, (0, 255, 0), 3)

cv2.imshow('Image', img)
cv2.imshow('Image GRAY', imgray)
cv2.waitKey(0)
cv2.destroyAllWindows()
노트북이 무슨 도형에 가까운지 검출 and 근처로 글자 띄우기
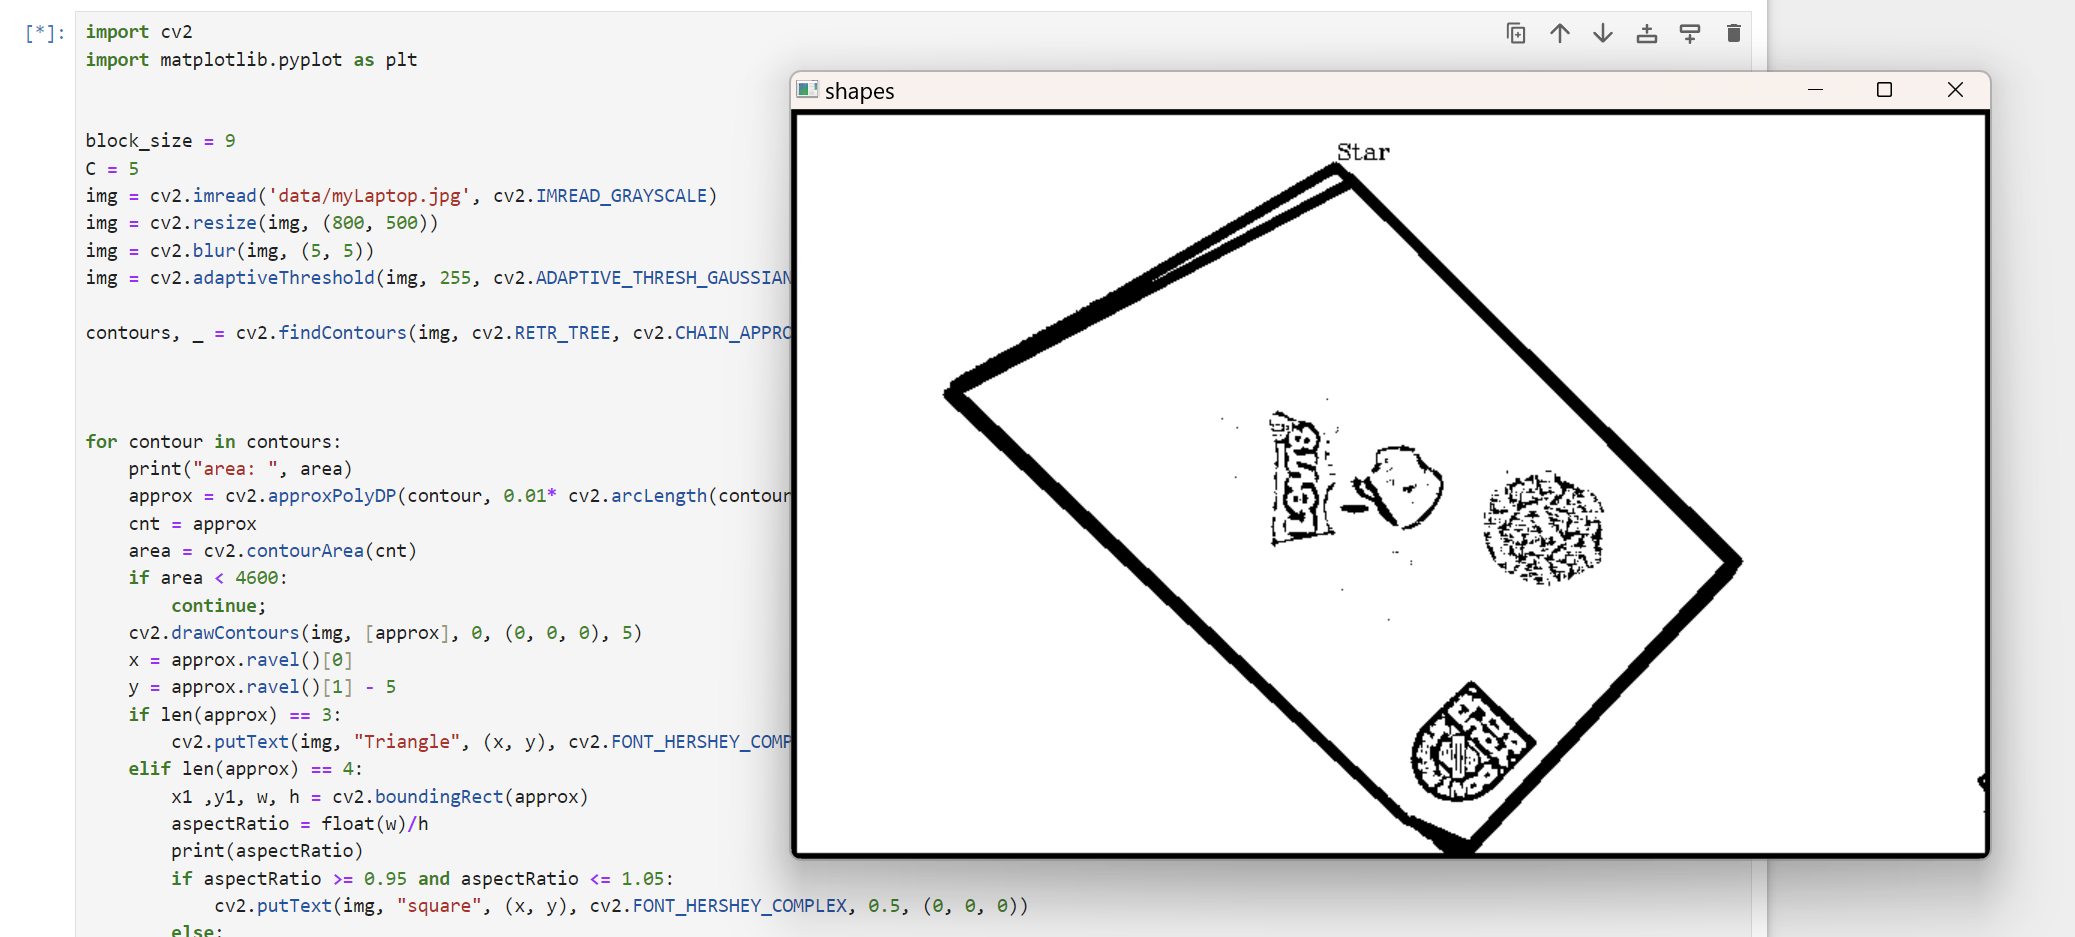
import cv2
import matplotlib.pyplot as plt


block_size = 9
C = 5
img = cv2.imread('data/myLaptop.jpg', cv2.IMREAD_GRAYSCALE)
img = cv2.resize(img, (800, 500))
img = cv2.blur(img, (5, 5))
img = cv2.adaptiveThreshold(img, 255, cv2.ADAPTIVE_THRESH_GAUSSIAN_C, cv2.THRESH_BINARY, block_size, C)

contours, _ = cv2.findContours(img, cv2.RETR_TREE, cv2.CHAIN_APPROX_NONE)


for contour in contours:
    print("area: ", area)
    approx = cv2.approxPolyDP(contour, 0.01* cv2.arcLength(contour, True), True)
    cnt = approx
    area = cv2.contourArea(cnt)
    if area < 4600:
        continue;
    cv2.drawContours(img, [approx], 0, (0, 0, 0), 5)
    x = approx.ravel()[0]
    y = approx.ravel()[1] - 5
    if len(approx) == 3:
        cv2.putText(img, "Triangle", (x, y), cv2.FONT_HERSHEY_COMPLEX, 0.5, (0, 0, 0))
    elif len(approx) == 4:
        x1 ,y1, w, h = cv2.boundingRect(approx)
        aspectRatio = float(w)/h
        print(aspectRatio)
        if aspectRatio >= 0.95 and aspectRatio <= 1.05:
            cv2.putText(img, "square", (x, y), cv2.FONT_HERSHEY_COMPLEX, 0.5, (0, 0, 0))
        else:
            cv2.putText(img, "rectangle", (x, y), cv2.FONT_HERSHEY_COMPLEX, 0.5, (0, 0, 0))
    elif len(approx) == 5:
        cv2.putText(img, "Pentagon", (x, y), cv2.FONT_HERSHEY_COMPLEX, 0.5, (0, 0, 0))
    elif len(approx) == 10:
        cv2.putText(img, "Star", (x, y), cv2.FONT_HERSHEY_COMPLEX, 0.5, (0, 0, 0))
    else:
        cv2.putText(img, "Circle", (x, y), cv2.FONT_HERSHEY_COMPLEX, 0.5, (0, 0, 0))

cv2.imshow("shapes", img)
cv2.waitKey(0)
cv2.destroyAllWindows()
어우 쫌 무섭지만 생각보다 잘 작동하는 것 같다.
얼굴 검출
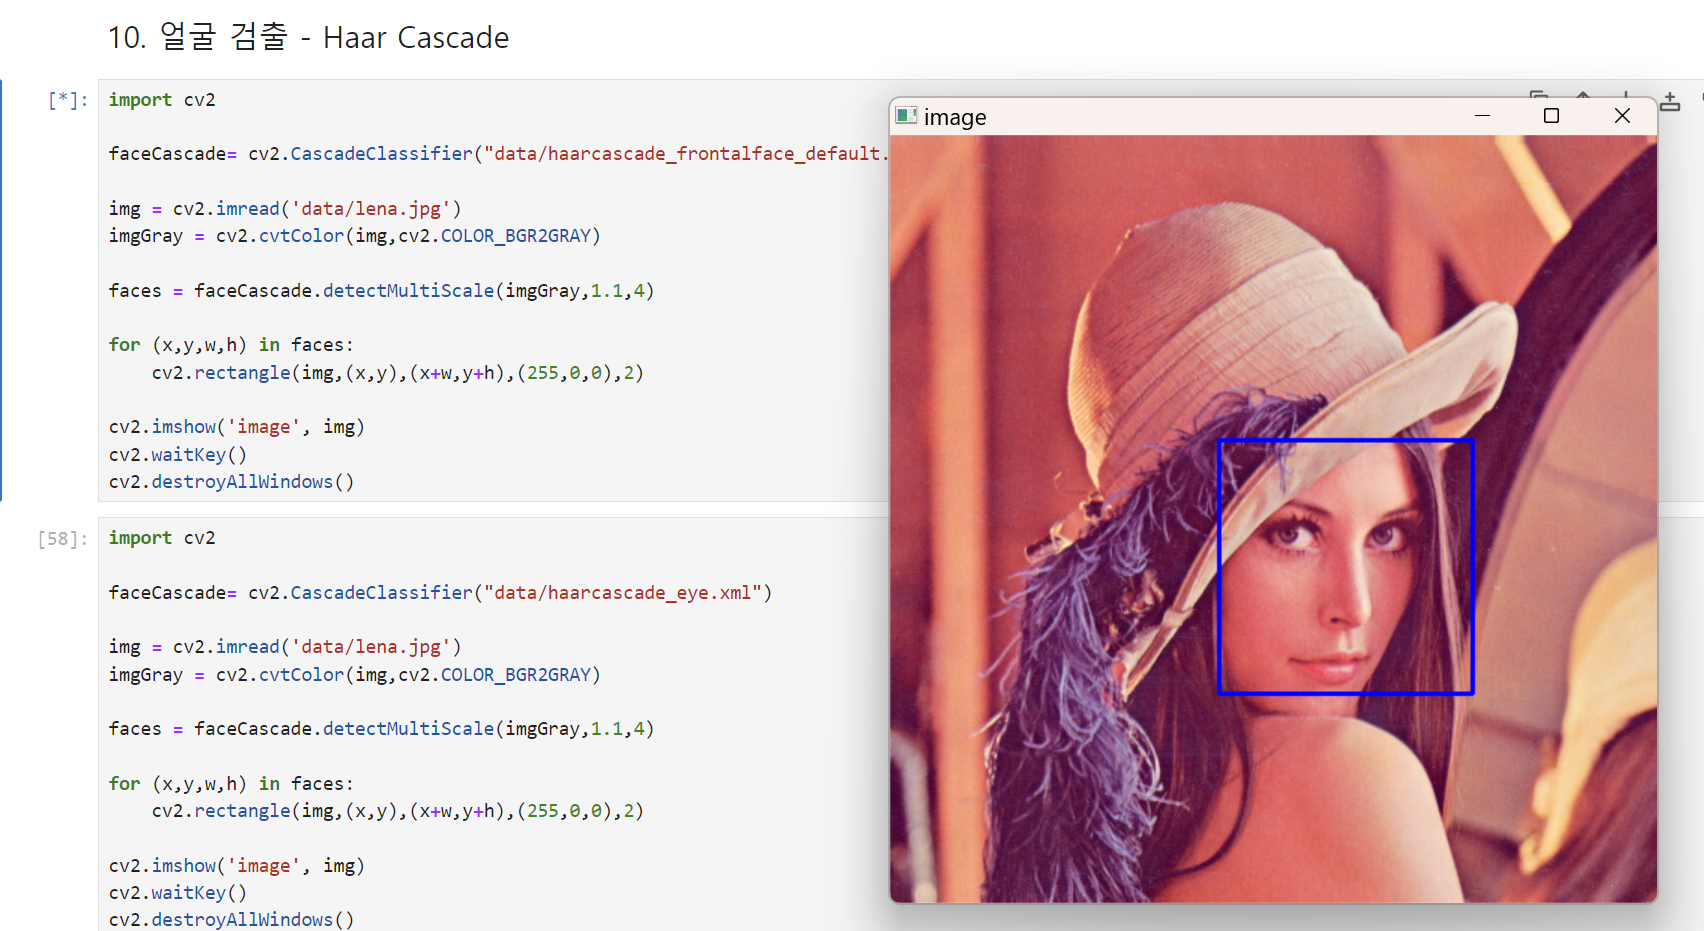
import cv2
faceCascade= cv2.CascadeClassifier("data/haarcascade_frontalface_default.xml")
img = cv2.imread('data/lena.jpg')
imgGray = cv2.cvtColor(img,cv2.COLOR_BGR2GRAY)
faces = faceCascade.detectMultiScale(imgGray,1.1,4)
for (x,y,w,h) in faces:
cv2.rectangle(img,(x,y),(x+w,y+h),(255,0,0),2)
cv2.imshow('image', img)
cv2.waitKey()
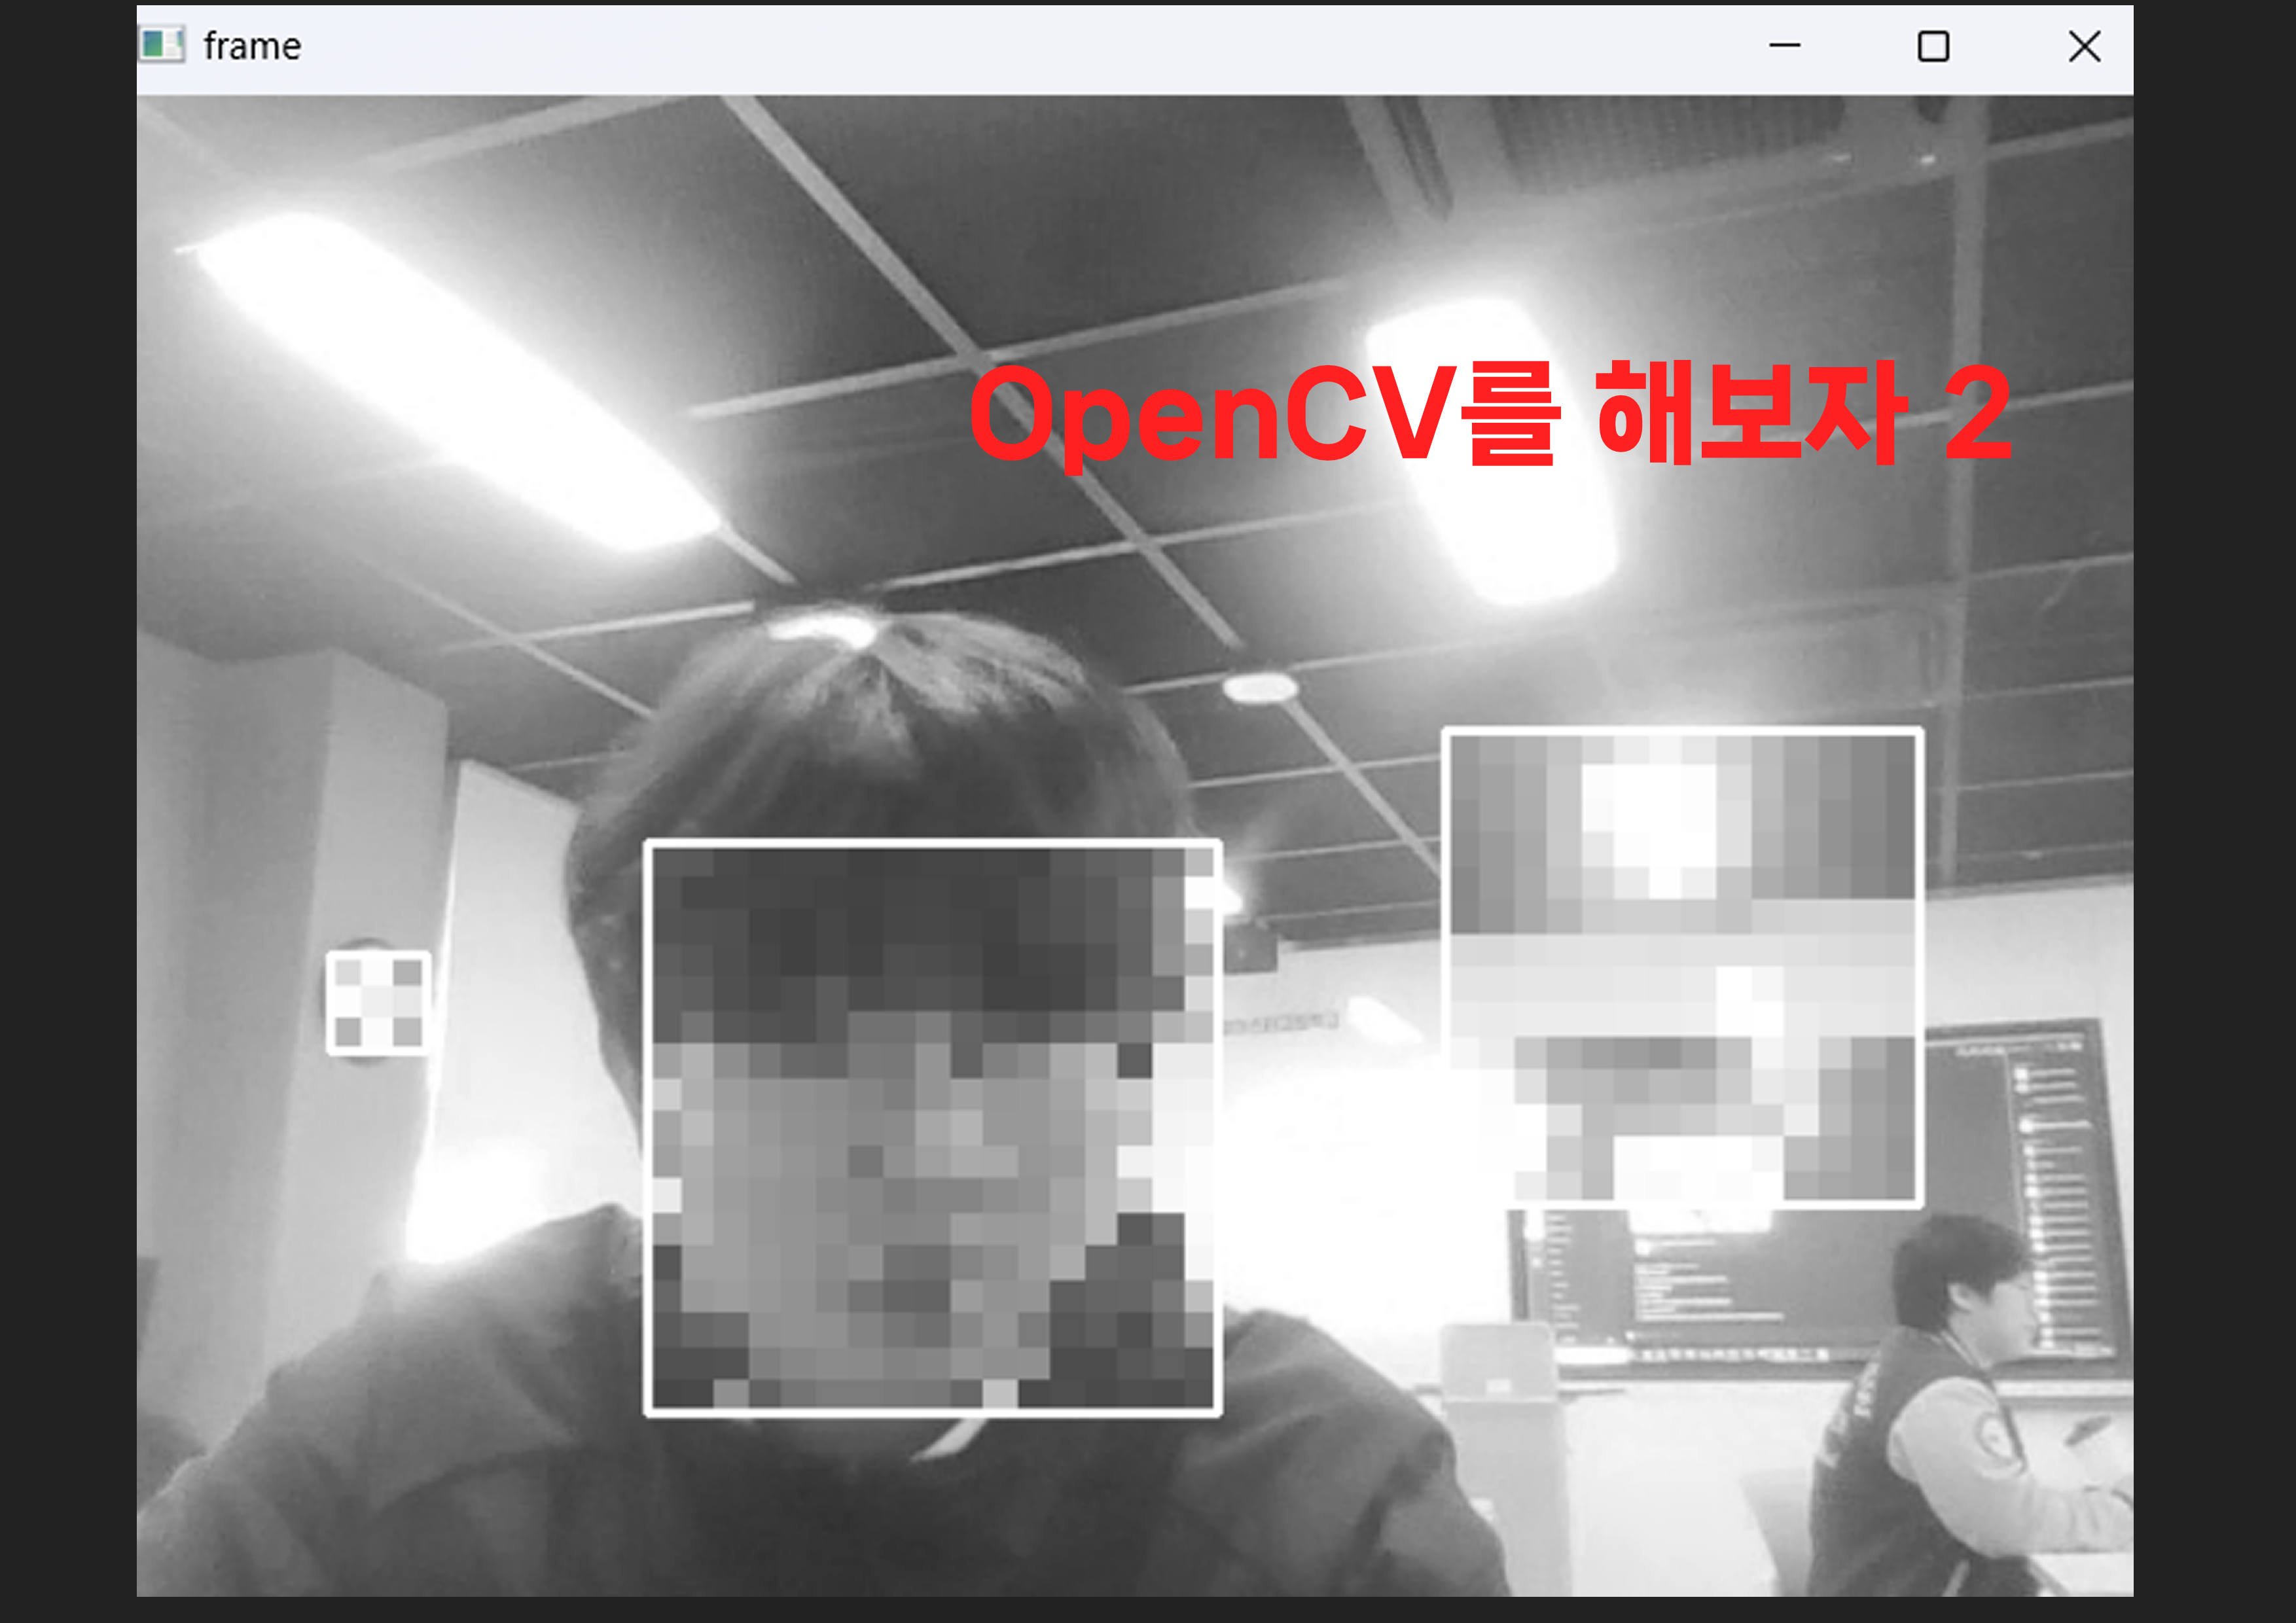
cv2.destroyAllWindows()내 얼굴 모자이크
화려하게 모자이크에 성공한 모습
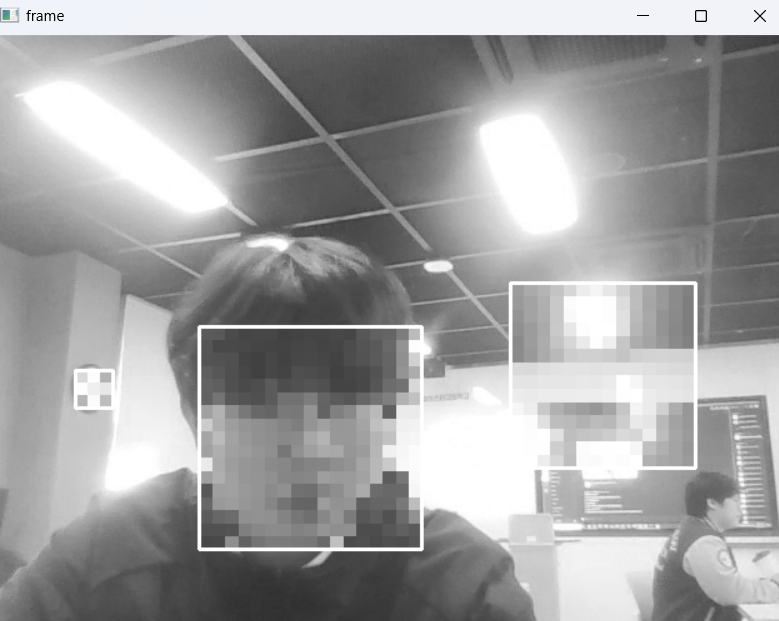
import cv2

faceCascade = cv2.CascadeClassifier("data/haarcascade_frontalface_default.xml")

cap = cv2.VideoCapture(0) # 인덱스번호로 연결된 소스를 객체로 선언 (웹캠 0번) (웹캠아니면 비디오 소스 넣기)
print(cap.isOpened()) # 소스가 열리는지 확인
while(cap.isOpened()): # 소스가 열리는 동안
    ret, frame = cap.read() # 소스로부터 이미지 객체 추출, ret: 성공여부 frame: 이미지 객체
    frame = cv2.cvtColor(frame, cv2.COLOR_BGR2GRAY)
    faces = faceCascade.detectMultiScale(frame,1.1,4)
    for (x,y,w,h) in faces:
        roi = img[y:y+h, x:x+w]
        factor = 10
        small_roi = cv2.resize(roi, (w//factor, h//factor))
        mosaic_roi = cv2.resize(small_roi, (w,h), interpolation=cv2.INTER_NEAREST)
        frame[y:y+h, x:x+w] = mosaic_roi
        cv2.rectangle(frame,(x,y),(x+w,y+h),(255,0,0),2)
    # frame = cv2.cvtColor(frame, cv2.COLOR_BGR2GRAY)
    if ret : # 성공했다면
        cv2.imshow('frame', frame) # 이미지객체를 frame이라는 윈도우 출력

        if cv2.waitKey(1) & 0xFF == ord('q'): # Q키를 누르면 break
            break
    else: # 소스에서부터 이미지 불러오는 것이 실패했다면
        break # 탈출
cap.release() # 소스초기화
cv2.destroyAllWindows() # 윈도우창 종료
마무리
오늘은 인공지능시간에 드디어 얼굴 모자이크같은 AI같은걸 해보았다.

고3, 프론트엔드