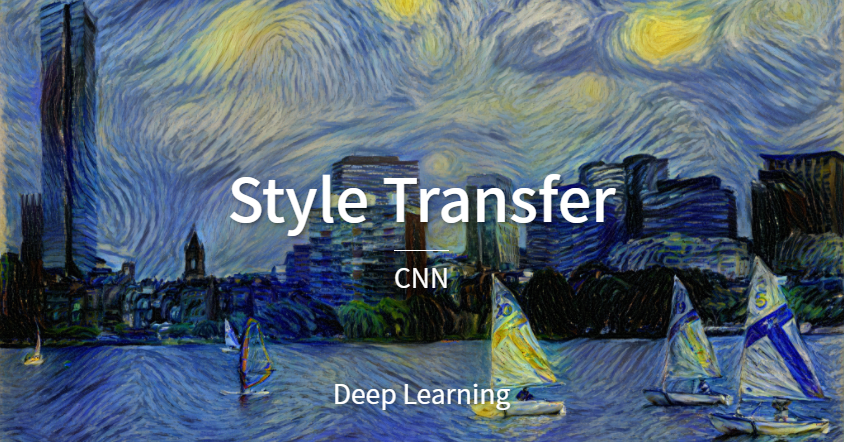
Introduction
딥러닝 스터디에서 진행하는 한 책이 끝나고 자유주제 발표를 위해 어떤 주제로 할까 찾아보다가, 책 뒷편에 있는 "화풍 변환"을 보고 논문을 읽고 이를 구현해보려 한다.
참고 논문 : A Nural Algorithm of artistic Style (2015. 08)
참고 코드 : Dongbin Na github code
image Reconstrction
- 이미지를 최적화(optimization)한다는 것은 특정 손실 값을 낮추는 방향으로 이미지를 업데이트 하는 것을 의미한다.
- MSE 손실(loss)를 이용해 임의의 노이즈(noise)를 특정한 이미지로 변환
# 목표 이미지(target image) 불러오기

loss = nn.MSELoss() # loss함수 설정
iters = 100 # 반복(iteration) 설정
lr = 1e4

print("[ Start ]")
imshow(noise)

for i in range(iters):
    # required_grad 속성의 값을 True로 설정하여 해당 torch.Tensor의 연산을 추적
    noise.requires_grad = True

    # 손실 함수에 대하여 미분하여 기울기(gradient) 계산
    output = loss(noise, target_image)
    output.backward()

    # 계산된 기울기(gradient)를 이용하여 손실 함수가 감소하는 방향으로 업데이트
    gradient = lr * noise.grad
    # 결과적으로 노이즈(perturbation)의 각 픽셀의 값이 [-eps, eps] 사이의 값이 되도록 자르기
    noise = torch.clamp(noise - gradient, min=0, max=1).detach_()

    if (i + 1) % 10 == 0:
        print(f'[ Step: {i + 1} ]')
        print(f'Loss: {output}')
        imshow(noise)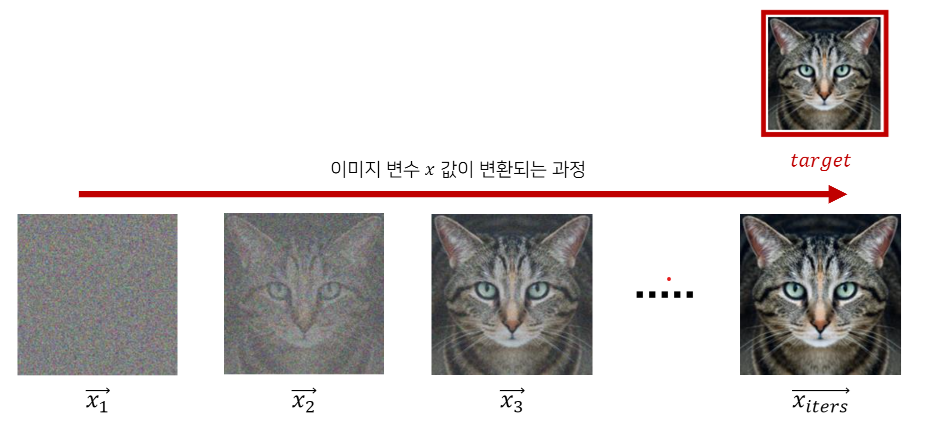
CNN 네트워크 불러오기
- 특징 추출기로 VGG 네트워크 사용
# 뉴럴 네트워크 모델을 불러옵니다.
cnn = models.vgg19(pretrained=True).features.to(device).eval()
print(cnn)
Style Reconstruction
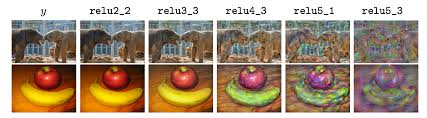
- 임의의 노이즈(noise)가 특정한 이미지의 스타일을 가지도록 변환한다.
- Style_layers 리스트 변수의 값을 조절하여 어떤 레이어를 이용할지 설정한다.
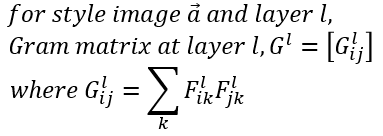
def gram_matrix(input):
    # b는 배치 크기, c는 특징 맵의 개수, (w, h)는 특징 맵의 차원을 의미
    b, c, w, h = input.size()
    # 논문에서는 i = 특징 맵의 개수, j = 각 위치(position)
    features = input.view(b * c, w * h)
    # 행렬 곱으로 한 번에 Gram 내적 계산 가능
    G = torch.mm(features, features.t())
    # Normalize 목적으로 값 나누기
    return G.div(b * c * w * h)
Gram_Matrix https://youtu.be/N14_w2RG1A8?t=624 (이 영상의 10분 24초 부터)를 보면, 스타일 이미지의 한 Conv 레이어(VGG19에서의) 안에 있는 피쳐들의 Gram Matrix가 Correlation Matrix를 만드는 방법으로 접근하고 노이즈로 시작한 타겟 이미지의 같은 Conv 레이어 안의 피쳐들로 구성한 Gram Matrix의 차이를 줄여가면서 타켓 이미지의 Conv 레이어 마다의 Gram Matrix가 스타일 이미지의 Conv 레이어 마다의 Gram Matrix와 유사한 구조가 되도록 점근해 가는 알고리즘이다.
# 스타일 손실(style loss) 계산을 위한 클래스 정의
class StyleLoss(nn.Module):
    def __init__(self, target_feature):
        super(StyleLoss, self).__init__()
        self.target = gram_matrix(target_feature).detach()

    def forward(self, input):
        G = gram_matrix(input)
        self.loss = F.mse_loss(G, self.target)
        return input
def get_style_losses(cnn, style_img, noise_image):
cnn = copy.deepcopy(cnn)
normalization = Normalization(cnn_normalization_mean, cnn_normalization_std).to(device)
style_losses = []
# 가장 먼저 입력 이미지가 입력 정규화(input normalization)을 수행하도록
model = nn.Sequential(normalization)
# 현재 CNN 모델에 포함되어 있는 모든 레이어를 확인
i = 0
for layer in cnn.children():
if isinstance(layer, nn.Conv2d): #만약 layer가 Conv2d이면
i += 1
name = 'conv_{}'.format(i)
elif isinstance(layer, nn.ReLU):
name = 'relu_{}'.format(i)
layer = nn.ReLU(inplace=False)
elif isinstance(layer, nn.MaxPool2d):
name = 'pool_{}'.format(i)
elif isinstance(layer, nn.BatchNorm2d):
name = 'bn_{}'.format(i)
else:
raise RuntimeError('Unrecognized layer: {}'.format(layer.__class__.__name__))
model.add_module(name, layer)
# 설정한 style layer까지의 결과를 이용해 style loss를 계산
if name in style_layers:
target_feature = model(style_img).detach()
style_loss = StyleLoss(target_feature)
model.add_module("style_loss_{}".format(i), style_loss)
style_losses.append(style_loss)
# 마지막 style loss 이후의 레이어는 사용하지 않도록
for i in range(len(model) -1, -1, -1):
if isinstance(model[i], StyleLoss):
break
model = model[:(i + 1)]
return model, style_lossesdef style_reconstruction(cnn, style_img, input_img, iters):
model, style_losses = get_style_losses(cnn, style_img, input_img)
optimizer = optim.LBFGS([input_img.requires_grad_()])
# optimizer = optim.Adam([input_img,requires_grad_()])
print(model)
print(style_losses)
print("[ Start ]")
imshow(input_img)
# 하나의 값만 이용하기 위해 배열 형태로 사용
run = [0]
while run[0] <= iters:
def closure():
input_img.data.clamp_(0, 1) #input이미지가 범위를 벗어나지 못하게 자른다.
optimizer.zero_grad() #optimizer 초기화
model(input_img) #모델에 input_image 넣기
style_score = 0 #초기화
for sl in style_losses:
style_score += sl.loss
style_score *= 1e6 #너무 작은 값인 경우
style_score.backward()
run[0] += 1
if run[0] % 50 == 0:
print(f"[ Step: {run[0]} / Style loss: {style_score.item()}]")
imshow(input_img)
return style_score
optimizer.step(closure) #loss값을 를 optimizer
# 결과적으로 이미지의 각 픽셀의 값이 [0, 1] 사이의 값이 되도록 자르기
input_img.data.clamp_(0, 1)
return input_img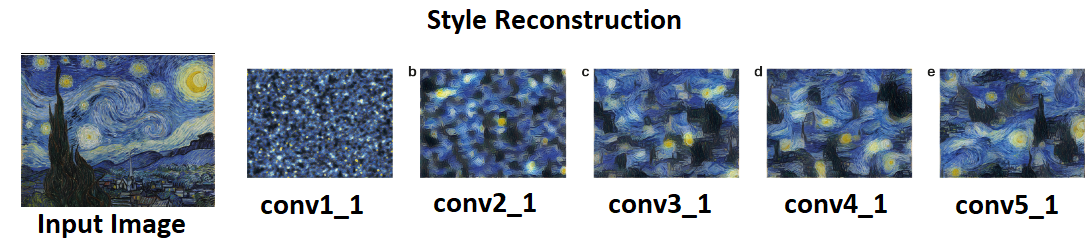
Content Reconstruction
-
임의의 노이즈(noise)가 특정 이미지의 콘텐츠를 가지도록 변환한다.
-
Content Reconstruction은 위에 올린 Style Reconstruction과 코드가 거의 비슷하며 Gram Matrix가 사용되지 않기 때문에 이 부분만 제외해주면 된다. 직접 구현해보길 바람!
순서
1. 콘텐츠 손실 계산을 위한 클래스 정의
2. 콘텐츠 손실을 계산하는 함수 (정규화, model쌓기)
3. Reconstruction함수 생성
Style Transfer
- Content Loss와 Style Loss를 함께 사용해서 Style Transfer진행
- 위의 코드들을 합쳐주면 된다. 동시에 실행되기 때문이다.
- Image_loader함수를 이용하여 콘텐츠 이미지와 스타일 이미지를 불러온다.
content_img = image_loader('jpg 경로', (512, 640))
style_img = image_loader('jpg 경로', (512, 640))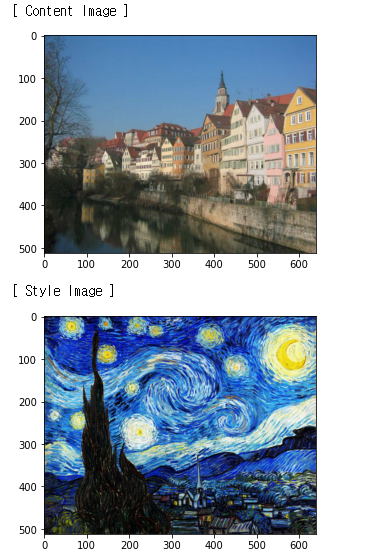

AI 엔지니어가 되고싶은 대학생 입니다.