클래스
클래스 2편으로 1편을 먼저 보고와주길 바란다.
1 클래스의 인스턴스 생성 과정
-
인스턴스 생성과 this 바인딩
new연산자와 함께 클래스를 호출하면 constructor의 내부 코드가 실행되기에 앞서 암묵적으로 빈 객체가 생성된다. 이 빈 객체가 바로 클래스가 생성한 인스턴스이다. 이때 클래스가 생성한 인스턴스의 프로토타입으로 클래스의 prototype 프로퍼티가 가리키는 객체가 설정된다. 그리고 암묵적으로 생성된 빈 객체, 즉 인스턴스는 this에 바인딩된다. 따라서 constructor 내부의 this는 클래스가 생성한 인스턴스를 가리킨다. -
인스턴스 초기화
constructor 내부 코드가 실행되어 this에 바인딩되어 있는 인스턴스를 초기화한다. 즉 this 바인딩되어 있는 인스턴스에 프로퍼티를 추가하고, constructor가 인수로 전달받은 초기값으로 인스턴스의 프로퍼티값을 초기화한다. 만약 constructor가 생략되었다면 이 과정도 생략된다. -
인스턴스 반환
클래스의 모든 처리가 끝나면 완성된 인스턴스가 바인딩된 this가 암묵적으로 반환된다.
class Person{
    constructor(name){
        // 1. 암묵적으로 인스턴스가 생성되고 this에 바인딩된다.
        console.log(this) // Person {}
        console.log(Object.getPrototypeOf(this) === Person.prototype) // true
        // thisdp 바인딩되어 있는 인스턴스를 초기화한다.
        this.name = name
        // 반환된다.
    }
}
2. 프로퍼티
2.1 인스턴스 프로퍼티
인스턴스 프로퍼티는 constructor 내부에서 정의해야 한다.
class Person{
    constructor(name){
        this.name = name
    }
}
const me = new Person("lee")
console.log(me) // Person { name: 'lee' }
constructor 내부에서 this에 인스턴스 프로퍼티를 추가한다. 이로써 클래스가 암묵적으로 생성한 빈 객체, 즉 인스턴스에 프로퍼티가 추가되어 인스턴스가 초기화된다.
class Person{
    constructor(name){
        this.name = name // public
    }
}

const me = new Person("lee")
console.log(me.name) // lee
단, js는 private, public, protected 개념이 없다. 무조건 public이다. 이후에 typescript를 배우면서 접근 제한자 개념이 추가되는데, js만으로는 public이 맞다.
2.2 접근자 프로퍼티
프로퍼티를 읽거나, 저장할 때 사용하는 함수로, get, set이 있다.
const person = {
    firstName: 'park',
    lastName: 'gyu',

    get fullName(){
        return `${this.firstName} ${this.lastName}`
    },

    set fullName(name){
        [this.firstName , this.lastName] = name.split(' ')
    }
}

console.log(person.fullName) // park gyu
person.fullName = 'chen shu'
console.log(person.fullName) // chen shu
위는 이전에 사용한 접근자 프로퍼티로 객체에 사용이 가능했다. 위 객체 리터럴을 클래스로 표현하면 다음과 같다.
class Person {
    constructor(firstName, lastName){
        this.firstName = firstName;
        this.lastName = lastName;
    }

    get fullName(){
        return `${this.firstName} ${this.lastName}`
    }

    set fullName(name){
        [this.firstName, this.lastName] = name.split(' ')
    }
}

const me = new Person('park', 'gyu')

console.log(me.fullName) // park gyu
me.fullName = 'lee shu'
console.log(me.fullName) // lee shu
접근자 프로퍼티는 자체적으로는 값을 갖지 않고 다른 데이터 프로퍼티의 값을 읽거나 저장할 때 사용하는 접근자 함수, 즉 getter함수와 setter 함수로 구성되어 있다.
get, set 키워드를 사용해 정의한 함수는 마치 인스턴스 프로퍼티처럼 사용된다. 다시말해 프로퍼티처럼 참조하는 형식으로 사용하며, 참조 시에 내부적으로 getter, setter가 호출된다.
클레스의 메서드는 기본적으로 프로토타입 메서드가 된다. 따라서 클래스의 접근자 프로퍼티 또한 인스턴스 프로퍼티가 아닌 프로토타입의 프로퍼티가 된다.
2.3 클래스 필드 정의 제안
클래스 필드( 필드 또는 맴버 변수)는 클래스 기반 객체지향 언어에서 클래스가 생성할 인스턴스의 프로퍼티를 가리키는 용어이다. 클래스 기반 객체지향 언어인 자바의 클래스 정의를 살펴보자, 자바의 클래스 필드는 마치 클래스 내부에서 변수처럼 사용된다.
public class Person {
    private String firstName = "";
    private String lastName = "";

    Person(String firstName, String lastName){
        this.firstName = firstName;
        this.lastName = lastName;
    }

    public String getFullName(){
        return firstName + " " + lastName;
    }
}
자바의 클래스에서는 위 예제와 같이 클래스 필드를 마치 변수처럼 클래스 몸체에서 this없이 선언한다.
그러나, 자바스크립트의 클래스 몸체에는 메서드만 선언할 수 있다. 따라서 클래스 몸체에 자바와 유사하게 클래스 필드를 선언하면 문법 에러가 발생한다.
class Person{
    name = "lee"
}

const me = new Person("lee")
그러나, 아마 최신 브라우저나 node엔진을 사용하고 있다면 에러가 발생하지 않을 것이다. 왜냐하면 TC39 프로세스의 stage3에 제안되어 인스턴스 프로퍼티를 마치 클래스의 필드처럼 사용할 수 있도록 제안되었기 때문이다.
참고로 TC프로세스는 ECMAScript에 새로운 표준을 추가하기 위해 공식적으로 명문화해 놓은 과정을 말한다. 0~4단계로 이루어져 있고, stage4단계까지 가게되면 차기 ECMAScript 버전에 포함된다.
최신브라우저인 chrome72 이상, Nodejs 12이상은 표준 사양 승급이 확실시되는 클래스 필드 제안을 선제적으로 미리 구현해 놓았다. 따라서 에러가 발생하지 않는 것이다.
단, 클래스 몸체에서 클래스 필드를 정의하는 경우 this에 클래스 필드를 바인딩해서는 안된다. this는 클래스의 constructor와 메서드 내에서만 유효하다.
class Person{
    this.name = "" // SyntaxError: Unexpected token '.'
}
클래스 필드를 참조하는 경우 자바와 같은 클래스 기반 객체지향 언어에서는 this를 생략할 수 있으나 자바스크립트에서는 this를 반드시 사용해야 한다.
class Person{
    name = 'lee'
    constructor(){
        console.log(name)
    }
}

new Person()
클래스 필드에 초기값을 할당하지 않으면 undefined를 갖는다. 만약 인스턴스를 생성할 때 외부의 값으로 클래스 필드를 초기화해야 할 필요가 있다면 constructor에서 클래스 필드를 초기화해야 한다.
class Person{
    name;
    constructor(name) {
        this.name = name
    }
}

const me = new Person("lee")
console.log(me) // Person { name: 'lee' }
이처럼 인스턴스를 생성할 때 클래스 필드를 초기화할 필요가 있다면 constructor 밖에서 클래스 필드를 정의할 필요가 없다. 클래스 필드를 초기화할 필요가 있다면 어차피 constructor 내부에서 클래스 필드를 참조하여 초기값을 할당해야 한다. 이때 this, 즉 클래스가 생성한 클래스 필드에 해당하는 프로퍼티가 없다면 자동 추가되기 때문이다.
그래서 결국 돌고돌아 우리가 아는 모습이 나온다.
class Person{
    constructor(name) {
        this.name = name
    }
}

const me = new Person("lee")
console.log(me) // Person { name: 'lee' }
함수는 일급 객체이므로 함수를 클래스 필드에 할당할 수 있다. 따라서 클래스 필드를 통해 메서드를 정의할 수도 있다.
class Person{
    name = 'lee'
    getName = function(){
        return this.name
    }
}

const me = new Person()
console.log(me.getName()) // Person { name: 'lee' }
이처럼 클래스 필드에 함수를 할당하는 경우, 이 함수는 프로토타입 메서드가 아닌 인스턴스 메서드가 된다. 모든 클래스 필드는 인스턴스 프로퍼티가 되기 때문이다. 따라서 클래스 필드에 함수를 할당하는 것은 권장하지 않는다.
이제 클래스 필드 정의 제안으로 인해 인스턴스 프로퍼티를 정의하는 방식은 두 가지가 되었다.
- constructor를 이용하여 인스턴스의 프로퍼티에 값을 추가하는 방법
- 초기화할 필요가 없다면 클래스 몸체에 인스턴스를 생성하는 방법
2.4 private 필드 정의 제안
자바스크립트는 접근 제한자를 제공하지 않기 때문에, 언제나 public이다. 그러나, stage3에는 private 필드를 정의할 수 있는 새로운 표준 사양이 제안되었다. 따라서 chrome과 nodejs에서는 해당 제안이 이미 구현되어있다.
다음 예제를 살펴보자, private 필드의 선두에는 #을 붙여준다. private필드를 참조할 때도 #을 붙여주어야 한다.
class Person{
    #name = 'lee'

    constructor(name){
        this.#name = name
    }
}

const me = new Person()
console.log(me.#name) // SyntaxError: Private field '#name' must be declared in an enclosing class
public 필드는 어디서든 참조할 수 있지만, private 필드는 클래스 내부에서만 조회가 가능하다. typescript 처럼 # 없이도 private을 사용할 수는 없다. 이후에 배울 typescript에서 private, public, protected를 어떻게 사용하는 지 알아보도록 하자
2.5 static 필드 정의 제안
정적 메서드에서 살펴보았듯이 클래스에는 static 키워드를 사용하여 정적 메서드를 정의할 수 있다. 하지만 static 키워드를 사용하여 정적 필드를 정의할 수는 없다. 하지만, static public, static private 필드, static private 메서드를 정의할 수 있는 새로운 표준 사양인 "Static class features"가 stage3에 새롭게 제안되었다.
class MyMath{
    // static public 필드 정의
    static PI =22/7
    // static private 필드 정의
    static #num = 10
    // static 메서드
    static increment(){
        return ++MyMath.#num
    }
}

console.log(MyMath.PI) // 3.14284
console.log(MyMath.increment()) // 11
3. 상속
3.1 클래스 상속과 생성자 함수 상속
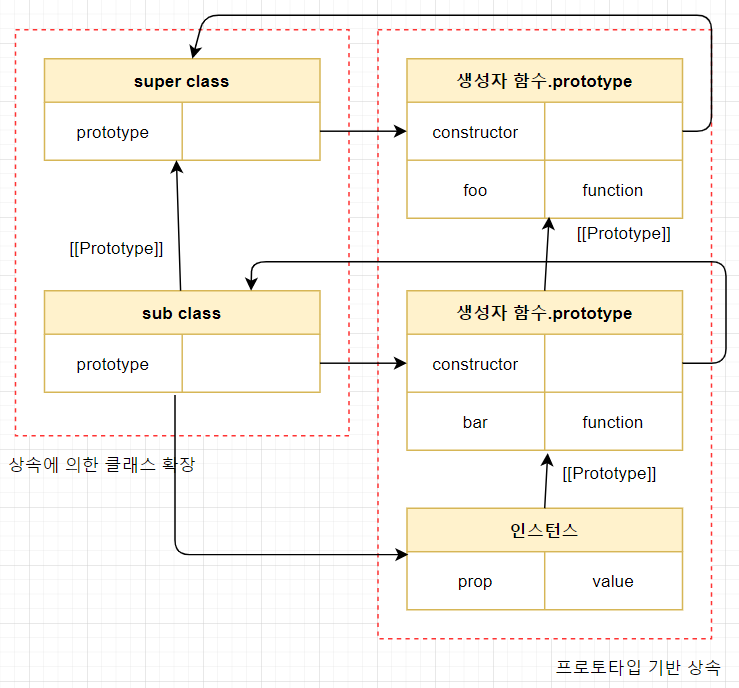
상속에 의한 클래스 확장은 지금까지 살펴본 프로토타입 기반 상속과는 다른 개념이다. 프로토타입 기반 상속은 프로토타입 체인을 통해 다른 객체의 자산을 상속받는 개념이지만 상속에 의한 클래스 확장은 기존 클래스를 상속받아 새로운 클래스를 확장(extends)하여 정의하는 것이다.
클래스와 생성자 함수는 인스턴스를 생성할 수 있는 함수라는 점에서 매우 유사하다. 하지만 클래스는 상속을 통해 기존 클래스를 확장할 수 있는 문법이 기본적으로 제공되지만 생성자 함수는 그렇지 않다.
클래스를 설명할 때 가장 대표적인 예제를 가져와 봤다.
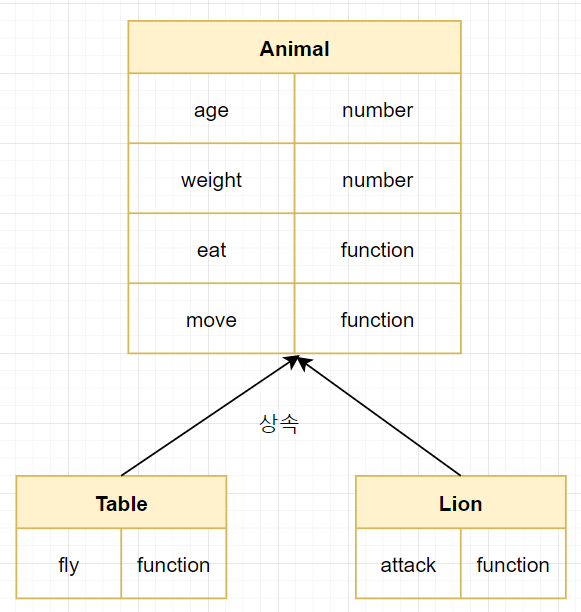
Bird 클래스와 Lion 클래스는 상속을 통해 Animal 클래스의 속성을 그대로 사용하고 자신만의 고유한 속성을 추가하여 확장했다. 이처럼 상속을 통해 Animal 클래스를 확장한 Bird 클래스를 구현해보자
class Animal{
constructor(age, weight){
this.age = age;
this.weight = weight
}
eat(){ return 'eat'}
move(){ return 'move'}
}
class Bird extends Animal {
fly() { return 'fly'}
}
const bird = new Bird(1, 5);
console.log(bird) // Bird { age: 1, weight: 5 }
console.log(bird instanceof Bird) // true
console.log(bird instanceof Animal) // true
console.log(bird.eat()) // eat
console.log(bird.move()) // move
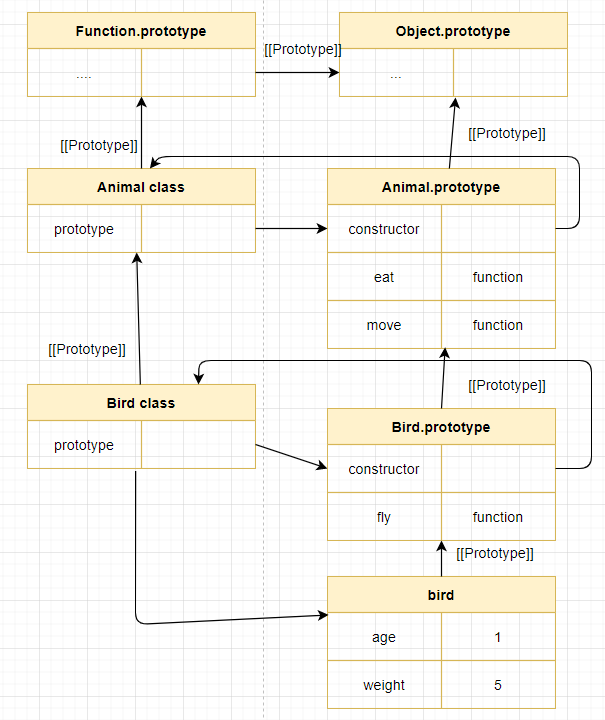
console.log(bird.fly()) // fly상속에 의해 확장된 클래스 Bird를 통해 생성된 인스턴스의 프로토타입 체인은 다음과 같다.
클래스는 상속을 통해 다른 클래스를 확장할 수 있는 문법인 extends 키워드가 기본적으로 제공된다. extends 키워드를 사용한 클래스 확장은 간편하고 직관적이다. 그러나 생성자 함수는 클래스와 같이 상속을 통해 다른 생성자 함수를 확장할 수 있는 문법이 제공되지 않는다.
때문에, 생성자 함수를 이용하여 상속을 표현하기 위해서는 의사 클래스 상속 패턴을 사용하여 상속에 의한 클래스 확장을 흉내내기도 했다. 꽤나 복잡하기도 하지만 사용하지도 않으므로 굳이 쓰진 않겠다.
3.2 extends 키워드
상속을 통해 클래스를 확장하려면 extends 키워드를 사용하여 상속받을 클래스를 정의한다.
class Base{}

class Derived extends Base{}
상속을 통해 확장된 클래스를 서브 클래스라 부르고, 서브클래스에게 상속된 클래스를 수퍼 클래스라고 부른다.
수퍼 클래스와 서브 클래스는 인스턴스의 프로토타입 체인 뿐만 아니라, 클래스 간의 프로토타입 체인도 생성한다. 이를 통해 프로토타입 메서드, 정적 메서드 모두 상속이 가능하다.
3.3 동적 상속
extends 키워드는 클래스뿐만 아니라, 생성자 함수를 상속받아 클래스를 확장할 수도 있다. 단, extends 키워드 앞에는 반드시 클래스가 와야 한다.
function Base(a){
this.a = a
}

class Derived extends Base {}

const derived = new Derived(1)
console.log(derived) // Derived { a: 1 }
extends 키워드 다음에는 클래스뿐만 아니라 [[Construct]] 내부 메서드를 갖는 함수 객체로 평가될 수 있는 모든 표현식을 사용할 수 있다. 이를 통해 동적으로 상속받을 대상을 결정할 수 있다.
function Base1() {}

class Base2 {}

let condition = true

class Derived extends (condition ? Base1 : Base2) {}

const derived = new Derived()
console.log(derived) // Derived {}

console.log(derived instanceof Base1) // true
console.log(derived instanceof Base2) // false
3.3 서브클래스의 constructor
만약 constructor를 생략하면 다음과 같은 빈 constructor가 생기게 된다.
constructor(){}서브 클래스에서 constructor를 생략하면 클래스에 다음과 같은 constructor가 암묵적으로 정의된다. args는 new 연산자와 함께 클래스를 호출할 때 전달한 인수의 리스트이다.
constructor(...args){
    super(...args)
}super()는 수퍼클래스의 constructor를 호출하여 인스턴스를 생성한다.
class Base {}
class Derived extends Base {}
다음은 아래와 같다.
class Base{
    constructor() {}
}

class Derived extends Base {
    constructor(...args) {
        super(...args)
    }
}

const derived = new Derived()
console.log(derived) // Derived {}
암묵적으로 위와 같이 constructor가 정의되는 것이다.
프로퍼티를 소유하는 인스턴스를 생성하려면 constructor내부에서 인스턴스에 프로퍼티를 추가해야 한다.
3.4 super 키워드
super 키워드는 함수처럼 호출할 수도 있고, this와 같이 식별자처럼 참조할 수 있는 특수한 키워드이다. super는 다음과 같이 동작한다.
- super를 호출하면 수퍼클래스의 constructor를 호출한다.
- super를 참조하면 수퍼클래스의 메서드를 호출할 수 있다.
3.4.1 super 호출
super를 호출하면 수퍼클래스의 constructor를 호출한다.
class Base{
    constructor(a, b) {
        this.a = a;
        this.b = b;
    }
}

class Derived extends Base {
    // constructor(... args) { super(...args)}
}

const derived = new Derived(1,2)
console.log(derived) // Derived { a: 1, b: 2 }
또한, super을 통해 상위 클래스의 생성자 함수를 호출할 수 있다.
class Base{
    constructor(a, b) {
        this.a = a;
        this.b = b;
    }
}

class Derived extends Base {
    constructor(a, b, c) {
        super(a, b)
        this.c = c;
    }
}

const derived = new Derived(1,2,3)
console.log(derived) // Derived { a: 1, b: 2, c: 3 }
이처럼 인스턴스 초기화를 위해 전달한 인수는 수퍼클래스와 서브 클래스에 배분되고 상속 관계의 두 클래스는 서로 협력하여 인스턴스를 생성한다.
단, super를 호출할 때 주의할 사항은 다음과 같다.
- 서브클래스에서 construcotr를 생략하지 않는 경우, 서브 클래스의 constructor에서는 반드시 super를 호출해야 한다.
class Base{}

class Derived extends Base {
    constructor() {
        console.log("start") // ReferenceError: Must call super constructor in derived class before accessing 'this' or returning from derived constructor
    }
}

const derived = new Derived()
console.log(derived)- 서브클래스의 constructor에서 super를 호출하기 전에는 this를 참조할 수 없다.
class Base{}

class Derived extends Base {
    constructor() {
        // ReferenceError: Must call super constructor in derived class before accessing 'this' or returning from derived constructor
        this.a = 1
        super()
    }
}

const derived = new Derived()
console.log(derived)
3.4.2 super 참조
1. 메서드 내에서 super를 참조하면 수퍼클래스의 메서드를 호출할 수 있다
- 서브클래스의 프로토타입 메서드 내에서 super.method는 수퍼클래스의 프로토타입 메서드 method를 가리킨다.
class Base{
    constructor(name) {
        this.name = name
    }
    method(){
        return `hello ${this.name}`
    }
}

class Derived extends Base {
    method(){
        return `${super.method()}`
    }
}

const derived = new Derived('lee')
console.log(derived.method()) // hello lee
super 참조를 통해 수퍼클래스의 메서드를 참조하려면 super 가 수퍼클래스의 메서드가 바인딩된 객체, 즉 수퍼클래스의 prototype 프로퍼티에 바인딩된 프로토타입을 참조할 수 있어야 한다. 위 예제는 다음 예제와 동일하게 동작한다.
class Base{
    constructor(name) {
        this.name = name
    }
    method(){
        return `hello ${this.name}`
    }
}

class Derived extends Base {
    method(){
        const __super = Object.getPrototypeOf(Derived.prototype)
        return `${__super.method.call(this)}`
    }
}

const derived = new Derived('lee')
console.log(derived.method()) // hello lee
super는 자신을 참조하고 있는 메서드(위 예제의 경우 Derived의 method)가 바인딩되어 있는 객체(위 예제의 경우 Derived.prototype)의 프로토타입(위 예제의 경우 Base.prototype)을 가리킨다. 따라서, super.method는 Base.prototype.method를 가리킨다. 단,super.method 즉, Base.prototype.method를 호출할 때 call메서드를 사용해 this를 전달해야 한다.
call 메서드를 사용해 this를 전달하지않고 Base.prototype.method를 그대로 호출하면 Base.prototype.method 메서드 내부의 this는 Base.prototype을 가리킨다. Base.prototype.method 메서드는 프로토타입 메서드이기 때문에 내부의 this는 Base.prototype이 아닌 인스턴스를 가리켜야 한다. name 프로퍼티는 인스턴스에 존재하기 때문이다.
이처럼 super참조가 동작하기 위해서는 super를 참조하고 있는 메서드(위 예제의 경우 Derived의 method)가 바인딩되어 있는 객체(위 예제의 경우 Derived.prototype)의 프로토타입(위 예제의 경우 Base.prototype)을 찾을 수 있어야 한다. 이를 위해서 메서드는 내부 슬롯 [[HomeObject]]를 가지며, 자신을 바인딩하고 있는 객체를 가리킨다.
super참조를 의사코드로 표현하면 다음과 같다.
super = Object.getPrototypeOf([[HomeObject]]);[[HomeObject]]는 메서드 자신을 바인딩하고 있는 객체를 가리킨다.
[[HomeObject]]를 통해 메서드 자신을 바인딩하고 있는 개체의 프로토타입을 찾을 수 있다. 가령, Derived 클래스의 method 메서드는 Derived.prototype에 바인딩되어 있다. 따라서 Derived 클래스의 method 메서드는 Derived.prototype에 바인딩되어 있다. 따라서 Derived 클래스의 method 메서드의 [[HomeObject]]는 Derived.prototype이 된다.
이를 통해 Derived 클래스의 method 메서드 내부의 super 참조가 Base.prototype으로 결정된다. 따라서 super.method는 Base.prototype.method를 가리키게 된다.
주의할 것은 ES6의 메서드 축약 표현으로 정의된 함수만이 [[HomeObject]]를 갖는다는 것이다
const obj = {
    foo() {}, //foo는 es6의 메서드 축약 표현으로 정의한 메서드이다. 따라서 [[HomeObject]]를 갖는다.
    bar : function(){} // bar는 ES6의 메서드 축약 표현으로 정의한 메서드가 아니라 일반 함수이다. 따라서 [[HomeObject]]를 갖지 않는다.
}[[HomeObject]]를 가지는 함수만이 super를 참조할 수 있다. 따라서 [[HomeObject]]를 가지는 ES6의 메서드를 축약 표현으로 정의된 함수만이 super참조를 할 수 있다. 단, super 참조는 수퍼클래스의 메서드를 참조하기 위해 사용하므로 서브클래스의 메서드에서 사용해야 한다.
super 참조는 클래스만의 전유물은 아니다. 객체 리터럴에서도 super 참조를 사용할 수 있다. 단 ES6의 메서드 축약 표현으로 정의된 함수만 가능하다.
const base = {
    name : 'lee',
    hello(){
        return `hello ${this.name}`
    }
}

const derived = {
    __proto__ : base,
    hello(){
        return `${super.hello()}`
    }
}

console.log(derived.hello()) // hello lee
2. 서브클래스의 정적 메서드 내에서 super.정적메서드는 수퍼클래스의 정적 메서드를 가리킨다.
class Base {
static hello(){
return 'hello'
}
}
class Derived extends Base{
static hello(){
return `${super.hello()} hellohello`
}
}
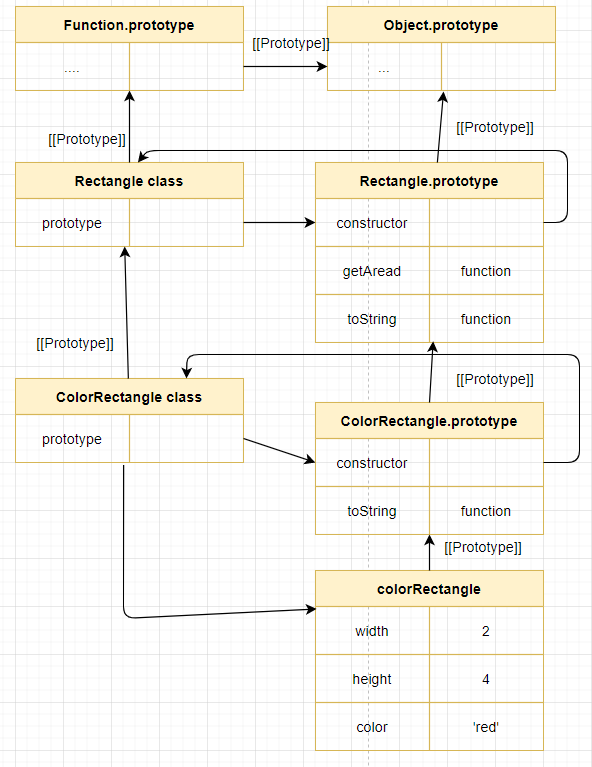
console.log(Derived.hello()) // hello hellohello3.5 상속 클래스의 인스턴스 생성 과정
class Rectangle {
constructor(width, height){
this.width = width;
this.height = height;
}
getArea(){
return this.width * this.height
}
toString(){
return `width = ${this.width}, height = ${this.height}`
}
}
class ColorRectangle extends Rectangle{
constructor(width, height, color) {
super(width, height)
this.color = color
}
//메서드 오버라이딩
toString(){
return super.toString() + `, color = ${this.color}`
}
}
const colorRectangle = new ColorRectangle(2,4,'red')
console.log(colorRectangle) // ColorRectangle { width: 2, height: 4, color: 'red' }
console.log(colorRectangle.getArea()) // 8
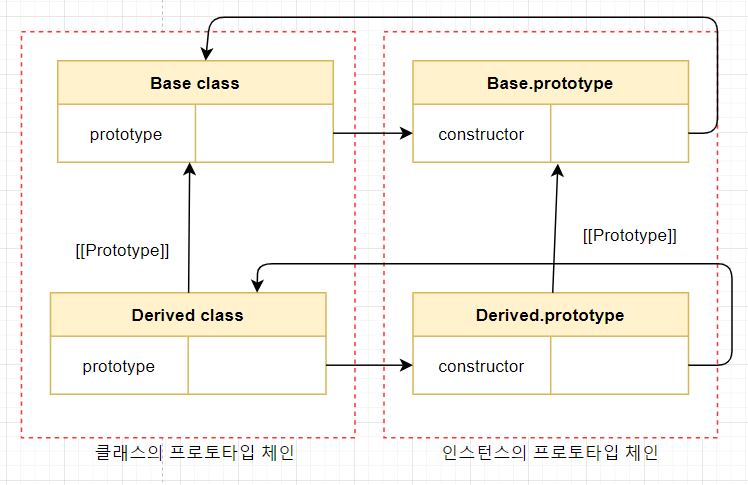
console.log(colorRectangle.toString()) // width = 2, height = 4, color = red다음 클래스의 프로토타입 체인을 살펴보면 다음과 같다.
3.5.1 서브클래스의 super 호출
자바스크립트 엔진은 클래스를 평가할 때 수퍼클래스와 서브 클래스를 구분하기 위해 "base" 또는 "derived"를 값으로 갖는 내부 슬롯 [[ContrcutorKind]]를 갖는다. 다른 클래스를 상속받지 않는 클래스(그리고 생성자 함수)는 내부 슬롯 [[ContrcutorKind]]의 값이 "base"로 설정되지만 다른 클래스를 상속받는 서브클래스는 내부 슬롯 [[ContrcutorKind]]의 값이 "derived"로 설정된다. 이를 통해 수퍼클래스와 서브 클래스는 new 연산자와 함께 호출되었을 때의 동작이 구분된다.
다른 클래스를 상속받지 않는 클래스(그리고 생성자 함수)는 이전에도 살펴보았듯이 new 연산자와 함께 호출되었을 때 암묵적으로 빈 객체, 즉 인스턴스를 생성하고 이를 this에 바인딩한다.
하지만 서브 클래스는 자신이 직접 인스턴스를 생성하지 않고 수퍼클래스에게 인스턴스 생성을 위임한다. 이것이 바로 서브 클래스의 cosntructor에게 반드시 super를 호출해야 하는 이유이다
서브클래스가 new 연산자와 함께 호출되면 서브 클래스 constructor 내부의 super 키워드가 함수처럼 호출된다. super가 호출되면 수퍼클래스의 constructor가 호출된다. 좀 더 정확히 말하자면 수퍼클래스가 평가되어 생성된 함수 객체의 코드가 실행되기 시작한다.
만약 서브클래스 constructor 내부에 super 호출이 없으면 에러가 발생한다. 실제로 인스턴스를 생성하는 주체는 수퍼클래스이므로 수퍼클래스의 constructor를 호출하는 super가 호출되지 않으면 인스턴스를 생성할 수 없기 때문이다.
3.5.2 수퍼클래스의 인스턴스 생성과 this바인딩
수퍼클래스의 constructor 내부의 코드가 실행되기 이전에 암묵적으로 빈 객체를 생성한다. 이 빈 객체가 바로 클래스가 생성한 인스턴스이다. 그리고 암묵적으로 생성된 빈 객체, 즉 인스턴스는 this에 바인딩된다. 따라서 수퍼 클래스의 constructor 내부의 this는 생성된 인스턴스를 가리킨다.
이때 인스턴스는 수퍼클래스가 생성한 것이지만, 서브 클래스이다. new 연산자와 함께 호출된 클래스가 서브클래스라는 것이 중요하다. 즉, new 연산자와 함께 호출된 함수를 가리키는 new.target는 서브클래스를 가리킨다. 따라서 인스턴스는 new.target이 가리키는 서브클래스를 인스턴스화 한 것이다.
class Rectangle {
    constructor(width, height){
        console.log(this) // ColorRectangle {}
        console.log(new.target) // new 연산자와 함꼐 호출된 함수, [class ColorRectangle extends Rectangle]
        this.width = width;
        this.height = height;
    }

    getArea(){
        return this.width * this.height
    }

    toString(){
        return `width = ${this.width}, height = ${this.height}`
    }
}
위의 Rectangle부분만 위와 같이 바꾸어보자
위의 결과를 확인하면 더더욱 와닿을 것이다. Rectangle 클래스가 만든 빈 객체는 this에 바인딩되고, 이는 서브클래스인 ColorRectangle 이다. 이로써 상위 클래스에서 하위 클래스의 인스턴스를 만든다는 것이 이해가 가고, 이를 위해서 super를 하위 생성자 함수에서 호출해주어야 한다는 것을 알게된다.
생성된 인스턴스의 프로토타입은 수퍼클래스의 prototype 프로퍼티가 가리키는 객체(Rentangle.prototype) 이 아니라, new.target 즉, 서브 클래스의 prototype 프로퍼티가 가리키는 객체(ColorRectangle.prototype)이 된다.
class Rectangle {
    constructor(width, height){
        console.log(this) // ColorRectangle {}
        console.log(new.target) // new 연산자와 함꼐 호출된 함수, [class ColorRectangle extends Rectangle]

        console.log(this instanceof ColorRectangle) // true
        console.log(this instanceof Rectangle) // true

        this.width = width;
        this.height = height;
    }

    getArea(){
        return this.width * this.height
    }

    toString(){
        return `width = ${this.width}, height = ${this.height}`
    }
}
위의 예제에서
console.log(this instanceof ColorRectangle) // true
console.log(this instanceof Rectangle) // true
다음이 true라는 것을 확인하도록 하자
3.5.3 수퍼클래스의 인스턴스 초기화
수퍼클래스의 constructor가 실행되어 this에 바인딩되어 있는 인스턴스를 초기화한다. 즉, this에 바인딩되어 있는 인스턴스에 프로퍼티를 추가하고 constructor가 인수로 전달받은 초기값으로 인스턴의 프로퍼티를 초기화한다.
constructor(width, height){
    console.log(this) // ColorRectangle {}
    console.log(new.target) // new 연산자와 함꼐 호출된 함수, [class ColorRectangle extends Rectangle]

    console.log(this instanceof ColorRectangle) // true
    console.log(this instanceof Rectangle) // true

    this.width = width;
    this.height = height;
    console.log(this) // width = 2, height = 4, color = red
}
3.5.4 서브클래스 constructor로의 복귀와 this바인딩
super 호출이 종료되고 제어 흐름이 서브 클래스 constructor로 돌아온다. 이때 super가 반환한 인스턴스가 this에 바인딩된다. 서브클래스는 별도의 인스턴스를 생성하지 않고, super가 반환한 인스턴스를 this에 바인딩하여 그대로 사용한다.
class ColorRectangle extends Rectangle{
    constructor(width, height, color) {
        super(width, height)
        console.log(this) // width = 2, height = 4, color = red
        this.color = color
    }
    //메서드 오버라이딩
    toString(){
        return super.toString() + `, color = ${this.color}`
    }
}
이처럼 super가 호출되지 않으면 인스턴스가 생성되지 않으며, this 바인딩도 할 수 없다. 서브클래스의 constructor에서 super를 호출하기 전에는 this를 참조할 수 없는 이유가 바로 이 때문이다. 따라서 서브 클래스 constructor 내부의 인스턴스 초기화는 반드시 super 초기화 이후에 처리되어야 한다.
3.5.5 서브클래스 인스턴스 초기화
super 호출 이후, 서브클래스의 constructor에 기술되어 있는 인스턴스 초기화가 실행된다. 즉 this에 바인딩되어 있는 인스턴스에 프로퍼티를 추가하고 constructor가 인수로 전달받은 초기값으로 인스턴스의 프로퍼티를 초기화한다.
3.5.6 인스턴스 반환
클래스의 모든 처리가 끝나면 완성된 인스턴스가 바인딩된 this가 암묵적으로 반환된다.
4. 표준 빌트인 생성자 함수 확장
extends 키워드는 클래스뿐만 아니라 [[Construct]] 내부 메서드를 갖는 함수 객체로 평가될 수 있는 모든 표현식에 사용할 수 있다. String, Number, Array 같은 표준 빌트인 객체도 [[Construct]] 내부 메서드를 갖는 생성자 함수이므로 extends 키워드를 사용하여 확장할 수 있다.
Array 함수를 받아서 중복된 요소를 제거하는 프로퍼티 메서드와 평균을 내는 프로퍼티 메서드를 만들어보자
class MyArray extends Array {
    uniq(){
        return this.filter((v, i ,self) => self.indexOf(v) === i)
    }

    average(){
        return this.reduce((pre,cur) => pre+cur, 0) / this.length
    }
}

const myArray = new MyArray(1,2,3,4,1,2)
console.log(myArray) // MyArray(6) [ 1, 2, 3, 4, 1, 2 ]
console.log(myArray.uniq()) // MyArray(4) [ 1, 2, 3, 4 ]
console.log(myArray.average()) // 2.1666666666666665
아직, filter, reduce는 배우지 않았으므로 그러려니 하고 넘어가면 된다. 중요한 것은 기존에 이미 있는 생성자가 있는 함수나 클래스를 확장할 수 있다는 것이다.
