openCV로 bird-eye view 구현하기 🐦
원근 변환(perspective transform)은 “원근감”을 주는 변환을 말한다. 이미지는 2차원 좌표계이므로 차원 간 차이를 보정해 줄 추가적인 연산과 시스템이 필요하고, 이 때 사용하는 좌표를 동차 좌표(homogeneous coordinates)라 한다.
2차원 좌표 에 대응하는 동차 좌표는 기존 차수에 1개의 상수항을 더하여 로 표현한다. 이를 다시 2차원 좌표로 바꿀 때 상수항 로 나누어 로 표현한다.
따라서 원근 변환에는 꼴의 좌표계가 필요하며, 다음과 같은 3x3 변환행렬식이 필요하다. opencv의 getPerspectiveTransform() 함수는 변환 전과 후를 짝짓는 4개의 매핑 좌표만 지정해 주면 원근 변환에 필요한 3*3 변환행렬을 계산해 준다.
opencv의 getPerspectiveTransform(), warpPerspective()를 활용하여 일반 이미지를 bird-eye view로 변환해 보자.
import cv2
import numpy as np
import matplotlib.pyplot as plt

image = cv2.imread('./test_img.jpg')
plt.imshow(cv2.cvtColor(image, cv2.COLOR_BGR2RGB))
plt.show()
원하는 샘플 이미지를 불러와서, 다음과 같이 사다리꼴 형태를 이루는 4개의 points를 지정한다.
p1 = [800, 450] , p2 = [450, 450] , p3 = [250, 700] , p4 = [1000, 700]
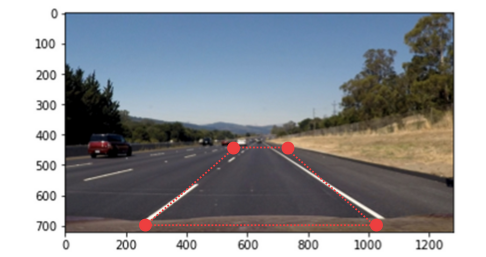
p1 =  [450, 450]  # 좌상
p2 =  [800, 450] # 좌하
p3 =  [1000, 700] # 우상
p4 = [250, 700]  # 우하

# corners_point_arr는 변환 이전 이미지 좌표 4개
corner_points_arr = np.float32([p1, p2, p3, p4])
height, width = image.shape[:2]


image_p1 = [0, 0]
image_p2 = [width, 0]
image_p3 = [width, height]
image_p4 = [0, height]

image_params = np.float32([image_p1, image_p2, image_p3, image_p4])


mat = cv2.getPerspectiveTransform(corner_points_arr, image_params)
# mat = 변환행렬(3*3 행렬) 반
image_transformed = cv2.warpPerspective(image, mat, (width, height))

plt.imshow(cv2.cvtColor(image_transformed, cv2.COLOR_BGR2RGB))
plt.show()
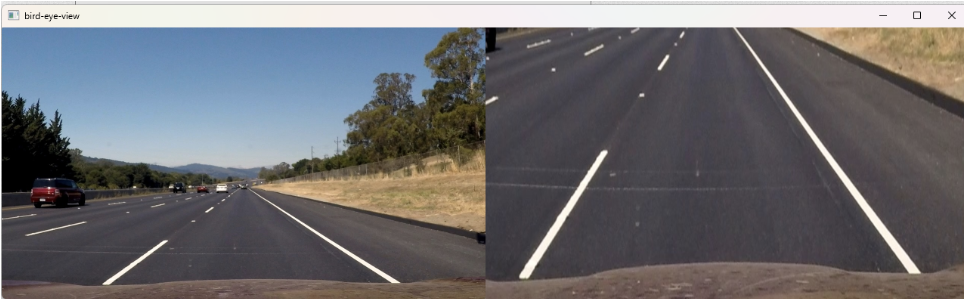
hcon = cv2.hconcat([image, image_transformed])
hcon = cv2.resize(hcon, (0, 0), fx=0.5, fy=0.5)
cv2.imshow('bird-eye-view', hcon)
cv2.waitKey(0)
cv2.destroyAllWindows()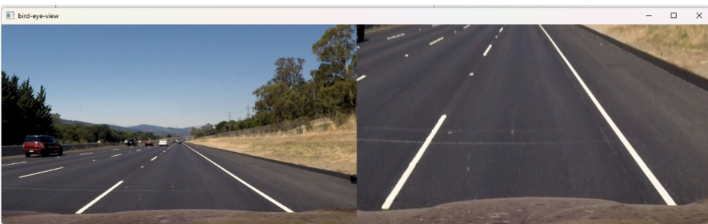
참조 링크

AI에 대체되지 않는 인재가 되자