opencv의 stitching_detailed.py를 기반으로 만들어진 stitching 모듈을 사용하여 스티칭 파라미터를 튜닝하고, videoCapture 스트리밍 이미지를 스티칭하여 파노라마 이미지로 구현하고자 한다.
(참조 링크)
import stitching
import cv2
import numpy as np

class VideoStitcher() :
    def __init__(self):
        setting = {"warper_type": "fisheye", "detector": "orb",
										"nfeatures" : 300, "try_use_gpu": True}
        self.stitcher = stitching.Stitcher(**setting)

    def run_video(self):
        # 실행 할 file 불러옴(camera setting 된 경우 cam으로 실행)
        cap1 = cv2.VideoCapture('./data/1.mp4')
        cap2 = cv2.VideoCapture('./data/2.mp4')
        cap3 = cv2.VideoCapture('./data/3.mp4')
        cap4 = cv2.VideoCapture('./data/4.mp4')
        cap5 = cv2.VideoCapture('./data/5.mp4')
        cap6 = cv2.VideoCapture('./data/6.mp4')

        while cap1.isOpened():
            ret, frame1 = cap1.read()
            ret, frame2 = cap2.read()
            ret, frame3 = cap3.read()
            ret, frame4 = cap4.read()
            ret, frame5 = cap5.read()
            ret, frame6 = cap6.read()

            frame1 = cv2.resize(frame1, (640, 480))
            frame2 = cv2.resize(frame2, (640, 480))
            frame3 = cv2.resize(frame3, (640, 480))
            frame4 = cv2.resize(frame4, (640, 480))
            frame5 = cv2.resize(frame5, (640, 480))
            frame6 = cv2.resize(frame6, (640, 480))

            stitched = self.start_stitching(frame1, frame2, frame3, frame4, frame5, frame6)
            cv2.imshow('stitched', stitched)

            if cv2.waitKey(1) & 0xFF == ord('q'):
                break

    # frame stitching
    def start_stitching(self, frame1, frame2, frame3, frame4, frame5, frame6):

        f1_path = './data/f1.jpg'
        cv2.imwrite(f1_path, frame1)
        f2_path = './data/f2.jpg'
        cv2.imwrite(f2_path, frame2)
        f3_path = './data/f3.jpg'
        cv2.imwrite(f3_path, frame3)
        f4_path = './data/f4.jpg'
        cv2.imwrite(f4_path, frame4)
        f5_path = './data/f5.jpg'
        cv2.imwrite(f5_path, frame5)
        f6_path = './data/f6.jpg'
        cv2.imwrite(f6_path, frame6)

        frame_list = [f1_path, f2_path, f3_path, f4_path, f5_path, f6_path]
        stitched = self.stitcher.stitch(frame_list)

        return stitched


if __name__ == '__main__' :
    vs = VideoStitcher()
    vs.run_video()
세팅한 주요 파라미터 설명
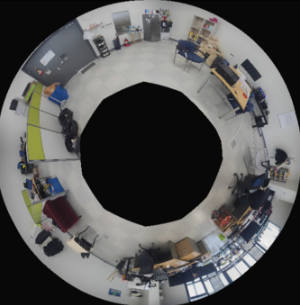
warper_type: input type으로 stitching result를 warping 시켜준다.
- possible options : spherical, plane, affine, cylindrical, fisheye, stereographic, compressedPlaneA2B1, compressedPlaneA1.5B1, compressedPlanePortraitA2B1, compressedPlanePortraitA1.5B1, paniniA2B1, paniniA1.5B1, paniniPortraitA2B1, paniniPortraitA1.5B1, mercator, transverseMercator
detector: feature detection-description algorithm을 선택한다.
- possible options : orb,sift,brisk,akaze
nfeatures: detection에 사용될 feature의 수를 선택한다.
- default 개수는 500개이며, 늘리거나 줄일 수 있음(줄일 경우 stitching 퀄리티가 하락 할 수 있음)
try_use_gpu: 연산 시 gpu를 사용한다.
- True일 경우 gpu 사용됨

AI에 대체되지 않는 인재가 되자