1. 우리 주변의 이미지 처리 기술 예시
- 얼굴 인식 카메라
- 화질 개선(Super Resolution)*
- 이미지 자동 태깅
기존에 다루던 데이터들: 정형데이터 DataFrame형태로 정리되어있던.
이미지 데이터는 그렇지 않음
컴퓨터에게 이미지는 각 픽셀 값을 가진 숫자 배열로 인식
픽셀당 갖고 있는 값은 해당 픽셀을 채울 색상을 의미
2. 이미지 전 처리하기
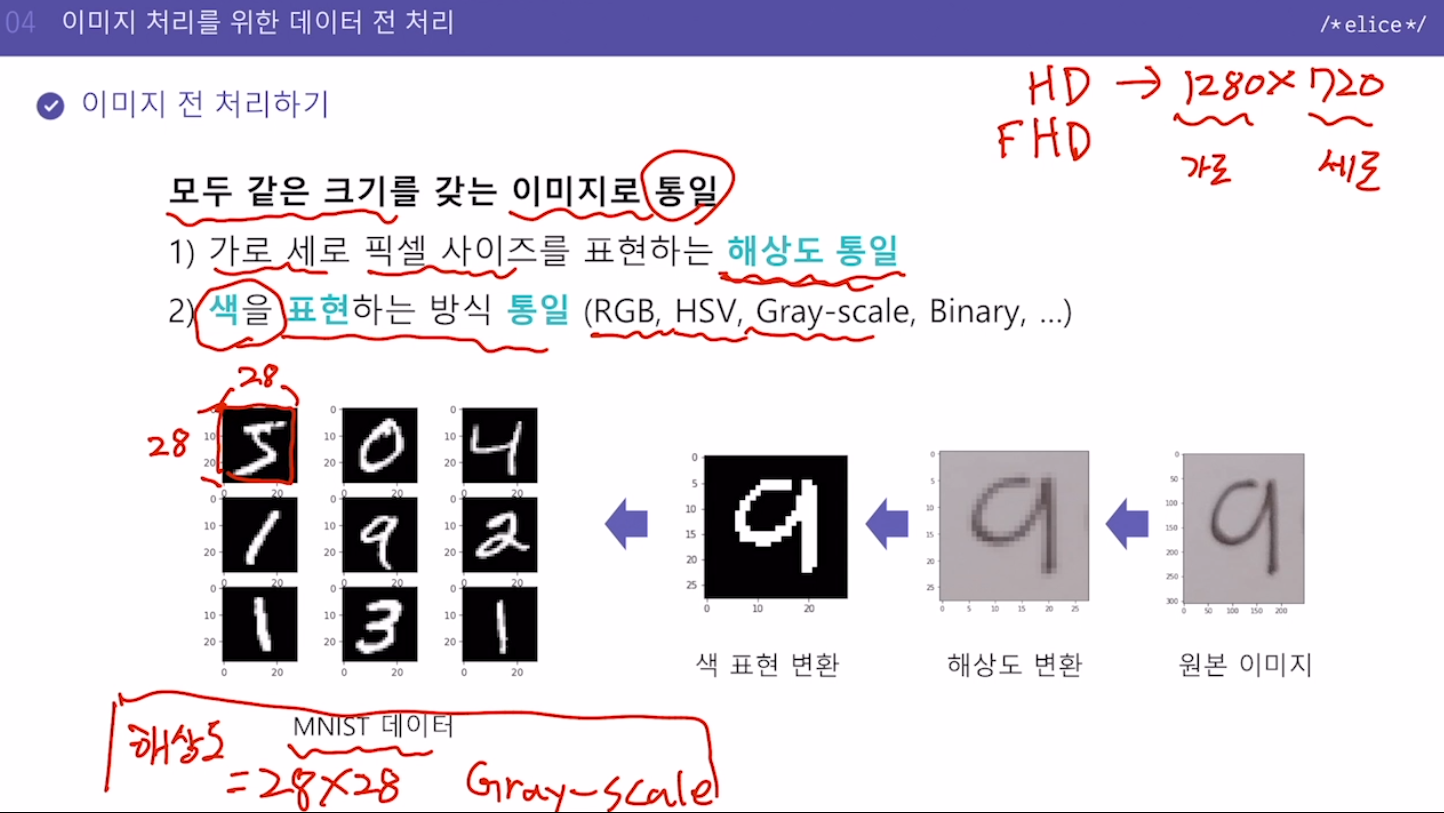
모두 같은 크기를 갖는 이미지로 통일
1) 가로 세로 픽셀 사이즈를 표현하는 '해상도' 통일
2) 색을 표현하는 방식 통일 (RGB, HSV, Gray-scale, Binary, ...)

모든 이미지의 해상도를 28x28로 변환(통일)
모든 이미지의 색 표현도 Gray-scale로 변환(통일)
3. 실습. MNIST 분류 CNN 모델 - 데이터 전 처리
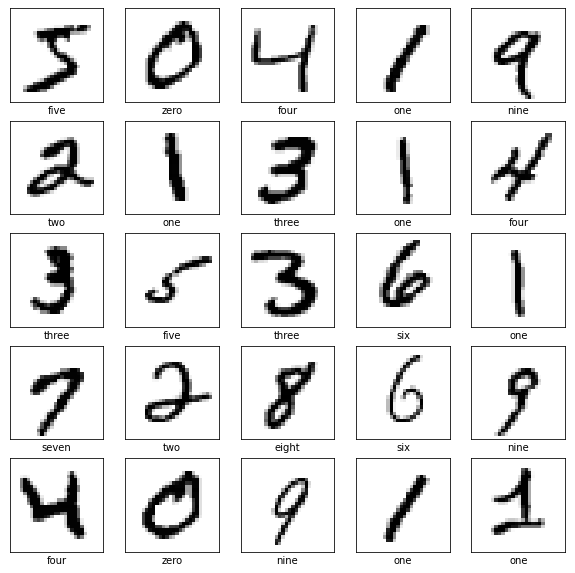
신경망을 이용한 학습을 시작할 때 대부분 MNIST를 접하게 됩니다. MNIST는 손글씨로 된 사진을 모아 둔 데이터입니다.
손으로 쓴 0부터 9까지의 글자들이 있고, 이 데이터를 사용해서 신경망을 학습시키고, 학습 결과가 손글씨를 인식할 수 있는지 검증합니다.

이번 실습에서는 우선 이미지 데이터를 출력하고 그 형태를 확인하여 CNN 모델에 적용할 수 있도록 데이터 전 처리를 수행합니다.
CNN을 위한 데이터 전처리
MNIST 데이터는 이미지 데이터이지만 가로 길이와 세로 길이만 존재하는 2차원 데이터입니다. CNN 모델은 채널(RGB 혹은 흑백)까지 고려한 3차원 데이터를 입력으로 받기에 채널 차원을 추가해 데이터의 모양(shape)을 바꿔줍니다. 결과는 아래와 같습니다.
[데이터 수, 가로 길이, 세로 길이]
-> [데이터 수, 가로 길이, 세로 길이, 채널 수]
- 차원 추가 함수
tf.expand_dims(data, axis)
: Tensor 배열 데이터에서 마지막 축(axis)에 해당하는 곳에 차원 하나를 추가할 수 있는 코드입니다. ( axis에 -1을 넣으면 어떤 data가 들어오던 마지막 축의 index를 의미합니다.)
지시사항
학습용 및 평가용 데이터를 CNN 모델의 입력으로 사용할 수 있도록 (샘플개수, 가로픽셀, 세로픽셀, 1) 형태로 변환합니다.
- tf.expand_dims 함수를 활용하여 train_images, test_images 데이터의 형태를 변환하고 각각 train_images, test_images에 저장합니다.
import numpy as np
import tensorflow as tf
import matplotlib.pyplot as plt
from elice_utils import EliceUtils

elice_utils = EliceUtils()

import logging, os
logging.disable(logging.WARNING)
os.environ["TF_CPP_MIN_LOG_LEVEL"] = "3"

# 동일한 실행 결과 확인을 위한 코드입니다.
np.random.seed(123)
tf.random.set_seed(123)


# MNIST 데이터 세트를 불러옵니다.
mnist = tf.keras.datasets.mnist

# MNIST 데이터 세트를 Train set과 Test set으로 나누어 줍니다.
(train_images, train_labels), (test_images, test_labels) = mnist.load_data()
# 이 load_data() 메서드를 쓰면 텐서형태로 저장되어있어서 따로 텐서로 변환할 필요 없음

# Train 데이터 5000개와 Test 데이터 1000개를 사용합니다.
train_images, train_labels = train_images[:5000], train_labels[:5000]
test_images, test_labels = test_images[:1000], test_labels[:1000]


print("원본 학습용 이미지 데이터 형태: ",train_images.shape)
print("원본 평가용 이미지 데이터 형태: ",test_images.shape)
print("원본 학습용 label 데이터: ",train_labels)

# 첫 번째 샘플 데이터를 출력합니다.
plt.figure(figsize=(10, 10))
plt.imshow(train_images[0], cmap=plt.cm.binary) # 첫번째 이미지를 gray-scale로 출력하겠단 의미
plt.colorbar()
plt.title("Training Data Sample")
plt.savefig("sample1.png")
elice_utils.send_image("sample1.png")

# 9개의 학습용 샘플 데이터를 출력합니다.
class_names = ['zero', 'one', 'two', 'three', 'four', 'five', 'six', 'seven', 'eight', 'nine']
for i in range(9):
    plt.subplot(3,3,i+1)
    plt.xticks([])
    plt.yticks([])
    plt.grid(False)
    plt.imshow(train_images[i], cmap=plt.cm.binary)
    plt.xlabel(class_names[train_labels[i]])
plt.savefig("sample2.png")
elice_utils.send_image("sample2.png")

"""
1. CNN 모델의 입력으로 사용할 수 있도록 (샘플개수, 가로픽셀, 세로픽셀, 1) 형태로 변환합니다.
"""
train_images = tf.expand_dims(train_images, -1)
test_images = tf.expand_dims(test_images, -1)

print("변환한 학습용 이미지 데이터 형태: ",train_images.shape)
print("변환한 평가용 이미지 데이터 형태: ",test_images.shape)