1. 방문정보 분석
- 연령/성별, 지역, 트래픽 소스, 방문페이지, 제품 등의 측정 기준을 통해서 사용자의 특성 분석
=> 사용자의 유지 이탈, 집단 간 상이한 행동 패턴 분석 가능
예) 구글 애널리틱스(웹) / 구글 파이어베이스(앱)
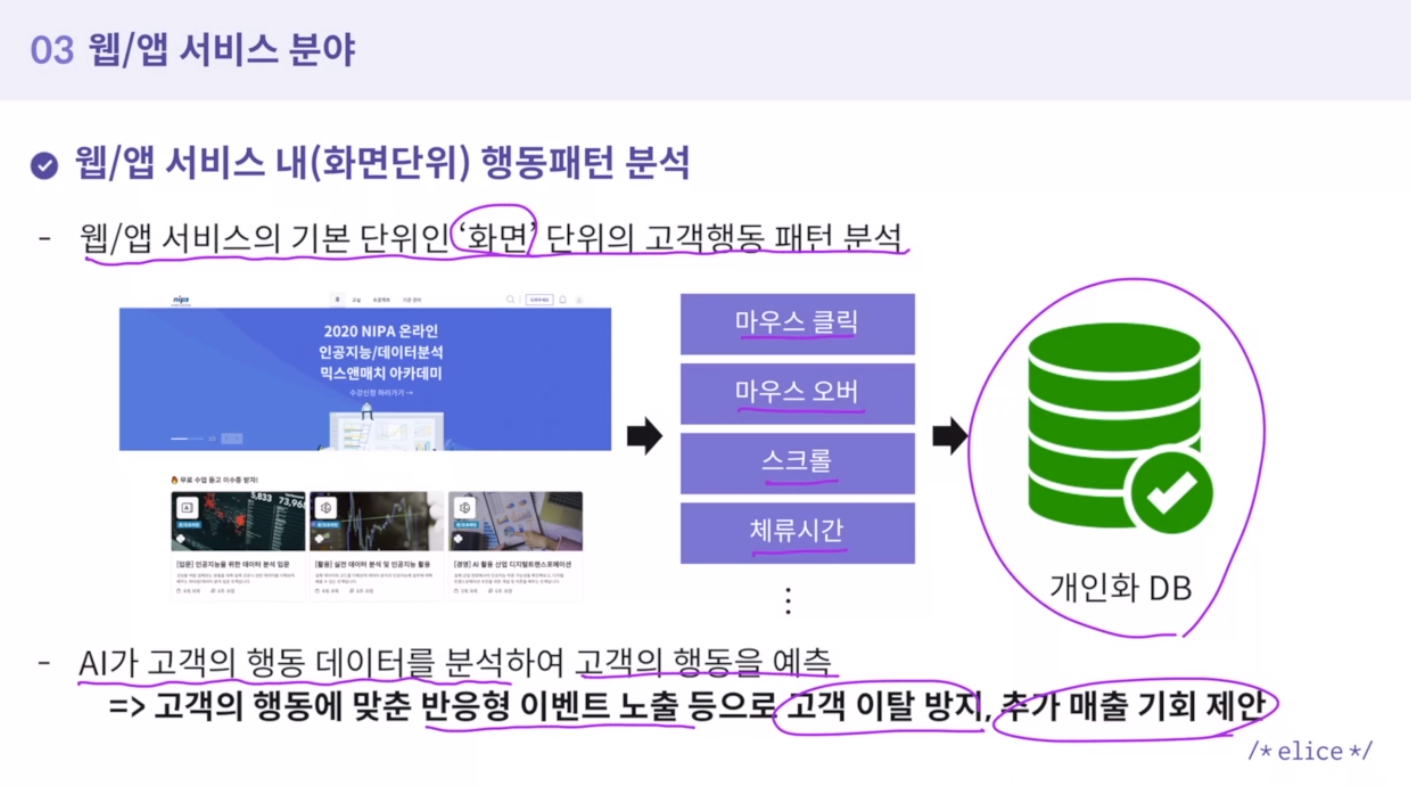
2. 화면단위 행동 패턴 분석
-
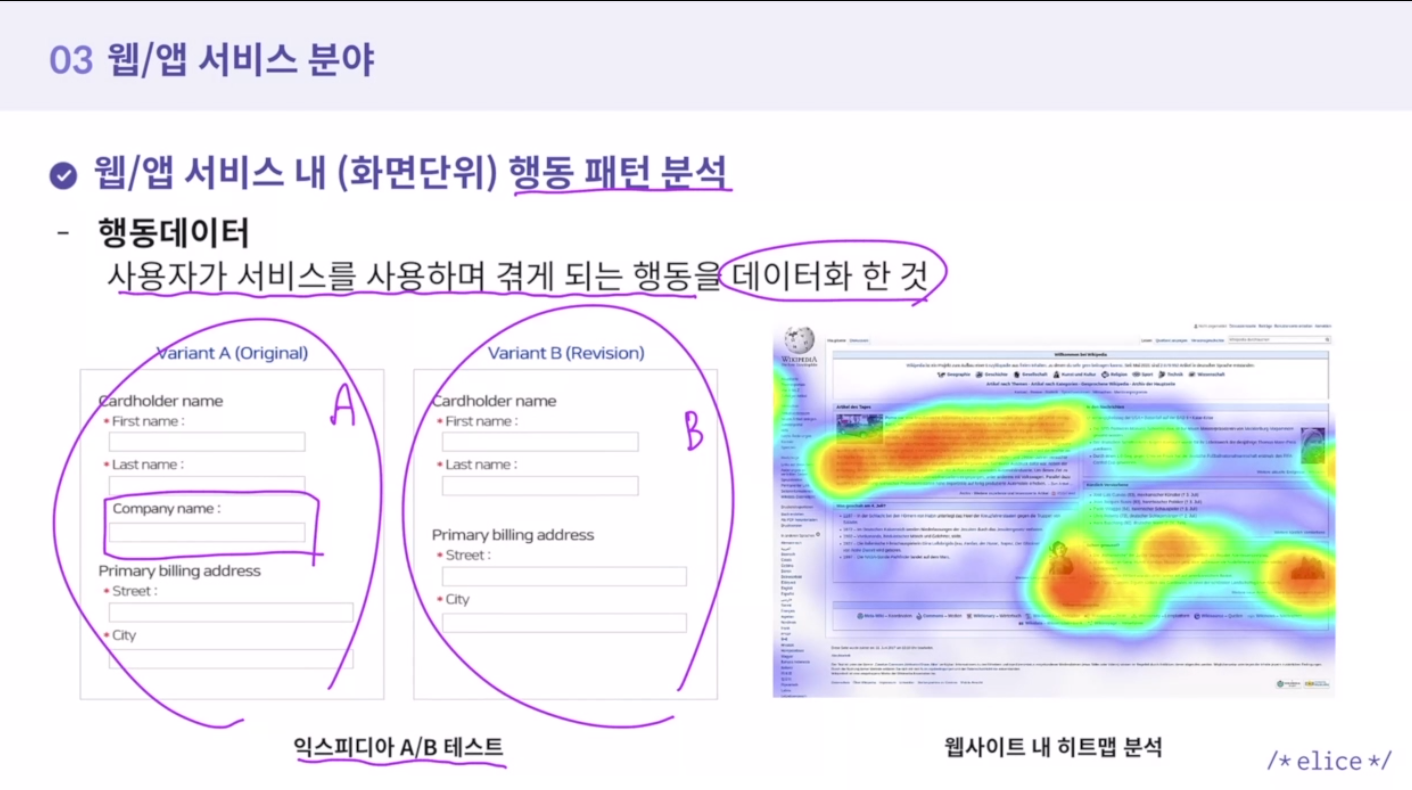
행동데이터
사용자가 서비스를 사용하며 겪게 되는 행동을 데이터화 한 것 -
A/B테스트
-
웹사이트 내 히트맵 분석
3. 실습
실습1
from __future__ import absolute_import, division, print_function, unicode_literals

import tensorflow as tf
import numpy as np

import cv2
import matplotlib.pyplot as plt

import warnings
warnings.filterwarnings("ignore", category=DeprecationWarning)

from elice_utils import EliceUtils
elice_utils = EliceUtils()


def data_print():

    img = cv2.imread("data/numbers.jpg")

    print("원본 이미지를 출력합니다.")
    plt.figure(figsize=(15,12))
    plt.imshow(img);

    plt.savefig("result2.png")
    elice_utils.send_image("result2.png")

    img_gray = cv2.cvtColor(img, cv2.COLOR_BGR2GRAY)
    img_blur = cv2.GaussianBlur(img_gray, (5, 5), 0)
    img_th = cv2.threshold(img_blur, 155, 250, cv2.THRESH_BINARY_INV)[1]

    contours, hierachy= cv2.findContours(img_th, cv2.RETR_EXTERNAL, cv2.CHAIN_APPROX_NONE)

    rects = [cv2.boundingRect(each) for each in contours]

    tmp = [w*h for (x,y,w,h) in rects]
    tmp.sort()

    rects = [(x,y,w,h) for (x,y,w,h) in rects if ((w*h>1000)and(w*h<500000))]

    print("\n이미지를 분할할 영역을 표시합니다.")
    for rect in rects:
    # Draw the rectangles
        cv2.rectangle(img, (rect[0], rect[1]), (rect[0] + rect[2], rect[1] + rect[3]), (0, 255, 0), 5)
    plt.clf()
    plt.figure(figsize=(15,12))
    plt.imshow(img);
    plt.savefig("result3.png")
    elice_utils.send_image("result3.png")

    seg_img = []

    margin_pixel = 50

    for cnt in contours:
        x, y, w, h = cv2.boundingRect(cnt)

        # Drawing a rectangle on copied image
        if ((w*h>1000)and(w*h<500000)):

            # Cropping the text block for giving input to OCR
            cropped = img.copy()[y - margin_pixel:y + h + margin_pixel, x - margin_pixel:x + w + margin_pixel]
            seg_img.append(cropped)

            rect = cv2.rectangle(img, (x, y), (x + w, y + h), (0, 255, 255), 5)

    print("\n분할 된 이미지를 출력합니다.")
    for i in range(len(seg_img)):
        plt.clf()
        plt.imshow(seg_img[i]);
        plt.savefig("result4.png")
        elice_utils.send_image("result4.png")


    re_seg_img = []

    for i in range(len(seg_img)):
        re_seg_img.append(cv2.resize(seg_img[i], (28,28), interpolation=cv2.INTER_AREA))

    gray = cv2.cvtColor(re_seg_img[0], cv2.COLOR_BGR2GRAY)
import machine as ma

def main():

    """
    지시사항 1번. 손글씨 이미지에서 숫자 부분만 분리하는 과정을 수행해보세요.
    """
    ma.data_print()

if __name__ == "__main__":
    main()
실습2. 손글씨 분류 딥러닝 모델
from __future__ import absolute_import, division, print_function, unicode_literals

import tensorflow as tf
import numpy as np

import cv2
import matplotlib.pyplot as plt

import warnings
warnings.filterwarnings("ignore", category=DeprecationWarning)

from elice_utils import EliceUtils
elice_utils = EliceUtils()

def train():
    mnist = tf.keras.datasets.mnist

    (x_train, y_train), (x_test, y_test) = mnist.load_data()
    x_train, x_test = x_train / 255.0, x_test / 255.0

    # model에 batch normalization layer 추가
    model = tf.keras.models.Sequential([
      tf.keras.layers.Flatten(input_shape=(28, 28)),
      tf.keras.layers.Dense(128, activation='relu'),
      tf.keras.layers.Dense(128, activation='relu'),
      tf.keras.layers.Dense(10, activation='softmax')
      #tf.keras.layers.Dense(10, activation='relu')
    ])

    # adam외의 optimizer로 변경
    # sparse_categorical_crossentropy외의 loss로 변경
    model.compile(optimizer='adam',
                  loss='sparse_categorical_crossentropy',
                  metrics=['accuracy'])

    # epochs 값 변경
    model.fit(x_train, y_train, epochs=5)

    model.evaluate(x_test,  y_test, verbose=2)

    # 임의의 5가지 test data의 이미지와 레이블값을 출력하고 예측된 레이블값 출력
    predictions = model.predict(x_test)
    idx_n = [15, 34, 68, 75, 98]

    for i in idx_n:

        img = x_test[i].reshape(28,28)
        plt.imshow(img,cmap="gray")
        plt.show()
        plt.savefig("result1.png")
        elice_utils.send_image("result1.png")

        print("Label: ", y_test[i])
        print("Prediction: ", np.argmax(predictions[i]))

    return model
import machine as ma

def main():

    """
    지시사항 1번. MNIST 데이터를 학습하는 인공지능 모델을 구현해보세요.
    """
    model = ma.train()

if __name__ == "__main__":
    main()
실습3. 분할된 이미지의 숫자 예측
from __future__ import absolute_import, division, print_function, unicode_literals

import tensorflow as tf
import numpy as np

import cv2
import matplotlib.pyplot as plt

import warnings
warnings.simplefilter("ignore")

from elice_utils import EliceUtils
elice_utils = EliceUtils()

import os
os.environ['TF_CPP_MIN_LOG_LEVEL'] = '3'

from tensorflow.python.util import deprecation
deprecation._PRINT_DEPRECATION_WARNINGS = False

tf.compat.v1.logging.set_verbosity(tf.compat.v1.logging.ERROR)

def data_predit():

    # model에 batch normalization layer 추가
    model = tf.keras.models.Sequential([
      tf.keras.layers.Flatten(input_shape=(28, 28)),
      tf.keras.layers.Dense(128, activation='relu'),
      tf.keras.layers.Dense(128, activation='relu'),
      tf.keras.layers.Dense(10, activation='softmax')
      #tf.keras.layers.Dense(10, activation='relu')
    ])

    # adam외의 optimizer로 변경
    # sparse_categorical_crossentropy외의 loss로 변경
    model.compile(optimizer='adam',
                  loss='sparse_categorical_crossentropy',
                  metrics=['accuracy'])

    import os

    checkpoint_path = "./cp.ckpt"
    checkpoint_dir = os.path.dirname(checkpoint_path)

    model.load_weights(checkpoint_path)


    img = cv2.imread("data/numbers.jpg")

    img_gray = cv2.cvtColor(img, cv2.COLOR_BGR2GRAY)
    img_blur = cv2.GaussianBlur(img_gray, (5, 5), 0)
    img_th = cv2.threshold(img_blur, 150, 250, cv2.THRESH_BINARY_INV)[1]

    contours, hierachy= cv2.findContours(img_th, cv2.RETR_EXTERNAL, cv2.CHAIN_APPROX_NONE)

    rects = [cv2.boundingRect(each) for each in contours]

    tmp = [w*h for (x,y,w,h) in rects]
    tmp.sort()

    rects = [(x,y,w,h) for (x,y,w,h) in rects if ((w*h>1000)and(w*h<500000))]

    for rect in rects:
    # Draw the rectangles
        cv2.rectangle(img, (rect[0], rect[1]), (rect[0] + rect[2], rect[1] + rect[3]), (0, 255, 0), 5)


    seg_img = []

    margin_pixel = 50

    for cnt in contours:
        x, y, w, h = cv2.boundingRect(cnt)

        # Drawing a rectangle on copied image
        if ((w*h>1500)and(w*h<600000)):

            # Cropping the text block for giving input to OCR
            cropped = img.copy()[y - margin_pixel:y + h + margin_pixel, x - margin_pixel:x + w + margin_pixel]
            seg_img.append(cropped)

            rect = cv2.rectangle(img, (x, y), (x + w, y + h), (0, 255, 255), 5)

    re_seg_img = []

    for i in range(len(seg_img)):
        re_seg_img.append(cv2.resize(seg_img[i], (28,28), interpolation=cv2.INTER_AREA))

    gray = cv2.cvtColor(re_seg_img[0], cv2.COLOR_BGR2GRAY)

    for i in range(len(seg_img)):

        gray = cv2.cvtColor(re_seg_img[i], cv2.COLOR_BGR2GRAY)
        img_binary = cv2.threshold(gray, 150, 250, cv2.THRESH_BINARY_INV)[1]
        test = img_binary.reshape(1,28,28) / 255.0

        #print(len(test))

        predictions = model.predict(test)

        img_test = test.reshape(28,28)
        plt.clf()

        plt.subplot(121)
        plt.imshow(seg_img[i])
        plt.title('Origin')

        plt.subplot(122)
        plt.imshow(img_test,cmap="gray")
        plt.title('Coverted')
        plt.show()

        plt.savefig("result4.png")
        elice_utils.send_image("result4.png")

        #print("Label: ", y_test[i])
        print("Prediction: ", np.argmax(predictions))
import machine as ma
def main():
"""
지시사항 1번. 이미지 변환 과정과 예측 과정을 수행해보세요.
"""
ma.data_predit()
if __name__ == "__main__":
main()
백엔드 개발자. 공동의 목표를 함께 이해한 상태에서 솔직하게 소통하며 일하는 게 가장 즐겁고 효율적이라고 믿는 사람.