table 사용
div를 이용해서 테이블을 만들 수도 있지만, html에서는 표를 만드는데 이미 도움이 되도록 관련 태그가 있다.
table 태그를 비롯한 것들이다.
<!DOCTYPE html>
<html lang="en">
<head>
  <meta charset="UTF-8">
  <meta name="viewport" content="width=device-width, initial-scale=1.0">
  <title>Document</title>
  <link rel="stylesheet" href="./css/layout4.css">
</head>
<body>
  <div>
    <table>
      <tr>
        <th>1</th>
        <td>2</td>
        <td>3</td>
      </tr>
      <tr>
        <td>1</td>
        <td>2</td>
        <td>3</td>
      </tr>
    </table>
  </div>
</body>
</html>
td, th {
border: 1px solid black;
}
table{
border-collapse: collapse;
}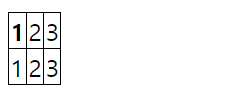
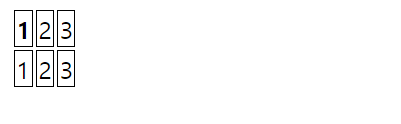
우선 위처럼 해주었다.
참고로
border-collapse: collapse;를 사용하면 table이 가진 틈을 없애기 위해 사용했고, 사용하지 않으면 아래처럼 보인다.
어떤 표를 만들고 싶으면
table 태그로 감싸주고, 그 안에 표시할 행만큼 tr태그를 생성, 그리고 tr태그 안에 데이터들(열) 만큼 생성 해주면된다.
위는 1개의 테이블에 2개의 행 3개의 열이 있는 표가 된다.
이 table -> tr -> td 의 순서는 바꿔서 사용할 수가 없으니 인지하고 사용하면 된다.
      <thead></thead>
      <tbody></tbody>
또한 이런 것이 있는데 표를 보면 구분하는 제목이 있기 마련이다.
이런 것을 thead 안에, 일반적인 행은 tbody안에 넣어서 작성하면 훨씬 깔끔해지니 이렇게 이용하면 되겠다.
기능상에 차이는 없으나, 코드 짤 때 구분하기가 좋다.
<!DOCTYPE html>
<html lang="en">
<head>
<meta charset="UTF-8">
<meta name="viewport" content="width=device-width, initial-scale=1.0">
<title>Document</title>
<link rel="stylesheet" href="./css/layout4.css">
</head>
<body>
<div>
<table>
<thead>
<tr>
<th>1</th>
<td>2</td>
<td>3</td>
</tr>
</thead>
<tbody>
<tr>
<td>1</td>
<td>2</td>
<td>3</td>
</tr>
</tbody>
</table>
</div>
</body>
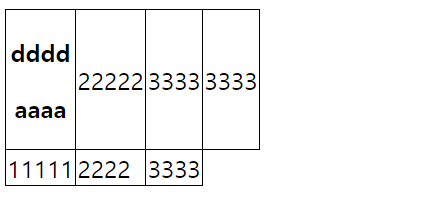
</html>vertical-align
셀 안의 요소를 상하 정렬 할 때 사용한다.
이런 것을
<!DOCTYPE html>
<html lang="en">
<head>
  <meta charset="UTF-8">
  <meta name="viewport" content="width=device-width, initial-scale=1.0">
  <title>Document</title>
  <link rel="stylesheet" href="./css/layout4.css">
</head>
<body>
  <div>
    <table>
      <thead>
        <tr>
          <th>
            <p>dddd</p>
            <p>aaaa</p>
          </th>
          <td style="vertical-align: top;">22222</td>
          <td style="vertical-align: bottom;">3333</td>
          <td style="vertical-align: middle;">3333</td>
        </tr>
      </thead>
      <tbody>
        <tr>
          <td>11111</td>
          <td>2222</td>
          <td>3333</td>
        </tr>
      </tbody>
    </table>
  </div>
</body>
</html>
/* table태그에서 vertical-align는 아래 3개만 가능 */
vertical-align: top;
vertical-align: bottom;
vertical-align: middle;을 이용해서
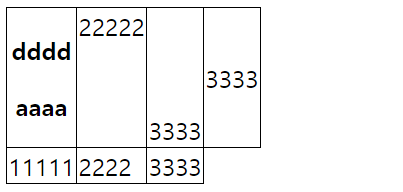
이런 식으로 만들 수도 있다.
또한 아래처럼 글씨간의 크기 차이가 발생했을 때도 사용가능하다.

vertical-align: top;속성을 안녕에다가 주면 아래 처럼 된다.

div로 표 만들기
<div style="display: table">
    <div style="display: table-row;">
      <div style="display:table-cell"></div>
      <div style="display:table-cell"></div>
    </div>
  </div>
위와 같은 방식을 사용하면 table을 사용한 것처럼 사용할 수 있다.
table태그로 표 만들기 예시
<!DOCTYPE html>
<html lang="en">
<head>
  <meta charset="UTF-8">
  <meta name="viewport" content="width=device-width, initial-scale=1.0">
  <title>Document</title>
  <link rel="stylesheet" href="./css/layout5.css">
</head>
<body>
  <div class="cart-background">
    <h3>Your Shopping cart</h3>
    <table class="cart-table">
      <thead>
        <tr>
          <th></th>
          <th class="cell-long">Item</th>
          <th>Amount</th>
          <th>Price</th>
          <th>Total</th>
        </tr>
      </thead>
      <tbody>
        <tr>
          <td><img src="./img/item1.png" alt="" width="50px"></td>
          <td>카메라</td>
          <td>1</td>
          <td>7000</td>
          <td>7000</td>
        </tr>
        <tr>
          <td colspan="5" style="text-align: right;">총가격 : 7000</td>
        </tr>
      </tbody>
    </table>
  </div>
</body>
</html>
td, th {
/* border: 1px solid black; */
}
.cart-table td, .cart-table th{
padding: 15px;
border-bottom: 1px solid #c2d3de;
}
table{
border-collapse: collapse;
}
.cart-background{
width: 100%;
background-color: #c2dede;
padding: 30px;
}
.cart-table{
width: 100%;
max-width: 700px;
margin: auto;
background: white;
border-radius: 10px;
}
.cart-table th:nth-child(2){
width: 400px;
}
/* .cell-long{
width: 700px;
} */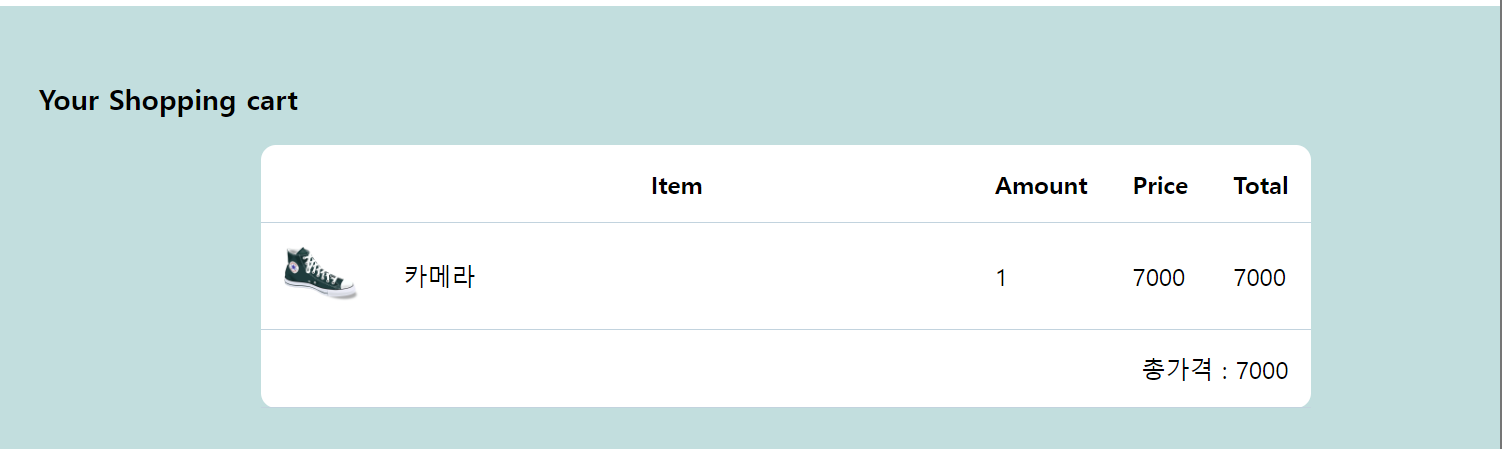
위 코드로 나온 결과이다.
thead태그에 각 데이터의 명칭을 담아 주었다.
여기서
<th class="cell-long">Item</th>
.cell-long{
  width: 700px;
}
을 사용하여 준다면 해당 열의 데이터들 모두가 이 cell-long의 속성을 받음을 확인 할 수 있다.
이유는 표의 크기가 각기 따로 놀지를 않기 때문이다.
또한
.cart-table th:nth-child(2){
  width: 400px;
}
이와 같은 css도 적용시켰는데, 이렇게 한다면, cart-table의 th인데 2번째에 있는 th에게 width:400px을 적용시키겠다는 의미가 된다.
그리고
<tr>
	<td colspan="5" style="text-align: right;">총가격 : 7000</td>
</tr>
이 코드를 보면 colspan이라는 것이 보이는데 td를 옆의 셀까지 포함해 5개 합친 셀로서 이용하겠다는 의미이다.
colspan="2" 면 2개를 합친 셀로서 이용하겠다는 의미가 된다.
그리고
.cart-table td, .cart-table th{
  padding: 15px;
  border-bottom: 1px solid #c2d3de;
}
해당 css에서 볼 수 있듯이 table도 border의 속성을 border-bottom과 같은 형식으로 줄 수 있다.
추가
table 태그에 border-collapse을 적용하면, border-radius가 안먹히는 경우가 있는데 이럴 땐 아래처럼 하면 된다.
table {
  border-collapse : collapse;
  border-spacing : 0;
}

(왼쪽위에있는 td) {
  border-top-left-radius : 5px;
}
각 끝 셀에서 적용시키는 방법
또는
table {
  border-collapse : collapse;
  border-radius : 7px;
  border-style : hidden;
  box-shadow : 0 0 0 1px #666;
}
그림자 넣는 속성인 box-shadow을 이용해 테두리를 가짜로 만들어내는 편법을 쓸 수 있다.