1. Dataset download
- nuScenes dataset을 다운받는다
- 여러 dataset이 있지만 용량 문제로 인해 mini 버전을 다운받았다
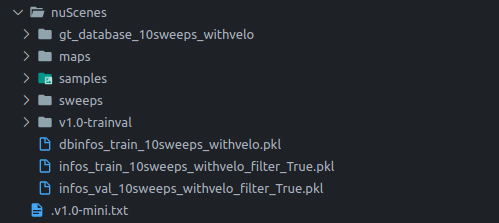
데이터 구조
- mini dataset을 다운받으면
v1.0-trainval이 아니라v1.0-mini인데 이를v1.0-trainval로 변경해야 한다
└─ NUSCENES_DATASET_ROOT
     ├── samples       <-- key frames
     ├── sweeps        <-- frames without annotation
     ├── maps          <-- unused
     └── v1.0-trainval <-- metadata
2. create_data
- CenterPoint 폴더 위치에서 create_data.py 파일을 실행한다
# python tools/create_data.py nuscenes_data_prep --root_path=NUSCENES_TRAINVAL_DATASET_ROOT --version="v1.0-trainval" --nsweeps=10

예시)
# python tools/create_data.py nuscenes_data_prep --root_path=/workspace/data/nuScenes/ --version="v1.0-trainval" --nsweeps=10- 그 결과 .plk 파일 3개와 gt_database가 생성되었다
cv2 에러
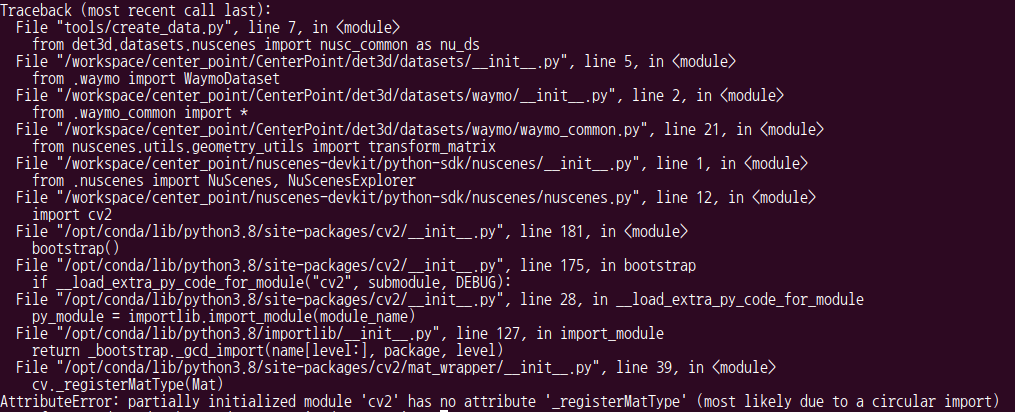
- 해결 방법
!pip install "opencv-python-headless<4.3"2. training
train.py 실행
- CenterPoint/에서 실행
--nproc_per_node: 자신의 코어 수에 맞게 설정한다CONFIG_PATH: 실행시킬 모델의 경로- nusc_centerpoint_voxelnet_0075voxel_fix_bn_z 모델의 성능이 가장 좋기 때문에 이 모델을 선택하였다
# python -m torch.distributed.launch --nproc_per_node=1 ./tools/train.py CONFIG_PATH

예시)
# python -m torch.distributed.launch --nproc_per_node=1 ./tools/train.py configs/nusc/voxelnet/nusc_centerpoint_voxelnet_0075voxel_fix_bn_z.py
파일 경로 수정
- 만약 data가 깃헙처럼 구성되어 있지 않다면 코드를 수정해주면된다
- nusc_centerpoint_voxelnet_0075voxel_fix_bn_z.py에서 data_root, db_info_path, train_anno, val_anno 경로를 자신의 경로에 맞게 변경해주면 된다
epoch 변경 방법
- configs/nusc/voxelnet/nusc_centerpoint_voxelnet_0075voxel_fix_bn_z.py 파일 수정
total_epochs변수 값을 변경해주면 된다- 기본 epoch은 20으로 설정되어 있다

pretrained weight 사용 방법
- configs/nusc/voxelnet/nusc_centerpoint_voxelnet_0075voxel_fix_bn_z.py 파일 수정
resume_from변수에 원하는 pretrained weight(.pth) 경로를 넣어준다

- 이렇게 epoch 21부터 학습이 시작된다

weight 저장 epoch 수를 변경할 경우 -> 모르겠다
- /workspace/center_point/CenterPoint/det3d/torchie/trainer의 trainer.py 수정
- epoch이 5마다 weight가 저장되도록 하기 위해
if (self.epoch + 1) % 5 == 0:부분을 추가하였다 -> 적용되지 않았따

발생한 에러 해결
libmpi.so.40 에러
OSError: /usr/local/mpi/lib/libmpi.so.40: undefined symbol: opal_hwloc201_hwloc_get_type_depth- 해결 : 환경 변수를 설정 해준다
export LD_LIBRARY_PATH=/opt/hpcx/ompi/lib:$LD_LIBRARY_PATHCUDA invalid device ordinal 에러
RuntimeError: CUDA error: invalid device ordinal- GPU 관련 에러
nvidia-smi로 GPU를 확인해보니 1개였다- 처음에 실행할 때
--nproc_per_node=4이렇게 설정하니 GPU가 1개인데 4개를 사용한다고 해서 에러가 발생했다 - 1로 수정하니 해결되었다
- GPU 확인 명령어 :
nvidia-smi

shared memory (shm) 에러
Unexpected bus error encountered in worker. This might be caused by insufficient shared memory (shm).- docker 실행 명령 옵션으로
--ipc설정을 해줘야한다 - 하지만 이건 container를 생성할 때 해야한다
- 따라서 아래의 방법으로 container를 image로 만든 후 다시 container를 생성하면서 옵션을 추가하려고 한다
-
container -> image 생성
-
이미지 생성
docker commit [container명] [image명]$ docker commit laughing_shirley center_point_image -
이미지 생성 확인
$ docker images
-
container 생성
$ docker run -it --ipc=host --gpus all -v [host 경로]:[container 경로] -p 8888:8888 --name [container명] [image명] /bin/bash

예시)
$ docker run -it  --ipc=host --gpus all -v /home/ubuntu/nahye_torch/:/workspace/center_point -v /home/ubuntu/nuScenes_data/:/workspace/data -p 8888:8888 --name "nahye" nvcr.io/nvidia/pytorch:21.12-py3 /bin/bash
-
3. test
- CenterPoint 폴더에서 dist_test.py 실행
--work_dir: 결과를 저장하고 싶은 폴더 경로
---checkpoint: 모델 학습 결과 weight 파일 경로
# python -m torch.distributed.launch --nproc_per_node=1 ./tools/dist_test.py CONFIG_PATH --work_dir work_dirs/CONFIG_NAME --checkpoint work_dirs/CONFIG_NAME/latest.pth

또는
#python ./tools/dist_test.py CONFIG_PATH --work_dir work_dirs/CONFIG_NAME --checkpoint work_dirs/CONFIG_NAME/latest.pth --speed_test

예시)
# python ./tools/dist_test.py configs/nusc/voxelnet/nusc_centerpoint_voxelnet_0075voxel_fix_bn_z.py --work_dir work_dirs/nusc_centerpoint_voxelnet_0075voxel_fix_bn_z/ --checkpoint work_dirs/nusc_centerpoint_voxelnet_0075voxel_fix_bn_z/latest.pth --speed_test
test 결과
- 성능 지표값
- 이미지에 예측 bbox와 GT bbox가 그려진 이미지
- 결과에 대한 설명은 다음 포스트에 작성하였다
4. tracking
- CenterPoint 폴더에서 pub_test.py 실행
--work_dir: 결과를 저장하고 싶은 폴더 경로--checkpoint: 학습 결과 나온 ~filter_True.json 파일 경로
# python tools/nusc_tracking/pub_test.py --work_dir WORK_DIR_PATH  --checkpoint DETECTION_PATH

예시)
# python tools/nusc_tracking/pub_test.py --work_dir work_dirs/tracking_result/ --checkpoint work_dirs/nusc_centerpoint_voxelnet_0075voxel_fix_bn_z/infos_val_10sweeps_withvelo_filter_True.json
파일 경로 수정
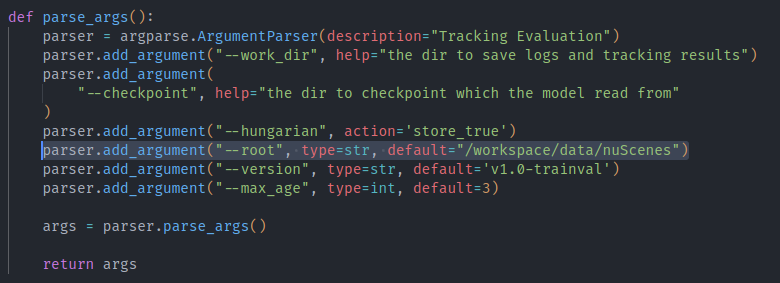
- tools/nusc_tracking/pub_test.py 파일 수정
- data 경로를 자신의 폴더에 맞게 변경해준다
tracking 결과
- tracking 관련 지표값
- 결과에 대한 설명은 다음 포스트에 작성하였다