The fetch() method takes one mandatory argument, the path to the resource you want to fetch. It returns a Promise that resolves to the Response to that request — as soon as the server responds with headers — even if the server response is an HTTP error status. You can also optionally pass in an init options object as the second argument (see Request).
A fetch() promise only rejects when a network error is encountered (which is usually when there's a permissions issue or similar). A fetch() promise does not reject on HTTP errors (404, etc.). Instead, a then() handler must check the Response.ok and/or Response.status properties.
Once a Response is retrieved, there are a number of methods available to define what the body content is and how it should be handled.
async function one() {
let url = 'https://api.github.com/repos/javascripttutorial/ko.javascript.info/commits';
let response = await fetch(url);
console.log(response);
}
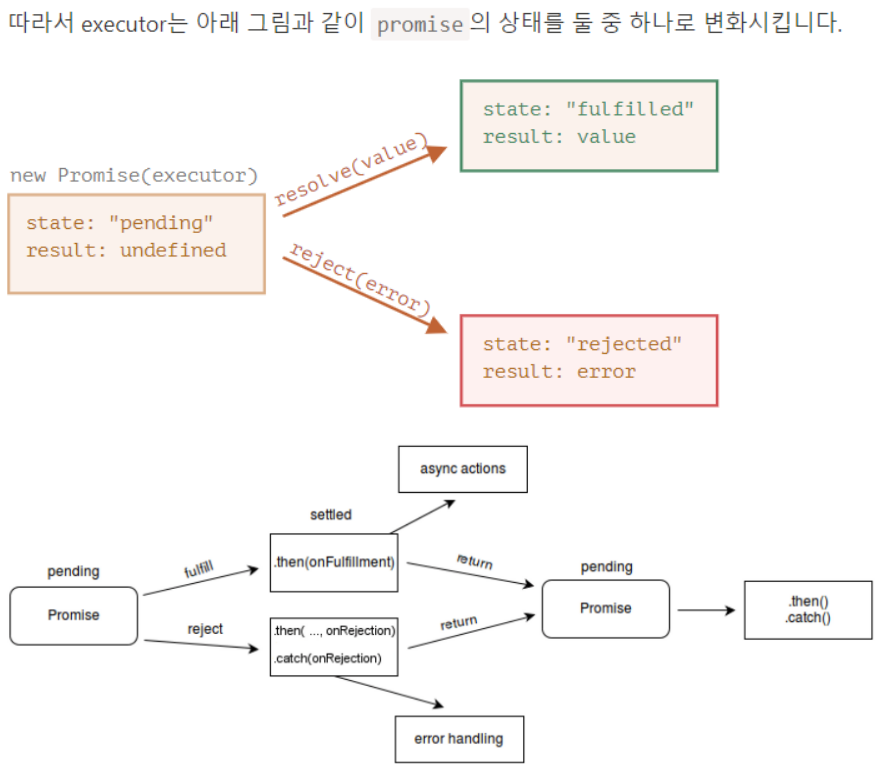
one();Promise를 생성하여 resolve, reject를 await가 기다리는 형식. await return의 결과로 response가 반환되거나 아니면 error가 반환 될 수도 있다. 기본적으로 네트워크나 보안 오류에서만 fetch는 error를 반환하고 HTTP error는 catch문을 사용하여 따로 설정 및 처리해 주어야 한다.
URL을 통한 비동기적 데이터 수용 func.
이후 response객체를 통한 본문을 읽을 때 사용되는 메서드는 딱 하나만 사용할 수 있습니다.
response.text()를 사용해 응답을 얻었다면 본문의 콘텐츠는 모두 처리 된 상태이기 때문에 response.json()은 동작하지 않습니다.
let text = await response.text(); // 응답 본문이 소비됩니다.
let parsed = await response.json(); // 실패
HTML.Status
The request succeeded. The result meaning of "success" depends on the HTTP method:
GET: The resource has been fetched and transmitted in the message body.HEAD: The representation headers are included in the response without any message body.PUTorPOST: The resource describing the result of the action is transmitted in the message body.TRACE: The message body contains the request message as received by the server.
Here’s the full list of all possible fetch options with their default values (alternatives in comments):
let promise = fetch(url, {
  method: "GET", // POST, PUT, DELETE, etc.
  headers: {
    // the content type header value is usually auto-set
    // depending on the request body
    "Content-Type": "text/plain;charset=UTF-8"
  },
  body: undefined // string, FormData, Blob, BufferSource, or URLSearchParams
  referrer: "about:client", // or "" to send no Referer header,
  // or an url from the current origin
  referrerPolicy: "no-referrer-when-downgrade", // no-referrer, origin, same-origin...
  mode: "cors", // same-origin, no-cors
  credentials: "same-origin", // omit, include
  cache: "default", // no-store, reload, no-cache, force-cache, or only-if-cached
  redirect: "follow", // manual, error
  integrity: "", // a hash, like "sha256-abcdef1234567890"
  keepalive: false, // true
  signal: undefined, // AbortController to abort request
  window: window // null
});
An impressive list, right?
We fully covered method, headers and body in the chapter Fetch.
The signal option is covered in Fetch: Abort.
Now let’s explore the remaining capabilities.
HTTP 리퍼러(HTTP Referer)는 웹 브라우저로 월드 와이드 웹을 서핑할 때, 하이퍼링크를 통해서 각각의 사이트로 방문시 남는 흔적
In HTTP, "Referer" (a misspelling of Referrer[1]) is the name of an optional HTTP header field that identifies the address of the web page (i.e., the URI or IRI), from which the resource has been requested. By checking the referrer, the server providing the new web page can see where the request originated.
In the most common situation, this means that when a user clicks a hyperlink in a web browser, causing the browser to send a request to the server holding the destination web page, the request may include the Referer field, which indicates the last page the user was on (the one where they clicked the link).
Web sites and web servers log the content of the received Referer field to identify the web page from which the user followed a link, for promotional or statistical purposes.[2] This entails a loss of privacy for the user and may introduce a security risk.
keepalive
The keepalive option indicates that the request may “outlive” the webpage that initiated it.
For example, we gather statistics on how the current visitor uses our page (mouse clicks, page fragments he views), to analyze and improve the user experience.
When the visitor leaves our page – we’d like to save the data to our server.
We can use the window.onunload event for that:
window.onunload = function() {
  fetch('/analytics', {
    method: 'POST',
    body: "statistics",
    keepalive: true
  });
};
Normally, when a document is unloaded, all associated network requests are aborted. But the keepalive option tells the browser to perform the request in the background, even after it leaves the page. So this option is essential for our request to succeed.
It has a few limitations:
- We can’t send megabytes: the body limit for
keepaliverequests is 64KB.
-
If we need to gather a lot of statistics about the visit, we should send it out regularly in packets, so that there won’t be a lot left for the last
onunloadrequest. -
This limit applies to all
keepaliverequests together. In other words, we can perform multiplekeepaliverequests in parallel, but the sum of their body lengths should not exceed 64KB. -
We can’t handle the server response if the document is unloaded. So in our example
fetchwill succeed due to
keepalive, but subsequent functions won’t work.
- In most cases, such as sending out statistics, it’s not a problem, as the server just accepts the data and usually sends an empty response to such requests.