detect 폴더를 만들어 그 안에 Java, Python 폴더를 각각 만들었다.
Java 폴더는 인텔리제이에서 실행,
Python 폴더는 vscode에서 실행했다.
# python 가상환경
python -m venv venv
cd 하고 Script 있는 경로 지정
activate
1.
main.py
vscode
import io
import numpy as np
import cv2
import base64
from fastapi import FastAPI, Form, UploadFile, File
from ultralytics import YOLO
from pydantic import BaseModel
from PIL import Image

app = FastAPI()
model = YOLO('yolo11n.pt')

@app.get("/")
async def test():
    return {"message": "Hello FastAPI!"}

def detect_objects(image: Image):
    img = np.array(image)
    results = model(img)
    class_names = model.names # 클래스 이름
    # print(class_names)

    for result in results:
        boxes = result.boxes.xyxy
        confidences = result.boxes.conf
        class_ids = result.boxes.cls
        # boxes : 탐지된 객체의 좌상단(x1, y1)과 우하단(x2, y2) 좌표
        # confidences : 해당 객체를 모델이 얼마나 확신하는지(0~1 값)
        # class_ids : 해당 객체가 어떤 클래스인지 나타내는 정수 ID
        for box, confidence, class_id in zip(boxes, confidences, class_ids):
            x1, y1, x2, y2 = map(int, box)
            label = class_names[int(class_id)]
            cv2.rectangle(img, (x1, y1), (x2, y2), (255, 0, 0), 2)
            cv2.putText(img, f'{label} {confidence:.2f}', (x1, y1), cv2.FONT_HERSHEY_DUPLEX, 0.9, (255, 0, 0), 2)
    result_image = Image.fromarray(img) # OpenCV가 사용하는 NumPy 배열을 다시 PIL Image로 변환하여 반환
    return result_image


class DetectionResult(BaseModel):
    message: str
    image: str

@app.post("/detect", response_model=DetectionResult)
async def detect_service(message: str = Form(...), file: UploadFile = File(...)):
    image = Image.open(io.BytesIO(await file.read()))

    if image.mode == 'RGBA':
        image = image.convert('RGB')
    elif image.mode != 'RGB':
        image = image.convert('RGB')

    result_image = detect_objects(image)

    # 메모리 버퍼(바이트 스트림) 만듦. 파일에 쓰지 않고 RAM 안에 바이너리 데이터를 담음
    buffered = io.BytesIO()
    result_image.save(buffered, format='JPEG')
    # 버퍼에 있는 JPEG 바이트를 꺼내 Base64로 인코딩
    # Base64 결과는 ASCII 바이트이므로 파이썬 문자열로 쓰기 위해 utf-8 문자열로 변경
    img_str = base64.b64encode(buffered.getvalue()).decode('utf-8')
    return DetectionResult(message=message, image=img_str)


if __name__ == "__main__":
    import uvicorn
    uvicorn.run(app, host="0.0.0.0", port=8000)
기존에 사용하던 yolo11n.pt를 yolov8n.pt로 교체하면, 동일 코드에서 YOLOv8 모델 성능을 확인할 수 있다.
io.BytesIO()
→ 메모리에 바이트 데이터를 저장하는 가상의 파일 객체
실제 하드디스크에 파일을 쓰지 않고, 메모리에서만 읽고 쓸 수 있다.
"임시 저장소"
buffered.getvalue(): 버퍼에 저장된 내용을 바이트(bytes)로 꺼낸다.
(이 시점에서 순수 JPEG 파일의 바이트 데이터가 있음)base64.b64encode(...): 이 바이트 데이터를 Base64로 인코딩
- Base64는 이미지를 문자 형태로 안전하게 전송할 수 있는 인코딩 방식
- 주로 JSON, HTML, 이메일 등에서 사용.decode('utf-8'): Base64 결과는 바이트이므로, UTF-8 문자열로 변환
→ 파이썬에서 일반 문자열처럼 다룰 수 있음
img_test.py
vscode
import requests

url = 'http://localhost:8000/detect'
message = 'people detect!'
file_path = 'people.jpg'

with open(file_path, 'rb') as file:
    response = requests.post(url, data={"message": message}, files={"file": file})

print(response.json())
index.html
인텔리제이
<!DOCTYPE html>
<html lang="en">
<head>
    <meta charset="UTF-8">
    <title>Detect</title>
</head>
<body>
<h2>Detect</h2>
<form method="post" enctype="multipart/form-data" id="fileUploadForm">
    <p>메세지: <input type="text" name="message"></p>
    <p>파일: <input type="file" name="file"></p>
    <p><button id="btn">전송</button></p>
</form>
<div id="result">결과 출력</div>

<script>
    const button = document.getElementById("btn")
    button.addEventListener("click", async function () {
        const form = document.getElementById("fileUploadForm")
        const formData = new FormData(form)
        const resultDiv = document.getElementById("result")
        button.disabled = true

        try {
            const resp = await fetch('http://localhost:8080/java_service', {
                method: 'post',
                body: formData
            })
            if(!resp.ok){
                const text = await resp.text().catch(()=>'')
                console.error('ERROR: ', resp.status, resp.statusText, text)
                alert('fail ' + resp.statusText)
                return
            }

            const data = await resp.json()
            resultDiv.innerHTML = (data.message || '') + '<br>'

            if(data.image){
                const img = document.createElement('img')
                img.src = 'data:image/png;base64,' + data.image
                resultDiv.appendChild(img)
            }
        }catch (err){
            console.error('ERROR: ', err)
            alert('fail ' + (err?.message || 'network error!'))
        }finally {
            button.disabled = false
        }
    })
</script>
</body>
</html>
RestResultController.java
인텔리제이
package com.koreait.detect.controller;

import org.springframework.http.MediaType;
import org.springframework.util.LinkedMultiValueMap;
import org.springframework.util.MultiValueMap;
import org.springframework.web.bind.annotation.PostMapping;
import org.springframework.web.bind.annotation.RequestPart;
import org.springframework.web.bind.annotation.RestController;
import org.springframework.web.client.RestClient;
import org.springframework.web.multipart.MultipartFile;

@RestController
public class RestResultController {

    private final RestClient restClient;

    public RestResultController(RestClient restClient){
        this.restClient = restClient;
    }

    @PostMapping("/java_service")
    public String serviceRequest(@RequestPart MultipartFile file,
                                 @RequestPart String message){
        // 한 키에 값이 여러 개 붙일 수 있는 Map
        MultiValueMap<String, Object> parts = new LinkedMultiValueMap<>();
        parts.add("message", message);
        parts.add("file", file.getResource());

        return restClient.post().uri("/detect")
                .contentType(MediaType.MULTIPART_FORM_DATA)
                .body(parts)
                .retrieve()
                .body(String.class);
    }
}
RestClientConfig.java
인텔리제이
package com.koreait.detect.config;

import org.springframework.context.annotation.Bean;
import org.springframework.context.annotation.Configuration;
import org.springframework.web.client.RestClient;

@Configuration
public class RestClientConfig {
    @Bean
    public RestClient restClient(){
        return RestClient.builder()
                .baseUrl("http://localhost:8000")
                .build();
    }
}
실행
uvicorn main:app --reloadimg_test.py도 실행
(단축키로 Ctrl+enter 등록해뒀다면 img_test.py 열려 있는 상태에서 Ctrl+enter!)
인텔리제이도 실행! localhost:8080
2.
mosquitto 여기서 2.0.8 버전 다운로드 받았다.
mosquitto.conf 파일 맨 밑에 이 내용을 추가하고 저장한다.↓
# MQTT 기본 리스너
listener 1883
protocol mqtt
# WebSocket 리스너 설정
listener 9001
protocol websockets
allow_anonymous true
저장이 잘 안되면, 다른 곳에 저장했다가 기존꺼 지우고 위 내용 저장된 것으로 교체하면 됨.
ai.py
vscode
# MQTT(Message Queuing Telemetry Transport)
# 전력, 네트워크, 리소스 소모가 적은 메시지 전송 프로토콜
# IoT 센서, 푸시 등
# window 2.0.18 버전 다운로드
import cv2
import sys
import paho.mqtt.client as mqtt
import numpy as np
import base64
import json
from ultralytics import YOLO

# Config
MODEL_PATH = 'yolo11n.pt'
BROKER = 'localhost'
PORT = 1883
CAMERA_INDEX = 0
WINDOW_TITLE = 'Frame'
FONT = cv2.FONT_HERSHEY_DUPLEX
SAVE_PATH = 'last_frame.jpg'
TOPIC = '/camera/objects'

def build_mqtt_client() -> mqtt.Client:
    # v2 콜백 API 사용
    client = mqtt.Client(callback_api_version=mqtt.CallbackAPIVersion.VERSION2)
    def on_connect(client, userdata, flags, reason_code, properties):
        print(f"[MQTT] Connected (reason={reason_code})")
    def on_disconnect(client, userdata, reason_code, properties):
        print(f"[MQTT] Disconnected (reason={reason_code})")
    def on_publish(client, userdata, mid, reason_code, properties):
        pass
    client.on_connect = on_connect
    client.on_disconnect = on_disconnect
    client.on_publish = on_publish
    return client

def detect_objects(image: np.ndarray, model: YOLO, colors: list[str]) -> np.ndarray:
    results = model(image, verbose=False)
    names = model.names # 클래스 이름
    for result in results:
        boxes = result.boxes.xyxy
        confidences = result.boxes.conf
        class_ids = result.boxes.cls
        for box, confidence, class_id in zip(boxes, confidences, class_ids):
            x1, y1, x2, y2 = map(int, box)
            cid = int(class_id)
            cid = cid if 0 <= cid < len(colors) else 0
            color = colors[cid]
            label = names.get(cid, f'class_{cid}')
            conf_txt = f'{float(confidence):.2f}'
            cv2.rectangle(image, (x1, y1), (x2, y2), (255, 0, 0), 2)
            text = f'{label} {conf_txt}'
            (tw, th), _ = cv2.getTextSize(text, FONT, 0.6, 2)
            cv2.rectangle(image, (x1, y1 - th - 6), (x1 + tw + 4, y1), color, -1)
            cv2.putText(image, text, (x1 + 2, y1 - 4), FONT, 0.6, (255, 255, 255), 2)
    return image

def get_colors(num_colors: int) -> list[tuple[int, int, int]]:
    rng = np.random.default_rng(0)
    colors = [tuple(int(x) for x in rng.integers(0, 255, size=3)) for _ in range(num_colors)]
    return colors

def main():
    try:
        model = YOLO(MODEL_PATH)
    except Exception as e:
        print(f'모델을 로드하지 못했습니다.')
        sys.exit(1)
    names_dict = model.names if isinstance(model.names, dict) else {i: n for i, n in enumerate(model.names)}
    num_classes = len(names_dict)
    colors = get_colors(num_classes if num_classes > 0 else 1)
    client = build_mqtt_client()
    try:
        client.connect(BROKER, PORT, keepalive=60)
        client.loop_start()
    except Exception as e:
        print('MQTT 연결 실패!')
    cap = cv2.VideoCapture(CAMERA_INDEX)
    if not cap.isOpened():
        print('카메라를 열지 못함')
        client.loop_stop()
        client.disconnect()
        sys.exit(1)
    try:
        while cap.isOpened():
            ret, frame = cap.read()
            if not ret:
                print('프레임을 찾을 수 없음')
                continue
            result_image = detect_objects(frame, model, colors)
            try:
                ok, buffer = cv2.imencode('.jpg', result_image, [cv2.IMWRITE_JPEG_QUALITY, 85])
                if ok:
                    jpg_b64 = base64.b64encode(buffer).decode('utf-8')
                    payload = json.dumps({'image': jpg_b64})
                    # qos=0: 최대 한 번 전송, 확인 없음
                    # qos=1: 적어도 한 번 전달 보장, 브로커가 PUBACK으로 확인해 줌
                    # qos=2: 정확히 한 번 전달, 4단계 핸드세이크로 가장 안전하지만 느리고 비용이 큼
                    client.publish(TOPIC, payload, qos=0)
            except Exception as e:
                print('MQTT 보내기 실패!')
    finally:
        try:
            cap.release()
        except Exception:
            pass
        try:
            client.loop_stop
            client.disconnect()
        except Exception:
            pass

if __name__ == "__main__":
    main()
ai.html
인텔리제이
<!DOCTYPE html>
<html lang="en">
<head>
    <meta charset="UTF-8">
    <title>MQTT Client</title>
    <script src="https://unpkg.com/mqtt/dist/mqtt.min.js"></script>
    <style>
        div{
            width: 100%;
            height: 100%;
        }
        img#cameraView {
            max-width: 100%;
            max-height: 100%;
        }
    </style>
</head>
<body>
<h2>MQTT Client</h2>
<div>
    <img id="cameraView">
</div>

<script>
    const broker = 'ws://localhost:9001'
    const topic = '/camera/objects'
    const client = mqtt.connect(broker)

    client.on('connect', ()=>{
        console.log('Connected to broker')
        client.subscribe(topic, (err)=>{
            if(err){
                console.log('에러남!')
            }
        })
    })

    client.on('message', (topic, message)=>{
        try{
            const payload = JSON.parse(message.toString())
            const base64Image = payload.image
            const img = document.getElementById('cameraView')
            img.src = `data:image/jpg;base64,${base64Image}`
        }catch (e){
            console.log('이미지 전달 실패')
        }
    })

    client.on('error', (error)=>{
        console.error("연결 에러")
    })

    client.on('close', (error)=>{
        console.error("연결이 끊어짐")
    })

</script>

</body>
</html>
DetectController.java
인텔리제이
package com.koreait.detect.controller;

import org.springframework.stereotype.Controller;
import org.springframework.web.bind.annotation.GetMapping;

@Controller
public class DetectController {
    @GetMapping("/")
    public String index(){
        return "index";
    }
}
webconfig.java
인텔리제이
package com.koreait.detect.config;

import org.springframework.context.annotation.Configuration;
import org.springframework.web.servlet.config.annotation.ViewControllerRegistry;
import org.springframework.web.servlet.config.annotation.WebMvcConfigurer;

@Configuration
public class WebConfig implements WebMvcConfigurer {
    @Override
    public void addViewControllers(ViewControllerRegistry registry) {
        registry.addViewController("/ai").setViewName("ai");
    }
}
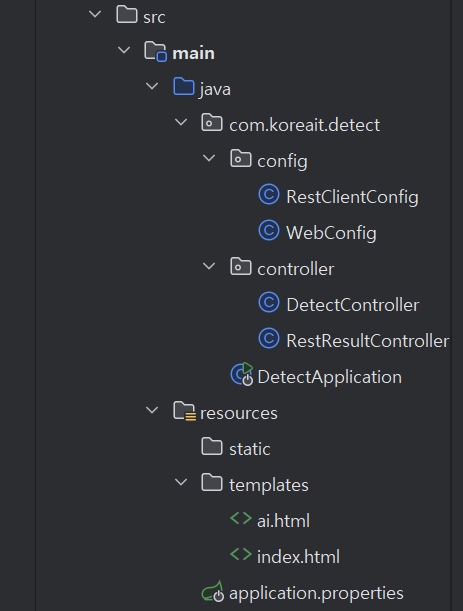
인텔리제이 폴더 구조

The light shines in the darkness.