⬅️ 로그인 구현(3) - 유효성 검사(with JWT token)
커스텀 로그인 페이지 만들기
NextAuth는 로그인, 로그아웃, 에러 등 간단한 인증 페이지를 제공해 준다.
기본으로 제공하는 화면들을 커스텀 페이지로 대체할 수 있는데, pages:{} 를 사용하면 된다.
💡 pages 구성 목록
import NextAuth from 'next-auth/next'
const handler = NextAuth({
    providers: [
        ...
    ],
    callbacks:{
        ...
    },
    pages:{
        signIn: '/auth/signin',
        signOut: '/auth/signout',
        error: '/auth/error', // Error code passed in query string as ?error=
        verifyRequest: '/auth/verify-request', // (used for check email message)
        newUser: '/auth/new-user' // New users will be directed here on first sign in (leave the property out if not of interest)
    }
})
export { handler as GET, handler as POST }
☝🏻 페이지가 실제로 존재하는 경로를 입력해주어야 한다.
커스텀 페이지 생성
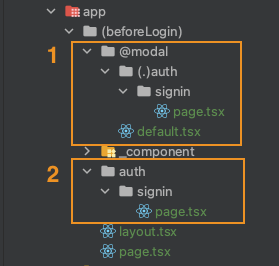
/app/(beforeLogin)/auth/signin/page.tsx 경로에 파일을 만들고, LoginModal 컴포넌트를 사용한다.
파일구조는 클론코딩 디렉토리 구조 를 참고하면 된다.
// /(beforeLogin)/_component/LoginModal.tsx
"use client";
import style from '@/app/(beforeLogin)/_component/login.module.css';
import {ChangeEventHandler, FormEventHandler, useState} from "react";
import {useRouter} from "next/navigation";
export default function LoginModal() {
const [email, setEmail] = useState('');
const [password, setPassword] = useState('');
const router = useRouter();
const handleSubmit:FormEventHandler<HTMLFormElement> = async (event) => {
event.preventDefault()
const result = await signIn("credentials", {
username: email,
password: password,
redirect: true,
callbackUrl: "/",
});
}
const onClickClose = () => {
router.back();
};
const onChangeId: ChangeEventHandler<HTMLInputElement> = (e) => {
setEmail(e.target.value)
};
const onChangePassword: ChangeEventHandler<HTMLInputElement> = (e) => {
setPassword(e.target.value)
};
return (
<div className={style.modalBackground}>
<div className={style.modal}>
<div className={style.modalHeader}>
<button className={style.closeButton} onClick={onClickClose}>
<svg width={24} viewBox="0 0 24 24" aria-hidden="true"
className="r-18jsvk2 r-4qtqp9 r-yyyyoo r-z80fyv r-dnmrzs r-bnwqim r-1plcrui r-lrvibr r-19wmn03">
<g>
<path
d="M10.59 12L4.54 5.96l1.42-1.42L12 10.59l6.04-6.05 1.42 1.42L13.41 12l6.05 6.04-1.42 1.42L12 13.41l-6.04 6.05-1.42-1.42L10.59 12z"></path>
</g>
</svg>
</button>
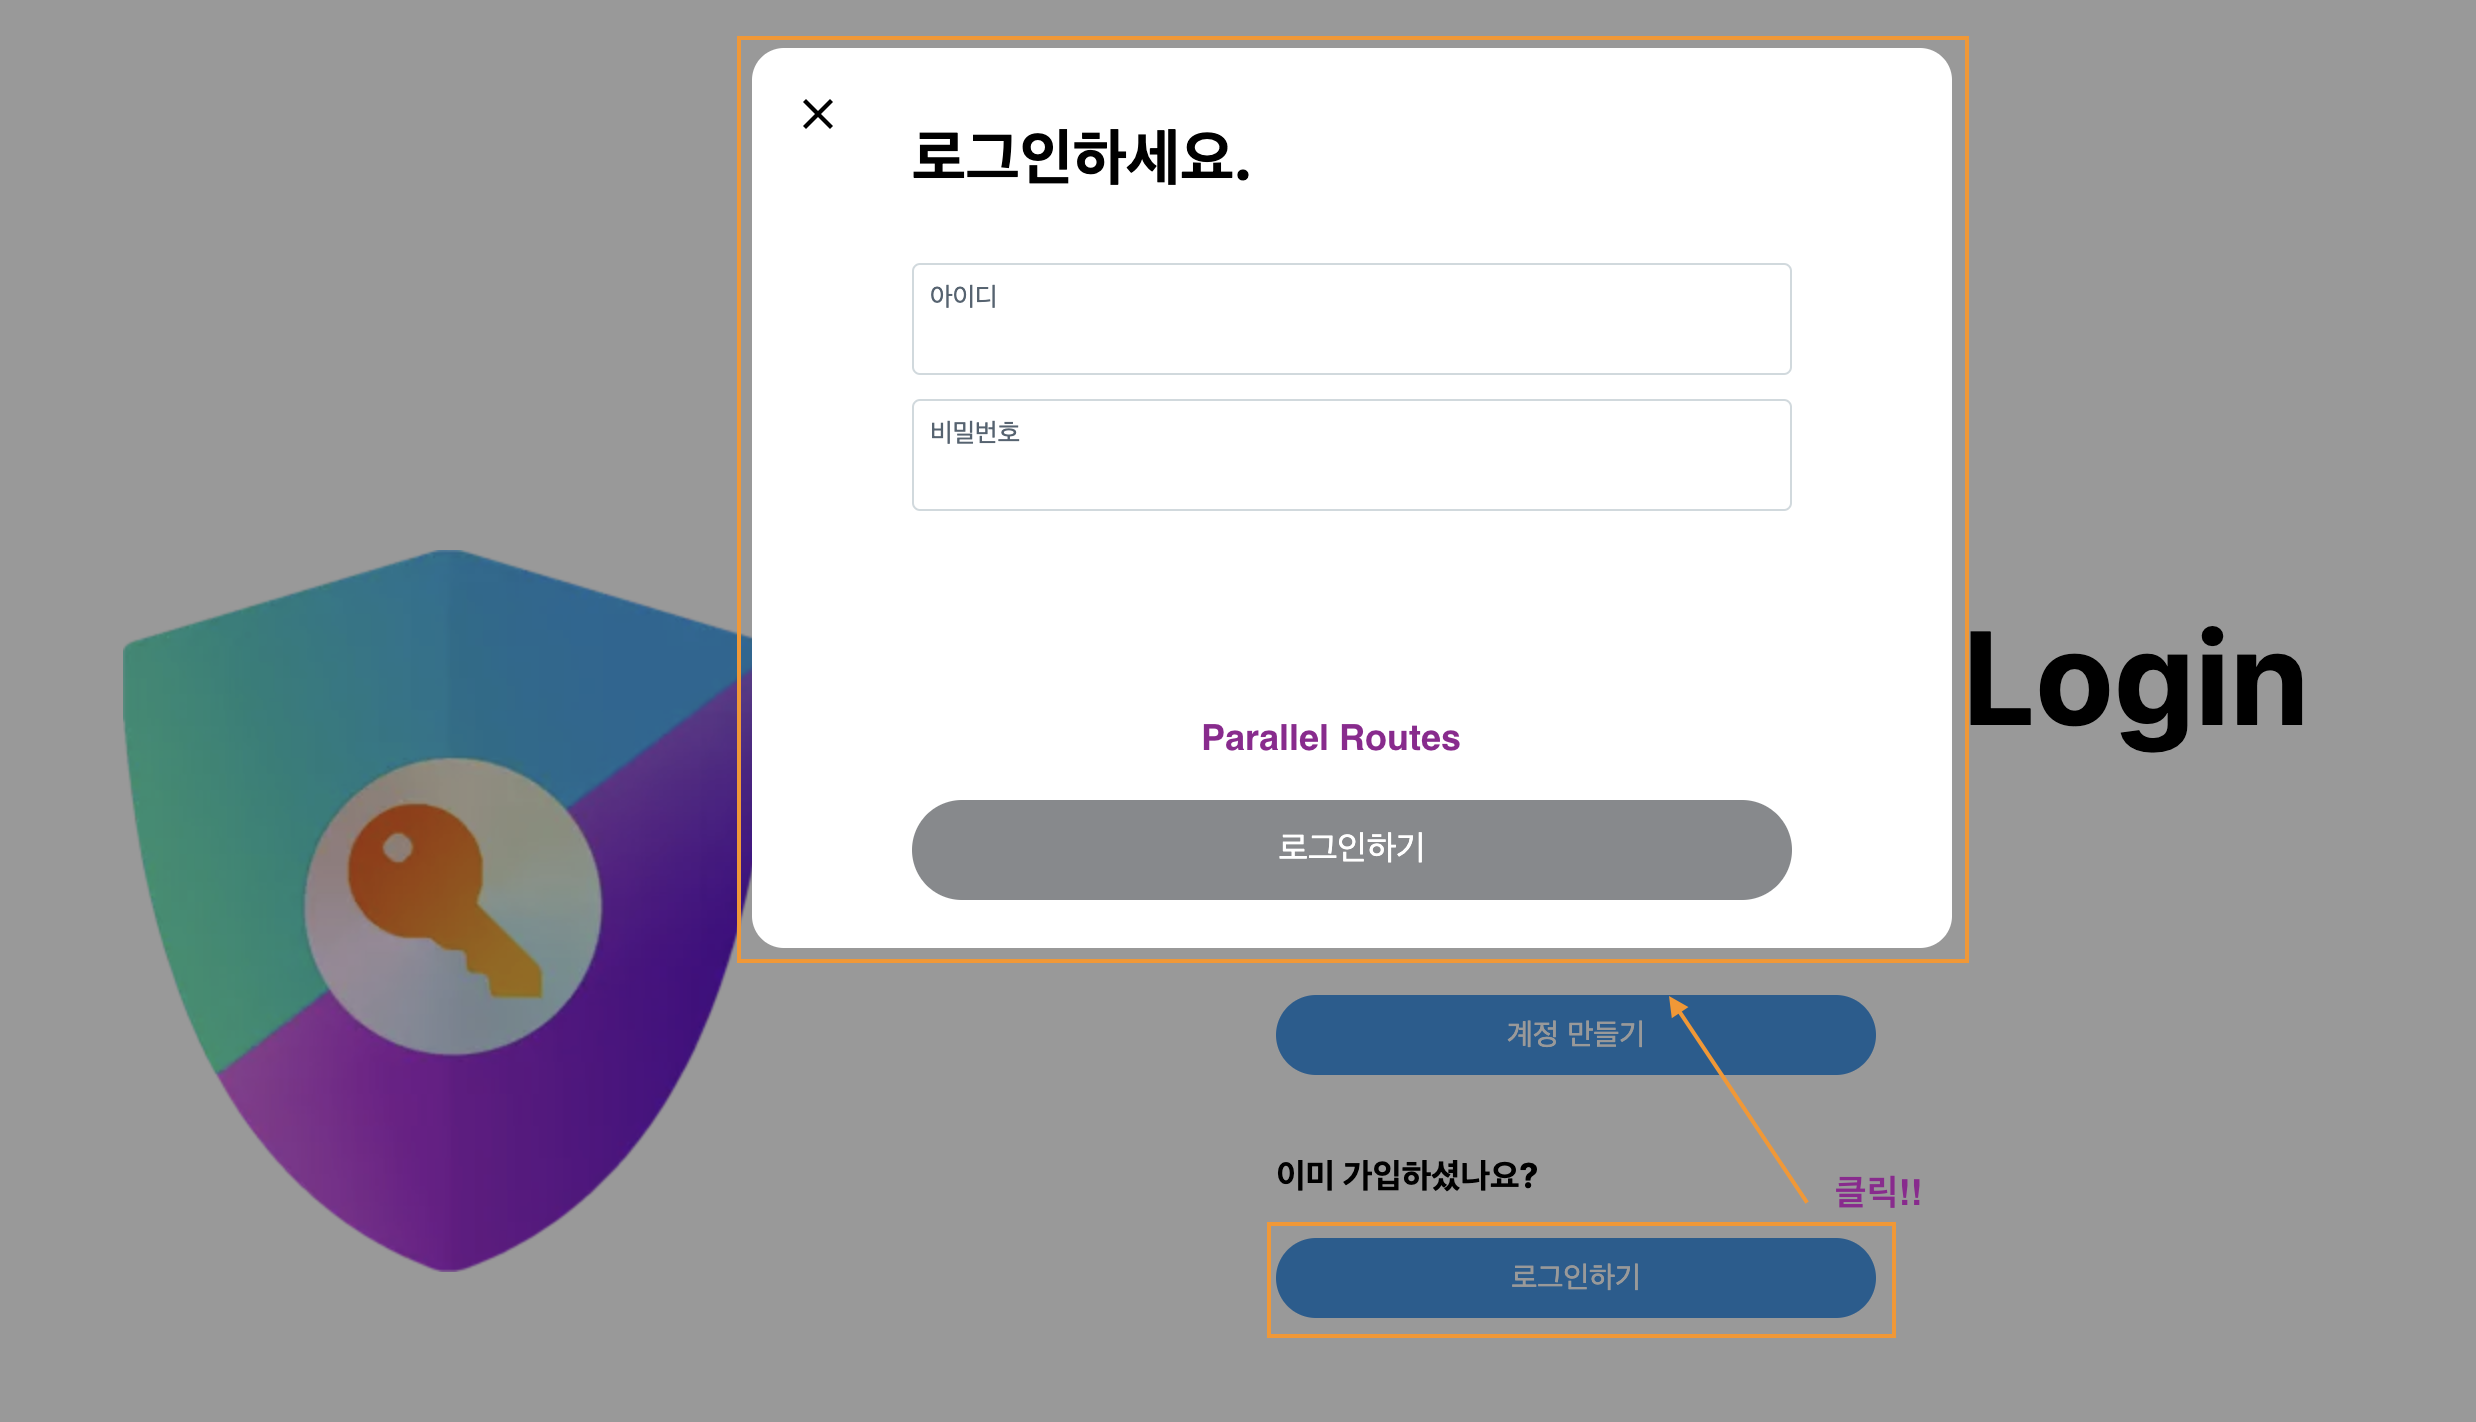
<div>로그인하세요.</div>
</div>
<form onSubmit={(e)=>handleSubmit(e)}>
<div className={style.modalBody}>
<div className={style.inputDiv}>
<label className={style.inputLabel} htmlFor="id">아이디</label>
<input id="id" className={style.input} value={email} onChange={onChangeId} type="text" placeholder="" autoComplete='off'/>
</div>
<div className={style.inputDiv}>
<label className={style.inputLabel} htmlFor="password">비밀번호</label>
<input id="password" className={style.input} value={password} onChange={onChangePassword} type="password" placeholder="" autoComplete='off'/>
</div>
</div>
<div className={style.modalFooter}>
<button className={style.actionButton} disabled={!email && !password}>로그인하기</button>
</div>
</form>
</div>
</div>
);
}UI 를 자연스럽게 구성하기 위해 폴더 구조를 바꿔 Parallel Routes 설정을 해주었다.
💡 Parallel Routes 설정하는 법
커스텀 페이지 등록
// /api/auth/[...nextauth]/route.ts
import NextAuth from 'next-auth/next'
const handler = NextAuth({
    providers: [
        ...
    ],
    callbacks:{
        ...
    },
    // 추가된 부분
    pages:{
        signIn: '/auth/signin',
    }
})
export { handler as GET, handler as POST }
🚨 주의
로그인하기버튼을 클릭하면Intercepting&Parallel라우팅되어 커스텀 로그인 화면이 뜨는 방식이다.
Intercepting이 되기 위해서는 라우트 이동을 해야하는데 next-auth의signIn은 라우트 이동이 아니므로Intercepting적용되지 않는다.<> // Main.tsx 중 로그인하기 버튼 <h3>이미 가입하셨나요?</h3> {/* 1. Intercepting & Parallel 화면 */} <Link href="/auth/signin" className={styles.signup}>로그인하기</Link> {/* 2. 새로운 페이지가 열림 */} {/*<button className={styles.signup} onClick={()=>signIn()}>로그인하기</button>*/} </>즉,
<Link/>를 클릭하면 1번 파일이 열리고,<button/>을 클릭하면 2번 파일이 열린다.
사실은<button/>을 클릭해야page:{signIn: '/auth/signin'}설정한 것을 확인할 수 있다.