[과제]
1. Metricbeat 가 수집한 시스템 메트릭을 Elasticsearch에 전송하고 Kibana 에서 Discover, Dashboard 시각화 할 수 있게 만드는 것
2. Metricbeat 가 수집한 시스템 메트릭을 Logstash를 거쳐 Elasticsearch로 전송하고 Kibana에서 시각화 대시보드
[버전]
8.17.4 tar
[서버]
192.168.219.159 (master) : Elasticsearch, Kibana, Logstash, CA 인증서
192.168.219.157 (data) : Elasticsearch, Metricbeat
192.168.219.158 (data) : Elasticsearch
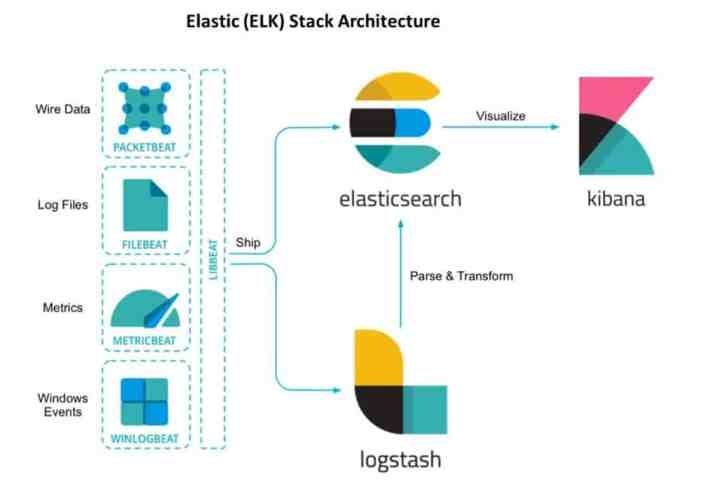
Metricbeat -> Elasticsearch -> Kibana
1. metricbeat.yml 수정
Metricbeat 가 수집한 데이터를 Elasticsearch 로 안전하게 보내고, Kibana 가 그 데이터를 시각화 할 수 있게 하려면 metricbeat.yml 을 수정할 필요가 있음
1. Kibana 연결정보(setup.kibana)
- metricbeat가 대시보드와 인덱스 플랫폼을 kibana에 자동 등록할 수 있게 해줌
- SSL 보안 설정, 로그인 인증 등
- ES 연결 정보(output.elasticsearch)
- 어디로 데이터를 보낼지(IP, 포트)
- SSL 보안 설정, 로그인 인증 등
- 보안 인증 구성
- https 통신, 인증서, fingerprint, 사용자 정보 필요
# Starting with Beats version 6.0.0, the dashboards are loaded via the Kibana API.
# This requires a Kibana endpoint configuration.
setup.kibana:

  # Kibana Host
  # Scheme and port can be left out and will be set to the default (http and 5601)
  # In case you specify and additional path, the scheme is required: http://localhost:5601/path
  # IPv6 addresses should always be defined as: https://[2001:db8::1]:5601
  host: "192.168.219.159:5601"
  username: "elastic"
  password: "elastic"

  # Kibana Space ID
  # ID of the Kibana Space into which the dashboards should be loaded. By default,
  # the Default Space will be used.
  #space.id:

...

# ================================== Outputs ===================================

# Configure what output to use when sending the data collected by the beat.

# ---------------------------- Elasticsearch Output ----------------------------
output.elasticsearch:
  # Array of hosts to connect to.
  hosts: ["192.168.219.147:9200", "192.168.219.148:9200", "192.168.219.149:9200"]
  ssl:
    enabled: true
    ca_trusted_fingerprint: <fingerprint>

  # Performance preset - one of "balanced", "throughput", "scale",
  # "latency", or "custom".
  preset: balanced

  # Protocol - either `http` (default) or `https`.
  protocol: "https"

  # Authentication credentials - either API key or username/password.
  #api_key: "id:api_key"
  username: "elastic"
  password: "elastic"

  ...
- http_ca.crt 파일에서 finger print 값 확인
openssl x509 -in http_ca.crt -fingerprint -sha256 -noout2. Kibana 실행
nohup ./bin/kibana 1>/dev/null 2>&1 &3. Metricbeat 실행
sudo ./metricbeat -eMetricbeat -> Logstash -> Elasticsearch -> Kibana
1. Logstash(159 서버) 방화벽 설정
su - root
firewall-cmd --permanent --add-port=5044/tcp
firewall-cmd --reload
2. Logstash 설정 파일 구성
su - elastic
[elastic@localhost logstash-8.17.4]$ cd config
[elastic@localhost config]$ mkdir metric
[elastic@localhost config]$ cp logstash-sample.conf metric/metric.conf

# metric.conf
# Sample Logstash configuration for creating a simple
# Beats -> Logstash -> Elasticsearch pipeline.

input {
  beats {
    port => 5044
  }
}

output {
  elasticsearch {
    hosts => ["https://192.168.219.159:9200"]
    cacert => "/home/elastic/elasticsearch-8.17.4/config/certs/http_ca.crt"
    index => "metricbeat_logs_from_logstash"
    user => "elastic"
    password => "elastic"
  }
stdout {}
}
- logstash 디렉토리 내에서 작업 이유
- 마스터노드(159)에 설치된 logstash의 config 디렉토리에서 작업 이유는, 이 서버에서 logstash를 실행해 데이터를 받아 ES 에 전송하기 위함
- config 디렉토리 내에 metric 이라는 새로운 폴더를 만들어서, metric 데이터를 처리하는 전용 파이프라인 구성 파일을 따로 관리하기 위한 용도
- logstash-sample.conf 복사 이유는 logstash 의 기본 샘플 설정 파일을 복사해서 metricbeat 데이터를 처리할 전용 파이프라인 설정 파일로 활용
3. metricbeat.yml 수정(157서버 데이터 노드)
[elastic@localhost metricbeat-8.17.4-linux-x86_64]$ sudo vi metricbeat.yml

# =================================== Kibana ===================================
setup.kibana:

  host: "192.168.219.159:5601"
  username: "elastic"
  password: "elastic"

# ------------------------------ Logstash Output -------------------------------
output.logstash:
  # The Logstash hosts
  hosts: ["192.168.219.159:5044"]

# output.elasticsearch 모두 주석처리
4. Logstash 실행
./bin/logstash -f config/metric/metric.conf- 프로세스 확인
- px -ef | grep logstash
- 포트 확인
- ss -nlpt | grep 5044
- 로그 파일 확인
- tail -f logs/logstash-plain.log
nohup ./bin/logstash -f config/metric/metric.conf &- 백그라운드 실행 시, 터미널로 뜨고 터미널 종료시 logstash 도 함께 종료 되므로, 이를 방지 하기 위해서 백그라운드 실행. 이 경우에는 ls 명령어 실행시 nohup.out 이 있어야 정상 실행
5. Metricbeat 실행
[elastic@localhost metricbeat-8.17.4]$ sudo ./metricbeat -e- ⚠️ 주의!! 실행 파일의 경로를 명시적으로 지정 ./ 를 붙임으로써 현재 디렉토리 파일임을 명시
6. Logstash 파이프라인 상태 확인
curl -XGET "http://localhost:9600/_node/pipelines?pretty"