Course
Get Started with Sensitive Data Protection
Lab
목록
- Cloud Data Loss Prevention API: Qwik Start
- Redacting Critical Data with Sensitive Data Protection ⬅️ 오늘의 Lab!
- Creating a De-identified Copy of Data in Cloud Storage
- Implement Sensitive Data Protection on Google Cloud: Challenge Lab
🌠 Redacting Critical Data with Sensitive Data Protection
개요
DLP API를 사용하여 문자열과 파일에서 일치하는 정보 유형을 검사해보고, 익명화 기법을 익혀서 데이터 익명화 및 문자열과 이미지의 정보 유형을 수정해보자.
실습과정
1. 프로젝트 리전 설정

# Region 수정 필요
gcloud config set compute/region Region
2. 저장소 Clone 및 API 사용 설정
(1) 프로젝트 코드 저장소 다운로드

git clone https://github.com/googleapis/synthtool✅ Cloud Data Loss Prevention Node.js 클라이언트 저장소
(2) 디렉터리 변경 및 패키지 설치

cd synthtool/tests/fixtures/nodejs-dlp/samples/ && npm install(3) 프로젝트 설정

# PROJECT_ID를 환경 변수로 설정(자신의 PROJECT_ID로 수정 필요)
export PROJECT_ID="filled in at lab start"

# gcloud의 기본 프로젝트 설정을 변경
gcloud config set project $PROJECT_ID
(4) API 사용 설정

gcloud services enable dlp.googleapis.com cloudkms.googleapis.com \
--project $PROJECT_ID
참고✨
DLP API- 텍스트, 이미지, Google Cloud Storage 저장소에서 민감한 개인 정보 보호 프래그먼트를 감지, 위험 분석, 익명화하는 방법을 제공Cloud Key Management Service(KMS) API- Google Cloud KMS를 사용하면 암호화 키를 관리하고 해당 키로 암호화 작업을 수행
3. 문자열 및 파일 검사
✅ inspectString.js 사용
(1) 문자열에서 민감한 정보 유형 검사

node inspectString.js $PROJECT_ID "My email address is jenny@somedomain.com and you can call me at 555-867-5309" > inspected-string.txt참고🤖
InfoType: 문자열의 해당 부분에 대해 감지된 정보 유형
➡️ 기본적으로inspectString.js는CREDIT_CARD_NUMBER,PHONE_NUMBER,PERSON_NAME,EMAIL_ADDRESSinfoType만 검사한다.- 가능성: 결과는 일치할 가능성에 따라 분류
➡️VERY_UNLIKELY부터VERY_LIKELY까지의 범위에 해당
(2) 파일에서 정보 유형 검사


# 파일 내용 확인
cat resources/accounts.txt

# 파일 내 민감한 정보  유형 검사
node inspectFile.js $PROJECT_ID resources/accounts.txt > inspected-file.txt
(3) Cloud Storage에 출력 업로드

gsutil cp inspected-string.txt gs://bucket_name_filled_after_lab_start
gsutil cp inspected-file.txt gs://bucket_name_filled_after_lab_start
4. 익명화
✅ deidentifyWithMask.js 사용
(1) 마스크로 익명화

node deidentifyWithMask.js $PROJECT_ID "My order number is F12312399. Email me at anthony@somedomain.com" > de-identify-output.txt(2) Cloud Storage에 출력 업로드

gsutil cp de-identify-output.txt gs://bucket_name_filled_after_lab_start5. 문자열 및 이미지 수정
✅ redactText.js 사용
(1) 샘플 입력에서 텍스트 수정

node redactText.js $PROJECT_ID  "Please refund the purchase to my credit card 4012888888881881" CREDIT_CARD_NUMBER > redacted-string.txt

# 결과
Please refund the purchase on my credit card [CREDIT_CARD_NUMBER]
(2) 이미지에서 전화번호 수정

node redactImage.js $PROJECT_ID resources/test.png "" PHONE_NUMBER ./redacted-phone.png(3) 이미지 수정 파일
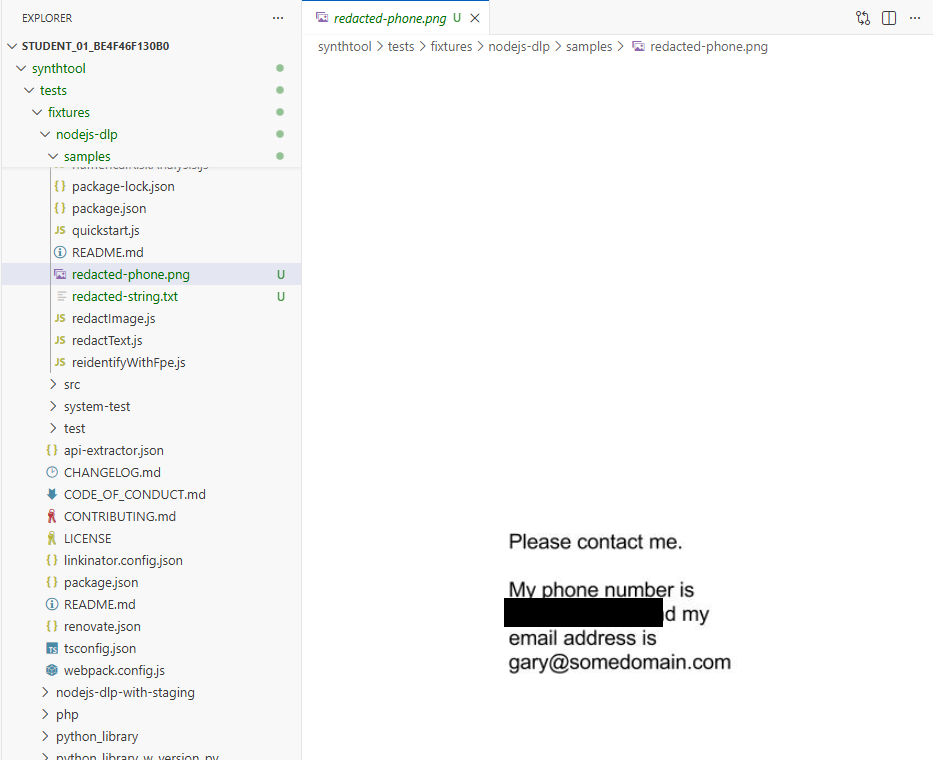
➡️ Open Editor > EXPLORER > synthtool > tests > fixtures > nodejs-dlp > samples > redacted-phone.png
(4) 이미지에서 이메일 주소 수정

node redactImage.js $PROJECT_ID resources/test.png "" EMAIL_ADDRESS ./redacted-email.png(5) 이미지 수정 파일
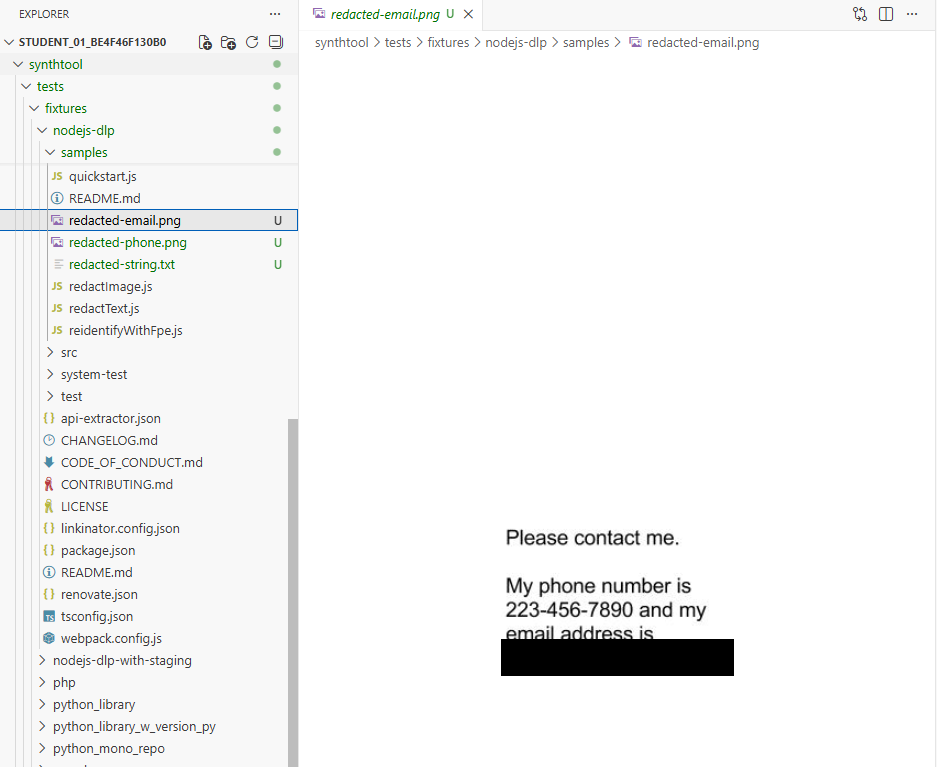
➡️ Open Editor > EXPLORER > synthtool > tests > fixtures > nodejs-dlp > samples > redacted-email.png
(6) Cloud Storage에 출력 업로드

gsutil cp redacted-string.txt gs://bucket_name_filled_after_lab_start
gsutil cp redacted-phone.png gs://bucket_name_filled_after_lab_start
gsutil cp redacted-email.png gs://bucket_name_filled_after_lab_start
새싹 개발자