핀토스 유저 프로그램 개요
유저 프로그램은 유저 프로세스 구현이기도 하다. 그런데 핀토스의 프로세스는 쓰레드로 만들어지기 때문에, 쓰레드 동작을 제대로 이해할 필요도 있다.
유저 프로그램 챕터의 목표는 커널 쓰레드만 실행할 수 있는 상황에서 유저 프로세스 실행 기능을 추가하여, 여느 프로세스에서 디스크에 있는 응용 프로그램도 실행할 수 있게 함이다.
유저 프로그램 구현을 위해서는 아래 두 가지 세부 사항을 구현해야 한다.
- 인자값 전달
- 시스템 콜
유저 프로그램 실행 과정 따라가보기
우선 핀토스의 유저 프로그램 실행 명령어 예시를 뜯어보자. 아래는 하나의 인자값을 응용 프로그램에 넘겨주는 프로그램을 핀토스에서 실행하는 커맨드다.
pintos -v -k -T 60 -m 20 --fs-disk=10 -p tests/userprog/args-single:args-single -- -q -f run 'args-single onearg'- -v: verbose mde. show VGA display output
- -k: display call stack when kernel panic occured
- —m 20: memory size
- —fs-disk=10: set file system disk size to 10MB
- -p tests/userprog/args-single:args-sinngle: copy tests/userprog/args-single into file system as name of args-single
- —q: quite option. turn off the kernel when the run is over
- -f: format file system
이 커맨드의 실행 과정을 간략하게 그림으로 그려보자.
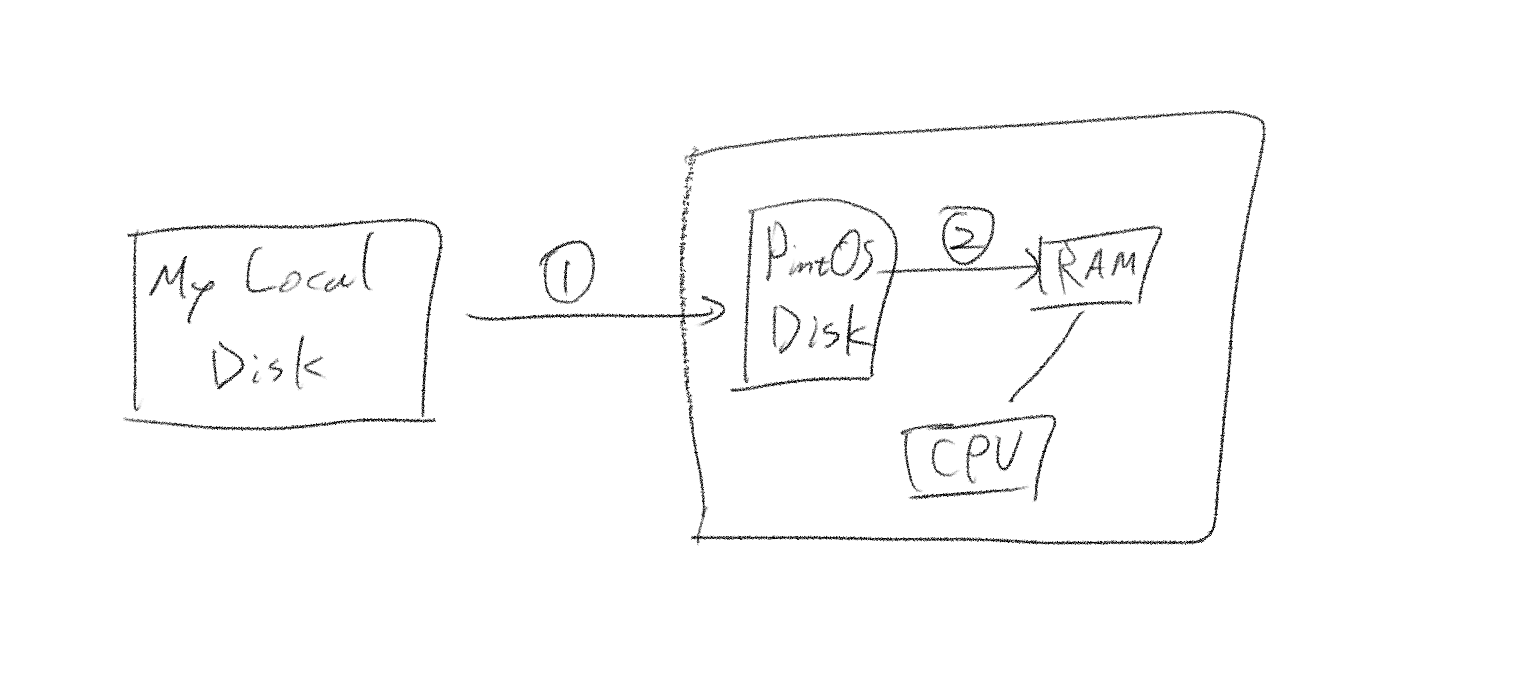
- 로컬 디스크에 있는 핀토스 프로젝트 디렉토리에서 핀토스 시스템의 가상 디스크로 args-single을 복사
- 파일 시스템의 응용 프로그램을 open, read 하여 램에 적재 후 실행
전체적인 그림을 간략하게 그려 봤으니 이제 운영체제의 프로그램 실행 함수를 순서대로 뜯어보자. 편의상 인자값이 없는 args-none 프로그램을 실행하는 경우를 가정하자. args-none의 실행 커맨드는 아래와 같다. 인자값이 없다는 점만 제외하면 방금 본 args-single과 같다.
pintos -v -k -m 20 --gdb --fs-disk=10 -p tests/userprog/args-none:args-none -- -q -f run args-nonerun_actions (argv)
운영체제는 run_actions에 문자열 배열인 argv 주소값을 넘겨준다. argv에는 run args-none을 파싱한 결과가 들어 있다. 디버거로 이를 살펴보면 다음과 같음을 알 수 있다.
argv: <args>
	[0]: "put"
    [1]: "args-none"
    [2]: "run"
    [3]: "args-none"
    [4]: <null ptr>
왜 파싱 도중 'put' 명령어가 들어갔는지 이해해야 한다. 이제부터 put을 자세히 뜯어보도록 하겠다.
fsutil_put("args-none")
put은 fsutil_put이라는 함수로 매핑된다. 이 함수에 대한 주석을 읽어보자.
/* Copies from the "scratch" disk, hdc or hd1:0 to file ARGV[1]
 * in the file system.
 *
 * The current sector on the scratch disk must begin with the
 * string "PUT\0" followed by a 32-bit little-endian integer
 * indicating the file size in bytes.  Subsequent sectors hold
 * the file content.
 *
 * The first call to this function will read starting at the
 * beginning of the scratch disk.  Later calls advance across the
 * disk.  This disk position is independent of that used for
 * fsutil_get(), so all `put's should precede all `get's. */
fsutil_put 함수를 통해 실행 파일(executable object file)이 파일 시스템으로 복사되는 과정은 다음과 같다.
- 첫 섹터에서 파일 크기를 읽는다.
disk_read(src, sector++, buffer);- 파일 시스템에 해당 크기의 파일을 생성한다.
if (!filesys_create (file_name, size))
		PANIC ("%s: create failed", file_name);
dst = filesys_open (file_name);- 이후 섹터들에서 실제 파일 내용을 순차적으로 읽어 파일에 기록한다.
while (size > 0) {
    int chunk_size = size > DISK_SECTOR_SIZE ? DISK_SECTOR_SIZE : size;
    disk_read(src, sector++, buffer);
    file_write(dst, buffer, chunk_size);
    size -= chunk_size;
}
이 과정을 통해 디스크의 실행 파일이 파일 시스템으로 복사되고, 이후 이 파일은 파일 시스템의 일부로서 filesys_open 함수로 열어 실행할 수 있게 된다. (이게 fsutil_put의 주석에 있던 내용 중 “Later calls”에 해당한다.) 사이즈를 청크 사이즈만큼 줄여가면서 전체 섹터를 가로질러, 디스크의 내용을 버퍼로 복사(disk_read)하고, 그것을 다시 파일 시스템 내의 목적지 파일로 복사(file_write)한다.
이 과정이 끝나면, 파일을 닫아주고 버퍼를 할당 해제한다. 이렇게 args-none 실행 파일을 파일 시스템에 로드할 수 있다.
이 설명으로 이해가 충분하지 않을 수 있다. 아래 fsutil_put 전문을 읽어보자.
void
fsutil_put (char **argv) {
	static disk_sector_t sector = 0;

	const char *file_name = argv[1];
	struct disk *src;
	struct file *dst;
	off_t size;
	void *buffer;

	printf ("Putting '%s' into the file system...\n", file_name);

	/* Allocate buffer. */
	buffer = malloc (DISK_SECTOR_SIZE);
	if (buffer == NULL)
		PANIC ("couldn't allocate buffer");

	/* Open source disk and read file size. */
	src = disk_get (1, 0);
	if (src == NULL)
		PANIC ("couldn't open source disk (hdc or hd1:0)");

	/* Read file size. */
	disk_read (src, sector++, buffer);
	if (memcmp (buffer, "PUT", 4))
		PANIC ("%s: missing PUT signature on scratch disk", file_name);
	size = ((int32_t *) buffer)[1];
	if (size < 0)
		PANIC ("%s: invalid file size %d", file_name, size);

	/* Create destination file. */
	if (!filesys_create (file_name, size))
		PANIC ("%s: create failed", file_name);
	dst = filesys_open (file_name);
	if (dst == NULL)
		PANIC ("%s: open failed", file_name);

	/* Do copy. */
	while (size > 0) {
		int chunk_size = size > DISK_SECTOR_SIZE ? DISK_SECTOR_SIZE : size;
		disk_read (src, sector++, buffer);
		if (file_write (dst, buffer, chunk_size) != chunk_size)
			PANIC ("%s: write failed with %"PROTd" bytes unwritten",
					file_name, size);
		size -= chunk_size;
	}

	/* Finish up. */
	file_close (dst);
	free (buffer);
}
run_task(argv)
위에서 봤던 run 연산은 run_task로 매핑된다. run_task는 argv[1]로 특징된 작업을 수행하는 함수다. 두 개의 분기를 볼 수 있는데, thread_tests의 경우 이전 챕터의 커널 쓰레드 테스트를 따로 처리하기 위해 있는 거고, 일반 응용 프로그램은 process_wait(process_create_initd(task))로 수행된다.
/* Runs the task specified in ARGV[1]. */
static void
run_task (char **argv) {
	const char *task = argv[1];

	printf ("Executing '%s':\n", task);
	if (thread_tests){
		run_test (task);
	} else {
		process_wait (process_create_initd (task));
	}
	printf ("Execution of '%s' complete.\n", task);
}
process_wait은 pid를 인자값으로 주고 그것이 종료될 때까지 기다리는 함수다. 시스템 콜 구현에서 더 자세히 보게될 것이므로 지금은 process_create_initd를 주목하자.
process_create_initd(task)
/* Starts the first userland program, called "initd", loaded from FILE_NAME.
 * The new thread may be scheduled (and may even exit)
 * before process_create_initd() returns. Returns the initd's
 * thread id, or TID_ERROR if the thread cannot be created.
 * Notice that THIS SHOULD BE CALLED ONCE. */
tid_t
process_create_initd (const char *file_name) {
	char *fn_copy;
	tid_t tid;

	/* Make a copy of FILE_NAME.
	 * Otherwise there's a race between the caller and load(). */
	fn_copy = palloc_get_page (0);
	if (fn_copy == NULL)
		return TID_ERROR;
	strlcpy (fn_copy, file_name, PGSIZE);

	/* Create a new thread to execute FILE_NAME. */
	tid = thread_create (file_name, PRI_DEFAULT, initd, fn_copy);
	if (tid == TID_ERROR)
		palloc_free_page (fn_copy);
	return tid;
}
process_create_initd는 넘겨받은 executable object file의 이름으로 쓰레드를 생성해서 pid를 리턴해주는 '프로세스 생성 함수'로 보면 된다. (주석 중의 'Starts the first userland program, called "initd", loaded from FILE_NAME이 정확히 무슨 의미인지는 아래서 자세히 다루겠다. 여기까지 봤을 때는 첫 유저 프로세스를 만드는 함수가 유별나게 구별 돼 있는 이유가 모호하다. 커널이 프로세스를 만드는 과정이라고 볼 수도 있기는 하다.
위 코드에서 재미있게 볼 만한 지점은 fn_copy를 하는 부분이다. 일련의 과정은 아래와 같다.
	/* Make a copy of FILE_NAME.
	 * Otherwise there's a race between the caller and load(). */
	fn_copy = palloc_get_page (0);
	if (fn_copy == NULL)
		return TID_ERROR;
	strlcpy (fn_copy, file_name, PGSIZE);

	/* Create a new thread to execute FILE_NAME. */
	tid = thread_create (file_name, PRI_DEFAULT, initd, fn_copy);
이렇게 복제를 하는 이유는 쓰레드 루틴이 여전히 파일 이름을 써야 하기 때문이다. 만약 fn_copy에 file_name을 복사하지 않았다면 커널 쓰레드는 경쟁 상태를 고려해 file_name을 공유 자원으로 세심하게 접근해야 하는데, 그것을 처리할 바에는 그냥 별도의 커널 주소를 할당(palloc_get_page(0))하고 거기에 복사하는게 효율적이다. 이를 그림으로 그리면 아래와 같다.
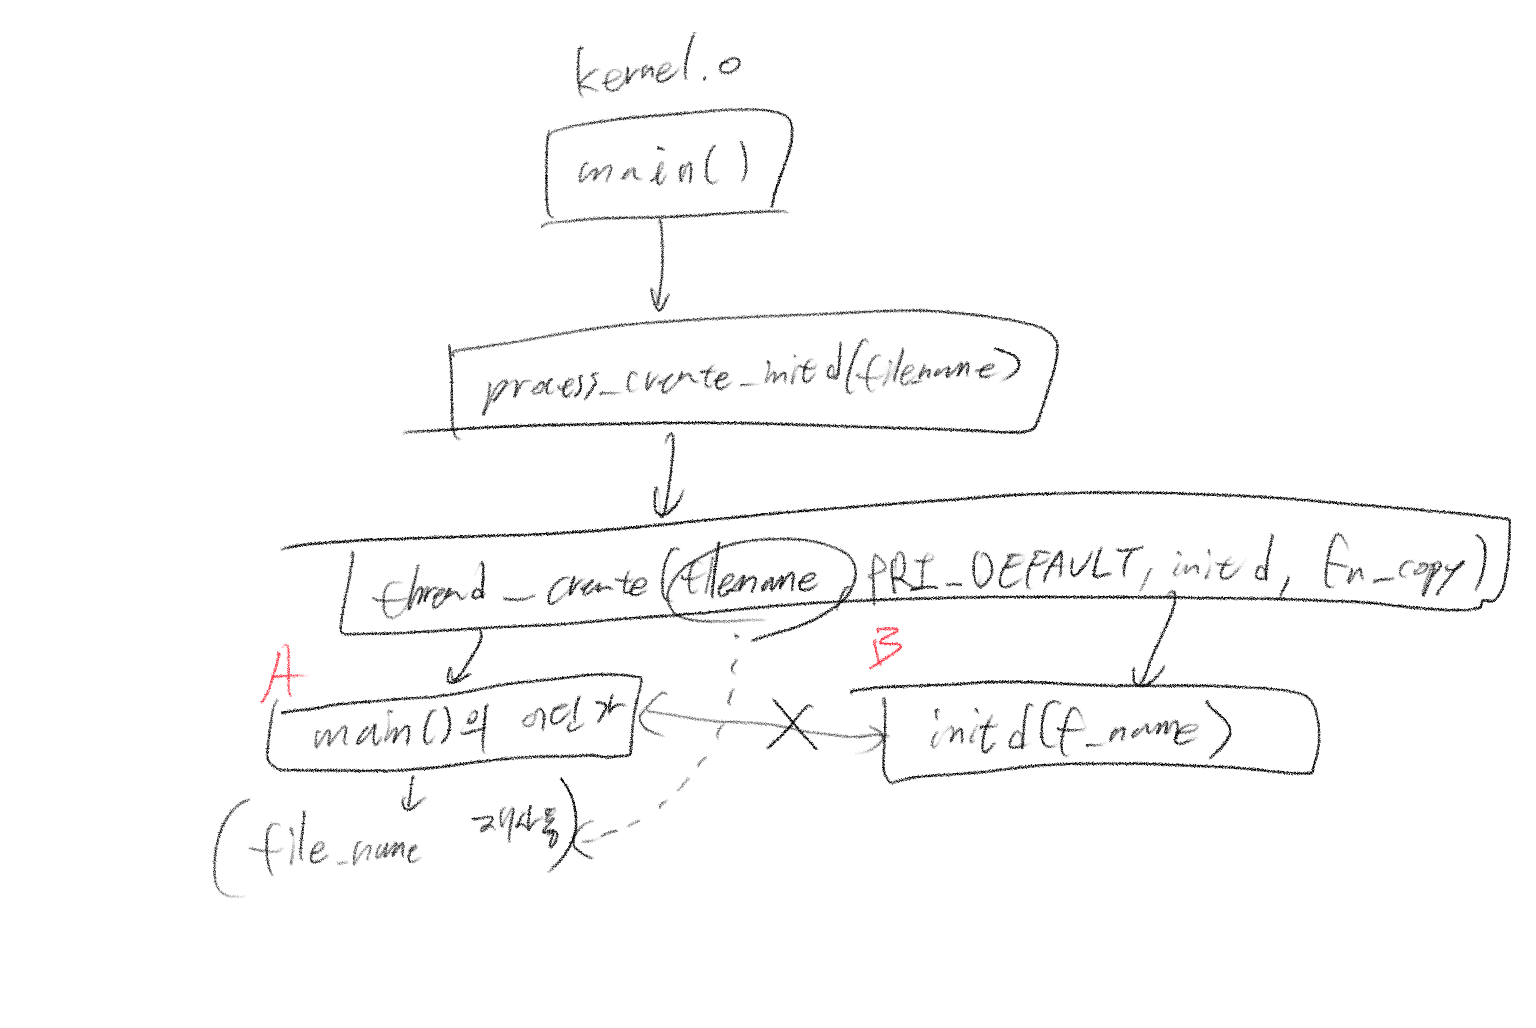
A와 B는 경쟁 조건에 있다. 이는 앞으로 있을 동기화 문제의 불길한 예고편과 같다. 이제 initd의 루틴을 따라가도록 해보자.
initd(fn_copy)
/* A thread function that launches first user process. */
static void
initd (void *f_name) {
#ifdef VM
	supplemental_page_table_init (&thread_current ()->spt);
#endif

	process_init ();

	if (process_exec (f_name) < 0)
		PANIC("Fail to launch initd\n");
	NOT_REACHED ();
}
process_init은 단순히 현재 쓰레드를 current라는 이름의 쓰레드 구조체 포인터 변수에 지정한다. process_exec을 자세히 보도록 하자.
/* Switch the current execution context to the f_name.
 * Returns -1 on fail. */
int
process_exec (void *f_name) {
	char *file_name = f_name;
	bool success;

	/* We cannot use the intr_frame in the thread structure.
	 * This is because when current thread rescheduled,
	 * it stores the execution information to the member. */
	struct intr_frame _if;
	_if.ds = _if.es = _if.ss = SEL_UDSEG;
	_if.cs = SEL_UCSEG;
	_if.eflags = FLAG_IF | FLAG_MBS;

	/* We first kill the current context */
	process_cleanup ();

	/* And then load the binary */
	success = load (file_name, &_if);

	/* If load failed, quit. */
	palloc_free_page (file_name);
	if (!success)
		return -1;

	/* Start switched process. */
	do_iret (&_if);
	NOT_REACHED ();
}
주석에 주목해보자.
/* Switch the current execution context to the f_name.이게 무슨 뜻일까? 현재 실행 중인 프로세스의 컨텍스트를 인자로 받은 f_name이라는 파일로 전환한다는 뜻이다. 즉, 새로운 프로그램을 현재 프로세스의 컨텍스트에서 실행하도록 만든다. 여기서부터는 함수 내의 루틴들이 모두 중요하므로 자세히 살펴보도록 하자.
process_cleanup
현재 프로세스의 리소스를 해제한다 정도만 알고 넘어가면 된다. 문맥 전환에 앞서 리소스 유출 문제를 해결하는 부분이다. 코드를 자세히 보면 현재 프로세스의 페이지 테이블 엔트리를 파괴하는 것을 알 수 있다.
load
로드 함수는 매우 길다. 아래 코드를 보자.
/* Loads an ELF executable from FILE_NAME into the current thread.
 * Stores the executable's entry point into *RIP
 * and its initial stack pointer into *RSP.
 * Returns true if successful, false otherwise. */
static bool
load (const char *file_name, struct intr_frame *if_) {
	struct thread *t = thread_current ();
	struct ELF ehdr;
	struct file *file = NULL;
	off_t file_ofs;
	bool success = false;
	int i;

	/* Allocate and activate page directory. */
	t->pml4 = pml4_create ();
	if (t->pml4 == NULL)
		goto done;
	process_activate (thread_current ());

	/* Open executable file. */
	file = filesys_open (file_name);
	if (file == NULL) {
		printf ("load: %s: open failed\n", file_name);
		goto done;
	}

	/* Read and verify executable header. */
	if (file_read (file, &ehdr, sizeof ehdr) != sizeof ehdr
			|| memcmp (ehdr.e_ident, "\177ELF\2\1\1", 7)
			|| ehdr.e_type != 2
			|| ehdr.e_machine != 0x3E // amd64
			|| ehdr.e_version != 1
			|| ehdr.e_phentsize != sizeof (struct Phdr)
			|| ehdr.e_phnum > 1024) {
		printf ("load: %s: error loading executable\n", file_name);
		goto done;
	}

	/* Read program headers. */
	file_ofs = ehdr.e_phoff;
	for (i = 0; i < ehdr.e_phnum; i++) {
		struct Phdr phdr;

		if (file_ofs < 0 || file_ofs > file_length (file))
			goto done;
		file_seek (file, file_ofs);

		if (file_read (file, &phdr, sizeof phdr) != sizeof phdr)
			goto done;
		file_ofs += sizeof phdr;
		switch (phdr.p_type) {
			case PT_NULL:
			case PT_NOTE:
			case PT_PHDR:
			case PT_STACK:
			default:
				/* Ignore this segment. */
				break;
			case PT_DYNAMIC:
			case PT_INTERP:
			case PT_SHLIB:
				goto done;
			case PT_LOAD:
				if (validate_segment (&phdr, file)) {
					bool writable = (phdr.p_flags & PF_W) != 0;
					uint64_t file_page = phdr.p_offset & ~PGMASK;
					uint64_t mem_page = phdr.p_vaddr & ~PGMASK;
					uint64_t page_offset = phdr.p_vaddr & PGMASK;
					uint32_t read_bytes, zero_bytes;
					if (phdr.p_filesz > 0) {
						/* Normal segment.
						 * Read initial part from disk and zero the rest. */
						read_bytes = page_offset + phdr.p_filesz;
						zero_bytes = (ROUND_UP (page_offset + phdr.p_memsz, PGSIZE)
								- read_bytes);
					} else {
						/* Entirely zero.
						 * Don't read anything from disk. */
						read_bytes = 0;
						zero_bytes = ROUND_UP (page_offset + phdr.p_memsz, PGSIZE);
					}
					if (!load_segment (file, file_page, (void *) mem_page,
								read_bytes, zero_bytes, writable))
						goto done;
				}
				else
					goto done;
				break;
		}
	}

	/* Set up stack. */
	if (!setup_stack (if_))
		goto done;

	/* Start address. */
	if_->rip = ehdr.e_entry;

	/* TODO: Your code goes here.
	 * TODO: Implement argument passing (see project2/argument_passing.html). */

	success = true;

done:
	/* We arrive here whether the load is successful or not. */
	file_close (file);
	return success;
}
코드가 길지만 아래와 같이 요약할 수 있다.
- ELF executable 을 현재 쓰레드로 불러온다.
- 인자값 전달을 수행한다.
1번은 위 코드를 찬찬히 뜯어보면 이해할 수 있다. 파일 시스템 상에서 실행 파일을 열고 적절한 주소 공간에 정보를 읽기 한다. (적절한 주소라는 표현을 보면 짐작할 수 있겠지만, 가상 메모리 구현 시점에 이를 제대로 구현하게 된다.)
지금은 2번을 중점적으로 봐야 한다. 인자값 전달은 프로세스 스택을 통해 이루어진다. 프로세스 스택의 구성은 아래와 같다. 아래는 /bin/ls -l foo bar를 실행하는 경우의 프로세스 스택이다.
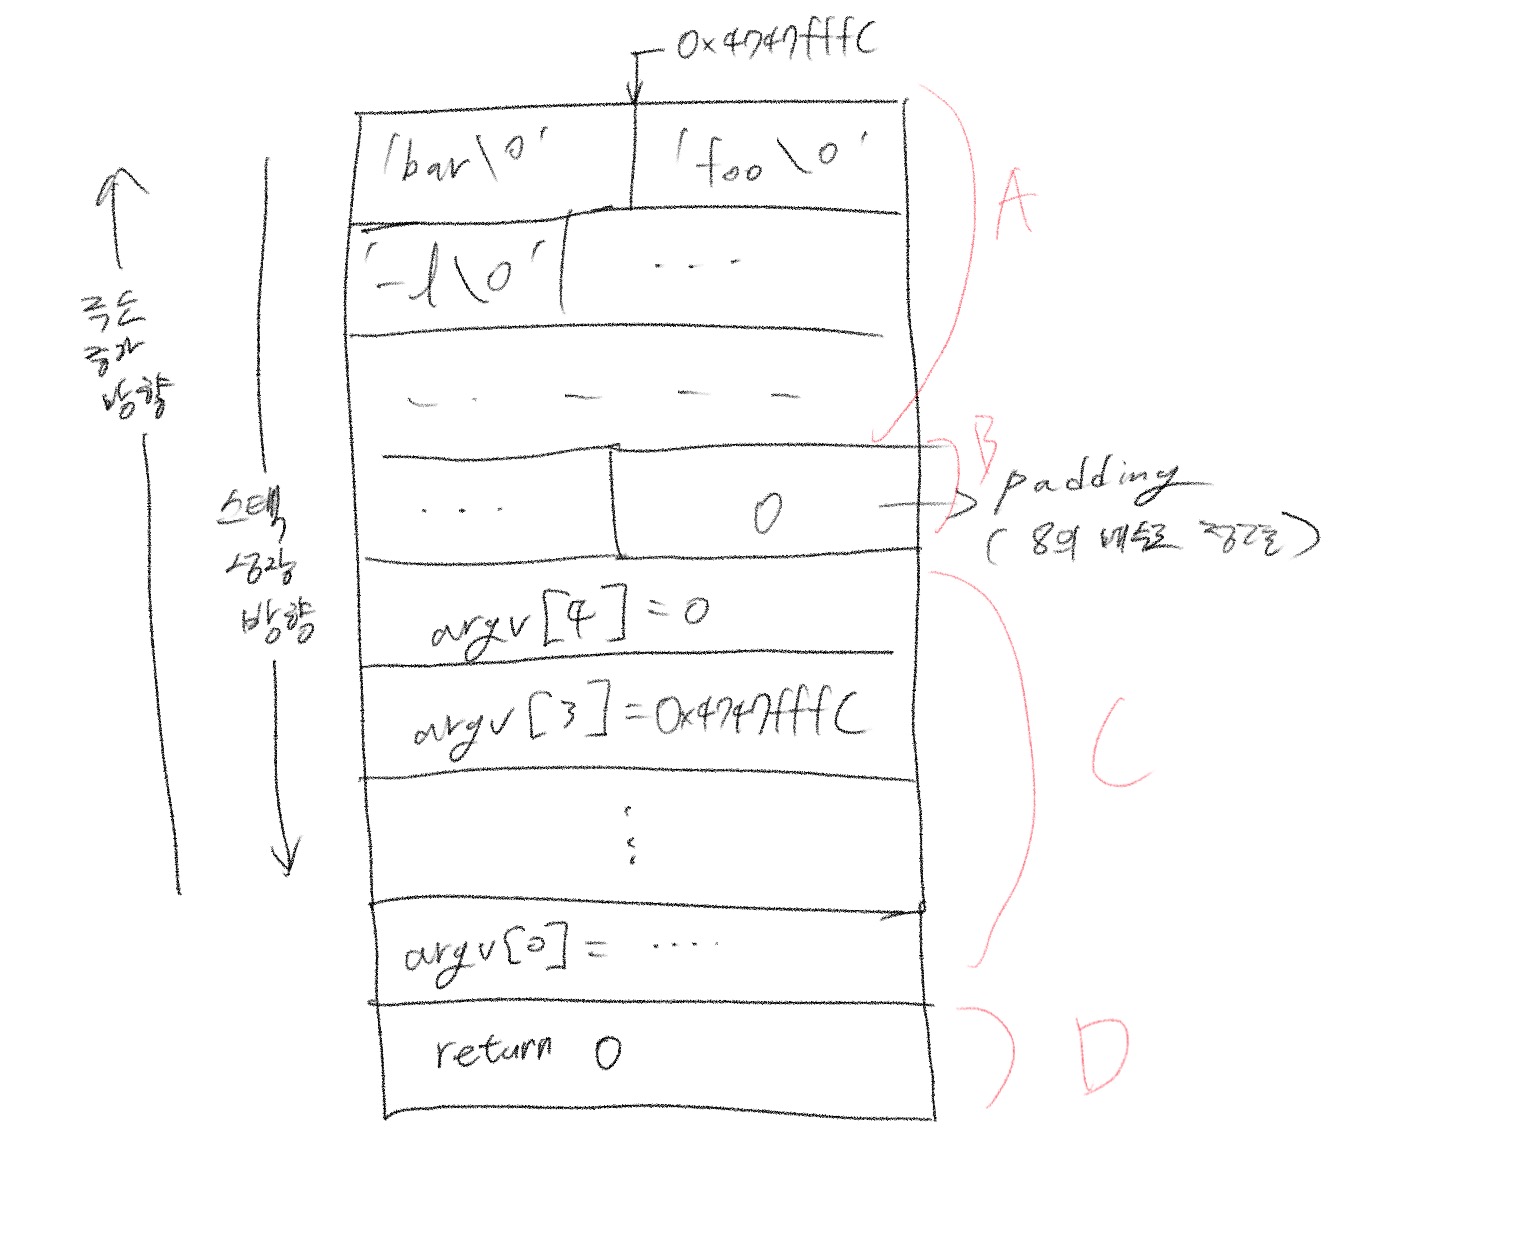
각 부분의 명세는 다음과 같다.
A: 인자값 데이터가 바로 저장되는 부분
B: 패딩(이유는 아래 참조)
C: 각 인자값을 가리키는 포인터 변수
D: 규약을 맞추기 위해 존재하는 무의미한 리턴 값.
이 그림을 이해하기 위해 깃북의 명세를 먼저 참조하도록 하자.
- Break the command into a:
bin/ls,l,foo,bar - Place the words at the top of the stack. Order doesn't matter, because they will be referenced through pointers
- Push the address of each string plus a null pointer sentinel, on the stack, in right to left order. These are the elments of argv. The null pointer sentinel ensures that argv[argc] is a null pointer, as required by the C standard. The order ensures that argv[0] is at the lowest virtual address. Word aligned accesses are faster than unaligned accesses, so for best performance round the stack pointer down to a multiple of 8 before the first push.
- Point %rsi to argv(the address of argv[0]) and set %rdi to argc
- Finally, push a fake "return address": although the entry function will never return, its stack frame must have the same structure as any other.
C standard에서 문자열의 끝은 null sentinel로 정의된다. 이 점은 위 그림에서
'bar\0'형식으로 인자값이 메모리 공간에 정의된 모습에서도 알 수 있다. 연속된 문자열의 끝을 대체 어떻게 알 수 있는지에 대한 답이 되는 규약이다.
몇 가지 주목할 점이 있다. argv[3]을 전달하는 매커니즘을 중점적으로 더 자세히 보도록 하자. 스택 초기화를 구현하면서 주목한 부분은 아래와 같다.
- 스택 포인터(%rsp)를 저장할 값만큼 빼줌:
if_->rsp -= strlen(argv[3])+1; - 스택 포인터 시작 주소를 따로 저장:
address_argv[3] = 0x4747fffc - algin 맞춰주기.
각 과정의 이유를 살펴보도록 하자.
스택 포인터를 저장할 인자값의 길이만큼 빼준다는 것은 아래 그림의 초기 상태를 상상해보면 알 수 있다. 아래 그림에서 'bar\0'을 저장하기 전의 인터럽트 프레임의 rsp 값은 무엇이었을까?
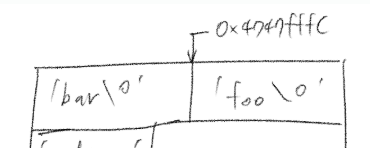
정답은 0x4747FFDC이다. 센티널 포함 길이가 4인 문자열 데이터는 32byte이고, 이를 저장 후의 스택 포인터가 0x4747fffc를 가리키고 있으므로 기존 주소에서 10진수 32를 뺀 값이 초기 스택 포인터의 주소다. 이런 식으로 각 인자값의 길이에 딱 맞게 데이터를 스택에 저장할 수 있다.
이렇게 되면 처리해야 하는 문제가 두 개 남아 있다.
첫째는 인용한 깃북 명세에 서술된 것처럼 8바이트 정렬을 맞추는 문제다. 레지스터 접근은 8바이트 정렬에서 최적의 속도를 내는데, 만약 우리가 데이터에 '딱 맞는' 스택 포인터 초기화를 한다면, 각 인자값의 주소를 저장하는 영역에서 전부 정렬이 어긋나게 될 수도 있다. 따라서 0으로 값을 채워 넣어 인자값 데이터 저장 영역을 8바이트 정렬로 맞춰주는 padding이 존재한다.
마지막 문제는 프로세스가 각 인자값을 직접 참조할 수 있도록 포인터 변수를 순서대로 지정해주는 것이다. A영역에서는 데이터가 순서대로 저장되지 않아도 상관 없다(깃북에도 명시돼 있다). 하지만 그것을 가리키는 포인터 변수들은 모두 순서대로 정의돼 있어야, 실행 프로그램이 argv[1]과 같은 방식으로 자신에게 주어진 인자값을 제대로 참조할 수 있다.
이것들을 고려하여 인터럽트 프레임의 레지스터를 설정 하면 스택 설정이 끝나고, do_iret 명령어를 사용하여 문맥을 전환한다.
do_iret이 무엇인지 정확히 이해하기도 꽤나 까다로웠다. 이 함수는 인터럽트 프레임 구조체에 저장된 정보를 CPU레지스터에 복원(지금의 경우는 새로 복사)하여 새로운 프로세스의 실행을 시작하는 핵심 함수다. 이때 load에서 주목할 부분은 아래와 같다.
if_->rip = ehdr.e_entry;이 코드는 새 프로그램의 시작주소(entry point)를 인자값으로 넘겨질 인터럽트 프레임의 rip에 설정하는데, do_iret이 실행 되면서 rip 값이 프로그램 카운터로 업데이트 된다.
이렇게 유저 프로그램 실행 후 인자값 전달 과정까지를 자세히 알아보았다. 다음 글에서 갖가지 시스템 콜을 알아보도록 하자.
후기

인자값 전달 구현을 하면서 본격적으로 시동이 걸렸던 기억이 난다. 이 때 주관적으로 느꼈던 점은 아래와 같다.
- 포인터 연산의 본질: memcpy와 같다. 그냥 직관적인 memcpy를 쓰는게 시간을 아끼는 길이다.
- read = write: 그냥 방향만 다를 뿐 모두 '복사' 연산이다. 헷갈린다면 전치사를 붙여서 생각해보자.(filesys_read = copy from filesys / filesys_write = copy to filesys)