Architecture Design
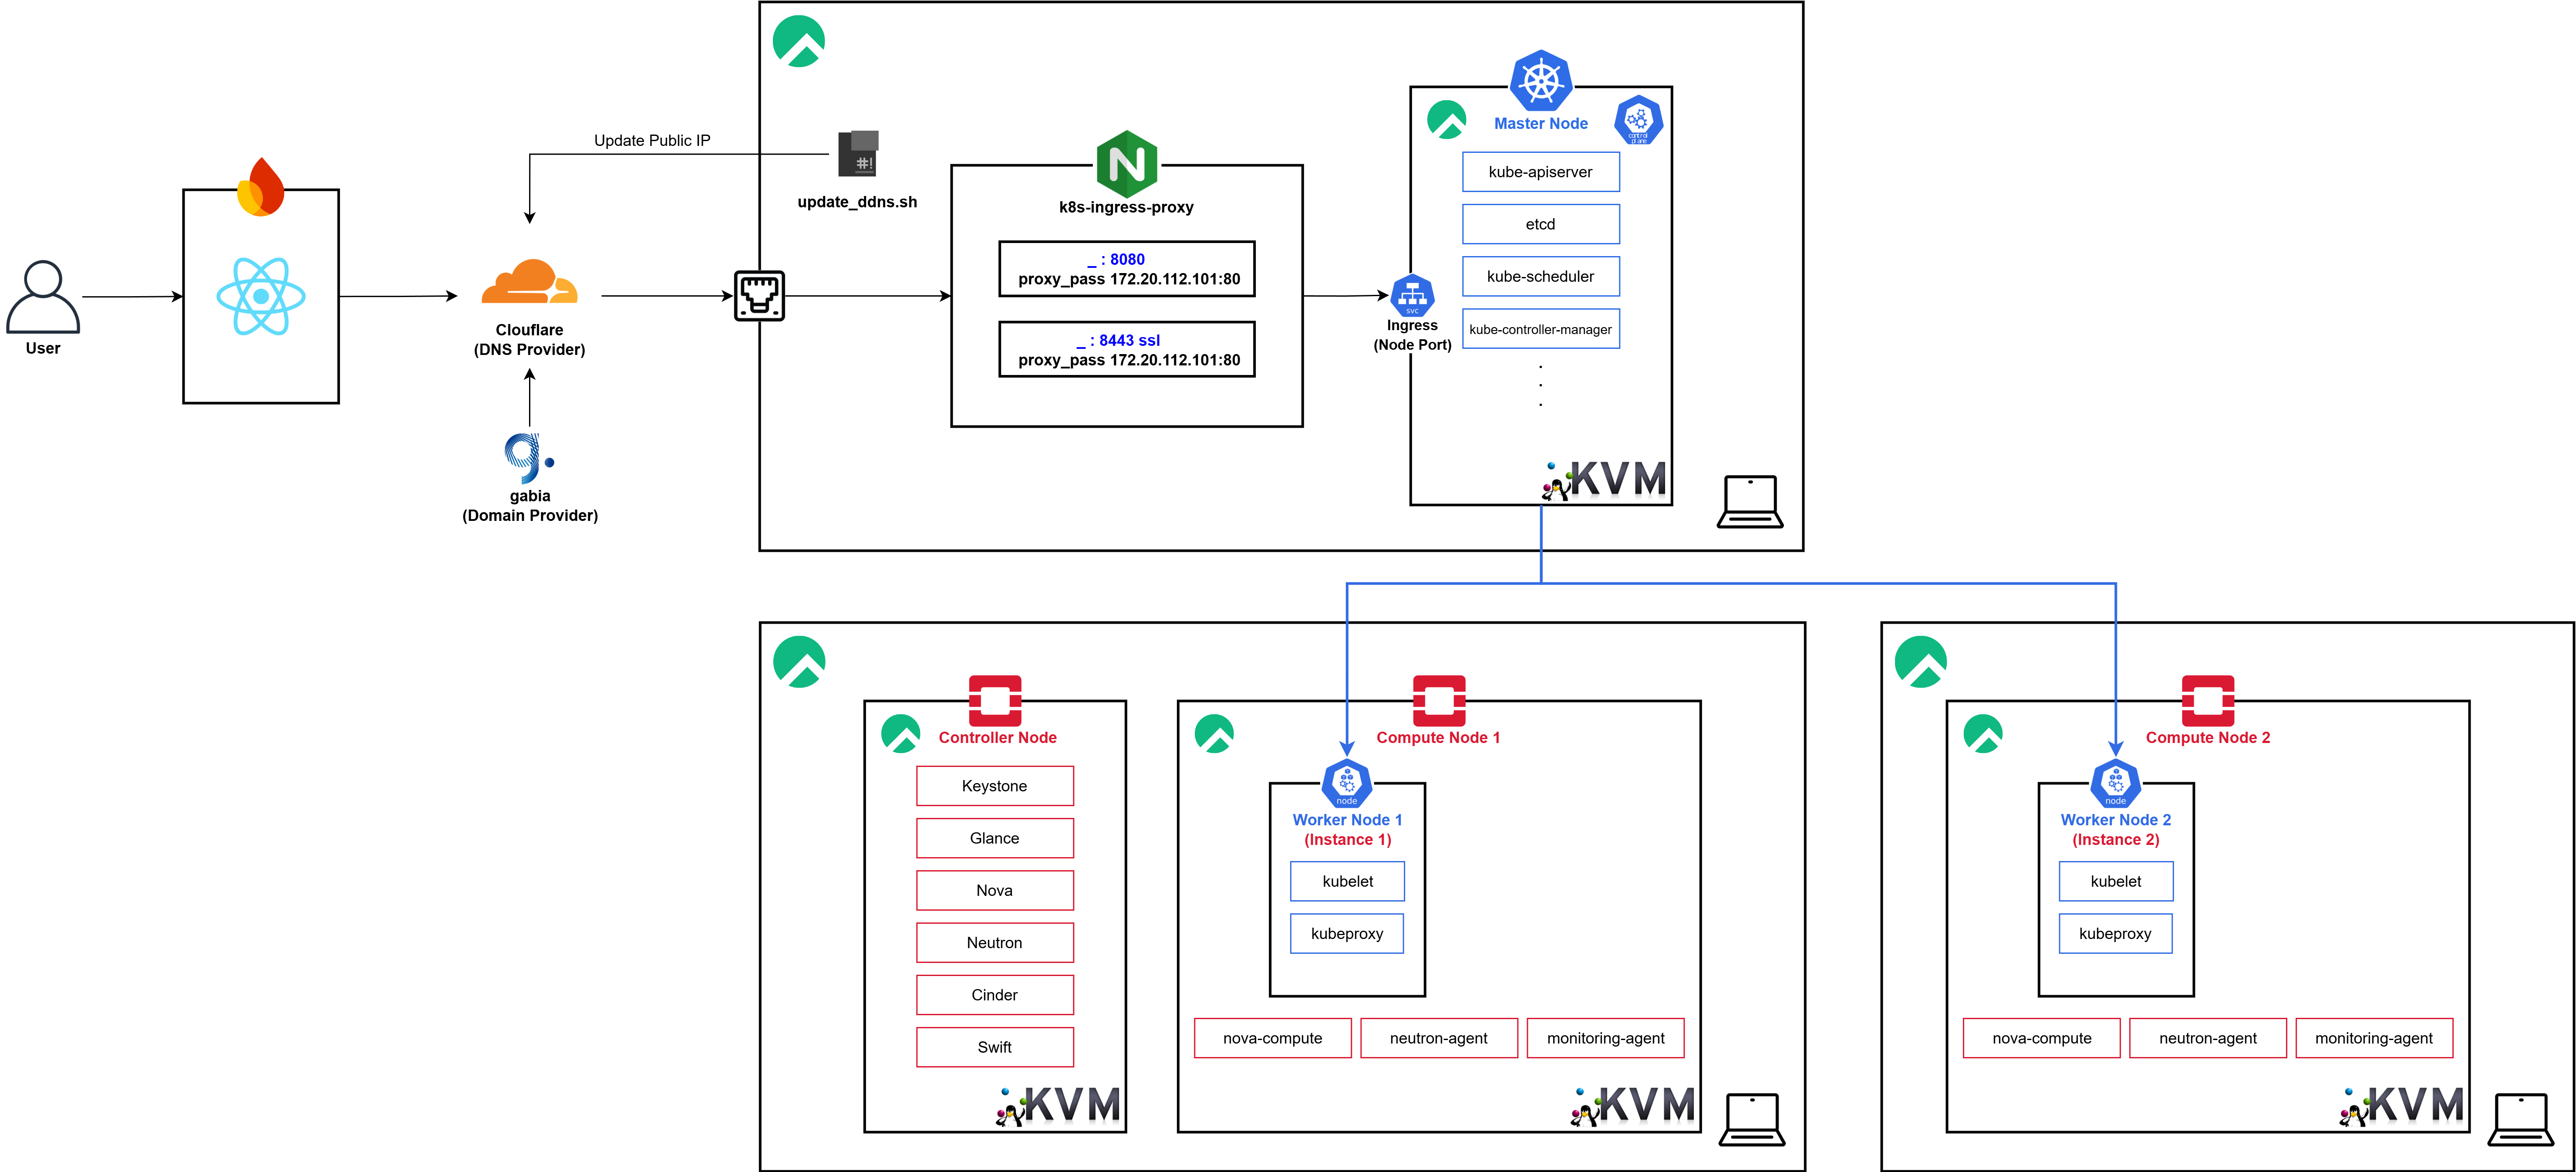 25년도 상반기 프로젝트들을 진행하면서 보유한 총 3개의 호스트 머신들 중 1개를 K3s 클러스터로 사용하여
 언제볼까의 Production 환경과 분리하여 사용하고 있었습니다.
하지만 모니터링, CI/CD, 로깅 인프라를 독립된 두개의 클러스터에 구성하면 리소스가 2배로 증가하고 관리 또한 어려워졌기에 Compute Node를 스케일 아웃하고 K8s 클러스터의 리소스를 스케일 아웃하고자 했습니다.
또한 기존의 굉장히 적은 리소스로 구성되어 있었던 Worker Node를 각 Compute Node에 각각 하나씩 배치될 수 있을 정도로 리소스를 높인 이미지로 변경해 안정성을 높이고자 했습니다.
K3s Graceful Shutoff
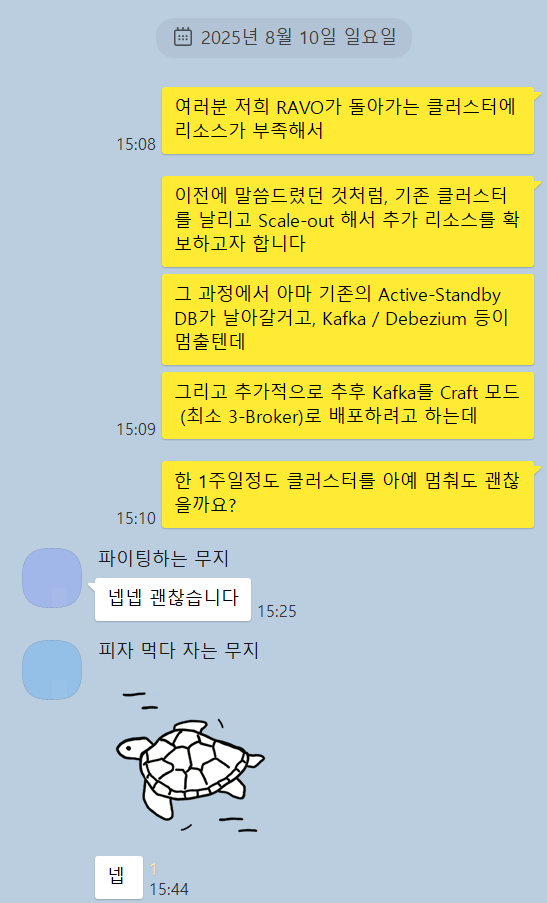 우선 기존의 데이터가 제거되어도 된다는 것과 클러스터가 중지되어도 문제가 없음을 K3s 클러스터에서의 프로젝트 백엔드 개발자분들께 확인받았습니다.
$ k get nodes
NAME   STATUS   ROLES                  AGE    VERSION
k3s    Ready    control-plane,master   149d   v1.31.6+k3s1
또한 이전에 K3s 클러스터를 조작하던 도중 강제 Shutoff로 인해 여러 문제가 발생했던 경험이 존재하여 이를 방지하고 정상적인 백업 KVM 이미지를 만들기 위해 우선 Graceful하게 종료해주었습니다.
kubectl cordon k3s먼저 해당 노드에 더 이상 새로운 파드가 스케줄링되지 않도록 cordon 명령으로 노드를 통제 상태로 만듭니다.
kubectl drain k3s --ignore-daemonsets --delete-emptydir-data이후 drain을 사용하여 현재 노드에서 실행 중인 모든 파드를 안전하게 evict합니다.
이 과정에서 파드들은 terminationGracePeriodSeconds에 따라 정상적인 종료 절차를 밟게 됩니다.
이때 DaemonSet에 의해 관리되는 파드들은 drain으로 제거할 수 없으므로, 이들을 무시하고 진행하도록 --ignore-daemonsets 옵션을 추가하였습니다.
...
pod/metrics-server-7984cff5d6-vzbjh evicted
pod/prometheus-prometheus-stack-kube-prom-prometheus-0 evicted
[6488040.007121] cni0: port 4(veth317e38d6) entered disabled state
[6488040.009959] device veth317e38d6 left promiscuous mode
[6488040.009989] cni0: port 4(veth317e38d6) entered disabled state
pod/debezium-server-6f86cb7d88-2r5rp evicted
node/k3s drained

$ sudo systemctl stop k3s
$ sudo systemctl status k3s --no-pager
× k3s.service - Lightweight Kubernetes
     Loaded: loaded (/etc/systemd/system/k3s.service; enabled; preset: disabled)
     Active: failed (Result: exit-code) since Sun 2025-08-10 07:41:07 EDT; 19s ago
   Duration: 2month 2w 5h 18min 17.879s
       Docs: https://k3s.io
    Process: 723 ExecStart=/usr/local/bin/k3s server (code=exited, status=1/FAILURE)
   Main PID: 723 (code=exited, status=1/FAILURE)
      Tasks: 31
     Memory: 426.5M
        CPU: 3w 3d 12h 23min 48.969s
     CGroup: /system.slice/k3s.service
             ├─3858 /var/lib/rancher/k3s/data/4532effb54c1f987f51a6b860588c2ae5…
             └─4636 /var/lib/rancher/k3s/data/4532effb54c1f987f51a6b860588c2ae5…
워크로드가 모두 정리된 이후, K3s 서버 및 에이전트 프로세스를 중지하였습니다.
sudo shutdown -h now최종적으로 KVM을 종료시킵니다.
Openstack Compute Node Installation
KVM Setup
[root@k3s-host ~]# free -h
               total        used        free      shared  buff/cache   available
Mem:           7.4Gi       715Mi       5.4Gi       146Mi       1.7Gi       6.7Gi
Swap:          7.7Gi       133Mi       7.6Gi
[root@k3s-host ~]# swapoff -a
[root@k3s-host ~]# vim /etc/fstab
[root@k3s-host ~]# free -h
               total        used        free      shared  buff/cache   available
Mem:           7.4Gi       841Mi       5.3Gi       153Mi       1.7Gi       6.6Gi
Swap:             0B          0B          0B
우선 이전에 발견했던 Compute Node 중지 문제를 해결하기 위해 위와 같이 swap 설정을 영구히 비활성화 시켰습니다.
[root@k3s-host ~]# hostnamectl set-hostname compute-2-host
[root@k3s-host ~]# reboot

...
[root@compute-2-host ~]# virsh list
 Id   Name   State
--------------------
또한 호스트네임을 위와 같이 변경하고 재시작 해주었습니다.
[root@k3s-host ~]# vim /etc/hosts/etc/hosts를 확인해본 결과 별도의 변경은 필요하지 않아 수정하지 않았습니다.
virt-install \
  --name compute2 \
  --ram 6500 \
  --vcpus 3 \
  --cpu host-passthrough \
  --disk path=/home/libvirt/images/compute2.qcow2,size=100,format=qcow2,bus=virtio,cache=none \
  --os-variant rocky9.0 \
  --location /home/libvirt/images/Rocky-9.2-x86_64-minimal.iso \
  --extra-args "inst.text console=ttyS0,115200n8" \
  --network network=k3snat,model=virtio \
  --graphics none
이후 위와 같이 compute2 KVM을 생성해주고
[root@45 ~]# hostnamectl set-hostname compute2
[root@45 ~]# reboot
hostnamectl을 이용해 호스트명을 변경한 이후 리부트하여줍니다.
[root@compute2 ~]# ip a
1: lo: <LOOPBACK,UP,LOWER_UP> mtu 65536 qdisc noqueue state UNKNOWN group default qlen 1000
    link/loopback 00:00:00:00:00:00 brd 00:00:00:00:00:00
    inet 127.0.0.1/8 scope host lo
       valid_lft forever preferred_lft forever
    inet6 ::1/128 scope host
       valid_lft forever preferred_lft forever
2: enp1s0: <BROADCAST,MULTICAST,UP,LOWER_UP> mtu 1500 qdisc fq_codel state UP group default qlen 1000
    link/ether 52:54:00:74:a9:78 brd ff:ff:ff:ff:ff:ff
    inet 45.120.120.154/24 brd 45.120.120.255 scope global dynamic noprefixroute enp1s0
       valid_lft 3581sec preferred_lft 3581sec
    inet6 fe80::5054:ff:fe74:a978/64 scope link noprefixroute
       valid_lft forever preferred_lft forever

[root@compute2 ~]# ping 8.8.8.8
PING 8.8.8.8 (8.8.8.8) 56(84) bytes of data.
64 bytes from 8.8.8.8: icmp_seq=1 ttl=114 time=37.3 ms
64 bytes from 8.8.8.8: icmp_seq=2 ttl=114 time=36.9 ms

--- 8.8.8.8 ping statistics ---
2 packets transmitted, 2 received, 0% packet loss, time 1001ms
rtt min/avg/max/mdev = 36.948/37.147/37.347/0.199 ms
이후 위와 같이 생성된 KVM의 NIC가 정상적으로 IP를 할당받으며 외부와 통신이 가능함을 확인하였습니다.
[root@compute-2-host ~]# virsh list
 Id   Name       State
--------------------------
 2    compute2   running

[root@compute-2-host ~]# virsh domiflist compute2
 Interface   Type      Source   Model    MAC
------------------------------------------------------------
 vnet1       network   k3snat   virtio   52:54:00:74:a9:78
이후 compute2 KVM의 인터페이스 MAC 주소를 확인해준 이후
$ virsh net-edit opstnat
<network>
  <name>k3snat</name>
  <uuid>5d1d3873-2834-4faf-b39a-a4d3d2b09d54</uuid>
  <forward mode='nat'/>
  <bridge name='virbr10' stp='off' delay='0'/>
  <mac address='52:54:00:f8:08:f5'/>
  <ip address='45.120.120.1' netmask='255.255.255.0'>
    <dhcp>
            <range start='45.120.120.100' end='45.120.120.200'/>
            <host mac="52:54:00:74:a9:78" name="compute2" ip="45.120.120.154"/>
    </dhcp>
  </ip>
</network>k3snat의 설정을 변경하여 45.120.120.154 IP가 항상 DHCP 서버를 통해 할당될 수 있게 하였습니다.
[root@compute-2-host ~]# virsh destroy compute2

[root@compute-2-host ~]# virsh net-destroy k3snat

[root@compute-2-host ~]# virsh net-start k3snat

[root@compute-2-host ~]# virsh start compute2[root@compute2 ~]# ip a
1: lo: <LOOPBACK,UP,LOWER_UP> mtu 65536 qdisc noqueue state UNKNOWN group default qlen 1000
link/loopback 00:00:00:00:00:00 brd 00:00:00:00:00:00
inet 127.0.0.1/8 scope host lo
valid_lft forever preferred_lft forever
inet6 ::1/128 scope host
valid_lft forever preferred_lft forever
2: enp1s0: <BROADCAST,MULTICAST,UP,LOWER_UP> mtu 1500 qdisc fq_codel state UP group default qlen 1000
link/ether 52:54:00:74:a9:78 brd ff:ff:ff:ff:ff:ff
inet 45.120.120.154/24 brd 45.120.120.255 scope global dynamic noprefixroute enp1s0
valid_lft 3586sec preferred_lft 3586sec
inet6 fe80::5054:ff:fe74:a978/64 scope link noprefixroute
valid_lft forever preferred_lft forever
[root@compute2 ~]# ping 8.8.8.8
PING 8.8.8.8 (8.8.8.8) 56(84) bytes of data.
64 bytes from 8.8.8.8: icmp_seq=1 ttl=114 time=36.5 ms
64 bytes from 8.8.8.8: icmp_seq=2 ttl=114 time=36.7 ms
--- 8.8.8.8 ping statistics ---
2 packets transmitted, 2 received, 0% packet loss, time 1002ms
rtt min/avg/max/mdev = 36.450/36.570/36.690/0.120 ms이후 위와 같이 재시작을 해주면 정상적으로 통신이 이루어짐을 볼 수 있으며
$ dnf install -y chrony
$ vim /etc/chrony.conf
# Use public servers from the pool.ntp.org project.
# Please consider joining the pool (https://www.pool.ntp.org/join.html).
server controller iburst

$ systemctl enable chronyd.service
$ systemctl restart chronyd.service
NTP를 위한 chronyd를 설치해주었습니다.
Configure BGP Dynamic Routing
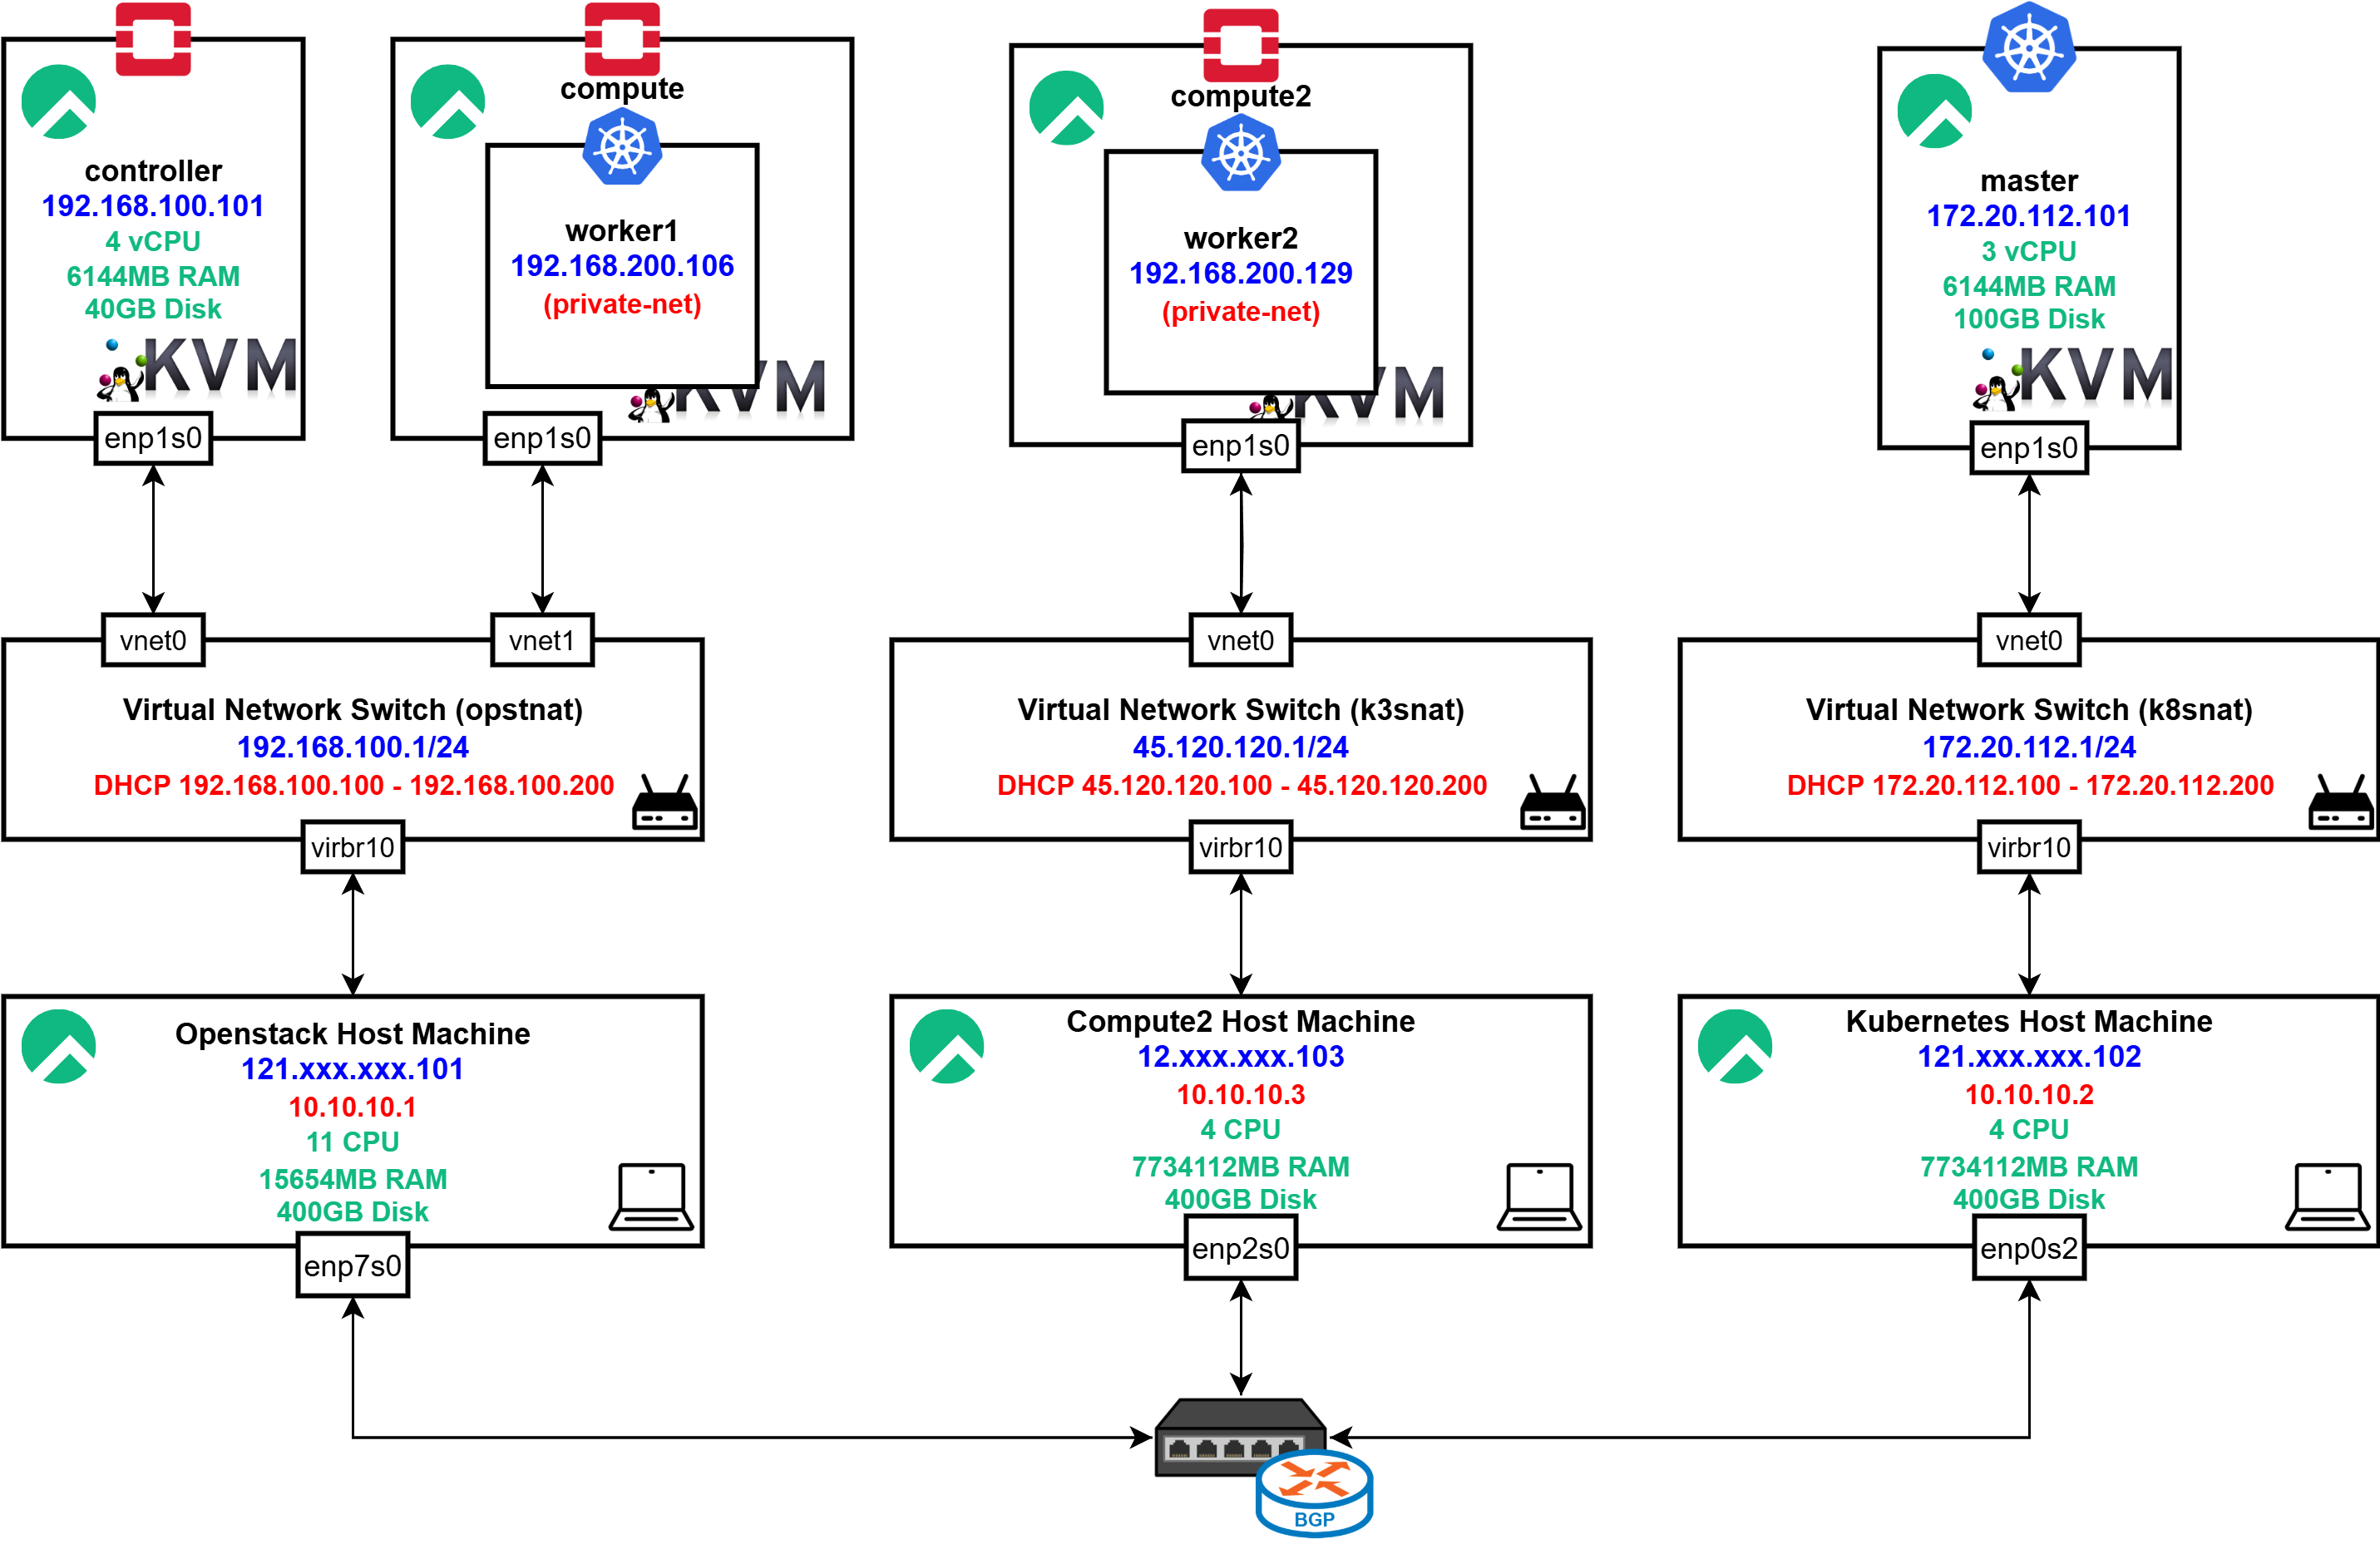
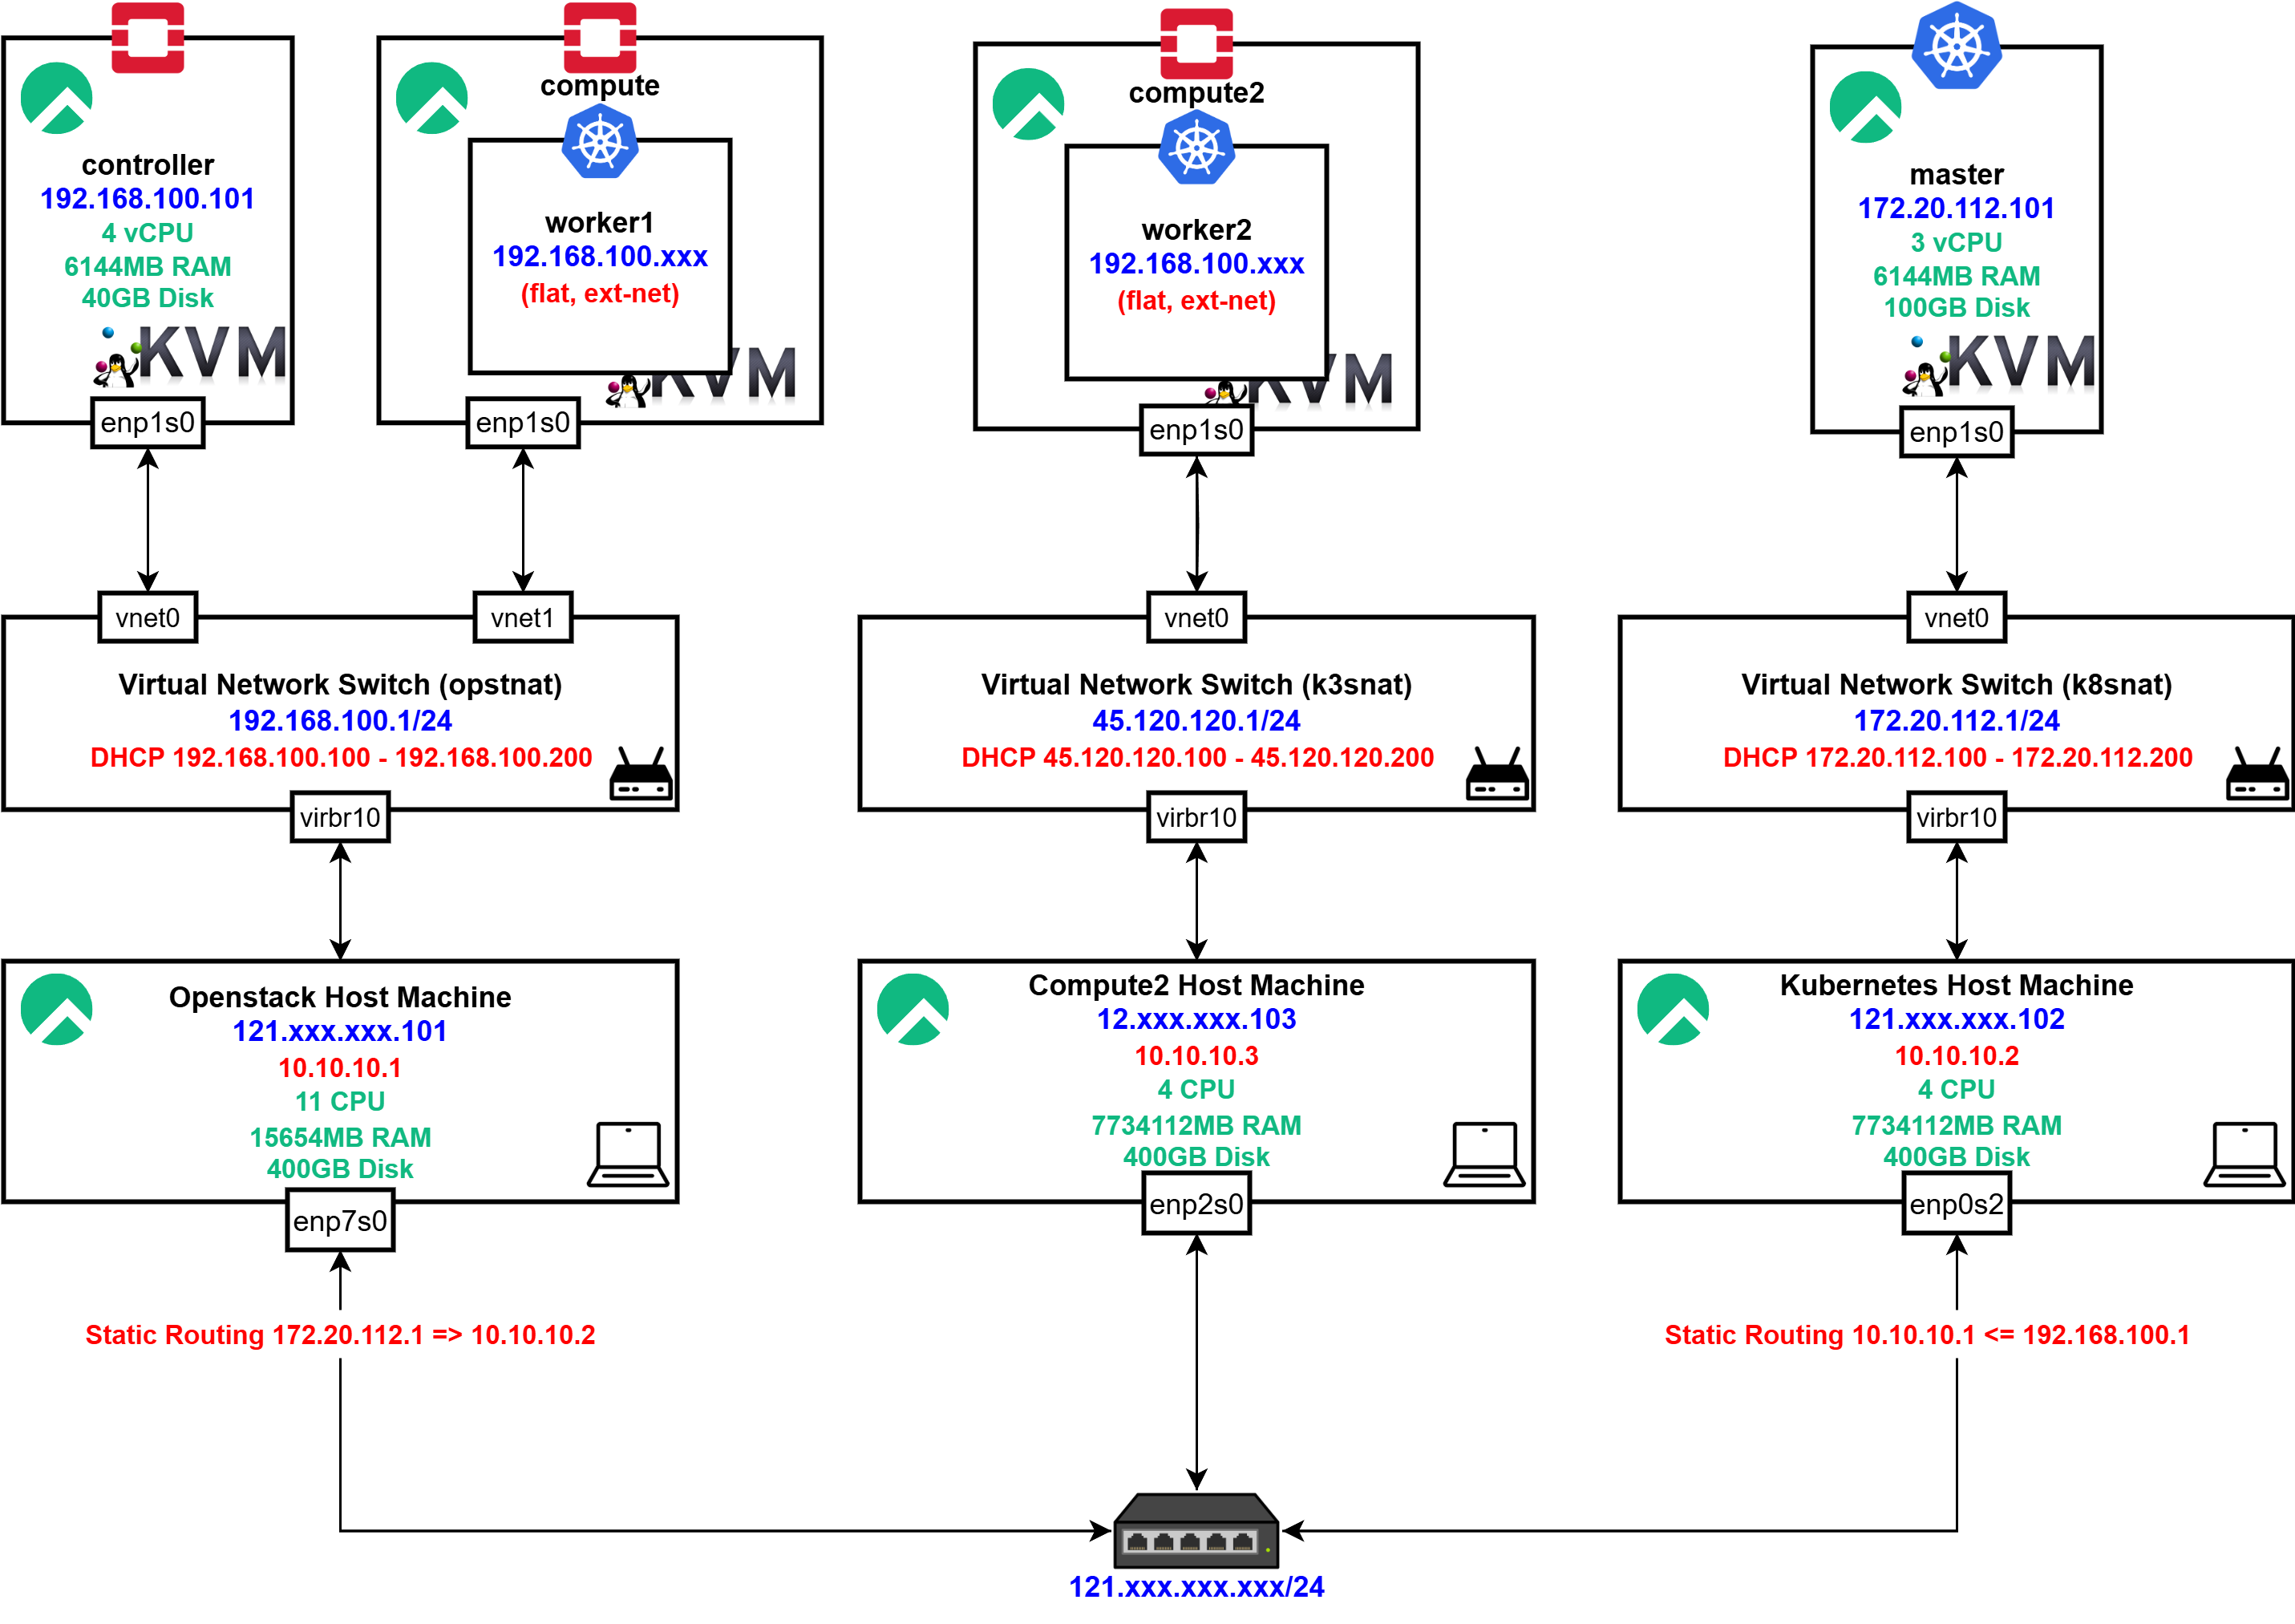 이전의 네트워크는 위와 같이 구성되어 있었습니다.
Static Routing을 통해서 OpenStack Host와 Kubernetes Host의 통신을 가능하게 하는 형태였는데, 이는 추후 확장성을 고려했을때 매우 비효율적이었기에 BGP Dynamic Routing을 통해 네트워크를 다시 구성해주고자 했습니다.
[root@compute-2-host ~]# nmcli connection modify enp2s0 +ipv4.addresses 10.10.10.3/24

[root@compute-2-host ~]# sudo nmcli connection down enp2s0
Connection 'enp2s0' successfully deactivated (D-Bus active path: /org/freedesktop/NetworkManager/ActiveConnection/2)

[root@compute-2-host ~]# sudo nmcli connection up enp2s0
Connection successfully activated (D-Bus active path: /org/freedesktop/NetworkManager/ActiveConnection/9)

[root@compute-2-host ~]# ip a
1: lo: <LOOPBACK,UP,LOWER_UP> mtu 65536 qdisc noqueue state UNKNOWN group default qlen 1000
    link/loopback 00:00:00:00:00:00 brd 00:00:00:00:00:00
    inet 127.0.0.1/8 scope host lo
       valid_lft forever preferred_lft forever
    inet6 ::1/128 scope host
       valid_lft forever preferred_lft forever
2: enp2s0: <BROADCAST,MULTICAST,UP,LOWER_UP> mtu 1500 qdisc fq_codel state UP group default qlen 1000
    ...
    inet 10.10.10.3/24 brd 10.10.10.255 scope global noprefixroute enp2s0
       valid_lft forever preferred_lft forever
	...
우선 위와 같이 Compute2 Host에 10.10.10.3/24 IP를 할당해주고
[root@compute-2-host ~]# ping 10.10.10.1
PING 10.10.10.1 (10.10.10.1) 56(84) bytes of data.
64 bytes from 10.10.10.1: icmp_seq=1 ttl=64 time=1.92 ms
64 bytes from 10.10.10.1: icmp_seq=2 ttl=64 time=0.946 ms

--- 10.10.10.1 ping statistics ---
2 packets transmitted, 2 received, 0% packet loss, time 1001ms
rtt min/avg/max/mdev = 0.946/1.434/1.922/0.488 ms

[root@compute-2-host ~]# ping 10.10.10.2
PING 10.10.10.2 (10.10.10.2) 56(84) bytes of data.
64 bytes from 10.10.10.2: icmp_seq=1 ttl=64 time=1.76 ms
64 bytes from 10.10.10.2: icmp_seq=2 ttl=64 time=0.967 ms
기존의 OpenStack Host와 Kubernetes Host와의 정상적인 통신을 확인하였습니다.
BGP Dynamic Routing
Border Gateway Protocol
인터넷에서 라우팅 정보를 교환하여 네트워크 간의 최적 경로를 결정하는 라우팅 프로토콜입니다.
BGP는 자율 시스템(AS) 간의 통신을 가능하게 하며, 인터넷의 핵심적인 역할을 수행합니다.
AS (Autonomous System, 자율 시스템): BGP의 핵심 개념으로, 단일 관리 정책하에 운영되는 라우터들의 집합을 의미합니다.
- 숫자 체계: ASN은 16비트 또는 32비트의 고유한 숫자로 구성됩니다.
- 16비트 ASN: 0 ~ 65,535 범위.
- 32비트 ASN: 65,536 ~ 4,294,967,295 범위.
- 표기 방식: 할당된 ASN은 'AS'라는 접두사와 함께 고유 번호로 표시됩니다.
- 각 AS는 ASN (AS Number) 이라는 고유한 번호를 가집니다. (ex. 구글 AS 15169, KT AS 4766)
Stub AS: 이는 하나의 연결만을 가진 자율 시스템으로, 트래픽이 자신의 네트워크를 통과하지 않습니다.Transit AS: 이는 두 개 이상의 연결을 가진 자율 시스템으로, 트래픽이 자신의 네트워크를 통과할 수 있습니다.Peering: 두 라우터가 BGP를 통해 서로 신뢰 관계를 맺고 경로 정보를 교환하기로 약속하는 것을 말합니다.Route Advertisement: 자신의 AS에 연결된 네트워크 대역을 피어에게 "이쪽으로 오면 내가 이 네트워크로 안내해 줄게"라고 알리는 행위입니다.
BGP는 ASN을 사용하여 네트워크 경로를 결정합니다.
1.IANA (Internet Assigned Numbers Authority): 대륙별 인증 기관인 IANA가 먼저 각 대륙에 ASN을 할당합니다.
2.RIR (Regional Internet Registry): RIR은 IANA로부터 받은 ASN을 각 지역(국가)의 관할 기관에 적절하게 배정합니다.
ASN은 위 두 단계의 할당 과정을 거칩니다.
https://lab.wallarm.com/what/bgp-%eb%9d%bc%ec%9a%b0%ed%8c%85-%ec%84%a4%eb%aa%85/?lang=ko
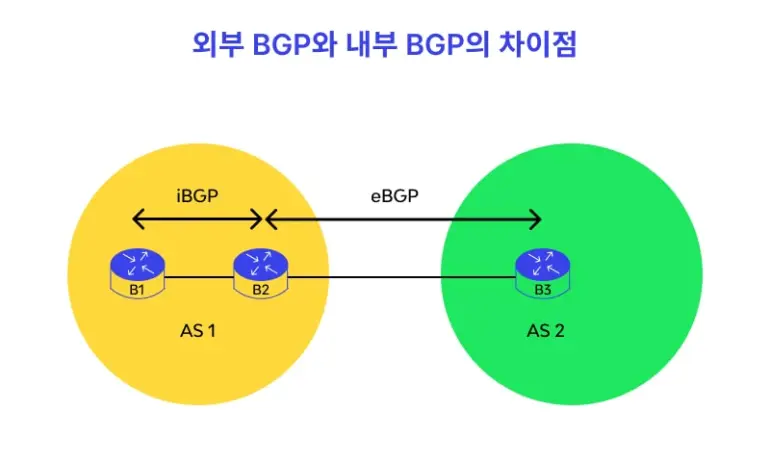
eBGP (external BGP): 다른 자율 시스템(AS) 간의 통신에 사용됩니다.
통신 사업자나 대규모 기업 네트워크처럼 서로 다른 네트워크를 연결하여 글로벌 트래픽을 처리하는 데 필수적입니다.iBGP (internal BGP): 동일한 자율 시스템(AS) 내부의 라우터 간 통신에 사용됩니다.
단일 네트워크 내의 라우터들이 정보를 공유하여 시스템 성능을 향상하고 트래픽을 효율적으로 관리하는 역할을 합니다.
현재 각 OpenStack Node들과 Kubernetes Master Node는 별도의 호스트 머신의 별도의 NAT 대역에 위치하고 있기 때문에 각각의 호스트가 BGP를 통해 본인의 NAT 대역을 Advertise 해주도록 하였습니다.
# OpenStack Host
sudo ip route del 172.20.112.0/24

# Kubernetes Host
sudo ip route del 192.168.100.0/24
우선 먼저 충돌을 막기 위해 수동으로 추가했던 Static Routing을 위한 ip route 규칙들을 모두 삭제합니다.
# 모든 호스트에서 실행
sudo dnf install -y frr
frr은 리눅스 운영체제에서 동적 라우팅 프로토콜을 관리하는 소프트웨어입니다. BGP, OSPF 등 다양한 라우팅 프로토콜을 지원하며, 라우터 역할을 수행하게 해줍니다.
이후 frr을 설치하여주고
# 모든 호스트에서 실행
sudo sed -i 's/bgpd=no/bgpd=yes/' /etc/frr/daemons
frr 설정 파일에서 bgpd 데몬을 사용하도록 설정합니다.
# Openstack Host
$ vim /etc/frr/frr.conf
frr defaults traditional
hostname openstack-host
log syslog informational
!
ip prefix-list ALLOW_ALL_PREFIXES seq 5 permit 0.0.0.0/0 le 32
!
route-map ALLOW_ALL permit 10
 match ip address prefix-list ALLOW_ALL_PREFIXES
!
router bgp 65001
 bgp router-id 10.10.10.1
 neighbor 10.10.10.2 remote-as 65002
 neighbor 10.10.10.2 update-source enp7s0
 neighbor 10.10.10.2 route-map ALLOW_ALL in
 neighbor 10.10.10.3 remote-as 65003
 neighbor 10.10.10.3 update-source enp7s0
 neighbor 10.10.10.3 route-map ALLOW_ALL in
 address-family ipv4 unicast
  redistribute connected
 exit-address-family
!
line vty
!
# Kubernetes Host
$ vim /etc/frr/frr.conf
frr defaults traditional
hostname kubernetes-host
log syslog informational
!
ip prefix-list ALLOW_ALL_PREFIXES seq 5 permit 0.0.0.0/0 le 32
!
route-map ALLOW_ALL permit 10
match ip address prefix-list ALLOW_ALL_PREFIXES
!
router bgp 65002
bgp router-id 10.10.10.2
neighbor 10.10.10.1 remote-as 65001
neighbor 10.10.10.1 update-source enp0s20f0u2
neighbor 10.10.10.1 route-map ALLOW_ALL in
neighbor 10.10.10.3 remote-as 65003
neighbor 10.10.10.3 update-source enp0s20f0u2
neighbor 10.10.10.3 route-map ALLOW_ALL in
address-family ipv4 unicast
redistribute connected
exit-address-family
!
line vty
!# Compute2 Host
$ vim /etc/frr/frr.conf
frr defaults traditional
hostname compute-2-host
log syslog informational
!
ip prefix-list ALLOW_ALL_PREFIXES seq 5 permit 0.0.0.0/0 le 32
!
route-map ALLOW_ALL permit 10
match ip address prefix-list ALLOW_ALL_PREFIXES
!
router bgp 65003
bgp router-id 10.10.10.3
neighbor 10.10.10.1 remote-as 65001
neighbor 10.10.10.1 update-source enp2s0
neighbor 10.10.10.1 route-map ALLOW_ALL in
neighbor 10.10.10.2 remote-as 65002
neighbor 10.10.10.2 update-source enp2s0
neighbor 10.10.10.2 route-map ALLOW_ALL in
address-family ipv4 unicast
redistribute connected
exit-address-family
!
line vty
!이후 각 호스트의 /etc/frr/frr.conf 파일을 위와 같이 작성합니다.
OpenStack Host의 frr.conf
OpenStack Host의 frr.conf를 기준으로 위 설정 파일을 설명하면 아래와 같습니다.
frr defaults traditionalhostname compute-2-host: FRR의 기본 동작 모드를 'traditionalhostname'으로 설정하고, 라우터 호스트명을compute-2-host로 지정합니다.log syslog informational: FRR의 로그 메시지를syslog로 보내고, 로그 레벨을 '정보성(informational)'으로 설정합니다.ip prefix-list ALLOW_ALL_PREFIXES seq 5 permit 0.0.0.0/0 le 32: 모든 IPv4 주소(0.0.0.0/0)를 허용하는 프리픽스 리스트ALLOW_ALL_PREFIXES를 정의합니다.route-map ALLOW_ALL permit 10: 라우팅 정책을 정의하는 라우트 맵ALLOW_ALL을 생성하고, 순서(sequence) 10번 규칙을 허용(permit)하도록 설정합니다.match ip address prefix-list ALLOW_ALL_PREFIXES:route-map에서 패킷의 IP 주소가ALLOW_ALL_PREFIXES프리픽스 리스트와 일치하는지 확인하는 조건을 정의합니다.router bgp 65003: BGP(Border Gateway Protocol) 라우팅 프로세스를 시작하고, 이 라우터의 AS(Autonomous System) 번호를 65003으로 설정합니다.bgp router-id 10.10.10.3: BGP 라우터의 고유 식별자 역할을 하는 라우터 ID를 10.10.10.3으로 설정합니다.neighbor 10.10.10.1 remote-as 65001: IP 주소 10.10.10.1을 가진 라우터와 BGP 인접(neighbor) 관계를 맺고, 상대방의 AS 번호는 65001임을 명시합니다.neighbor 10.10.10.1 update-source enp2s0: BGP 패킷을 보낼 때,enp2s0인터페이스의 IP 주소를 출발지 IP로 사용하도록 지정합니다.neighbor 10.10.10.1 route-map ALLOW_ALL in: 인접 라우터10.10.10.1로부터 라우팅 업데이트를 수신(in)할 때ALLOW_ALL라우트 맵을 적용하여 경로를 제어합니다.address-family ipv4 unicast: BGP에서 IPv4 유니캐스트 경로 정보를 교환할 것을 선언합니다.redistribute connected: 라우터에 직접 연결된 네트워크 경로들을 BGP를 통해 다른 라우터들에게 광고(advertise)합니다.line vty: FRR의 원격 접속 설정(Virtual Terminal)을 시작하는 부분입니다.
# 모든 호스트에서 실행
sudo systemctl enable --now frr
sudo systemctl status frr
이후 FRR 서비스를 시작하고 이를 확인합니다.
# BGP 피어링 상태 요약. State가 'Established'가 되어야 성공.
vtysh -c "show ip bgp summary"

# BGP를 통해 학습한 라우팅 경로 확인.
# '*'와 '>' 표시가 붙은 경로가 현재 활성화된 경로입니다.
vtysh -c "show ip route bgp"
이후 모든 호스트에서 FRR 전용 쉘인 vtysh 명령어로 BGP 상태를 확인합니다.
[root@openstack-host ~]# vtysh -c "show running-config"
Building configuration...

Current configuration:
!
frr version 8.5.3
frr defaults traditional
hostname openstack-host
log syslog informational
no ipv6 forwarding
!
router bgp 65001
 bgp router-id 10.10.10.1
 neighbor 10.10.10.2 remote-as 65002
 neighbor 10.10.10.2 update-source enp7s0
 neighbor 10.10.10.3 remote-as 65003
 neighbor 10.10.10.3 update-source enp7s0
 !
 address-family ipv4 unicast
  network 192.168.100.0/24
  neighbor 10.10.10.2 route-map ALLOW_ALL in
  neighbor 10.10.10.3 route-map ALLOW_ALL in
 exit-address-family
exit
!
ip prefix-list ALLOW_ALL_PREFIXES seq 5 permit 0.0.0.0/0 le 32
!
route-map ALLOW_ALL permit 10
 match ip address prefix-list ALLOW_ALL_PREFIXES
exit
!
end
하지만 이 과정에서 위와 같이 기존에 설정한 내용과 running-config의 내용이 일치하지 않으면 수동으로 이를 적용해주어야 합니다.
# OpenStack Host
printf 'frr defaults traditional\nhostname openstack-host\nlog syslog informational\n!\nrouter bgp 65000\n bgp router-id 10.10.10.1\n neighbor 10.10.10.2 remote-as 65000\n neighbor 10.10.10.2 update-source enp7s0\n neighbor 10.10.10.2 next-hop-self\n neighbor 10.10.10.3 remote-as 65000\n neighbor 10.10.10.3 update-source enp7s0\n neighbor 10.10.10.3 next-hop-self\n address-family ipv4 unicast\n  redistribute connected\n exit-address-family\n!\nline vty\n!\n' | sudo tee /etc/frr/frr.conf

# Kubernetes Host
printf 'frr defaults traditional\nhostname kubernetes-host\nlog syslog informational\n!\nrouter bgp 65000\n bgp router-id 10.10.10.2\n neighbor 10.10.10.1 remote-as 65000\n neighbor 10.10.10.1 update-source enp0s20f0u2\n neighbor 10.10.10.1 next-hop-self\n neighbor 10.10.10.3 remote-as 65000\n neighbor 10.10.10.3 update-source enp0s20f0u2\n neighbor 10.10.10.3 next-hop-self\n address-family ipv4 unicast\n  redistribute connected\n exit-address-family\n!\nline vty\n!\n' | sudo tee /etc/frr/frr.conf

# Compute2 Host
printf 'frr defaults traditional\nhostname compute-2-host\nlog syslog informational\n!\nrouter bgp 65000\n bgp router-id 10.10.10.3\n neighbor 10.10.10.1 remote-as 65000\n neighbor 10.10.10.1 update-source enp2s0\n neighbor 10.10.10.2 remote-as 65000\n neighbor 10.10.10.2 update-source enp2s0\n neighbor 10.10.10.2 next-hop-self\n address-family ipv4 unicast\n  redistribute connected\n exit-address-family\n!\nline vty\n!\n' | sudo tee /etc/frr/frr.conf
만약 수동 작성시에도 문제가 발생한다면 위와 같이 printf를 통해 정확하게 적용하여줍니다.
[root@openstack-host ~]# vtysh -c "show ip bgp summary"

IPv4 Unicast Summary (VRF default):
BGP router identifier 10.10.10.1, local AS number 65000 vrf-id 0
BGP table version 10
RIB entries 15, using 2880 bytes of memory
Peers 2, using 1449 KiB of memory

Neighbor        V         AS   MsgRcvd   MsgSent   TblVer  InQ OutQ  Up/Down State/PfxRcd   PfxSnt Desc
10.10.10.2      4      65000         7         9        0    0    0 00:00:47            3        4 N/A
10.10.10.3      4      65000         9        13        0    0    0 00:00:45            3        4 N/A

Total number of neighbors 2

[root@openstack-host ~]# vtysh -c "show ip route bgp"
Codes: K - kernel route, C - connected, S - static, R - RIP,
       O - OSPF, I - IS-IS, B - BGP, E - EIGRP, N - NHRP,
       T - Table, v - VNC, V - VNC-Direct, F - PBR,
       f - OpenFabric,
       > - selected route, * - FIB route, q - queued, r - rejected, b - backup
       t - trapped, o - offload failure

B>* 14.xxxxx.0/24 [200/0] via 10.10.10.3, enp7s0, weight 1, 00:01:41
B>* 45.120.120.0/24 [200/0] via 10.10.10.3, enp7s0, weight 1, 00:01:41
B>* 121.xxxxx.0/24 [200/0] via 10.10.10.2, enp7s0, weight 1, 00:01:44
B>* 172.20.112.0/24 [200/0] via 10.10.10.2, enp7s0, weight 1, 00:01:44
이후 다른 호스트들에서도 위와 같이 정상적으로 접근이 활성화된 것을 볼 수 있으며
[root@openstack-host ~]# ping 172.20.112.101
PING 172.20.112.101 (172.20.112.101) 56(84) bytes of data.
64 bytes from 172.20.112.101: icmp_seq=1 ttl=63 time=1.62 ms
64 bytes from 172.20.112.101: icmp_seq=2 ttl=63 time=1.68 ms

[root@kubernetes-host ~]# ping 192.168.100.101
PING 192.168.100.101 (192.168.100.101) 56(84) bytes of data.
64 bytes from 192.168.100.101: icmp_seq=1 ttl=63 time=1.83 ms
64 bytes from 192.168.100.101: icmp_seq=2 ttl=63 time=1.42 ms
기존과 동일하게 서로의 NAT 주소로 호스트에서 접근이 가능한 것을 볼 수 있습니다.
# 1. 10.10.10.x 대역에서 Compute2의 가상 네트워크(45.120.120.x)로 들어오는 트래픽 허용
sudo iptables -I LIBVIRT_FWI 1 -s 10.10.10.0/24 -d 45.120.120.0/24 -j ACCEPT

# 2. Compute2의 가상 네트워크(45.120.120.x)에서 10.10.10.x 대역으로 나가는 트래픽 허용
sudo iptables -I LIBVIRT_FWO 1 -s 45.120.120.0/24 -d 10.10.10.0/24 -j ACCEPT
또한 위와 같이 Compute Host의 NAT로의 iptables RULE을 추가로 작성해주면
[root@openstack-host ~]# ping 45.120.120.101
PING 45.120.120.101 (45.120.120.101) 56(84) bytes of data.
64 bytes from 45.120.120.101: icmp_seq=1 ttl=63 time=1.68 ms
64 bytes from 45.120.120.101: icmp_seq=2 ttl=63 time=1.76 ms

[root@kubernetes-host ~]# ping 45.120.120.101
PING 45.120.120.101 (45.120.120.101) 56(84) bytes of data.
64 bytes from 45.120.120.101: icmp_seq=1 ttl=63 time=1.97 ms
64 bytes from 45.120.120.101: icmp_seq=2 ttl=63 time=2.35 ms
위와 같이 정상적으로 통신이 Establish되는 것을 볼 수 있으며
[root@master wwwm]# k logs -f wwwm-spring-be-v2-86f76b65fd-zmzm8

  .   ____          _            __ _ _
 /\\ / ___'_ __ _ _(_)_ __  __ _ \ \ \ \
( ( )\___ | '_ | '_| | '_ \/ _` | \ \ \ \
 \\/  ___)| |_)| | | | | || (_| |  ) ) ) )
  '  |____| .__|_| |_|_| |_\__, | / / / /
 =========|_|==============|___/=/_/_/_/

 :: Spring Boot ::                (v3.3.2)

2025-08-12T09:11:18.891Z  INFO 1 --- [WHEN-WILL-WE-MEET] [           main] o.e.w.WhenWillWeMeetApplication          : Starting WhenWillWeMeetApplication v0.0.1-SNAPSHOT using Java 21 with PID 1 (/app.jar started by root in /)
Master Node에서 Worker Node의 Workload에 접근이 가능한 것을 볼 수 있습니다.
Configure Compute Host
이러한 BGP 설정 이후 정상적으로 기존에 진행했던 방식과 동일하게 Nova와 Neutron을 설정하여줍니다.
openstack-nova-compute
[root@compute2 ~]# systemctl status openstack-nova-compute
● openstack-nova-compute.service - OpenStack Nova Compute Server
     Loaded: loaded (/usr/lib/systemd/system/openstack-nova-compute.service; en>
     Active: active (running) since Wed 2025-08-13 03:35:10 EDT; 1min 0s ago
   Main PID: 65970 (nova-compute)
      Tasks: 22 (limit: 38292)
     Memory: 121.7M
        CPU: 3.048s
     CGroup: /system.slice/openstack-nova-compute.service
             └─65970 /usr/bin/python3 /usr/bin/nova-compute

Aug 13 03:36:10 compute2 nova-compute[65970]: 2025-08-13 03:36:10.224 65970 ERR>
Aug 13 03:36:10 compute2 nova-compute[65970]: 2025-08-13 03:36:10.224 65970 ERR>
Aug 13 03:36:10 compute2 nova-compute[65970]: 2025-08-13 03:36:10.224 65970 ERR>
Aug 13 03:36:10 compute2 nova-compute[65970]: 2025-08-13 03:36:10.224 65970 ERR>
Aug 13 03:36:10 compute2 nova-compute[65970]: 2025-08-13 03:36:10.224 65970 ERR>
Aug 13 03:36:10 compute2 nova-compute[65970]: 2025-08-13 03:36:10.224 65970 ERR>
Aug 13 03:36:10 compute2 nova-compute[65970]: 2025-08-13 03:36:10.224 65970 ERR>
Aug 13 03:36:10 compute2 nova-compute[65970]: 2025-08-13 03:36:10.224 65970 ERR>
Aug 13 03:36:10 compute2 nova-compute[65970]: 2025-08-13 03:36:10.224 65970 ERR>
Aug 13 03:36:10 compute2 nova-compute[65970]: 2025-08-13 03:36:10.224 65970 ERR>
[TroubleShooting] FileNotFoundError: [Errno 2] No such file or directory: '/usr/lib/python3.9/site-packages/instances'
Nova를 설치하는 과정에서 위와 같은 오류가 발생한다면
[DEFAULT]
enabled_apis = osapi_compute,metadata
transport_url = rabbit://openstack:o5vKi2rnhxB@controller:5672/
my_ip = 45.120.120.154
compute_driver = libvirt.LibvirtDriver
instances_path = /var/lib/nova/instances
명시적으로 instances_path를 /var/lib/nova/instances로 지정하여주고
mkdir -p /var/lib/nova/instances
chown -R nova:nova /var/lib/nova/instances
chmod 755 /var/lib/nova/instances
위와 같이 해당 디렉터리를 만들고 설정한 뒤
[root@controller ~]# su -s /bin/sh -c "nova-manage cell_v2 discover_hosts --verbose" nova
...
Skipping cell0 since it does not contain hosts.
Getting computes from cell 'cell1': 4c904549-f28f-4d89-b47d-b1de8135152a
Checking host mapping for compute host 'compute2': e8826b23-3540-4c82-9a7f-efdac7439294
Creating host mapping for compute host 'compute2': e8826b23-3540-4c82-9a7f-efdac7439294
Found 1 unmapped computes in cell: 4c904549-f28f-4d89-b47d-b1de8135152a
위와 같이 Controller에서 discover_hosts를 통해 새로운 Compute Node를 등록할 수 있습니다.
[root@controller ~]# openstack compute service list
+--------------------------------------+----------------+------------+----------+---------+-------+----------------------------+
| ID                                   | Binary         | Host       | Zone     | Status  | State | Updated At                 |
+--------------------------------------+----------------+------------+----------+---------+-------+----------------------------+
| 799ac5c1-3d7a-4517-b113-d39398c2f0c3 | nova-scheduler | controller | internal | enabled | up    | 2025-08-13T07:47:27.000000 |
| 28892e63-324f-48ff-8813-1f7b4a4bee91 | nova-conductor | controller | internal | enabled | up    | 2025-08-13T07:47:27.000000 |
| 259f0bee-aa49-4511-a110-9d077e8f5032 | nova-compute   | compute    | nova     | enabled | up    | 2025-08-13T07:47:24.000000 |
| 262e842c-3509-4505-abaf-c9d52b6c5f57 | nova-compute   | compute2   | nova     | enabled | up    | 2025-08-13T07:47:18.000000 |
+--------------------------------------+----------------+------------+----------+---------+-------+----------------------------+
또한 위와 같이 정상적으로 compute service가 OpenStack 클러스터에 포함된 모습을 볼 수 있었습니다.
openstack-netron
[root@controller ~]# openstack network agent list
+--------------------------------------+--------------------+------------+-------------------+-------+-------+---------------------------+
| ID                                   | Agent Type         | Host       | Availability Zone | Alive | State | Binary                    |
+--------------------------------------+--------------------+------------+-------------------+-------+-------+---------------------------+
| 1f9257e6-e17c-44f7-847e-7b42611db8af | Open vSwitch agent | compute    | None              | :-)   | UP    | neutron-openvswitch-agent |
| 5714217b-89ba-416f-8c16-ee556ed3e8e2 | Open vSwitch agent | controller | None              | :-)   | UP    | neutron-openvswitch-agent |
| 70b36a3e-68fd-4f1b-8ee4-cb5645140281 | Metadata agent     | controller | None              | :-)   | UP    | neutron-metadata-agent    |
| df911242-e20c-4f08-ac59-45a4e0dc2e9f | L3 agent           | controller | nova              | :-)   | UP    | neutron-l3-agent          |
| e47d886f-140e-4253-a34f-e9593d95dfa2 | Open vSwitch agent | compute2   | None              | :-)   | UP    | neutron-openvswitch-agent |
| f4726158-927e-434c-8591-ca340534d40b | DHCP agent         | controller | nova              | :-)   | UP    | neutron-dhcp-agent        |
+--------------------------------------+--------------------+------------+-------------------+-------+-------+---------------------------+
또한 기존 Computute Node를 설정했을때와 마찬가지로 설정하고 DHCP Client 설정 등을 완료하면 위와 같이 neutron까지 세팅을 완료할 수 있으며
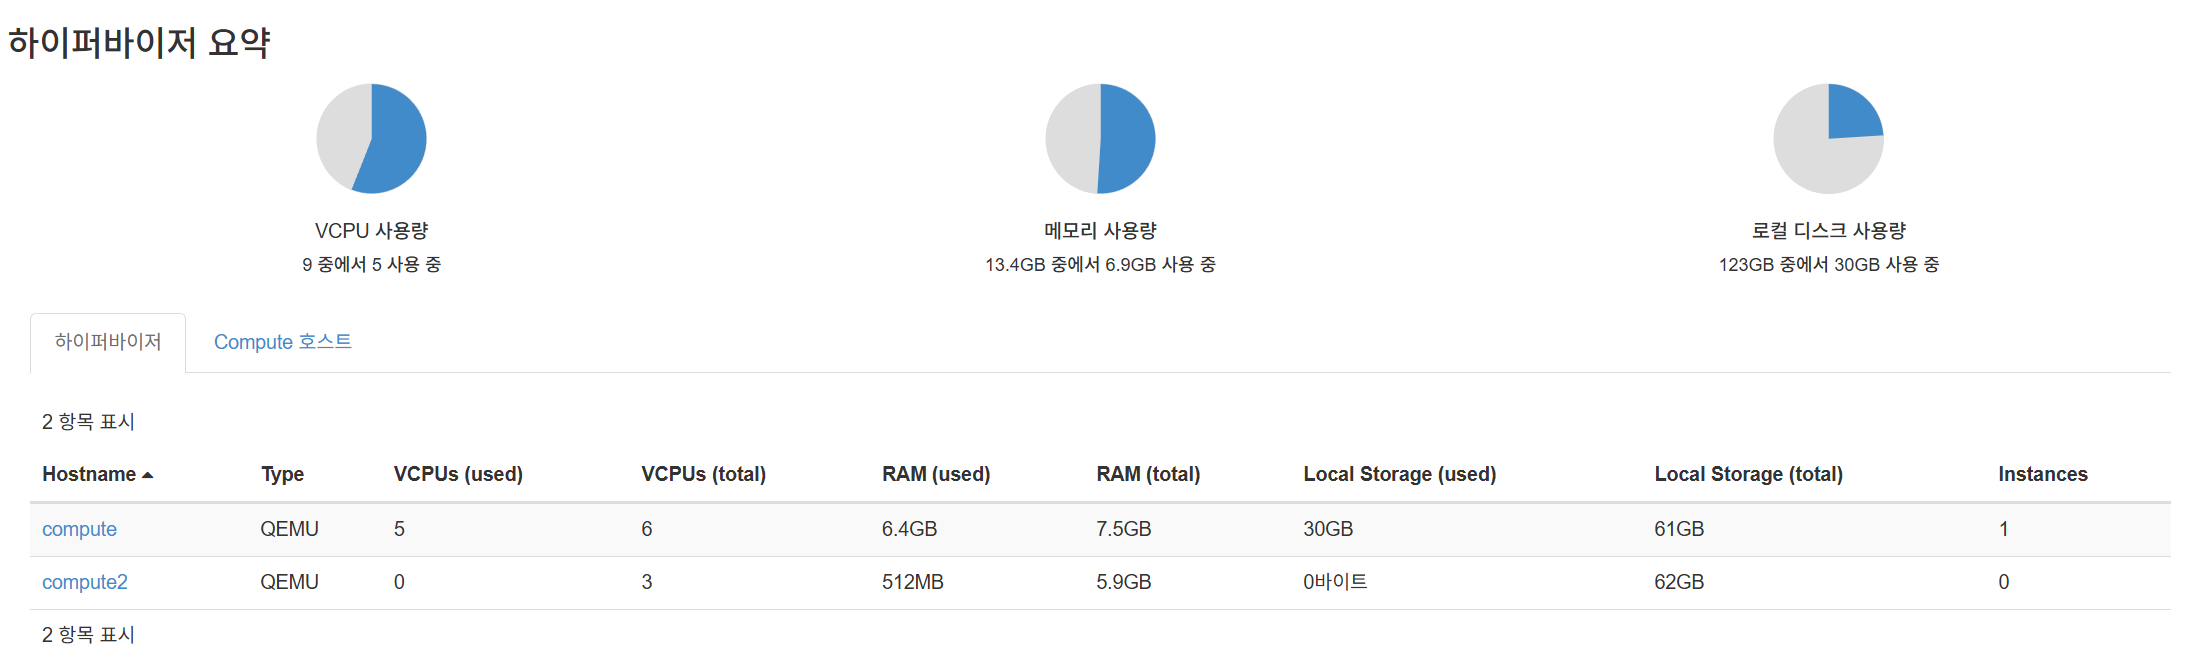 Horizon 대시보드에서 추가된 하이퍼바이저를 확인할 수 있습니다.
Compute Nodes br-tun Configuration
또한 현재 Multi Compute Node 구성이기 때문에 br-tun 설정 없이는 두 Compute Node에 있는 인스턴스 간의 내부 통신이 불가능합니다.
compute1에 있는 VM끼리는br-int(Integration Bridge)를 통해 서로 통신할 수 있습니다.compute1의 VM이compute2의 VM과 통신해야 할 경우, 이 트래픽은 물리 네트워크를 통해 전달되어야 합니다.- 호스트도 다르고 NAT 대역도 다른 현재 환경에서는 두 노드의 물리 네트워크가 직접 L2로 연결되어 있지 않으므로, VM의 L2 트래픽을 L3 패킷으로 Encapsulation하여 보내야 합니다.
- 이때 encapsulation과 decapsulation를 담당하는 것이 바로 br-tun입니다.
- 주로 VXLAN이나 GRE 같은 터널링 프로토콜을 사용합니다.
[root@compute ~]# ovs-vsctl show
...
Port patch-tun
  Interface patch-tun
    type: patch
    options: {peer=patch-int}
    error: "No usable peer 'patch-int' exists in 'system' datapath."
따라서 compute1의 OVS 설정을 열람하였을 때 위와 같은 오류가 발생하였습니다.
이는 br-int의 patch-tun 포트가 연결될 상대인 patch-int 포트를 br-tun 브릿지에서 찾지 못했다는 의미입니다.
# compute1, compute2 모두
ovs-vsctl add-br br-tun
따라서 가장 먼저 br-tun이라는 이름의 OVS 브릿지를 생성합니다.
# compute1, compute2 모두

# 1. br-int에 patch-tun 포트 추가
ovs-vsctl add-port br-int patch-tun
ovs-vsctl set interface patch-tun type=patch options:peer=patch-int

# 2. br-tun에 patch-int 포트 추가
ovs-vsctl add-port br-tun patch-int
ovs-vsctl set interface patch-int type=patch options:peer=patch-tun
이후 두 브릿지 사이에 트래픽이 오갈 수 있도록 가상의 케이블인 patch port를 생성하여 br-int와 br-tun를 연결합니다.
$ vim /etc/neutron/plugins/ml2/openvswitch_agent.ini
[ovs]
# 터널링에 사용할 브릿지를 br-tun으로 지정
tunnel_bridge = br-tun

# 터널링 트래픽이 나갈 노드의 물리적 IP 주소를 지정
# 각 노드의 IP로 설정
local_ip = <NODE_MANAGEMENT_IP>

[agent]
# 사용할 터널링 프로토콜을 지정 (일반적으로 vxlan)
tunnel_types = vxlan
이후 위와 같이 /etc/neutron/plugins/ml2/openvswitch_agent.ini를 설정하여주고
systemctl restart neutron-openvswitch-agent.serviceneutron-openvswitch-agent.service 서비스를 재시작하여줍니다.
[root@compute ~]# ovs-vsctl show
85ccefa0-dd2d-4696-8ffe-bed0ece90fa1
    Manager "ptcp:6640:127.0.0.1"
        is_connected: true
    Bridge br-tun
        Controller "tcp:127.0.0.1:6633"
            is_connected: true
        fail_mode: secure
        datapath_type: system
        Port vxlan-2d78789a
            Interface vxlan-2d78789a
                type: vxlan
                options: {df_default="true", egress_pkt_mark="0", in_key=flow, local_ip="192.168.100.102", out_key=flow, remote_ip="45.120.120.154"}
        Port patch-int
            Interface patch-int
                type: patch
                options: {peer=patch-tun}
        Port vxlan-c0a86465
            Interface vxlan-c0a86465
                type: vxlan
                options: {df_default="true", egress_pkt_mark="0", in_key=flow, local_ip="192.168.100.102", out_key=flow, remote_ip="192.168.100.101"}
        Port br-tun
            Interface br-tun
                type: internal
[root@compute2 ~]# ovs-vsctl show
ea65d926-af7a-4469-a721-278a3e6f4f42
    Manager "ptcp:6640:127.0.0.1"
        is_connected: true
    Bridge br-tun
        Controller "tcp:127.0.0.1:6633"
            is_connected: true
        fail_mode: secure
        datapath_type: system
        Port br-tun
            Interface br-tun
                type: internal
        Port vxlan-c0a86465
            Interface vxlan-c0a86465
                type: vxlan
                options: {df_default="true", egress_pkt_mark="0", in_key=flow, local_ip="45.120.120.154", out_key=flow, remote_ip="192.168.100.101"}
        Port vxlan-c0a86466
            Interface vxlan-c0a86466
                type: vxlan
                options: {df_default="true", egress_pkt_mark="0", in_key=flow, local_ip="45.120.120.154", out_key=flow, remote_ip="192.168.100.102"}
이후 위와 같이 두 Compute Node에서 VXLAN 터널링이 활성화된 것을 볼 수 있습니다.
Network Reconfiguration
또한 기존에는 OpenStack NAT과 Livirt NAT 네트워크 대역이 192.168.100.xxx로 동일해 충돌이 존재하였습니다.
# controller
openstack router unset --external-gateway router1
따라서 우선 기존의 라우터를 unset하여주고
# controller
openstack subnet delete ext-subnet

openstack network delete ext-net
Controller에서 위와 같이 ext-net 네트워크를 삭제하여줍니다.
# openstack-host
sudo ip addr add 192.168.200.1/24 dev virbr10
이후 위와 같이 192.168.200.1/24 대역에 대한 라우트를 OpenStack Host에 추가하여 Controller VM을 위한 기존 192.168.100.1 게이트웨이 역할과, 새로운 외부 네트워크를 위한 192.168.200.1 게이트웨이 역할을 동시에 수행하게 만들어줍니다.
이후의 모든 명령은 별도의 명시가 없다면 Controller에서 진행합니다.
openstack network create --external \
  --provider-network-type flat \
  --provider-physical-network provider \
  ext-net-new
위와 같이 flat타입의 ext-net-new 네트워크를 생성해주고
openstack subnet create --network ext-net-new \
  --subnet-range 192.168.200.0/24 \
  --gateway 192.168.200.1 \
  --allocation-pool start=192.168.200.10,end=192.168.200.200 \
  --dns-nameserver 8.8.8.8 \
  ext-subnet-new
해당 네트워크에 subnet을 새롭게 추가합니다.
이때--gateway 192.168.200.1의 주소는 OpenStack Host에 추가한 IP와 반드시 일치해야 합니다.
# openstack-host
# 1. 새로운 대역에서 인터넷으로 '나가는' 트래픽 허용
sudo iptables -I FORWARD -s 192.168.200.0/24 -j ACCEPT

# 2. 인터넷에서 새로운 대역으로 '돌아오는' 응답 트래픽 허용
sudo iptables -I FORWARD -d 192.168.200.0/24 -m state --state RELATED,ESTABLISHED -j ACCEPT

# 3. '나가는' 트래픽을 호스트의 공인 IP로 주소 변환(SNAT)
sudo iptables -t nat -A POSTROUTING -s 192.168.200.0/24 -j MASQUERADE

# 4. 출발지가 10.10.10.0/24 네트워크이고 목적지가 192.168.200.0/24 네트워크인 트래픽을 허용
sudo iptables -I LIBVIRT_FWI 1 -s 10.10.10.0/24 -d 192.168.200.0/24 -j ACCEPT

sudo service iptables save
또한 위와 같이 새로운 iptables RULE들을 추가하여줍니다.
openstack router set --external-gateway ext-net-new router1이후 Router에 --external-gateway로 ext-net-new를 설정해주면
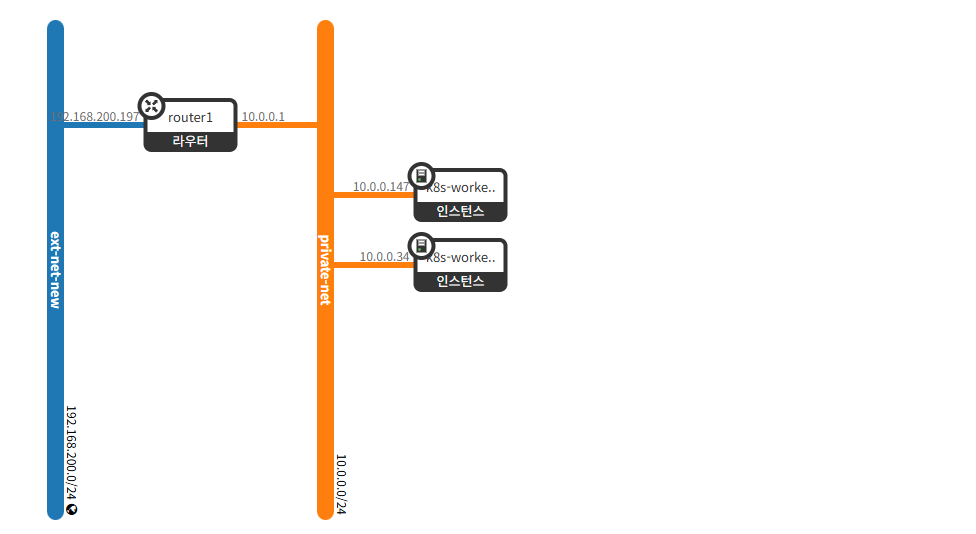 위와 같이 정상적으로 네트워크가 연결된 것을 볼 수 있습니다.
$ openstack floating ip create ext-net-new
+---------------------+--------------------------------------+
| Field               | Value                                |
+---------------------+--------------------------------------+
| created_at          | 2025-08-15T13:19:06Z                 |
| description         |                                      |
| dns_domain          | None                                 |
| dns_name            | None                                 |
| fixed_ip_address    | None                                 |
| floating_ip_address | 192.168.200.106                      |
| floating_network_id | 861a383a-c8c5-411f-86bd-d6d5b3c00f36 |
| id                  | 781a4cc5-93fc-4bc5-8fae-37871a387614 |
| name                | 192.168.200.106                      |
| port_details        | None                                 |
| port_id             | None                                 |
| project_id          | 0636a6ee7b2242e7ba9faf5e7d1daed4     |
| qos_policy_id       | None                                 |
| revision_number     | 0                                    |
| router_id           | None                                 |
| status              | DOWN                                 |
| subnet_id           | None                                 |
| tags                | []                                   |
| updated_at          | 2025-08-15T13:19:06Z                 |
+---------------------+--------------------------------------+
또한 새롭게 생성한 네트워크에서 Floating IP를 생성해주고
# k8s-worker-1에 연결
openstack server add floating ip k8s-worker-1 192.168.200.106
기존 k8s-worker-1에 이를 할당하여줍니다.
Controller VXLAN Configuration
[root@controller ~]# ovs-vsctl show
e066f1d7-b888-4e29-8cb6-484dc0a0c83d
    Manager "ptcp:6640:127.0.0.1"
        is_connected: true
    Bridge br-ex
        Controller "tcp:127.0.0.1:6633"
            is_connected: true
        fail_mode: secure
        datapath_type: system
        Port br-ex
            Interface br-ex
                type: internal
        Port enp1s0
            Interface enp1s0
        Port phy-br-ex
            Interface phy-br-ex
                type: patch
                options: {peer=int-br-ex}
    Bridge br-int
        Controller "tcp:127.0.0.1:6633"
            is_connected: true
        fail_mode: secure
        datapath_type: system
        Port br-int
            Interface br-int
                type: internal
        Port qr-7a7996db-db
            tag: 1
            Interface qr-7a7996db-db
                type: internal
        Port int-br-ex
            Interface int-br-ex
                type: patch
                options: {peer=phy-br-ex}
        Port tapc73159c7-a5
            tag: 2
            Interface tapc73159c7-a5
                type: internal
        Port patch-tun
            Interface patch-tun
                type: patch
                options: {peer=patch-int}
        Port qg-57f5a497-03
            tag: 2
            Interface qg-57f5a497-03
                type: internal
        Port tap3362413f-78
            tag: 1
            Interface tap3362413f-78
                type: internal
    Bridge br-tun
        Controller "tcp:127.0.0.1:6633"
            is_connected: true
        fail_mode: secure
        datapath_type: system
        Port br-tun
            Interface br-tun
                type: internal
        Port patch-int
            Interface patch-int
                type: patch
                options: {peer=patch-tun}
    ovs_version: "3.1.3"
또한 Controller에서는 br-tun이 정상적으로 설정되어 있지 않음을 확인하였습니다.
일반적으로 Controller와 Compute Node들이 물리적, 혹은 같은 VLAN대역에 존재하면 Controller는 터널링 없이 Compute Node와 통신이 가능합니다.
하지만 현재의 인프라 구성에서는 Compute2 Node가 아예 다른 호스트 머신의 다른 NAT 대역에 위치합니다.
인스턴스의 내부 패킷, DHCP 요청, metadata 서비스 요청 등은 네트워크 노드(Controller)를 통해 서비스되고 있습니다.
따라서 Compute2와 네트워크(Controller) 노드간 VXLAN 터널이 없으면, 인스턴스가 네트워크 노드의 DHCP/metadata에 접근할 수 없어 IP 미할당, 클라우드-init 실패, 네트워크 불가 상황 등이 발생하게 됩니다.
즉, Controller의 br-tun은 네트워크 서비스의 중심 허브 역할이 되는 셈입니다.
따라서 Controller는 모든 Compute Node들과 각각 VXLAN 포트인 Point to Point 터널을 맺어야 패킷이 정상적으로 흐르게 됩니다.
# Controller
# /etc/neutron/plugins/ml2/openvswitch_agent.ini
[ovs]
bridge_mappings = provider:br-ex
local_ip = 192.168.100.101

tunnel_bridge = br-tun
tunnel_type = vxlan

[agent]
tunnel_types = vxlan
# local_ip = 192.168.100.101
l2_population = true
따라서 Controller에서 위와 같이 설정을 확인하여주고
sudo systemctl restart openvswitch
sudo systemctl restart neutron-openvswitch-agent
동일하게 Neutron 관련 서비스들을 재시작하여 터널링을 활성화하여줍니다.
k8s-worker-1 Rejoin
[root@master ~]# sudo kubeadm token create --print-join-command
kubeadm join 172.20.112.101:6443 --token 5dpaxx.pil1q1yeaye9ksvy --discovery-token-ca-cert-hash sha256:57fb9d1378939e273ee653c73c40920a5dc0c0ea94f2c360be93d767154ef5f0
이후 k8s-worker-1의 IP가 변경되어 Rejoin을 수행해주고자 하였습니다.
기존 방식과 같이 추가해주게 되면 K8s Host에서 기존의 캐시된 IP로 Worker Node를 기억하여 연결이 정상적으로 이루어지지 않습니다.
# vi join-config.yaml
apiVersion: kubeadm.k8s.io/v1beta3
kind: JoinConfiguration
discovery:
  bootstrapToken:
    apiServerEndpoint: "172.20.112.101:6443"
    token: "<TOKEN>"
    caCertHashes:
    - "sha256:<CA-CERT-HASH>"
nodeRegistration:
  name: "k8s-worker-1"
  kubeletExtraArgs:
    cloud-provider: "external"
    node-ip: "192.168.200.106"
따라서 위와 같이 join-config.yaml 파일을 작성하여주고
sudo kubeadm join --config join-config.yaml위 명령어를 통해 Worker에서 Join을 수행합니다.
[TroubleShooting] failed to validate nodeIP: node IP: \"192.168.200.106\" not found in the host's network interfaces
Aug 15 11:49:04 k8s-worker-1.novalocal kubelet[16356]: E0815 11:49:04.325917   16356 kubelet_node_status.go:719] "Failed to set some node status fields" err="failed to validate nodeIP: node IP: \"192.168.200.106\" not found in the host's network interfaces" node="k8s-worker-1"
Aug 15 11:49:04 k8s-worker-1.novalocal kubelet[16356]: I0815 11:49:04.327060   16356 kubelet_node_status.go:501] "Fast updating node status as it just became ready"
하지만 위와 같은 로그가 Kubelet에서 발생하는데 이는 Kubelet이 IP를 등록하기 전에, IP(192.168.100.65)가 내 로컬 네트워크 카드에 진짜로 존재하는지 최종 검증을 하기 때문에 발생하는 오류입니다.
Floating IP는 VM 내부에 존재하지 않기 때문에 해당 검증이 항상 실패하게 되기에 Floating IP가 마치 로컬에 존재하는 것처럼 속여서 해결할 수 있습니다.
sudo ip addr add 192.168.200.106/32 dev loWorker에서 위 명령어를 실행하여 Floating IP를 로컬의 lo (loopback) 인터페이스에 임시로 추가합니다.
sudo systemctl restart kubelet이후 kubelet를 재시작하면
[root@master ~]# k get nodes -o wide
NAME           STATUS   ROLES           AGE     VERSION   INTERNAL-IP      EXTERNAL-IP   OS-IMAGE                      KERNEL-VERSION                 CONTAINER-RUNTIME
k8s-worker-1   Ready    <none>          3m11s   v1.32.8   192.168.200.106  <none>        Rocky Linux 9.5 (Blue Onyx)   5.14.0-503.14.1.el9_5.x86_64   cri-o://1.33.0
master         Ready    control-plane   176d    v1.32.2   172.20.112.101   <none>        Rocky Linux 9.2 (Blue Onyx)   5.14.0-284.11.1.el9_2.x86_64   cri-o://1.33.0
위와 같이 로그가 정상적으로 추가된 것을 볼 수 있으며
# k8s-wordker-1
$ sudo vi /etc/systemd/system/add-kubelet-ip.service
[Unit]
Description=Add Kubelet Floating IP to loopback interface for validation
After=network-online.target
Wants=network-online.target

[Service]
Type=oneshot
ExecStart=/usr/sbin/ip addr add 192.168.200.106/32 dev lo
RemainAfterExit=true
ExecStop=/usr/sbin/ip addr del 192.168.200.106/32 dev lo

[Install]
WantedBy=multi-user.target
이후 인스턴스 재시작시에도 동일한 문제 발생을 방지하기 위해 위와 같은 스크립트를 작성하고
sudo systemctl enable add-kubelet-ip.service해당 스크립트를 영구히 적용시켜줍니다.
Worker-2 Instance Creation
openstack flavor create k8s.worker.medium \
  --vcpus 3 \
  --ram 5500 \
  --disk 30 \
  --swap 0 \
  --ephemeral 0 \
  --public
이후 새로운 Worker를 위한 flavor를 생성하여주고
openstack server create \
  --flavor k8s.worker.medium \
  --image "Rocky Linux 9 Generic Cloud" \
  --nic net-id=$(openstack network list --name private-net -f value -c ID) \
  --security-group default \
  --key-name k8s-worker-2 \
  k8s-worker-2
위와 같이 새로운 이미지를 생성해주면
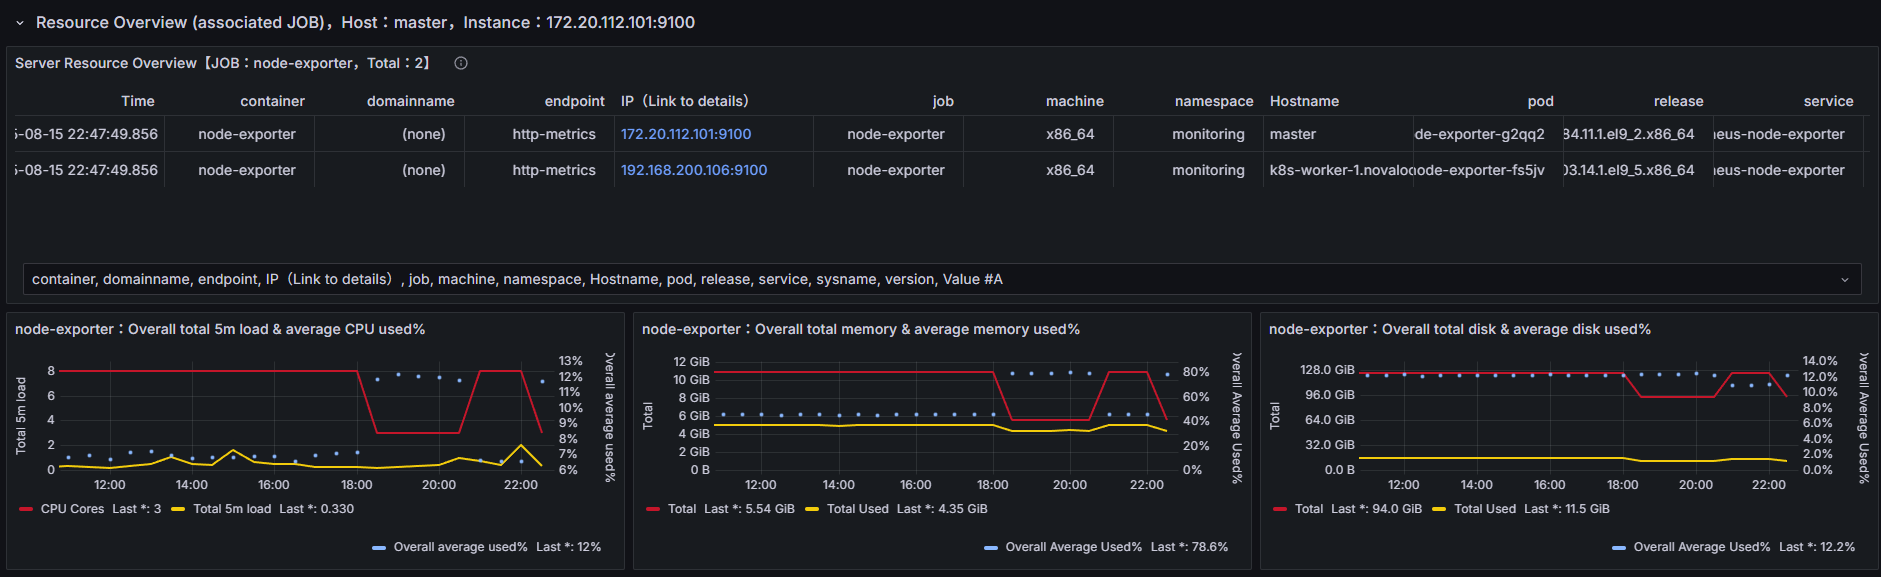
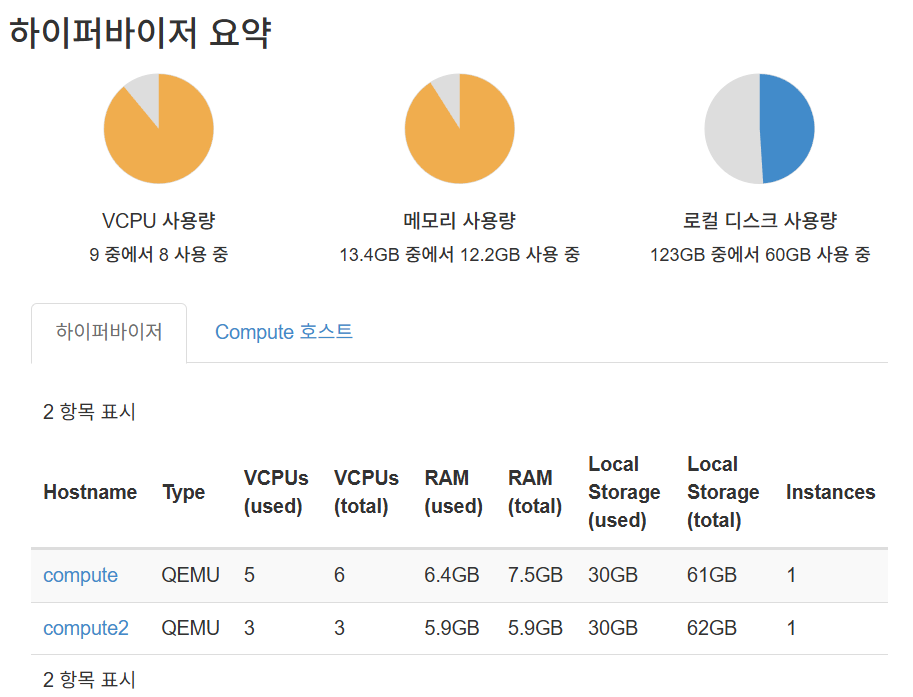 정상적으로 하이퍼바이저 리소스를 사용하는 것을 볼 수 있습니다.
$ openstack floating ip create ext-net-new
+---------------------+--------------------------------------+
| Field               | Value                                |
+---------------------+--------------------------------------+
| created_at          | 2025-08-15T13:19:09Z                 |
| description         |                                      |
| dns_domain          | None                                 |
| dns_name            | None                                 |
| fixed_ip_address    | None                                 |
| floating_ip_address | 192.168.200.129                      |
| floating_network_id | 861a383a-c8c5-411f-86bd-d6d5b3c00f36 |
| id                  | ea194085-7df9-414a-9dfb-cf2ba1b47b90 |
| name                | 192.168.200.129                      |
| port_details        | None                                 |
| port_id             | None                                 |
| project_id          | 0636a6ee7b2242e7ba9faf5e7d1daed4     |
| qos_policy_id       | None                                 |
| revision_number     | 0                                    |
| router_id           | None                                 |
| status              | DOWN                                 |
| subnet_id           | None                                 |
| tags                | []                                   |
| updated_at          | 2025-08-15T13:19:09Z                 |
+---------------------+--------------------------------------+
이후 위와 같이 새로운 Floating IP를 생성하여주고
$ openstack server add floating ip k8s-worker-2 192.168.200.129Floating IP를 생성한 인스턴스에 추가하여줍니다.
$ [root@controller ~]# ping 192.168.200.129하지만 해당 Floating IP로 Ping을 수행할 수 없었습니다.
# compute-2-host

# 1. ext-net-new 대역에서 인터넷으로 '나가는' 트래픽 허용
sudo iptables -I FORWARD -s 192.168.200.0/24 -j ACCEPT

# 2. 인터넷에서 ext-net-new 대역으로 '돌아오는' 응답 트래픽 허용
sudo iptables -I FORWARD -d 192.168.200.0/24 -m state --state RELATED,ESTABLISHED -j ACCEPT

# 3. '나가는' 트래픽을 호스트의 공인 IP로 주소 변환(SNAT)
sudo iptables -t nat -A POSTROUTING -s 192.168.200.0/24 -j MASQUERADE

# 4. 변경된 규칙 저장
sudo service iptables save
이는 openstack-host는 192.168.200.129가 virbr10에 직접 연결된 로컬 네트워크에 있다고 착각하고 있기 때문에 controller VM이 192.168.200.129로 ping을 보내면, 게이트웨이인 openstack-host는 이 IP를 외부로 라우팅하지 않고 virbr10 네트워크 안에서 ARP로 찾으려고 시도하여 발생하는 문제입니다.
하지만 192.168.200.129 IP를 가진 VM은 compute-2-host에 있기 때문에 ARP 요청에 응답할 수 없습니다.
결국 ARP 타임아웃이 발생하고, openstack-host의 커널은 Destination Host Unreachable 메시지를 생성하여 controller VM에게 되돌려줍니다.
따라서 위와 같은 iptables RULE들을 추가해주고
# openstack-host
sudo ip route add 192.168.200.129/32 via 10.10.10.3192.168.200.129로 가는 트래픽은 compute-2-host(10.10.10.3)를 통해 보내도록 route를 수동으로 추가합니다.
[root@compute-2-host ~]# tcpdump icmp | grep 192.168.200.129

dropped privs to tcpdump

tcpdump: verbose output suppressed, use -v[v]... for full protocol decode

listening on enp2s0, link-type EN10MB (Ethernet), snapshot length 262144 bytes

10:08:16.952301 IP 10.10.10.1 > 192.168.200.129: ICMP echo request, id 44, seq 4, length 64

10:08:16.952415 IP compute-2-host > 10.10.10.1: ICMP redirect 192.168.200.129 to host 10.10.10.1, length 92

10:08:16.952447 IP 10.10.10.1 > 192.168.200.129: ICMP echo request, id 44, seq 4, length 64

[root@compute ~]# tcpdump icmp
dropped privs to tcpdump
이후 compute-2-host가 10.10.10.1로부터 받은 ping 요청 패킷을 어떻게 처리해야 할지 몰라 패킷이 물리적 인터페이스(enp2s0)에 도착했지만, 커널이 이 패킷을 VM(k8s-worker-2)이 연결된 가상 인터페이스로 Forwarding 해주지 않습니다.
# compute-2-host
sudo ip route add 192.168.200.129/32 via 45.120.120.1
이후 192.168.200.129로 가는 패킷은 KVM 게스트인 45.120.120.154로 보내도록 경로를 추가하여줍니다.
위 명령어는 BGP로 학습한 192.168.200.0/24 전체 대역 규칙보다 더 구체적인 /32 규칙을 추가하여 우선적으로 적용되게 됩니다.
[root@compute ~]# tcpdump icmp
dropped privs to tcpdump
tcpdump: verbose output suppressed, use -v[v]... for full protocol decode
listening on enp1s0, link-type EN10MB (Ethernet), snapshot length 262144 bytes
10:54:32.563456 IP 192.168.200.1 > 10.0.0.34: ICMP echo request, id 66, seq 1, length 64
10:54:33.564616 IP 192.168.200.1 > 10.0.0.34: ICMP echo request, id 66, seq 2, length 64
10:54:34.565783 IP 192.168.200.1 > 10.0.0.34: ICMP echo request, id 66, seq 3, length 64

[root@compute2 ~]# tcpdump icmp
dropped privs to tcpdump
tcpdump: verbose output suppressed, use -v[v]... for full protocol decode
listening on enp1s0, link-type EN10MB (Ethernet), snapshot length 262144 bytes
10:53:42.212954 IP 10.10.10.1 > 192.168.200.129: ICMP echo request, id 65, seq 1, length 64
10:53:43.228774 IP 10.10.10.1 > 192.168.200.129: ICMP echo request, id 65, seq 2, length 64
10:53:44.252869 IP 10.10.10.1 > 192.168.200.129: ICMP echo request, id 65, seq 3, length 64
10:53:45.276863 IP 10.10.10.1 > 192.168.200.129: ICMP echo request, id 65, seq 4, length 64
10:53:46.300897 IP 10.10.10.1 > 192.168.200.129: ICMP echo request, id 65, seq 5, length 64
또한 현재 분산 가상 라우팅 (DVR, Distributed Virtual Routing) 방식을 사용하여 패킷이 메인 라우터를 거치지 않고, openstack-host에서 compute2로 직접 전달되기 때문에 목적지 주소가 변환되지 않은 Floating IP(192.168.200.129) 그대로 도착하여 패킥이 정상적으로 처리되지 않습니다.
$ sudo ip addr add 192.168.200.129/32 dev br-ex

[root@compute2 ~]# ip a
...
5: br-ex: <BROADCAST,MULTICAST,UP,LOWER_UP> mtu 1500 qdisc noqueue state UNKNOWN group default qlen 1000
    link/ether 8a:51:a2:e9:57:49 brd ff:ff:ff:ff:ff:ff
    inet 45.120.120.154/24 brd 45.120.120.255 scope global dynamic br-ex
       valid_lft 2784sec preferred_lft 2784sec
    inet 192.168.200.129/32 scope global br-ex
       valid_lft forever preferred_lft forever
따라서 compute2 KVM 게스트의 br-ex 인터페이스에 Floating IP를 직접 할당합니다. 이제 커널은 이 IP로 오는 패킷을 자신의 것으로 인지하고 받아들여 OVS로 전달하게 됩니다. OVS는 이미 이 Floating IP를 처리할 규칙을 가지고 있으므로, VM의 내부 IP로 변환하여 최종적으로 통신이 성공하게 됩니다.
K8s Cluster Scaleout
[root@master ~]# k get nodes -o wide
NAME           STATUS   ROLES           AGE     VERSION   INTERNAL-IP       EXTERNAL-IP   OS-IMAGE                      KERNEL-VERSION                 CONTAINER-RUNTIME
k8s-worker-1   Ready    <none>          21h     v1.32.8   192.168.200.106   <none>        Rocky Linux 9.5 (Blue Onyx)   5.14.0-503.14.1.el9_5.x86_64   cri-o://1.33.0
k8s-worker-2   Ready    <none>          4m10s   v1.32.8   192.168.200.129   <none>        Rocky Linux 9.6 (Blue Onyx)   5.14.0-284.11.1.el9_2.x86_64   cri-o://1.33.0
master         Ready    control-plane   177d    v1.32.2   172.20.112.101    <none>        Rocky Linux 9.2 (Blue Onyx)   5.14.0-284.11.1.el9_2.x86_64   cri-o://1.33.0
이후 k8s-worker-2에도 kubelet 등을 설치하고 join하게 되면 위와 같이 정상적으로 K8s Cluster가 Scale-out된 것을 볼 수 있습니다.
Summary
iptable RULES
############################## Openstack Host
# Libvirt 네트워크 간 통신 허용
sudo iptables -I LIBVIRT_FWI 1 -s 10.10.10.0/24 -d 192.168.100.0/24 -j ACCEPT
sudo iptables -I LIBVIRT_FWI 1 -s 10.10.10.0/24 -d 192.168.200.0/24 -j ACCEPT
sudo iptables -I LIBVIRT_FWO 1 -s 192.168.100.0/24 -d 10.10.10.0/24 -j ACCEPT

# 192.168.200.0/24 네트워크 포워딩 및 NAT 설정
sudo iptables -I FORWARD -s 192.168.200.0/24 -j ACCEPT
sudo iptables -I FORWARD -d 192.168.200.0/24 -m state --state RELATED,ESTABLISHED -j ACCEPT
sudo iptables -t nat -A POSTROUTING -s 192.168.200.0/24 -j MASQUERADE

# VXLAN 트래픽 허용
sudo iptables -I INPUT -p udp --dport 4789 -j ACCEPT

############# KVMs
# Kubernetes 네트워크 라우팅 추가
sudo ip route add 172.20.112.0/24 via 192.168.100.1 dev br-ex

# VXLAN 트래픽 허용
sudo iptables -I INPUT -p udp --dport 4789 -j ACCEPT

############################## K8s Host
# Libvirt 네트워크 간 통신 허용
sudo iptables -I LIBVIRT_FWI 1 -s 10.10.10.0/24 -d 172.20.112.0/24 -j ACCEPT
sudo iptables -I LIBVIRT_FWO 1 -s 172.20.112.0/24 -d 10.10.10.0/24 -j ACCEPT

############# Master KVM
# OpenStack 내부 네트워크 라우팅 추가
sudo ip route add 192.168.100.0/24 via 172.20.112.1 dev enp1s0

############################## Compute2 Host
# Libvirt 네트워크 간 통신 허용
sudo iptables -I LIBVIRT_FWI 1 -s 10.10.10.0/24 -d 45.120.120.0/24 -j ACCEPT
sudo iptables -I LIBVIRT_FWO 1 -s 45.120.120.0/24 -d 10.10.10.0/24 -j ACCEPT
sudo iptables -I LIBVIRT_FWI 1 -s 10.10.10.0/24 -d 192.168.200.0/24 -j ACCEPT

# 192.168.200.0/24 네트워크 포워딩 및 NAT 설정
sudo iptables -I FORWARD -s 192.168.200.0/24 -j ACCEPT
sudo iptables -I FORWARD -d 192.168.200.0/24 -m state --state RELATED,ESTABLISHED -j ACCEPT
sudo iptables -t nat -A POSTROUTING -s 192.168.200.0/24 -j MASQUERADE

# 45.120.120.0/24 네트워크 포워딩 및 조건부 NAT 설정
sudo iptables -A FORWARD -m conntrack --ctstate RELATED,ESTABLISHED -j ACCEPT
sudo iptables -A FORWARD -s 45.120.120.0/24 -j ACCEPT
sudo iptables -A FORWARD -d 45.120.120.0/24 -j ACCEPT
sudo iptables -t nat -A POSTROUTING -s 45.120.120.0/24 ! -d 10.10.10.0/24 -j MASQUERADE

# VXLAN 트래픽 허용 및 포워딩
sudo iptables -I INPUT -p udp --dport 4789 -j ACCEPT
sudo iptables -I FORWARD -p udp --dport 4789 -d 45.120.120.154 -j ACCEPT
sudo iptables -I FORWARD -p udp --sport 4789 -s 45.120.120.154 -j ACCEPT

############# Compute2 KVM
# VXLAN 트래픽 허용
sudo iptables -I INPUT -p udp --dport 4789 -j ACCEPT
각 호스트와 KVM들에 추가되어야 하는 iptables RULE들은 위와 같습니다.
OVS Architecture
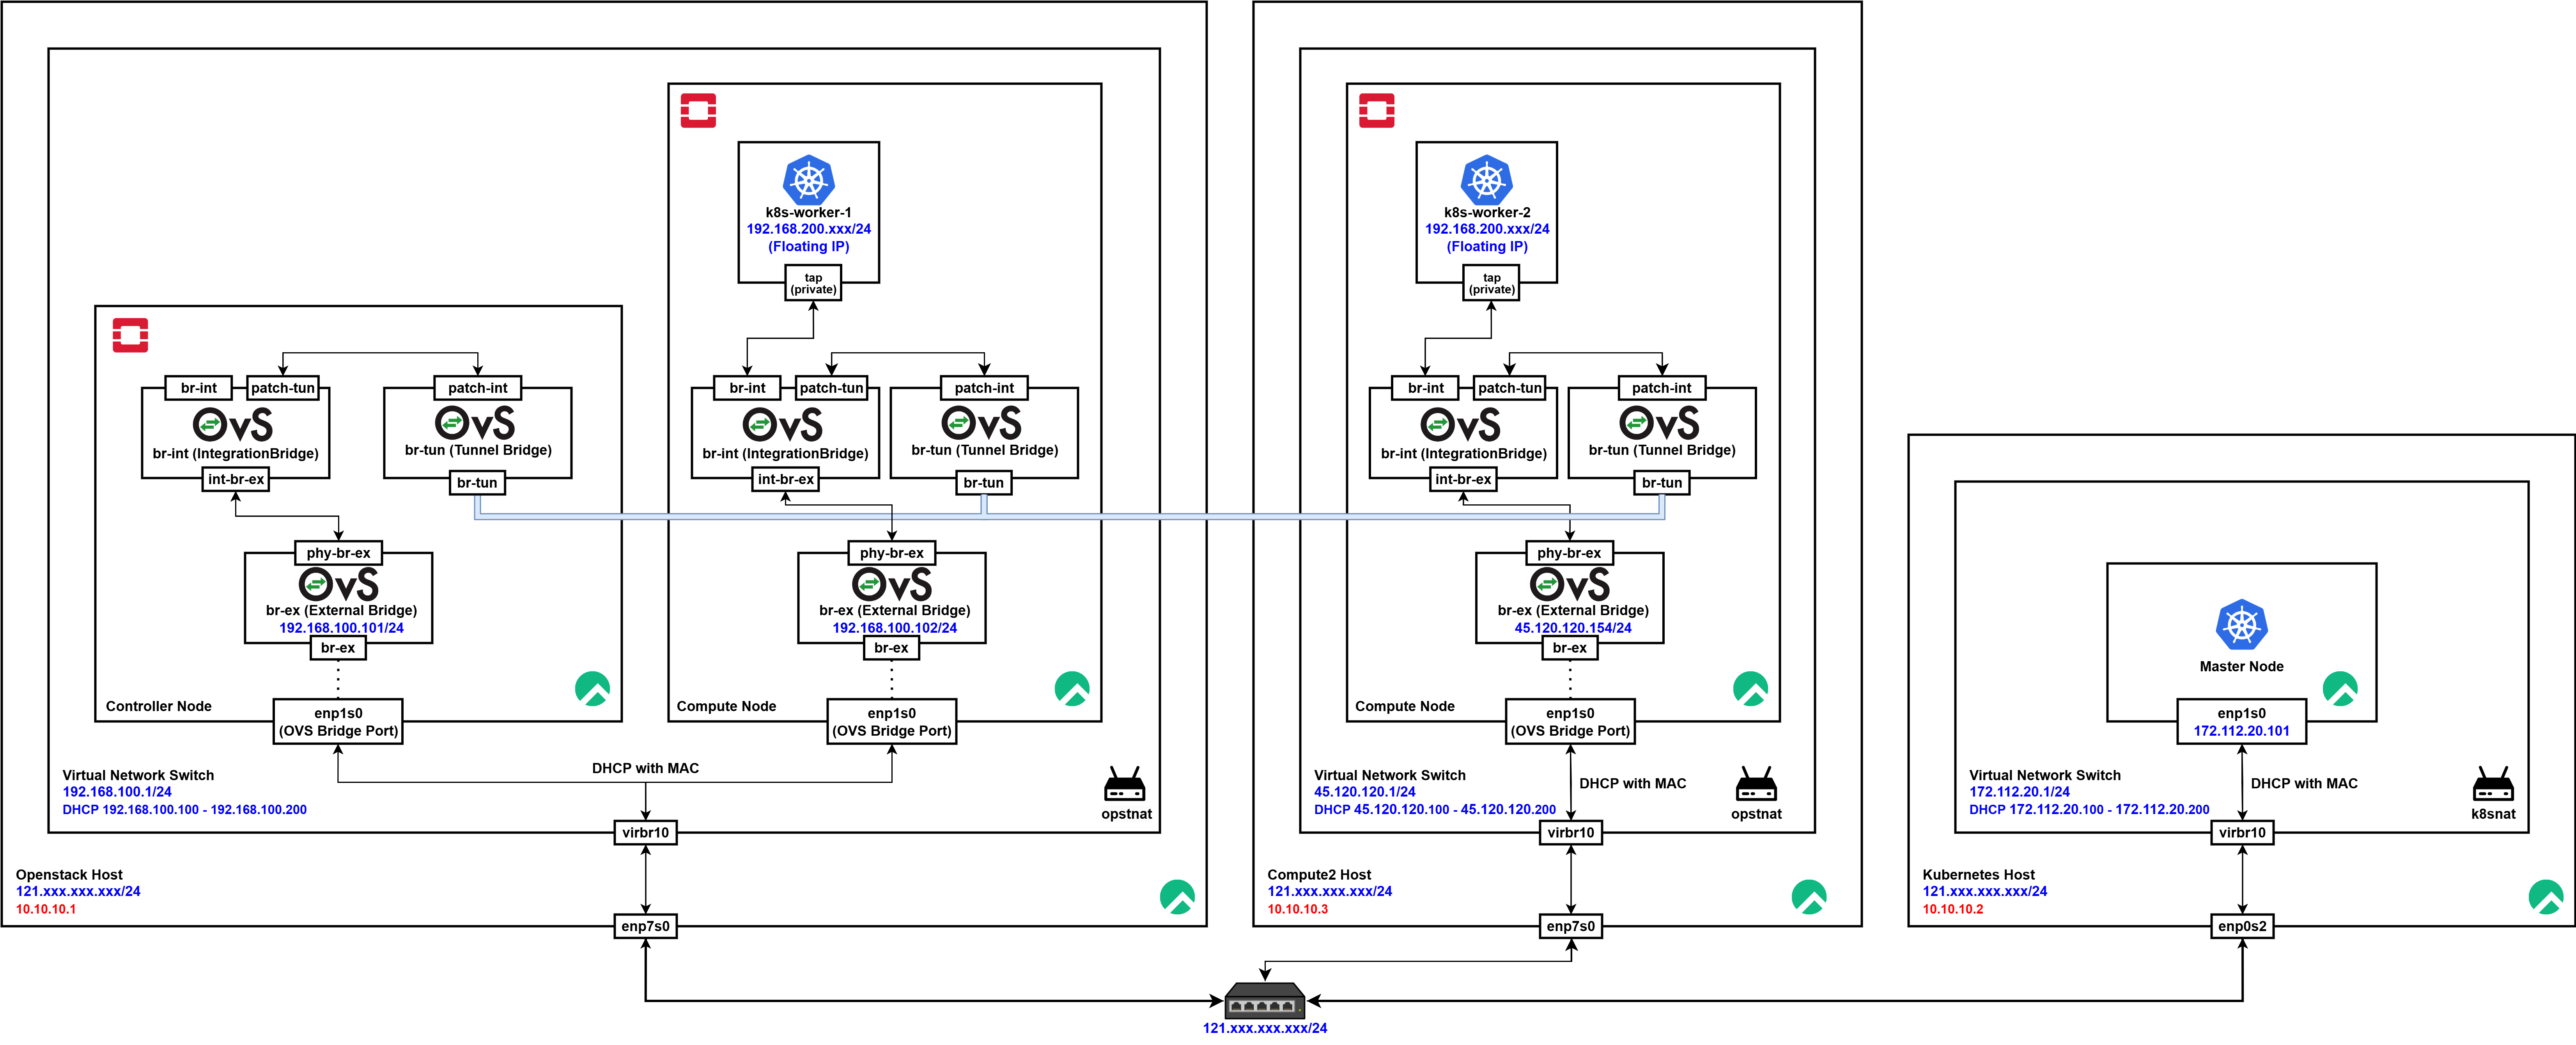
| 주요 인터페이스/브리지 | 설명 | |
|---|---|---|
| 1 | 물리 NIC (enp7s0, enp1s0, enp0s2) | 물리적 패킷 입출구 |
| 2 | virbr10 | 가상 브리지, VM/컨테이너 연결 |
| 3 | phy-br-ex, br-ex | OVS 외부 브리지, 네트워크 분리 및 라우팅 |
| 4 | patch-tun, br-tun | OVS 터널 브리지, 노드간 터널링 트래픽 전달 |
| 5 | patch-int, br-int | OVS 내부 브리지, VM/컨테이너 연결 |
| 6 | tap (VM NIC) | VM/컨테이너 내부 인터페이스 도착 지점 |
[Scenario 1] 외부에서 10.10.10.1(Host) -> 192.168.200.xxx(K8s Worker VM)로 패킷 전달
-
외부 Host(10.10.10.1)에서 패킷 송신
- 트래픽 출발: 물리 인터페이스(enp7s0)를 통해 내부 virbr10(가상 브리지)로 패킷 전달.
-
virbr10(가상 브리지) 통과
- virbr10에서 해당 패킷을 가상 네트워크로 전달.
-
Controller Node로 진입
- 패킷은 enp1s0(OVS Bridge Port)로 Controller Node에 들어옴.
-
OVS External Bridge(br-ex, 192.168.100.101/24)에 들어온 패킷
- phy-br-ex → int-br-ex를 거쳐 br-int(Integration Bridge)에 도달.
- 내부 네트워크 간 패킷 연결(port, patch 연결).
-
Kubernetes k8s-worker-1로 전달
- br-int → VM 내부의 tap 인터페이스(Private NIC)로 패킷 전달.
- 최종적으로 k8s-worker-1(192.168.200.xxx)에 도착.
[Scenario 2] Compute Node 간 VXLAN 터널링(192.168.100.102 <> 45.120.120.154)
-
Compute Node1에서 패킷 송신
- VM의 tap → br-int(Integration Bridge) → patch-tun을 통해 br-tun(Tunnel Bridge)로 이동.
- br-tun에서 VXLAN, GRE 등 터널링 매커니즘으로 Compute Node2의 br-tun에 전달.
-
Compute Node2에서 패킷 수신
- 터널 수신 브리지(br-tun) → patch-int로 br-int(Integration Bridge)로 이동.
- br-int → 타깃 VM의 tap 인터페이스로 전달.