Architecture
STT Logic
 먼저
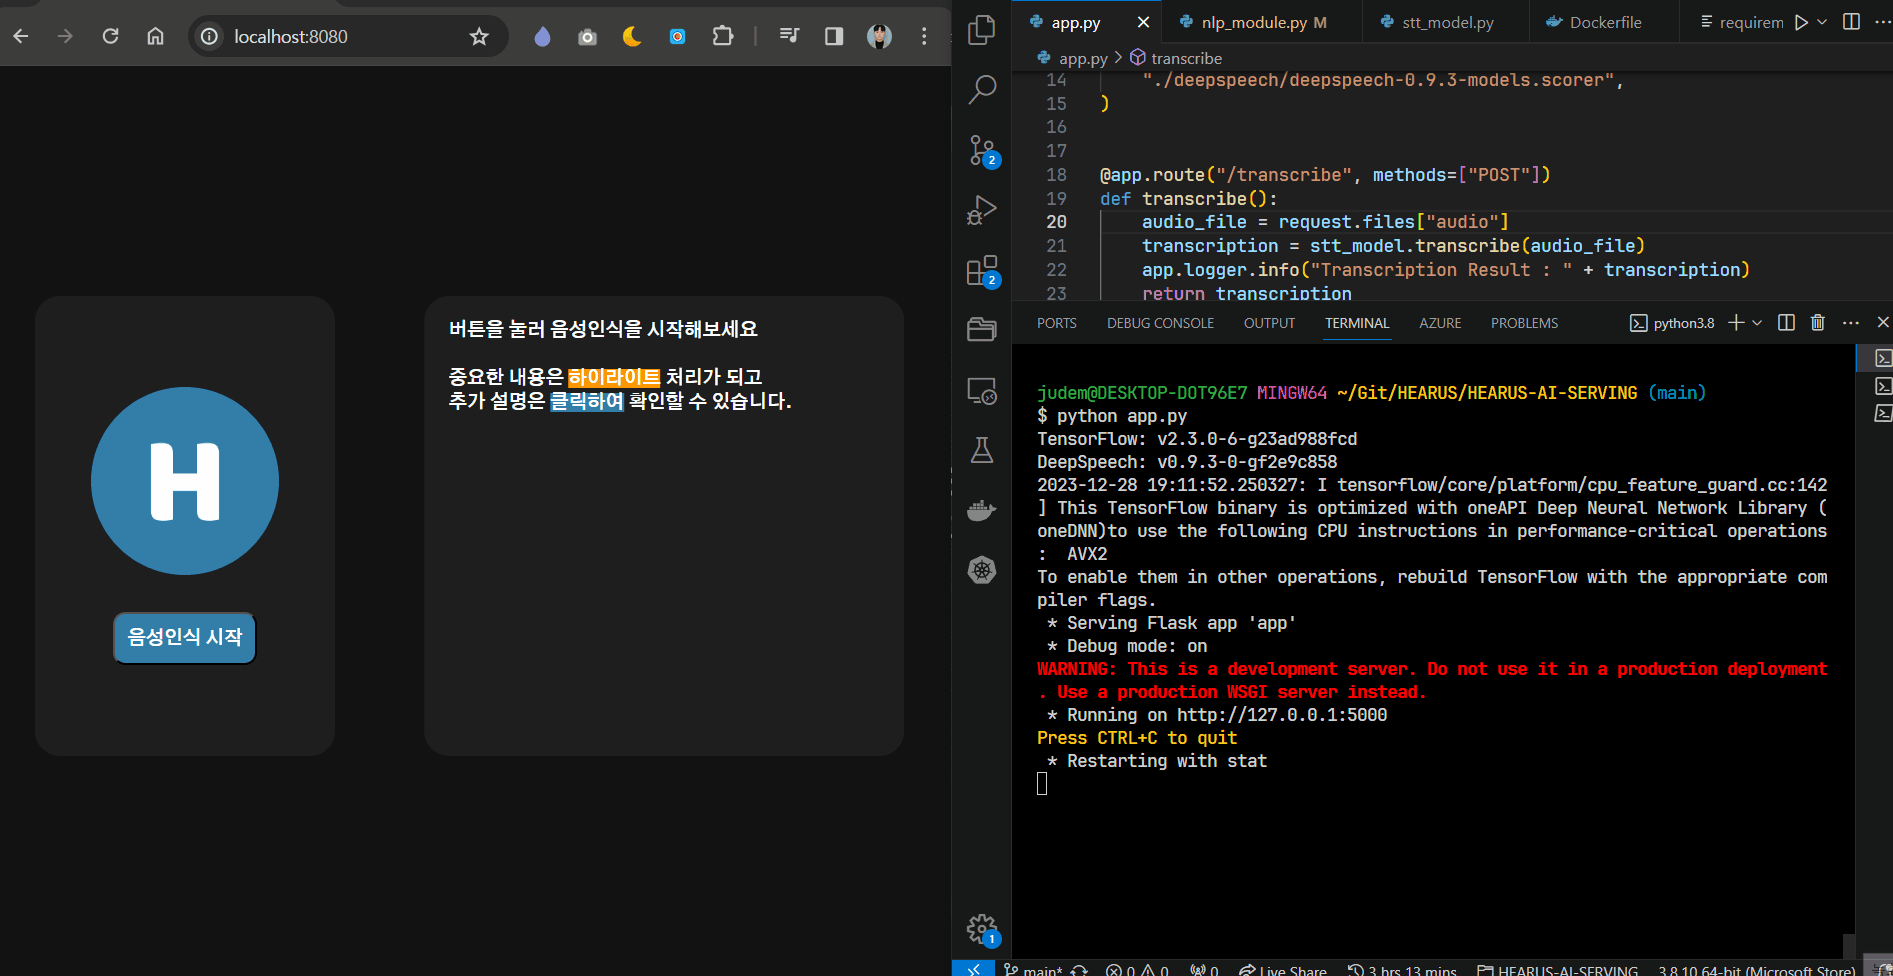
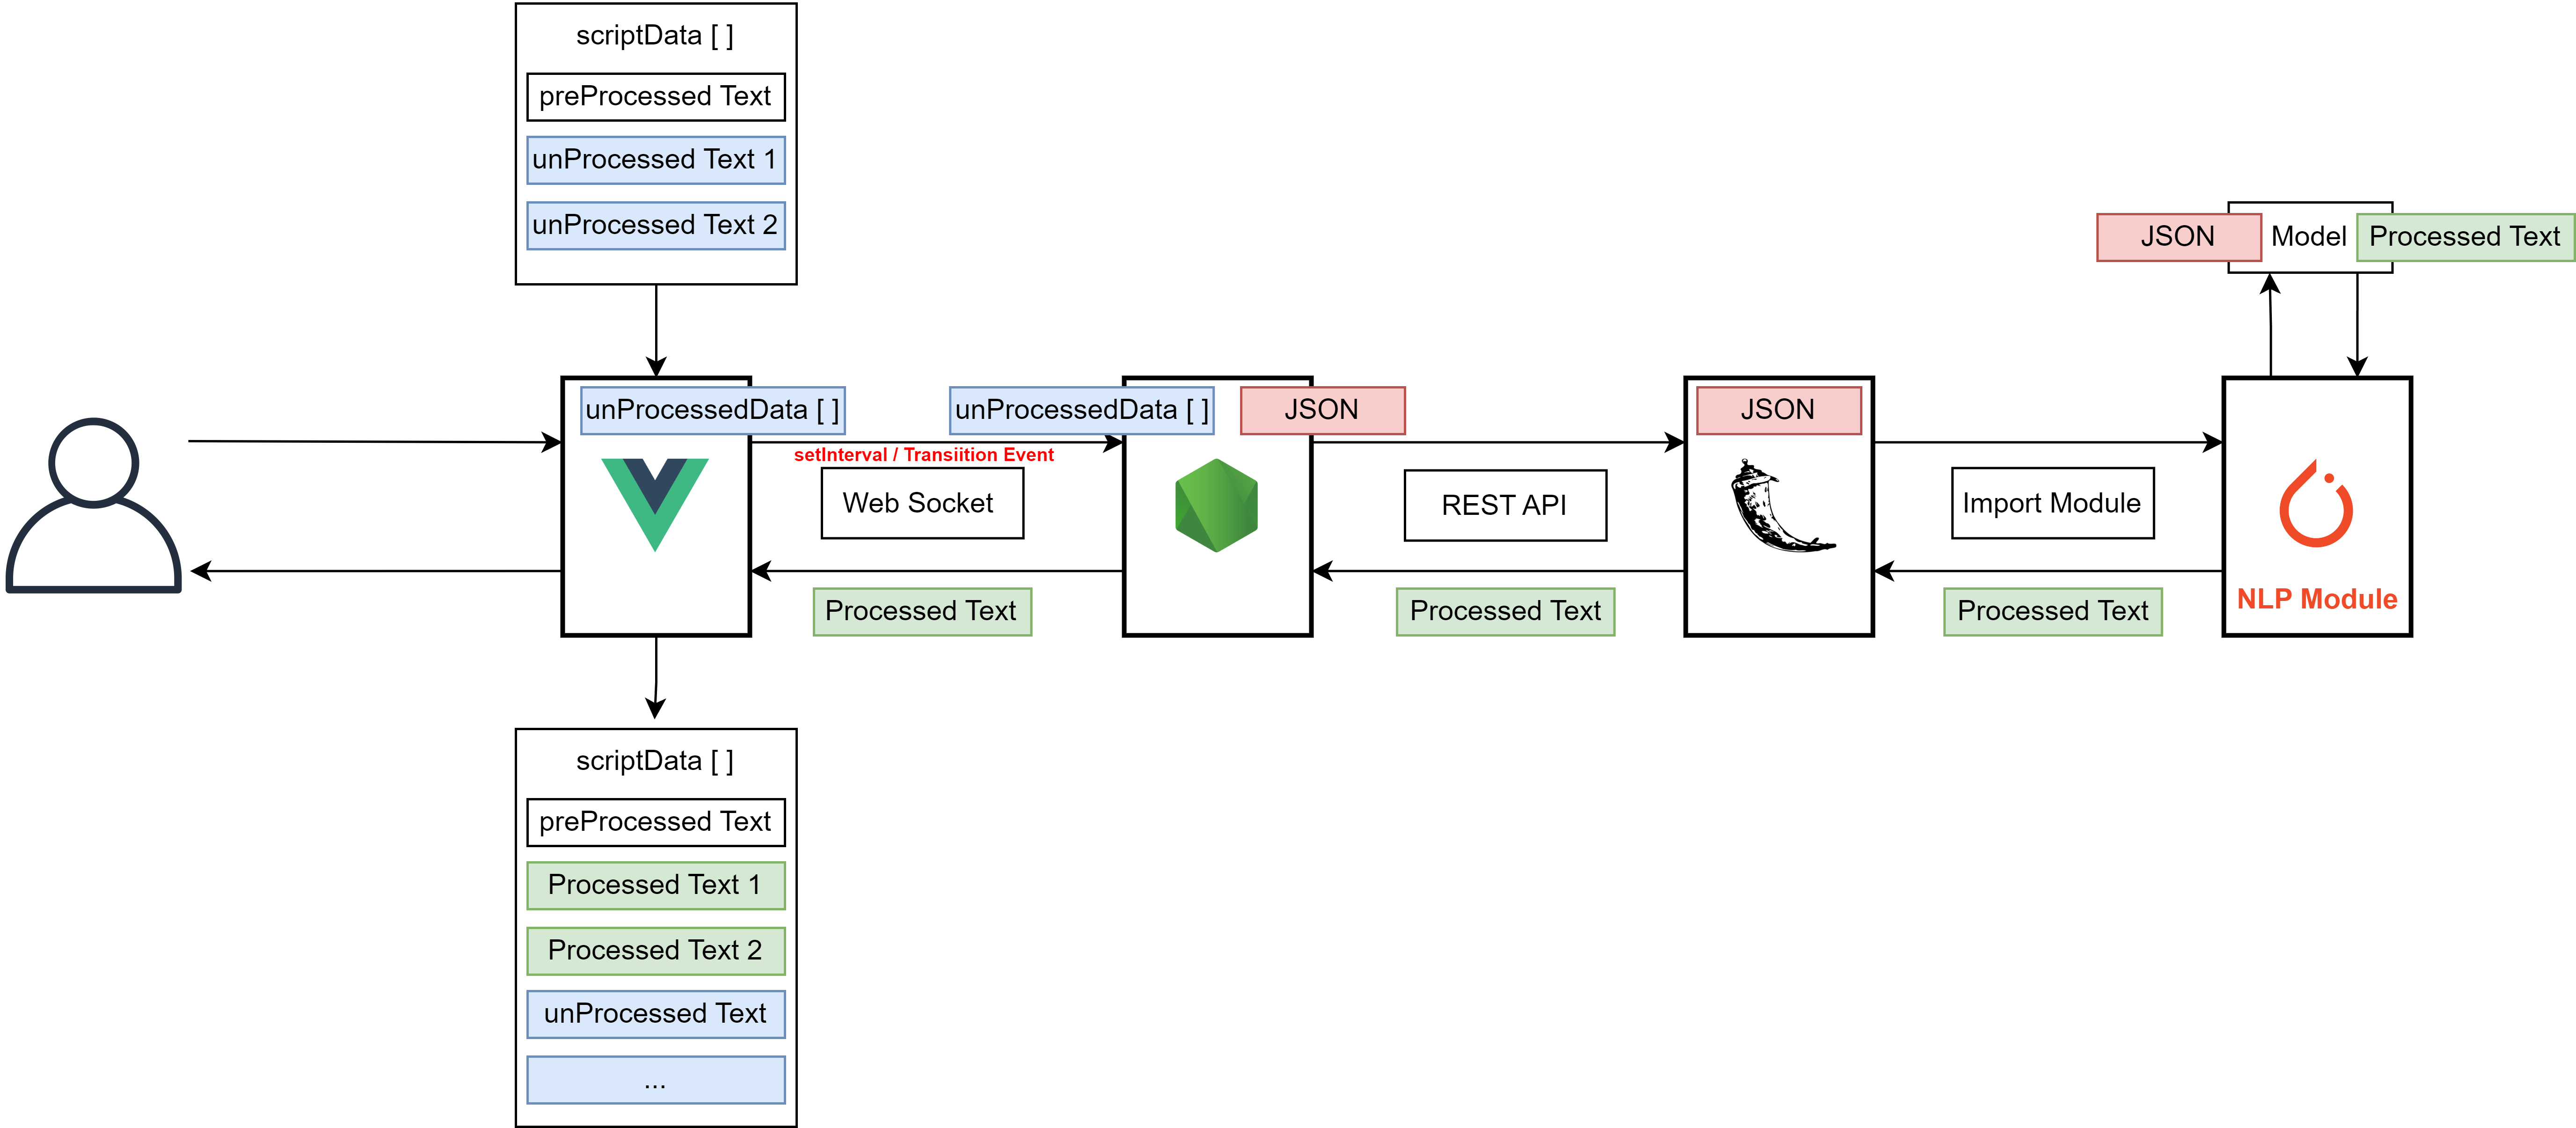
먼저 MediaRecorder의 blob 데이터를 setInterval을 통해 express 서버로 전송하면 Queue에서 해당 데이터를 wav형태로 변환하고 REST API를 통해 flask로 전송한다. 이후 STT Model에서 이를 Transcribed Text로 변환하고 반환한다.
NLP Logic
 STT 로직에서 음성 데이터 변환이 완료되면 이를
 scriptedData[]배열에 저장한다. 이후 해당 데이터들 중에서 아직 처리되지 않은 unProcessedData[]배열을 setInterval, 혹은 event를 통해 express 서버로 전송한다. 이후 express 서버에서 이를 JSON 형태로 변환하고 flask의 model을 통해 Processing한다. 이후 Processed Text를 frontend에서 적절하게 처리하면 NLP 로직 구현이 완료된다.
NLP Logic 구현
Script Data 구조화
// unProcessedData[]
{
    "arrayStart" : 3,
    "arrEnd" : 8,
    "unProcessedText" : [
        // ["TextData", "Tag". "comment"]
        // Tag Example
        // none=효과없음 highlight=하이라이팅 comment=GPTAPI로부터 부가설명
        ["안녕", "none", ""],
        ["하세요", "none", ""],
        ["좋은", "none", ""],
        ["아침", "none", ""],
        ["입니다", "none", ""],
        ["오늘은", "none", ""],
        ["NLP에", "none", ""],
        ["대해", "none", ""]
    ],
    "sumText" : "안녕 하세요 좋은 아침 입니다 오늘은 NLP에 대해"
}
단계적으로 NLP 모델에 데이터를 처리하기 위해 위와 같이 scriptData[]를 구조화한다.
// ProcessedData[]
{
    "arrayStart" : 3,
    "arrEnd" : 8,
    "unProcessedText" : [
        ["안녕", "none", ""],
        ["하세요", "none", ""],
        ["좋은", "highlight", ""],
        ["아침", "none", ""],
        ["입니다", "none", ""],
        ["오늘은", "none", ""],
        [
            "NLP에",
            "comment",
            "자연어 처리(NLP)는 인간의 언어를 이해하고 해석하는 데 필요한 기술과 알고리즘을 개발하는 컴퓨터 과학의 한 분야입니다."
        ],
        ["대해", "none", ""]
    ],
    "sumText" : "안녕 하세요 좋은 아침 입니다 오늘은 NLP에 대해"
}
또한 NLP 처리 이후의 데이터는 위와 같이 tag 데이터가 추가된 모습이다.
Vue
export default {
data() {
return {
// Script Data, NLP Processing
// ["TextData", "Tag". "comment"]
// Tag Example
// none=효과없음 highlight=하이라이팅
// comment=GPTAPI로부터 부가설명 br=줄바꿈
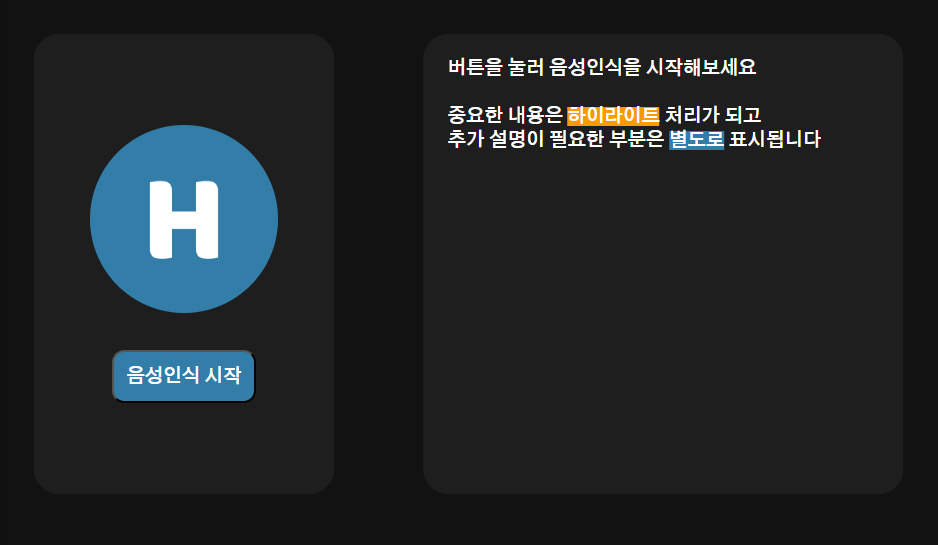
scriptData: [
["버튼을", "none", ""],
["눌러", "none", ""],
["음성인식을", "none", ""],
["시작해보세요", "none", ""],
["", "br", ""],
["", "br", ""],
["중요한 내용은", "none", ""],
["하이라이트", "highlight", ""],
["처리가 되고", "none", ""],
["", "br", ""],
["추가 설명이 필요한 부분은", "none", ""],
["별도로", "comment", "해당 키워드에 대한 추가 설명입니다"],
["표시됩니다", "none", ""],
],
preProcessedLen: 0,
};
},
...기존에 구조화한 데이터 처럼 Vue에서도 기존 scriptData를 초기화한다.
    computed: {
        formattedScriptText() {
            return this.scriptData.map(data => {
                if (data[1] === 'highlight') {
                    return `<span style="background-color: #FF9900;">${data[0]}</span>`;
                } else if (data[1] === 'comment') {
                    return `<span style="background-color: #337ea9;">${data[0]}</span>`;
                } else if (data[1] === 'br') {
                    return '</br>';
                } else {
                    return data[0];
                }
            }).join(' ');
        }
    },
  ...
이후 위와 같이 formattedScriptText() 함수를 통해 태그에 따라 textArea에 노출시킬 수 있도록 한다.
this.sendTextDataInterval = setInterval(async () => {
                if (this.preProcessedLen != this.scriptData.length) {
                    const arrStart = this.preProcessedLen;
                    const arrEnd = this.scriptData.length;
                    const unProcessedText = this.scriptData.slice(arrStart, arrEnd);
                    const sumText = unProcessedText.map(data => { return data[0]; }).join(' ');

                    const textData = JSON.stringify({
                        arrStart: arrStart,
                        arrEnd: arrEnd,
                        unProcessedText: unProcessedText,
                        sumText: sumText
                    });
                    this.socket.emit('nlProcessing', textData);
                    this.preProcessedLen = this.scriptData.length
                }
            }, 10000);
startRecord 이후 sendTextDataInterval을 설정하여 scriptData를 이전에 구조화한 데이터 포맷에 맞게 JSON 형태로 변환하고 이를 socket에 emit하여 express 서버로 전송한다.
Express
...
        const nlpQueue = new Queue((task, done) => {
            processNLText(task.clientSocket, task.textData)
                .then(() => done())
                .catch(err => done(err));
        }, { concurrent: 1 });

		...

        clientSocket.on('nlProcessing', async (textData) => {
            nlpQueue.push({ clientSocket, textData });
        });
충돌을 방지하기 위해 Queue에서 데이터를 순차적으로 처리한다.
{"arrStart":16,"arrEnd":17,"unProcessedText":[["and i would not ","none",""]],"sumText":"and i would not "}또한 로그를 통해 데이터가 정상적으로 입력되는 것을 확인할 수 있었다.
const axios = require('axios');

function processNLText(clientSocket, textData) {
    return new Promise(async (resolve, reject) => {
        try {
            const response = await axios.post(
                process.env.FLASK_HOST + '/process',
                textData,
                { headers: { 'Content-Type': 'application/json' } }
            );

            //console.log("NLProcessing result: " + JSON.stringify(response.data, null, 2));
            clientSocket.emit('NLPResult', response.data);
            resolve();
        } catch (error) {
            console.error('Error in NLProcessing ', error);
            reject(error);
        }
    });
}

module.exports = processNLText;
이후 Vue로부터의 JSON 형태의 구조화된 데이터를 그대로 flask 서버로 전송하는 간단한 로직을 작성한다.
Flask
@app.route("/process", methods=["POST"])
def process():
    if not request.is_json:
        return jsonify({"error": "Missing JSON in request"}), 400

    try:
        text_data = request.get_json()

        processed_text = process_text(text_data)
        return jsonify(processed_text)
    except json.JSONDecodeError as e:
        return jsonify({"error": "Invalid JSON"}), 400
flask 서버에서는 request.get_json()을 통해 데이터를 받아오고 이를 모델로 넘겨 처리한다.
def process_text(text_data):
    for item in text_data.get("unProcessedText", []):
        if "he" in item[0]:
            item[1] = "highlight"
        elif "a" in item[0]:
            item[1] = "comment"
            item[2] = "a가 포함된 단어는 설명이 추가됩니다."

    return text_data
이때 NLP 모델은 임의로 생성한 것으로 현재 인공지능 파트에서 같은 포맷을 공유하여 개발을 진행하고 있다. 현재 모델은 'he'가 포함되면 highlight, 'a'가 포함되면 comment를 추가한다.
반환 데이터 처리
Vue 반환 데이터 처리
this.socket.on('NLPResult', (result) => {
            console.log('NLP Result : ' + result)
            let nlpResult = typeof result === 'string' ? JSON.parse(result) : result;
            const { arrStart, arrEnd, unProcessedText } = nlpResult;
            this.scriptData.splice(arrStart, arrEnd - arrStart, ...unProcessedText);
        });
express 서버로부터 emit된 데이터를 위와 같이 JSON 형태로 parsing하여 저장한다.
이후 arrStart와 arrEnd 범위의 scriptData를 치환하여 NLP 데이터를 저장한다.
this.socket.on('recognitionResult', (result) => {
            console.log('Recognition Result: ' + result);
            this.recognitionResult = result;
            this.resCnt += 1;

            if (this.isRecording && result.trim() !== '') {
                const words = result.split(' ');

                words.forEach(word => {
                    if (word.trim() !== '') {
                        const tmp = [word, "none", ""];
                        this.scriptData.push(tmp);
                    }
                });
            } else {
                this.recognitionResult = '';
            }

            const textArea = this.$refs.scrollableText;
            if (textArea.scrollHeight) {
                textArea.scrollTop = textArea.scrollHeight;
            }
        });
또한 recognitionResult 의 공백을 제거하기 위해 위와 같이 함수를 수정한다.
Popup-box UI
<script src='@/scripts/appScript.js'></script>
<template>
<div class="background d-flex justify-content-center align-items-center vh-100">
<div class="card-container text-center">
<img :src="logoImageSrc" alt="Logo" class="card-item logo-img mb-3" :class="{ 'animated-logo': isRecording }" />
<button v-if="!isRecording" @click="startRecording" class="card-item btn btn-primary rounded-pill mb-2">음성인식 시작
</button>
<button v-if="isRecording" @click="stopRecording" class="card-item stop-btn btn-danger rounded-pill">음성인식
중단</button>
</div>
<div class="script-container text-center">
<div ref="scrollableText" class="scrollable-text">
<template v-for="(item, index) in formattedScriptText" :key="index">
<span v-if="item.type === 'comment'" @click="showPopup($event, item.index)"
:style="{ backgroundColor: '#337ea9', cursor: 'pointer', display: 'inline' }">
{{ item.text }}
</span>
<span v-else-if="item.type === 'highlight'" :style="{ backgroundColor: '#FF9900', display: 'inline' }">
{{ item.text }}
</span>
<br v-else-if="item.type === 'br'" />
<span v-else :style="{ display: 'inline' }">
{{ item.text }}
</span>
<template v-if="item.type !== 'br'"> </template>
</template>
</div>
</div>
<div class="subtitles">{{ recognitionResult }}</div>
</div>
<!-- Popup Box -->
<div v-if="showPopupFlag" class="popup-box" ref="popupBox" @click.self="hidePopup" :style="popupStyle">
{{ popupContent }}
</div>
</template>이후 comment를 위한 팝업박스를 만들기 위해 위와 같이 App.vue파일을 수정한다.
/* popup-box */
.popup-box {
    position: absolute;
    background-color: #337ea9;
    color: white;
    z-index: 1000;
    padding: 3px;
    border-radius: 5px;
    font-size: 15px;
}
또한 새롭게 .popup-box css 요소를 위와 같이 생성해준다.
	data() {
        return {
          ...
            // Popup Data properties
            showPopupFlag: false,
            popupContent: '',
            popupStyle: {},
            hidePopupTimeout: null,
        };
    },
    computed: {
        formattedScriptText() {
            return this.scriptData.map((data, index) => {
                return {
                    text: data[0],
                    type: data[1],
                    comment: data[2],
                    index: index
                };
            });
        },
    },
    methods: {
      ...
        // popup-box
        showPopup(event, index) {
            console.log("showPopup triggered");

            event.stopPropagation();
            const comment = this.scriptData[index][2];
            if (comment) {
                this.popupContent = comment;
                this.popupStyle = {
                    left: `${event.clientX}px`,
                    top: `${event.clientY}px`
                };
                this.showPopupFlag = true;
            }
            clearTimeout(this.hidePopupTimeout);
            // this.hidePopupTimeout = setTimeout(() => {
            //     this.hidePopup();
            // }, 60000);

            this.$nextTick(() => {
                window.addEventListener('click', this.handleOutsideClick);
            });
        },
        hidePopup() {
            this.showPopupFlag = false;

            // clearTimeout(this.hidePopupTimeout);
            window.removeEventListener('click', this.handleOutsideClick);
        },
        handleOutsideClick(event) {
            console.log("handleOutsideClick triggered");
            let popupElement = this.$refs.popupBox;
            if (popupElement && !popupElement.contains(event.target)) {
                this.hidePopup();
            }
        }
    },
최종적으로 이벤트를 감지하여 popup-box를 노출하기 위해 위와 같이 showPopup() 함수를 선언하고 window.addEventListener를 통해서 화면 내 클릭을 감지하여 popup-box를 숨기거나 노출한다.